LTV22HD - Television V7 - Free user manual and instructions
Find the device manual for free LTV22HD V7 in PDF.


| Product Type | LED TV |
| Model Number | LTV22HD |
| Screen Size (Diagonal) | 22 inches (55.9 cm) |
| Display Resolution | 1366 x 768 (HD) |
| Aspect Ratio | 16:9 |
| Brightness | 200 cd/m² |
| Contrast Ratio | 1000:1 |
| Viewing Angle | 178° (H/V) |
| Refresh Rate | 60 Hz |
| Audio Output | 2 x 3W |
| Tuner | ATSC / DVB-T2 / DVB-C |
| Input Ports | HDMI x1, VGA x1, USB x1, AV (Composite) x1, Audio Input (3.5mm) x1, Antenna/Cable input |
| Output Ports | Audio Out (3.5mm) x1, Headphone Jack x1 |
| Power Supply | AC 100-240V, 50/60Hz |
| Power Consumption (Typical) | 30W |
| Power Consumption (Standby) | < 0.5W |
| Dimensions (with stand) | 510 x 370 x 160 mm (W x H x D) |
| Weight (with stand) | 3.5 kg |
| VESA Mount Pattern | 100 x 100 mm |
| Remote Control | Included |
| Wall Mountable | Yes (supports VESA 100x100) |
| Energy Efficiency Class | A+ |
| Special Features | Sleep timer, parental lock, EPG, favorite channel list |
| Maintenance | Clean with dry soft cloth; avoid chemicals |
| Safety | Keep ventilation slots clear; do not expose to moisture; unplug during storms |
| Spare Parts and Repairability | Contact V7 support for parts; repair by qualified personnel |
Frequently Asked Questions - LTV22HD V7
User questions about LTV22HD V7
0 question about this device. Answer the ones you know or ask your own.
Ask a new question about this device
Download the instructions for your Television in PDF format for free! Find your manual LTV22HD - V7 and take your electronic device back in hand. On this page are published all the documents necessary for the use of your device. LTV22HD by V7.
USER MANUAL LTV22HD V7
This symbol alerts you to dangerous voltage and the risk of electrical shock.

This symbol identifies important operating and service instructions.
Safety instructions
1) Read these instructions.
2) Keep these instructions.
3) Heed all warnings.
4) Follow all instructions.
5) Do not use this LCD TV near water.
6) Clean the LCD TV with a dry cloth only. Do not use liquid, alcohol, or aerosol cleaners.
7) Do not block any ventilation openings. Install your LCD TV in a well ventilated area.
8) Keep your LCD TV away from moisture, excessive dust and any heat sources, such as radiators, heat registers, stoves, or any other apparatus (including amplifiers) that produce heat.
9) Do not remove the back cover. There are no user-serviceable parts inside.
10) Do not defeat the purpose of the polarized or grounding-type plug. A polarized plug has two blades with one wider than the other. A grounding type plug has two blades and a third grounding prong. The third prong is provided for your safety. If the plug does not fit into your wall outlet, consult an electrician and replace the obsolete outlet.
11) Protect all cables from being walked on. Make sure they do not become pinched, particularly at their plugs, receptacles and at the points where they exit from the LCD TV.
12) Never rest objects on the power cord or route it through a high-traffic area. It is better to use the power cord that is connected to the equipment.
13) Add only attachments and accessories specified by the manufacturer.
14) Use this device only with a cart, stand, tripod, bracket or table specified by the manufacturer or sold with the LCD TV. When using the device on a cart, use caution to avoid injury from the cart tipping over.
15) Unplug this LCD TV during lightening storms or when you are not using it for long periods of time.
16) Refer all service requests to qualified service personnel. Servicing may be required if the LCD TV has been damaged in any way, such as: the power cord or plug are damaged; liquid has been spilled or objects have fallen onto the equipment; the LCD TV has been exposed to rain or moisture; the device does not operate normally; or the device has been dropped.

natural_image
Symbolic icon of a person climbing a ladder against a red circular background (no text or numbers)17) Do not place the LCD TV where it may be dripped or splashed on, or where objects filled with liquid will be placed near it.
18) The Shock Hazard Marking and Associated Graphical Symbol are provided on the back panel of unit.
19) This product is for entertainment only. Visual display tasks are excluded.
20) When mounting the product on a wall or ceiling, install the product according to the method recommended by the manufacturer. To ensure your safety, use only the manufacturer's approved mounting hardware.

CAUTION: Any damage caused by incorrectly attempting to mount this LCD TV is not covered under the terms of the manufacturers warranty.

WARNING: To reduce the risk of fire or electric shock, do not expose this LCD TV to rain or moisture.
Contents
ACCESSORIES....1
FRONT PANEL BUTTONS 2
BACK PANEL BUTTONS.... 3
REMOTE CONTROL 4
INSTALLATION....6
Connecting an RF antenna or to cable TV....6
Connecting to a DVD or set-top box 6
Connecting to the Headphone 8
Connecting to a Computer 8
Connecting the power cord....9
BASIC OPERATIONS....10
Before using the LCD TV.... 10
Turning the power on and off 10
Selecting the input source 10
Adjusting the volume 10
INFO 10
Electronic Program Guide (EPG)....11
Selecting a channel 11
List....11
Favorite Channels....12
Setting the sleep time 12
Zoom 12
MTS Selecting 12
C.C Mode 12
Configuring options using the OSD menu.... 12
SAFETY PRECAUTIONS 24
CARE AND MAINTENANCE 25
TROUBLESHOOTING 25
ACCESSORIES
Thank you for purchasing this high-performance LCD-TV!
This package comes with:
LCD TV
- User's Guide
- Warranty Card
- Remote control
- Two AA batteries*
Power Cord
VGA Cable
- RCA A/V Cable
* Batteries shall not be exposed to excessive heat such as sunshine, fire or the like.
FRONT PANEL BUTTONS

| 1 | Volume down (adjust decreases) |
| 2 | Volume up (adjust increases) |
| 3 | On-Screen Display (OSD) menu button (returns to the previous menu) |
| 4 | Scroll down (selects the next channel down) |
| 5 | Scroll up (selects the next channel up) |
| 6 | Input source selection (serves as the ENTER button) |
| 7 | Power on and off switch |
| 8 | Power LED indicator and Remote control receiver |
BACK PANEL BUTTONS

A Power receptacle (for AC input)
B Headphone jack
C PC Audio input
D VGA (15-pin) signal input from a computer
E YPbPr and High Definition (HD) component video input
F S-Video input
G YPbPr/ DVI signal Audio input (left/right)
H AV/ S-Video signal Audio input (left/right)
I Composite Video input
J HDMI signal input (supports HDCP or a PC)
K RF antenna and cable TV input
REMOTE CONTROL
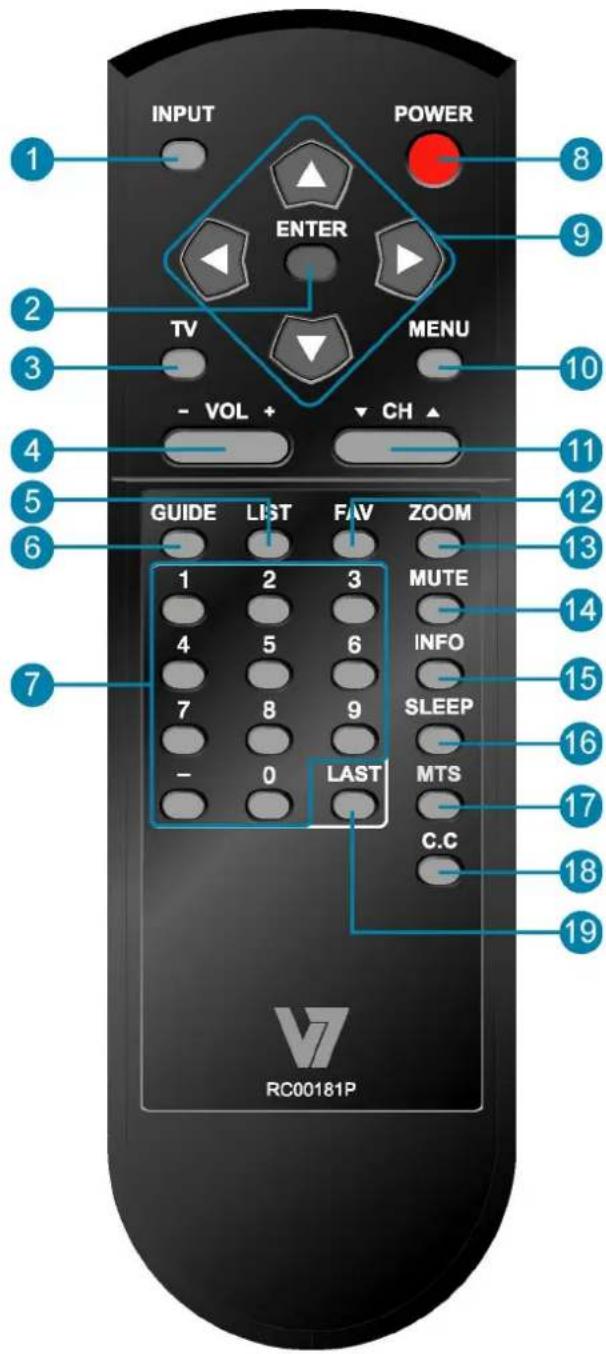
Remote control button function as follows:
| 1 INPUT Selects input source | ||
| 2 | ENTER | Confirm selection or enter selected menu |
| 3 TV Switches to TV from any other source | ||
| 4 - VOL + Adjusts the volume up and down | ||
| 5 LIST Select channel from program list | ||
| 6 GUIDE Select electronic program guide (EPG) | ||
| 7 0~9, - number Change the channel | ||
| 8 POWER Powers on and off | ||
| 9 UP/ DOWN/ LEFT/ RIGHT | Navigate and select OSD options and items | |
| 10 MENU Turns the On-Screen Display (OSD) menu on and off | ||
| 11 ▼CH▲ | Adjusts the channel up and down | |
| 12 FAV Select from preset Favorite Channels | ||
| 13 ZOOM Adjust window size | ||
| 14 | MUTE | Turns volume mute on and off |
| 15 | INFO | Displays current information |
| 16 | SLEEP | Turns on sleep timer setting |
| 17 | MTS | Select Mono, Stereo or SAP sound |
| 18 | C.C | Select caption mode |
| 19 | LAST | Returns to the previous channel |
INSTALLATION
Connecting an RF antenna or to cable TV
Make sure the power is OFF before installing your LCD TV.
1) AIR TV: Connect the LCD TV to TV antenna with 75-ohm coaxial cable. Preset the air TV channels into memory with Auto Scan function when using an antenna TV system. This air input jack both support TV and DTV systems. Besides, the TV system (NTSC) and DTV system (ATSC) can be found by scanning "AIR" with Auto Scan function (see page 21).
2) Cable TV: Connect the LCD TV to the cable with CATV and Digital cable. Preset the cable TV channels into memory with Auto Scan function when using a cable TV system. The cable input jack both support CATV and Digital cable systems. Besides, the CATV system (cable TV) and Digital cable system (clear QAM) can be found by scanning "Cable" with Auto Scan function (see page 21).
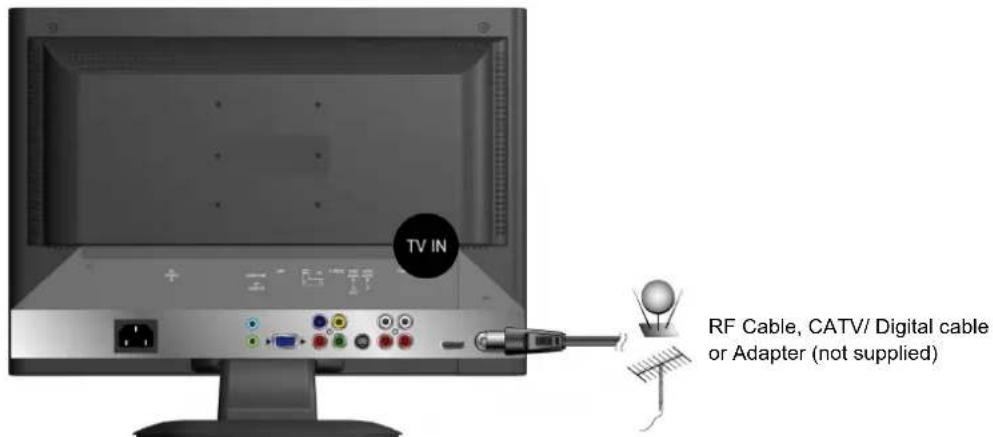
Note: Users can select either Air or Cable TV cable to be connected to the TV IN jack. To watch both of them, use an adapter to connect both Air and Cable cables to the jack.
Connecting to a DVD or set-top box
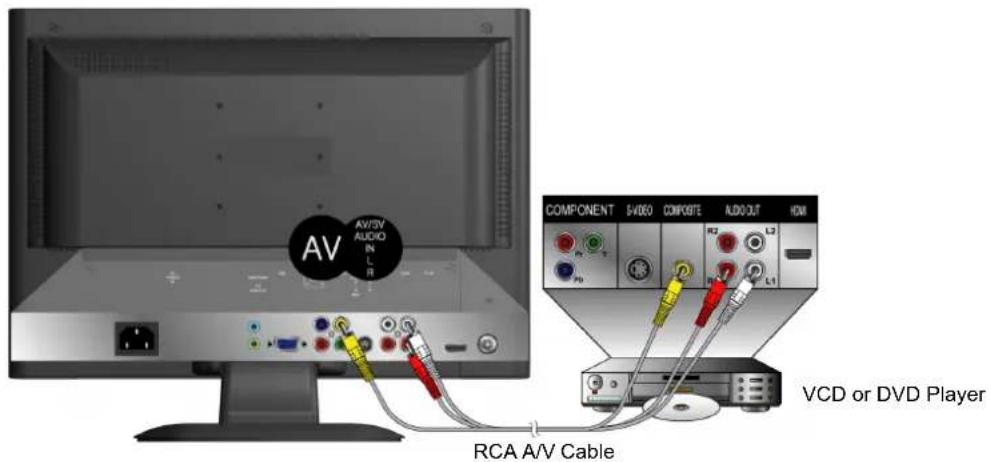
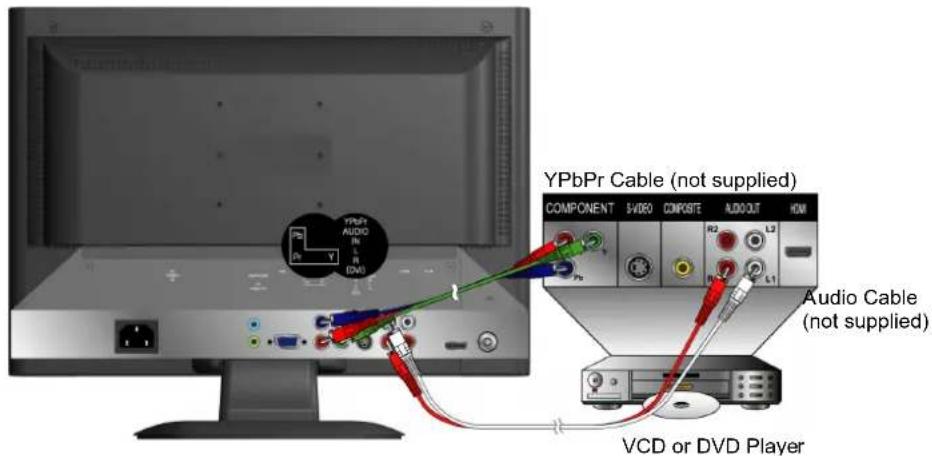
Connect the video and audio cables from a compatible device into the back panel of the LCD TV.
1) Connecting the RCA A/V cable:
2) Connecting the S-Video cable:

3) Connecting the YPbPr cable:
4) Connecting the HDMI cable:
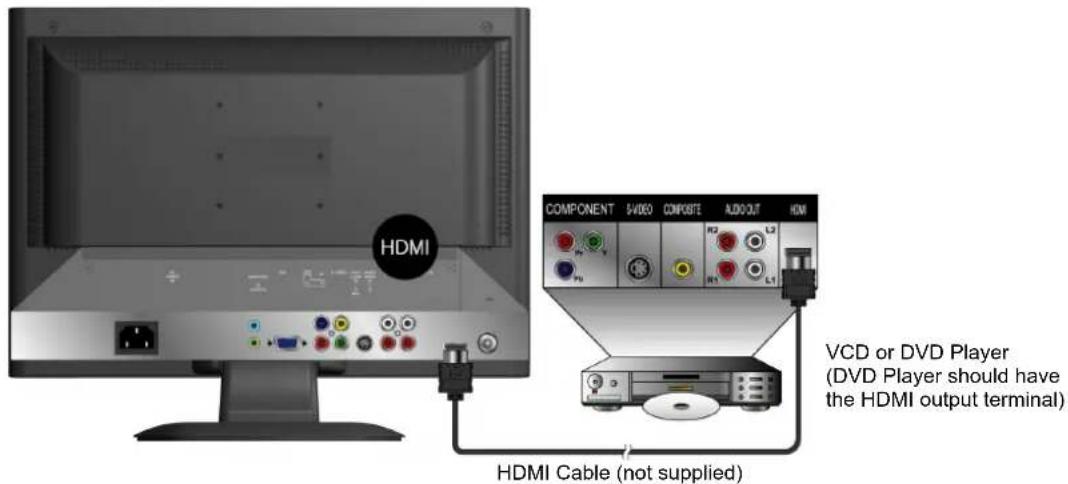
5) Connecting the HDMI to DVI cable:

Connecting to the Headphone
Connect the headphone to the headphone output terminal of the LCD TV. (Headphone sold separately).
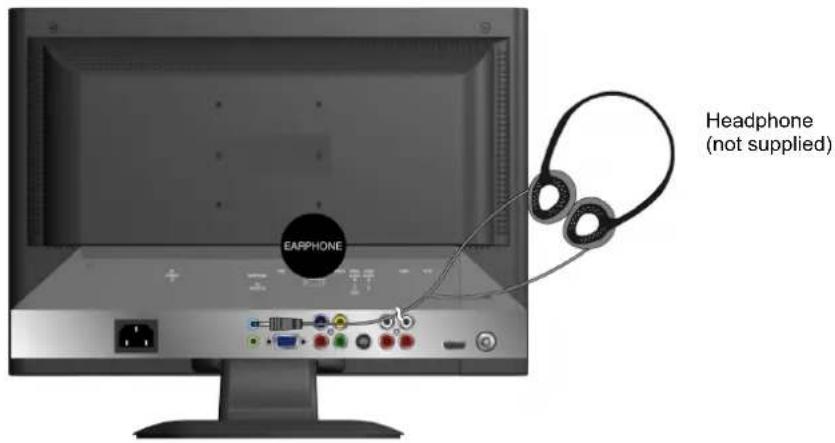
Connecting to a Computer
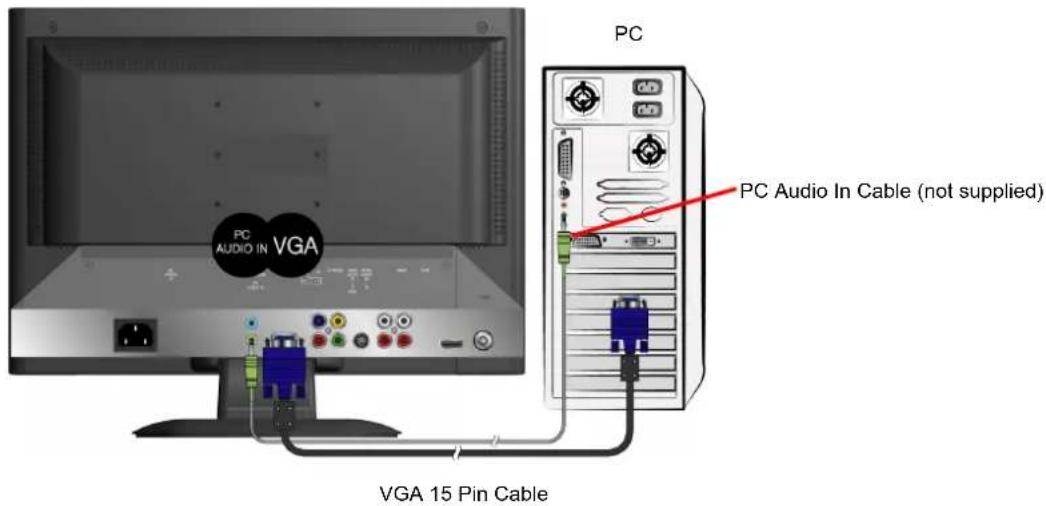
1) Connecting the VGA (15-pin D-Sub): Connect the VGA cable from VGA output on the computer to the VGA terminal input on the LCD TV. Connect the audio-in cable (green) from the audio output on the computer to the audio input terminal (green) on the LCD TV.
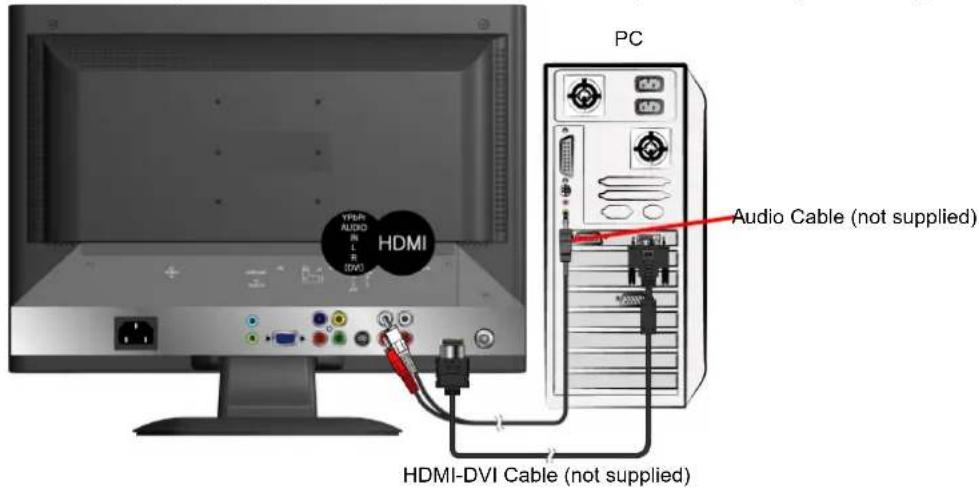
2) Connecting the HDMI-DVI cable: Connect the HDMI-DVI cable from the computer's DVI output to the LCD TV's HDMI terminal input. Connect the green end of the audio-in cable from the audio output on your computer to the audio input terminal (red/white) on the LCD TV.
Connecting the power cord
Connect the power cord to the power receptacle on the back of the LCD TV, and plug the other end into a correctly-grounded electrical outlet.

BASIC OPERATIONS
To select input source, change channels, and adjust volume, use the TV remote control or the front panel controls.
Before using the LCD TV
Connect all external equipment properly.
Connect the power cord. The power LED indicator lights orange.
Turning the power on and off
Press POWER on the LCD TV or press POWER on the remote control. The power LED lights blue when the LCD TV is on.
Note: After a few seconds of idleness, the power LED lights orange when no signal is present.
Selecting the input source
Press the INPUT on the remote control, then use ▲▼ to select the input source. Item settings are: TV, AV, S-Video, YPbPr, HDMI, and D-SUB.
To confirm the selection, press ENTER.

Adjusting the volume
Press - VOL +.
To turn off the volume, press MUTE.
To restore volume, press MUTE again, or press - VOL+.

INFO
To display the current information of the LCD TV:
Press INFO, and the current state will be displayed on the screen. (It shows all or some of the information about Input, Channel, Resolution, Audio Type, etc., depending on what input source it is in.)


* The picture here shows an example of the INFO screen in a DTV source.
Electronic Program Guide (EPG)
Press the GUIDE button on the remote control and the program information for the channel you are watching will be displayed on the screen.

* The picture here shows an example of the GUIDE screen in a DTV source.
Selecting a channel
Press number key or ▼CH▲ button to select your desired channel.
1. ATV
The “-” button has no function in ATV mode. Directly press the number buttons to select channels.
2. DTV
Use “-” button to select the sub channel in DTV.
Ex: Your desired number is 80-3.
Press 8 → press 0 → press “-” → press 3.
- Whether in ATV or DTV, after you input the channel numbers, press ENTER button to direct to the channel immediately, or wait for 3 seconds to change automatically.
- Return to the previous channel, press LAST button.
List
Press LIST button and there will be a small window showing program list, you can scroll through the list to select the channel you want directly without using the ▼CH▲ button.

Favorite Channels
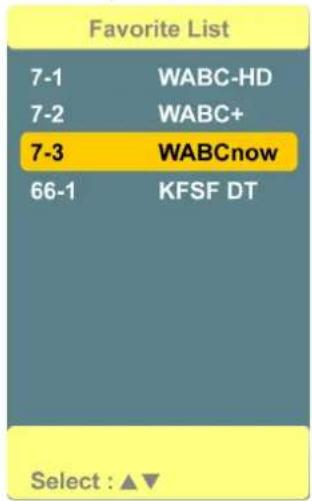
Press FAV button to show Favorite List and select your favorite channels that have already been stored. (You need to preset the favorite channels from the OSD menu to enable this function.)
Setting the sleep time
Repeatedly press SLEEP button to set the off timer. The function is used to automatically shut off the LCD TV after a preset period of time passed. There are several times for choice – OFF, 15min, 30min, 60min, 90min, 120min, 180min, 240min.
Zoom
Press ZOOM button repeatedly to select the screen size. You can select from Full, 4:3, Movie Scale, and Zoom In.
MTS Selecting
Press MTS button to choose the available sound output that is preset by TV broadcasting station.
C.C Mode
Press C.C button to select the caption mode.
Configuring options using the OSD menu
This menu allows you to adjust various settings using your remote control or the MENU button on the top of the LCD TV. The basic steps are as follows:
◆ Press MENU to display On-Screen Display (OSD) menu.
◆ Press ◀▶ to select your desired top Menu, and press ENTER or ▲▼ to enter the menu you select.
◆ Use ▲▼ to select the control you want to adjust.
◆ When selecting the control with ▶, press ▶ to enter next level menu or enable the function.
◆ Press ◀▶ to adjust or select the settings.
◆ Press MENU again to exit the current OSD page.
Use the OSD menu to adjust various settings for your LCD TV.
Press MENU to display the OSD menu. Press ◀ or ▶ to select the desired OSD menu page.
PICTURE Menu
—To adjust the picture quality
In TV, AV, S-Video, YPbPr, HDMI source:

Note: When in AV, S-Video, YPbPr or HDMI source, the TIME and TV Menu options are disabled.
In D-SUB source:
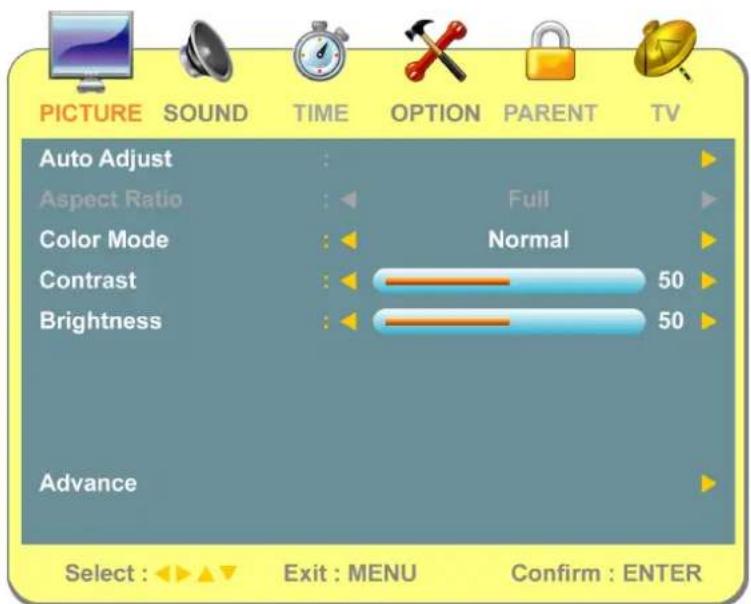
- Auto Adjust: To auto adjust picture's horizontal position, vertical position, fine tune and H-Size. (only enabled in D-SUB source)
- Aspect Ratio: To select image size from Full, 4:3, Movie Scale, or Zoom In.
● Color Mode: To select color mode from Normal, Warm, or Cold. - Contrast: To adjust contrast of video. (right: Max, left: Min.)
● Brightness: To adjust luminance of video. (right: Max, left: Min.)
● Sharpness: To adjust picture sharpness. (right: sharper, left: softer.)
● Tint: To adjust tint level.
● Color: To adjust color. (right: brilliant color, left: pale color.)
- Advance: To adjust advanced D-SUB functions, press ▶ to enter. (only enabled in D-SUB source)

◆ Phase: To adjust delay time of phase in order to reduce the noise of picture.
◆ Clock: To adjust clock frequency in order to get optimized horizontal size.
◆ V-Position: To adjust the vertical position of the picture.
◆ H-Position: To adjust the horizontal position of the picture.
SOUND Menu
—To set the audio quality and status
In DTV source:

In ATV, AV, S-Video, YPbPr, HDMI, D-SUB source:

● Bass: To adjust bass.
- Treble: To adjust the treble.
● Balance: To adjust left and right audio balance.
● Audio Language: To select the available audio languages. (only enabled in DTV mode)
TIME Menu
—To set up time zone
It is only active in TV source.

● Time Zone: To select the correct Time Zone for your area.
● Daylight Saving Time: To select summer Daylight Saving Time.
OPTION Menu
—To set up OSD window
In YPbPr, HDMI, D-SUB source:
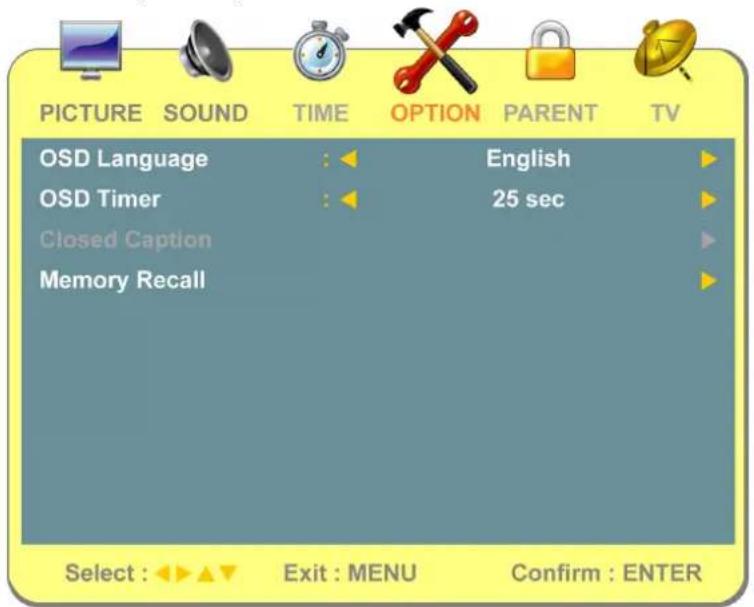
- OSD Language: To select an OSD language from English, French or Spanish.
- OSD Timer: To setup the display time of OSD. (5, 10, 15, 25, 40, and 60 seconds)
- Closed Caption: To set close caption options.

◆ CC Mode: To select Closed Caption Mode from Off, On, or CC on Mute.
◆ Basic Selection: To set basic analog closed caption options. (CC1\~CC4, TEXT1\~TEXT4)
◆ Advanced Selection: To select closed caption signal formats and set up caption modes for digital TV channels. (Service1\~6)
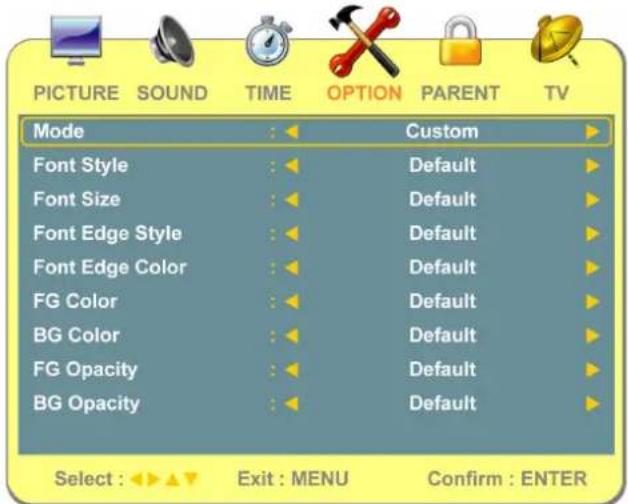
Option: Press ◀▶ to select Mode from Default or Custom. When “Custom” is selected, use ▲▼ to select the desired controls, ◀▶ to adjust detailed settings.
● Memory Recall: To restore the factory default settings.
PARENT Menu
—To set up parental control
In TV, AV, S-Video, YPbPr, HDMI source:
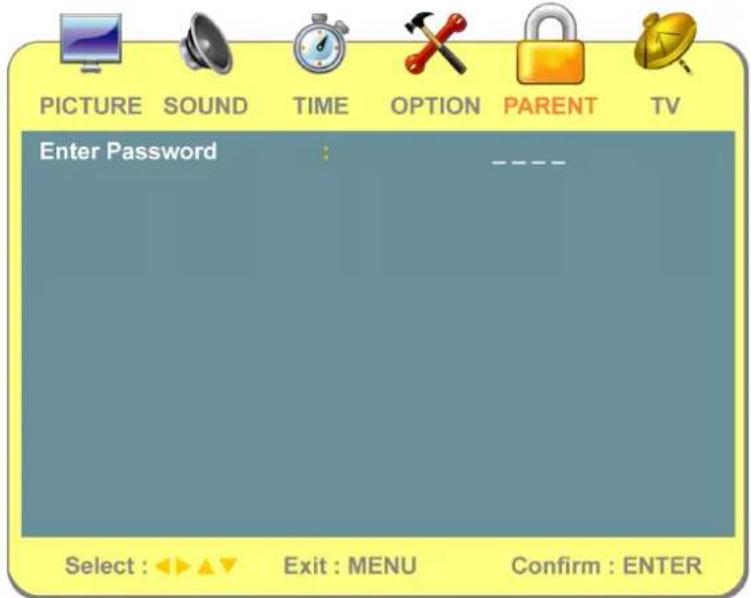
- Enter Password: Enter password and the screen below will show. (The default password is 0000.)

- Change Password: To change the password, press ▶, and the screen on the right appears. Follow the instructions to change password.
- System Lock: Select "On" to enable the following options.
Note: The below options can be enabled only when "On" is selected here.
● Unrated Lock: Select "On" to block unrated movies or TV programs.
● US: Press ▶ to set TV or MPAA ratings.
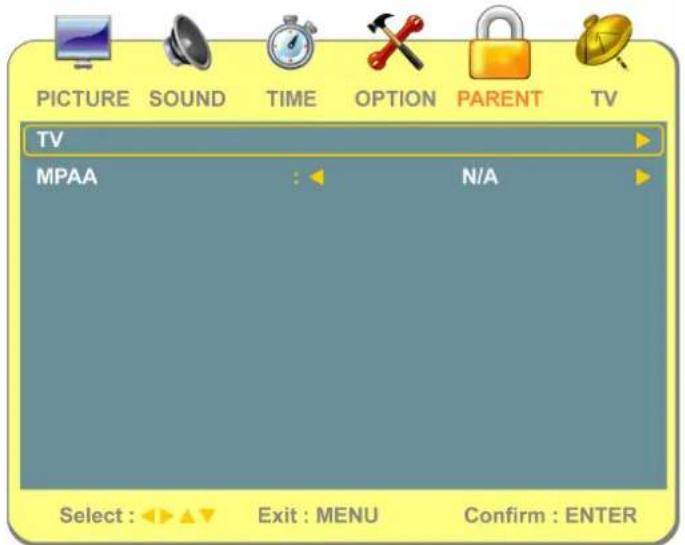
TV: To adjust TV blocking level in the US. You can select between TV-Y, TV-Y7, TV-G, TV-PG, TV-14, or TV-MA.

The TV Ratings in the US are defined as following.
| TV-Y | All children | TV-PG | Parental guidance suggested |
| TV-Y7 | Directed to older children: this program is designed for children age 7 and above | TV-14 | Parents strongly cautioned: this program contains some material that is unsuitable for children under 14 years of age |
| TV-G | General audience | TV-MA | Mature audience only |
◆ MPAA: To adjust movie blocking level in the US. You can select between N/A, G, PG, PG-13, R, NC-17, or X.
The movie Ratings in the US are defined as following.
| N/A | Not applicable | R | Restricted |
| G | General audience | NC-17 | No one 17 and under limited |
| PG | Parental guidance suggested | X | Adult audience only |
| PG-13 | Parents strongly cautioned |
● Canada: Press ▶ to set Canadian English and French ratings.

- Canada Eng: To adjust blocking level in English-speaking region of Canada. You can select between E, C, C8+, G, PG, 14+, 18+. The Canadian English Ratings are defined as following.
| E | Exempt | PG | Parental guidance |
| C | Children | 14+ | Viewers 14 years and older |
| C8+ | Children eight years and older | 18+ | Adult programming |
| G General programming, suitable for all audiences | |||
Canada Fre: To adjust blocking level in French-speaking region of Canada. You can select between E, G, 8 ans +, 13 ans +, 16 ans +, 18 ans +. The Canadian French Ratings are defined as following.
| E | Exempt | 13 ans + | Not appropriate for children of less than 13 years |
| G | General | 16 ans + | Not appropriate for children of less than 16 years |
| 8 ans + | Children eight years and older | 18+ | Reserved to adults |
- RRT Setting: To set Rating Region Table that defines the rating standard for a particular geographic region and/or country. Press ▶ to enter the setting.

Note: This picture is an example of the content of RRT Setting. However, the selections and sub-selections of RRT Setting may be different in your OSD menu according to the local broadcasting system.
- Reset RRT: Press ▶ to reset RRT Setting.
TV Menu
—To set up for TV
It is only active in TV source.
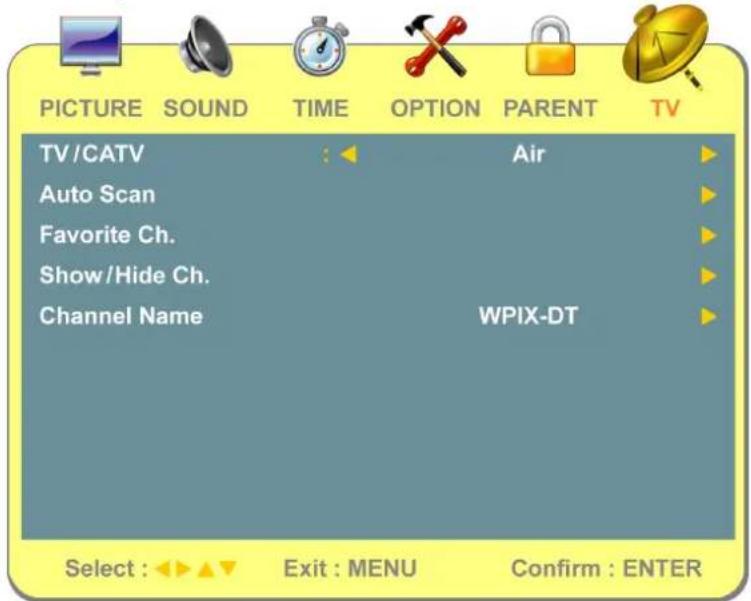
● TV/CATV: To select Cable or Air as the TV source.
- Auto Scan: To auto scan the TV or DTV channels. Select Air or Cable in TV/CATV option, and press ▶ to start auto scanning TV channels. Press MENU again at any time to interrupt scanning.
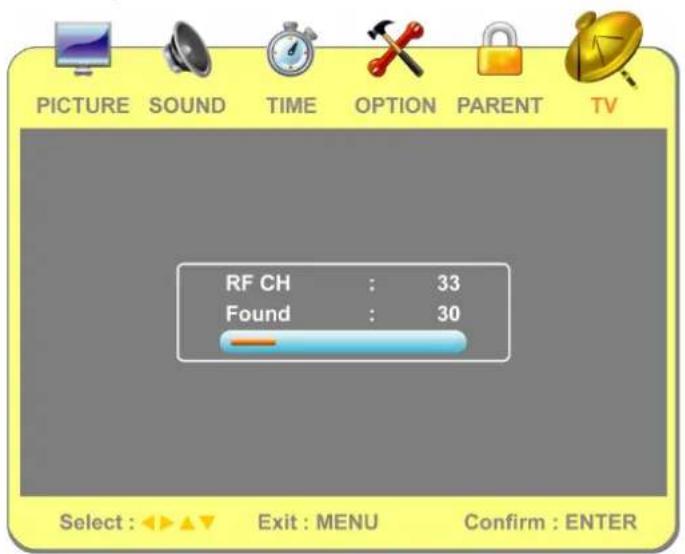
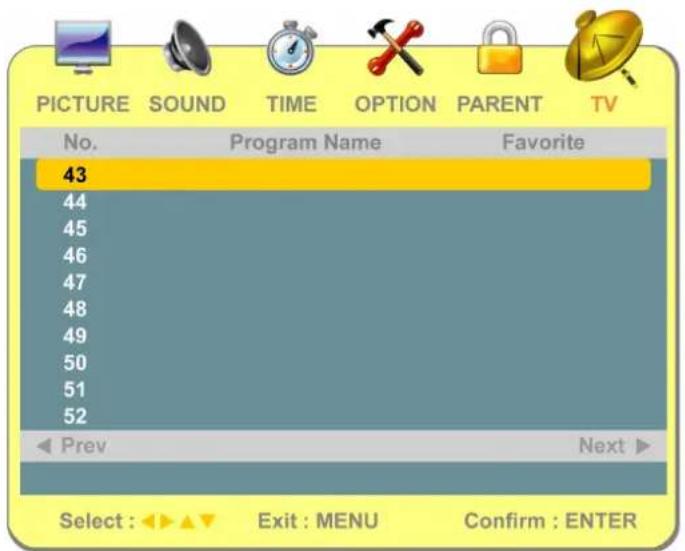
- Favorite Ch.: To set your favorite channels into memory. Press ENTER to confirm/ cancel your favorite channels.
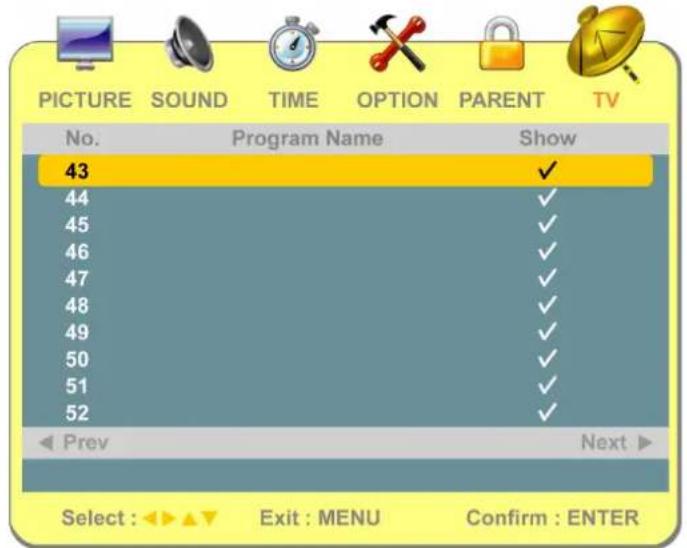
● Show/Hide Ch.: Press ENTER to skip the selected channel. To restore the channel, press ENTER again.
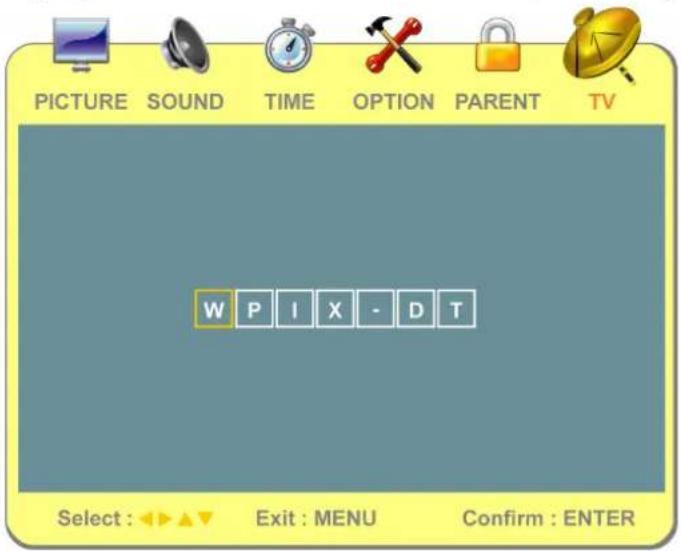
- Channel Name: Press ▶ to edit a name for the current channel. Use ▲▼ to choose letters or signs, ◀▶ to move forward or backward, and then press MENU or ENTER to exit.
TECHNICAL SPECIFICATION
| LCD | Type 21.6" TFT Active Matrix0.27675 (H) x 0.27675 (V) pixel pitch | |
| Color Filter RGB vertical stripe | ||
| Glass surface Anti-Glare | ||
| Input signal | RGB RGB analog (0.7/1.0 Vp-p, 75 ohms) Separate Sync,fh: 30-82 kHz, fv:50-75 Hz | |
| RF TV system Antenna / NTSC+ATSC | ||
| TV Cable system / CATV + Digital Cable | ||
| Video 1 composite RCA, 1 S-Video, 1 YPbPr component,1 HDMI | ||
| Audio 1 mini-stereo, 2 pair of RCA (L/R) stereo | ||
| Compatibility PC Up to 1680 x 1050 Non-interlaced | ||
| Resolution Recommendedand supported | 1680 x 1050 @ 60 Hz1440 x 900 @ 60 Hz1360 x 768 @ 60 Hz1280 x 1024 @ 60 Hz1280 x 768 @ 60 Hz1024 x 768 @ 60, 75 Hz800 x 600 @ 60, 75 Hz640 x 480 @ 60, 75 Hz | |
| Speaker Output 2.5W x 2 @THD=10% | ||
| Audio Output 1 Headphone jack | ||
| Power | Voltage | 100-240 VAC, 50/60 Hz (auto switch) |
| Display area | Full Scan | 464.94 mm (H) x 290.5875 mm (V)18.3" (H) x 11.4" (V) |
| Operatingconditions | Temperature | 32°F to + 104°F (0°C to + 40°C) |
| Humanity | 20% to 65% (no condensation) | |
| Altitude | To 10,000 feet (3,000m) | |
| Storage condition | Temperature | -4°F to + 140°F (-20°C to + 60°C) |
| Humanity | 10% to 90% (no condensation) | |
| Altitude | To 40,000 feet (12,000m) | |
| Dimensions | Physical | 518.4mm (W) x 430.4mm (H) x 216.0mm (D)20.4" (W) x 16.9" (H) x 8.5" (D) |
| Weight | Net | 6.5 kg (14.3 lb) |
| Regulations | UL, FCC-B (Doc-B) | |
| Power saving modes | On | < 55 W (blue LED) |
| Stand by | < 3 W (orange LED) | |
| Preset Timing Mode (Pre-adjusted to GTF® 1680 x 1050 @ 60 Hz)Warning: Do not set the graphics card in your computer to exceed these refresh rates;doing so may result in permanent damage to the LCD TV | ||
Note: Product Specifications are subject to change without notice.
SAFETY PRECAUTIONS
This LCD TV is manufactured and tested based on the fundamental principle that a user's safety comes first. However, improper use or installation may result in danger to the LCD TV as well as to the user. Carefully go over the following WARNINGS before installation and keep this guide handy.
WARNINGS
- This LCD TV should only be connected to an AC power source of the type indicated on the label on the rear end of the LCD TV. If you are unsure of the power source in your residence, consult your local dealer or power company.
- Do not try to repair the LCD TV yourself as it contains no user-serviceable parts. The LCD TV should only be repaired by a qualified technician.
- Do not remove the LCD TV cabinet. There are high-voltage parts inside that may cause you to suffer electric shock, even when the power cord is disconnected.
- Stop using the LCD TV if the cabinet is damaged. Have it checked by a service technician.
- Install the LCD TV in a clean dry environment. Unplug the LCD TV immediately if it gets wet and consult your service technician.
● Always unplug the LCD TV before cleaning it. Clean the LCD TV with a dry cloth only. Do not use liquid, alcohol or aerosol cleaners. - Keep the LCD TV away from magnetic objects, motors, TV sets, and transformers.
- Do not place heavy objects on the cable or power cord.
- For PLUG CABLE EQUIPMENT, the Socket-outlet should be installed near the equipment and should be easily accessible.
CARE AND MAINTENANCE
Care
- Avoid exposing the LCD TV directly to sunlight or any other heat source. Install the LCD TV away from the sunlight to reduce glare.
● Install the LCD TV in a well ventilated area.
● Do not place anything heavy on top of your LCD TV.
● Make certain your LCD TV is installed in a clean and moisture-free area. - Keep your LCD TV away from magnets, motors, transformers, speakers, and TV sets.
Safety Tips
- If you see smoke, hear abnormal noise or smell an odor that appears to be coming from your LCD TV, remove the power cord immediately and call your service center.
● WARNING: Never remove the rear cover of your LCD TV cabinet. The display unit inside contains high-voltage and may cause electric shock. - Never try to repair your LCD TV yourself. Always call your service center or a qualified technician to fix it.
TROUBLESHOOTING
No power
● Make sure the AC power cord is securely connected to the LCD TV and the wall outlet.
● Plug another electrical device into the power outlet to verify the outlet is working.
Power on but no screen image
● Make sure the video cables are tightly secured.
● Make sure you selected the correct video input source.
- Adjust the brightness.
● Make sure all cables are connected.
Wrong or abnormal colors
- If any colors (red, green, blue) are missing, check the video cable to make sure it is securely connected. Loose or broken pins in the cable connector could cause an improper connection.
- Connect the LCD TV to another video source or use another TV to make sure the video source is no problem.
- Safety instructions
- Contents
- ACCESSORIES
- FRONT PANEL BUTTONS
- BACK PANEL BUTTONS
- REMOTE CONTROL
- INSTALLATION
- Connecting an RF antenna or to cable TV
- Connecting to a DVD or set-top box
- Connecting to the Headphone
- Connecting to a Computer
- Connecting the power cord
- BASIC OPERATIONS
- Before using the LCD TV
- Turning the power on and off
- Selecting the input source
- Adjusting the volume
- INFO
- Electronic Program Guide (EPG)
- Selecting a channel
- ATV
- DTV
- List
- Favorite Channels
- Setting the sleep time
- Zoom
- MTS Selecting
- C.C Mode
- Configuring options using the OSD menu
- PICTURE Menu
- SOUND Menu
- TIME Menu
- —To set up time zone
- OPTION Menu
- PARENT Menu
- TV Menu
- —To set up for TV
- It is only active in TV source.
- SAFETY PRECAUTIONS
- WARNINGS
- CARE AND MAINTENANCE
- Care
- Safety Tips
- TROUBLESHOOTING
- No power
- Power on but no screen image
- Wrong or abnormal colors
Brand : V7
Model : LTV22HD
Category : Television