
DS14DBL2 - Drill HiKOKI - Free user manual and instructions
Find the device manual for free DS14DBL2 HiKOKI in PDF.


| Product Type | Cordless Drill Driver |
| Brand | HiKOKI |
| Model | DS14DBL2 |
| Voltage | 14.4 V |
| Battery Type | Lithium-ion (Li-ion) |
| Chuck Type | Keyless, 13 mm (1/2 in) |
| Max Torque | 50 Nm |
| No Load Speed | 0 – 1,700 rpm |
| Impact Function | No (drill only) |
| Weight (with battery) | 1.7 kg |
| Dimensions (L x W x H) | 200 x 80 x 250 mm |
| Power Source | Battery (not included) |
| Battery Capacity (typical) | 1.5 – 3.0 Ah |
| Charging Time | 30 – 60 minutes |
| Drilling Capacity (steel) | 13 mm |
| Drilling Capacity (wood) | 38 mm |
| Cooling Method | Air cooled |
| Safety Features | Overload protection, brake |
| Maintenance | Clean vents, replace carbon brushes |
| Warranty | 2 years (varies by region) |
Frequently Asked Questions - DS14DBL2 HiKOKI
User questions about DS14DBL2 HiKOKI
0 question about this device. Answer the ones you know or ask your own.
Ask a new question about this device
Download the instructions for your Drill in PDF format for free! Find your manual DS14DBL2 - HiKOKI and take your electronic device back in hand. On this page are published all the documents necessary for the use of your device. DS14DBL2 by HiKOKI.
USER MANUAL DS14DBL2 HiKOKI
natural_image
Two identical electric drill motors labeled DS18DBL2 and DV18DBL2, shown in a circular diagram with no text or symbols on the devices themselves.
en Handling instructions
zh 使用說明書
ko 취급 설명서
viHướng dẫn sử dụng
th คู่มือการใช้งาน
id Petunjuk pemakaian
③ar 提ليمات المعالجة
GENERAL POWER TOOL SAFETY WARNINGS

WARNING
Read all safety warnings and all instructions.
Failure to follow the warnings and instructions may result in electric shock, fire and/or serious injury.
Save all warnings and instructions for future reference.
The term “power tool” in the warnings refers to your mains-operated (corded) power tool or battery-operated (cordless) power tool.
1) Work area safety
a) Keep work area clean and well lit. Cluttered or dark areas invite accidents.
b) Do not operate power tools in explosive atmospheres, such as in the presence of fl ammable liquids, gases or dust.
Power tools create sparks which may ignite the dust or fumes.
c) Keep children and bystanders away while operating a power tool.
Distractions can cause you to lose control.
2) Electrical safety
a) Power tool plugs must match the outlet. Never modify the plug in any way.
Do not use any adapter plugs with earthed (grounded) power tools.
Unmodified plugs and matching outlets will reduce risk of electric shock.
b) Avoid body contact with earthed or grounded surfaces, such as pipes, radiators, ranges and refrigerators. There is an increased risk of electric shock if your body is earthed or grounded.
c) Do not expose power tools to rain or wet conditions. Water entering a power tool will increase the risk of electric shock.
d) Do not abuse the cord. Never use the cord for carrying, pulling or unplugging the power tool. Keep cord away from heat, oil, sharp edges or moving parts.
Damaged or entangled cords increase the risk of electric shock.
e) When operating a power tool outdoors, use an extension cord suitable for outdoor use. Use of a cord suitable for outdoor use reduces the risk of electric shock.
f) If operating a power tool in a damp location is unavoidable, use a residual current device (RCD) protected supply.
Use of an RCD reduces the risk of electric shock.
3) Personal safety
a) Stay alert, watch what you are doing and use common sense when operating a power tool. Do not use a power tool while you are tired or under the influence of drugs, alcohol or medication.
A moment of inattention while operating power tools may result in serious personal injury.
b) Use personal protective equipment. Always wear eye protection.
Protective equipment such as dust mask, non-skid safety shoes, hard hat, or hearing protection used for appropriate conditions will reduce personal injuries.
c) Prevent unintentional starting. Ensure the switch is in the off position before connecting to
power source and/or battery pack, picking up or carrying the tool.
Carrying power tools with your fi nger on the switch or energising power tools that have the switch on invites accidents.
d) Remove any adjusting key or wrench before turning the power tool on.
A wrench or a key left attached to a rotating part of the power tool may result in personal injury.
e) Do not overreach. Keep proper footing and balance at all times.
This enables better control of the power tool in unexpected situations.
f) Dress properly. Do not wear loose clothing or jewellery. Keep your hair, clothing and gloves away from moving parts.
Loose clothes, jewellery or long hair can be caught in moving parts.
g) If devices are provided for the connection of dust extraction and collection facilities, ensure these are connected and properly used.
Use of dust collection can reduce dust-related hazards.
4) Power tool use and care
a) Do not force the power tool. Use the correct power tool for your application.
The correct power tool will do the job better and safer at the rate for which it was designed.
b) Do not use the power tool if the switch does not turn it on and off.
Any power tool that cannot be controlled with the switch is dangerous and must be repaired.
c) Disconnect the plug from the power source and/or the battery pack from the power tool before making any adjustments, changing accessories, or storing power tools.
Such preventive safety measures reduce the risk of starting the power tool accidentally.
d) Store idle power tools out of the reach of children and do not allow persons unfamiliar with the power tool or these instructions to operate the power tool.
Power tools are dangerous in the hands of untrained users.
e) Maintain power tools. Check for misalignment or binding of moving parts, breakage of parts and any other condition that may affect the power tool's operation.
If damaged, have the power tool repaired before use.
Many accidents are caused by poorly maintained power tools.
f) Keep cutting tools sharp and clean. Properly maintained cutting tools with sharp cutting edges are less likely to bind and are easier to control.
g) Use the power tool, accessories and tool bits etc. in accordance with these instructions, taking into account the working conditions and the work to be performed.
Use of the power tool for operations different from those intended could result in a hazardous situation.
5) Battery tool use and care
a) Recharge only with the charger specified by the manufacturer.
A charger that is suitable for one type of battery pack may create a risk of fire when used with another battery pack.
b) Use power tools only with specifically designated battery packs.
Use of any other battery packs may create a risk of injury and fire.
c) When battery pack is not in use, keep it away from other metal objects, like paper clips, coins, keys, nails, screws or other small metal objects, that can make a connection from one terminal to another.
Shorting the battery terminals together may cause burns or a fire.
d) Under abusive conditions, liquid may be ejected from the battery; avoid contact. If contact accidentally occurs, fl ush with water. If liquid contacts eyes, additionally seek medical help.
Liquid ejected from the battery may cause irritation or burns.
6) Service
a) Have your power tool serviced by a qualified repair person using only identical replacement parts.
This will ensure that the safety of the power tool is maintained.
PRECAUTION
Keep children and infi rm persons away.
When not in use, tools should be stored out of reach of children and infi rm persons.
CORDLESS DRIVER DRILL / IMPACT DRIVER DRILL SAFETY WARNINGS
- Wear ear protectors when impact drilling.
Exposure to noise can cause hearing loss.
- Use auxiliary handle(s), if supplied with the tool.
Loss of control can cause personal injury.
- Hold power tool by insulated gripping surfaces, when performing an operation where the cutting accessory or fastener may contact hidden wiring.
Cutting accessory and fasteners contacting a "live" wire may make exposed metal parts of the power tool "live" and could give the operator an electric shock.
ADDITIONAL SAFETY WARNINGS
-
Make sure that the area to be drilled is absolutely free of any hidden obstructions including electrical wiring, water, or gas pipes. Drilling into the aforementioned may result in electric shock or short circuit, gas leak or other hazards that can cause serious accidents or injuries.
-
When using the tool, make sure the side handle is attached and firmly secured.
If not firmly secured, the tool may jerk out of position when overburdened, resulting in injury.
Tighten the side handle so that the protrusion of the handle points towards the upper surface of the unit. (Fig. 3-b)
Prior to use, always make sure that the side handle is not loose.
If the handle loosens during use, tighten it further.
-
During operation, make sure to firmly hold the tool's handle and side handle with both hands. Failure to do so may result in injury.
-
Secure the workpiece. A workpiece clamped with clamping devices or in a vice is held more secure than by hand.
-
Setting up and checking the work environment. Check if the work environment is suitable by following the precaution.
-
Do not allow foreign matter to enter the hole for connecting the rechargeable battery.
-
Never disassemble the rechargeable battery and charger.
-
Never short-circuit the rechargeable battery. Shortcircuiting the battery will cause a great electric current and overheat. It results in burn or damage to the battery.
-
Do not dispose of the battery in fire. If the battery is burnt, it may explode.
-
Bring the battery to the shop from which it was purchased as soon as the post-charging battery life becomes too short for practical use. Do not dispose of the exhausted battery.
-
Do not insert object into the air ventilation slots of the charger. Inserting metal objects or inflammables into the charger air ventilation slots will result in electrical shock hazard or damaged charger.
-
When mounting a bit into the keyless chuck, tighten the sleeve adequately. If the sleeve is not tight, the bit may slip or fall out, causing injury.
-
When changing the rotational speed with the shift knob, confirm that the switch is off. Changing the speed while the motor is rotating will damage the gears.
-
The clutch dial cannot be set between the numerals "1, 4, 7 ... 22" or the dots, and do not use with the clutch dial numeral between "22" and the line at the middle of the drill mark. Doing so may cause damage.
-
Always use this unit with clockwise rotation, when using it as impact drill.
-
Resting the unit after continuous work.
-
The power tool is equipped with a temperature protection circuit to protect the motor. Continuous work may cause the temperature of the unit to rise, activating the temperature protection circuit and automatically stopping operation. If this happens, allow the power tool to cool before resuming use.
-
The motor may stop in the event the tool is overloaded. In this should occur, release the tool's switch and eliminate the cause of the overload.
Avoid touching the front case which can heat up during continuous operation.
-
The motor rotation may be locked to cease while the unit is used as drill. While operating the driver drill, take care not to lock the motor.
-
The use of the battery in a cold condition (below 0 degree Centigrade) can sometimes result in the weakened tightening torque and reduced amount of work. This, however, is a temporary phenomenon, and returns to normal when the battery warms up.
-
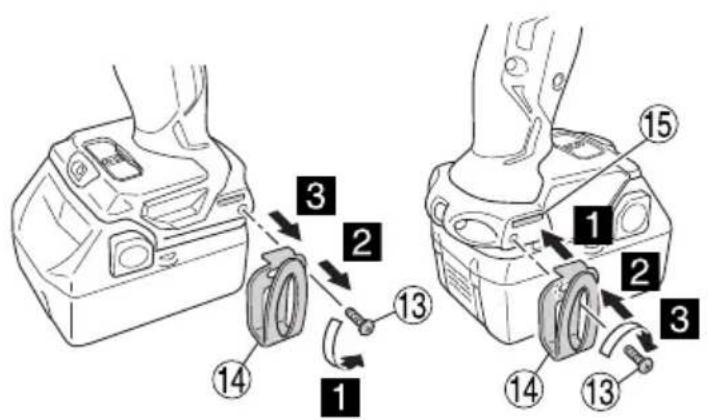
Install securely the hook. Unless the hook is securely installed, it may cause an injury while using.
When electing to carry the tool hooked to your hip belt, make sure to detach the tool bit and side handle. Failure to do so may result in unexpected injury.
- Do not look directly into the light. Such actions could result in eye injury.
Wipe off any dirt or grime attached to the lens of the LED light with a soft cloth, being careful not to scratch the lens.
Scratches on the lens of the LED light can result in decreased brightness.
CAUTION ON LITHIUM-ION BATTERY
To extend the lifetime, the lithium-ion battery equips with the protection function to stop the output.
In the cases of 1 to 3 described below, when using this product, even if you are pulling the switch, the motor may stop.
This is not the trouble but the result of protection function.
- When the battery power remaining runs out, the motor stops.
In such a case, charge it up immediately.
- If the tool is overloaded, the motor may stop. In this case, release the switch of tool and eliminate causes of overloading. After that, you can use it again.
English
- If the battery is overheated under overload work, the battery power may stop.
In this case, stop using the battery and let the battery cool. After that, you can use it again.
Furthermore, please heed the following warning and caution. WARNING
In order to prevent any battery leakage, heat generation, smoke emission, explosion and ignition beforehand, please be sure to heed the following precautions.
- Make sure that swarf and dust do not collect on the battery.
During work make sure that swarf and dust do not fall on the battery.
○ Make sure that any swarf and dust falling on the power tool during work do not collect on the battery. - Do not store an unused battery in a location exposed to swarf and dust.
Before storing a battery, remove any swarf and dust that may adhere to it and do not store it together with metal parts (screws, nails, etc.). - Do not pierce battery with a sharp object such as a nail, strike with a hammer, step on, throw or subject the battery to severe physical shock.
- Do not use an apparently damaged or deformed battery.
- Do not use the battery in reverse polarity.
- Do not connect directly to an electrical outlets or car cigarette lighter sockets.
- Do not use the battery for a purpose other than those specified.
- If the battery charging fails to complete even when a specified recharging time has elapsed, immediately stop further recharging.
- Do not put or subject the battery to high temperatures or high pressure such as into a microwave oven, dryer, or high pressure container.
- Keep away from fire immediately when leakage or foul odor are detected.
- Do not use in a location where strong static electricity generates.
- If there is battery leakage, foul odor, heat generated, discolored or deformed, or in any way appears abnormal during use, recharging or storage, immediately remove it from the equipment or battery charger, and stop use.
- Do not immerse the battery or allow any fluids to flow inside. Conductive liquid ingress, such as water, can cause damage resulting in fire or explosion. Store your battery in a cool, dry place, away from combustible and fl ammable items. Corrosive gas atmospheres must be avoided.
CAUTION
- If liquid leaking from the battery gets into your eyes, do not rub your eyes and wash them well with fresh clean water such as tap water and contact a doctor immediately.
If left untreated, the liquid may cause eye-problems.
- If liquid leaks onto your skin or clothes, wash well with clean water such as tap water immediately.
There is a possibility that this can cause skin irritation.
- If you find rust, foul odor, overheating, discolor, deformation, and/or other irregularities when using the battery for the first time, do not use and return it to your supplier or vendor.
WARNING
If a conductive foreign matter enters in the terminal of lithium ion battery, the battery may be shorted, causing fire. When storing the lithium ion battery, obey surely the rules of following contents.
○ Do not place conductive debris, nail and wires such as iron wire and copper wire in the storage case.
To prevent shorting from occurring, load the battery in the tool or insert securely the battery cover for storing until the ventilator is not seen.
REGARDING LITHIUM-ION BATTERY TRANSPORTATION
When transporting a lithium-ion battery, please observe the following precautions.
WARNING
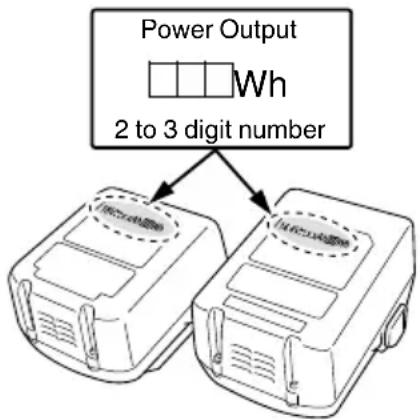
Notify the transporting company that a package contains a lithium-ion battery, inform the company of its power output and follow the instructions of the transportation company when arranging transport.
○ Lithium-ion batteries that exceed a power output of 100 Wh are considered to be in the freight classification of Dangerous Goods and will require special application procedures.
☐ For transportation abroad, you must comply with international law and the rules and regulations of the destination country.
flowchart
graph TD
    A["Power Output"] --> B["Device 1: 2 to 3 digit number"]
    A --> C["Device 2: Wh"]
NAMES OF PARTS (Fig. 1 – Fig. 13)
| 1 | Rechargeable battery Hammer mark | |
| 2 | Latch Shift knob | 12 |
| 3 | Handle | 13 Screw |
| 4 | Pilot lamp | 14 Hook |
| 5 | Rubber cap | 15 Groove |
| 6 | Protruding portion of the side handle | 16 Trigger switch |
| 7 | Side handle | 17 Remaining battery indicator lamp |
| 8 | Drill mark | 18 Display panel |
| 9 | Clutch dial | 19 Sleeve |
| 10 | Triangle mark | 20 Push button |
SYMBOLS
WARNING
The following show symbols used for the machine. Be sure that you understand their meaning before use.
 | DS14DBL2 / DS18DBL2:Cordless Driver DrillDV14DBL2 / DV18DBL2:Cordless Impact Driver Drill |
 | To reduce the risk of injury, user must read instruction manual. |
| Direct current | |
| V Rated voltage | |
| n_0 | No-load speed |
| /min Oscillation per minute | |
| Bpm Impact rate | |
| Ls Low speed | |
| Hs High speed | |
 | Brick |
 | Wood |
 | Metal |
 | Machine screw |
 | Wood screw |
 | Drill chuck capacity |
 | Weight |
 | Drilling |
 | Impact drilling |
 | Switching ON |
 | Switching OFF |
 | Disconnect the battery |
 | Change rotation speed - High speed |
 | Change rotation speed - Low speed |
 | Clockwise rotation |
 | Counterclockwise rotation |
 | The battery remaining power is nearly empty. Recharge the battery soonest possible |
 | The battery remaining power is a half. |
 | The battery remaining power is enough. |
 | Warning |
| Prohibited action | |
Table 1
| Indications of the pilot lamp | ||||
| Pilot lamp(red) | Before charging | Blinks | Lights for 0.5 seconds. Does not light for 0.5 seconds. (off for 0.5 seconds) | |
| While charging Lights | Lights continuously | |||
| Charging complete | Blinks | Lights for 0.5 seconds. Does not light for 0.5 seconds. (off for 0.5 seconds) | ||
| Overheat standby | Blinks | Lights for 1 second. Does not light for 0.5 seconds. (off for 0.5 seconds) | Battery overheated. Unable to charge. (Charging will commence when battery cools) | |
| Charging impossible | Flickers | Lights for 0.1 seconds. Does not light for 0.1 seconds. (off for 0.1 seconds) | Malfunction in the battery or the charger | |
English
● Regarding the temperatures and charging time of the battery.
The temperatures and charging time will become as shown in Table 2.
Table 2
| Battery\Charger | UC18YFSL | |
| Charging voltage V 14.4 - 18 | ||
| Weight kg 0.5 | ||
| Temperatures at which the battery can be recharged | 0°C - 50°C | |
| Charging time for battery capacity, approx. (At 20°C) | ||
| 1.5 Ah | min. | 22 |
| 2.0 Ah | min. | 30 |
| 2.5 Ah | min. | 35 |
| 3.0 Ah | min. | 45 |
| 4.0 Ah | min. | 60 |
| 5.0 Ah | min. | 75 |
| Number of battery cells 4 - 10 | ||
NOTE
The recharging time may vary according to temperature and power source voltage.
CAUTION
When the battery charger has been continuously used, the battery charger will be heated, thus constituting the cause of the failures. Once the charging has been completed, give 15 minutes rest until the next charging.
-
Disconnect the charger's power cord from the receptacle.
-
Hold the charger firmly and pull out the battery.
NOTE
Be sure to pull out the battery from the charger after use, and then keep it.
CAUTION
☐ If the battery is charged while it is heated because it has been left for a long time in a location subject to direct sunlight or because the battery has just been used, the pilot lamp of the charger lights for 1 second, does not light for 0.5 seconds (off for 0.5 seconds). In such a case, first let the battery cool, then start charging.
When the pilot lamp flickers (at 0.2-second intervals), check for and take out any foreign objects in the charger's battery connector. If there are no foreign objects, it is probable that the battery or charger is malfunctioning. Take it to your authorized Service Center.
☐ Since the built-in micro computer takes about 3 seconds to confirm that the battery being charged with charger is taken out, wait for a minimum of 3 seconds before reinserting it to continue charging. If the battery is reinserted within 3 seconds, the battery may not be properly charged.
☐ If the pilot lamp does not blink in red (every second) even though the charger cord is connected to the power, it indicates that the protection circuit of the charger may be activated.
Remove the cord or plug from the power and then connect it again after 30 seconds or so. If this does not cause the pilot lamp to blink in red (every second), please take the charger to the HiKOKI Authorized Service Center.
MOUNTING AND OPERATION
| Action | Figure | Page |
| Removing and inserting the battery | 1 | 54 |
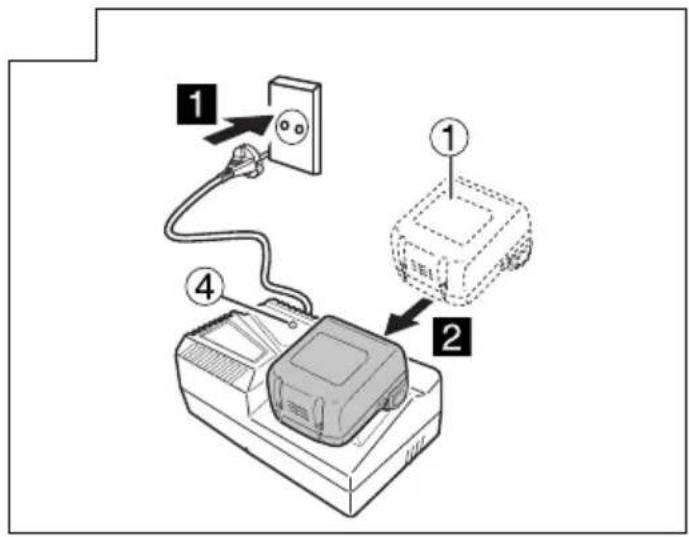
| Charging | 2 | 54 |
| Installing / Removing the side handle | 3-a | 54 |
| Tightening torque adjustment | 4 | 54 |
| Selecting the drill position | 5 | 55 |
| Selecting the impact position | 6 | 55 |
| Change rotation speed | 7 | 55 |
| Removing and mounting the hook | 8 | 55 |
| Remaining battery indicator 9 | 55 | |
| How to use the LED light | 10 | 56 |
| Mounting the bit | 11 | 56 |
| Reversing the rotational direction | 12 | 56 |
| Switch operation | 13 | 56 |
| Selecting accessories | — | 57 |
REACTIVE FORCE CONTROL
This product features a reactive force control (RFC) to minimize the danger of twisting the operator's arms when tool itself suddenly jerks during operation.
When the tool bit is suddenly overburdened, the tool itself may react to the motor's force and twist in the opposite direction of the motor's rotation, which could result in injury. (Fig. 14)
When the tool's built-in control detects a reactive force, it stops the motor's output before the entire tool jerks to lessen the twisting of the operator's arms.
When this function activates, it will be indicated by the LED light blinking (0.1-second blinks/off 0.5 seconds) while the switch is pulled.
(See "LED light warning signals")
However, as the function may not activate depending on situations or conditions during operation, so care should be taken to avoid any sudden overburdening of the tool bit when operating the tool.
● Possible causes of sudden overburdening
① Tool bit biting into material
② Impact against nails, metal or other hard objects
③ Also, other causes include any combination of the aforementioned.
- When the reactive force control (RFC) is triggered. When the RFC is triggered and the motor stops, turn off the tool's switch and remove the cause of the overburdening before continuing operation.

Fig. 14
LED LIGHT WARNING SIGNALS (Fig. 15)
This product features functions that are designed to protect the tool itself as well as the battery. While the switch is pulled, if any of the safeguard functions are triggered during operation, the LED light will blink as described in
Table 3. When any of the safeguard functions are triggered, immediately remove your fi nger from the switch and follow the instructions described under corrective action.

natural_image
Illustration of a hand using a drill bit to lift a tool, with no visible text or symbolsFig. 15
Table 3
| Safeguard Function LED | Light Display Corrective Action | |
| Overburden Protection | On 0.1 second/off 0.5 second | If the operating with the shift knob set on HIGH, adjust to LOW and continue operation. Remove the cause of the overburdening. |
| Reactive Force Control | Remove the cause of the overburdening. When operating the tool, firmly hold the tool to make sure it doesn't jerk. | |
| Over-discharge Protection | On 0.5 second/off 0.5 second | Charge the battery as soon as possible. |
| Temperature Protection | On 0.3 second/off 0.3 second | Allow the tool and battery to thoroughly cool. |
MAINTENANCE AND INSPECTION
1. Inspecting the tool
Since use of as dull tool will degrade efficiency and cause possible motor malfunction, sharpen or replace the tool as soon as abrasion is noted.
2. Inspecting the mounting screws
Regularly inspect all mounting screws and ensure that they are properly tightened. Should any of the screws be loose, retighten them immediately. Failure to do so could result in serious hazard.
3. Maintenance of the motor
The motor unit winding is the very "heart" of the power tool. Exercise due care to ensure the winding does not become damaged and/or wet with oil or water.
4. Cleaning on the outside
When the power tool is stained, wipe with a soft dry cloth or a cloth moistened with soapy water. Do not use chloric solvents, gasoline or paint thinner, for they melt plastics.
5. Storage
Store the power tool in a place in which the temperature is less than 40^ C and out of reach of children.
NOTE
Storing lithium-ion batteries.
Make sure the lithium-ion batteries have been fully charged before storing them.
Prolonged storage (3 months or more) of batteries with a low charge may result in performance deterioration, signifi cantly reducing battery usage time or rendering the batteries incapable of holding a charge.
However, signifi cantly reduced battery usage time may be recovered by repeatedly charging and using the batteries two to five times.
If the battery usage time is extremely short despite repeated charging and use, consider the batteries dead and purchase new batteries.
CAUTION
In the operation and maintenance of power tools, the safety regulations and standards prescribed in each country must be observed.
Important notice on the batteries for the HiKOKI cordless power tools
Please always use one of our designated genuine batteries. We cannot guarantee the safety and performance of our cordless power tool when used with batteries other than these designated by us, or when the battery is disassembled and modified (such as disassembly and replacement of cells or other internal parts).
NOTE
Due to HiKOKI's continuing program of research and development, the specifications herein are subject to change without prior notice.
TROUBLESHOOTING
Use the inspections in the table below if the tool does not operate normally. If this does not remedy the problem, consult your dealer or the HiKOKI Authorized Service Center.
| Symptom Possible | cause Remedy | |
| Tool doesn't run No remaining | g battery power Charge the battery. | |
| Battery isn't securely attached. Push in the battery until a click is heard. | ||
| Tool suddenly stopped Tool | was overburdened Remove the cause of the overburdening.See “Reactive force control”. | |
| Reactive force control was activated | ||
| Battery or tool overheated Allow the tool and battery to thoroughly cool. | ||
| Tool bits-can't be attached-fall off | The shape of the attachment portion doesn't match | The chucking diameter of the keyless chuck is 1.5 mm to 13 mm. Use a bit that falls within the stated range. |
| The lock of the keyless chuck is worn Contact | a HiKOKI Authorized Service Center and arrange to have the old keyless chuck replaced with a new one. | |
| Switch can't be pulled Forward | d/reverse selector button is positioned halfway | Press the button firmly into position for the desired direction of rotation. |
| Screw head slips or comes loose. | Bit number doesn't match with the screw size | Install a suitable bit. |
| The bit is worn Replace with a new bit. | ||
| Holes can't be smoothly drilled. | The drill is worn Replace with a new drill. | |
| Rotation speed isn't appropriate Adjust the rotation speed (HIGH/LOW) to match the material to be drilled. | ||
| The drill is rotating in reverse Switch to forward rotation. | ||
一般安全規則
警告
閱讀所有安全警告說明
natural_image
Line drawing of a hand using a drill bit to lift a tool, with no visible text or symbols圖 15
表 3
natural_image
Illustration of a hand using a drill bit to lift a mechanical component (no text or symbols visible)그림 15
표3
natural_image
Line drawing of a hand using a drill bit to lift a tool, with no visible text or symbolsHình 15
Bàng 3
natural_image
Line drawing of a hand using a drill bit to lift a motor (no text or symbols)รูปที่ 15
ตารางที่ 3
natural_image
Line drawing of a hand using a drill bit to lift a tool, with no visible text or symbolsGbr. 15
Tabel 3
natural_image
Illustration of a hand using a drill bit to lift a tool, with no visible text or symbols15 الشكل
2


5

8
9

2

10 11


12 13


DS18DBL2, DV18DBL2: Ls 500 /min
Hs
Ls 400 /min
Hs
natural_image
Line drawing of a quill pen with inkwell, no text or symbols present
natural_image
Line drawing of a quill pen with inkwell, no text or symbols presentKoki Holdings Co., Ltd.

- GENERAL POWER TOOL SAFETY WARNINGS
- WARNING
- 1) Work area safety
- 2) Electrical safety
- 3) Personal safety
- 4) Power tool use and care
- 5) Battery tool use and care
- 6) Service
- PRECAUTION
- CORDLESS DRIVER DRILL / IMPACT DRIVER DRILL SAFETY WARNINGS
- ADDITIONAL SAFETY WARNINGS
- CAUTION ON LITHIUM-ION BATTERY
- English
- Furthermore, please heed the following warning and caution. WARNING
- CAUTION
- REGARDING LITHIUM-ION BATTERY TRANSPORTATION
- SYMBOLS
- NOTE
- REACTIVE FORCE CONTROL
- LED LIGHT WARNING SIGNALS (Fig. 15)
- MAINTENANCE AND INSPECTION
- Inspecting the tool
- Inspecting the mounting screws
- Maintenance of the motor
- Cleaning on the outside
- Storage
- Important notice on the batteries for the HiKOKI cordless power tools
- TROUBLESHOOTING
- 一般安全規則
- 警告
Brand : HiKOKI
Model : DS14DBL2
Category : Drill