
K3E11 W O - Cooker INDESIT - Free user manual and instructions
Find the device manual for free K3E11 W O INDESIT in PDF.


| Product Type | Freestanding Electric Cooker |
| Brand | Indesit |
| Model | K3E11 W O |
| Oven Dimensions (HxWxD) | 38 x 34 x 39 cm |
| Oven Volume | 50 Litres |
| Max Oven Power Absorption | 2000 W |
| Hob Type | Electric Radiant Hotplates |
| Hotplate - Rapid 180 mm | 2000 W |
| Hotplate - Rapid 145 mm | 1500 W |
| Max Hob Power Absorption | 7000 W |
| Voltage & Frequency | 220-230V / 380-400V 3N AC 50/60 Hz |
| Oven Functions | Convection, Pastry, Top Heat, Grill |
| Oven Light | Yes, separate knob |
| Timer | Mechanical timer (120 min max) |
| Adjustable Feet | Yes, screw-in type |
| Warming Drawer | Present (internal dimensions 42x44x18 cm) |
| Energy Efficiency Class | Not specified (Convection mode rated) |
| Cleaning Method | Manual cleaning with warm water and mild detergent |
| Oven Lamp Replacement | 25W, 230V, E14 socket, high-temp resistant |
| Power Supply Cable | H05RR-F 3x4 (230V 1N) or 5x2.5 (400V 3N) |
| Safety Features | Earthing required, automatic cut-off via thermostat |
| Weight | Not specified (approx. 50-60 kg) |
| Spare Parts Availability | Original spare parts from authorized service centers |
| Warranty | Standard manufacturer warranty |
Frequently Asked Questions - K3E11 W O INDESIT
User questions about K3E11 W O INDESIT
0 question about this device. Answer the ones you know or ask your own.
Ask a new question about this device
Download the instructions for your Cooker in PDF format for free! Find your manual K3E11 W O - INDESIT and take your electronic device back in hand. On this page are published all the documents necessary for the use of your device. K3E11 W O by INDESIT.
USER MANUAL K3E11 W O INDESIT
Installation and use
Fornuis
natural_image
Diagram showing a mechanical assembly with directional arrows indicating motion, no text or symbols presentFig. A Fig. B

Fig. C Fig. D
220-230V/380-400V 3N AC 50/60 Hz
ENERGY LABEL
natural_image
Diagram showing two circular components with curved arrows indicating rotation or movement, connected by lines (no text or symbols)To maintain the EFFICIENCY and SAFETY of this appliance, we recommend:
- call only the Service Centers authorized by the manufacturer
• always use original Spare Parts
1 This appliance is intended for non-professional use within the home.
2 Before using your appliance, read the instructions in this owner's manual carefully since you will find all the instructions you require to ensure safe installation, use and maintenance. Always keep this owner's manual close to hand since you may need to refer to it in the future.
3 When you have removed the packing, check that the appliance is not damaged. If you have any doubts, do not use the appliance, contact your nearest Ariston Service Centre. Never leave the packing components (plastic bags, foamed polystyrene, nails, etc.) within the reach of children since they are a source of potential danger.
4 The appliance must be installed only by a qualified person in compliance with the instructions provided. The manufacturer declines all responsibility for improper installation which may harm persons and animals and damage property.
5 The electrical safety of this appliance can only be guaranteed if the cooker is correctly and efficiently earthed, in compliance with regulations on electrical safety. Always ensure that the earthing is efficient; if you have any doubts call in a qualified technician to check the system. The manufacturer declines all responsibility for damage resulting from a system which has not been earthed.
6 Before plugging the appliance into the mains, check that the specifications indicated on the date plate correspond to those of the electrical mains of your home.
7 Check that the electrical capacity of the system and sockets will support the maximum power of the appliance, as indicated on the data plate. If you have any doubts, call in a qualified technician.
8 An omnipolar switch with a contact opening of at least 3 mm or more, is required for the installation.
9 If the socket and appliance plug are not compatible, have the socket replaced with a suitable model by a qualified technician. The latter, in particular, will also have to ensure that the cross section of the socket cables are suitable for the power absorbed by the appliance. The use of adapters, multiple sockets and/or extensions, is not recommended. If their use cannot be avoided, remember to use only single or multiple adapters and extensions which comply with current safety regulations. In these cases, never exceed the maximum current capacity indicated on the single adapter or extension and the maximum power indicated on the multiple adapter.
10 Do not leave the appliance plugged in if it is not in use. Switch off the main switch when you are not using the appliance.
11 The openings and slots used for ventilation and dispersion of heat on the rear and below the control panel must never be covered.
12 The user must not replace the supply cable of this appliance. Always call an after-sales service centre authorised by the manufacturer in the event of cable damage or replacement.
13 This appliance must be used for the purpose for which it was expressly designed. Any other use (e.g. heating rooms) is considered to be improper and consequently dangerous. The manufacturer declines all responsibility for damage resulting from improper and irresponsible use.
14 A number of fundamental rules must be followed when
using electrical appliances. The following are of particular importance:
- do not touch the appliance when your hands or feet are wet
• do not use the appliance barefoot - do not use extensions, but if these are necessary caution must be exercised.
- never pull the power supply cable or the appliance to unplug the appliance plug from the mains.
- never leave the appliance exposed to atmospheric agents (rain, sun etc.)
- do not allow children or persons who are not familiar with the appliance to use it, without supervision.
15 Always unplug the hob from the mains or switch off the main switch before cleaning or carrying out maintenance operations.
16 If you are no longer using an appliance of this type, remember to make it unserviceable by unplugging the appliance from the mains and cutting the supply cable. Also make all potentially dangerous parts of the appliance safe, above all for children who could mistake it for a toy.
17 Do not forget that the cooking zone stays hot for at least half an hour after it has been turned off. Take care not to inadvertently place pans or items on the hot zone.
18 Do not turn the cooking zones on if there is any aluminium foil or plastic material on the hob.
19 Do not get too close to the hot hob.
20 When using small electric appliances near the hob, keep the power supply cable away from the hot parts.
21 Make sure you turn the handles of pots and pans inwards to avoid knocking them over accidentally.
22 Never leave a cooking zone on without a pan on it, as the zone would heat up almost immediately, causing damage to the heating elements.
23 Remember to keep children away from the appliance when you use the grill or oven, since these parts become very hot. Keep children well away.
24 Make sure the knobs are in the “•”/“o” position when the appliance is not in use.
25 If the cooker is placed on a pedestal, take the necessary precautions to prevent the same from sliding off the pedestal itself.
26. Clean the glass part of the oven door using a sponge and a non-abrasive cleaning product, then dry thoroughly with a soft cloth. Do not use rough abrasive material or sharp metal scrapers as these could scratch the surface and cause the glass to crack.
Installation
The following instructions should be read by a qualified technician to ensure that the appliance is installed, regulated and technically serviced correctly in compliance with current regulations.
Important: disconnect the cooker from the electricity when making any adjustment, maintenance operation, etc.
Positioning
The appliance can be installed next to furniture units which are no taller than the top of the cooker hob. For proper installation of the cooker, the following precautions must be taken:
a) Kitchen cabinets installed next to the cooker that are taller than the top of the hob must be situated at least 200 mm from the edge of the hob.
b) Hoods must be installed according to the requirements in the installation manual for the hoods themselves and in any case at a minimum distance of 650 mm.
c) Place the wall cabinets adjacent to the hood at a minimum height of 420 mm from the hob (see figure).
d) Should the cooker be installed beneath a wall cabinet, the latter should be situated at least 700 mm (millimetres) away from the hob, as shown in the figure.
e) the cut-out for the cooker cabinet should have the dimensions indicated in the figure.

Levelling your appliance (only on a few models)
Your cooker is supplied with feet for levelling the appliance. If necessary, these feet can be screwed into the housings in the corners of the cooker base (Fig. A).
Mounting the legs (only on a few models)
Press-fit legs are supplied which fit under the base of your cooker (Fig. B).

natural_image
Diagram showing a mechanical press or clamping mechanism with rotational arrows and a cylindrical component (no text or symbols)Fig. A Fig. B
Electrical connection
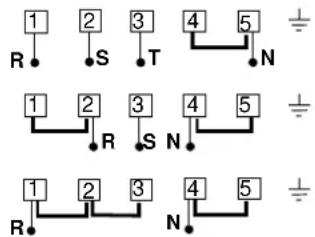
The power supply cable since its size depends on the electric connection (see the following connection diagram).

Feeding cable installation
Terminal block opening:
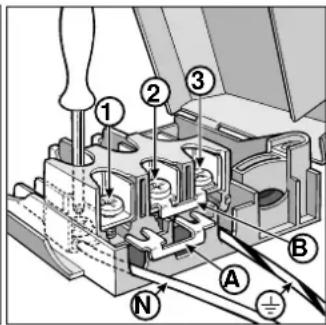
•Unscrew screw "V" (Fig. C)
•Pull and open the junction block lid
For the installation of the feeding cable carry out the following operations:
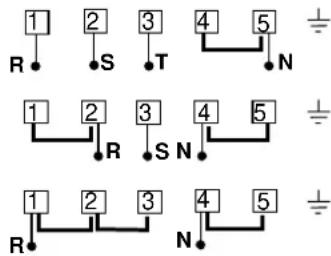
- position the small connection A-B according to the type of connection that has to be performed using the scheme shown in the figure D.
Note: the small connections are prepared by the Factory for the 230V monophase connection (contacts 1-2-3 are connected to one another). The bridge 4-5 is situated in the lower part of the terminal block.
- introduce the cables (N and ± ) as shown in the figure and tighten the relative screws.
- fix the remaining cables on the 1-2-3 clips.
- fix the feeding cable in the special cable stop and close the cover fastening it with the screw "V".

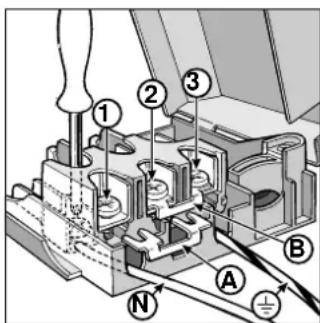
Fig. C Fig. D
Connecting the supply cable to the mains
Fit a plug, normalised for the load indicated on the data plate, on the cable; when making the connection directly to the mains, an omnipolar switch with a minimum opening of 3 mm between the contacts, must be installed between the appliance and the mains. This switch must be sufficient for the load and must comply to regulations in force (the earthing wire must not be interrupted by the switch). The power supply cable must be positioned so that it does not exceed 50°C more than room temperature at any point of its length. Before making the connection check that:
- the limiter valve and the home system can support the appliance load (see data plate);
- the power supply system has an efficient earthing connection which complies with the provisions of current regulations;
- the socket or omnipoar circuit-breaker is easily accessible once the cooker has been installed.
ture of more than 50°C with respect to the room temperature, anywhere along its length.
Before making the connection, check that:
- the limiter valve and the home system can support the appliance load (see data plate);
• the mains are properly earthed in compliance with current directives and regulations;
- there is easy access to the socket and omnipolar circuit breaker, once the hob has been installed.
Technical Characteristics
Oven
Dimensions (HxWxD): 38x34x39 cm
Volume: 50 Litres
Max. Oven Power Absorption: 2000 W
Innder dimensions of the plate plate warmer:
Width: 42 cm
Depth: 44 cm
Height: 18 cm
Electric Hob
Rapid ∅ 180 mm: 2000 W
Rapid ∅ 145 mm: 1500 W
Max. Electric Hob Power Absorption: 7000 W
Voltage and Frequency
220-230V/380-400V 3N AC 50/60 Hz
ENERGY LABEL
Directive 2002/40/EC on the label of electric ovens
Norm EN 50304
Declared energy consumption for Natural convection Class
heating mode: Convection

This appliance conforms with the following European Economic Community directives:
- 73/23/EEC of 19/02/73 (Low Voltage) and subsequent modifications;
- 89/336/EEC of 03/05/89 (Electromagnetic Compatibility) and subsequent modifications;
- 93/68/EEC of 22/07/93 and subsequent modifications.
Disposal of old electrical appliances
The European Directive 2002/96/EC on Waste Electrical and Electronic Equipment (WEEE), requires that old household electrical appliances must not be disposed of in the normal unsorted municipal waste stream. Old appliances must be collected separately in order to optimise the recovery and recycling of the materials they contain and reduce the impact on human health and the environment. The crossed out "wheeled bin" symbol on the product reminds you of your obligation, that when you dispose of the appliance it must be separately collected. Consumers may take their old appliance to public waste collection areas, other communal collection areas, or if national legislation allows return it to a retailer when purchasing a similar new product. All major household appliance manufacturers are active in the creation of systems to manage the collection and disposal of old appliances.
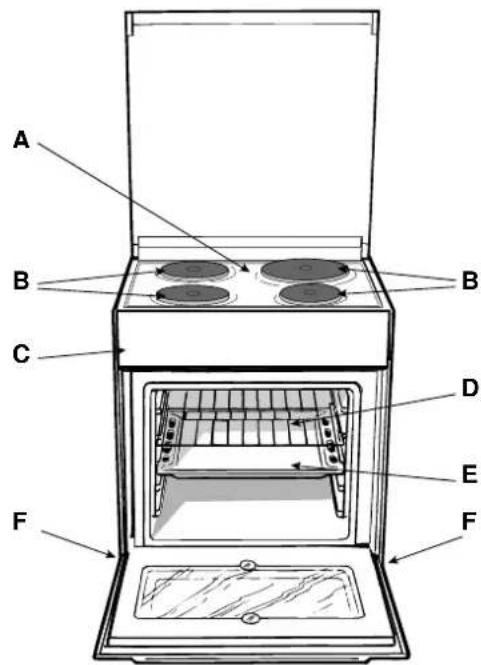
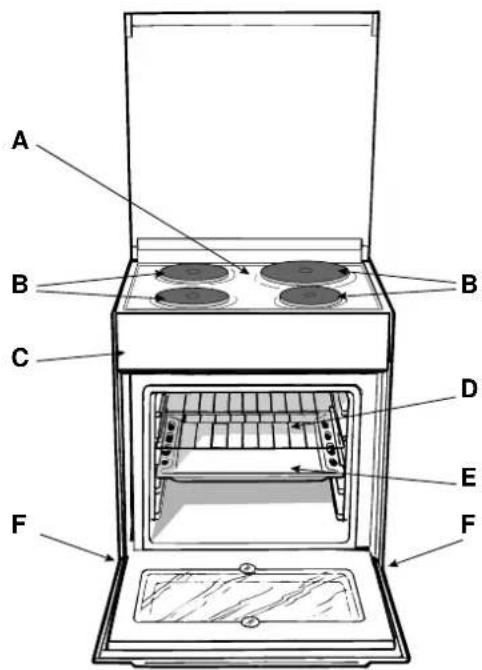
Cooker with electric oven

A Hob surface
B Electric hotplate
C Control Panel
D Oven Rack
E Dripping Pan or Baking Sheet
F Adjustable Feet
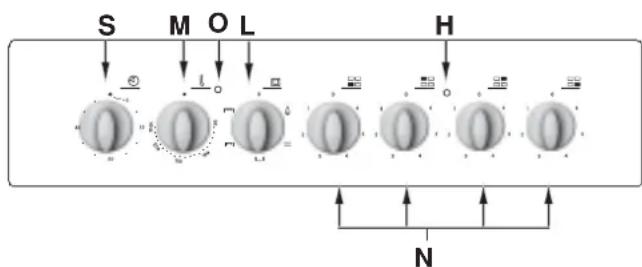
H Electric hotplate indicator light
L Selector Knob
M Thermostat Knob
N Electric hotplate control knobs
- Thermostat Light
S Timer Knob
flowchart
graph TD
    S --> A["Circle with 3D label"]
    M --> B["Circle with 2D label"]
    O --> C["Circle with 1D label"]
    L --> D["Circle with 4D label"]
    H --> E["Circle with 5D label"]
    N --> F["Circle with 6D label"]
How To Use Your Appliance
The various functions featured with the oven are controlled using the knobs and buttons on the control panel.
Notice: The first time you use your appliance, we recommend that you set the thermostat to the highest setting and leave the oven on for about half an hour with nothing in it, with the oven door shut. Then, open the oven door and let the room air. The odour that is often detected during this initial use is due to the evaporation of substances used to protect the oven during storage and until it is installed.
Attention: Only use the bottom shelf of the oven when using the rotisserie to cook (where present). For all other types of cooking, never use the bottom shelf and never place anything on the bottom of the oven when it is in operation because this could damage the enamel. Always place your cookware (dishes, aluminium foil, etc. etc.) on the grate provided with the appliance inserted especially along the oven guides.
Convection Mode
Position of thermostat knob "M": between 50°C and Max.
On this setting, the top and bottom heating elements come on. This is the classic, traditional type of oven which has been perfected, with exceptional heat distribution and reduced energy consumption. The convection oven is still unequalled when it comes to cooking dishes made up of several ingredients, e.g. cabbage with ribs, Spanish style cod, Ancona style stockfish, tender veal strips with rice, etc. Excellent results are achieved when preparing veal or beef-based dishes as well (braised meats, stew, goulash, wild game, ham etc.) which need to cook slowly and require basting or the addition of liquid. It nonetheless remains the best system for baking cakes as well as fruit and cooking using covered casserole dishes for oven baking. When cooking in convection mode, only use one dripping pan or cooking rack at a time, otherwise the heat distribution will be uneven. Using the different rack heights available, you can balance the amount of heat between the top and the bottom of the oven. Select from among the various rack heights based on whether the dish needs more or less heat from the top.
Pastry Mode | \_ |
Position of thermostat knob "M": Between 50°C and Max. The bottom heating element comes on.
This mode is ideal for baking and cooking delicate foods - especially cakes that need to rise because the heat coming from the bottom helps the leavening process.
Please note that it takes a considerable amount of time for the higher temperatures to be reached, therefore we recommend you use the “Convection Mode” in these cases.
"Top" Oven
Position of thermostat knob "M": Between 50°C and Max. The top heating element comes on.
This mode can be used to brown food at the end of cooking.
Grill
Position of thermostat knob "M": Max
The top central heating element comes on.
The extremely high and direct temperature of the grill makes it possible to brown the surface of meats and roasts while locking in the juices to keep them tender. The grill is also
highly recommended for dishes that require a high temperature on the surface: beef steaks, veal, rib steak, filets, hamburgers etc...
Some grilling examples are included in the “Practical Cooking Advice” paragraph.
The oven light
Set knob "L" to the 🔒 symbol to turn it on. It lights the oven and stays on when any of the electrical heating elements in the oven come on.
Thermostat Light (O)
This light indicates that the oven is heating. When it turns off, the temperature inside the oven has reached the setting made with the thermostat knob. At this point, the light will turn on and off as the oven maintains the temperature at a constant level.
Timer Knob (S)
In order to use the timer, it must be wound by turning the "S" knob almost one complete turn in the clockwise direction
○. Then, turning it back ⏻ set the desired time by lining up the number for the minutes with the mark on the control panel.
The control knobs for the hob electric hotplates (N)
The cookers can be fitted with normal and rapid electric hotplates in a variety of combinations (the rapid hotplates can be distinguished from the rest by the red boss in the centre of the same). To avoid any heat loss and damage to the hotplates, we advise you to use pans with a flat bottom, with a diameter which matches that of the hotplate itself. The table contains the different settings indicated on the knobs and the use for which the hotplates are recommended.
| Setting | Normal or Fast Plate |
| 0 | Off |
| 1 | Cooking vegetables, fish |
| 2 | Cooking potatoes (using steam) soups, chickpeas, beans. |
| 3 | Continuing the cooking of large quantities of food, minestrone |
| 4 | For roasting (average) |
| 5 | For roasting (above average) |
| 6 | For browning and reaching a boil in a short time. |
Before using the hotplates for the first time, you should heat them at maximum temperature for approximately 4 minutes, without any pans. During this initial stage, their protective coating hardens and reaches its maximum resistance.
Electric hotplate indicator light (H)
This light comes on when any of the electrical hotplates on a hob which features electric hotplates have been turned on.
Practical Cooking Advice
When cooking in the oven, use only one dripping pan or rack at a time. Select from among the top or bottom rack heights based on whether the dish needs more or less heat from the top.
Preheating
If the oven must be preheated (this is generally the case when cooking leavened foods), we recommend you use the “convection mode” to reach the desired temperature as quickly as possible. When preheating is over, which is indicated by the red light “E” going out, select the required cooking mode.
Cooking Fish and Meat
When cooking white meat, fowl and fish, use temperature settings from 180 °C to 200 °C.
For red meat that should be well done on the outside while tender and juicy in the inside, it is a good idea to start with a high temperature setting (200°C-220°C) for a short time, then turn the oven down afterwards.
In general, the larger the roast, the lower the temperature setting. Place the meat on the centre of the grid and place the dripping pan beneath it to catch the fat.
Make sure that the grid is inserted so that it is in the centre of the oven. If you would like to increase the amount of heat from below, use the low rack heights. For savoury roasts (especially duck and wild game), dress the meat with lard or bacon on the top.
Baking Cakes
When baking cakes, always preheat the oven and do not open the oven door during baking to prevent the cake from dropping. In general:
Pastry dropped
Use less liquid or lower the temperature by 10° C.
Pastry is too dark on top
Place it on a lower rack, lower the temperature, and increase the cooking time.
Cooked well on the inside but sticky on the outside
Use less liquid, lower the temperature, and increase the cooking time.
The pastry sticks to the pan
Grease the pan well and sprinkle it with a dusting of flour.
I used more than one level and they are not all at the same cooking point
Use a lower temperature setting. It is not necessary to remove the food from all the racks at the same time.
Using the Grill
Use the |\~\~\~|“grill” mode, placing the food under the centre of the grill (situated on the 3rd or 4th rack form the bottom) because only the central part of the top heating element is turned on.
Use the bottom rack (1st from the bottom), placing the dripping pan provided to collect any sauce and/or grease and prevent the same from dripping onto the oven bottom.
When using this mode, we recommend you set the thermostat to the highest setting. However, this does not mean you cannot use lower temperatures, simply by adjusting the thermostat knob to the desired temperature.
Important: always use the grill with the oven door shut. This will allow you both to obtain excellent results and to save on energy (approximately 10%).
Therefore the best results when using the grill modes are obtained by placing the grid on the lower racks (see cooking table) then, to prevent fat and grease from dripping onto the bottom of the oven and smoke from forming, place a dripping-pan on the 1st oven rack from the bottom.
| Selector knob setting | Food to be cooked Weight (in kg) | Cooking rack position from bottom | Preheating time (minutes) | Thermostat knob setting | Cooking time (minutes) | |
| 1 Convection | Duck | 1 | 3 | 15 | 200 | 65-75 |
| Roast veal or beef | 1 | 3 | 15 | 200 | 70-75 | |
| Pork roast | 1 | 3 | 15 | 200 | 70-80 | |
| Biscuits (short pastry) | - | 3 | 15 | 180 | 15-20 | |
| Tarts | 1 | 3 | 15 | 180 | 30-35 | |
| Lasagne | 1 | 3 | 10 | 190 | 35-40 | |
| Lamb | 1 | 2 | 10 | 180 | 50-60 | |
| Mackerel | 1 | 2 | 10 | 180 | 30-35 | |
| Plum-cake | 1 | 2 | 10 | 170 | 40-50 | |
| Cream puffs | 0.3 | 3 | 10 | 180 | 30-35 | |
| Sponge-cake | 0.5 | 3 | 10 | 170 | 20-25 | |
| Savoury pies | 1.5 | 3 | 15 | 200 | 30-35 | |
| 2 Pastry Mode |—| | Raised Cakes | 0,5 | 3 | 15 | 160 | 30-40 |
| Tarts | 1 | 3 | 15 | 180 | 35-40 | |
| Fruit cakes | 1 | 3 | 15 | 180 | 50-60 | |
| Brioches | 0,5 | 3 | 15 | 160 | 25-30 | |
| 3 Top Oven |▼▼| | Browning food to perfect cooking | - 3/4 | 15 220 - | |||
| 4 Grill |▼▼| | Soles and cuttlefish | 1 | 4 | 5 | Max | 8-10 |
| Squid and prawn kebabs | 1 | 4 | 5 | Max | 6-8 | |
| Cod filet | 1 | 4 | 5 | Max | 10 | |
| Grilled vegetables | 1 | 3/4 | 5 | Max | 10-15 | |
| Veal steak | 1 | 4 | 5 | Max | 15-20 | |
| Cutlets | 1 | 4 | 5 | Max | 15-20 | |
| Hamburgers | 1 | 4 | 5 | Max | 7-10 | |
| Mackerels | 1 | 4 | 5 | Max | 15-20 | |
| Toasted sandwiches | n.° 4 | 4 | 5 | Max | 2-3 | |
NB: cooking times are approximate and may vary according to personal taste. When cooking using the grill, the dripping pan must always be placed on the 1st oven rack from the bottom.
Routine Maintenance and Cleaning
Before each operation, disconnect the appliance from the electrical power supply. To ensure that the appliance lasts a long time, it must be thoroughly cleaned frequently, keeping in mind that:
•do not use steam equipment to clean the appliance
- the enamelled parts and the self-cleaning panels, where present, are washed with warm water without using any abrasive powders or corrosive substances which could ruin them;
- the inside of the oven should be cleaned fairly often while it is still warm, using warm water and detergent followed by careful rinsing and drying;
•the electric hotplates should be cleaned with a damp cloth and lubricated with a little oil while still warm;
•stainless steel may become marked if it comes into contact with very hard water or harsh detergents (containing phosphorous) for long periods of time. After cleaning, it is advisable to rinse thoroughly and dry. It is also recommended that drops of water be dried;
Warning: never place hot containers or items and flammable materials inside the dishwarmer drawer.
! The internal surfaces of the compartment (where present) may become hot.
N.B.: Avoid closing the cover while the electric plates are still warm. Remove any liquid from the lid before opening it.
Replacing the Oven Lamp
- Disconnect the oven from the power supply by means of the omnipolar switch used to connect the appliance to the electrical mains; or disconnect the plug if it is accessible.
- Remove the glass cover of the lamp-holder.
-
Remove the lamp and replace it with a lamp resistant to high temperatures (300°C) with the following specifications:
-
Voltage: 230V
- Wattage: 25W
- Socket: E14
-Replace the glass cover and connect the oven to the mains.

natural_image
Diagram of a mechanical or fluidic component with circular features and directional arrows, no text or symbols present.Belangrijk
natural_image
Mechanical assembly diagram showing a cylindrical component being inserted into a housing, with motion arrows indicating rotation (no text or symbols present)Afb. A Afb. B
380-400V 3N\~ H05RR-F 5x2.5 CEI-UNEL 35363
380-400V 2N\~ H05RR-F 4x4 CEI-UNEL 35363
220-230V 1N\~ H05RR-F 3x4 CEI-UNEL 35363

Afb. C Afb. D
220-230V/380-400V 3N AC 50/60 Hz
ENERGY LABEL
flowchart
graph TD
    S --> A["Circle with 'O'"]
    M --> B["Circle with 'L'"]
    O --> C["Circle with 'H'"]
    L --> D["Circle with 'N'"]
    H --> E["Circle with 'O'"]
    N --> F["Circle with 'N'"]
    A --> G["Arrow to circle"]
    B --> H
    C --> I["Arrow to circle"]
    D --> J["Arrow to circle"]
    E --> K["Arrow to circle"]
    F --> L["Arrow to circle"]
Gebruiksaanwijzing
natural_image
Pure technical diagram showing two circular components with directional arrows, no text or symbols presentKooktips
natural_image
Diagram showing a mechanical assembly with directional arrows indicating motion, no text or symbols presentA ábra B ábra
380-400V 3N\~ H05RR-F 5x2.5 CEI-UNEL 35363
380-400V 2N\~ H05RR-F 4x4 CEI-UNEL 35363
220-230V 1N\~ H05RR-F 3x4 CEI-UNEL 35363

C ábra D ábra
220-230V/380-400V 3N AC 50/60 Hz
ENERGIA BESOROLÁS
Hungary Representative Office
H- 1072 Budapest (Hungary)
natural_image
Diagram of a mechanical component with rotating parts and directional arrows (no text or symbols)natural_image
Mechanical assembly diagram showing a cylindrical component being inserted into a housing, with motion arrows indicating rotation (no text or symbols present)Obr. A Obr. B
Elektrické zapojení
380-400V 3N\~ H05RR-F 5x2.5 CEI-UNEL 35363
380-400V 2N\~ H05RR-F 4x4 CEI-UNEL 35363
220-230V 1N\~ H05RR-F 3x4 CEI-UNEL 35363

Obr. C Obr. D
220-230V/380-400V 3N AC 50/60 Hz
ENERGETICKÝ ŠTÍTEK
flowchart
graph TD
    S --> A["Circle with ①"]
    M --> B["Circle with ②"]
    O --> C["Circle with ③"]
    L --> D["Circle with ④"]
    H --> E["Circle with ⑤"]
    N --> F["Circle with ⑥"]
Pokyny pro použití
natural_image
Diagram showing two circular components with a curved arrow indicating rotation or movement (no text or symbols)- ENERGY LABEL
- Installation
- Positioning
- Levelling your appliance (only on a few models)
- Mounting the legs (only on a few models)
- Electrical connection
- Feeding cable installation
- Connecting the supply cable to the mains
- Technical Characteristics
- Oven
- Innder dimensions of the plate plate warmer:
- Electric Hob
- Voltage and Frequency
- This appliance conforms with the following European Economic Community directives:
- Cooker with electric oven
- How To Use Your Appliance
- Convection Mode
- Pastry Mode | \_ |
- "Top" Oven
- Grill
- The oven light
- Thermostat Light (O)
- Timer Knob (S)
- The control knobs for the hob electric hotplates (N)
- Electric hotplate indicator light (H)
- Practical Cooking Advice
- Preheating
- Cooking Fish and Meat
- Baking Cakes
- Pastry dropped
- Pastry is too dark on top
- Cooked well on the inside but sticky on the outside
- The pastry sticks to the pan
- I used more than one level and they are not all at the same cooking point
- Using the Grill
- Routine Maintenance and Cleaning
- Replacing the Oven Lamp
- Belangrijk
- Gebruiksaanwijzing
- Kooktips
- ENERGIA BESOROLÁS
- Elektrické zapojení
- ENERGETICKÝ ŠTÍTEK
- Pokyny pro použití
Brand : INDESIT
Model : K3E11 W O
Category : Cooker