
IAN 61339 - Uncategorized FLORABEST - Free user manual and instructions
Find the device manual for free IAN 61339 FLORABEST in PDF.


| Product Type | Charcoal Trolley Barbecue |
| Brand | Florabest |
| Model | IAN 61339 |
| Dimensions (assembled) | Approx. 83 x 86.5 x 43.5 cm |
| Weight | Approx. 7 kg |
| Grill Grate Size | Approx. 48.3 x 28.3 cm |
| Firebowl Capacity | Approx. 1 kg charcoal |
| Fuel Type | Charcoal |
| Intended Use | Outdoor domestic grilling only |
| Assembly Required | Yes |
| Included Accessories | Barbecue skewer with 2 racks, wooden handle, 3 wind protectors, grill grate with 2 handles, 5 long storage slats, 3 short storage slats, axle, 2 wheels, wheel braces, stand braces, cross braces, reinforcing braces, storage holders |
| Tools Required for Assembly | Hammer, Philips screwdriver, open-ended spanners SW 8 mm and SW 13 mm |
| Safety Features | Stable stand, warning against moving when hot, use of ignition aids per EN1860-3, no water to extinguish |
| Cleaning Instructions | Cool completely, use mild detergent and water, avoid abrasive cleaners |
| Disposal | Dispose of ash in metal containers, recycle through approved center |
| Warranty | 3 years from purchase date (private use only) |
| Service Contact (UK) | Tel: 0871 5000 700, Email: support.uk@kompernass.com |
| Service Contact (Ireland) | Tel: 1850 930 412, Email: support.ie@kompernass.com |
| Service Contact (Cyprus) | Tel: 800 9 44 01, Email: support.cy@kompernass.com |
| Importer | Kompernass GmbH, Burgstrasse 21, 44867 Bochum, Germany |
| Manual Languages | English, German, Greek, Romanian, Bulgarian, Croatian, etc. (multilingual) |
Frequently Asked Questions - IAN 61339 FLORABEST
User questions about IAN 61339 FLORABEST
0 question about this device. Answer the ones you know or ask your own.
Ask a new question about this device
Download the instructions for your Uncategorized in PDF format for free! Find your manual IAN 61339 - FLORABEST and take your electronic device back in hand. On this page are published all the documents necessary for the use of your device. IAN 61339 by FLORABEST.
USER MANUAL IAN 61339 FLORABEST
Trolley Barbecue FGW 84 A1


natural_image
Outdoor picnic setup with two roasted chicken on a metal grill, surrounded by bread and vegetables (no text or symbols visible)Trolley Barbecue
Assembly and Operating Instructions
Roštilj s kotačima
Upute za montažu i rukovanje
Gratar pe roti
Index
Introduction 2
Information for these operating instructions....2
Copyright....2
Intended use 2
Safety....3
Basic Safety Instructions.... 3
Items supplied 4
Connection elements 4
Assembly 4
Preparing for assembly 4
Required assembly material.... 5
Initial use 9
Cleaning and Care 9
Disposal 10
Technical data 10
Appendix....11
Warranty 11
Service....11
Importer....11
Introduction
Information for these operating instructions
These operating instructions are a component of the Trolley Barbeque FGW 84 A1 (hereafter designated as the appliance) and they supply you with important information about the intended use, safety and assembly as well as operation of the appliance.
The operating instructions must constantly be kept available close to the appliance. They are to be read and applied by everyone occupied with operating the appliance.
Retain these operating instructions and pass them on, with the appliance, to any future owner.
Copyright
This documentation is copyright protected.
All reproductions or duplications, also as extracts, as well as representations of the illustrations, even in an altered state, are only permitted with the written approval of the manufacturer.
Intended use
This trolley barbecue is intended exclusively for the preparation of grilled foods. It is suitable only for use outdoors. This trolley barbecue is intended for use only in domestic environments, not for commercial applications.
No liability will be accepted for damage resulting from incorrect or improper usage, the application of force or unauthorised modifications.
WARNING
Risks from unintended use!
Risks can arise if the appliance is used for unintended purposes and/or other types of use.
Use the appliance exclusively for its intended purposes.
Observe the procedures described in these operating instructions.
The manufacturer assumes no responsibility for damage caused by improper use, inappropriate repairs, making unauthorised changes or for using unapproved replacement parts.
The operator alone bears liability.
Safety
In this chapter you will receive important safety information regarding handling of the appliance.
This appliance complies with the statutory safety regulations.
Incorrect usage can lead to personal injury and property damage.
Basic Safety Instructions
WARNING
Warnings about burns!
When it is in use, ensure that the trolley barbecue is standing on a firm and solid surface, otherwise it could tip over.
IMPORTANT! During use the trolley barbecue will become very hot and therefore may not be moved, otherwise it could tip over.
When grilling, wear appropriate grilling gloves and use a grilling tong.
NEVER leave a heated up grill unsupervised. Keep children and pets well away from a hot grill.
Allow the trolley barbecue to cool down completely before cleaning it.
Caution! For igniting and reigniting, do not use spiritus, petrol or similar liquids! Use only ignition aids complying with EN1860-3. The defl agration could cause an uncontrollable development of heat.
NEVER use water to extinguish the glowing charcoal.
WARNING
Warning in regard to suff ocation!
Use the trolley barbecue ONLY outdoors!
▶ Do not operate the trolley barbeque in indoor rooms or roofed-over areas.
GB CY
Items supplied
1 x Barbecue skewer (incl. 2 x barbecue racks and 1 x wooden handle)
2 1 x Wind protector, left
3 1 x Wind protector, middle
4 1 x Wind protector, right
5 1 x Grill grate (including 2 handles)
6 1 x Firebowl
7 1 x Handle
8 2 x Handle holder, short
9 2 x Stand braces
10 2 x Cross braces
11 5 x Storage slats, long
12 2 x Wheels
13 1 x Axle
14 2 x Wheel brace
15 2 x Storage holder, long
16 2 x Reinforcing braces
17 3 x Storage slats, short
Connection elements
 | [40KC] |  |  |  |  |  |
| M5x10 | M5x12 | ∅4x10 | M5 | M8 | ∅5.4 | M4x10 |
| 25x | 22x | 2x | 47x | 2x | 47x | 2x |
Assembly
Preparing for assembly
Allow yourself plenty of time for the assembly of the trolley barbecue. Secure a level workplace of about two to three square meters. Remove all individual items from the packaging and place them where they are conveniently handy. Check the items to ensure that that they are all present and without any damage.
Required assembly material
 | Hammer |
 | Philips-type screwdriver |
 | Open-ended spanners SW 8 mm, SW 13 mm |
IMPORTANT
To avoid possible injury, the screw heads should always face outwards. First tighten all screw connections down when the assembly is complete, this will help avoid undesirable material tensions.
Step 1
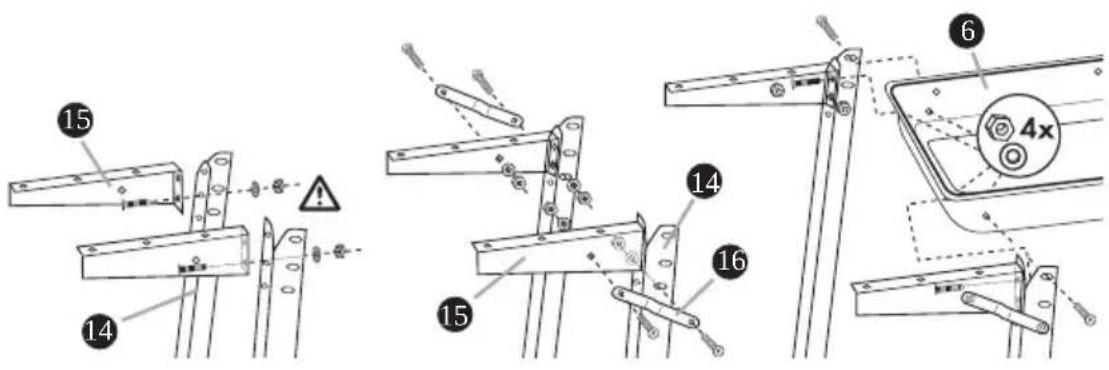
Connect the storage holder 15 with the wheel brace 14 by means of the washers 5.4, M5 x 10 screws and nuts M5.

Please take note that only the lower hole of the storage holdel5 is to be used for the screws.
Secure the reinforcing braces 16 with the wheel braces 14 by means of the washers ∅ 5.4, M5 x 10 screws and nuts M5. Secure the reinforcing braces 16 with the storage holders 15 by means of the washers ∅ 5.4, M5 x 10 screws and nuts M5.
Assemble the wheel braces 14, with the assembled storage holder 15, to the left of the fire bowl 6 by means of the washers ∅ 5.4, 2 M5×12 screws and nuts M5. For this, use the upper hole in the wheel braces 14.
Step 2
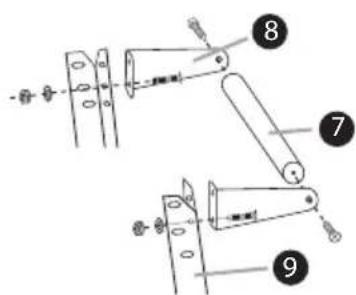
Assemble the handle holder 8 and stand braces 9 as described in step 1. Fix the handle 7 between the short handle holders 8 and then secure them by means of the wood screws ∅ 4 x 10.
Assemble the stand braces ⑨, with the assembled handle, to the right of the fire bowl ⑥ by means of M5 x 12 screws, washers ∅ 5.4, M5x10 screws and nuts M5. For this, use the upper hole in the stand braces ⑨.

Step 3
Place the cross braces 10 , with the 5 holes upwards, between the wheel braces 14 and the stand braces 9 . Screw these together by means of the washers ∅ 5.4, M5 x 10 screws and nuts M5.
Fix the fi ve storage slats11 to the cross braces 10. Screw these together by means of the washers ∅ 5.4, M5x12 screws and nuts M5.

Step 4
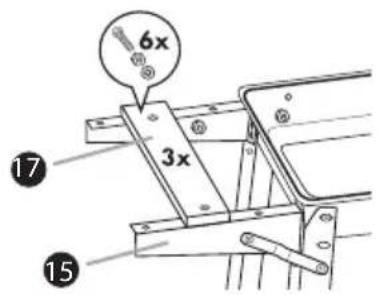
Assemble the three storage slats 17 on the storage holder 15 by means of the washers ∅ 5.4, M5×12 screws and nuts M5.

Step 5
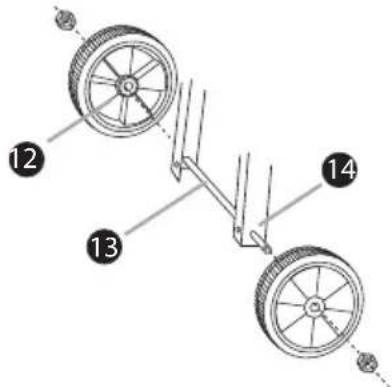
Guide the axle 13 through the lower boreholes on the wheel braces 14 and secure the placed-on wheels 12 with the self-securing nuts M8.

Step 6
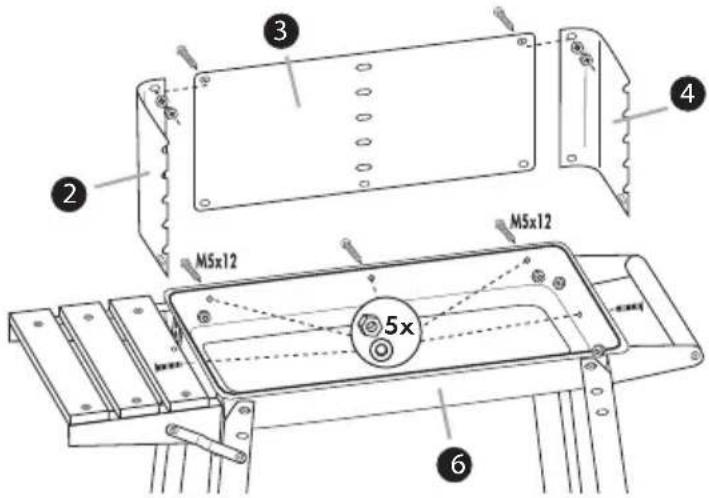
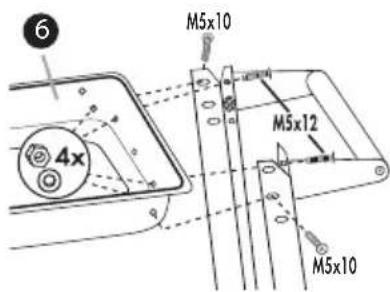
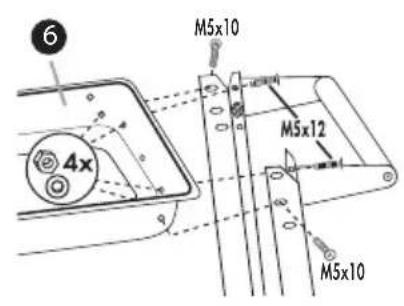
Secure the wind protector elements 2 3 4 with 2 M5x10 screws, washers ∅ 5.4 and nuts M5 (only at the top). When done, screw the wind protector elements 2 3 4 from inside onto the fi rebowl 6 by means of the washers ∅ 5.4, 2 M5 x 12 screws, 3 M5 x 10 screws and nuts M5.
Step 7
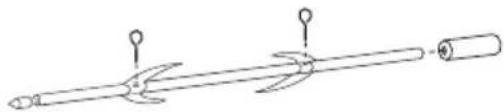
Secure the wooden grip onto the rear part of the skewer (straight edge) with light hammer blows. Slide the barbecue racks onto the skewer. Secure the barbeque racks with the eye screws M4 x 10.

natural_image
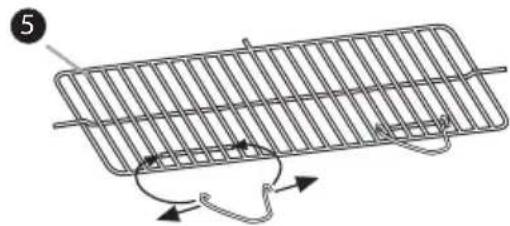
Line drawing of a mechanical tool with two blades and a cylindrical end (no text or symbols)Assemble the two handles onto the grill grate 5.
natural_image
Diagram of a wire mesh structure with curved arrows indicating motion or force direction (no text or symbols)Step 8
Place the grill grate 5 and the skewer garniture 1 into the wind protector 2 3 4 .
To fi nish the assembly, tighten all screw connections fi rmly.

Initial use
NOTICE
Before the first use, the grill must be warmed up for at least 30 minutes.
WARNING
Warnings about burns!
Warning! For igniting and reigniting, do not use spiritus, petrol or similar liquids! Use only ignition aids complying with EN1860-3. The defl agration could cause an uncontrollable development of heat.
Build up a small pile of charcoal in the firebowl.
Ignite one or two fi relighters with a match or cigarette lighter then lay them on the charcoal pile.
Allow the fi relighters to burn for 2 to 4 minutes. Then slowly start fi lling the fi rebowl with charcoal.
After about 20 minutes the charcoal will display a white coating of ash. ■ The optimal burning temperature has now been reached.
Distribute the charcoal, using a suitable metallic implement, evenly in the fi rebowl.
Insert the grill grate and start the barbecue.
Cleaning and Care
WARNING
Warnings about burns!
Before cleaning it or putting it into storage, allow the trolley barbecue to cool down completely. NEVER use water to extinguish the glowing charcoal.
IMPORTANT
Do not use abrasive or aggressive cleaning agents, they can damage the enamelled pieces..
For normal cleaning, use a cloth and water with standard detergent.
For heavy soiling on the enamelled parts, use a standard commercial enamel cleaner. Pay heed to the instructions supplied by the manufacturer of the cleaning agent being employed. Clean the grill grate with detergent and a household sponge.
Disposal
Dispose of fl ammable materials carefully and with regard to the environment. Fundamentally dispose of remaining waste ONLY into containers made of metal and intended for this purpose or made of non-fl ammable materials.
Dispose of the Trolley Barbecue through an approved waste disposal centre or at your community waste facility. Observe the currently applicable regulations. In case of doubt, please contact your waste disposal centre.
Dispose of all packaging materials in an environmentally friendly manner.

Technical data
Dimensions (assembled) approx. 83 x 86,5 x 43,5 cm
Grill grate approx. 48,3 x 28,3 cm
Weight approx. 7 kg
Firebowl capacity approx. 1 kg
Appendix
Warranty
You receive a 3-year warranty for this appliance as of the purchase date. This appliance has been manufactured with care and meticulously examined before delivery.
Please retain your receipt as proof of purchase. In the case of a warranty claim, please make contact by telephone with our service department. Only in this way can a post-free despatch for your goods be assured.
NOTICE
The warranty covers only claims for material and manufacturing defects, not for transport damages, wearing parts or for damage to fragile components, e.g. switches.
This product is for private use only and is not intended for commercial applications. In the event of misuse and improper handling, use of force and interference not carried out by our authorized service branch, the warranty will become void.
Your statutory rights are not restricted in any way by this warranty. The warranty period will not be extended as a result of repairs made under warranty. This applies also to replaced and repaired parts.
Damages and defects discovered on purchase are to be reported directly after unpacking, at the latest two days after the date of purchase.
On the lapse of the warranty period, all repairs carried out are liable to charges.
Service
GB DES UK LTD
Tel.: 0871 5000 700 (£ 0.10 / minute)
E-Mail: support.uk@kompernass.com
IE Kompernass Service Ireland
Tel: 1850 930 412 (0,082 EUR/Min.)
Standard call rates apply. Mobile operators may vary.
E-Mail: support.ie@kompernass.com
CY Kompernass Service Cyprus
Tel: 800 9 44 01
E-Mail: support.cy@kompernass.com
Importer
KOMPERNASS GMBH
BURGSTRASSE 21
44867 BOCHUM, GERMANY
www.kompernass.com
Sadržaj
Uvod....14
Informacije u vezi sa ovim uputama za rukovanje 14
Autorsko pravo 14
Korak 2

Korak 3
Postavite poprečne potpornjake 10 , sa 5 otvora okrenutih prema gore, između potpornjake kotača 14 i stajaće potpornjake 9 . Spajanje izvršite uz pomoć podložnih pločica ∅5.4, vijaka M5x10 i matica M5.
Fiksirajte pet dasaka za odlaganje 11 na poprečnim potpornjacima 10. Vijčano ih spojite uz pomoć podložnih pločica ∅5.4, M5x12 vijaka i matica M5.

Korak4
Montirajte tri daske za odlaganje 17 na držače 15 uz pomoć podložnih pločica 5.4 , M5x12 vijaka i matica M5.
Korak 5
Postaviteosovinu 13 kroz donje otvore potpornjaka za kotače 14 i osigurajte postavljene kotače 12 uz pomoć samoosiguravajućih matica M8.
Korak 6
HR
Korak 7
Učvrstite drveni rukohvat na stražnjem dijelu bodeža, (ravna ivica), blagim udarcima čekića. Gurnite stezaljke za meso na bodež. Fiksirajte stezaljke za meso uz pomoć ušičastih vijaka M4x10.
natural_image
Simple line drawing of a tool with three blades and a handle, no text or symbols presentPričvrstite dva rukohvata na rešetku 5.

natural_image
Diagram of a wire mesh structure with curved arrows indicating motion or force direction (no text or symbols)Korak 8
Umetnite rešetku roštilja 5 i garnituru bodeža 1 vjetrobran 2 3 4. Na koncu montaže sve vijčane spojeve čvrsto zategnite.

Puštanje u rad
NAPOMENA
RO
Pasul 2
Pasul 3
Pasul 6
Pasul 7
natural_image
Simple line drawing of a tool with two handles and a handle, no text or symbols presentnatural_image
Diagram of a wire mesh structure with curved arrows indicating motion or force direction (no text or symbols)Pasul 8
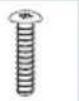 |  | [8K6B] | | [D43B] |  | [0HKT] |
| M5x1025 6p. | M5x1222 6p. | ∅ 4x10² 6p. | M547 6p. | M82 6p. | ∅ 5,447 6p. | M4x102 6p. |
Монтаж
Стъпка 2

Стъпка 3
Стъпка 6
Стъпка 7
natural_image
Simple line drawing of a tool with three blades and a handle, no text or symbols presentnatural_image
Diagram of a wire mesh structure with curved arrows indicating motion or force direction (no text or symbols)Стъпка 8
Употреба
УКАЗАНИЕ
Βήμα 2

Βήμα 3
Βήμα 6
Βήμα 7
natural_image
Simple line drawing of a tool with three blades and a handle, no text or symbols presentnatural_image
Diagram of a wire mesh structure with curved arrows indicating motion or force direction (no text or symbols)Βήμα 8
Θέση σε λειτουργία
ΥΠΟΔΕΙΞΗ
(local charge 0,031 EUR/minute (including VAT 19 %))
E-Mail: support.gr@kompernass.com

Kompernass Service Cyprus
Tel: 800 9 44 01
E-Mail: support.cy@kompernass.com
Εισαγωγέας
KOMPERNASS GMBH
BURGSTRASSE 21
44867 BOCHUM, GERMANY
www.kompernass.com
Inhaltsverzeichnis
Einführung 62
Schritt 2
Schritt 3
Schritt 6
Schritt 7
natural_image
Simple line drawing of a tool with three blades and a handle, no text or symbols presentnatural_image
Diagram of a wire mesh structure with curved arrows indicating motion or force direction (no text or symbols)Schritt 8
Inbetriebnahme
HINWEIS


- Trolley Barbecue FGW 84 A1
- Index
- Introduction 2
- Safety....3
- Items supplied 4
- Assembly 4
- Initial use 9
- Cleaning and Care 9
- Disposal 10
- Technical data 10
- Appendix....11
- Introduction
- Information for these operating instructions
- Copyright
- Intended use
- WARNING
- Risks from unintended use!
- Safety
- Basic Safety Instructions
- Warnings about burns!
- Warning in regard to suff ocation!
- GB CY
- Items supplied
- Connection elements
- Assembly
- Preparing for assembly
- Required assembly material
- IMPORTANT
- Step 1
- Step 2
- Step 3
- Step 4
- Step 5
- Step 6
- Step 7
- Step 8
- Initial use
- NOTICE
- Cleaning and Care
- Disposal
- Technical data
- Appendix
- Warranty
- Service
- Importer
- Sadržaj
- Uvod....14
- Korak 2
- Korak 3
- Korak4
- Korak 5
- Korak 6
- Korak 7
- Korak 8
- Puštanje u rad
- NAPOMENA
- Pasul 2
- Pasul 3
- Pasul 6
- Pasul 7
- Pasul 8
- Монтаж
- Стъпка 2
- Стъпка 3
- Стъпка 6
- Стъпка 7
- Стъпка 8
- Употреба
- УКАЗАНИЕ
- Βήμα 2
- Βήμα 3
- Βήμα 6
- Βήμα 7
- Βήμα 8
- Θέση σε λειτουργία
- ΥΠΟΔΕΙΞΗ
- Εισαγωγέας
- Inhaltsverzeichnis
- Einführung 62
- Schritt 2
- Schritt 3
- Schritt 6
- Schritt 7
- Schritt 8
- Inbetriebnahme
- HINWEIS
Brand : FLORABEST
Model : IAN 61339
Category : Uncategorized