
SC44E1 - Vacuum Cleaner SAMSUNG - Free user manual and instructions
Find the device manual for free SC44E1 SAMSUNG in PDF.


| Product Type | Canister Vacuum Cleaner |
| Model | Samsung SC44E1 |
| Dimensions (L x W x H) | 4.6 x 2.4 x 3.5 m |
| Weight | 5.7 kg |
| Power Consumption | 2000 W |
| Dust Capacity | 2.0 L |
| Filtration System | HEPA Washable Filter |
| Bagless | Yes |
| Cord Length | 6.0 m |
| Noise Level | 75 dB |
| Suction Control | Variable (Electronic) |
| Accessories Included | Crevice Tool, Dusting Brush, Upholstery Nozzle |
| Power Cord Type | Automatic Rewind |
| Motor Type | Carbon Brush |
| Warranty | 2 Years |
Frequently Asked Questions - SC44E1 SAMSUNG
User questions about SC44E1 SAMSUNG
0 question about this device. Answer the ones you know or ask your own.
Ask a new question about this device
Download the instructions for your Vacuum Cleaner in PDF format for free! Find your manual SC44E1 - SAMSUNG and take your electronic device back in hand. On this page are published all the documents necessary for the use of your device. SC44E1 by SAMSUNG.
USER MANUAL SC44E1 SAMSUNG
WARNING
POWER CORD

Accessories


This vacuum cleaner is approved for the following.
EMC Directive: 2004/108/EEC
Low Voltage Directive: 2006/95/EC

WARNING
POWER CORD

SUCTION CONTROL
• HOSE
Accessories
Carpet cleaning

Floor cleaning


- BELT REPLACEMENT


Vacuum Cleaner User Manual
Before operating this unit, please read the instructions carefully.
For indoor use only.
Thank you for purchasing a Samsung product.
Safety Information
SAFETY INFORMATION

Before operating the appliance, please read this manual thoroughly and retain it for your reference.

Because these operating instructions cover various models, the characteristics of your vacuum cleaner may differ slightly from those described in this manual.
CAUTION/WARNING SYMBOLS USED
 WARNING WARNING | Indicates that a danger of death or serious injury exists. |
 CAUTION CAUTION | Indicates that a risk of personal injury or material damage exists. |
OTHER SYMBOLS USED
 | Represents something you must NOT do. |
 | Represents something you must follow. |
 | Indicates that you must disconnect the power plug from the socket. |
IMPORTANT SAFEGUARDS
- Read all instructions carefully. Before switching on, make sure that the voltage of your electricity supply is the same as that indicated on the rating plate on the bottom of the cleaner.
- WARNING: Do not use the vacuum cleaner when rug or floor is wet. Do not use to suck up water.
- Do not use the vacuum cleaner without a dust bin. Empty the dust bin before it is full in order to maintain the best efficiency.
- Do not use the vacuum cleaner to pick up matches, live ashes or cigarette butts.
- Keep the vacuum cleaner away from stoves and other heat sources. Heat can deform and discolour the plastic parts of the unit.
- Avoid picking up hard, sharp objects with the vacuum cleaner as they may damage the cleaner parts. Do not stand on the hose assembly. Do not put weight on the hose. Do not block the suction or the exhaust port.
- Switch the vacuum cleaner off on the body of the machine before unplugging from the electrical outlet.
Disconnect the plug from the electrical outlet before changing the dust bag or dust container. To avoid damage, please remove the plug by grasping the plug itself, not by pulling on the cord.
- This appliance can be used by children aged from 8 years and above and persons with reduced physical, sensory or mental capabilities or lack of experience and knowledge if they have been given supervision or instruction concerning use of the appliance in a safe way and understand the hazards involved.
- Children shall not play with the appliance. Cleaning and user maintenance shall not be made by children without supervision.
- The plug must be removed from the socket outlet before cleaning or maintaining the appliance.
- The use of an extension cord is not recommended.
- If your vacuum cleaner is not operating correctly, switch off the power supply and consult an authorized service agent.
- If the supply cord is damaged, it must be replaced by the manufacturer or its service agent or a similarly qualified person in order to avoid a hazard.
- Don't carry the vacuum cleaner by holding the hose. Use the handle on the vacuum cleaner set.
- Unplug the cleaner when not in use. Turn off the power switch before unplugging.
ASSEMBLING THE CLEANER

MAINTAIN TOOLS AND FILTER

08 Using accessory
09 Maintain floor tools
11 Emptying the dust bin
12 When to clean the dust pack
13 Cleaning the dust pack
14 Cleaning the outlet filter
TROUBLESHOOTING

assembling the cleaner


06_ assembling
operating the cleaner
ON/OFF SWITCH

CAUTION
- When removing the plug from the electrical outlet, grasp the plug, not the cord.

POWER CORD

SUCTION CONTROL
• HOSE
To reduce suction for cleaning draperies, small rugs, and other light fabrics, pull the tap air until the hole is open.

Maintain tools and filter
USING ACCESSORY
Pipe (Option)
- Adjust the length of the telescopic pipe by sliding the length control button located in the center of the telescopic pipe back and forth.

- To check for blockages, separate the telescopic pipe and adjust to shorten. This allows for easier removal of waste clogging the tube.

Accessory
- Dusting brush for furniture, shelves, books, etc.

- Crevice tool for radiators, crevices, corners, between cushions.

2-Step Brush (Option)
- Adjust the inlet lever according to the floor surface.

Carpet Cleaning

Floor Cleaning
- Remove waste matter completely if the inlet is blocked.

Pet Brush (Option)
For improved pick-up of pet hair and fibre on carpets.
Frequent vacuuming of hair or pet fur may cause a falling-off of the rotation due to matters tangled around the drum. In this case, clean the drum with care.

Blanket brush (Option)
Clogs on turbine keep brush from turning, thus need to be unclogged as follows. For picking up pet hair and fibre on upholstery and bed linen.

Remove waste matter completely when inlet is blocked.

Turn the lock button to 'UNLOCK', and remove waste matter.

To reassemble, align the cover to the front of the main body and close. After closing the cover, ensure that the lock button is turned to the 'LOCK' position.


Use for bedclothes only. Be cautious not to damage brush during unclogging.
Maintain tools and filter
Mini turbo brush (Optional)
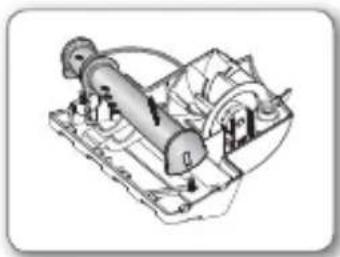
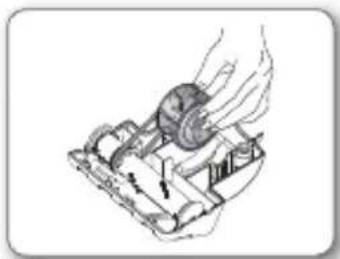
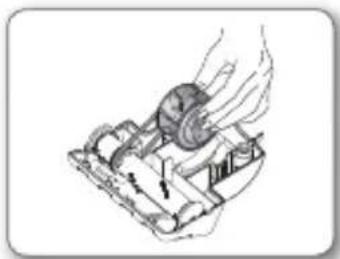
- TO REPLACE BRUSHROLL
- If a clog is present or debris is visible, unscrew the two screws on the back of the Mini turbo brush to remove the faceplate and clear any obstructions.
- Inspect condition of brushroll. Replace brushroll if brushes are worn down. To remove brushroll, pull up and out of end slots in nozzle housing. Insert ends of brushroll into same slots to replace. Inspect belt to ensure that it is in good condition. If belt is broken or cracked, replace belt according to To Replace Belt instructions.
- Using at MAX. Press the MAX button to operate the vacuum at maximum intake.
- TO REPLACE BELT
- Remove bottom plate. See figure in To Replace Brushroll instructions.
- Loop one end of new belt around shaft of pulley.
- Loop other end of belt around designated area for it on brushroll. Insert brushroll into slots in nozzle housing. See figure in To Replace Brushroll instructions.
- Fit Mini turbo brush back together as described in To Replace Brushroll instructions.



- Once dust reaches the dust full mark, light on the lamp of filter check, or suction is noticeably reduced during cleaning. Empty.

- Throw away dust into the bin.

- Take the dust bin out by pressing the button.
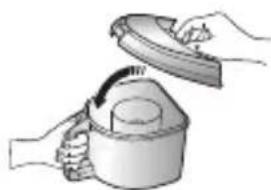
- Close the dust bin cover.

- Separate the dust bin cover.
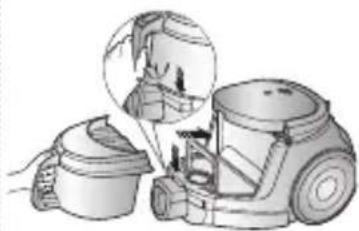
- Before use, push the dust bin into the main body of the vacuum cleaner until you hear the "click" sound.
- Empty into a plastic bag (recommended for asthma/allergy sufferers)


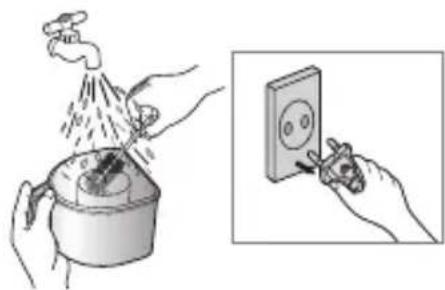
You may rinse the dust bin with cold water.

maintain _11
maintain tools and filter
WHEN TO CLEAN THE DUST PACK
- If suction is noticeably reduced during cleaning, please check the dust pack as indicated below.
Push the button to working
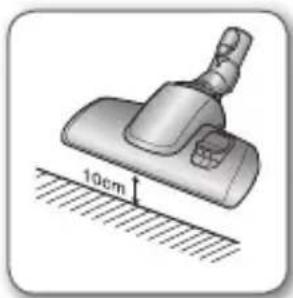
If suction is noticeably reduced with the inlet floating 10cm above flat floor, clean it.


When suction is noticeably reduced continuously, please cleaning the Dust Pack as shown in the following illustration.
- Remove the dust bin and dust pack as shown.

- Remove the sponge and filter from the dust pack.

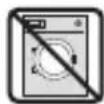
- Wash the sponge and the filter of the dust pack with water.

- Let the sponge and filter dry in the shade for more than 12 hours.

- Put the sponge and filter into the dust pack.

- Put the assembled dust pack into the main body.


Make sure the filter is completely dry before putting it back into the vacuum cleaner. Allow 12 hours for it to dry.


Maintain tools and filter
Cleaning the outlet filter

Press the fixed frame part at the back of the main body to remove.
Option - Micro filter
Remove and replace the blocked outlet filter.

Replacement filters are available at your local Samsung distributor.
Option![graph TD A["Top Box"] --> B["Bottom Box"] C["Top Box"] --> D["Bottom Box"]](/content/2026/05/1101747/images/6ac64c395b5693ab9beaaa17986f8b1bfa4abee3694b5fc305449332b2c1a77d.jpg)
Troubleshooting
| PROBLEM SOLUTION | |
| Motor dows not start. | Check cable, pulg and socket.Leave to cool. |
| Suction force is gradually decreasing. | Check for blockage and remove. |
| Cord does not rewind fully. | Pull the cord out 2-3m and push down the cord rewind button. |
| Vacuum cleaner dows not pick up dirt. | Check hose and replace if required. |
| Low or decreasing suction | Please check filter and, if required, clean as illustrated in the instructions. if filters are out of condition change them to new ones. |
| Body overheating | Please check filters, If required clean as illustrated in the instruction. |
| Static electricity discharge • Please decrease power suction. | |
This vacuum cleaner is approved for the following.
EMC Directive: 2004/108/EEC
Low Voltage Directive: 2006/95/EC
product fiche
[English]
According to Commission Regulation (EU) No 665/2013 and No 666/2013
| A | Supplier Samsung Electronics., Co. Ltd | ||
| B | Model SC44E0 SC44E1 | ||
| C | Energy Efficiency Class F F | ||
| D | Annual Energy Consumption (kWh/yr) 58 58 | ||
| E | Carpet Cleaning Performance Class F F | ||
| F | Hardfloor Cleaning Performance Class D D | ||
| G | Dust Re-Emission Class D D | ||
| H | Sound Power Level (dBA) 81 81 | ||
| I | Rated Input Power (W) | 1300 1300 | |
| J | Type | General purpose vacuum cleaner | |
1) Indicative annual energy consumption (kWh per year), based on 50 cleaning tasks. Actual annual energy consumption will depend on how the appliance is used. 2) Measurements for power consumption and performance are based on methods in EN 60312-1 and EN 60704.
memo
SAMSUNG
Vacuum cleaner

- When unplugging from the wall outlet, grasp the plug, not the cord.

POWER CORD

SUCTION CONTROL
• ON THE HOSE
Accessories
- The crevice tool allows cleaning of radiators, recesses, corners, and between cushions.

Carpet cleaning

Floor cleaning
Pet hair brush (optional)

Use only for bedding. Be careful not to damage the brush during fluffing.


- TO REPLACE THE BELT
- Remove the bottom plate.
Refer to the figure in the section “To replace the brush roll”.
- Place one end of the new belt around the belt pulley shaft.
- Place the other end of the belt on the corresponding location on the brush roll. Insert the brush roll into the openings in the nozzle housing.
Refer to the figure in the section “To replace the brush roll”.
- Reattach the Mini turbo brush accessory according to the instructions in the section “To replace the brush roll”.

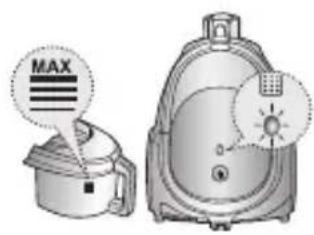
- When the dust level reaches the maximum fill mark, the filter check indicator lights up, or if suction power is noticeably weaker during cleaning, empty the dust cup.

- Dispose of the dust in a trash can.

- Close the dust cup lid.

- Detach the dust cup lid.

- Before use, place the dust container into the vacuum cleaner housing by pressing it until it clicks into place.

You can rinse the dust container with cold water.
maintenance _11
If the suction power is noticeably weaker while the suction part is 10 cm above a flat floor, clean the dust assembly.

If the suction power continuously decreases, clean the dust assembly as shown in the following illustration.
CLEANING THE DUST ASSEMBLY
- Remove the dust container and the dust assembly as shown.

- Take out the sponge and filter from the dust assembly.

- Wash the sponge and filter from the dust assembly with water.

- Leave the sponge and filter to dry for more than 12 hours in a place not exposed to direct sunlight.

- Place the sponge and filter back into the dust assembly.

- Place the assembled dust assembly into the vacuum cleaner housing.


Make sure the filter is completely dry before putting it back into the vacuum cleaner. Leave it to dry for 12 hours.


Press the part of the fixed frame on the back of the device housing to remove it.
OPTION - MICRO FILTER
Remove and replace the clogged exhaust filter.
![graph TD A["Top Box with Grid Pattern"] --> B["Bottom Space"] C["Top Box with Grid Pattern"] --> D["Bottom Space"]](/content/2026/05/1101747/images/bfecfd788ded1565959faf5f05d3c81273414083143888c3d27d892f01d7f9e0.jpg)
Troubleshooting
| PROBLEM REŠENJE | |
| Motor se ne uključuje. | Proverite kabl, utikač i utičnicu.Ostavite uređaj da se ohladi. |
| Snaga usisavanja se postepeno smanjuje. | Proverite da li postoji zapušenje i uklonite ga. |
| Kabl se ne uvlači u potpunosti. | Izvucite kabl 2–3 m, pa pritisnite dugme za uvlačenje kabla. |
| Usisivač ne usisava prljavštinu. | Proverite crevo i zamenite ga po potrebi. |
| Mala ili opadajuća snaga usisavanja | Proverite filter i po potrebi ga očistite u skladu sa uputstvima. a u slučaju da je dotrajao zamenite ga. |
| Kućište se pregreva | Proverite filtere i po potrebi ih očistite u skladu sa uputstvima. |
| Pražnjenje statičkog elektriciteta | Smanjite snagu usisavanja. |

ATTENTION
POWER CORD

SUCTION CONTROL
- THE HOSE
Accessories
Carpet cleaning

Floor cleaning




Maintenance _11


Troubleshooting
ECM Directive: 2004/108/EEC

- When pulling the plug out of the power outlet, hold the plug, not the cord.

POWER CORD

SUCTION CONTROL
- HOSE
maintenance of attachments and filter
USING THE ACCESSORIES
Hose (optional)
- To check for blockages, disconnect the telescopic hose and reduce its length. This makes it easier to remove accumulated debris from the hose.

Accessory
- Tubular tool for radiators, cracks, corners, spaces between cushions.

2-position brush (optional)
- Adjust the suction opening lever according to the floor surface.

Carpet cleaning

Floor cleaning
- If the suction opening is blocked, remove accumulated debris.

Pet hair brush (optional)
For better collection of pet hair and fibers on carpets.
Upholstery brush (optional)


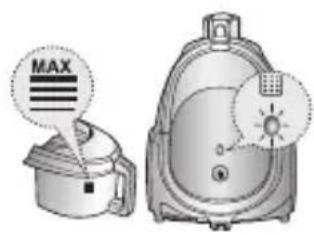
- Throw the dust into the trash.

- Press the button and remove the dust container.

- Close the lid of the dust container.

- Remove the lid of the dust container.


maintenance _11
maintenance of accessories and filter
WHEN TO CLEAN THE DUST CONTAINER

- Remove the sponge and filter from the dust container.

- Wash the sponge and filter from the dust container with water.
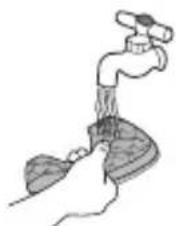
- Leave the sponge and filter to dry for at least 12 hours in a shaded place.

- Place the sponge and filter back into the dust container.

- Place the assembled dust container back into the main unit.


Before returning it to the vacuum cleaner, the filter must be completely dry. Leave it to dry for 12 hours.


maintenance of accessories and filter
CLEANING THE EXHAUST FILTER

Clean and replace the clogged outlet filter.
![graph TD A["Grid Pattern"] --> B["Blank Storage Panel"] C["Grid Pattern"] --> D[" lined Out Storage Panel"]](/content/2026/05/1101747/images/5b87a5c0721a17debab39ca8fb5fcd3a050b537de49d185101e3460d91946494.jpg)
Troubleshooting
| PROBLEM RJEŠENJE | |
| Motor se ne pokreće. | Provjerite kabel, utikač i utičnicu.Ostavite uređaj da se ohladi. |
| Usisna snaga postepeno se smanjuje. | Provjerite postoji li začepljenje i uklonite ga. |
| Kabel se ne može namotati do kraja. | Izvucite 2 - 3 metra kabela i pritisnite gumb za namotavanje kabela. |
| Usisivač ne skuplja prljavštinu. | Provjerite crijevo i prema potrebi ga zamijenite. |
| Usisavanje je slabo ili postaje slabije | Provjerite fi ltar i prema potrebi ga očistite u skladu s ilustracijama u uputama. Ako fi ltri više nisu funkcionalni, zamijenite ih novima. |
| Pregrijavanje kućišta | Provjerite fi ltre i prema potrebi ih očistite u skladu s ilustracijama u uputama. |
| Pražnjenje statičkog elektriciteta | Smanjite usisnu snagu. |
ON/OFF SWITCH

CAUTION
POWER CORD

SUCTION CONTROL
- HOSE
Accessories
Carpet cleaning

Upholstery nozzle (Optional)


- TO REPLACE THE BELT


- Empty the dust container.


maintenance_11


CLEAR
POWER CABLE

VACUUMING MANAGEMENT
- HOSE
Accessories
- Dusting brush for furniture, shelves, books, etc.

- Crevice nozzle for radiators, gaps, corners, between cushions.

Two-stage brush (optional)
• Set the lever on the attachment according to the floor surface.

Cleaning carpets

Cleaning hard floors


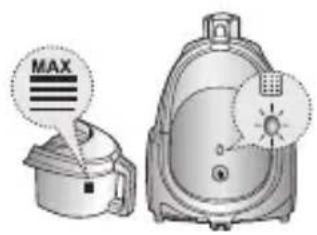
- Remove the dust container by pressing the button.

- Remove the dust container lid.

- Empty the dust into the trash. 5.

Close the dust container lid.


- Wash the sponge and filter of the dust filter assembly with water.

- Install the sponge and filter into the dust filter assembly.
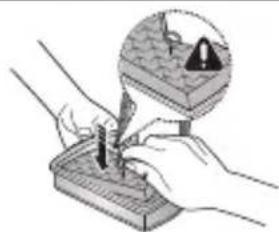

Make sure the filter is completely dry before inserting it back into the vacuum cleaner. Wait 12 hours for it to dry.


If you have any questions or comments relating to Samsung products, please contact the SAMSUNG customer care center.
| Country | Customer Care Center 📞 | Web Site |
| CROATIA 062 SAMSUNG (062 726 7864) www.samsung.com/hr | ||
| SERBIA 011 321 6899 www.samsung.com/rs | ||
| MONTENEGRO 020 405 888 | ||
| KOSOVO +381 0113216899 | ||
| BOSNIA 05 133 1999 | ||
| MACEDONIA 023 207 777 | ||
| ALBANIA 42 27 5755 | ||
| BULGARIA 07001 33 11 www.samsung.com/bg | ||
| RUMANIA | 08010 SAMSUNG (08010 726 7864) only from landline, local network Romtelecom - local tariff / 021 206 01 10 for landline and mobile, normal tariff | www.samsung.com/ro |
| SLOVENIA 080 - MYSAMSUNG (080 69 726 7864) www.samsung.si | ||
- POWER CORD
- ACCESSORIES
- SUCTION CONTROL
- BELT REPLACEMENT
- VACUUM CLEANER USER MANUAL
- SAFETY INFORMATION
- CAUTION/WARNING SYMBOLS USED
- OTHER SYMBOLS USED
- IMPORTANT SAFEGUARDS
- ASSEMBLING THE CLEANER
- MAINTAIN TOOLS AND FILTER
- TROUBLESHOOTING
- OPERATING THE CLEANER
- ON/OFF SWITCH
- USING ACCESSORY
- PIPE (OPTION)
- ACCESSORY
- STEP BRUSH (OPTION)
- PET BRUSH (OPTION)
- BLANKET BRUSH (OPTION)
- MINI TURBO BRUSH (OPTIONAL)
- TO REPLACE BRUSHROLL
- TO REPLACE BELT
- WHEN TO CLEAN THE DUST PACK
- CLEANING THE OUTLET FILTER
- PRODUCT FICHE
- [ENGLISH]
- MEMO
- VACUUM CLEANER
- PET HAIR BRUSH (OPTIONAL)
- TO REPLACE THE BELT
- CLEANING THE DUST ASSEMBLY
- MAINTENANCE OF ATTACHMENTS AND FILTER
- USING THE ACCESSORIES
- HOSE (OPTIONAL)
- POSITION BRUSH (OPTIONAL)
- UPHOLSTERY BRUSH (OPTIONAL)
- MAINTENANCE OF ACCESSORIES AND FILTER
- WHEN TO CLEAN THE DUST CONTAINER
- CLEANING THE EXHAUST FILTER
- UPHOLSTERY NOZZLE (OPTIONAL)
- POWER CABLE
- VACUUMING MANAGEMENT
- TWO-STAGE BRUSH (OPTIONAL)
Brand : SAMSUNG
Model : SC44E1
Category : Vacuum Cleaner