
LK9810I - Screen VIVITEK - Free user manual and instructions
Find the device manual for free LK9810I VIVITEK in PDF.


| Product Type | Projection Screen |
| Brand | Vivitek |
| Model | LK9810I |
| Diagonal Size | 100 inches |
| Aspect Ratio | 16:9 |
| Screen Material | Matte White |
| Gain | 1.0 |
| Viewing Angle | 160 degrees |
| Frame Material | Aluminum |
| Frame Color | Black |
| Mounting Type | Wall-mount or ceiling-mount |
| Dimensions (W x H) | 2214 mm x 1245 mm |
| Weight | 15 kg |
| Compatibility | All standard projectors |
| Surface Type | Fixed frame |
| Cleaning | Clean with a soft dry cloth |
| Safety | Ensure secure mounting to wall or ceiling |
| Spare Parts | Not available for this item |
| Repairability | Non-repairable, replace if damaged |
Frequently Asked Questions - LK9810I VIVITEK
User questions about LK9810I VIVITEK
0 question about this device. Answer the ones you know or ask your own.
Ask a new question about this device
Download the instructions for your Screen in PDF format for free! Find your manual LK9810I - VIVITEK and take your electronic device back in hand. On this page are published all the documents necessary for the use of your device. LK9810I by VIVITEK.
USER MANUAL LK9810I VIVITEK
natural_image
Computer monitor blank with a green border and 'vVitek' logo at bottom (no readable text or symbols on screen)NovoTouch
User Manual
(For LK9810i)
Table of Contents
Safety 4
Regulatory Compliance 6
Package Contents 8
Optional Accessories....9
Overview 10
Display Front View ....10
Display Rear View....11
Display Right View 12
Display Bottom View 13
Remote Control....14
Installing Batteries....15
Remote Control Usage 15
Installing the Wall Mount....16
Connections...... 19
HDMI-In (1.3/1.4)....19
VGA-In 20
Audio-In....20
LAN (RJ-45) 21
Touch....21
AV-In 22
RS-232 22
USB (2.0/3.0) 23
VGA-Out 23
Earphone 24
Coax-Out 24
Getting Started 25
Powering the Display 25
Switching Input Source....26
Display Settings....27
Audio 28
Screen....28
Display 29
Using the Display 30
Home Screen 30
Note 31
Finder 32
Browser 33
System Settings....33
Cleaning the Display 34
Specifications 35
Troubleshooting 36
Appendix (RS-232 Specifications) 37
Copyright Statement...... 40
Safety
Placement
- Do not place the unit on an unstable cart, stand, tripod, bracket, table, or shelf.
- Do not expose the unit to direct sunlight and other sources of heat.
- Do not put the unit near appliances that generate magnetic fields.
- Do not put any liquid near or on the unit, make sure you do not spill any liquid inside the unit.
- Do not put heavy objects on top of the unit.
Power Supply
- Check that the unit's operating voltage is identical to your local power supply.
- Please unplug the display from the power supply during possible thunder-storms or lightning.
- Please unplug the display from the power supply when the unit will be idle for a long time.
- Please prevent the power cable from receiving physical or mechanical damage.
- Please use the original power cable from the product packaging, and don't modify or lengthen it.
- Please check and ensure that the AC source is connected with the ground.
- The power cable that comes with the display is for use exclusively by this device.
LED Screen
- This display only supports landscape display orientation. Do not mount in portrait display orientation or mount facing up or facing down.
- Never use any hard or sharp object in place of the styluses.
- Do not use permanent or dry-erase markers on the screen. If dry-erase markers are used on the screen, remove the ink as soon as possible with a lint-free, non-abrasive cloth.
- Unplug the power cable before cleaning.
- For a longer panel lifetime and better display performance, do not set the display to high brightness for a long period of time.
Temperature
- Do not place the unit near or over a radiator or a heater.
- If your display is suddenly moved from a cold to a warm place, please unplug the power cable and do not turn it on at least 2 hours, making sure the moisture inside the unit is all evaporated.
• Normal operating temperature is 0 - 40°C.
Humidity
- Do not expose the unit to rain, or place in a high humidity area.
- Please make sure indoor environment is dry and cool.
• Normal operating humidity is 10% - 90%.
Ventilation
- Please put the unit in a well ventilated place, so the heating can be released easily.
- Ensure that the unit has enough space for ventilation. Space requirement: left, right and back >10cm, top>20cm.
Earphone
- Using the earphones to listen to loud audio for an extended period of time might affect one's hearing.
- Before using earphones, please turn down the volume in advance.
Battery
- Please make sure the battery is properly disposed or recycled after use.
- Please keep the battery away from children.
- DO NOT throw the battery into a fire.
- For the remote control batteries, ensure that the correct batteries are used and installed in the proper orientation.
Maintenance
- This machine should only be maintained/serviced by certified technician.
- Inspect the display mount frequently to ensure that it has remained securely installed.
- Check the mounting location for loose screws, gaps, distortions, signs of damage or weakness that can occur over time.

Disposal of Old Electric and Electronic Equipment
The symbol on your product or the package represents that the product should not be treated as the normal household waste when discarded but should be carried to the recycling location of the waste electric and electronic equipment.
The consequence on the environment and human health due to the incorrect disposal of the product can be prevented if it can be ensured that the product is properly discarded. Material recycling is helpful to the protection of natural resources. The symbol is only valid in European Union. If you want to discard electrical and electronic equipment, contact the governmental authorities or your dealer for the correct method of disposal.
Important Recycling Instructions
The product may contain other electronic wastes and may pose risk if not discarded properly. Abide by the local, state/provincial or federal laws of recycling or discarding. For more information, please visit the website and contact Electronic Industries Alliance (EIA) on WWW.EIAE.ORG.
Regulatory Compliance
FCC Warning
This equipment has been tested and found to comply with the limits for a Class A digital device pursuant to Part 15 of the FCC Rules. These limits are designed to provide reasonable protection against harmful interference when the equipment is operated in a commercial environment.
This equipment generates, uses, and can radiate radio frequency energy and, if not installed and used in accordance with the instruction manual, may cause harmful interference to radio communications. Operation of this equipment in a residential area is likely to cause harmful interference in which case the user will be required to correct the interference at his/her own expense.
Changes or modifications not expressly approved by the parties responsible for compliance could void the user's authority to operate the equipment.
Federal Communications Commission (FCC) Notice (U.S. Only)

This device complies with Part 15 of the FCC Rules. Operation is subject to the following two conditions: (1) this device may not cause harmful interference, and (2) this device must accept any interference received, including interference that may cause undesired operation.
Canada
This class A digital apparatus complies with Canadian ICES-003.
CE Declaration of Conformity
This device complies with the requirements set out in the Council Directive on the Approximation of the Laws of the Member States relating to Electromagnetic Compatibility (2014/30/EU), Low-voltage Directive (2014/35/EU) and RoHS directive (2011/65/EU).
This product has been tested and found to comply with the harmonized standards for Information Technology Equipment, these harmonized standards published under Directives of Official Journal of the European Union.
WARNING: This equipment is compliant with Class A of EN55032/CISPR 32. In a residential environment this equipment may cause radio interference.
NOTE: This equipment has been tested and found to comply with the limits for a Class A digital device, pursuant to part 15 of the FCC Rules. These limits are designed to provide reasonable protection against harmful interference when the equipment is operated in a commercial environment. This equipment generates, uses, and can radiate radio frequency energy and, if not installed and used in accordance with the instruction manual, may cause harmful interference to radio communications. Operation of this equipment in a residential area is likely to cause harmful interference in which case the user will be required to correct the interference at his own expense.
Safety Certifications
FCC-A, cTUVus, CE, CB, EAC, RoHS
Disposal and Recycling
This product may contain other electronic waste that can be hazardous if not disposed of properly. Recycle or dispose in accordance with local, state, or federal Laws. For more information, contact the Electronic Industries Alliance at www.eiae.org.
Package Contents
Ensure that all of the proper items are included with the display in the packaging. The items that should be included in the packaging are:

natural_image
Blank white rectangular frame with gray border and faint watermark text at bottom right (no readable document content)NovoTouch


natural_image
Line drawing of a cord with attached plug and connector (no text or symbols)Remote Control

natural_image
Pure electrical circuit lines without any symbolsPower Cable
Wall Mount Kit

natural_image
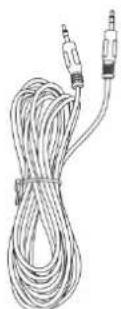
Line drawing of a coiled electrical cable with connectors (no text or symbols)Audio Cable
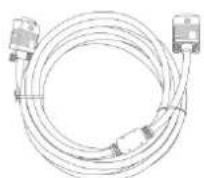
USB Cable
VGA Cable
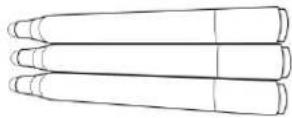

Documentation CD
Stylus x 3


Batteries x 2
Quick Guide
Optional Accessories
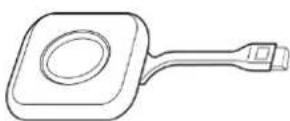
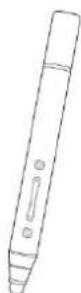
LauncherPlus (QL300)
Smart Pen (VKP05)
Overview
Display Front View
The following illustration shows the front side of the display and its various components:
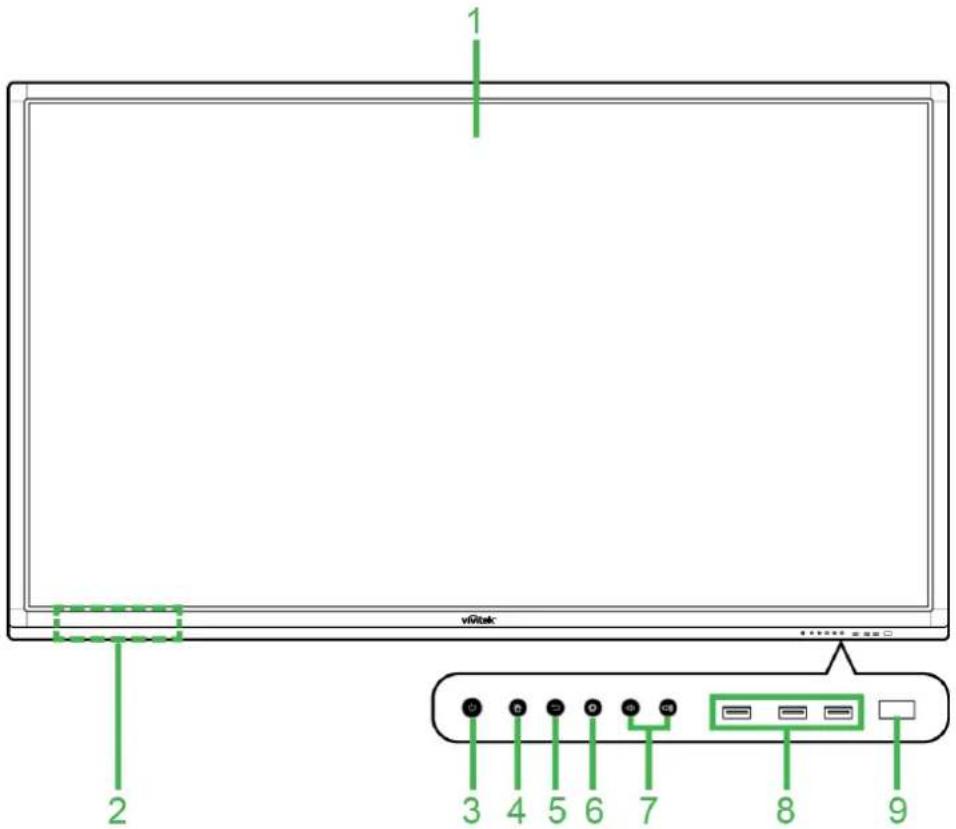
| No. | Item | Description |
| 1 | Touchscreen | Use touch gestures to navigate the display's user interface.Tap to wake the display when it is in standby mode (the screen is off but the display is on). |
| 2 | Magnetic Stylus Holder | Holds the styluses included in with the display. |
| 3 | Power Button / Status Indicator LED | Power Button:[When display is off]:Press to power on the display.[When display is on]:Press to place the display on standby.Press and hold for 2 seconds to power off the display. |
| Status Indicator LED:Blue: The display is powered on or in standby mode.Red: The display is connected to a power source but not powered on.Off: The display is not connected to a power source.Flashing Red/Blue: (1) The display is in standby mode, (2) the display is powering off, or (3) the firmware is upgrading | ||
| 4 | Home Button | Opens the display's home screen. |
| 5 | Back Button | Returns the display to the previous screen. |
| 6 | Settings Button | Opens the display's input source menu. |
| 7 | Volume Down/Up Button | Decreases/Increases the display's volume |
| 8 | USB 2.0 Ports | Connects to a USB flash drive to view media files or to a mouse/keyboard. |
| 9 | Remote Control IR Sensor | Receives the signal from the display's remote control with a range of up to 8 meters. |
Display Rear View
The following illustration shows the rear of the display and its various components:

| No. | Item | Description |
| 1 | Handles | Allows you to safely carry/move the display. |
| 2 | Wall Mount Screw Holes | Used to install the wall mount included with the display. See the “Installing the Wall Mount” section for more information. |
Display Right View
The following illustration shows the right side of the display and its various components:

| No. | Item | Description |
| 1 | Power Switch | Activates the display once it is connected to a power source. |
| 2 | HDMI-In Port 4 (1.4) | Connects to Blu-Ray/DVD players, set-top boxes, digital media players, computers, or other video sources to broadcast video and audio. |
| 3 | USB 2.0 Port | Connects to a USB flash drive to view media files or to a mouse/keyboard. |
| 4 | HDMI-In Port 1 (1.3) | Connects to Blu-Ray/DVD players, set-top boxes, digital media players, computers, or other video sources to broadcast video and audio. |
| 5 | HDMI-In Port 2 (1.3) | Connects to Blu-Ray/DVD players, set-top boxes, digital media players, computers, or other video sources to broadcast video and audio. |
| 6 | HDMI-In Port 3 (1.3) | Connects to Blu-Ray/DVD players, set-top boxes, digital media players, computers, or other video sources to broadcast video and audio. |
| 7 | VGA-Out Port | Connects to either a second display or projector to duplicate or extend the video shown on the display. |
| 8 | Audio-In Jack 1 | Connects to the video source connected to the VGA-In port 1 to broadcast its audio. |
| 9 | VGA-In Port 1 | Connects to a computer to broadcast video. |
| 10 | VGA-In Port 2 | Connects to a computer to broadcast video. |
| 11 | Audio-In Jack 2 | Connects to the video source connected to the VGA-In port 2 to broadcast its audio. |
| 12 | USB 3.0 Port | Connects to a USB flash drive to view media files or to a mouse/keyboard. |
| 13 | Touch Port | Connects to a computer to allow the touchscreen to control the computer's interface. |
Display Bottom View
The following illustration shows the bottom of the display and its various components:
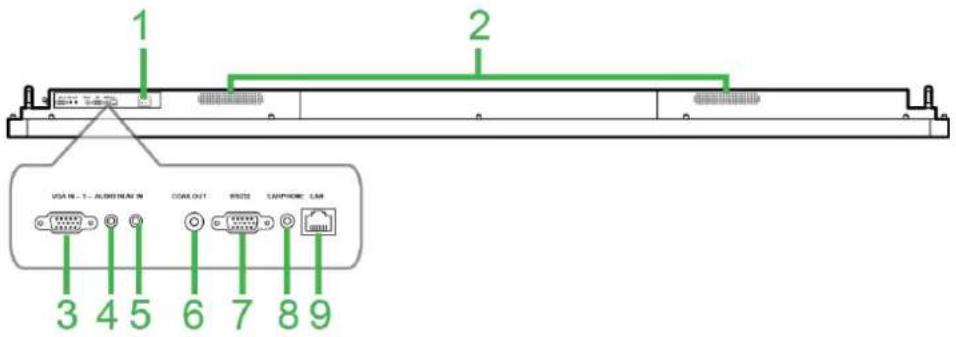
| No. | Item | Description |
| 1 | Power Connector | Connects to a power outlet. |
| 2 | Speakers | Broadcasts the display's audio. |
| 3 | VGA-In Port 3 | Connects to a computer to broadcast video. |
| 4 | Audio-In Jack 3 | Connects to the video source connected to the VGA-In port 3 to broadcast its audio. |
| 5 | AV-In Jack | Connects to DVD players, set-top boxes, and other sources to broadcast analog video and audio |
| 6 | Coax-Out Port | Connects to external speakers to broadcast audio. |
| 7 | RS-232 Port | Connects to a computers or servers for control commands. |
| 8 | Earphone Jack | Connects to external headphones/earphones to broadcast audio. |
| 9 | LAN Port | Connects to a router for internet access. |
Remote Control
The following illustration shows the display's remote control and its buttons:
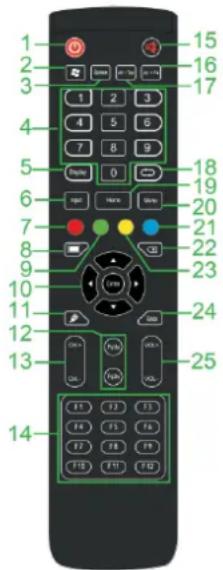
| No. | Button | Description |
| 1 | Power | Turns the display on or off. |
| 2 | Windows Menu* | Performs the same action as the Windows key on a PC keyboard. |
| 3 | Spacebar* | Performs the same action as the spacebar on a PC keyboard. |
| 4 | Numeric Keypad | Numeric input buttons. |
| 5 | Display Information | Displays the current channel/input information. |
| 6 | Input Source | Opens the input source menu. |
| 7 | Lock/Unlock Display Buttons and Touchscreen | Disables/Enables both the buttons located on the front of the display and the display's touchscreen. |
| 8 | Blank Screen | Makes the screen display a monochromatic screen. |
| 9 | Lock/Unlock Display Buttons | Disables/Enables the buttons located on the front of the display. |
| 10 | Navigation Buttons | Navigates between various applications and menus shown on screen. |
| 11 | Quick Draw | Launches the displays drawing tools. See the Error! Reference source not found. section for more information. |
| 12 | Page Up/Down* | Performs the same action as the Page Up/Down buttons on a PC keyboard. |
| 13 | Function Buttons | Functional buttons. |
| 14 | F1 - F12* | Performs the same action as the F1 - F12 keys on a PC keyboard. |
| 15 | Mute | Disables the display's audio. |
| 16 | Alt+F4 (Close Window)* | Performs the same action as the Alt+F4 key combination on a PC keyboard. |
| 17 | Alt+Tab (Switch Window)* | Performs the same action as the Alt+Tab key combination on a PC keyboard. |
| 18 | Function Button | Functional button. |
| 19 | Home Screen | Returns the display to the home screen. |
| 20 | Settings Menu | Opens the OSD settings menu. |
| 21 | Freeze Screen | Freezes the screen. |
| 22 | Backspace | Deletes the entered text. |
| 23 | Lock/Unlock Touchscreen | Disables/Enables the display's touchscreen and prevents touch gestures from working. |
| 24 | Back | Returns to the previous screen. |
| 25 | Volume +/- | Adjusts the display's audio level. |
*Only functional when an OPS unit running Windows is installed into the display.
Installing Batteries
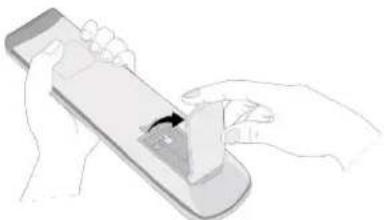
Before using the display's remote control you must first install the two AAA batteries included with the display.
- Open the battery compartment cover on the remote control.
natural_image
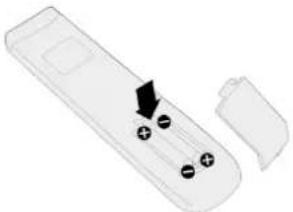
Illustration of hands using a handheld device to interact with a screen (no text or symbols visible)- Insert the batteries ensuring that the + and - terminals on the battery match their corresponding terminals in the battery compartment.
natural_image
3D illustration of a remote control device with a black arrow pointing to its ports (no text or symbols)WARNING: Failure to install the correct batteries in the correct orientation may result in damage or possibly injury.
- Replace the battery compartment cover on the remote control.

natural_image
Illustration of hands using a handheld device to interact with a screen (no text or symbols visible)Remote Control Usage
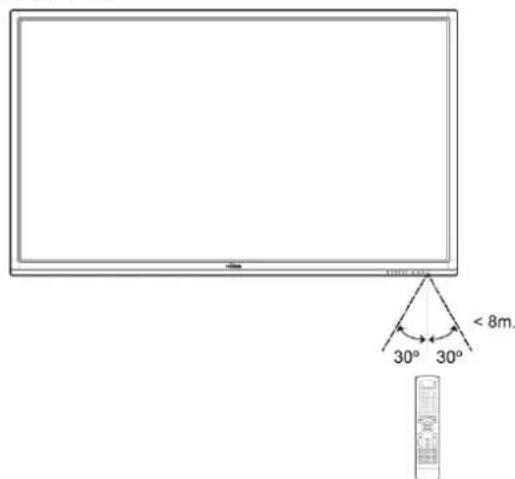
When using the remote control ensure that the remote control is pointed at the IR sensor at the front of the display within a range of 8 meters distance and 30-degrees to the left and right of the IR sensor.
Installing the Wall Mount
Before installing the wall mount ensure the following:
• Installation should only be done by a certified professional.
• Maximum wall mount kit load capacity:150kg (330lbs).
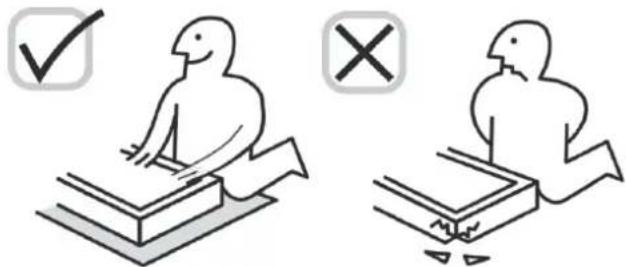
- When setting the display down to install the wall mount, place it face down on a flat and stable surface covered by a protective sheet or cloth and a table cushion as shown in the illustration provided. DO NOT place the display on an uncovered surface.
- Ensure that all the following parts are included in the wall mount kit:


| Letter | Item | Quantity |
| A | Wall Mount Frame | 1 |
| B | Wall Mount Brackets | 2 |
| C | Bracket Screws | 4 |
| D | Frame Screws | 2 |
| E | Wall Screw Washers | 8 |
| F | Wall Screws | 8 |
| G | Anchor Screws | 8 |
To mount NovoTouch onto a wall follow the instructions below:
NOTE: This display only supports landscape display orientation. Do not mount in portrait display orientation or mount facing up or facing down.
- Install the two (B) the wall mount brackets onto the display using the four (C) bracket screws.

- Install the eight (G) anchor screws into the wall you want to mount NovoTouch on.

- Install the (A) wall mount frame onto the wall by securing the eight (F) wall screws and (E) washers to the anchors.

- Mount the displays' wall mount brackets onto the wall mount frame.

natural_image
Simple line drawing of a wall-mounted device with a vertical panel and a vertical wall, connected by a right-angle arrow (no text or symbols)- Secure the wall mount brackets to the frame using the two (D) frame screws.

Connections
This section describes the connections available for the various ports located on either the right or bottom side of the NovoTouch display.
NOTE: It is suggested that you make any connections prior to powering on the display.
HDMI-In (1.3/1.4)
The HDMI-In ports connects to various devices such as Blu-Ray/DVD players, set-top boxes, digital media players, computers, and other sources to broadcast video and audio on the NovoTouch. When connecting a device to the HDMI-In port:
- Use an HDMI cable with a standard Type-A HDMI connector.
- Select the corresponding HDMI input in the input source menu on the NovoTouch. See the Switching Input Source section for more information on selecting input sources.

VGA-In
The VGA-In port connects to mainly computers to broadcast video on the NovoTouch. When connecting a device to the VGA-In port:
- Use a standard VGA cable.
- Select the corresponding VGA input in the input source menu on the NovoTouch. See the Switching Input Source section for more information on selecting input sources.
- If you want the NovoTouch to also broadcast audio from the connected devices, connect an audio cable from the audio-out jack of the source to the Audio-In jack that corresponds to the connected VGA-In port of the NovoTouch (for example Audio-In 2 for VGA-In 2), as described in the Audio-In section below.
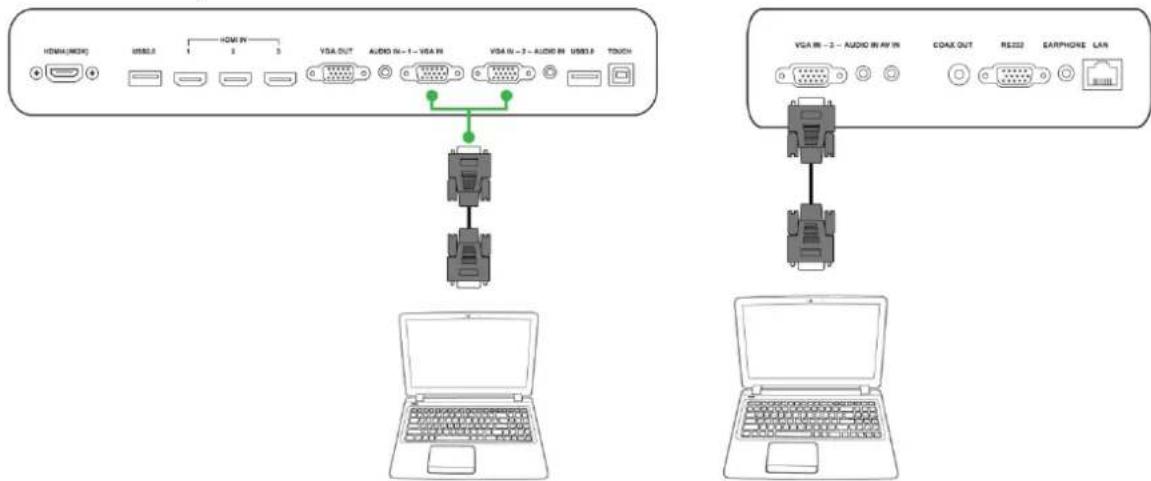
Audio-In
The Audio-In jack is used particularly for connections that feature video-only streams (such as a VGA connection) by connecting to the audio out jack of the video source to broadcast the audio from that source. When connecting a device to the Audio-In port:
- Use a standard 3.5mm audio cable.
- Ensure the audio jack the source is connected to corresponds to the audio jack's respective VGA source (for example Audio-In 2 is used for VGA-In 2).

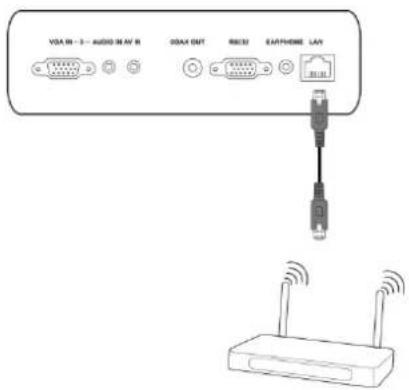
LAN (RJ-45)
The LAN (RJ-45) port connects to a router or a hub to allow the NovoTouch to access the internet. When connecting a router to the LAN port:
- Use a standard Ethernet cable.
NOTE: Only the LAN port on the right side is functional on the NovoTouch. DO NOT connect to the LAN port located on the bottom of the NovoTouch.
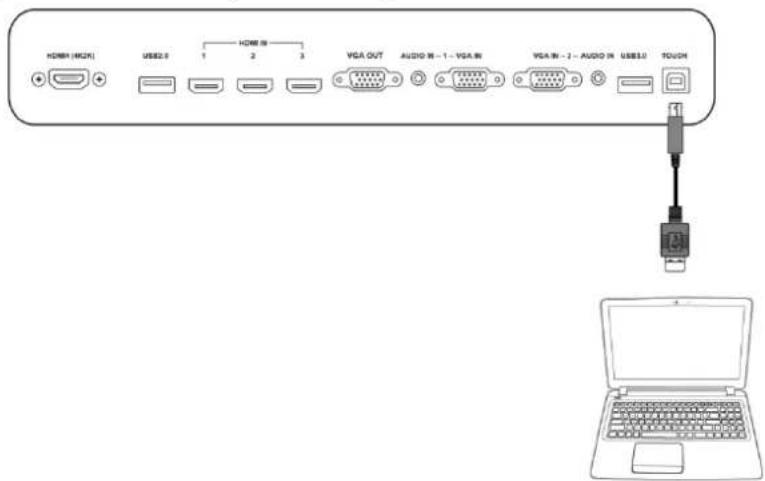
Touch
The touch port allows you to connect a computer (via any of its USB ports) to the NovoTouch and use the touchscreen on the NovoTouch to control the computer's on screen interface. When connecting a computer to the touch port:
- Use a Type-A to Type-B USB cable.
- Ensure that a video connection for the computer is made and the corresponding input source is selected in the input source menu, so that the touchscreen is able to show the computer's interface.
- Allow the computer to install any necessary drivers.
AV-In
The AV-In port connects to various devices such as DVD players, set-top boxes, and other sources to broadcast analog video and audio on the NovoTouch. When connecting a device to the AV-In port:
- Use a 3-to-1 composite/RCA cable or corresponding converter cable.
- Select the corresponding AV input in the input source menu on the NovoTouch. See the Switching Input Source section for more information on selecting input sources.

RS-232
The AV In port connects to a computer or server to provide data and control signals to the NovoTouch. When connecting a device to the RS-232 port:
- Use a standard RS-232 cable.

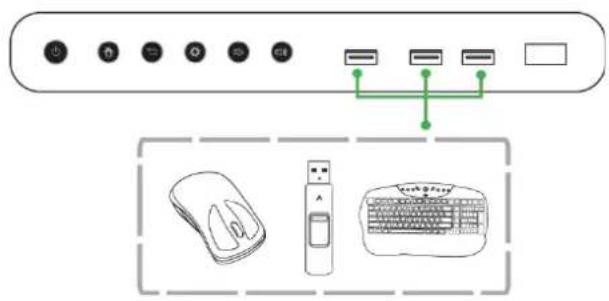
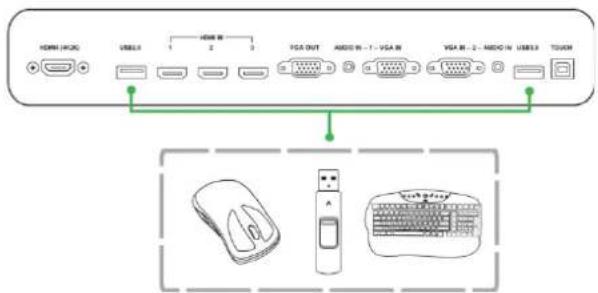
USB (2.0/3.0)
The USB ports allow you to connect USB flash drives for direct playback of stored media, as well as USB devices such as a mouse or keyboard for easier navigation of the NovoTouch's interface. When connecting a USB flash drive:
- Launch the Finder app to view the media files stored on the flash drive. See the Finder section for more information.
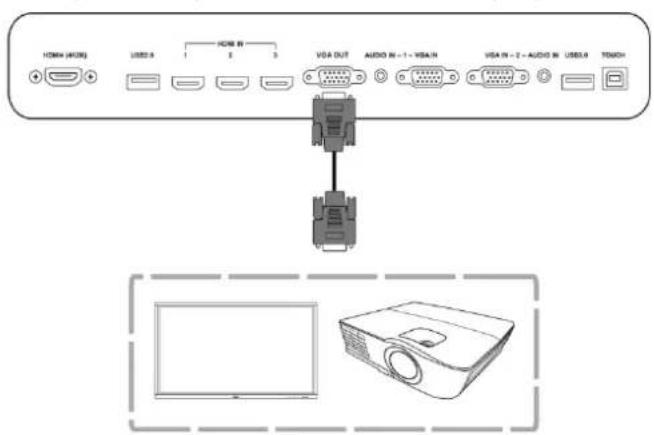
VGA-Out
The VGA-Out port connects to the VGA-in port on other displays or projectors to duplicate or extend the video shown on the NovoTouch on the connected display/projector. When connecting another display device to the VGA-Out port:
- Use a standard VGA cable.
- Select the corresponding VGA input on the second display.
Earphone
The earphone jack connects to external earphones/headphones to broadcast the audio from the NovoTouch.

Coax-Out
The Coax-Out jack connects to external speakers to broadcast the audio from the NovoTouch. When connecting external speakers to the Coax-Out jack:
- Use a standard coaxial cable.

Getting Started
Powering the Display
After mounting/installing the NovoTouch in the desired location you must supply power to the display using the following steps:
- Plug the supplied power cable into the display and a power source. NOTE: Only use the power cable provided in the packaging with the display.
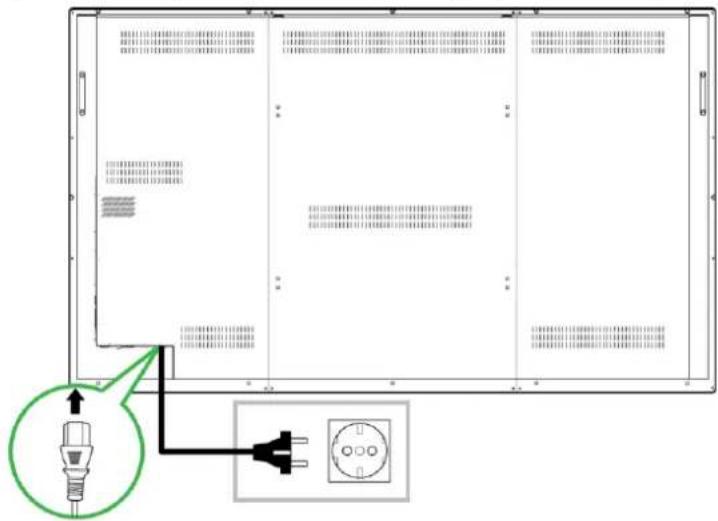
- Turn the power switch located at the bottom of the display on.
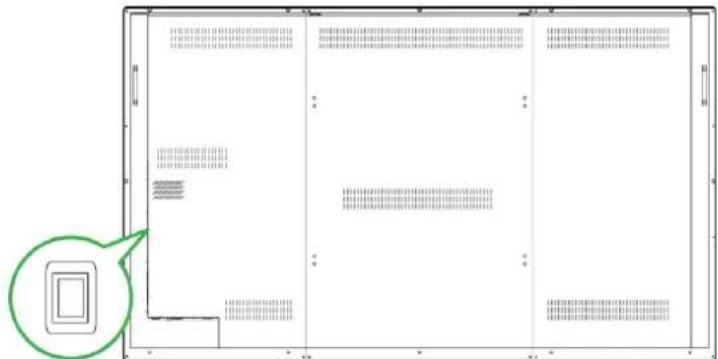
- Press the power button on the display or the remote control to power on the display.

Switching Input Source
After making a video input connection, open the input source menu to select which input source to show on the display. To open the input source menu choose one of the following methods:
- Press the Settings button located on the front side of the display

natural_image
Line drawing of a hand pointing at a button labeled 'A' with dots, next to a blank screen (no text or symbols on the screen)- Press the Input button on the remote control.

- Touch and hold the bottom of the touchscreen then swipe up.

natural_image
Simple diagram with a green upward arrow and a small dot at the bottom center, no text or symbols present.Once the input source menu is open select the video input you want to show on the display. Video inputs with a blue dot underneath indicate video inputs that are currently connected.
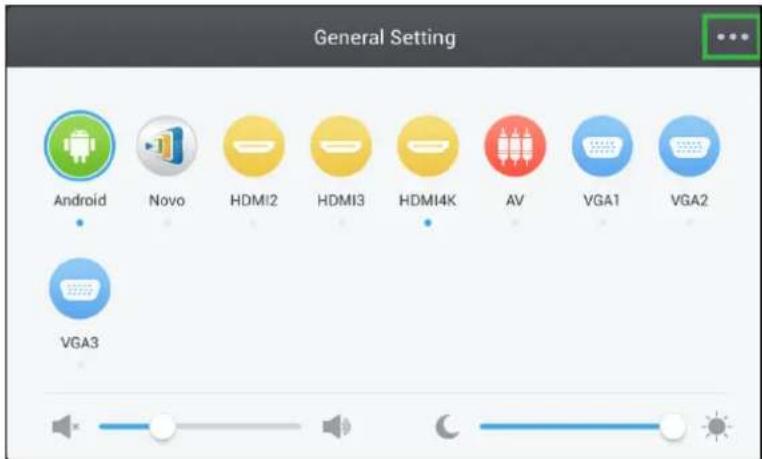
Display Settings
The display settings menu is an On-Screen Display (OSD) menu which allows you to configure various video/audio related settings for the display. To open the display settings menu choose one of the following methods:
- Open the input source menu, and then select ••• at the top left corner of the input source menu.

- Press the Menu button on the remote control.

The display settings menu includes the following for sub-menus:
- Audio
- Screen
- Display
- Adjust
Audio

The Audio settings menu allows you to adjust the following settings:
| Item | Description |
| Volume | Adjusts the volume level for the display. |
| Bass | Adjusts the low-frequency audio level for the display. |
| Treble | Adjusts the high-frequency audio level for the display. |
| Balance | Adjusts the left/right audio balance for the display. |
| Preset Settings | Provides various preset audio settings for the display.The available settings include: Standard, Movie, Meeting, and Class. |
| Mute | Disables the display's audio. |
Screen

The Screen settings menu allows you to adjust the following settings:
| Item | Description |
| Auto | Allows the display to auto adjust the screen ratio based on the video source. |
| 4:3 | Sets a 4:3 screen ratio for video. |
| 16:9 | Sets a 16:9 screen ratio for the video. |
| PTP (Pixel-To-Pixel) | Shows the video without scaling it, such that each pixel of the video correlates with a single pixel on the monitor. |
Display

The Display settings menu allows you to adjust the following settings:
| Item | Description |
| Brightness | Adjusts the brightness level for the display. |
| Contrast | Adjusts the contrast level for the display. |
| Hue | Adjusts the hue level for the display. |
| Sharpness | Adjusts the sharpness for the display. |
| Preset Settings | Provides various preset video settings for the display.The available settings include: Standard, Bright, Colorful, and Soft. |
Using the Display
Home Screen
When NovoTouch is powered on and no video source is selected or if the NovoTouch button is selected in the input source menu, the NovoTouch home screen will be shown by default. The home screen is the main user interface for NovoTouch from where you are able to launch the following key apps installed on NovoTouch, as well as a set of touch-based tools:
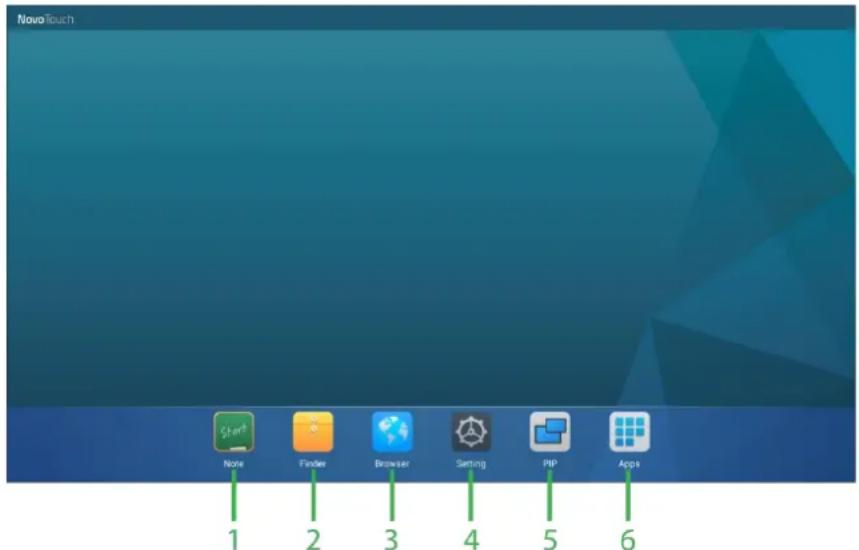
| No. | Item | Description |
| 1 | Note | Opens the sketchpad app. |
| 2 | Finder | Opens the file navigation app. |
| 3 | Browser | Opens the web browser app. |
| 4 | Settings | Opens the system settings menu for the NovoTouch.NOTE: This settings menu controls the NovoTouch systems settings, and is distinct from the display settings menu. |
| 5 | PIP | Opens the Picture-In-Picture window. |
| 6 | All Apps | Opens a menu of all the apps installed on NovoTouch. |
The home screen for NovoTouch is non-configurable, but app shortcuts and widgets can be added to additional screens on the interface by touching and holding the touchscreen until the widgets and shortcuts selection screen appears.
See the following sections for more information on the various apps and tools located on the home page.
Note
The Note app allows you to use the touchscreen as a sketchpad to freehand draw on the display using touch gestures.
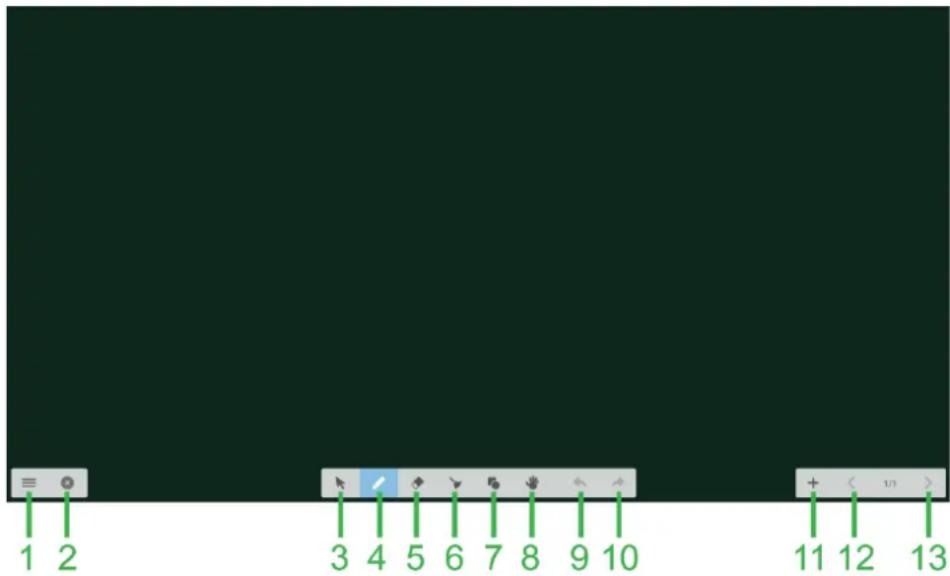
| No. | Item | Description |
| 1 | File Menu | Allows you to save/open/start new drawings, import/export images, and perform other file related actions. |
| 2 | Close | Closes the Note app. |
| 3 | Cursor | Allows you to select and move items drawn on the touchscreen. |
| 4 | Drawing Tool | Allows you to draw as well as configure the size and color of the drawing tool you want to use. |
| 5 | Eraser Tool | Allows you to erase items drawn on the touchscreen. |
| 6 | Clear All Tool | Allows you to erase all items drawn on the touchscreen at once. |
| 7 | Shapes Tool | Allows you to add lines and shapes on the drawing. |
| 8 | Zoom Tool | Allows you to change the scale level of the drawing. |
| 9 | Undo | Cancels the previous action. |
| 10 | Redo | Restores the previous action. |
| 11 | Add Page | Adds a new page to the drawing. |
| 12 | Previous Page | Jumps to the previous page. |
| 13 | Next Page | Jumps to the next page. |
Finder
The Finder app allows you to navigate the files and folders saved locally on NovoTouch as well as any storage devices connected to ports.

| No. | Item | Description |
| 1 | Storage Devices List | Displays the various storage devices available to navigate in the app, select a storage device to navigate. |
| 2 | Previous | Jumps to the previous folder opened in the navigation window. |
| 3 | File Type | Allows you to view files based on file type. |
| 4 | Search | Allows you to search for specific files. |
| 5 | Exit | Exits the Finder app. |
| 6 | Sort | Sorts the files either by name, type, size, or time. |
| 7 | Thumbnail | Changes the navigation window to thumbnail view. |
| 8 | List | Changes the navigation window to list view. |
| 9 | Select | Allows you to select multiple files in the navigation window. Once files are selected a file management menu will open allowing you to copy, paste, cut, delete, etc. the files selected. |
| 10 | Select All | Selects all files in the navigation window. Once files are selected a file management menu will open allowing you to copy, paste, cut, delete, etc. the files selected. |
| 11 | Navigation Window | Navigate through file folders in this window. |
| 12 | File Details | Displays details for the file selected in the navigation window. |
Browser
The Browser app allows you to browse the internet on the NovoTouch after connecting the display to an internet connection via either an Ethernet connection or a wireless connection. See the LAN (RJ-45) section or the Error! Reference source not found. s ection for more information on connecting the display to the internet.

System Settings
The system settings menu allows you to configure or view various settings related to the system/software for NovoTouch.

Cleaning the Display
When cleaning the NovoTouch display, please ensure you follow the instructions below to prevent damage to the display and its panel.
- Before you begin cleaning the display, ensure that it is powered off and unplugged from the power source. Then remove any styluses, pens, or accessories attached to the display.
- Do not use any chemicals on the panels.
- Do not use anything abrasive to wipe the display, use a clean soft, lint-free cloth instead to wipe the display.
- Do not spray water directly on the display, fill a spray bottle with water and spray directly on to the cleaning cloth instead. After wiping the display with the wet cleaning cloth use another clean soft, lint-free cloth to dry the display.
- Make sure all dust, debris, and smudges are removed from the display, ensuring that the corners and edges are also wiped clean.
- When wiping the display use a circular motion as seen in the image below:

flowchart
graph TD
    A["Start"] --> B{Decision}
    B --> C["End"]
    C --> A
    B --> D["End"]
    D --> A
    style A fill:#fff,stroke:#000
    style B fill:#fff,stroke:#000
    style C fill:#fff,stroke:#000
    style D fill:#fff,stroke:#000
Specifications
| Model Name | NovoTouch LK9810l | |||
| Display Type/Size/Technology | 98" Backlit LED (IPS Panel) | |||
| Brightness (Typical/Minimum) | 440cd/m2400cd/m2 | |||
| Contrast Ratio (Typical) | 1,300:1 | |||
| Native Resolution | 4K Ultra-HD (3840 x 2160) | |||
| Viewing Angle (H/V) | 178°/178" | |||
| Aspect Ratio | 16:9 | |||
| Response Time (MS) | 5ms (Typ) | |||
| Touch Technology | Infrared Touch | |||
| Touch Points (Writing/Touch) | 5 Points/10 Points | |||
| Display Orientation | Landscape (No Portrait mode support) | |||
| Operating System Version | AndroidTM v4.2.1 | |||
| Connectivity | Input | Display | HDMI v1.4 (x1), HDMI v1.3 (x3), AV-In (x1), VGA-In (x1) | |
| Audio | Audio-In (3.5mm) (x1) | |||
| Output | Display | VGA-Out (1080P) (x1) | ||
| Audio | Audio-Out (3.5mm) (x1), Coaxial-Out (RCA) (x1) | |||
| Internet | LAN (RJ45) (x1) | |||
| Control | RS232 (x1) | |||
| USB | Front | USB 2.0 (x3) | ||
| Side | USB 2.0 (x1), USB 3.0 (x1), USB Type B (x2)(For Touch Port) | |||
| Bottom | N/A | |||
| Expansion Module | PC OPS Module | Optional (48pin) | ||
| Internal Speakers | 10W (x2) (Stereo) | |||
| Dimensions (L x H x D) (Estimated) | IFPD | 2,257 x 1,335 x 110 mm(88.8" x 52.6" x 4.3") | ||
| With Handles | 2,257 x 1,335 x 121 mm(88.8" x 52.6" x 4.8") | |||
| Weight (Estimated) | 150kg (331lbs) | |||
| Available Color | Black | |||
| Standard Accessories | AC Power Cord, VGA Cable, USB Cable, Audio Cable, Stylus (x3), Remote Control, Wall Mount Kit, Documentation Kit | |||
Copyright © 2017 Vivitek. Vivitek is a trademark of Delta Electronics, Inc.
Troubleshooting
If the display does not function normally
| Remote control failure | 1 | Check whether there are other objects between the remote control and the IR sensor window, thus leading to remote control failure. |
| 2 | Check whether the battery electrodes in the remote control are in the correct orientation. | |
| 3 | Check whether remote control needs to replace its batteries. | |
| Machine automatically shuts down | 1 | Check whether sleep is set or not. |
| 2 | Check whether there has been a sudden power outage. | |
| 3 | Check whether there is a signal (the display may power off after a period of inactivity). |
PC mode issues
| Signal is out of range | 1 | Check whether the display is setup correctly. |
| 2 | Check whether the resolution is the best resolution. | |
| Background has vertical lines or streaks | 1 | Select auto correction in the OSD settings menu. |
| 2 | Adjust the clock and phase values in the OSD settings menu. | |
| Image lacks color or the color is incorrect | 1 | Check whether the video cables are well connected or have quality problems. |
| 2 | Adjust brightness or contrast values in the OSD settings menu. | |
| The display format is not supported | 1 | Select auto correction in the OSD settings menu. |
| 2 | Adjust the clock and phase values in the OSD settings menu. |
Touch functionality issues
| Touch function invalid | 1 | Check whether the touchscreen driver is installed. |
| 2 | Check whether the size of point of contact is comparable to finger. | |
| Touch position is not correct | 1 | Check whether the touchscreen driver is installed. |
| 2 | Check whether touch pen is facing the screen. |
Videos do not function normally
| No picture and no sound | 1 | Check whether the machine is in a powered state. |
| 2 | Check whether signal cable is plugged in correctly, and whether the correct input source is selected. | |
| 3 | If the display is in internal computer mode, check whether internal computer is started. | |
| The image features horizontal or vertical stripes or image dithering | 1 | Check whether signal cable is plugged in correctly. |
| 2 | Check whether other electronic equipment or power tools are placed around the machine. | |
| No color, color is weak, or image is weak | 1 | Adjust brightness or contrast values in the OSD settings menu. |
| 2 | Check whether signal cable is plugged in correctly. |
Audio does not function normally
| Images is shown without sound | 1 | Check whether the mute button has been pressed. |
| 2 | Press VOL + / - to adjust volume. | |
| 3 | Check whether the audio line is connected correctly. | |
| Only one speaker has sound | 1 | Adjust the sound balance in the OSD settings menu. |
| 2 | Check whether the computer's sound control panel has only set up one sound channel. | |
| 3 | Check whether audio line is connected correctly. | |
| VGA output is shown without sound | 1 | Check whether the audio out jack of the external device is connected to the audio in jack. |
Appendix (RS-232 Specifications)
The following are the pin definitions for the RS-232 port:
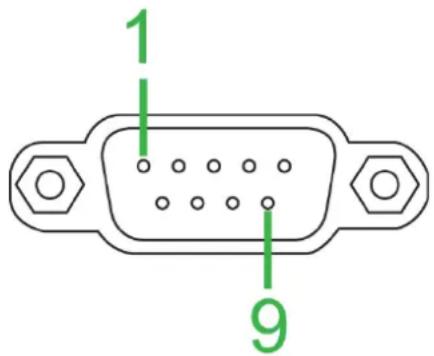
Serial Port Settings:
| Item | Value |
| Baud Rate | 9600bps (fixed) |
| Data Bits | 8 (fixed) |
| Stop Bits | 1 (fixed) |
| Parity | None (fixed) |
| Stream Control | None (fixed) |
Command Format:
| No. | Content | Description | Remark |
| 1 | 0xAA | Head | Fixed Value |
| 2 | 0xBB | Fixed Value | |
| 3 | 0xCC | Fixed Value | |
| 4 | Main | ||
| 5 | Subcommand | ||
| 6 | 0x00 | Length | Valid data |
| 7 | checksum | Checksum | Sum from No.4 to No.6 |
| 8 | 0xDD | End | Fixed Value |
| 9 | 0xEE | Fixed Value | |
| 10 | 0xFF | Fixed Value |
Code List
| Function | Mode | Code | Remark |
| Power | ON | AA BB CC 01 00 00 01 DD EE FF | |
| OFF | AA BB CC 01 01 00 02 DD EE FF | ||
| Source | VGA1 | AA BB CC 02 03 00 05 DD EE FF | |
| HDMI1 | AA BB CC 02 06 00 08 DD EE FF | ||
| HDMI2 | AA BB CC 02 07 00 09 DD EE FF | ||
| HDMI3 | AA BB CC 02 05 00 07 DD EE FF | ||
| HDMI4K (4K*2K) | AA BB CC 02 0D 00 0F DD EE FF | ||
| PC | AA BB CC 02 08 00 0A DD EE FF | ||
| ANDROID | AA BB CC 02 0A 00 0C DD EE FF | ||
| ANDROID+ | AA BB CC 02 0E 00 10 DD EE FF | ||
| DP | AA BB CC 02 11 00 13 DD EE FF | ||
| Volume | 000-100 | AA BB CC 03 00 xx ** DD EE FF | |
| MUTE | AA BB CC 03 01 00 04 DD EE FF | ||
| UNMUTE | AA BB CC 03 01 01 05 DD EE FF | ||
| Aspect Ratio | 16:9 | AA BB CC 08 00 00 08 DD EE FF | |
| 4:3 | AA BB CC 08 01 00 09 DD EE FF | ||
| PTP | AA BB CC 08 07 00 0F DD EE FF | ||
| PC Power | ON | AA BB CC 09 01 00 0A DD EE FF | |
| OFF | AA BB CC 09 00 00 09 DD EE FF | ||
| xx = from 0 to 100, for volumeEx. Volume = 30 (Decimal) = 1E (Hex), xx = 1E and ** = 03 (Hex) + 00 (Hex) + 1E (Hex) = 21 (Hex). | |||
| Remote Control | WIN | AA BB CC 07 0B 00 12 DD EE FF | |
| Space | AA BB CC 07 46 00 4D DD EE FF | ||
| Alt+Tab | AA BB CC 07 1D 00 24 DD EE FF | ||
| Alt+F4 | AA BB CC 07 1F 00 26 DD EE FF | ||
| NUM_1 | AA BB CC 07 00 00 07 DD EE FF | ||
| NUM_2 | AA BB CC 07 10 00 17 DD EE FF | ||
| NUM_3 | AA BB CC 07 11 00 18 DD EE FF | ||
| NUM_4 | AA BB CC 07 13 00 1A DD EE FF | ||
| NUM_5 | AA BB CC 07 14 00 1B DD EE FF | ||
| NUM_6 | AA BB CC 07 15 00 1C DD EE FF | ||
| NUM_7 | AA BB CC 07 17 00 1E DD EE FF | ||
| NUM_8 | AA BB CC 07 18 00 1F DD EE FF | ||
| NUM_9 | AA BB CC 07 19 00 20 DD EE FF | ||
| NUM_0 | AA BB CC 07 1B 00 22 DD EE FF | ||
| Display | AA BB CC 07 1C 00 23 DD EE FF | ||
| Refresh | AA BB CC 07 4C 00 53 DD EE FF | ||
| Input | AA BB CC 07 07 00 0E DD EE FF | ||
| Home | AA BB CC 07 48 00 4F DD EE FF | ||
| Menu | AA BB CC 07 0D 00 14 DD EE FF | ||
| Delete | AA BB CC 07 40 00 47 DD EE FF | ||
| Energy | AA BB CC 07 4E 00 55 DD EE FF | ||
| UP | AA BB CC 07 47 00 4E DD EE FF | ||
| DOWN | AA BB CC 07 4D 00 54 DD EE FF | ||
| LEFT | AA BB CC 07 49 00 50 DD EE FF | ||
| RIGHT | AA BB CC 07 4B 00 52 DD EE FF | ||
| ENTER | AA BB CC 07 4A 00 51 DD EE FF | ||
| Point | AA BB CC 07 06 00 0D DD EE FF | ||
| Back | AA BB CC 07 0A 00 11 DD EE FF | ||
| CH+ | AA BB CC 07 02 00 09 DD EE FF | ||
| CH- | AA BB CC 07 09 00 10 DD EE FF | ||
| VOL+ | AA BB CC 07 03 00 0A DD EE FF | ||
| VOL- | AA BB CC 07 41 00 48 DD EE FF | ||
| PageUp | AA BB CC 07 42 00 49 DD EE FF | ||
| PageDown | AA BB CC 07 0F 00 16 DD EE FF | ||
| F1 | AA BB CC 07 45 00 4C DD EE FF | ||
| F2 | AA BB CC 07 12 00 19 DD EE FF | ||
| F3 | AA BB CC 07 51 00 58 DD EE FF | ||
| F4 | AA BB CC 07 5B 00 62 DD EE FF | ||
| F5 | AA BB CC 07 44 00 4B DD EE FF | ||
| F6 | AA BB CC 07 50 00 57 DD EE FF | ||
| F7 | AA BB CC 07 43 00 4A DD EE FF | ||
| F8 | AA BB CC 07 1A 00 21 DD EE FF | ||
| F9 | AA BB CC 07 04 00 0B DD EE FF | ||
| F10 | AA BB CC 07 59 00 60 DD EE FF | ||
| F11 | AA BB CC 07 57 00 5E DD EE FF | ||
| F12 | AA BB CC 07 08 00 0F DD EE FF | ||
| RED | AA BB CC 07 5C 00 63 DD EE FF | ||
| GREEN | AA BB CC 07 5D 00 64 DD EE FF | ||
| YELLOW | AA BB CC 07 5E 00 65 DD EE FF | ||
| BLUE | AA BB CC 07 5F 00 66 DD EE FF | ||
Polling Code List
| Function | Code | Response | Status |
| Power Status | AA BB CC 01 02 00 03 DD EE FF | AA BB CC 80 00 00 80 DD EE FF | ON |
| AA BB CC 80 01 00 81 DD EE FF | OFF | ||
| Volume Status | AA BB CC 03 02 00 05 DD EE FF | AA BB CC 82 00 xx ** DD EE FF | Volume = xx |
| Mute Status | AA BB CC 03 03 00 06 DD EE FF | AA BB CC 82 01 00 83 DD EE FF | Mute |
| AA BB CC 82 01 01 84 DD EE FF | Unmute | ||
| Source Status | AA BB CC 02 00 00 02 DD EE FF | AA BB CC 81 03 00 84 DD EE FF | VGA1 |
| AA BB CC 81 0E 00 8F DD EE FF | ANDROID+ | ||
| AA BB CC 81 05 00 86 DD EE FF | HDMI3 | ||
| AA BB CC 81 06 00 87 DD EE FF | HDMI1 | ||
| AA BB CC 81 07 00 88 DD EE FF | HDMI2 | ||
| AA BB CC 81 08 00 89 DD EE FF | PC | ||
| AA BB CC 81 0A 00 8B DD EE FF | ANDROID | ||
| AA BB CC 81 11 00 92 DD EE FF | DP | ||
| PC Status | AA BB CC 09 02 00 0b DD EE FF | AA BB CC 83 00 00 82 DD EE FF | ON |
| AA BB CC 83 01 00 84 DD EE FF | OFF | ||
| AA BB CC 83 02 00 85 DD EE FF | Sleep | ||
| AA BB CC 83 03 00 86 DD EE FF | Hibernate |
Copyright Statement
Copyright
The user manual (including all pictures, illustrations and software) is protected by the international copyright right law. All rights are reserved. No duplication of the manual or any content included in the manual is allowed without the written consent of the manufacturer.
Vivitek is the trademark of Delta Electronics, Inc. ©All rights reserved. 2017
Disclaimer
The information in the manual is subject to change without notice. The manufacturer does not provide any statement or warranty of the contents in the manual and clearly give up the implied warranties of merchantability and of fitness for a particular purpose. The manufacturer reserves the rights to modify the publication and change the contents of the materials at any time without notice to any person.
About the Manual
The manual describes how to install and use the display and is applicable to the end-user. Relevant information (such as illustrations and descriptions) is put on the same page as possible as we can. The format, easy for printing, is convenient for reading and paper-saving which is beneficial to environmental protection. It is suggested printing the page you need.
Vivitek Americas
46101 Fremont Blvd, Fremont, CA 94538
U.S.A.
T: +1-510-668-5100
F: +1-510-668-0680
Vivitek Asia
7F, No. 186, Ruey Kuang Road, Neihu, Taipei 11491
Taiwan R.O.C.
T: +886-2-8797-2088
F: +886-2-6600-2358
Vivitek Europe
- NovoTouch
- User Manual
- Table of Contents
- Safety 4
- Package Contents 8
- Overview 10
- Installing the Wall Mount....16
- Connections...... 19
- Getting Started 25
- Using the Display 30
- Cleaning the Display 34
- Specifications 35
- Troubleshooting 36
- Appendix (RS-232 Specifications) 37
- Copyright Statement...... 40
- Safety
- Placement
- Power Supply
- LED Screen
- Temperature
- Humidity
- Ventilation
- Earphone
- Battery
- Maintenance
- Disposal of Old Electric and Electronic Equipment
- Important Recycling Instructions
- Regulatory Compliance
- FCC Warning
- Federal Communications Commission (FCC) Notice (U.S. Only)
- Canada
- CE Declaration of Conformity
- Safety Certifications
- Disposal and Recycling
- Package Contents
- Optional Accessories
- Overview
- Display Front View
- Display Rear View
- Display Right View
- Display Bottom View
- Remote Control
- Installing Batteries
- Remote Control Usage
- Installing the Wall Mount
- Connections
- HDMI-In (1.3/1.4)
- VGA-In
- Audio-In
- LAN (RJ-45)
- Touch
- AV-In
- RS-232
- USB (2.0/3.0)
- VGA-Out
- Coax-Out
- Getting Started
- Powering the Display
- Switching Input Source
- Display Settings
- Audio
- Screen
- Display
- Using the Display
- Home Screen
- Note
- Finder
- Browser
- System Settings
- Cleaning the Display
- Troubleshooting
- Appendix (RS-232 Specifications)
- Copyright Statement
- Copyright
- Disclaimer
- About the Manual
- Vivitek Americas
- Vivitek Asia
- Vivitek Europe
Brand : VIVITEK
Model : LK9810I
Category : Screen