
TSU7000 - Remote control PHILIPS - Free user manual and instructions
Find the device manual for free TSU7000 PHILIPS in PDF.


| Product Type | Home Theater Control Panel (Universal Remote Control) |
| Dimensions (H x W x D) | 6.07 x 3.64 x 1.10 inches (154.2 x 92.4 x 27.8 mm) |
| Weight | Approximately 0.55 lbs (250 g) |
| Power Source | Rechargeable NiMH battery pack (4 x 1.2 V), charged via docking station |
| Display | 3.8-inch color TFT LCD touch screen, 320 x 240 pixels (QVGA), 65536 colors, white LED backlight |
| Memory | 32 MB |
| Interface | USB 1.1 port |
| Infrared (IR) | 4 high-performance IR sending LEDs, 1 receiver; operating distance approx. 33 ft (10 m); learning frequency up to 78 KHz and 455 KHz |
| Radio Frequency (RF) | Band: 418 MHz; supports 16 Extender IDs and 4 channels (requires optional RF Extender RFX6000) |
| Main Functions | IR code learning, macro creation (up to 250 actions), programmable timers, cursor navigation, RF operation, multi-language support (English, Spanish, French, German, Dutch), device customization via ProntoProEdit NG software |
| Maintenance & Care | Clean with soft damp cloth; use diluted window cleaner for stubborn spots; avoid abrasive detergents, excessive water, and sharp objects on touch screen |
| Safety Warnings | Do not expose to rain/moisture; protect from temperature extremes; do not drop or subject to strong impact (glass touch screen); use only specified battery pack |
| Included Accessories | USB cable, CD-ROM with ProntoProEdit NG software, AAA rechargeable battery pack, docking station |
| Compatibility | Controls most IR-controlled devices; built-in database for over 800 brands; works with optional RF Extender for through-wall operation |
Frequently Asked Questions - TSU7000 PHILIPS
User questions about TSU7000 PHILIPS
0 question about this device. Answer the ones you know or ask your own.
Ask a new question about this device
Download the instructions for your Remote control in PDF format for free! Find your manual TSU7000 - PHILIPS and take your electronic device back in hand. On this page are published all the documents necessary for the use of your device. TSU7000 by PHILIPS.
USER MANUAL TSU7000 PHILIPS
This equipment has been tested and found to comply with the limits for a Class B digital device, pursuant to part 15 of the FCC rule and ICES 003 in Canada. These limits are designed to provide reasonable protection against harmful interference in residential installations. This equipment generates, uses, and can radiate radio frequency energy and, if not installed and used in accordance with the instructions, may cause harmful interference to radio communications. However, there is no guarantee that interference will not occur in a particular installation. If the equipment does cause harmful interference to radio or television reception, which can be determined by turning the equipment off and on, the user is encouraged to try to correct the interference by one or more of the following measures:
■ Reorient or relocate the receiving antenna extender.
■ Increase the separation between the equipment and receiver.
■ Connect the equipment into an outlet on a different circuit from the receiver.
- Consult the dealer or an experienced radio/TV technician for help.
FCC Information for Users
Caution The user changes or modifications not expressly approved by the party responsible for compliance could void the user's authority to operate the equipment.
Table of Contents
Taking a First Look 4
ProntoPro NG: The Home Theater Control Panel 4
The Device 5
The Touch Screen 7
The Docking Station 8
What's New for ProntoPro Next Generation? 9
Before You Start 10
Installing the Battery Pack 10
Charging the ProntoPro NG 11
Getting Started 13
Turning on ProntoPro NG 13
Setting Time and Date 14
Changing the Time Format 14
Changing the Time 14
Changing the Date 15
Setting the Language 16
Operating ProntoPro NG 17
Device Overview 17
Page Overview 18
Customizing ProntoPro NG 19
Using the Tools 19
Defining the Brand for a Device 20
Learning Commands 23
Labeling Elements 25
Adding Devices 28
Deleting Elements 30
Moving Devices 31
Adjusting the Settings 32
Setting the Brightness of the Backlight 33
Setting the Timeout of the LCD Screen 33
Setting the Volume Level 34
Setting the Navigation for ProntoPro NG 34
Setting the Animation Mode 35
Calibrating the Touch Screen 35
Adjusting the Screen Activation Settings 36
Using the Power Features 38
Creating and Editing Macros 38
Creating a Macro 38
Editing a Macro 40
Creating and Editing Timers 51
Activating Timers 41
Creating and Editing Timers 42
Operating ProntoPro NG with the Cursor 48
Operating ProntoPro NG with RF 50
Selecting RF to Operate your Devices 51
Selecting IR to Operate your Devices 52
ProntoProEdit NG 53
FAQ 55
Troubleshooting 57
General Problems 57
Customizing Problems 58
Memory Storage Problems 59
ProntoPro NG error messages 61
Connection to the PC 59
Maintaining ProntoPro NG 60
Important Notices 60
Cleaning ProntoPro NG 60
Upgrading ProntoPro NG 60
List of Symbols 61
Specifications 64
Glossary 65
Index 68
Taking a First Look
ProntoPro NG: The Home Theater Control Panel
ProntoPro NG is a Home Theater Control Panel that allows maximum flexibility and customization for even the most sophisticated home entertainment system. It can control almost any device that works with infrared (IR) remote control signals. Its intuitive interface makes it a perfect remote control for every user.
ProntoPro NG is easy to configure. It contains a huge universal database where IR codes are stored to control different brands for all kinds of video, audio devices and even home automation equipment. By default ProntoPro NG is set up to control Philips and Marantz devices. For other brands you simply choose the brands of your devices when you use ProntoPro NG for the first time.
Furthermore the ProntoPro NG is equipped with a color touch screen. This TFT-display supports 65536 colors so you can upload any color picture.
ProntoPro NG offers you some extra powerful features:
- You can create and edit macros, allowing you to send a series of commands with one single touch.
- You can set timers for certain actions to be carried out at predefined times, e.g. switching on your lights or recording your favorite daily TV-show with your VCR.
- You can choose to have ProntoPro NG working with radio frequency (RF) signals to operate devices from a distance or from an adjacent room. To do this, you need an optional RF Extender that converts ProntoPro NG RF signals into IR signals.
With ProntoProEdit NG software you can create your own screens and define a personal look. ProntoProEdit NG's Online Help system (accessible via the 'Help' icon in ProntoProEdit NG) will guide you through the process.
See 'ProntoProEdit NG' on page 53 for more information. You can find ProntoProEdit NG on the included CD-ROM and on the Philips website www.pronto.philips.com. In the Downloads section of the website you can also find the latest upgrades for your ProntoPro NG software.
The Device
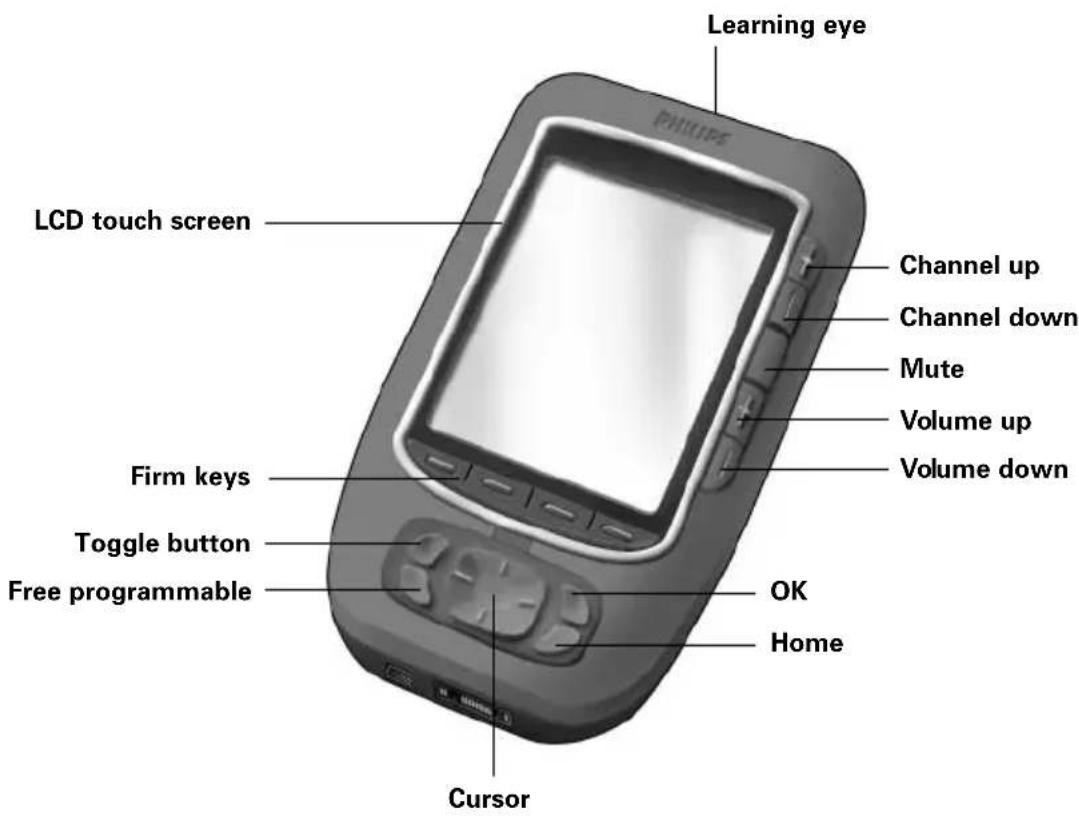
ProntoPro NG has several hard buttons. Most are freely programmable, some have a predefined function:
■ The buttons on the left side of the ProntoPro NG screen have predefined functions: Page up, Page down and Backlight.
■ The 4 firm keys below the touch screen are freely programmable. You can reprogram the function of these buttons and change the label on the touch screen.
■ The cursor and the Home button on the right side of the cursor are programmed to operate devices (e.g. navigating through the on screen menu of your TV). With the Toggle button you can change the working of the cursor. The free programmable and the OK button are meant for future purposes. The buttons on the right side of the screen are used to control the volume and channel: Channel up, Channel down, Mute, Volume up and Volume down. Although these buttons each have a predefined function, you can program them yourself. If you learn one of these buttons or assign a macro to it, its predefined function will be permanently lost.
Taking a First Look

User Guide
The Touch Screen

Taking a First Look
The Docking Station
The docking station is used to charge the ProntoPro NG's battery pack. When your ProntoPro NG is placed in the docking station, you can connect ProntoPro NG to your computer via the USB port of the docking station, instead of the USB port of the ProntoPro NG.


What's New for ProntoPro Next Generation?
This new ProntoPro NG (TSU7000) offers several new features compared to the previous model of ProntoPro (TSU6000). The most important ones are:
■ Transparency
ProntoPro NG supports transparency in buttons and other objects. This makes it easier to create complex user interfaces. You can now place buttons with a transparent background on top of a background image, let transparent buttons overlap or create transparency effects within buttons.
65536 colors
The number of colors has increased from 256 to 65536 (64k). Therefore the buttons look much more natural.
USB
ProntoPro NG has a USB port to make downloading much easier.
■ 32 MB of Memory
ProntoPro NG has 32 Megabyte of memory. This enables you to download larger configuration files to ProntoPro NG.
■ Integrated Macros
Macros are now better integrated in the configuration file. Each button can be a macro, this means each button can contain more than one action.
■ More advanced Timers
Your ProntoPro NG is able to set timers for certain actions to be carried out at any time you choose. Timers are not an entirely new feature of ProntoPro NG, but they are easier to use and better integrated with the configuration file. You can activate and deactivate the timers you created and you can also set them to repeat daily or weekly. For instance, you can have the lights switched on every day at sunset. You can also create a timer to set your VCR to record your favorite TV-show on Wednesday and Saturday.
Page Overview
The Page Overview offers you a list of all the pages for one device. Every device comes with a Page Overview, making it easier and faster to browse through the device pages.
- Cursor Navigation
By default the cursor is programmed to operate devices. The functions assigned to the cursor button depend on the device active on ProntoPro NG. ProntoPro NG also offers you the possibility to use the cursor for navigating through devices and pages on the screen. The Left and Right cursor buttons allow you to scroll through the devices, with the Up and Down cursor buttons you scroll through the different pages.
■ Animation Mode
ProntoPro NG provides navigation feedback through graphical animations of mode transitions and page transitions. You can enable and disable the animations of your ProntoPro NG in the Settings Pages.
■ Multi Language Support
ProntoPro NG now supports besides English also Spanish, French, German and Dutch.
Before You Start
When you use ProntoPro NG for the first time, you will have to:
■ install the battery pack;
■ place ProntoPro NG in the docking station and charge it.
Attention Use the docking station only with the Philips NiMH rechargeable battery pack.
Never plug other appliances (like mobile phones, PDA's, ...) into the docking station. This causes damage to the connector and the appliance.
Installing the Battery Pack
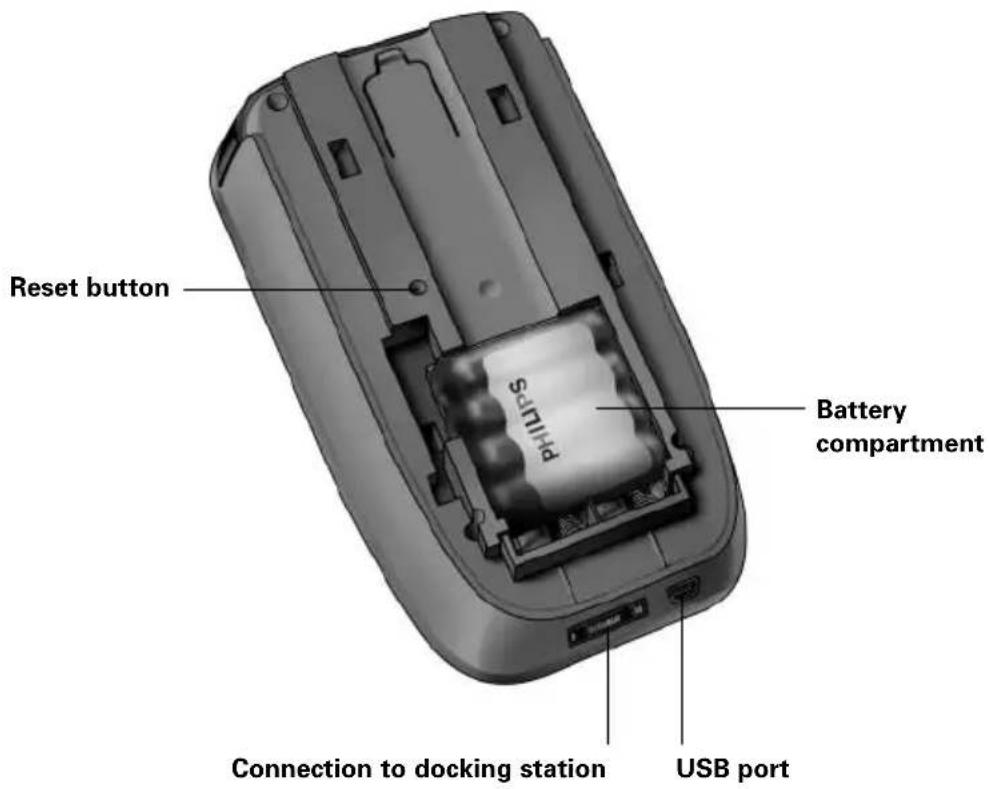
1 Press the latch on the battery cover with your thumb and then slide the cover forward firmly.
2 Lift up the battery cover.


3 Place the battery pack in the battery compartment.
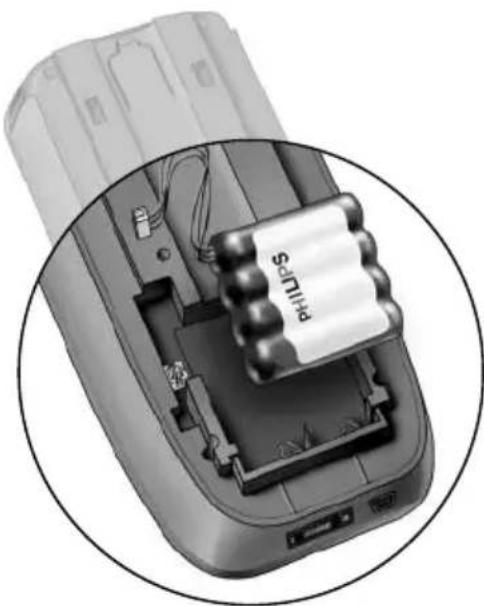
4 Plug the cable of the battery pack in the connector.
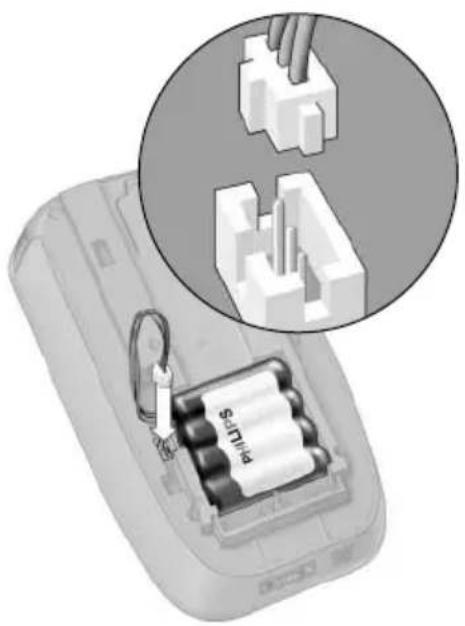
5 Slide the battery cover back on.
Make sure the wires of the battery pack do not get stuck while sliding the cover on.
After a few seconds, the ProntoPro NG starts up automatically and an introduction screen appears. The ProntoPro NG beeps twice to indicate that it has finished starting up.
Because the battery pack is not fully pre-charged, you need to charge it as described below.
Charging the ProntoPro NG
For charging the ProntoPro NG, you have to place it in the docking station. When the battery pack is running low, the Low Battery icon will appear on the ProntoPro NG.
You can charge the ProntoPro NG at any time; the battery pack does not have to be entirely empty before recharging.
Note You can continue using the ProntoPro NG while it is being charged.
When the battery pack is empty, the ProntoPro NG's settings are retained. You only need to set the clock. However, you should recharge the ProntoPro NG as soon as possible to ensure perfect performance.
1 P lug the power adapter into a wall outlet and connect it to the docking station.
2 Slide the ProntoPro NG in the docking station until it clicks.
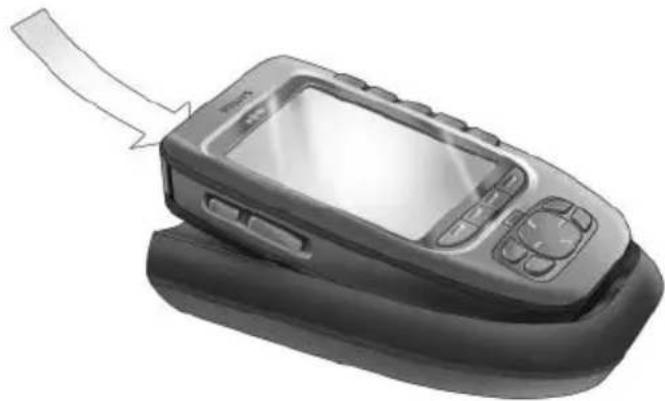
Charging starts immediately. The blue charging LEDs on the front of the docking station indicate that the battery pack is being charged.
When the ProntoPro NG is fully charged, the charging LEDs switch off. Normal charging time is 2 to 3 hours, depending on the condition of the battery pack.
When the charging LEDs are flashing, an error has occurred. Try one of the following:
■ Make sure the battery pack is properly installed in your ProntoPro NG.
■ Make sure the ProntoPro NG is placed properly in the docking station.
- Check if the connector in the docking station is clean and free of obstructions.
■ Cool down the battery pack.
3 When the ProntoPro NG is fully charged, take it out of the docking station.
Make sure that you first tilt the ProntoPro NG to an angle of 30° to 45° and then take it out of the docking station.

Turning on ProntoPro NG
ProntoPro NG can be turned on in four different ways:
Tap the touch screen.
Note Only use your finger, a stylus or a blunt soft object like a pencil eraser to operate the touch screen.
Press one of the 4 firm keys below the screen to activate the display (default setting).
For more information, see 'Adjusting the Firm Keys Settings' on page 36.
Note When you press a hard button on ProntoPro NG, the according function will be executed immediately, while the 4 firm keys below the touch screen will activate the display.
Press the Backlight button.
Tilt ProntoPro NG more than 50 degrees (default setting).
For more information, see 'Adjusting the Pickup Sensor Settings' on page 37.

Setting Time and Date
When you have installed the battery pack and turned on ProntoPro NG, you have to set the current time.
Attention Every time you reset your ProntoPro NG you will have to set the time again.
Changing the Time Format
1 Tap and hold the ProntoPro NG icon in the upper left corner of the touch screen for 3 seconds. The Tools Menu appears.
2 T ap fettion in the Tools Menu. The first Settings Page appears.

3 Tap the Time Format button AM/PM in the first Settings Page. The Time Format button toggles between the three time formats:
■ 12 hour (AM/PM): This is the default format;
■ 24 hour;
No time.
4 Tap the ProntoPro NG icon 📋 to exit the Tools Menu.
Changing the Time
1 Tap and hold the ProntoPro NG icon 📋 in the upper left corner of the touch screen for 3 seconds. The Tools Menu appears.
2 T ap Setthe Tools Menu.
The first Settings Page appears.
3 Tap the Time button in the first Settings Page.
The Time button is selected. The labels '+' and '-' appear for the two middle firm keys.
4 To increase the time, press (and hold) the firm key labeled '+'.
-or-
To decrease the time, press (and hold) the firm key labeled '-'.
5 Tap the Time button again.
The new time is set.
6 Tap the ProntoPro NG icon 📋 to exit the Tools Menu.
Changing the Date
1 Tap and hold the ProntoPro NG icon 📋 in the upper left corner of the touch screen for 3 seconds. The Tools Menu appears.
2 T ap Setthe Tools Menu.
The first Settings Page appears.
To change the day
1 T ap the Day button in the first Settings Page.
The Day button is selected. The labels '+' and '-' appear for the two middle firm keys.
2 To increase the days, press (and hold) the firm key labeled '+'. -or- To decrease the days, press (and hold) the firm key labeled '-'.
3 T ap the Day button again.
The new day is set.
4 When you have changed the date, tap the ProntoPro NG icon 📋 to exit the Tools Menu.
To change the month
1 T ap the Month button in the first Settings Page.
The Month button is selected. The labels '+' and '-' appear for the two middle firm keys.
2 To increase the months, press (and hold) the firm key labeled '+'.
-or-
To decrease the months, press (and hold) the firm key labeled '-'.
3 T ap the Month button again. The new month is set.
4 When you have changed the date, tap the ProntoPro NG icon 📋 to exit the Tools Menu.
To change the year
1 Tap the Year button in the first Settings Page.
The Year button is selected. The labels '+' and '-' appear for the two middle firm keys.
2 To increase the years, press (and hold) the firm key labeled '+'. -or-
To decrease the years, press (and hold) the firm key labeled '-'.
3 Tap the Year button again.
The new year is set.
4 When you have changed the date, tap the ProntoPro NG icon 📋 to exit the Tools Menu.
Setting the Language
You can change the language used on your ProntoPro NG.
1 Tap and hold the ProntoPro NG icon in the upper left corner of the touch screen for 3 seconds. The Tools Menu appears.
2 T ap Setting Tools Menu. The first Settings Page appears.
3 Press the Page down hard button. The second Settings Page appears.
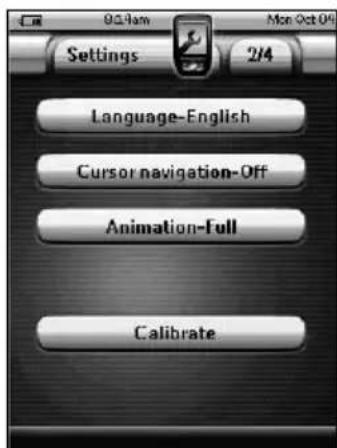
4 T ap in the second Settings Page. The Language button toggles between five languages:
■ English;
German;
French;
■ Dutch;
■ Spanish.
5 Tap the ProntoPro NG icon 📋 to exit the Tools Menu.
Operating ProntoPro NG
ProntoPro NG contains a series of customizable devices, each consisting of several device pages. All active devices on your ProntoPro NG are listed in the Device Overview. All the available device pages are listed per device in the Page Overview.
Device Overview
The Device Overview offers you a list of all the devices you can control with ProntoPro NG. To view the Device Overview, press the Device Overview button at the top of the touch screen.

You can navigate between the devices in two different ways:
■ Tap the device you want to operate from the Device Overview.
- Tap the Device Left button at the top of the touch screen to navigate to the previous device.
Tap the Device Right button 📋 at the top of the touch screen to navigate to the next device.
By default you navigate through ProntoPro NG, using this touch screen navigation. When cursor navigation is enabled, the Device Left and Device Right button
disappear and the Cursor Navigation icon 📁 appears at the top left. You then navigate through the devices and pages using the cursor. For more information on changing the touch screen navigation to cursor navigation, see 'Operating ProntoPro NG with the Cursor' on page 48.
Page Overview
The Page Overview offers you a list of all the pages for one device. To view the Page Overview, tap the Page Overview button, which displays the page number in the upper area of touch screen.
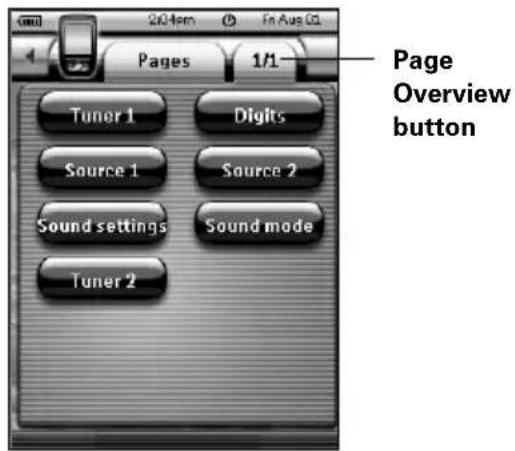
You can navigate between the different pages in two different ways:
■ Tap the page you want to operate from the Page Overview.
■ Press the Page Up or Page Down hard button on the left side of ProntoPro NG.
Customizing ProntoPro NG
What makes ProntoPro NG so powerful is the ability to extend its functionality in multiple ways, like programming additional functions, adding supplementary devices and changing the interface as it suits you best.
For full editing you can use ProntoProEdit NG software. See 'ProntoProEdit NG' on page 53 for more information.
Using the Tools
ProntoPro NG provides different tools. For customizing ProntoPro NG you have to switch to the appropriate tool. ProntoPro NG offers 10 different tools in the Tools Menu, each providing different functionalities:
| Settings Settings Tool:Defining the settings of your ProntoPro NG (p. 32) | Timer Timer Tool:Defining timer actions to be carried out at predefined times (p. 41) |
| Brand Brand Tool:Defining the brands of your audio/video equipment (p. 20) | Learn Learn Tool:Learning IR codes from other remote controls (p. 23) |
| Label Label Tool:Labeling buttons, devices and pages (p. 25) | Add Add Tool:Adding new devices or copying existing devices (p. 28) |
| Delete Delete Tool:Deleting buttons or devices (p. 30) | Move Move Tool:Moving devices in the Device Overview (p. 31) |
| Macro Macro Tool:Programming a sequence of commands for one single button (p. 38) | RF IR RF IR Tool:Defining to operate ProntoPro NG with IR signals or RF signals (p. 50) |
To enter the Tools Menu, you have to tap and hold the ProntoPro NG icon 📁 in the upper left corner of the touch screen for 3 seconds.
You can exit all Tools by tapping the ProntoPro NG icon 📋. Keep in mind that your latest changes to the current page will not be saved automatically.
In the Tools:
- Tap to start using the Tool.
■ Tap to go back to the Tools Menu.
Tap to confirm an action and save the changes you made. - Tap to cancel an action without saving the changes.
■ Press the firm key labeled to Done series of actions and go back to the Tools Menu.
Defining the Brand for a Device
ProntoPro NG contains a huge list of brands and their corresponding IR codes in its database. ProntoPro NG uses these IR codes to control devices. Because there are several brands using specific IR codes, you have to define the brands and the corresponding code sets for each device. You can either have ProntoPro NG autosearch the brand or select it yourself. If a device's brand contains more than one IR code set, you also have to select it.
On the Device Overview you find buttons for the most common video and audio devices. ProntoPro NG is set by default to operate Philips and Marantz devices. For all devices other than Philips or Marantz, you first have to define the brand before you can operate them with ProntoPro NG.
Selecting the Brand and Code Set for your Device
1 Tap and hold the ProntoPro NG icon in the upper left corner of the touch screen for 3 seconds.
The Tools Menu appears.
2 T ap in the Tools Menu.
The 'Brand Tool' screen appears.
3 T ap in the 'Brand Tool' screen. The Device Overview appears.
4 In the Device Overview, tap the Device for which you want to define the brand.
A message screen appears.
5 T ap OK . The 'Brands' screen appears.
Selecting the brand
1 Tap the Scroll Down button 📋 or the Scroll Up button 🔒 next to the Brands list. The Brands list scrolls down/up.
Note You can also select the brand via the virtual keyboard by tapping one or more of the brand's name characters.
2 Tap the brand for the selected Device in the Brands list.
3 T ap in the 'Brands' screen.
If there is only one code set, the 'Installing the Brand' screen appears.
Go to 'Installing the brand' below.
-or-
If there is more than one possible code set, a message screen appears.
4 T ap OK . The 'Code sets' screen appears.
Selecting the code set
1 Tap the Scroll Down button 📋 or the Scroll Up button 🔒 next to the Code Sets list.
The Code Sets list scrolls down/up.
2 Tap the code set for the selected Device in the Code Sets list.
3 Tap in the 'Code Sets' screen.
The 'Installing the Brand' screen appears.
Installing the brand
1 T ap in the 'Installing the Brand' screen. The first Page of the selected Device appears.
2 T ap different buttons to see if the device is responding to the IR codes for the selected brand and code set.
3 Press the left firm key, labeled Previous The 'Installing the Brand' screen appears again.
4 T a p In the 'Installing the Brand' screen.
The IR codes for the selected brand and code set are installed.
Selecting the Brand and searching the Code Set for your device
Note Make sure the device for which you are searching the brand is turned on.
1 Tap and hold the ProntoPro NG icon 📋 in the upper left corner of the touch screen for 3 seconds. The Tools Menu appears.
2 T ap in the Tools Menu.
The 'Brand Tool' screen appears.
3 T ap in the 'Brand Tool' screen. The Device Overview appears.
4 In the Device Overview, tap the Device for which you want to define the brand.
A message screen appears.
5 T ap OK . The 'Brands' screen appears.
6 Select the brand of your device as described in 'Selecting the brand' on page 21.
Searching the code set
1 T ap in the 'Code Sets' screen.
The 'Searching the Code Set' screen appears.
2 T ap and point ProntoPro NG at the device.
The 'Searching' screen appears. ProntoPro NG searches through the list of code sets for the selected brand, by sending out an IR code for each code set.
3 When the device for which you are defining the brand, turns off, tap in the 'Searching' screen. The 'Installing the Brand' screen appears.
4 T o install the brand and code set, follow the instructions described in 'Installing the brand' on page 21.
Searching the Brand and Code Set for your device
1 Tap and hold the ProntoPro NG icon 📋 in the upper left corner of the touch screen for 3 seconds. The Tools Menu appears.
2 T ap in the Tools Menu.
The 'Brand Tool' screen appears.
3 T ap in the 'Brand Tool' screen. The Device Overview appears.
4 In the Device Overview, tap the Device for which you want to define the brand.
A message screen appears.
5 T ap OK .
The 'Brands' screen appears.
Searching the brand
1 T ap in the 'Brands' screen.
The 'Searching the Brand' screen appears.
2 T ap and point ProntoPro NG at the device.
The ‘Searching’ screen appears. ProntoPro NG searches through the list of brands, by sending out an IR code for each brand.
3 When the device for which you are defining the brand, turns off,
tap in the 'Searching' screen.
The 'Installing the Brand' screen appears.
4 T o install the brand and code set, follow the instructions described in 'Installing the brand' on page 21.
Learning Commands
If an IR code is not in the database, you can program ProntoPro NG commands by transmitting IR signals from your existing remote control to ProntoPro NG's learning eye.
The Learn Tool allows you to learn a button or a device action. A device action is an action that is executed automatically when you select a device. E.g. when you select TV, your ProntoPro NG can learn to switch on the TV at the same time. You can also use the Learn Tool to relearn commands that do not work properly.

Note Changing the Brand in the Brand Tool will not have an impact on the learned codes.
Learning a Button
1 Tap and hold the ProntoPro NG icon 📁 in the upper left corner of the touch screen for 3 seconds. The Tools Menu appears.
2 T ap in the Tools Menu. The 'Learn Tool' screen appears.
3 T ap Learn Button . The last page you have visited appears.
4 Navigate to the Device and the Page that contains the button you want to learn.
5 Position ProntoPro NG and the remote control as illustrated above.
| Note | Make sure that you aim ProntoPro NG'slearning eyeat the remote control's IR window.Thedistancebetween ProntoPro NG and the remote control should be between 2 and 8 inches (5 and 20 cm). |
6 T ap the button you want to learn. A Learning indication appears in the upper right corner of the touch screen.
7 Press and hold the key on the other remote control for 1 second. Make sure you press the key within 5 seconds. If learning succeeded, you will get an OK message. If learning failed, you will get a Failure message. See 'ProntoPro NG will not learn commands' on page 58 for more information.
8 When you want ProntoPro NG to learn other buttons, repeat steps 6 and 7. 9 Press the left firm key labels Done the touch screen to stop learning.
Learning a Device Action
1 Tap and hold the ProntoPro NG icon 📋 in the upper left corner of the touch screen for 3 seconds.
The Tools Menu appears.
2 T ap in the Tools Menu.
The 'Learn Tool' screen appears.
3 T ap Learn Device Action . The Device Overview appears.
4 Position ProntoPro NG and the remote control as illustrated above.
Note Make sure that you aim ProntoPro NG's learning eye at the remote control's IR window. The distance between ProntoPro NG and the remote control should be between 2 and 8 inches (5 and 20 cm).
5 T ap the Device for which you want to learn a Device Action.
A Learning indication appears in the upper right corner of the touch screen.
6 Press and hold the key on the other remote control for 1 second. Make sure you press the key within 5 seconds.
If learning succeeded, you will get an OK message.
If learning failed, you will get a Failure message.
See 'ProntoPro NG will not learn commands' on page 58 for more information.
7 When you want ProntoPro NG to learn other device actions, repeat steps 5 and 6.
8 Press the left firm key labels: Bees the touch screen to stop learning.
Labeling Elements
The Label Tool allows you to label a button, a device or a page. In the Label Tool you can find a virtual keyboard. This keyboard zooms in when you tap a character.
![1 2 3 4 5 6 7 8 9 0 - = q w e r t y u i o p [ ] ' a s d f g h j k i ;' z x c v b n m , . / \](/content/2026/05/1098727/images/76fd2c525f6ff3d12b9148306c9ee87409845fd6c84dd715cf20051cb75e09d8.jpg)
The keyboard contains five different character sets, including a series of symbols you can use for labeling. You use the Shift button to switch between the five character sets on the keyboard.
![1 2 3 4 5 6 7 8 9 0 - = q w e r t y u i o p [ ] `a s d f g h j k l ; ' z x c v b n m , . / \nShift](/content/2026/05/1098727/images/17a8dafdb18df8f69cd03adf33d715bb3a30631ed6d381f024a2718fa5ab8ae1.jpg)
For a complete list of the symbols, see 'List of Symbols' on page 61.
Labeling a Button
1 Tap and hold the ProntoPro NG icon in the upper left corner of the touch screen for 3 seconds. The Tools Menu appears.
2 T ap in the Tools Menu.
The 'Label Tool' screen appears.
3 T ap Label Button . The page you last visited appears.
4 Navigate to the Device and the Page that contains the button you want to label.
5 T ap the button you want to label. The 'Labeling' screen appears.
6 T ap the keyboard.
The keyboard zooms in.
7 T ap the character you want to add to the label.
The character is added to the label. The keyboard automatically zooms out again.
1 T o zoom out without adding a character to the label, pres Unzoom The character is not added to the label. The keyboard is zoomed out.
2 T o use other characters and symbols, pres Shift The character set on the keyboard switches. You can choose from four different character sets.
3 T o remove characters, press the firm key labels Delete The character in front of the cursor is removed.
8 You can add other characters to the label.
9 T ap Save .
The label of the selected button is changed. The last visited page appears again.
-or-
Tap Cancel.
The last visited page appears again, without changing the label of the selected button.
10 You can select other buttons on ProntoPro NG to label.
11 Press the left firm key labeled to Done a touch screen to exit the Label Tool.
Labeling a Device
1 Tap and hold the ProntoPro NG icon 📁 in the upper left corner of the touch screen for 3 seconds.
The Tools Menu appears.
2 T ap in the Tools Menu.
The 'Label Tool' screen appears.
3 T a p Label Device . The Device Overview appears.
4 T ap the Device you want to label. The 'Labeling' screen appears.
5 Follow the instructions 6 to 8 of 'Labeling a Button' on page 26.
6 T ap Save .
The label of the selected Device is changed. The Device Overview appears again.
-or-
Tap Cancel.
The Device Overview appears again, without changing the label of the selected device.
7 You can select other Devices in the Device Overview to label.
8 Press the left firm key labels Dela the touch screen to exit the Label Tool.
Labeling a Page
1 Tap and hold the ProntoPro NG icon 📁 in the upper left corner of the touch screen for 3 seconds.
The Tools Menu appears.
2 T an in the Tools Menu.
The 'Label Tool' screen appears.
3 T ap in the 'Label Tool' screen. The Page Overview appears.
4 T ap the Page you want to label. The 'Labeling' screen appears.
5 Follow the instructions 6 to 8 of 'Labeling a Button' on page 26.
6
T ap Save
The label of the selected Page is changed. The Page Overview appears again.
-or-
Tap Cancel.
The Page Overview appears again, without changing the label of the selected page.
7 You can select another Page in the Page Overview to label.
8 Press the left firm key labels Done the touch screen to exit the Label Tool.
Adding Devices
The Add Tool allows you to add a new device or copy an existing device. When you add a new device, a device template stored on your ProntoPro NG is used to create the device pages, buttons and functions. By default Philips IR codes are used when you add a new device. For your brand of device, you then have to program the new device using the Brand Tool (page 20) or the Learn Tool (page 23). Copying an existing device saves time. The personal settings you defined for that device will also be copied. For instance, if you want to add a second CD player, you do not have to define the Brand, learn or create macros again. You can just copy them from the existing CD player already programmed on your ProntoPro NG.
Adding a New Device
1 Tap and hold the ProntoPro NG icon 📋 in the upper left corner of the touch screen for 3 seconds. The Tools Menu appears.
2 T ap in the Tools Menu. The 'Add Tool' screen appears.
3 T ap in the 'Add Tool' screen. The 'Adding' screen appears.
4 Tap the device template you want to add in the Device Templates list. The 'IR Code' screen appears.
5 T ap Select. The 'Actions' screen appears.
6 T ap in the Actions screen.
The Device is added to ProntoPro NG with its actions like IR codes, beeps and delays.
-or-
Tap in the Actions screen.
The Device is added to ProntoPro NG without its actions like IR codes, beeps and delays. To operate this device, you have to learn every button of the device with the Learn Tool.
Note Added devices are automatically positioned at the end of the Device Overview. You can move devices with the Move Tool. See 'Moving Devices' on page 31 for more information.
Copying an Existing Device
1 Tap and hold the ProntoPro NG icon 📁 in the upper left corner of the touch screen for 3 seconds. The Tools Menu appears.
2 T ap in the Tools Menu. The 'Add Tool' screen appears.
3 T ap in the 'Add Tool' screen. The 'Adding' screen appears.
4 Tap the Device you want to copy in the Devices list. The 'IR Code' screen appears.
5 T ap Select. The 'Actions' screen appears.
6 T ap in the Actions' screen. The Device is copied to ProntoPro NG with its actions like IR codes, beeps and delays.
-or-
Tap in the Actions screen.
The Device is copied to ProntoPro NG without its actions like IR codes, beeps and delays. To operate this device, you have to learn every button of the device with the Learn Tool.
Note Added devices are automatically positioned at the end of the Device Overview. You can move devices with the Move Tool. See 'Moving Devices' on page 31 for more information.
Deleting Elements
The Delete Tool allows you to delete a button or a device.
Deleting a Button
1 Tap and hold the ProntoPro NG icon in the upper left corner of the touch screen for 3 seconds. The Tools Menu appears.
2 T ap in the Tools Menu. The 'Delete Tool' screen appears.
3 T ap Delete Button . The last visited page on the ProntoPro NG appears.
4 Navigate to the Device and the Page that contains the button you want to delete.
5 T ap the button you want to delete. A message screen appears.
6 T ap Delete . The button is deleted.
7 You can select other buttons on ProntoPro NG to delete. -or-
Press the right firm key labeled Unda the deletion. The button is restored.
8 Press the left firm key labels the touch screen to exit the Delete Tool.
Deleting a Device
1 Tap and hold the ProntoPro NG icon 📋 in the upper left corner of the touch screen for 3 seconds. The Tools Menu appears.
2 T ap in the Tools Menu. The 'Delete Tool' screen appears.
3 T ap Delete Device The Device Overview appears.
4 T ap the Device you want to delete. A message screen appears.
5 T ap Delete . The Device is deleted.
6 You can select other Devices on ProntoPro NG to delete.
-or-
Press the right firm key labeled Unda the deletion.
The Device is restored.
7 Press the left firm key labeled Delo the touch screen to exit
the Delete Tool.
Moving Devices
The Move Tool allows you to move a device up or down the Device Overview, enabling you to put your most used devices at the top of the list.
1 Tap and hold the ProntoPro NG icon 📋 in the upper left corner of the touch screen for 3 seconds.
The Tools Menu appears.
2 T ap in the Tools Menu.
The 'Move Tool' screen appears.
3 T ap the Device you want to move in the Devices list.
4 Tap the Move Up ↑ or Move Down button ↓ in the 'Moving' screen.
The selected Device moves up/down in the Device List.
5 T ap OK the 'Moving' screen.
The Device is moved.
Adjusting the Settings
In the Settings Pages you can adjust several settings. You can:
■ Set the time and date as described earlier, on page 14.
■ Set the brightness of the backlight;
■ Set the timeout of the LCD screen;
■ Set the volume level;
■ Set the language of the ProntoPro NG, as described earlier, on page 16.
■ Set ProntoPro NG to operate with the Cursor;
■ Set the animation mode;
■ Calibrate the touch screen;
■ Adjust the screen activation settings.
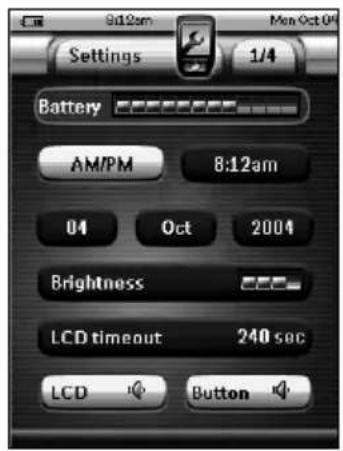


In the fourth Settings Page you can consult the version information and the available memory.
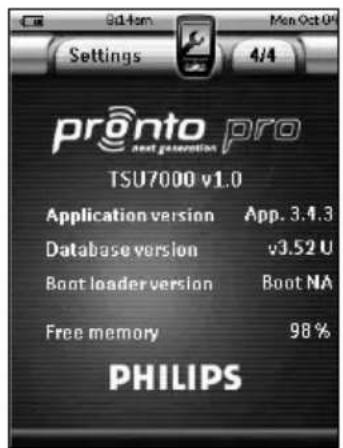
User Guide
1 Tap and hold the ProntoPro NG icon 📁 in the upper left corner of the touch screen for 3 seconds. The Tools Menu appears.
2 Select Settings
The first Settings Page appears.
Setting the Brightness of the Backlight
You can adjust the intensity of the LCD backlight. There are 4 levels of backlight brightness.
1 T ap the Brightness in the first Settings Page.
The Brightness button is selected. The '+' and '-' labels appear on the two middle firm keys below the touch screen.
2 To increase the brightness, press (and hold) the firm key labeled '+'. -or-
To decrease the brightness, press (and hold) the firm key labeled '-'.
3 T ap the Brightness
The new Backlight Brightness is set.
Setting the Timeout of the LCD Screen
The timeout of the LCD screen determines how long the LCD touch screen stays active before turning off. Shortening the active time will increase ProntoPro NG's battery life.
Note The LCD screen will only time out when you are not using ProntoPro NG.
1 T ap LCD Timcoft H8 sec Page.
The LCD Timeout button is selected. The '+' and '-' labels appear on the two middle firm keys below the touch screen.
2 To increase the timeout, press (and hold) the firm key labeled '+'. -or-
To decrease the timeout, press (and hold) the firm key labeled '-'.
3 T a p LCD Timeout 40 sec again.
The new LCD screen timeout is set.
Setting the Volume Level
You can set the volume level for the hard buttons as well as for the touch screen buttons. The volume of the button refers to the loudness of the beep you hear when you press or tap a button.
Setting the Volume Level of the Hard Buttons
To adjust the volume of the hard buttons, tap in the first Settings Page.
You can either select 1 of the 3 volume levels or choose to mute. Every time you press, the volume level increases with one step up to level 3.
Setting the Volume Level of the Touch Screen
To adjust the volume level of the touch screen, tap in the first Settings Page.
You can either select 1 of the 3 volume levels or choose to mute. Every time you tap, the volume level increases with one step up to level 3.
Setting the Navigation for ProntoPro NG
The cursor is used by default to operate your devices. You then navigate the ProntoPro NG with the touch screen buttons. However, you can also set the cursor to browse through ProntoPro NG's devices and pages. For more information on operating the ProntoPro NG with the cursor, see 'Operating ProntoPro NG with the Cursor' on page 48.
To set the navigation for the ProntoPro NG, tap second Settings Page:
In the Cursor navigation-Off
- You can select Cursor Navigation-Off to navigate the ProntoPro NG with the touch screen buttons.
- You can select Cursor Navigation-On to navigate the ProntoPro NG with the cursor.
Setting the Animation Mode
ProntoPro NG provides navigation feedback through graphical animations. Switching pages is done with a page transition, switching from Use Mode to one of the Tools is accompanied with a mode transition. You can enable and disable the animations of your ProntoPro NG in the second Settings Page:
- You can disable the animations by choosing 'None' (no animations). By disabling all animations you use the absolute maximum of your ProntoPro NG's processing speed.
- When changing pages with the 'Page Only' animation, one page seems to slide out of the screen, while the second page slides in.
- The 'Mode Only' animation shifts the ProntoPro NG icon at the top area of the touch screen.
- With the option 'Full' you can enable both animations at the same time.
Calibrating the Touch Screen
When you first use your ProntoPro NG, the touch screen is already calibrated. However, if you notice that your ProntoPro NG does not send out the commands in accordance with what is indicated on the touch screen, it is advised to recalibrate the touch screen.
Attention Never use an actual pen, pencil or other sharp object on the touch screen. Use a pointy object like a plastic-tipped pen or a stylus intended for use with touch screens.
1 T ap in the second Settings Page. The 'Calibration' screen appears.
2 Tap the upper left corner on the touch screen.
3 Tap the lower right corner of the touch screen.
4 Tap the upper right corner of the touch screen.
5 Tap the lower left corner on the touch screen. The touch screen is calibrated.
Adjusting the Screen Activation Settings
In the third Settings Page you can adjust the screen activation settings. You can define when or if you want the LCD backlight to be activated. You can also set when or if you want the ProntoPro NG to send out IR codes or perform button actions.
You can adjust the following screen activation settings:
■ Firm keys settings;
■ Cursor keys settings;
- Pickup sensor settings.

Tip You can adjust the timeout for the LCD backlight. For more information, see 'Setting the Timeout of the LCD Screen' on page 33.
Adjusting the Firm Keys Settings
You can set the firm keys settings to 3 different states. The firm keys are located below the touch screen of your ProntoPro NG.
To adjust the firm keys settings of the ProntoPro NG, tap in the third Settings Page. You can now toggle between the following 3 firm keys states:
■: This setting implies that when you press one of the 4 firm keys, your
ProntoPro NG will send out the IR code or perform the action assigned to this key.
The LCD backlight will not be activated when pressing a firm key.
■: This setting implies that when you press one of the 4 firm keys, the LCD backlight will be activated and your ProntoPro NG will send out the IR code or perform the action assigned to this key.
■: This is the default setting of your ProntoPro NG. It implies that when you press one of the 4 firm keys, the LCD backlight will be activated.
The ProntoPro NG will not send out an IR code nor perform the button action.
Adjusting the Cursor Keys Settings
You can set the cursor keys settings to 3 different states.
For more information on the cursor keys, see 'Operating ProntoPro NG with the Cursor' on page 48.
To adjust the cursor keys settings of the ProntoPro NG, tap in the third Settings Page. You can now toggle between the keys states:

■: This setting implies that when you press one of the cursor keys, the LCD backlight will be activated.
The ProntoPro NG will not send out an IR code nor perform the button action.
■: This setting implies that when you press one of the cursor keys, your ProntoPro NG will send out the IR code or perform the action assigned to this key.
The LCD backlight will not be activated when pressing a cursor key.
■: This is the default setting of your ProntoPro NG. It implies that when you press one of cursor keys, the LCD backlight will be activated and your ProntoPro NG will send out the IR code or perform the action assigned to this key.
Adjusting the Pickup Sensor Settings
You can set the pickup sensor settings of your ProntoPro NG to 2 different states. This implies that you can choose whether or not the backlight should be activated when tilting your ProntoPro NG.
To adjust the pickup sensor settings, tap
in the third Pickup sensor-On
Settings Page. You can now toggle between the following 2 states:
- Pickup sensor-Off: This setting deactivates the LCD backlight when tilting the ProntoPro NG.
- Pickup sensor-On: This is the default setting. It activates the LCD backlight when tilting the ProntoPro NG.
Using the Power Features
Creating and Editing Macros
A macro allows you to send a sequence of commands when tapping one single button. You can for instance switch on your TV, turn on a movie channel and prepare your VCR for recording by rewinding the videotape. The macro contains an action list. The action list can be created and edited in the Macro Tool.
Note Once you have programmed a macro, the button actions will not be changed when you select another brand in the Brand Tool.
In the Macro Tool you first have to select the button that will contain the macro, also called the target button. Then, one by one, you create an action list by adding actions to this target button. You can do this by:
- Selecting another button and adding its actions to the action list of your target button.
■ Adding a delay to the action list.
■ Adding a beep to the action list.
After creating the macro, all actions you added to the action list are executed when you tap the button.
Creating a Macro
1 Tap and hold the ProntoPro NG icon 📋 in the upper left corner of the touch screen for 3 seconds. The Tools Menu appears.
2 T ap in the Tools Menu.
The 'Macro Tool' screen appears.
3 T ap for the 'Macro Tool' screen. The last visited page appears.
4 Navigate to the Device and the Page that contains the target button you want to use for a macro.
5 T ap the button you want to select as a target button.
If you can use the button to program a macro, the 'Macro' screen appears.
-or-
If you cannot use the button to program a macro, you hear a Failure beep.

User Guide
Note
You can assign a macro to most buttons of your ProntoPro NG. Only the hard buttons on the left side of ProntoPro NG (Backlight, Page Up and Page Down) cannot be programmed.
To add an action to the action list
1 T ap in the 'Macro' screen. The last visited page appears again.
2 Navigate to the Device and the Page that contains the button you want to add to the macro.
3 T ap the button with the action(s) you want to add to the macro. The 'Macro' screen appears.
The name of the selected button is added at the bottom of the Action List. The macro will execute all the actions that are assigned to this button.
4 You can select other buttons to add to the macro.
To add a delay to the action list
You can add a delay to the action list e.g. to insert a short pause between turning on a device and sending commands to it, allowing the device to warm up.
1 T ap in the 'Macro' screen.
The ‘+’ button and ‘-’ button appear on the two middle firm keys below the touch screen.
2 To increase the delay, tap (and hold) the firm key labeled '+'. -or-
To decrease the delay, tap (and hold) the firm key labeled '-'.
Note You can still change the delay later on.
To add a beep to the action list
To determine when the macro execution is finished, it is useful to add a beep as final command in the action list.
1 Select the action in the action list, where you want to add a beep. The action is selected.
2 T ap in the 'Macro' screen.
A default beep is added to the action list, after the selected action.
Totest the macro
You do not have to exit the Macro Tool to try out the macro you created or edited. From within the Macro Tool you can test the macro. ProntoPro NG executes all actions as you defined them in the action list.
In the 'Macro' screen, press the left firm key labeled ProntoPro NG executes the actions in the action list.
Test
Note Make sure that you keep ProntoPro NG aimed at your Home Theater equipment during the macro execution.
Tofinish the macro
Tap in the 'Macro' screen. The macro is created and assigned to the button you selected as a target. -or- Tap in the 'Macro' screen. The Tools Menu appears again without creating the macro.
Editing a Macro
Moving an action in the action list
1 T o display the 'Macro' screen with the action list assigned to the button, follow the instructions 1 to 5 as described in 'Creating a Macro' on page 38.
2 T ap the action in the action list you want to move in the 'Macro' screen. The selected action is highlighted.
3 In the 'Macro' screen, tap the Move Up button ↑ or the
Move Down button ↓ .
The selected action moves up/down in the action list.
4 You can select other actions to move.
Deleting an action from the action list
1 T o display the 'Macro' screen with the action list assigned to the button, follow the instructions 1 to 5 as described in 'Creating a Macro' on page 38.
2 T ap the action in the action list you want to delete in the 'Macro' screen.
The selected action is highlighted.
3 In the 'Macro' screen, press the right firm key labeled . Delete The selected action is deleted from the action list.
4 You can select other actions to delete.
Creating and Editing Timers
With the Timer Tool you can define actions to be carried out at predefined times. For instance, you can switch on the lights or program your VCR to record your favorite daily TV-show.
Note When a timer is executed, you will hear a beep and a Timer message appears on screen.
If ProntoPro NG is performing another task (sending out IR codes, testing a macro, ...) when a timer is due to be executed, ProntoPro NG first continues performing the current task.
Activating Timers
1 Tap and hold the ProntoPro NG icon in the upper left corner of the touch screen for 3 seconds. The Tools Menu appears.
2 T ap in the Tools Menu.
The 'Timer Tool' information screen appears.
3 T ap in the 'Timer Tool' information screen.
The 'Timer' screen appears.
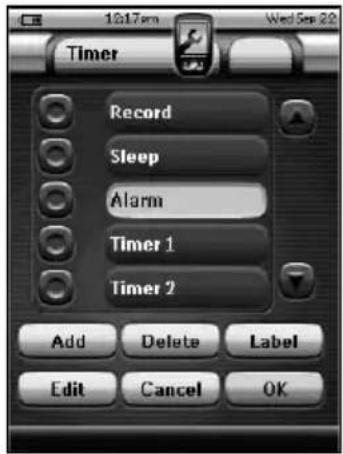
4 T ap the check box in front of the timer that you want to activate.
The timer is activated.
5 In the 'Timer' screen, tap . OK
The 'Timer' screen closes and the Tools Menu appears again. The Timer icon appears next to the time indication.
-or-
In the 'Timer' screen, tap Cancel
The Timer screen closes without activating the timer.
Note In the Timers list, activated timers are displayed first, followed by the not-activated timers. Both activated and not-activated timers are listed chronologically.
Creating and Editing Timers
Adding a Timer
1 Tap and hold the ProntoPro NG icon in the upper left corner of the touch screen for 3 seconds. The Tools Menu appears.
2 T ap in the Tools Menu.
The 'Timer Tool' information screen appears.
3 T ap Go . The 'Timer' screen appears.
4 In the 'Timer' screen, tap to add a new timer to the list.
A new timer is added to the Timers list. By default a new timer is labeled Timer and a number. It has no start and stop actions defined.

5 T o label the timer, tapLabel, as described in 'Labeling a Timer' on page 43.
6 T o define the start and stop actions for the timer, tap, as described in 'Editing a Timer' on page 44.
7 In the 'Timer' screen, tap . OK The 'Timer' screen closes and the Tools Menu appears again. The timer is added.
-or- In the 'Timer' screen, tap Cancel The Timer screen closes without adding the timer.
Deleting a Timer
1 Tap and hold the ProntoPro NG icon in the upper left corner of the touch screen for 3 seconds. The Tools Menu appears.
2 T ap in the Tools Menu. The 'Timer Tool' information screen appears.
3 T ap Go . The 'Timer' screen appears.
User Guide
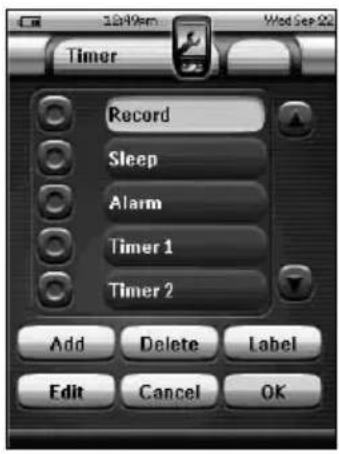
4 T ap the label of the timer you want to delete.
The timer is highlighted.
5 In the 'Timer' screen, tap . Delete
A message screen appears.
6 In the message screen, tap Delete.
The timer is deleted from the list.
7 In the 'Timer' screen, tap . OK
The 'Timer' screen closes and the Tools Menu appears again. The timer is deleted.
-or-
In the 'Timer' screen, tap Cancel
The Timer screen closes without deleting the Timer.
Labeling a Timer
The default name for a timer is 'Timer' followed by a number, for example Timer 5.
1 Tap and hold the ProntoPro NG icon in the upper left corner of the touch screen for 3 seconds. The Tools Menu appears.
2 T ap in the Tools Menu. The 'Timer Tool' information screen appears.
3 T ap Go . The 'Timer' screen appears.
4 T ap the label of the timer you want to label. The timer is highlighted.
5 In the 'Timer' screen, tap . Label The 'Labeling' screen appears.
6 Label the timer as described in 'Labeling Elements' on page 25.
7 In the 'Labeling' screen, tap . Save
The 'Timer' screen appears again and the timer is relabeled.
8 In the 'Timer' screen, tap . OK
The Tools Menu appears again.
Editing a Timer
1 Tap and hold the ProntoPro NG icon in the upper left corner of the touch screen for 3 seconds. The Tools Menu appears.
2 T ap in the Tools Menu. The 'Timer Tool' information screen appears.
3 T ap Go . The 'Timer' screen appears.
4 T ap the label of the timer you want to edit. The timer is highlighted.
5 In the 'Timer' screen, tap . Edit The 'Editing Timer' screen appears.
6 T o edit the timer, execute the following steps:

1 Set the Start Date. See 'Setting the Start Date' on page 45 for more information.
2 Set the Start Time. See 'Setting the Start Time or Stop Time' on page 45 for more information.
3 Define the Start Action. See 'Defining the Start Action or Stop Action' on page 46 for more details.
4 Set the Stop Time. See 'Setting the Start Time or Stop Time' on page 45 for more information.
5 Define the Stop Action. See 'Defining the Start Action or Stop Action' on page 46 for more details.
6 Define the Repeat Settings. See 'Defining the Repeat Settings' on page 46 for more information.
7 In the 'Editing Timer' screen, tap . OK The timer settings are defined. The 'Timer' screen appears again.
8 In the 'Timer' screen, tap . OK The Tools Menu appears again.
Setting the Start Date
When you add a new timer the Start Date is the current date by default. The Stop Date is calculated automatically based on the Start Date, the Start Time and the Stop Time.
Tochange the Start Date:
1 In the 'Editing Timer' screen, tap the Day button.
The Day button is selected. The labels '+' and '-' appear for the two middle firm keys.
2 To increase the value, press (and hold) the firm key labeled '+'.
-or-
To decrease the value, press (and hold) the firm key labeled '-'.
3 T ap the Day button again.
The Day is set.
4 Repeat step 1 to 3 for the Month and the Year button.
The Start Date is set.
Setting the Start Time or Stop Time
1 In the 'Editing Timer' screen, tap the Start Time button or Stop Time button.
The Start Time button or Stop Time button is selected. The labels '+' and '-' appear for the two middle firm keys.
2 To increase the time, press (and hold) the firm key labeled '+'.
-or-
To decrease the time, press (and hold) the firm key labeled '-'.
3 T ap the Time button again.
The new Start Time or Stop Time is set.
Note If the Stop Time lies before the Start Time, the Stop Date automatically jumps to the next day.
Defining the Start Action or Stop Action
ProntoPro NG uses a similar procedure to define the Action List for the Start Action or the Stop Action of the selected timer as in the Macro Tool. See 'Creating and Editing Macros' on page 38 for more information.
Example Some examples of timer actions are: switching on your lights at a specific time or recording your favorite daily TV-show with your VCR.
1 In the 'Editing Timer' screen, tap the The 'Timer' screen appears.

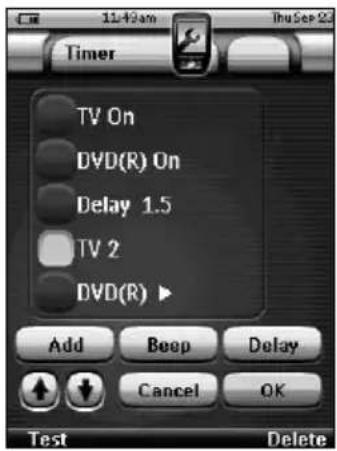
2 In the 'Timer' screen, tap . Add The last visited page appears again.
3 Navigate to the Device and the Page that contains the button you want to add to the macro.
4 T ap the button you want to add to the action list of the timer. The 'Macro' screen appears.
The name of the selected button is added at the bottom of the Action List. The macro will execute all the actions that are assigned to this button.
5 In the 'Macro' screen, tap . OK
The Start Action or Stop Action is defined. The 'Editing Timer' screen appears again.
Defining the Repeat Settings
If you want the timer to repeat itself on more than one occasion, you can use the repeat settings.
1 In the 'Editing Timer' screen, tap the The 'Repeat Settings' screen appears.

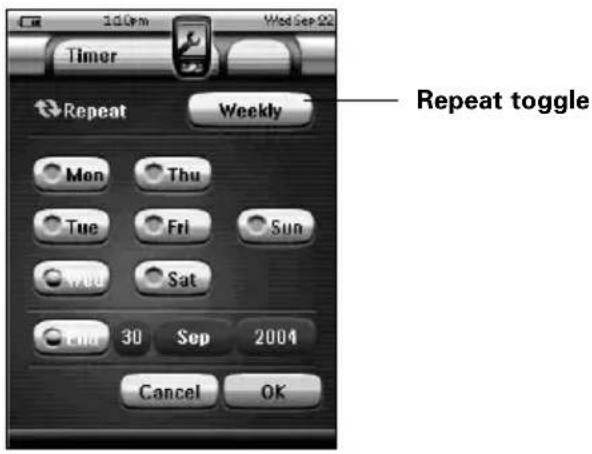
2 T ap the repeat toggle button No
By default 'No' is selected.
The Repeat button toggles between the three settings:
■ No: This is the default setting;
Daily;
■ Weekly.
1 T o change the setting to 'Daily', tap the button again. Every day of the week is automatically selected.
2 If you want to set an end date for the repeating timer, select the End Date check box.
The End Date is enabled.
3 Define the End Date, as described in 'Setting the Start Date' on page 45.
The End Date is defined.
-or-
1 To change the setting to 'Weekly', tap the button again. The current day is selected.
2 Select or deselect the different days of the week on which the timer has to be executed.
3 If you want to set an end date for the repeating timer, select the End Date check box.
The End Date is enabled.
4 Define the End Date, as described in 'Setting the Start Date' on page 45.
The End Date is defined.
-or-
To change the setting to 'No', tap the button again.
The timer will not be repeated.
3 In the 'Repeat Settings' screen, tap
OK
The 'Editing Timer' screen appears again. Feedback about the repeat settings
is provided below the button Repeat Settings
Operating ProntoPro NG with the Cursor
The cursor is set by default to operate the devices, e.g. to navigate through an on-screen TV menu. The cursor contains 4 cursor keys: Right, Left, Up and Down. Each cursor key contains an action list. This list depends on the device that is being operated.

The cursor can also be used to navigate through devices and pages on ProntoPro NG's touch screen.
When you enable the cursor navigation in the Settings Pages, the touch screen navigation with the Left Device and Right Device buttons at the top area
of the touch screen disappears and the cursor navigation icon 📁 appears in the top left corner. You use the cursor for navigating, and not for operating your devices, until you disable the cursor navigation again.
To set the cursor navigation:
1 Tap and hold the ProntoPro NG icon in the upper left corner of the touch screen for 3 seconds. The Tools Menu appears.
2 Select the . Settings
The first Settings Page appears.
3 Press the Page Down hard button at the left side of the ProntoPro NG. The second Settings Page appears.
4 T ap in the second Settings Page.
The cursor navigation is enabled. The Toggle hard button is activated.
5 Tap the ProntoPro NG icon 📋 in the top center of the touch screen to exit the Settings Tool.
Touse the cursor for navigating the ProntoPro NG:
1 Press the Left and Right buttons of the cursor. ProntoPro NG navigates through the devices.
2 Press the Up and Down buttons of the cursor. ProntoPro NG navigates through the pages.
3 Press the Toggle button to easily switch from navigating on ProntoPro NG to control audio/video equipment. The Device Left and Device Right buttons appear in the top area of the touch screen and the cursor is used for controlling audio/video equipment.
4 Press the Toggle hard button again to switch back to cursor navigation.
Operating ProntoPro NG with RF
By default, ProntoPro NG uses infrared (IR) signals to operate devices. IR signals have an operating distance of approximately 33 ft (10 m).

However, you can choose to have ProntoPro NG working with radio frequency (RF) signals to operate devices from a distance or from an adjacent room.
An RF Extender (not included) is therefore required.
The RFX6000 is an RF Extender that can be used in combination with ProntoPro NG. The RF Extender receives RF signals from ProntoPro NG and converts them into IR signals, sent out to the device. Therefore, the RF Extender has to be placed near the device you are operating with the RF Extender's sending eye pointed towards the device.

Selecting RF to Operate your Devices
1 Tap and hold the ProntoPro NG icon 📁 in the upper left corner of the touch screen for 3 seconds. The Tools Menu appears.
2 T ap in the Tools Menu.
The 'RF IR Tool' screen appears.
3 T ap Go . The Device Overview appears.
4 T ap the Device for which you want to select RF.
The 'Select IR or RF' screen appears. By default IR is selected in the Sending Signals list.
The Define RF button is disabled.
5 Choose RF in the Sending Signals list. The Define RF button is enabled.
6 T ap Define RF . The 'RF Settings' screen appears.
7 Select the RF Channel in the RF Channel list you use for the RF Extender.
The RF Channel on the RFX6000 has to be the same as the RF Channel on ProntoPro NG.
8 Select the Extender ID in the Extender ID list you use for the RF Extender.
The Extender ID on the RFX6000 has to be the same as the Extender ID on ProntoPro NG.
Note You can use several RF Extenders with your ProntoPro NG. For each RF Extender you use for your devices, you need to set the RF Channel and the Extender ID. The RF Channel is identical for all RF Extenders. The Extender ID on the RFX6000 is unique for each RF Extender.
9 T ap OK the 'RF Settings' screen. The RF settings are saved.
10 Tap in the 'Select IR or RF' screen. ProntoPro NG will send out RF signals for the selected device.
Note Try to keep ProntoPro NG and the RF Extender away from metal objects, as this will have a negative impact on the range.
Selecting IR to Operate your Devices
1 Tap and hold the ProntoPro NG icon 📋 in the upper left corner of the touch screen for 3 seconds.
The Tools Menu appears.
2 T ap in the Tools Menu.
The 'RF IR Tool' screen appears.
3 T ap Go . The Device Overview appears.
4 T ap the Device for which you want to select IR.
The 'Select IR or RF' screen appears. RF is selected in the Sending Signals list.
5 Choose IR in the Sending Signals list. The 'Define RF' button is disabled.
6 T ap OK the 'Select IR or RF' screen.
ProntoPro NG will send out IR signals for the selected device.
If you want to personalize your ProntoPro NG even more beyond its standard programming features, ProntoProEdit NG is the tool for you to use. ProntoProEdit NG is ProntoPro NG's companion software that you find on the included CD-ROM. Please check the website to make sure that you have the latest version. You can find more information on http://www.pronto.philips.com.
Tolearn how to work properly with ProntoProEdit NG, consult its online help system accessible via the Help menu or by pressing F1.
With ProntoProEdit NG you can:
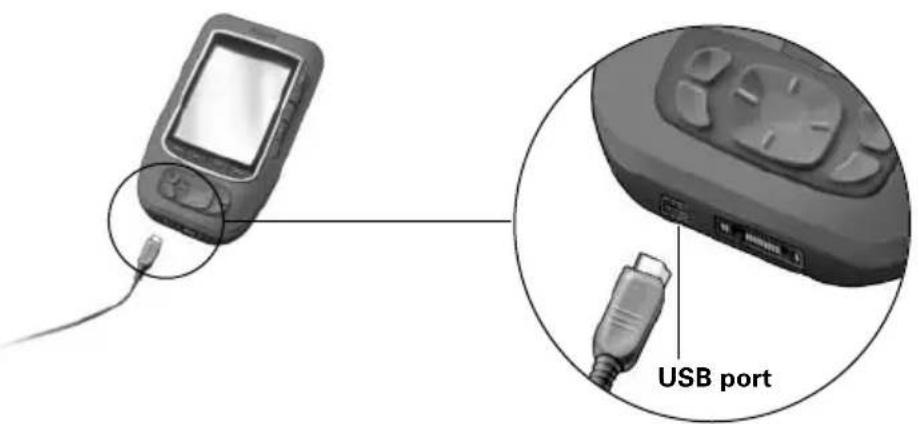
- Upload and download new configurations to and from your ProntoPro NG. You do this with the PC cable included with your ProntoPro NG:
1 P lug one end of the cable in the USB port on your computer.
2 Plug the other end of the cable in the USB port on ProntoPro NG.
- Add, delete, modify and move control panels, devices and commands anywhere on the touch screen;
- Save, duplicate and share configuration files, codes or devices with other ProntoPro NG users;
- Import new graphics to create new buttons and designs;
Use .PNG graphic files that support transparency. You can now place buttons with a transparent background on top of a background image, let transparent buttons overlap or create transparency effects within buttons. You can use the color in the upper left corner of the bitmap as transparency color.
■ Personalize configuration files to optimize the use of your ProntoPro NG;
■ Copy, Paste and Edit plain IR codes that you can exchange with other ProntoPro NG users; - Preview new configuration files on ProntoProEdit NG Simulator, to check what ProntoPro NG's interface will look like;
■ Create and edit macros. In ProntoProEdit NG you have access to the more advanced features for macros.
Some example screens of what you can accomplish with ProntoProEdit NG:

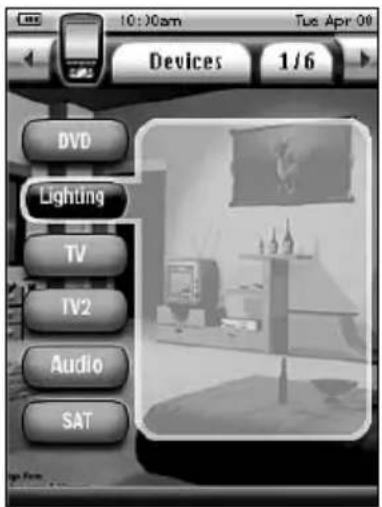
Note When ProntoPro NG is connected to your PC, it uses more battery power. Therefore, it is recommended to disconnect the USB cable after uploading and downloading.
Why don't my buttons work properly?
When you find that your ProntoPro NG does not send out the commands in accordance with what is indicated on the touch screen, it is advised to recalibrate the touch screen. Calibration is necessary when you notice that tapping a button activates one of the adjacent buttons or when you have to tap next to a button to activate it. Calibration enables ProntoPro NG to place the icons on the touch screen in line with their predefined functions.
Attention Never use an actual pen, pencil or other sharp object on the touch screen. Use a pointy object like a plastic-tipped pen or a stylus intended for use with touch screens.
How do I calibrate the touch screen?
1 Tap and hold the ProntoPro NG icon 📋 in the upper left corner of the touch screen for 3 seconds. The Tools Menu appears.
2 Select Settings
The first Settings Page appears.
3 Press the Page Down button at the left side of the ProntoPro NG. The second Settings Page appears.
4 T ap in the second Settings Page. The 'Calibration' screen appears.
5 T ap the upper left corner on the touch screen.
6 Tap the lower right corner of the touch screen.
7 Tap the upper right corner of the touch screen.
8 Tap the lower left corner on the touch screen. The touch screen is calibrated.
9 Tap the ProntoPro NG icon 📋 again to exit the Settings Tool.
How do I reset ProntoPro NG?
Normally, resetting ProntoPro NG is not necessary. However, if ProntoPro NG's touch screen freezes or if you notice unusual behavior, you need to perform a reset to get ProntoPro NG running again.
1 Press the latch on the battery cover with your thumb and then slide the cover forward firmly.
2 Lift off the battery cover.
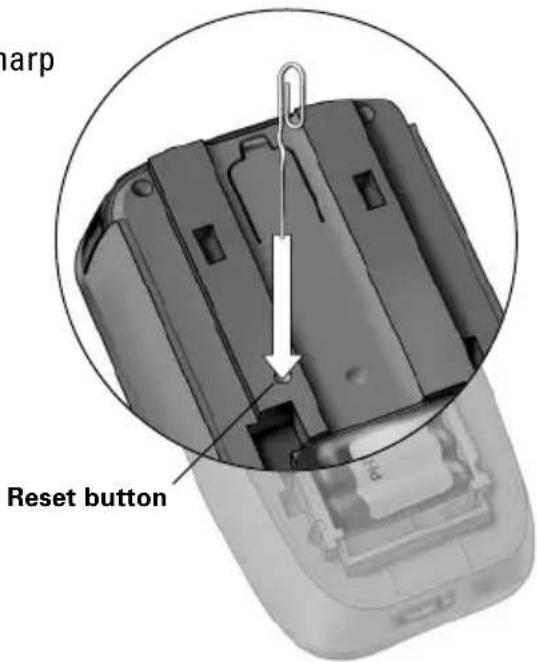
You can find the Reset button in the battery compartment.
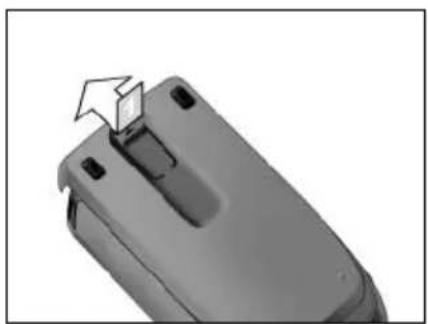

3 U se an unfolded paperclip or a sharp pencil to carefully press the Reset button.
ProntoPro NG restarts.
ProntoPro NG beeps twice to indicate it is ready for use.
4 Set the time again. See 'Changing the Time' on page 14 for more information.
Note If you reset ProntoPro NG, all personal changes like saved and programmed commands, IR codes, timers and macros are retained.
Why does a device respond to some RF signals and not to others?
Not all commands for all devices work properly with RF signals.
If a device does not respond properly to RF signals sent out by ProntoPro NG, you have to reconfigure ProntoPro NG to operate the device with IR signals.
General Problems
ProntoPro NG shuts off automatically
This is a timeout feature of ProntoPro NG to save power. You can change the time ProntoPro NG stays active in the Settings Tool.
See 'Setting the Timeout of the LCD Screen' on page 33 for more information.
The touch screen buttons on the ProntoPro NG do not respond properly
If the touch screen buttons on the ProntoPro NG do not respond properly, calibrate the touch screen.
See 'Calibrating the Touch Screen' on page 35 for more information.
Devices do not respond to commands from ProntoPro NG
- Make sure the ProntoPro NG's sending eye is pointed towards the device you are operating.
- Check if the Low Battery icon has appeared on the screen. If so, place the ProntoPro NG in the docking station and recharge the battery pack.
- Check if your device understands Philips-Marantz RC codes. Normally you can find this in the documentation of your device.
■ Make sure you have defined the correct brands for your devices. (p. 20)
■ Make sure you have defined the correct code set for your devices. (p. 21) - Check if the button you are trying to use is assigned properly via Brand Tool or via Learn Tool. (p. 23)
- Check if your device is in RF mode. Switch your device back to IR mode. (p. 52)
■ If you have set up your ProntoPro NG to operate devices with RF signals: - Check in the RF IR Tool if the devices you want to operate are set up properly. (p. 51)
- Check if the Extender ID and the Channel ID on your ProntoPro NG match the Extender ID and the Channel ID on the RF Extender.
■ Make sure the RF Extender is placed near the devices you want to use with RF signals.
■ Make sure that the distance between the RF Extender and the ProntoPro NG is at least 1 meter. - Make sure that the RF Extender's sending eye is pointed towards the device.
■ Change the Channel if you notice interferences from other RF channels.
If you want to use RF signals for devices on different locations, you need more than one RF Extender. See the User Guide of the RF Extender for more information.
Customizing Problems
Buttons are not sending the correct commands
■ Make sure you have defined the correct brands for your devices. (p. 20)
■ Make sure you have defined the correct code set for your devices. (p. 21)
■ Make sure you should calibrate your screen. (p. 35)
- Check whether the button of the device is learned properly. (p. 23)
■ Check whether the macro recorded properly. (p. 38)
Macros do not work
- Make sure ProntoPro NG's sending eye is pointed towards the device the entire time the macro is being executed.
■ The sending eye is located at the top of ProntoPro NG.
■ Insert delays to allow devices to start up properly. - Check for inactive buttons in your macro.
- Check if you did not reprogram the buttons. Macros do not store commands, they store buttons. If you reprogram a button, the macro executes the new command assigned to the button.
ProntoPro NG will not learn commands
■ Make sure your ProntoPro NG and the remote control are positioned correctly.
■ When the sending eye of your existing remote control is not pointed towards the learning eye of the ProntoPro NG, ProntoPro NG might not receive the signals properly. Align the remote controls as correctly as possible.
■ When the distance between your existing remote control and the ProntoPro NG is too short or too long, ProntoPro NG might not receive the signals properly. Try out several distances between 5 and 20 centimeters (2 and 8 inches) to learn the commands.
- Avoid programming ProntoPro NG under bright fluorescent light, in sunlight or in a dark room: it might affect the infrared signals.
■ Make sure the battery pack in the ProntoPro NG is not empty.
- Press and hold the key on the other remote control for more than one second.
The configuration file is corrupted
When the configuration file is corrupted, you can use ProntoProEdit NG to download a new configuration file. Taken into account that all your customized commands, devices and macros will be lost and you will have to reprogram your ProntoPro NG. Therefore it is recommended to save the configuration by uploading it to the PC with ProntoProEdit NG.
Timers do not work
■ Check if the timer has been activated. (p. 41)
■ Make sure a Start Action for the timer has been defined properly. (p. 46)
- Check whether the date and time of your ProntoPro NG are set properly. (p. 14)
Memory Storage Problems
Memory storage problems can be the cause of ProntoPro NG not saving a macro. Storage problems can be caused by a full memory or by a low battery pack.
- Consult the third Settings Page to see how much memory is available. (p. 32)
- Consult the first Settings Page or the battery icon at the top of your screen to check the battery status. Recharge if necessary. (p. 11)
ProntoPro NG error messages
If one of the following error messages occurs, please contact your dealer or the Philips customer service:
■ Invalid CF version or corrupt flash;
■ Incorrect software version.
When your ProntoPro NG does not respond and the screen stays blank:
1 Download the configuration file again.
2 When downloading the configuration file again does not work, download the firmware from http://www.pronto.philips.com.
Connection to the PC
■ Make sure the ProntoPro NG battery pack is sufficiently charged while using ProntoProEdit NG to download or upload.
- Do not pull out the USB cable while uploading or downloading a configuration file.
Important Notices
Take care not to scratch the touch screen
Use your finger to tap the touch screen or use plastic-tipped pens intended for use with touch screen.
Never use an actual pen, pencil or other sharp object on the touch screen.
Protect ProntoPro NG from temperature extremes
Keep ProntoPro NG away from heaters and other heat sources.
ProntoPro NG is not waterproof
ProntoPro NG should not be exposed to rain or moisture.
Do not store or use ProntoPro NG in any location that is extremely damp or wet.
When you have spilled water on ProntoPro NG, you have to take out the battery pack and let ProntoPro NG dry for 48 hours before you insert the battery pack again.
The touch screen of ProntoPro NG contains a glass element
Do not drop ProntoPro NG or subject it to any strong impact.
Cleaning ProntoPro NG
■ Use a soft, damp cloth to clean ProntoPro NG.
If the touch screen of ProntoPro NG is spoiled, clean it with a soft cloth moistened with a diluted window-cleaning solution.
- Do not use a corrosive detergent or an abrasive sponge.
■ Avoid the use of abundant water.
Upgrading ProntoPro NG
You can find the latest upgrades of your ProntoPro NG software (when available) on http://www.pronto.philips.com. Navigate to the Downloads section. If you are already registered you can enter your username and password to log in. Otherwise you can register and become a ProntoZone member for free.
List of Symbols
| [37H8] | Pause |
| [19B4] | Stop |
 | Normal run; normal speed |
| [14LAT] | Normal run; normal speed |
| [52TH] | Fast run; fast speed |
| [50CA2] | Fast run; fast speed |
| [14CCT] | Slow run; slow speed |
| [14CCT] | Slow run; slow speed |
| [14D18] | Eject |
| [15CA] | Recording, general |
| [14CEA] | Key |
| [58KW] | Navigate |
| [19V28] | Still mode |
| [18B3] | Tape running direction |
| [19C37] | Next track |
| [36B3] | Previous track |
| [1HSHT] | Fast forward to index |
| [1TB22] | Rewind to index |
| [20VC3] | Frame by frame, general |
| [1TB1] | Frame by frame, general |
| [1TB8] | Subtitle |
| [55ZC] | Cancel picture |
| [54V12] | Picture-in-picture mode |
| [2CB12] | Menu |
| [17T10] | Picture-in-picture shift |
| [17T88] | Picture-in-picture swap |
| [50CCT] | Multi-picture display |
| [50VC2] | Picture-in-picture select |
| [1HTTA] | Teletext mode |
User Guide
List of Symbols
 | Page number up |
 | Page number down |
 | Page enlargement |
 | TV and text mixed |
 | 1st or 2nd language |
 | Last view; previous program |
 | Stand-by |
 | Zone focus: long distance |
 | Zone focus: very short distance |
 | Single or multi-digit selection |
 | Brightness; brilliance |
 | Contrast |
 | Brightness/contrast |
 | Color saturation |
 | Lamp; lighting; illumination |
 | Split screen freeze / double screen freeze |
 | Split screen swap / double screen swap |
 | Split screen / double screen |
 | Movie expand |
 | Personal preference |
 | Picture-in-picture freeze |
 | Main index page |
 | Picture freeze |
 | Programmable timer; general |
 | Enter |
 | Application assistance |
 | Actual time on screen |
 | EPG / Electronic Program Guide |
 | Video output |
User Guide
List of Symbols
 | Read data from store |
 | Write data into store |
 | Page hold |
 | Sound muting |
 | Additional information on screen |
 | Spatial sound effect |
 | Television; video |
 | Sound; audio |
 | Surround sound |
 | Dolby Digital |
 | Digital Theater Systems |
 | Active control |
User Guide
Specifications
The specifications and design of this product are subject to change without notice.
| Display 64k color TFT 3.8" touch screen LCD | |
| 320x240 pixels (QVGA) resolutionWhite LED-backlight for LCD and buttons | |
| Interface | USB 1.1-port connector |
| Software Database with IR codes to operate more than 800 brandsBuilt-in Philips IR codesTotal number of devices only limited by memory | |
| Infrared (IR) 4 high performance IR-sending LEDs, 1 receiver LEDOperating distance of approximately 33 ft (10m)Learning frequency up to 78 KHz and 455 KHz | |
| Radio frequency Band: 418 MHz(RF) 16 Extender ID's and 4 Channels | |
| Memory | 32 Mbytes |
| Power Power on by tapping the touch screen, by tilting the ProntoPro NG management or by pressing a buttonPower off automatically | |
| Dimensions 6.07 inch x 3.64 inch x 1.10 inch(HxWxD) (154,2mm x 92,4mm x 27,8mm) | |
| Operating temperature | 41°-113° F(5° - 45° C) |
| Accessories | Included:USB cable for PC connectionCD-ROM with ProntoProEdit NG softwareAAA rechargeable battery pack (4x1.2 V)Docking stationNot included:RF Extender (RFX6000) |
| ProntoProEdit NG | PC requirements:Windows 98SE, ME, 2000, XP64 MB of RAM75 MB of free hard disk spaceFree USB PortCD-ROM player |
IR-database information:
Redesigned by UEI Technology
Licensed under U.S. Patent 5,689,353
Portions © UEI 1999
Action An action is a command that will be executed by ProntoPro NG. An action can be an IR code, a link, a delay or a beep. You can assign one or more actions to a button or a hard button. It is the same as a macro.
Action list An action list is a list of actions assigned to a button or a hard button. An action list can contain up to 250 actions.
Animation mode ProntoPro NG provides navigation feedback through graphical animations. These animations can be found in the Animation mode. You can enable and disable the animations of your ProntoPro NG in the Settings Pages.
Branding ProntoPro NG contains a list of brands and their according IR codes in its database. ProntoPro NG uses IR codes to control devices. Because there are several brands using specific IR codes, you have to define the brand and code set for each device.
Button alias See Link.
Button backlight The Button backlight is a special light source that is placed behind the hard buttons on your ProntoPro NG, enhancing the visibility of these buttons.
Calibration Calibrating the touch screen enables ProntoPro NG to exactly match the icons on the touch screen with their predefined functions.
Code set A code set is a list of IR codes. Audio and video devices of different brands use different code sets. A device can only receive and execute functions from the correct code set.
Cursor navigation There are two ways of navigating through ProntoPro NG: using the touch screen or using the cursor for navigation. When you select cursor navigation, the cursor can only be used for navigating through devices and pages on ProntoPro NG touch screen, not for controlling audio/video equipment.
Delay A delay is a pause between two actions. A delay gives the device enough time to execute the first action before it receives an impulse to execute a second action.
Device Every device in the configuration file appears on the Device Overview Page of ProntoPro NG and in the tree view in ProntoProEdit NG. A device represents the equipment you want to control with ProntoPro NG, for instance a TV, VCR, CD player, Amplifier, Satellite receiver or any device operated by an IR remote. The device contains a number of pages with buttons.
Device action A device action is an action that is executed automatically when you select a device. E.g. when you select TV, you can learn your ProntoPro NG to switch on the TV at the same time.
Device Overview You use the Device Overview on ProntoPro NG to access the different devices. The Device Overview contains buttons for each device in the configuration. By pressing these buttons you navigate to the first page of the selected device.
Device settings The device settings are the type of device, the brand, the IR code set and the functions. In order to control a device with your ProntoPro NG, you first have to set the device settings.
Device template You can create a template from a device in ProntoProEdit NG Advanced Mode. When you add a new device on ProntoPro NG, this template will be used.
Firm key ProntoPro NG has 4 firm keys located below the touch screen. The label of a firm key is displayed at the bottom of the touch screen. You can configure the functions of the firm keys, just like most hard buttons and the buttons on the touch screen. The strength of the firm keys is that you can also configure their label, so they can always indicate the function assigned to them.
Hard button A hard button is a button that can be pressed and generates an event. Hard buttons can be found on ProntoPro NG. Their layout and visual aspects cannot be changed. You can configure the functions of the hard buttons, just like the firm keys and the buttons on the touch screen.
IR Short for infrared.
IR code ProntoPro NG sends out infrared (IR) signals to operate devices. IR codes for all kinds of video and audio device brands are stored in ProntoPro NG's universal database. By selecting IR codes and assigning them to buttons and hard buttons, you can program your ProntoPro NG to operate your equipment. When IR codes are not present in the database, you can always learn them from the conventional remote control of your equipment.
Label A label is the text you want to put on a soft button or a firm key.
LCD Short for liquid crystal display.
LCD backlight LCD backlight is a special light source that is placed behind the LCD screen, enhancing the visibility of this screen.
Link A link, also called a button alias, is a shortcut from the action list of one button to the action list of another button. Instead of adding the same actions to several buttons or hard buttons, you can create a link and reuse the action list. When your ProntoPro NG is executing an action list and comes across a link, the action list referred to by that link is executed.
Macro A macro is a sequence of actions executed when pressing a single button on ProntoPro NG. Every button or hard button can act as a macro and perform a list of commands. It is the same as an action list.
Mode animation When you switch from using the ProntoPro NG to the Tools Menu, the ProntoPro NG icon shifts at the top area of the touch screen. This is called a 'mode animation'.
Page A page of a device is the area of 320 by 240 pixels on ProntoPro NG's touch screen containing buttons or other objects.
Page animation When you switch from one page to another, the first page slides out of the screen and the second page slides in the screen. This is called a 'page animation'.
ProntoPro NG ProntoPro NG is a universal remote control with a touch screen. You can customize and fully configure ProntoPro NG to your personal needs: the devices you want to operate, the functions you want to perform and the layout on ProntoPro NG.
ProntoProEdit NG ProntoProEdit is the visual editor for creating and configuring ProntoPro Configuration Files.
RF Short for Radio Frequency.
RF code You can choose to operate your devices with RF signals instead of IR signals. To use RF signals, you need an RF Extender. The advantage of RF is that it spreads in all directions and that it pervades walls. In other words, you can operate your devices from an adjacent room.
RF Extender An RF Extender is a converter box that receives RF signals and turns them into IR signals to operate devices. When your ProntoPro NG sends out RF codes, the RF Extender receives them and sends out IR codes to your devices.
RFX6000 The RFX6000 is an RF Extender that can be used in combination with ProntoPro NG.
Settings Tool The Settings Tool allows you to consult and adjust several settings, for instance consulting the battery level, setting the date and time, calibrating the touch screen, ...
Simulator ProntoPro NG simulator is a separate application in ProntoProEdit NG package, which simulates every aspect of your ProntoPro NG. You use ProntoPro NG simulator to test your PCF without the need to download it to your ProntoPro NG. When you make changes in ProntoPro NG simulator, they will not be saved in the configuration file.
Soft button A soft button is a button that can be found on the touch screen. The layout and the visual aspects of a soft button can be changed. You can also configure the functions of the soft buttons.
Timer A timer allows you to define actions to be carried out at predefined times. For instance, you can set an alarm or program your VCR to record your favorite daily TV-show.
Touch screen The touch screen of your ProntoPro NG is the centered area that contains soft buttons you can use to operate the remote control.
USB USB (Universal Serial Bus) is a 'plug and play' interface between a computer and add-on devices (such as audio players, joysticks, keyboards, telephones, scanners, and printers).
A
action, 39
action list
action, 39
beep, 39
delay, 39
activating timer, 41
Add Tool, 28
adding
action, 39
beep, 39
delay, 39
new device, 28
timer, 42
adjusting
backlight brightness, 33
LCD screen timeout, 33
volume level, 34
animation mode, 9
full, 35
mode, 35
none, 35
page, 35
B
battery compartment, 6
battery pack, 10
battery pack installing, 10
beep, 39
brand
installing, 21
searching, 22
selecting, 20, 22
Brand Tool, 20
button, 5
backlight, 6
cursor, 5, 48
hard buttons, 5
labeling, 26
learning, 24
Page down, 6
Page up, 6
reset, 6
Toggle, 48
button action deleting, 30
C
calibrating the touch screen, 35
changing
date, 15
language, 16
time, 14
time format, 14
channel
channel down, 5
channel up, 5
charging ProntoPro NG, 11
clock settings. See time
code set
searching, 22
selecting, 21
colors, 8
connection to docking station, 6
copying existing device, 29
creating macro, 38
cursor, 5, 48
cursor navigation, 9, 34
D
date, 15
delay, 39
Delete Tool, 30
deleting
action in a macro, 40
button action, 30
device, 30
timer, 42
device
adding, 28
copying, 29
deleting, 30
labeling, 27
moving, 31
device action learning, 24
Device Overview, 17
docking station, 8, 11
download, 53
E
editing
macro, 40
timer, 44
error message, 49
H
Home Theater Control Panel, 4
|
infrared, 50
installing battery pack, 10
installing brand, 21
IR signals, 50, 51, 52
K
keyboard, 25
symbols, 25, 61
zoom, 25
L
Label Tool, 25
labeling
button, 26
device, 27
page, 27
symbols, 25, 61
timer, 43
language, 16
LCD screen, 5
LCD screen timeout, 33
Learn Tool, 23
learning
button, 24
device action, 24
remote control, 23
M
macro, 9
action, 39
beep, 39
creating, 38
delay, 39
deleting action, 40
editing, 40
move, 40
testing, 39
troubleshooting, 58
Macro Tool, 38
memory, 9
mode animation, 35
move action in a macro, 40
Move Tool, 31
Moving a Device, 31
multi language support, 9
N
navigation
cursor, 9, 34, 48
touch screen, 34, 48
0
operating the ProntoPro NG
cursor navigation, 48
RF signals, 50
touch screen navigation, 48
troubleshooting, 57
Overview
Device, 17
Page, 18
P
page animation, 35
page labeling, 27
Page Overview, 9, 18
ProntoPro NG, 4
adjusting the settings, 32
appliance, 5
charging, 11
customizing, 19
Device Overview, 17
docking station, 8
IR signals, 52
maintaining, 60
operating, 17
Page Overview, 18
resetting, 55
RF signals, 51
specifications, 64
touch screen, 7
turning on, 13
upgrading, 60
USB cable, 53
USB port, 53
ProntoProEdit NG, 53
ProntoProEdit Simulator, 53
R
radio frequency, 50
Remote Control, 4
repeat settings, 46
resetting the ProntoPro NG, 55
RF Extender, 50
RF IR Tool, 50
RF signals, 50, 54
S
screen, 5, 7
calibrating, 35
timeout, 33
searching
brand, 22
code set, 22
User Guide
selecting
brand, 20, 22
code set, 21
settings, 32
animation mode, 35
backlight brightness, 33
calibrating the touch screen, 35
date, 14, 15
language, 16
LCD screen timeout, 33
time, 14
time format, 14
volume level, 34
Simulator, 53
specifications, 64
start action, 46
start date, 45
start time, 45
stop action, 46
stop time, 45
storage problems, 59
symbols, 25, 26, 61
T
testing the macro, 39
time, 14
time format, 14
timer, 9
activating, 41
adding, 42
deleting, 42
editing, 44
labeling, 43
repeat settings, 46
start action, 46
start date, 45
start time, 45
stop action, 46
stop time, 45
Timer Tool, 41
Toggle button, 48
Tool, 19
Add, 28
Brand, 20
Delete, 30
Label, 25
Learn, 23
Macro, 38
Moving, 31
RF IR, 50
Timer, 41
touch screen, 5, 7
touch screen calibration, 35, 55
transparency, 9
turning on ProntoPro NG, 13
U
upgrading, 60
upload, 53
USB, 9
USB cable, 53
USB port, 6, 53
V
volume
mute, 5
volume down, 5
volume level, 34
volume up, 5
volume level
hard buttons, 34
touch screen buttons, 34

- FCC INFORMATION FOR USERS
- TABLE OF CONTENTS
- TAKING A FIRST LOOK 4
- BEFORE YOU START 10
- GETTING STARTED 13
- CUSTOMIZING PRONTOPRO NG 19
- USING THE POWER FEATURES 38
- PRONTOPROEDIT NG 53
- FAQ 55
- TROUBLESHOOTING 57
- MAINTAINING PRONTOPRO NG 60
- LIST OF SYMBOLS 61
- SPECIFICATIONS 64
- GLOSSARY 65
- INDEX 68
- TAKING A FIRST LOOK
- PRONTOPRO NG: THE HOME THEATER CONTROL PANEL
- THE DEVICE
- THE DOCKING STATION
- WHAT'S NEW FOR PRONTOPRO NEXT GENERATION
- TRANSPARENCY
- 65536 COLORS
- USB
- 32 MB OF MEMORY
- INTEGRATED MACROS
- MORE ADVANCED TIMERS
- PAGE OVERVIEW
- CURSOR NAVIGATION
- ANIMATION MODE
- MULTI LANGUAGE SUPPORT
- BEFORE YOU START
- INSTALLING THE BATTERY PACK
- CHARGING THE PRONTOPRO NG
- TURNING ON PRONTOPRO NG
- SETTING TIME AND DATE
- CHANGING THE TIME FORMAT
- CHANGING THE TIME
- CHANGING THE DATE
- TO CHANGE THE DAY
- TO CHANGE THE MONTH
- TO CHANGE THE YEAR
- SETTING THE LANGUAGE
- OPERATING PRONTOPRO NG
- DEVICE OVERVIEW
- CUSTOMIZING PRONTOPRO NG
- USING THE TOOLS
- DEFINING THE BRAND FOR A DEVICE
- SELECTING THE BRAND AND CODE SET FOR YOUR DEVICE
- SELECTING THE BRAND
- SELECTING THE CODE SET
- INSTALLING THE BRAND
- SELECTING THE BRAND AND SEARCHING THE CODE SET FOR YOUR DEVICE
- SEARCHING THE CODE SET
- SEARCHING THE BRAND AND CODE SET FOR YOUR DEVICE
- SEARCHING THE BRAND
- LEARNING COMMANDS
- LEARNING A BUTTON
- LEARNING A DEVICE ACTION
- LABELING ELEMENTS
- LABELING A BUTTON
- LABELING A DEVICE
- LABELING A PAGE
- ADDING DEVICES
- ADDING A NEW DEVICE
- COPYING AN EXISTING DEVICE
- DELETING ELEMENTS
- DELETING A BUTTON
- DELETING A DEVICE
- MOVING DEVICES
- ADJUSTING THE SETTINGS
- SETTING THE BRIGHTNESS OF THE BACKLIGHT
- SETTING THE TIMEOUT OF THE LCD SCREEN
- SETTING THE VOLUME LEVEL
- SETTING THE VOLUME LEVEL OF THE HARD BUTTONS
- SETTING THE VOLUME LEVEL OF THE TOUCH SCREEN
- SETTING THE NAVIGATION FOR PRONTOPRO NG
- SETTING THE ANIMATION MODE
- CALIBRATING THE TOUCH SCREEN
- ADJUSTING THE SCREEN ACTIVATION SETTINGS
- ADJUSTING THE FIRM KEYS SETTINGS
- ADJUSTING THE CURSOR KEYS SETTINGS
- ADJUSTING THE PICKUP SENSOR SETTINGS
- USING THE POWER FEATURES
- CREATING AND EDITING MACROS
- CREATING A MACRO
- NOTE
- TO ADD AN ACTION TO THE ACTION LIST
- TO ADD A DELAY TO THE ACTION LIST
- TO ADD A BEEP TO THE ACTION LIST
- TOTEST THE MACRO
- TOFINISH THE MACRO
- EDITING A MACRO
- MOVING AN ACTION IN THE ACTION LIST
- DELETING AN ACTION FROM THE ACTION LIST
- CREATING AND EDITING TIMERS
- ACTIVATING TIMERS
- ADDING A TIMER
- DELETING A TIMER
- LABELING A TIMER
- EDITING A TIMER
- SETTING THE START DATE
- SETTING THE START TIME OR STOP TIME
- DEFINING THE START ACTION OR STOP ACTION
- DEFINING THE REPEAT SETTINGS
- 2 T AP THE REPEAT TOGGLE BUTTON NO
- 3 IN THE 'REPEAT SETTINGS' SCREEN, TAP
- OPERATING PRONTOPRO NG WITH THE CURSOR
- OPERATING PRONTOPRO NG WITH RF
- SELECTING RF TO OPERATE YOUR DEVICES
- SELECTING IR TO OPERATE YOUR DEVICES
- WHY DON'T MY BUTTONS WORK PROPERLY
- HOW DO I CALIBRATE THE TOUCH SCREEN
- HOW DO I RESET PRONTOPRO NG
- 2 LIFT OFF THE BATTERY COVER
- 3 U SE AN UNFOLDED PAPERCLIP OR A SHARP PENCIL TO CAREFULLY PRESS THE RESET BUTTON
- 4 SET THE TIME AGAIN. SEE 'CHANGING THE TIME' ON PAGE 14 FOR MORE INFORMATION
- WHY DOES A DEVICE RESPOND TO SOME RF SIGNALS AND NOT TO OTHERS
- GENERAL PROBLEMS
- PRONTOPRO NG SHUTS OFF AUTOMATICALLY
- THE TOUCH SCREEN BUTTONS ON THE PRONTOPRO NG DO NOT RESPOND PROPERLY
- DEVICES DO NOT RESPOND TO COMMANDS FROM PRONTOPRO NG
- CUSTOMIZING PROBLEMS
- BUTTONS ARE NOT SENDING THE CORRECT COMMANDS
- MACROS DO NOT WORK
- PRONTOPRO NG WILL NOT LEARN COMMANDS
- THE CONFIGURATION FILE IS CORRUPTED
- TIMERS DO NOT WORK
- MEMORY STORAGE PROBLEMS
- PRONTOPRO NG ERROR MESSAGES
- CONNECTION TO THE PC
- IMPORTANT NOTICES
- TAKE CARE NOT TO SCRATCH THE TOUCH SCREEN
- PROTECT PRONTOPRO NG FROM TEMPERATURE EXTREMES
- PRONTOPRO NG IS NOT WATERPROOF
- THE TOUCH SCREEN OF PRONTOPRO NG CONTAINS A GLASS ELEMENT
- CLEANING PRONTOPRO NG
- UPGRADING PRONTOPRO NG
- LIST OF SYMBOLS
- SPECIFICATIONS
- A
- B
- C
- D
- E
- H
- K
- L
- M
- N
- 0
- P
- R
- S
- T
- U
- V
Brand : PHILIPS
Model : TSU7000
Category : Remote control