
ER-6472C - Elliptical bike Clas Ohlson - Free user manual and instructions
Find the device manual for free ER-6472C Clas Ohlson in PDF.


| Brand | Clas Ohlson |
| Model | ER-6472C |
| Article Number | 34-7508 |
| Product Type | Cross Trainer (Elliptical Bike) |
| Dimensions (H x L x W) | 1600 mm x 1340 mm x 590 mm |
| Flywheel Weight | 8 kg each (dual flywheels) |
| Maximum User Weight | 120 kg |
| Power Supply | 6 V DC, 1000 mA via included AC/DC adaptor (230 V AC, 50 Hz) |
| Resistance System | Magnetic tension, adjustable via computer |
| Number of Programs | 15 (Manual, Rolling, Valley, Fat Burn, Ramp, Mountain, Intervals, Watt Control, Heart Rate Control, User Profile, Body Test, User Data) |
| Heart Rate Monitoring | Hand pulse sensors on fixed handlebars |
| Body Fat Measurement | Yes, via Body Test program (FAT%, BMR, BMI, Body Type) |
| Fitness Test | Pulse Recovery test (F1.0 to F6.0 rating) |
| Adjustable Footplates | Yes, multiple positions |
| Transportation Wheels | Yes, on front foot |
| Safety Standards | EN975-1+A1, EN975-5/HC |
| Intended Use | Home use only |
| Assembly Required | Yes, detailed step-by-step instructions |
| Maintenance | Check bolts every other month; clean with mild detergent |
| Disposal | Follow local ordinances |
Frequently Asked Questions - ER-6472C Clas Ohlson
User questions about ER-6472C Clas Ohlson
0 question about this device. Answer the ones you know or ask your own.
Ask a new question about this device
Download the instructions for your Elliptical bike in PDF format for free! Find your manual ER-6472C - Clas Ohlson and take your electronic device back in hand. On this page are published all the documents necessary for the use of your device. ER-6472C by Clas Ohlson.
USER MANUAL ER-6472C Clas Ohlson
natural_image
Line drawing of a stationary exercise bike with adjustable arms and wheels (no text or symbols)Art.no. Model
34-7508 ER-6472C
Cross Trainer
Art.no. 34-7508 Model ER-6472C
Please read the entire instruction manual before using and save it for future use.
We apologise for any text or photo errors and any changes of technical data.
If you have any questions concerning technical problems please contact our Customer Service Department (see address on reverse).
Table of Contents
- Safety 4
- Packaging contents 5
- Assembly 6
- Exercise Computer 12
- Use 12
- Starting to exercise 13
- Exercise instructions 17
- Disposal 18
- Specifications 18
1. Safety
The product is tested according to these safety standards: EN975-1+A1 and EN975-5/HC
Warning: Always consult a doctor before you begin exercising if you suffer from any sickness or ailment which might be exaggerated by physical exercise. Stop the exercise immediately if you feel dizzy.
Check that all bolts, nuts and other parts are securely tightened on the Cross Trainer.
Place the Cross Trainer in a spacious area with at least 1 metre in all directions.
Read the entire instruction manual before you start exercising. Save it for future use.
- The Cross Trainer is made for home use only and tested up to a maximum body weight of 120 kg.
- Follow the assembly instructions carefully.
- Use only the included original parts.
- Check that all parts are included in the package before you start to assemble the Cross Trainer. (See “Contents of package”.)
- When assembling, use only suitable tools and ask for assistance if needed.
- Place the Cross Trainer on an even, non-slip surface. Because of possible corrosion, the usage of the Cross Trainer in damp conditions is not recommended.
- Before using, and every other month, check that all bolts and nuts on the Cross Trainer are securely tightened and undamaged. Replace possible worn out parts immediately and do not use the Cross Trainer until they are changed.
- Never use strong solutions/detergents when cleaning the Cross Trainer.
- The Cross Trainer is intended for adults. Children should not use it without adult supervision.
- Ensure that those using the Cross Trainer are aware of possible hazards, e.g. clothes getting caught in moving parts during training.
- Consult your physician before starting with any exercise program. He can advise on the kind of training and which level is suitable. Warning! Incorrect/excessive training can cause injuries.
- Follow the advice for correct training as detailed in the training instructions.
- The intensity can be adjusted from the computer.
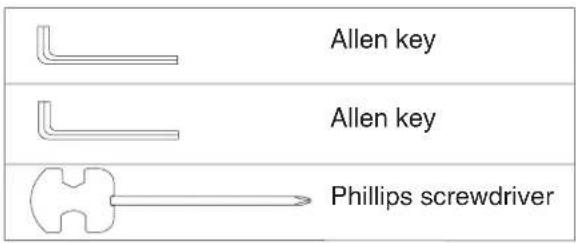
2. Packaging contains

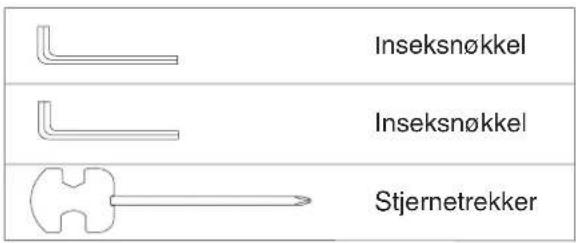
| Bolt M8x40 | 4 |
| Wave washer M8x35 | 4 |
| Socket head screw M8x35 | 4 |
| Washer M8 | 4 |
| Coach bolt M6x50 | 4 | |
| Spring washer M6 | 4 | |
| Washer M6 | 4 | |
| Pedal locking knob | 4 | |
| Bolt M8x70 | 4 | |
| Cap nut M8 | 8 | |
| Washer M8 | 4 | |
| Bolt M10x78 | 2 | |
| Cap nut M10 | 2 | |
| Washer M10 | 2 |
3. Assembly
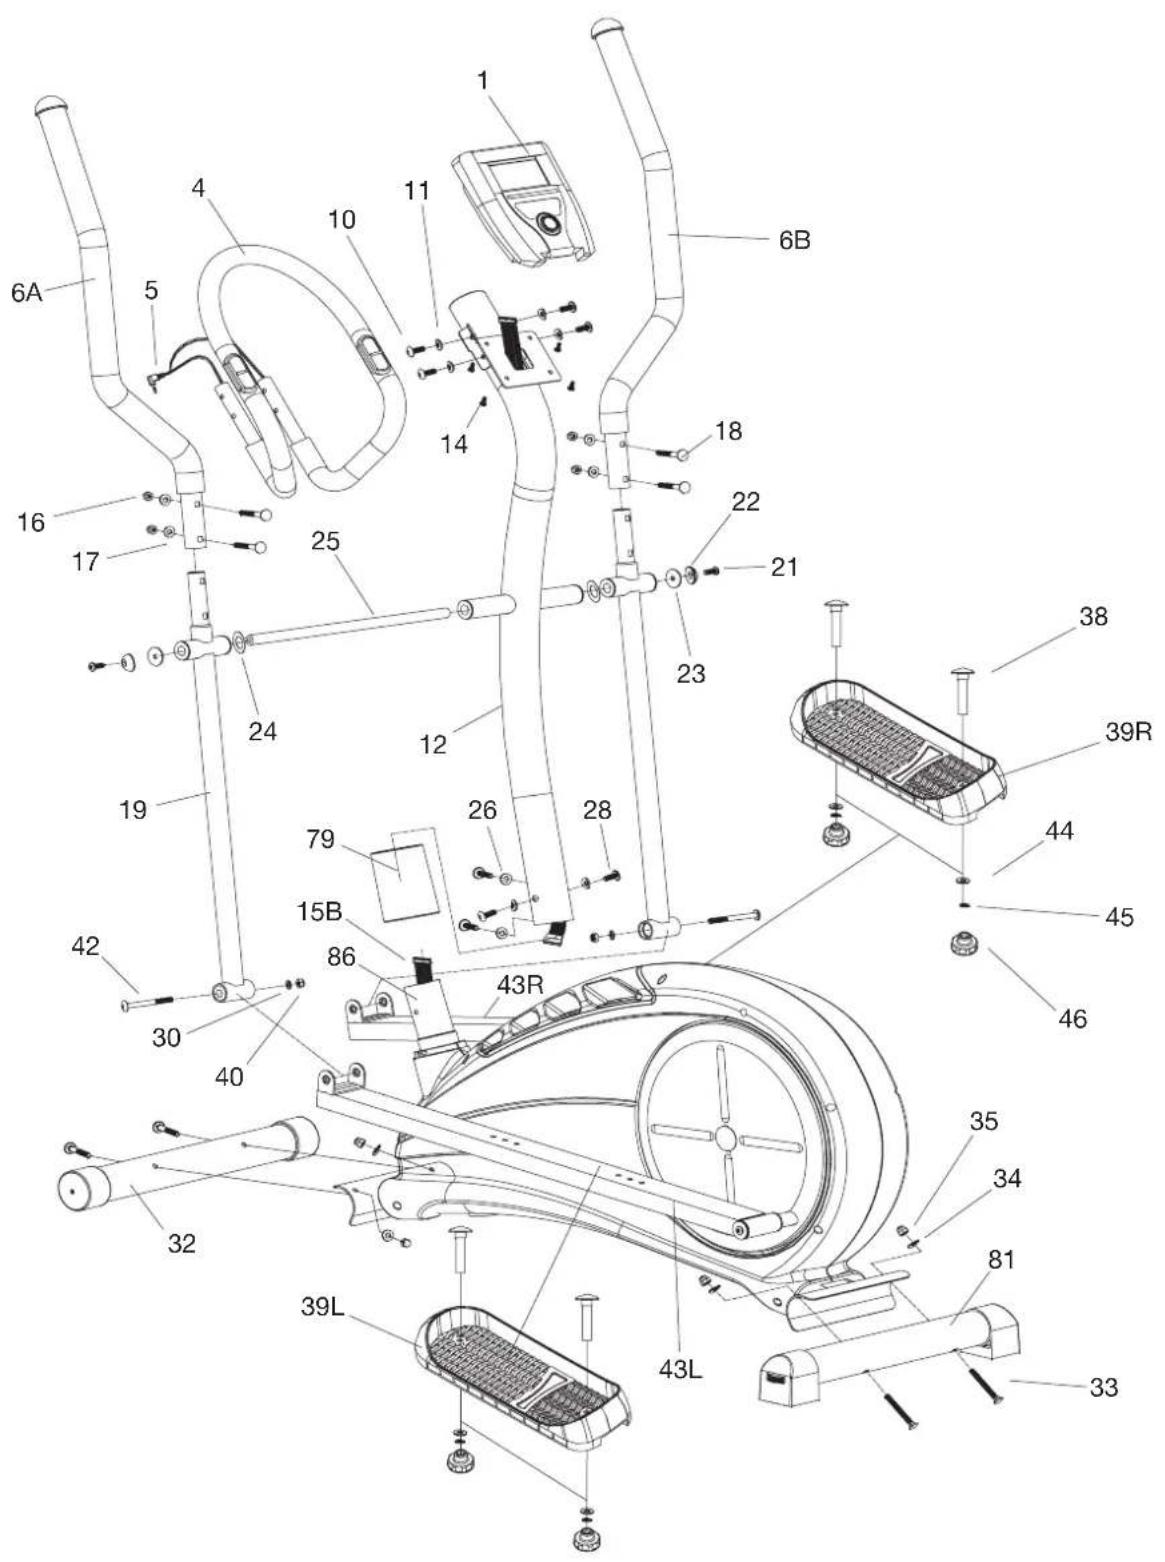
Step 1
- Attach the front foot (32) and rear foot (81) to the base frame using two bolts (33), washers (34) and cap nuts (35) on each foot.
- If the floor is uneven, the rear foot (81) has an individual height adjuster on both sides.
- The front foot (32) has transportation wheels, which need to face towards the front of the Cross Trainer.

Step 2
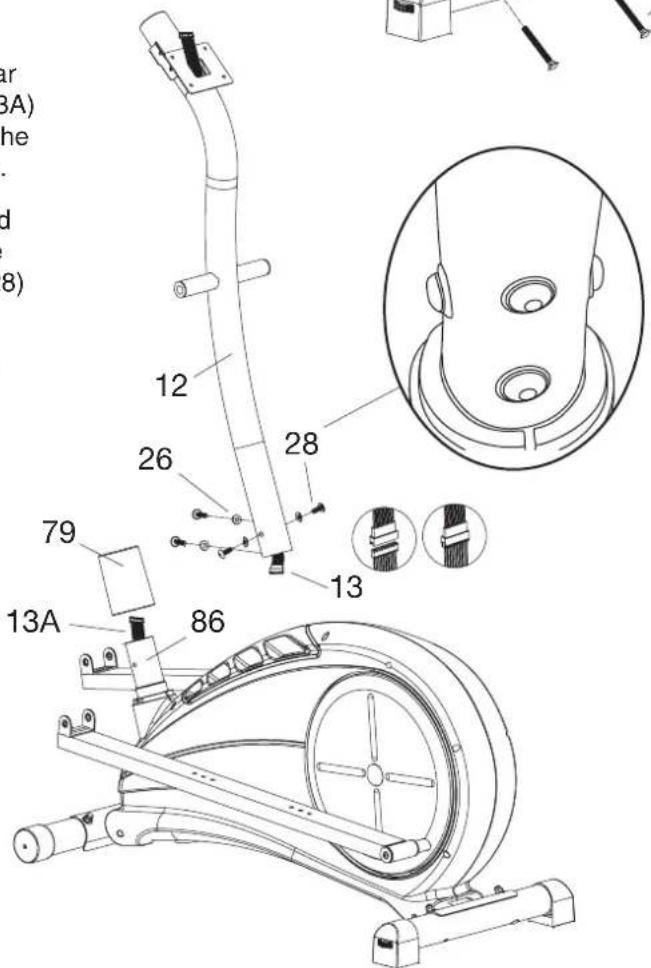
- Fit the plastic collar (79) over the handlebar post and then pass the computer cable (13A) up from the base frame and connect it to the computer cable (13) in the handlebar post.
- First unscrew the pre-assembled bolts and then secure the handlebar post (12) to the base frame (86) using four M8x20 bolts (28) and four washers (26).
- Attach the round plastic collar (79) part of the way up the handlebar post using a piece of sticky tape so that it is not in the way during assembly. Do not tighten the bolts (28) yet.
Step 3
-
Unscrew the pre-assembled screws (21) and then pass the axle (25) through the holes at the top of the lower half of the moveable handlebars (19) and the handlebar post (12) as shown. Remember the washers (24) between the post and the handlebars. Secure the axle using the screws (21), wave washers (24), washers (22) and the plastic washers (23).
-
Tighten the screws (21) making sure that the moveable handlebars can move back and forth freely but without too much play.

-
Attach the lower moveable handlebar (19) to the U-bracket of the pedal arm (43). Secure it using the bolts (42), washers (30) and nuts (40). Adjust the tube to a comfortable length for you. Take up the slack in the U-bracket.
-
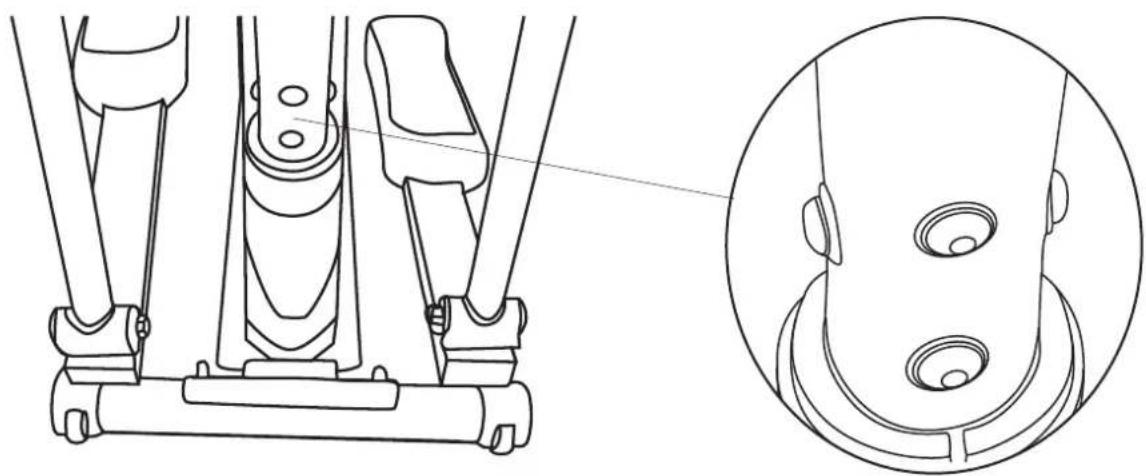
It is now time to tighten the screws at the base of the frame. First tighten the two screws on the front, then the two screws on the side. If the two side screws are tightened first, the frame will be loose and noisy.
natural_image
Technical line drawing of a mechanical assembly with cross-sectional and top views (no text or symbols)-
Remove the tape and attach the plastic collar (79).
-
Attach the upper halves of the moveable handlebars (6A & 6B) to the lower halves (19) using the bolts (18), washers (17) and cap nuts (16).
Step 4
- Attach the footplates (39L & 39R) using the holes in the pedal arms (43) in a position that suits you best. Experiment until you find the best position for you. Secure using screws (38), washers (44) lock washers (45) and locking knobs (46).
Note! Both footplates should be positioned on the same setting.

Step 5
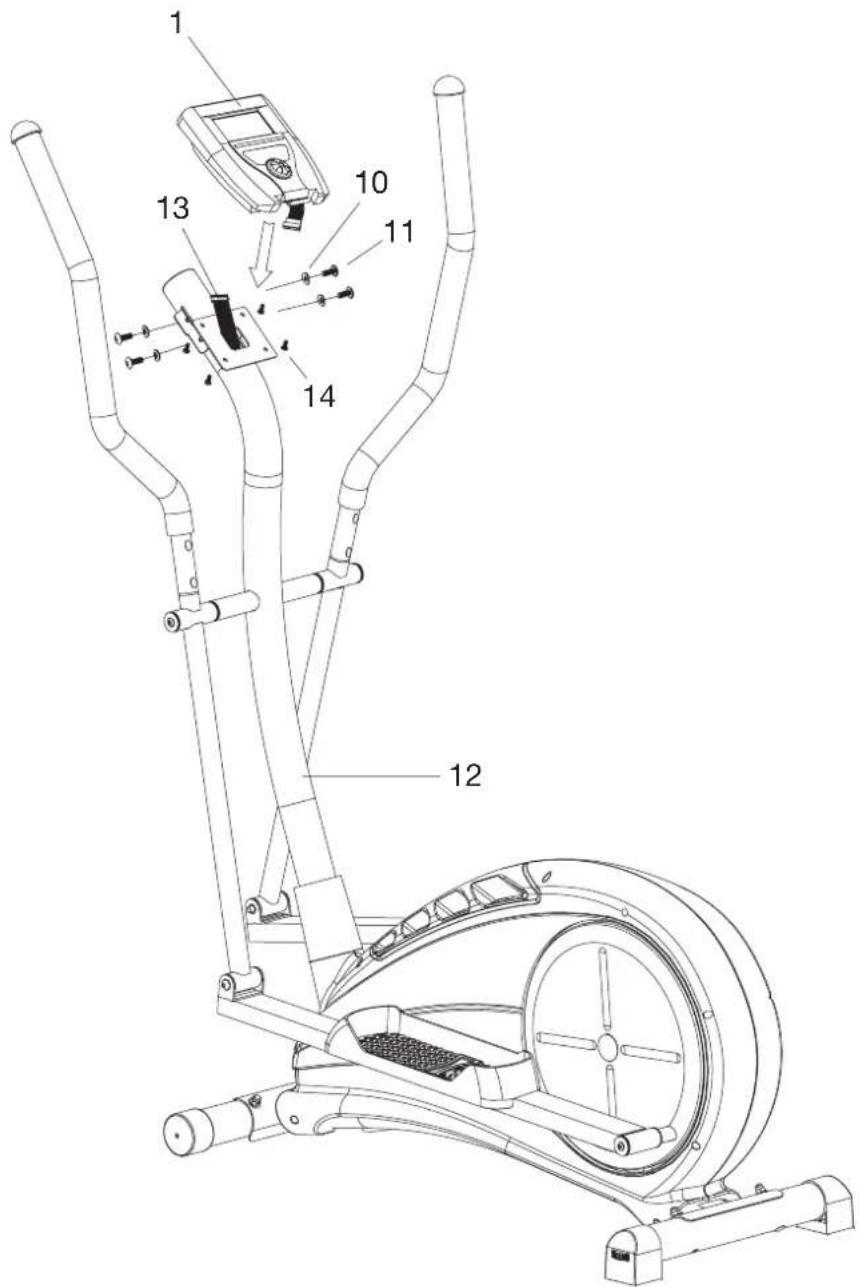
- First connect the computer cable (13) to the connection on the back of the computer(1). Then fix the computer to the bracket using the screws (14) supplied.
Step 6
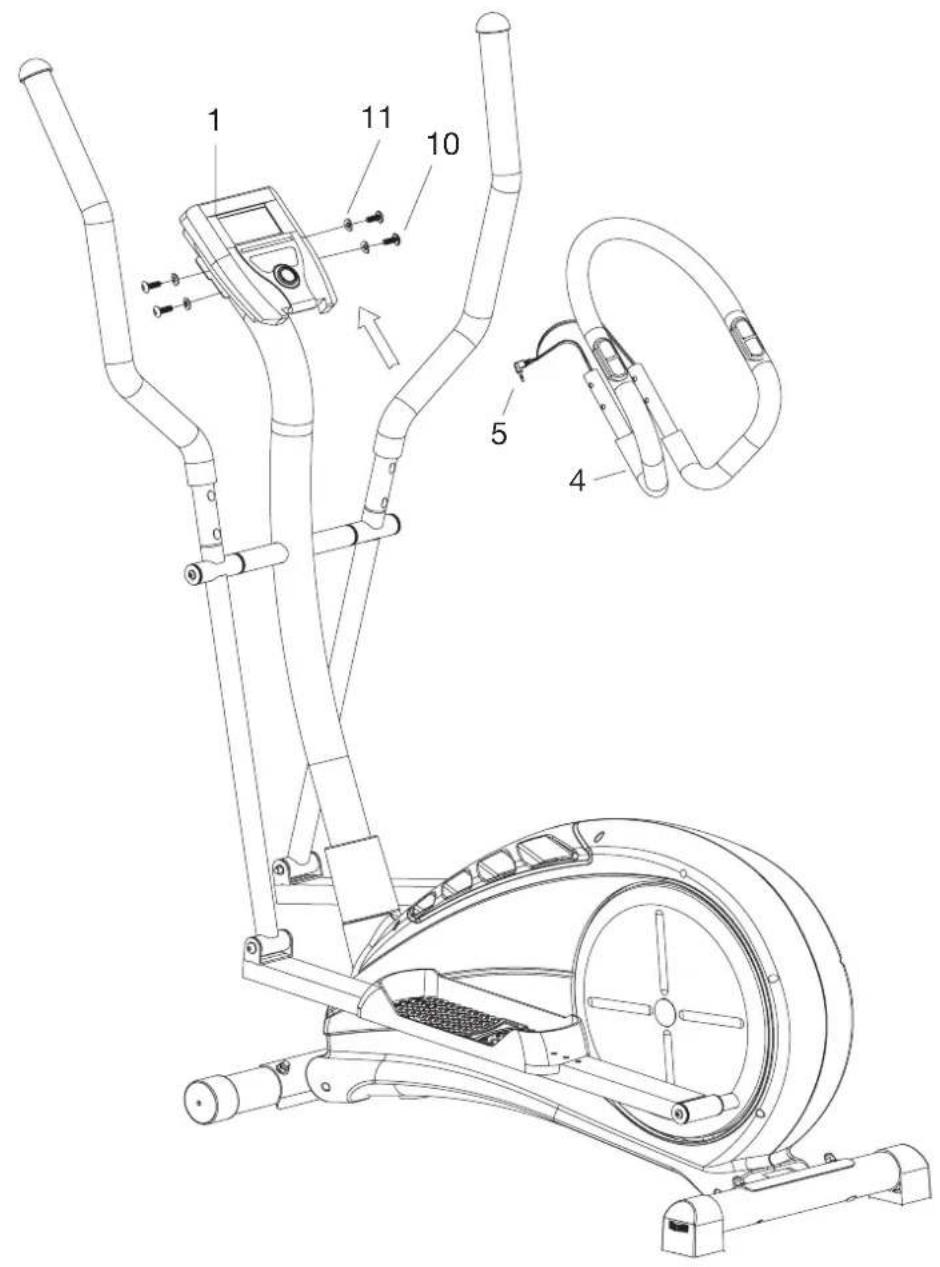
- Attach the fixed handlebar (4) to the handlebar post using the four bolts (10) and washers (11).
- Plug the pulse rate sensor cable (5) into the back of the computer.
4. Exercise Computer
5. Use
Power Supply
Connect the DC plug from the supplied AC/DC adaptor (6 V, 1,000 mA, + in centre) to the outlet on the back side of the rear foot (81). Connect the adaptor to a wall socket.
Turn on the display
Press any of the buttons or start pedalling to activate the display. Underneath PROGRAM the number 1 will flash for Program 1 MANUAL. Check that the AC/DC adaptor is correctly connected if the display is not working.
Moving the Cross Trainer
Grip the fixed handlebar and lift the rear foot off the ground so that the wheels on the front can rotate.

natural_image
Line drawing of a human figure using an outdoor stationary exercise machine (no text or symbols present)6. Starting to Exercise
6.1 Basic use
Activating the display
Push one of the buttons or start pedalling to activate the display. If the display does not work, make sure that the AC/DC adaptor is correctly connected.
Tension
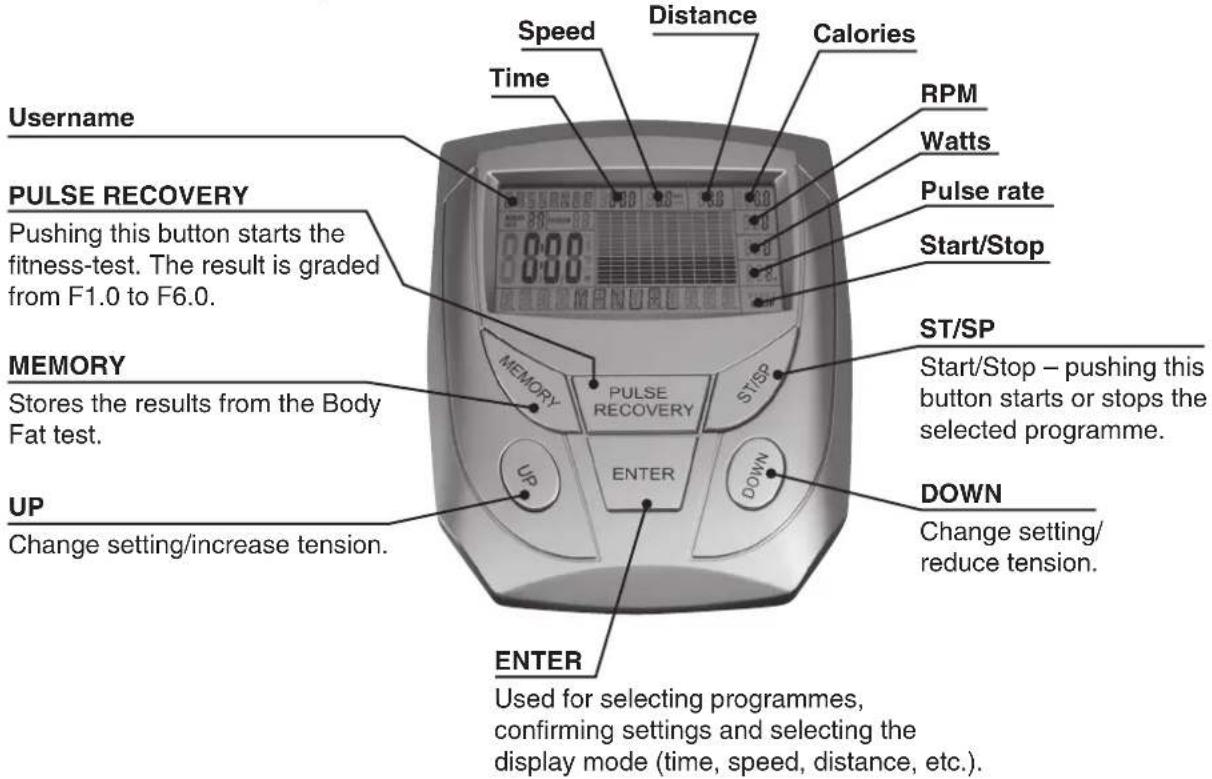
The tension is represented by bars on the display, a high bar represents a high tension and a low bar represents a lower tension. The tension can be altered whilst you are exercising using [UP] and [DOWN].
Targets
Every exercise program has various targets which you can set, such as the workout time, distance travelled, or number of calories burned.
To Pause
Push the [ST/SP] button whenever you would like to pause the training programme. The measurement will pause and the display will show the current values. Push [ST/SP] again to resume the programme.
To change the function whilst training
Push [ST/SP] to stop the current programme. Push [UP] or [DOWN] to select another programme, confirm by pushing [ENTER].
Resetting
To reset set programmes, push [ST/SP] and hold it in for 3 seconds. The computer will beep and the display will briefly show every sequence of the programme.
6.2 Selecting an Exercise Programme
Explanation of the menus/programmes
| No. Programmes Explanation | Targets/Settings | ||
| 1 Manual | Exercise programme | with or without set targets. The tension can be manually adjusted whilst exercising. | - TIME- DISTANCE- CALORIES |
| 2 Rolling | Preset programme with varied tension throughout the workout. | - TIME- DISTANCE- CALORIES | |
| 3 Valley | Preset programme representing the ups and downs of a valley. | - TIME- DISTANCE- CALORIES | |
| 4 Fat Burn | Preset programme representing an upward slope and a downward slope. | - TIME- DISTANCE- CALORIES | |
| 5 Ramp | Preset programme with gradually increasing tension. | - TIME- DISTANCE- CALORIES | |
| 6 Mountain | Preset mountain climbing programme with tension levels rising and falling throughout. | - TIME- DISTANCE- CALORIES | |
| 7 Intervals | Preset programme with the tension level changing rapidly. | - TIME- DISTANCE- CALORIES | |
| 8 Watt Control | Select tension manually. Constant tension no matter how fast you pedal. Tension preset to 100 W, but can be altered. | - TIME- DISTANCE- CALORIES- WATT | |
| 9 55 % H.R.C. Heart rate controlled programme. Exercise until you have reached 55% of your maximum pulse. | - TIME- DISTANCE- CALORIES- AGE- TARGET H.R | ||
| 10 75 % H.R.C. Heart rate controlled programme. Exercise until you have reached 75% of your maximum pulse. | - TIME- DISTANCE- CALORIES- AGE- TARGET H.R | ||
| 11 90 % H.R.C. Heart rate controlled programme. Exercise until you have reached 90% of your maximum pulse. | - TIME- DISTANCE- CALORIES- AGE- TARGET H.R | ||
| 12 Target | Heart rate controlled programme. Exercise until you have reached your target pulse. | - TIME- DISTANCE- CALORIES- TARGET H.R | |
| 13 | Users Profile Allows you to create a personalised programme by setting the tension levels of each column. | - TIME- DISTANCE- CALORIES- COLUMN 1-10 | |
| 14 Body | Test Presents the results of FAT%, BMR, BMI and BODY TYPE (see chart). | - HEIGHT- WEIGHT- AGE- SEX | |
| 15 User Data Enter you personal details. - NAME: Max. 8 letters | - HEIGHT- WEIGHT- AGE- SEX | ||
Exercising without targets
Follow these steps to start exercising without setting any targets:
- Push [UP] or [DOWN] to select the desired exercise programme (see the chart).
- Push [ST/SP] to start exercising without setting any targets.
- You may now start exercising. Mount the Cross Trainer as shown.
Entering your personal settings
- Select program 15 (User Data) using [UP] or [DOWN], confirm using [ENTER].
- Change the setting using [UP] or [DOWN] and push [ENTER] to advance to the next setting.
- Repeat the process until you have made all the settings.

natural_image
Line drawing of a humanoid figure using an eotard machine (no text or symbols present)Starting to exercise and setting targets
- Push [UP] or [DOWN] to select the desired exercise programme (see the chart). Press [ENTER] to confirm.
- Press [ENTER] once or repeatedly to select targets/settings.
- Change the setting using [UP] or [DOWN] and push [ENTER] to advance to the next setting.
- Repeat the process until you have made all the settings.
- When all the settings have been made, push [ST/SP] to start exercising.
- You may now start exercising. Mount the Cross Trainer as shown.
Example:
Exercising in 15 minute intervals:
- Select program 7 (Intervals) using [UP] or [DOWN].
- Push [ENTER] to confirm, "TIME" is shown in the display.
- Set the time to 15 minutes using [UP] or [DOWN].
- Push [ST/SP] to start exercising, the countdown is displayed.
- A buzzer sounds for a few seconds when you have reached your target, e.g. when the countdown reaches "0".
6.3 Pulse measurement
- Place both palms against the pulse sensor on the handlebars. Hold both pulse sensors in order to obtain as accurate a reading as possible. After a while your current pulse rate will be displayed.
- When the words "HOLD SENSOR" appear in the display during an exercise programme you should place both palms against the sensors.
- Heart rate control is read magnetically. There is an automatic adjustment of the read heart rate compared to the actual heart rate.
- If your pulse rate is less then the set target value, the load resistance will increase. If your pulse rate is above the set target value, the load resistance will decrease.
- If the load resistance has decreased to its lowest possible value and your pulse is still above the set target value the display starts to flash to warn you to slow down.
line
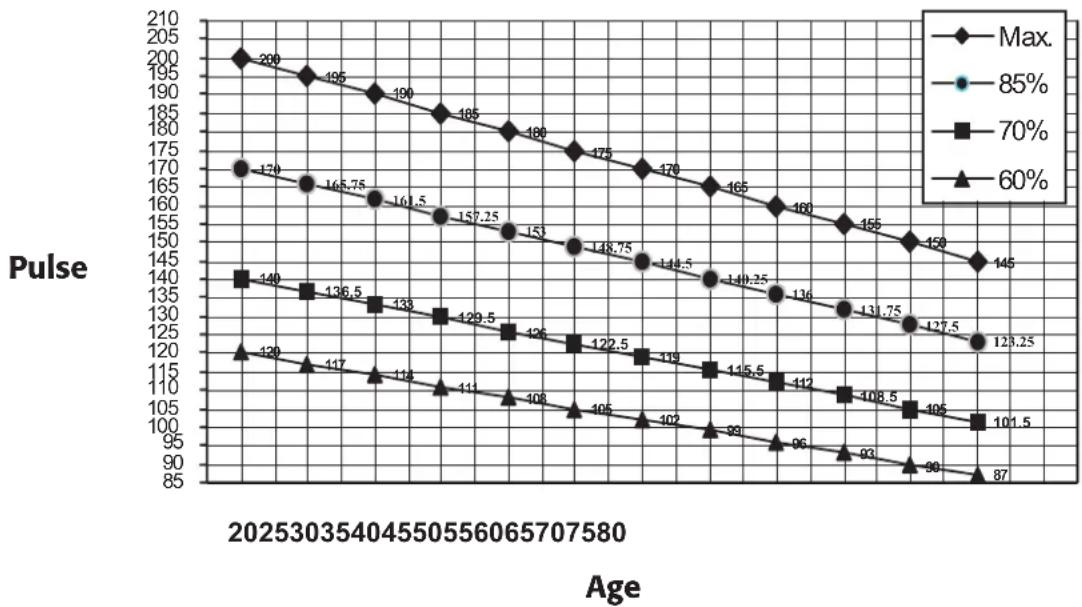
| Age | Max. | 85% | 70% | 60% | |---|---|---|---|---| | 202530 | 200 | 170 | 140 | 120 | | 303540 | 195 | 165.75 | 136.5 | 117 | | 404550 | 190 | 161.5 | 133 | 114 | | 505560 | 185 | 157.25 | 129.5 | 111 | | 606570 | 180 | 153 | 126 | 108 | | 707580 | 175 | 148.75 | 122.5 | 105 | | 808590 | 170 | 144.5 | 119 | 102 | | 909900 | 165 | 140.25 | 115.5 | 99 | | 1010000 | 160 | 136 | 112 | 96 | | 1111100 | 155 | 131.75 | 108.5 | 93 | | 1212200 | 150 | 127.5 | 105 | 90 | | 1313300 | 145 | 123.25 | 101.5 | 87 |6.4 Measuring body fat - Body test (program 14)
- Start program 14 (Body test).
- Place both palms against the pulse sensor on the handlebars. Hold both pulse sensors in order to obtain a correct reading. If the computer does not read a pulse value, ERROR will appear on the display.
- The results will be presented as FAT%, BMR, BMI and BODY TYPE. Push [ENTER] to select which result you wish to view.
FAT% Chart
The results obtained from the computer are only for the interests of exercising and should not be used for medical purposes.
6.5 Fitness-test (Pulse Recovery)
This test is personal and is used to measure your pulse after you have finished exercising.
- After your workout pass, push [PULSE RECOVERY] once.
- Hold the pulse sensors in both hands and begin pedalling.
- The timer counts down from 60 seconds to zero.
- When the test is over the result is displayed:
| F1.0 Excellent | |
| F2.0 Good | |
| F3.0 | Average |
| F4.0 Below average | |
| F5.0 Poor | |
| F6.0 Very poor | |
7. Exercise instructions
Many different factors have to be considered when you plan your training program. If you have been physically inactive for a long time or if you suffer from any kind of illness you need to consult with a physician before you plan your exercise program.
Intensity
- To achieve the best possible results the right intensity needs to be selected, this is based on your pulse. This equation is often used to calculate your maximum pulse:
Max pulse = 220 - Your age
- During training your pulse should be between 60% and 85% of your maximum pulse (see the pulse chart at the end of the instruction manual).
- For the first few weeks of exercise your workout pulse should be 60% of your maximum pulse.
- When you have improved your values and have been training for a few weeks you can allow your workout pulse to increase up to 85% of your maximum pulse.
Burning Fat
The body starts burning fat at 60% of your maximum pulse. The optimal fat burning will be at 60 to 70% of your maximum pulse. You will achieve the best results if you normally do 3 workouts of 30 minutes per week.
Example:
You are 52 years old and are starting to exercise and burn fat.
Maximum pulse rate = 220 - 52 (age) = 168 pulse/min.
Lowest pulse rate = 168 x 0.6 = 101 pulse/min.
Maximum workout pulse rate = 168 x 0.7 = 117 pulse/min.
A workout pulse between 101 and 117 during training gives the best fat burning result in this example according to the equation.
Workout tips!
Warm-up
Before every training session, you should warm-up for 5-10 minutes which can include some stretching or walking with a light load.
Training session
During actual training a rate of 60 to 85% of the maximum pulse rate should be chosen. The length of the training session can be calculated using the following as a guide.
• Daily training session = Approx.10 minutes per session.
- 2-3 times per week = Approx. 20 minutes per session.
- 1-2 times per week = Approx. 60 minutes per session.
Cooling down:
For an effective cooling-down of the muscles and the metabolism the intensity should be drastically decreased during the last 5-10 minutes. Stretching is also helpful in preventing muscle stiffness.
For best results:
- Exercising will show results after quite a short time and your workout pulse will soon decrease during the training sessions.
- In order to achieve this, you will need to be motivated to exercise regularly. Choose fixed hours for your training.
- Begin exercising carefully, and then increase the amount of your training as you become more fit.
- Wishing you luck with to healthier lifestyle!
8. Disposal
Follow local ordinances when disposing of this product. If you are unsure about how to dispose of this product contact your municipality.
9. Specifications
Power: 6 V DC, 1000 mA via the supplied mains adaptor 230 V AV, 50 Hz
Size:
Height 1600 mm
Length 1340 mm
Width 590 mm
Flywheel 8 kg each
Cross Trainer
Art.nr 34-7508 Modell ER-6472C
Steg 1
Steg 3
natural_image
Technical line drawing of a mechanical assembly with cross-sectional and top views (no text or symbols)Steg 6
natural_image
Line drawing of a humanoid robot performing a stationary exercise on an easot (no text or symbols present)6.5 Fitness-test (Pulse Recovery)
| Bolt M8x40 | 4 |
| Skive M8 | 4 |
| Inseksbolt M8x35 | 4 |
| Skive M8 | 4 |
Trinn 1
Trinn 2
Trinn 3
natural_image
Technical line drawing of a mechanical assembly with cross-sectional and top views (no text or symbols)Trinn 6
natural_image
Line drawing of a humanoid figure using an eotard machine (no text or symbols present)6.5 Fitness-test (Pulse Recovery)
| F1,0 Utmerket | |
| F2,0 Bra | |
| F3,0 | Gjennomsnittelig |
| F4,0 Under gjennomsnittet | |
| F5,0 Dårlig | |
| F6,0 Svært dårlig | |
1. askel
2. askel
natural_image
Technical line drawing of a mechanical assembly with cross-sectional and top views (no text or symbols)6. askel
natural_image
Line drawing of a humanoid robot performing an exercise on an eotard machine (no text or symbols present)6.5 Fitness-testi (Pulse Recovery)
For consumer contact, please visit www.clasohlson.co.uk and click on customer service.
INTERNET www.clasohlson.co.uk
- Cross Trainer
- Art.no. 34-7508 Model ER-6472C
- Table of Contents
- Safety
- Packaging contains
- Assembly
- Step 1
- Step 2
- Step 3
- Step 4
- Step 5
- Step 6
- Exercise Computer
- Use
- Power Supply
- Turn on the display
- Moving the Cross Trainer
- Starting to Exercise
- Basic use
- Activating the display
- Tension
- Targets
- To Pause
- To change the function whilst training
- Resetting
- Selecting an Exercise Programme
- Exercising without targets
- Entering your personal settings
- Starting to exercise and setting targets
- Example:
- Pulse measurement
- Measuring body fat - Body test (program 14)
- Fitness-test (Pulse Recovery)
- Exercise instructions
- Intensity
- Burning Fat
- Workout tips!
- Warm-up
- Training session
- Cooling down:
- For best results:
- Disposal
- Specifications
- Art.nr 34-7508 Modell ER-6472C
- Steg 1
- Steg 3
- Steg 6
- Trinn 1
- Trinn 2
- Trinn 3
- Trinn 6
- askel
- askel
- askel
- Fitness-testi (Pulse Recovery)
Brand : Clas Ohlson
Model : ER-6472C
Category : Elliptical bike