
IVOD-1002 - DVD player BLAUPUNKT - Free user manual and instructions
Find the device manual for free IVOD-1002 BLAUPUNKT in PDF.


| Product Type | DVD Player |
| Brand | Blaupunkt |
| Model | IVOD-1002 |
| Dimensions (W x D x H) | 430 x 260 x 40 mm |
| Weight | 1.5 kg |
| Power Supply | AC 100-240V, 50/60Hz |
| Power Consumption | 10 W (typical) |
| Disc Compatibility | DVD, DVD±R/RW, CD, CD-R/RW, MP3, JPEG, DivX |
| Video Outputs | HDMI, Composite, Component |
| Audio Outputs | Stereo RCA, Coaxial Digital |
| Playback Functions | Play, Pause, Stop, Fast Forward/Rewind, Skip, Repeat, Zoom, Angle, Subtitle |
| Remote Control | Included |
| Maintenance | Clean lens with soft cloth; avoid liquids |
| Safety Precautions | Keep away from water and heat sources |
| Spare Parts | Remote control, power cable |
| Repairability | Repair by qualified personnel only |
| Warranty | 1 year standard warranty |
Frequently Asked Questions - IVOD-1002 BLAUPUNKT
User questions about IVOD-1002 BLAUPUNKT
0 question about this device. Answer the ones you know or ask your own.
Ask a new question about this device
Download the instructions for your DVD player in PDF format for free! Find your manual IVOD-1002 - BLAUPUNKT and take your electronic device back in hand. On this page are published all the documents necessary for the use of your device. IVOD-1002 by BLAUPUNKT.
USER MANUAL IVOD-1002 BLAUPUNKT
In Car Video | Overhead DVD System

IVOD-1002
Overhead DVD System
www.blaupunktusa.com
BLAUPUNKT
Overhead DVD System .... 3
Infrared remote control overview ..... 5
Notes for the user 7
Precautionary measures 7

Safety Notices 7
Supplied parts 8
Installing the unit 9
Connections 11
General Information 13
Basic operation 15
Advanced operation 20
Settings 23
Maintenance and care 25
Troubleshooting 26
Glossary 27
Specifications 29
Limited Warranty 30
OVERHEAD DVD SYSTEM
① Switch for interior lighting ② Reset button (located on base) ③ Monitor auto power ON/OFF (located on base) ④ DVD: next chapter; VCD/CD/MP3: next track; menu: move cursor upwards ⑤ EJECT Eject disc ⑥ DISC IN A disc is inserted ⑦ DVD: previous chapter; VCD/CD/MP3: previous track; menu: move cursor downward
⑧ PLAY/PAUSE Play the disc, pause (freeze frame) ⑨ Source Select A/V source (DVD, AV1, AV2) ⑩ AV2 AV 2 input selected ⑪ AV1 AV 1 input selected ⑫ DVD Displays the video signal from the DVD player ⑬ POWER Turns system power on / off ⑭ STOP Stop playing disc
OVERHEAD DVD SYSTEM

① Headphone jack 1 ② Volume control for headphone jack 1 ③ 10 inch TFT display
④ DVD player disc slot ⑤ Volume control for headphone jack 2 ⑥ Headphone jack 2
INFRARED REMOTE CONTROL OVERVIEW
INFRARED REMOTE CONTROL OVERVIEW
① POWER Turn system power on / off ② 0 - 9 Numeric key buttons ③ PLAY/PAUSE ④ STOP ⑤ DVD: Next / previous chapter VCD/CD/MP3: Next / previous track MENU mode: Cursor up/down ⑥ Select the SUBTITLE language (depending on the DVD disc) ⑦ AUDIO Select the audio soundtrack (depending on the DVD disc) ⑧ SETUP Display the SETUP menu of the DVD player ⑨ SOURCE Selects AV source (DVD, AV1 or AV2) ⑩ MENU Displays the DVD root menu ⑪ MUTE Mutes the audio ⑫ EJECT Ejects the disc
⑬ REPEAT Selects repeat mode ⑭ SLOW Slow motion play (only for DVD) ⑮ Fast forward / fast reverse ⑯ OK Confirms selection ⑰ DISP Display time information (during playback) ⑱ SETUP Display the SETUP menu of MONITOR Settings (e.g. brightness, contrast, etc.) ⑲ TITLE Display the DVD title menu (depending on the DVD disc) ⑳ ZOOM Set Zoom mode ANGLE Select the viewing angle (depending on the DVD disc)
NOTES FOR THE USER
Thank you for choosing a Blaupunkt product. We hope you enjoy using this new piece of equipment. Please read these operating instructions before using the equipment for the first time.
Precautionary measures
Please observe all the warning notices, precautionary measures and maintenance tips contained in these operating instructions so as to extend the life of your monitor.
Warning
Video products should never be in view of the driver. Operation of Video within view of the driver is illegal.
- Do not place the monitor in the following positions:
- Positions in which it could restrict the driver's view.
- Positions in which it could become a danger to safety (e.g. hand brake, steering wheel, gearshift lever and airbag).
- Only operate the device with the recommended voltage supply of 12 V direct current.
- Do not attempt to open or dismantle the monitor, since you could suffer an electric shock as a result.
- Avoid using the monitor in environments where it is subjected to dust, dirt or moisture.
- Do not install the monitor in places where it is subjected to direct sunlight.
Blaupunkt recommends having all your video products installed by an authorized dealer.

Safety notices
Please observe the following safety notices during installation and while making the connections.
- Disconnect the negative and positive terminals of the battery.
- When doing so, please observe the safety notices provided by the vehicle manufacturer.
- Before drilling the holes necessary for mounting the equipment and for laying cables, please make sure that concealed cables, the fuel tank and fuel lines cannot be damaged in the process!
1 Overhead DVD System, 1 Mounting Plate, 1 Trim Ring, 1 Remote Control, 1 Power supply cable (5 m) with fuses, 5 Rubber Caps, 1 User Manual, Mounting Hardware
Technical data, design and supplied parts may vary slightly due to product updating.
Select a suitable location for secure installation of the unit.
- The unit must not distract the driver or restrict the driver's view.
- The ability to enter and get out of the vehicle must not be impeded.
- The unit must not be installed in such a way that could prevent the other vehicle components from functioning properly (e.g. sliding sunroof).
- Make sure that the unit is installed in a safe and secure position and that it cannot become detached in the event of an emergency stop.
- Do not attach the unit merely to the roof liner.
- If you need to drill additional holes, make sure you do not drill through the sheet metal of the vehicle's roof.
- Avoid using the unit over a long period of time while the engine is off in order to prevent the battery from becoming discharged.
Before starting work, disconnect the ground cable from the vehicle battery's negative terminal in order to prevent short circuits. Note - follow the vehicle manufacturer's safety instructions (alarm system, air bag, immobilizer, etc.).
The unit must be installed horizontally (within -10° to +30° of horizontal). A more severe angle may prevent the unit from functioning correctly.
The DVD system is attached via a mounting plate. Depending on the installation, the mounting plate can be attached to the vehicle with self-tapping screws through any of the 10 small slots in the plate. The DVD system is then attached to the mounting plate using five machine screws. Depending on the thickness of the headliner, longer self-tapping screws may also be used. Check the screw length required prior to final installation.
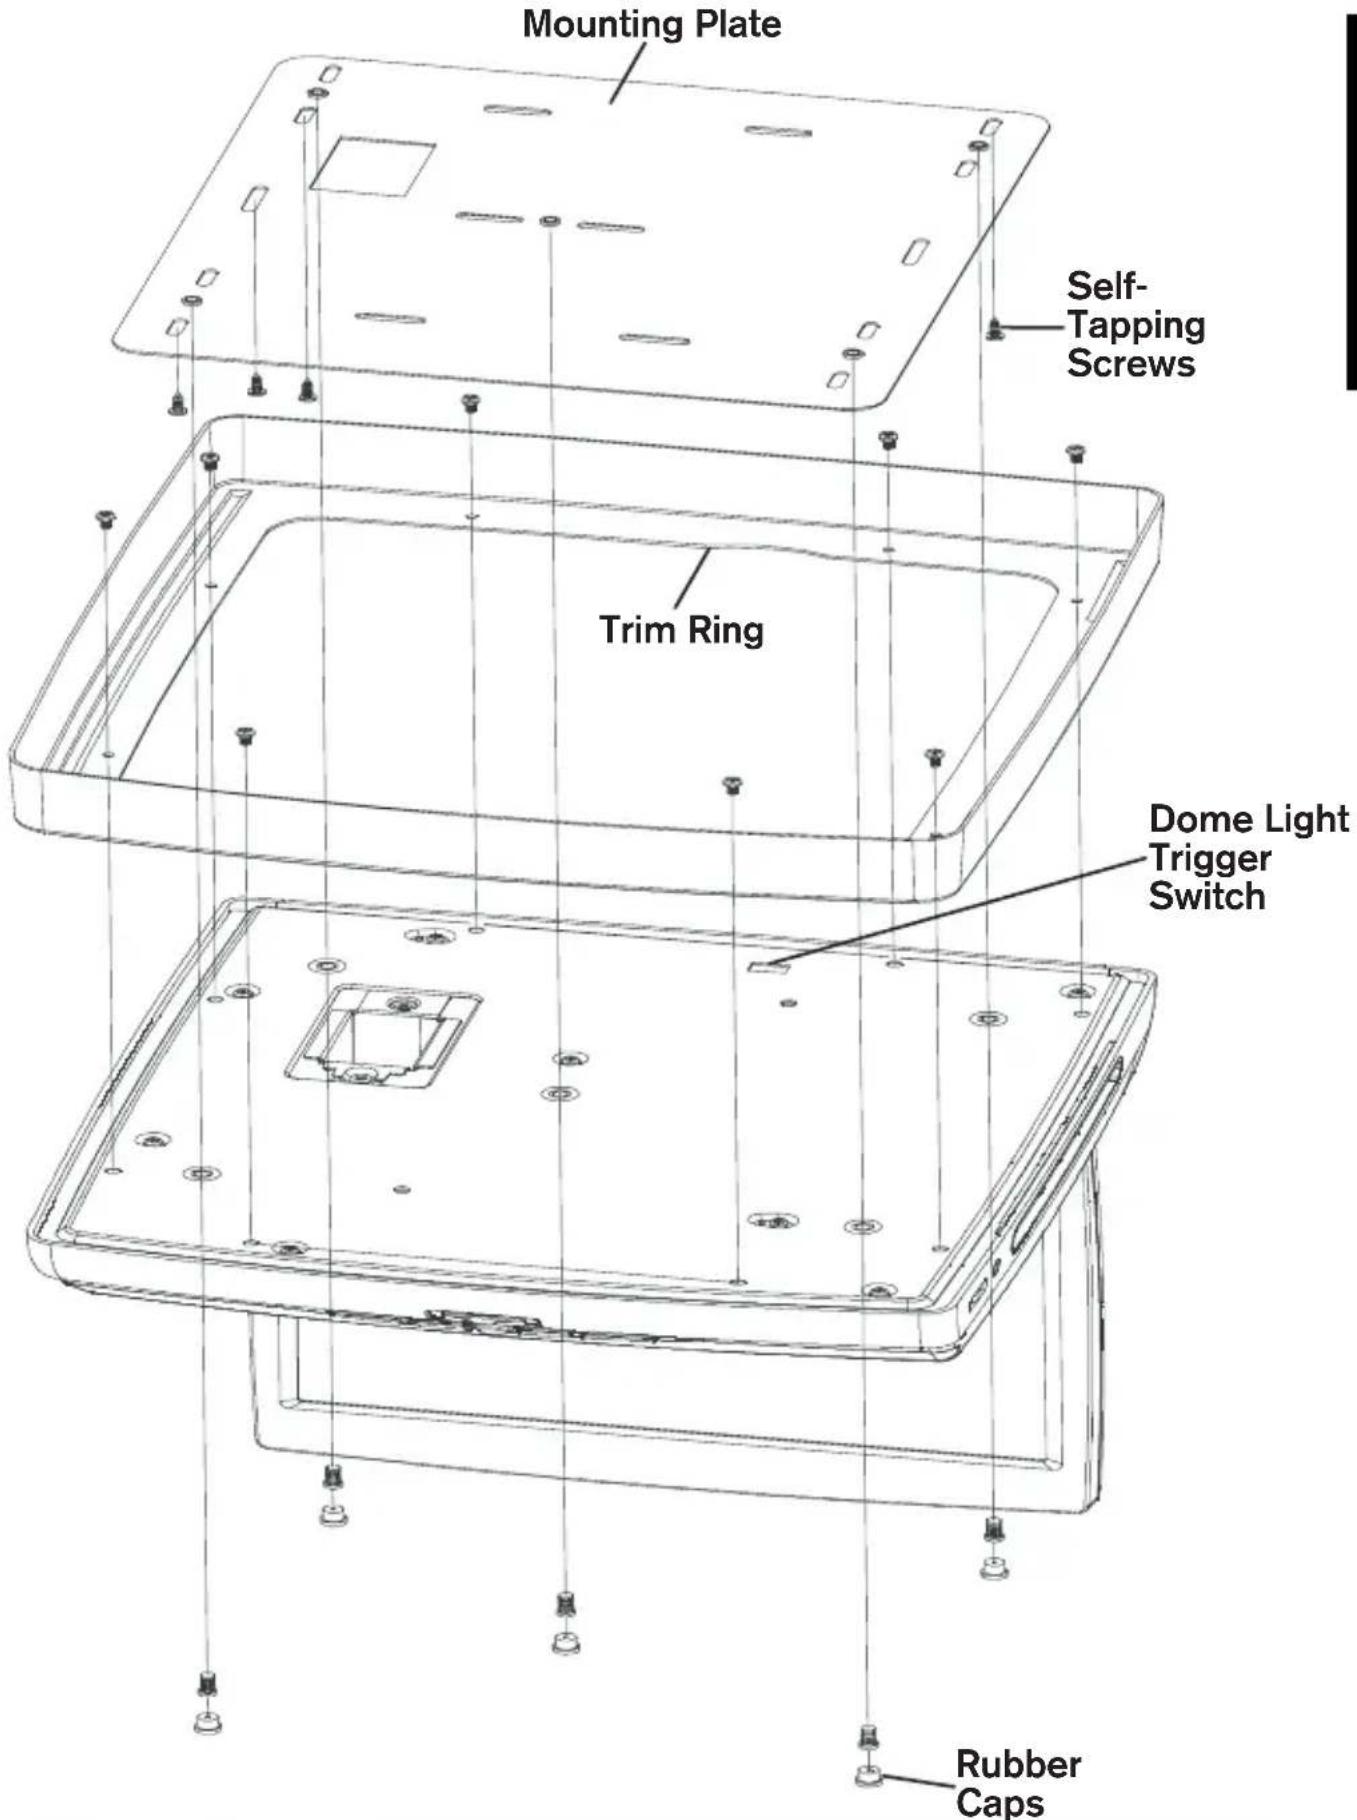
Marking the installation area.
- Carefully pry the two transparent covers of the interior lights off the unit from the outside using a screwdriver. This allows access to the two front mounting screw holes.
- Open the monitor display to access the three rear mounting screw holes.
- Hold the unit in the intended mounting position and make five marks through the screw holes.
- Align the mounting plate with the five mounting screw marks and trace suitable drill hole marks through the small slots.
Attaching the unit.
- Carefully drill the holes you traced through the slots.
- Screw the mounting plate into position using the self-tapping screws provided.
- Connect all the required leads to the unit.
- Screw the unit to the mounting plate using the five machine screws provided.
- Cover the three rear screw holes with the rubber caps provided.
- Snap the two interior light covers back into position.
Electrical connections.
Route all cables with care. Do not cut off unused cables; tape them up and secure them to one side. They may be useful in the future for additional functions.
Power supply connections.
| Cable color | Category Connection | |
| Yellow input | +12v permanent | positive(must be rated for at least 3 amps) |
| Red input | +12v ignition positive | (switched plus) |
| Black input | Battery negative | (vehicle chassis) |
| White input | Door contact/in | interior lighting(must be rated for at least 1 amp) |
If the yellow +12V permanent positive lead is lengthened and connected directly to the battery, it must be protected by an additional 10 Amp fuse located near the battery (max. 10-15 cm).
+12 V permanent lead (yellow):
Connect the yellow lead to a suitable connector with +12V permanent positive voltage.
This connection should be rated for a current of at least 3 amps.
+12 V switched lead (red):
Connect the red lead to a suitable +12V circuit switched through the ignition.
Battery negative lead (black):
Connect the black lead to a suitable ground (vehicle chassis).
Interior lighting (white):
The IVOD1002 has two built-in lamps that can be connected to the interior lighting system of the vehicle. Connect the white lead to the interior lighting circuit. Set the dome light trigger switch to the correct position for your application (see installation diagram).
Audio/video inputs "AV 1 IN" and "AV 2 IN"
- Connect the RCA plug to the video input "AV 1 IN" of the multimedia system (in the recess on the top of unit). Connect the 4-pin jack of the supplied A/V cable to video input "AV 2 IN" on the right side of the multimedia system.
Audio/video output "OUTPUT"
- Connect the yellow Cinch/RCA plug to a suitable multimedia unit video input.
- Connect the white and red Cinch/RCA plugs to the left and right Line or AUX inputs of the vehicle audio system.
Prepare the remote control by inserting the batteries.
Open the battery compartment on the back of the remote control. Insert two AAA Alkaline batteries. Pay attention to correct polarity (marked inside the battery compartment). Close the battery compartment.


Initial operation
- Reconnect the vehicle battery.
- Restore complete function to the electrical system (clock, on-board computer, alarm system, air bag, immobilizer, etc.).
- Switch on the ignition.
- Fold down the display screen of the multimedia unit. Press the RESET button (see page 16) using a paper clip or other suitably thin object.
- Insert a DVD/VCD/audio/MP3 or JPEG-image CD into the DVD player.
- Check that the audio and video functions are working correctly in conjunction with the any other components of the multimedia system. See the Operation section of this manual.

CAUTION: Any inappropriate use of the device may expose the user to visible/invisible laser rays which exceed the limits for Class 1 laser products.
Do not open the unit and do not attempt to repair it yourself. Refer servicing to qualified personnel.
Copyright protection
This product incorporates copyright protection technology that is protected by method claims of certain U.S. patents and other intellectual property rights owned by Macro vision Corporation and other rights owners. Use of this copyright protection technology must be authorized by Macro vision Corporation, and is intended for home and other limited viewing uses only unless otherwise authorized by Macro vision Corporation. Reverse engineering or disassembly is prohibited.
Region Code Information
This mobile DVD Player is designed and manufactured to play DVD discs with Region codes1 and 0.
Dolby Digital
Manufactured under license from Dolby Laboratories.
"Dolby" and the double-D symbol are trademarks of Dolby Laboratories.
Confidential unpublished works.
1992-1997 Dolby Laboratories. All rights reserved.
Disc formats
Supported formats
The following 8cm and 12cm discs are supported:
• DVD video 5 and 9 • DVD video 10 and 18 - Video CD - Super Video CD - CD Audio - MP3 (CD-ROM) - JPEG image CD
Formats which are not supported
- DVD-ROM
- DVD-RW/DVD-RAM • CDV
- CD-G • DVDs with a Region code other than 1 and 0 • Kodak Photo CD (previously CDI format)
Note: As a rule, even self-burned CDs are supported. However, depending on the blank disc and burning program used, playback difficulties may arise.
Handling and cleaning DVDs and CDs

Avoid leaving fingerprints on the disc when handling it.
Always store discs in their protective cases.
Always ensure that discs are clean and dry before inserting.
Protect discs from heat and direct sunlight.
Dirt, dust, scratches and warped discs will cause unit malfunction.
Do not put labels on discs.
Disc cleaning
Use a dry soft cloth to wipe the surface of a disc. If the disc is especially dirty, use a soft cloth slightly moistened with isopropyl (rubbing) alcohol. Never use solvents such as benzine, or conventional record cleaners as they may mar the surface of the disc.
Preparing new discs with rough spots
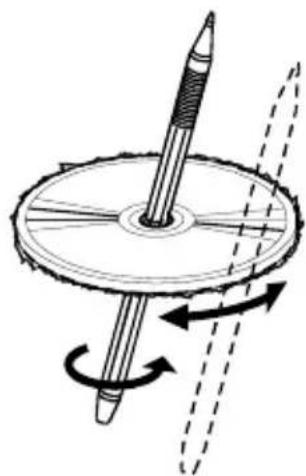
New discs may have some roughness around the edge. The DVD Player may not work properly or the video/sound reproduction may skip if such discs are used. Use a ballpoint pen, etc., to remove roughness from the edge of the disc.
Switching on/off
To switch on the system:
- Switch on the ignition.
- Press the POWER button on the system or the remote control.
To switch off the system:
- Press the POWER button on the system or the remote control.
Or:
- Switch off the ignition.
Loading a disc
Carefully slide the disc with the printed side facing upwards, into the player disc slot until it is drawn in. The player starts playback automatically.
Ejecting a disc
- Press the ▲ button on the system.
- The disc is ejected.
- Remove the disc.
Auxiliary lighting
Permanent on
- Set the auxiliary lighting switch to "ON"
Automatic lighting
- Set the auxiliary lighting switch to "AUTO" The auxiliary lighting for the system is controlled by the vehicle interior lighting system.
Lighting off
- Set the auxiliary lighting switch to "OFF"
TFT display
Opening the display
- Press the unlocking button for the display and pull the screen carefully downward.

Do not touch the display screen itself! This can damage the LCD panel.
Closing the display
- Swivel the display to the straight position. Push it carefully upwards until it snaps into place.
Swivelling the display
- The display can be swivelled in either direction by approx. 30° to achieve an optimum viewing angle.
Selecting the AV source
- The DVD system allows the connection of two external AV sources (see installation instructions) for display on the system's display panel.
- Press the SRC button on the system or the remote control to select AV sources; DVD, AV1 or AV2.
- The selected AV source is then shown on the display.
- The corresponding LED (DVD, AV1 or AV2) illuminates on the front of the unit.
Display settings
- Press the Monitor Setup button once or several times to call up the display settings.
- Press the button to change the value of the setting. Press OK button to exit the display mode.
Brightness
- Set the brightness to between 0 and 32
Color saturation- (AV1/AV2 only)
- Set the color saturation to between 0 and 32.
Contrast
- Set the contrast to between 0 and 32.
Color balance - TINT (AV1/AV2 only)
- Set the color balance to between 0 and 32.
Image sharpness - (AV1/AV2 only)
- Set the sharpness to between 0 and 32.
TV standard
- Set the TV standard appropriate to the connected AV source. The options are: AUTO, PAL and NTSC.
Display mode
- Set the display mode according to the current video media. You can choose between NORMAL (4:3), FULL (16:9) and WIDE 1 (extended 16:9).
Installation position
- Set the installation position to CEILING (overhead).
Note: The "Desktop" setting is not supported by the DVD player.
User settings
This function allows the display settings, brightness, contrast, color, tint and sharpness to be saved for a specific user and then subsequently restored.
- Set the desired values for the display settings.
- Select SAVE by pressing the ▶▶ button to save the values as user settings.
- Select READ by pressing the button to restore the values as user settings.
Default settings
- Select DEFAULT and press the ◀◀ and ▶ buttons to return the display to its default settings.
Starting/stopping playback
Press the button to stop playback.
The player stores the current disc position.
Press the button to resume playback at the stored position.
Press the button twice to stop playback and go back to the initial track/chapter of the inserted disc.
Video CDs with PBC (playback control)
Video CDs with PBC can be played with or without a menu:
- Press the MENU button to select between playback with or without PBC.
Pause (still picture)
- Press the button during playback.
- Press the button once again to resume normal playback.
Fast forward/reverse
- Press the ◀ or ▶ button during playback.
Each time the button is pressed, the speed of fast forward/reverse changes as follows:
DVD:
Normal ->2x ->4x ->6x ->8x ->20x
VCD/CD/MP3:
Normal ->2x ->4x ->6x ->8x
Skipping chapters/tracks
- Press one of the buttons during playback.
- Press the button to jump to the next chapter (DVD) or track (VCD/CD).
- Press the button to jump to the previous chapter (DVD) or track (VCD/CD).
Note: For some VCD2.0 discs (PAC playback control), the buttons may not work.
Repeating chapters/tracks
- Press the REPEAT button once, or more than once to select the REPEAT mode as follows:
DVD:
- CHAPTER REPEAT ON: The current chapter is repeated.
- TITLE REPEAT ON: The current title is repeated.
REPEAT OFF: The repeat function is switched off.
During VCD/CD:
- REP - ONE: The current track is repeated.
- REP - ALL: All tracks of the inserted disc are repeated.
- REPEAT OFF: The repeat function is switched off.
Time displays
Press the DISP button during playback to display different time information on the screen of the disc that is playing.
Example:
DVD:
- Press DISP once: The following information is shown on the screen:
- current title number and total number of titles,
- current chapter number and total number of chapters, and
- elapsed total time.
Press DISP again.
Press DISP for the third time:
Press DISP for the fourth time:
Press DISP for the fifth time:
The message on the screen will be cleared.
CD/VCD:
Each time the DISP button is pressed, the time displayed changes in the following order:
- SINGLE ELAPSED (track/chapter)
- SINGLE REMAIN (track/chapter)
- TOTAL ELAPSED (CD)*
- TOTAL REMAIN (CD) *
- OFF
* only when PBC is off
MP3:
Each time the DISP button is pressed, the time displayed changes in the following order:
- CHAPTER ELAPSED
- CHAPTER REMAIN
MENU function
MENU button
- Press the MENU button during playback. The basic menu of the DVD is displayed. If different menu options are available, move the cursor to the desired menu option with the cursor buttons ▲ or ▼.
- Confirm your selection by pressing the ENTER button.
TITLE button
If the DVD has multiple titles recorded, you can select the preferred title from the title menu to start playback.
- Press the TITLE button during playback.
- The title menu is displayed.
- Move the cursor to the desired title with the cursor buttons ▲ or ▼.
- Confirm your selection by pressing the ENTER button.
Selecting audio language
DVD:
- Press the AUDIO button once or more than once during playback to select the desired audio soundtrack language.
Notes: The number of audio languages is dependent on the inserted DVD. Some DVDs only contain one audio language. If the inserted DVD only contains one audio language, the “◀” appears in the left top corner of the screen when pressing the AUDIO button.
VCD/CD:
- Press the AUDIO button once or more than once during playback to select between the following modes:
- Stereo (L & R),
- L only,
- R only
Selecting subtitle language (DVD only)
- Press the SUB-T button once or several times during playback to select the required language for subtitles.
Notes: The number of subtitle languages is dependent on the inserted DVD. Some discs only contain one subtitle language. If only one language is available on the disc, the “◀” appears in the left top corner of the screen when pressing the SUBTITLE button.
Zoom (magnification)
- Press the ZOOM button once or several times during playback to select the required amount of zoom.
OFF -> 1.5X -> 2X -> 3X -> OFF
Selecting the viewing angle (DVD only)
When the ANGLE MARK (camera angle) function is activated, the symbol is displayed on the screen when a scene with alternative camera angles is played from a DVD.
- Press the ANGLE button once or several times while the symbol is displayed to select the various camera angles.
Notes: This function only works with discs having scenes recorded at different angles.
The number of viewing angles depends on the individual DVD.
To activate ANGLE MARK see General settings.
MP3 disc playback
This player supports the following CD formats for MP3 playback:
- Joliet
- Romeo
- ISO9660
Make sure that the MP3 files have a file format designation of .mp3.
Two different modes of MP3 playback are available:
- WITH MENU
- NO MENU
The playback mode can be set in the SETUP menu under "PREFERENCES"
WITH MENU
In this mode the display shows all the MP3 folders of the disc on the left and the file names of the folder currently opened on the right.
In STOP mode:
- Use the and buttons to select between the left and right column.
- Use the and buttons to select the desired item or folder.
- Press the ENTER or button to playback the selected item.
The screen shows:

Notes: The FOLDER can only be selected in STOP mode. During playback, the screen will display the MP3-ID3 tags instead of the REPEAT mode.
WITHOUT MENU
When the SMART NAV function is set to "NO MENU", only the track (file) number and the elapsed time for the current file are displayed on the screen. All the tracks (files) of the MP3 CD inserted are played sequentially.
Note: The folder cannot be selected in this mode.
Repeat file/directory - REPEAT
- Press the REPEAT button once or more than once to select one of the following repeat modes:
WITH MENU
- REP-ONE:
Repeat the current MP3 file.
- FOLDER REPEAT:
Repeats all MP3 files in the current directory in sequence.
- NO REPEAT:
The REPEAT function is switched off.
WITHOUT MENU
- REP - ONE:
The current track is repeated.
- REP - ALL:
All the tracks on the MP3 CD are repeated.
- REPEAT OFF:
The REPEAT function is switched off.
NEXT/PREVIOUS files
During playback:
- Press the ▲ button to select the next MP3 file.
- Press the button to select the previous MP3 file.
FAST FORWARD/REVERSE
Press the ◀ button during playback.
Each time the button is pressed, the speed of fast forward/reverse changes as follows:
Normal playback -
2x - > 4x - > 6x - > 8x
ADVANCED OPERATION
JPEG image CDs
The DVD player supports the display of JPEG images.
The DVD player supports the display of JPEG images.
Ensure that the JPEG images have a file format designation .jpg.
Insert a disc with JPEG images in the player.
- The navigation menu appears on the display as follows:
- The navigation menu appears on the display as follows:

You can switch between the left and right-hand columns using the ◀ and ▶ buttons. You can select the desired file or the desired directory using the and buttons.
- You can switch between the left and right-hand columns using the ◀ and ▶ buttons. You can select the desired file or directory using the corresponding buttons.
- Press the ENTER or button in order to start a slide show, beginning with the selected file.
- All the images in the current directory are displayed in sequence for approx. 5 seconds each.
- Press the button in order to pause or resume the slide show.
- In order to start the slide show with a particular image from the folder currently selected, enter the number which appears after the image in the navigation menu using the numeric key buttons and press the ENTER button.
Notes: JPEG images can be recognized by the camera symbol to the left of the file name. The directory can only be selected in STOP mode. Volume, color, contrast and brightness cannot be adjusted during image CD playback.
Next/previous image
During playback:
04050002 04050003- Press ▲ select the next JPEG file.
- Press ▼ to select the previous JPEG file.
Repeat file/directory - REPEAT
- Press the REPEAT button briefly once or several times to set the REPEAT mode as follows:
- REP-ONE: The current JPEG file is displayed again.
- FOLDER REPEAT: All the JPEG files in the current directory are displayed again.
- REPEAT OFF: The REPEAT function is switched off.
Image overview (digest mode)
- Press MENU.
- Up to nine thumbnail JPEG images are displayed on the screen.
- The images are assigned to the numeric key buttons on the remote control as follows:
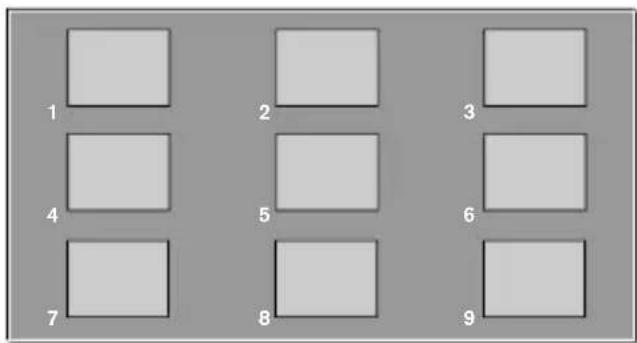
- You can select the next/previous nine thumbnail images in the current directory using the ▲ and buttons.
- Press one of the numeric key buttons (1 to 9), in order to see the image in full screen image mode.
- Digest mode is automatically ended and the slide show resumes beginning with the current image.
Setup Menu
Main page
In STOP mode:
- Press the SETUP button.
- The initial SETUP menu is displayed.
- Select the preferred item by using the ▲ / ▼ buttons.
- Press the ENTER button to confirm your selection.
The following options are available:
- GENERAL SET-UP
This includes TV display & audio output. For details please refer to the General setup menu.
- SPEAKER SET-UP
This changes the audio output from DOLBY AC3 5.1 DOWNMIX to 2 channel mode. Please refer to Speaker set-up menu.
- AUDIO SET-UP
This selects all other AUDIO functions. Please refer to Audio set-up menu.
- PREFERENCES
This configures the system. For details please refer to Preferences set-up menu.
General set-up menu
TV DISPLAY
This selects the appropriate screen ratio (4:3 or 16:9) according to the video source.
• NORMAL/PS (For 4:3 Viewing)
Played back in the PAN & SCAN style. (If connected to a wide-screen video source, the left and right edges are cut off.)
• NORMAL/LB (For 4:3 Viewing)
Played back in letterbox style. (If connected to a wide-screen video source, black bands appear at top and bottom of the screen.)
• WIDE (For 16:9 Viewing)
Select when a wide-screen video source is connected.
TV TYPE
This system can play discs recorded in either PAL or NTSC formats.
- Select MULTI format, if the video source supports PAL and NTSC.
- Select NTSC format, if the video source supports NTSC only.
- Select PAL format, if the video source supports PAL only.
PIC MODE
If you select AUTO, the system PIC mode will depend on the DVD disc.
- Select HI-RES format for best image resolution.
- Select N-FLICKER format if flickering noise appears.
ANGLE MARK
- Select ON, if you want to display the angle icon “☐” when a multi-angle DVD disc is playing.
- Select OFF, if you do not wish to display the angle icon.
OSD LANG
- Select the desired language for the On-Screen Display.
CAPTIONS
- Activate the CAPTIONS feature by selecting ON.
Speaker set-up menu
DOWNMIX
This is to select the Dolby AC3 5.1 Downmix mode for the analog output.
Audio set-up menu
OP MODE
The operating mode for the Dolby Digital decoder cannot be changed. The mode is always set to LINE MODE.
DUAL MONO
- Select the desired Dual mono mode for 1+1 coded Dolby Digital programs.
- STEREO: Stereo-reproduction 1+1 program. CH1 for left channel, CH2 for right channel.
- CH1 MONO: CH1 Mono-reproduction. CH1 in both Left/Right output.
- CH2 MONO: CH2 Mono-reproduction. CH2 in both Left/Right output.
- MIX MONO: Mix mono-reproduction. CH1+CH2 are combined in both Left/Right output.
LPCM OUTPUT
- Select the sampling rate for the D/A converter: 48 kHz to 96 kHz.
DRC - Dynamic Range Control
- Select DRC to adjust the dynamic range of a Dolby Digital encoded program. There are 8 steps between off and full compression.
Preferences set-up menu
AUDIO
- Select the initial audio soundtrack language you prefer.
SUBTITLE
- Select the initial subtitle language you prefer.
DISC MENU
- Select the initial disc menu language you prefer.
LOCAL
- Select the region in which the system is to be operated (e.g. UNITED STATES). This setting affects the parental control function (parental guidance level for films).
PARENTAL
- Select the desired parental guidance level from the list. The factory default password for changing the parental guidance is 3308.
PASSWORD
- Select CHANGE to change the factory set password for parental control. Key in the initial factory password of 3308. Then key in a new 4 digit password. Confirm the new password by re-entering it.
SMART NAV
This is used to set the display mode for MP3 playback.
- Select NO MENU to play MP3 files without folder/file display.
- Select WITH MENU to show the disc contents in folder/file style.
DEFAULTS
Select RESET to return the player to the factory defaults.
Replacing the remote control batteries.
Open the battery compartment on the back of the remote control. Remove the discharged batteries. Insert two AAA Alkaline batteries. Note the correct polarity (marked inside the battery compartment). Close the battery compartment.


Changing bulbs
Carefully pry the transparent cover of the interior lights off the unit using a small screwdriver.
Replace the bulbs with the same type (12 V/2 - 3 W). Snap the cover closed.
Cleaning the unit and the remote control
Do not use lighter fluid, methyl alcohol or other solvents for cleaning. Only use a damp cloth.
In rare cases, your DVD system may not function the way you expect it to. Before calling for service please read the operating instructions and go through the following check list.
| Symptoms Possible cause / | remedy |
| Player does not work when switching on ignition and pressing the POWER button. | Check fuses (unit and vehicle) and connections (see mounting instructions).Press the RESET button (see page 16). |
| The remote control does not work. | Change the batteries in the remote control.Replace the batteries with two AAA Alkaline batteries.The infrared lens on the remote or the unit is covered by objects or dirty.Clean the infrared lenses with a damp cloth. |
| Skips during DVD playback. Distorted sound.Frozen picture. Interference in picture.Player does not read disc at all. | Player cannot read the inserted disc due to disc damage or dirt on the surface. Clean the disc and attempt to replay. |
| Player does not recognize the inserted disc. | Inserted disc type is not compatible with the player (see specifications).In cold weather conditions, condensation may occur on the laser.Wait approximately 5 minutes until the condensation evaporates. |
| Player hang-up (picture freezes). | Switch the player off and on to resume normal operation.Press the RESET button (see page 3). |
| No FOLDER/FILE display when playing an MP3 disc.Wrong language for audio, DVD menu or subtitles is selected when inserting a DVD. | Set SMART NAV option to: WITH MENU in the preferences set-up menu.Check initial language settings in the PREFERENCES set-up menu. |
| Color saturation is too weak/strong during DVD/VCD/SVCD playback. | Remove the disc.Set the required COLOR value using the or buttons and re-insert the disc.Reset default value:With the disc removed, press the DISP button. |
Dolby Digital
Dolby Laboratories audio compression technology that allows up to 6 channels (Right, Left, Center, Surround Right, Surround Left and Subwoofer) in one audio stream (AC3). Most DVDs contain Dolby Digital audio.
Dolby Surround
Dolby Laboratories audio encoding technology that combines the information for two additional channels (Center, Surround) in a standard stereo signal. The Dolby Surround signal can be played on any stereo equipment, however a Dolby Surround Decoder is needed to separate the Center and Surround channels from the stereo channels.
Dolby Surround Pro Logic
An optimized decoder technology for Dolby Surround encoded signals.
DRC (Dynamic Range Control)
DRC lets you limit the dynamic range of a Dolby Digital encoded program.
DTS
An audio compression system for cinemas developed by Digital Theater Systems, Inc.
DVD (Digital Versatile Disc)
The DVD disc is a 12 cm disc, containing two layers of digital information. The maximum amount of data on a single-layer, single-sided DVD can be up to 4.7 Gigabytes.
A two-layer double-sided DVD can be up to 18 Gigabytes.
JPEG (Joint Photographic Expert Group)
JPEG images are bitmapped images that use a compression method in order to save memory space.
Macrovision
Copyright protection technology developed by Macrovision Corporation. Copyright owners can protect their videocassettes from unauthorized recording on VCRs by using Macrovision technology.
MP3
Digital audio data compressed in MPEG1 Layer 3 format. MP3 files are approximately ten times smaller than the non-compressed PCM data.
OSD (On Screen Display)
Information about the disc and player status are displayed directly on the monitor screen.
Parental guidance function
Frequently Termed “Parental Control” or “Parental Management Level”, this function is based on a movie rating assigned by the MPAA (Motion Picture Association of America). Depending on the DVD player setting, this classification enables entire DVDs to be blocked for viewing by children and teenagers. Note - not all DVD manufacturers support this rating system.
Currently, the following levels are officially recognized by the MPAA:
- G (General audience): suitable for all members of the general public including children
- PG (Parental Guidance): allowed for general viewing but with parental supervision
- PG-13 (Parental Guidance 13): allowed for viewing by children over 13 with parental supervision
- R (Restricted): parental supervision or the accompaniment by an adult is mandatory
- NC-17: contents unsuitable for children under 17
Other classifications (non MPAA):
• ADULT: only suitable for adults - NR (Not Rated): no classification
PBC (Playback Control)
Some VCD 2.0 Video CDs are encoded with playback control, allowing you to navigate through the disc contents with a menu.
SVCD (Super Video CD)
This is an East Asian standard for video data on a standard 12 cm CD. The data is stored in MPEG2 format. The maximum bit rate for video is 2264 kbps. Two different stereo audio soundtracks can be recorded on a SVCD.
VCD (Video Compact Disc)
A world wide standard for digital video on a standard 12 cm CD. The data is stored in MPEG1 format. The maximum bit rate for video is 1150 kbps. Only one stereo audio track can be recorded on a VCD.
VFD (Vacuum Fluorescent Display)
This DVD player is equipped with a multi-color display with adjustable brightness.
TFT (Thin Film Transistor)
A technology for manufacturing large, high resolution LCD flat-screen displays (e.g. computer monitors, LCD TVs, etc.).
SPECIFICATIONS
| Model IVMR-1002 | |
| Screen size (Diagonal): 10" Monitor | |
| Screen resolution: 800 (H) x 3 (RGB) x 480(V) | |
| Active area: 216.0 (H) x 129.6 (V) | |
| Signal system: Dual system NTSC/PAL | |
| Brightness: 300 cd/m2 | |
| Contrast ratio: 400:1(Typ.) | |
| Viewing angle: Left/right: 55/55 degreesUp/down: 35/50 degrees | |
| Video input level: 1.0 Vpp ± 10 % | |
| Audio input level: 0.3 Vrms | |
| Humidity for normal operation: 10%~75% | |
| Carrier frequency for IR sensor: L-CH: 2.3 MHzR-CH: 2.8 MHz | |
| Operating voltage (direct current): 10-16V | |
| Current consumption (Max): 2.0 A (at +12V) | |
| Current consumption: IVOD "Off" 3 mA (at +12V) | |
| Operating temperature: -4°F ~ 158°F (- 20°C to +70°C) | |
| Storage temperature: -22°F ~ 176°F (- 30°C to +80°C) | |
| Dimensions: 10 5/8 x 2 5/16 x 11 5/16 in (270 x 59 x 288mm) | |
| Weight: ≤6.5 lbs (2948g) |
Subject to changes!
Robert Bosch Corporation (for products sold in the United States) warrants new Blaupunkt car audio products distributed in the United States through authorized Blaupunkt dealers, or which are imported as original vehicle equipment by the automobile manufacturer, to be free from defects in material and workmanship, in accordance with the following terms and conditions:
For twelve (12) months after delivery to you, the original consumer purchaser, we will repair or at our option replace at no charge to you any car audio product which, under normal conditions of use and service, proves to be defective in materials or workmanship. However, this warranty does not cover expenses incurred in the removal or reinstallation of any car audio product, whether or not proven defective, and does not cover products not purchased from an authorized Blaupunkt dealer. This warranty is limited to the original consumer purchaser and is not transferable.
Repaired and replacement car audio products shall assume the identity of the original for purpose of this warranty and this warranty shall not be extended with respect to such products.
To obtain performance of this warranty, contact the nearest Blaupunkt authorized repair facility or our nearest office. A dated purchase receipt or other proof that the product is within the warranty period will be required in order to honor your claim. Carefully pack the unit and ship prepaid to the servicing location.
For further information: In the United States, write to the Robert Bosch Corporation, 2800 South 25th Avenue, Broadview, Illinois, 60155, attention Blaupunkt Customer Service Department or call 1-800-950-2528.
Specifically excluded from this warranty are failures caused by misuse, neglect, abuse, improper operation or installation, dropping or damaging a radio faceplate, unauthorized service or parts, or failure to follow maintenance instructions or perform normal maintenance activities. Normal maintenance activities for car audio products include but are not limited to cleaning, such as cleaning radio faceplate connectors and tape heads, tape player head demagnetization and tape player lubrication, compact disc and lens cleaning, and other minor maintenance activities and adjustments that are outlined in the owner's manual or that are normally required for continued proper operation. Also excluded from this warranty are the correction of improper installation and the elimination of any external electromagnetic interference.
THIS WARRANTY SETS FORTH YOUR EXCLUSIVE REMEDIES WITH RESPECT TO THE PRODUCTS COVERED BY IT. WE SHALL NOT BE LIABLE FOR ANY INCIDENTAL, CONSEQUENTIAL, SPECIAL OR PUNITIVE DAMAGES ARISING FROM THE SALE OR USE OF ANY BLAUPUNKT CAR AUDIO PRODUCTS, WHETHER SUCH CLAIM IS IN CONTRACT OR TORT. NO ATTEMPT TO ALTER, MODIFY, OR AMEND THIS WARRANTY SHALL BE EFFECTIVE UNLESS AUTHORIZED IN WRITING BY AN OFFICER OF ROBERT BOSCH CORPORATION.
THIS WARRANTY IS IN LIEU OF ALL OTHER WARRANTIES OR REPRESENTATIONS, EXPRESS OR IMPLIED, INCLUDING ANY WARRANTY IMPLIED BY LAW, WHETHER FOR MERCHANTABILITY OR FITNESS FOR A PARTICULAR PURPOSE OR OTHERWISE AND SHALL BE EFFECTIVE ONLY FOR THE PERIOD THAT THIS EXPRESS WARRANTY IS EFFECTIVE.
ANY IMPLIED WARRANTY SHALL BE LIMITED IN DURATION TO ONE YEAR FROM DATE OF PURCHASE. SOME STATES IN THE U.S. DO NOT ALLOW LIMITATIONS ON HOW LONG IMPLIED WARRANTY LASTS. SO THE ABOVE LIMITATIONS MAY NOT APPLY TO YOU.
THIS LIMITED WARRANTY GIVES YOU SPECIFIC LEGAL RIGHTS, AND YOU MAY ALSO HAVE OTHER RIGHTS WHICH VARY FROM STATE TO STATE IN THE U.S.
In the event any provision, or any part or portions of this warranty shall be held invalid, void or otherwise unenforceable, such holding shall not affect the remaining part or portions of that provision or any other provision hereof.
ROBERT BOSCH CORPORATION
BLAUPUNKT CUSTOMER SERVICE
2800 SOUTH 25TH AVENUE
BROADVIEW, IL 60155
TEL: 1-800-950-2528


- IN CAR VIDEO | OVERHEAD DVD SYSTEM
- BLAUPUNKT
- OVERHEAD DVD SYSTEM
- INFRARED REMOTE CONTROL OVERVIEW
- NOTES FOR THE USER
- PRECAUTIONARY MEASURES
- WARNING
- SAFETY NOTICES
- SELECT A SUITABLE LOCATION FOR SECURE INSTALLATION OF THE UNIT
- MARKING THE INSTALLATION AREA
- ATTACHING THE UNIT
- ELECTRICAL CONNECTIONS
- V PERMANENT LEAD (YELLOW)
- V SWITCHED LEAD (RED)
- BATTERY NEGATIVE LEAD (BLACK)
- INTERIOR LIGHTING (WHITE)
- AUDIO/VIDEO INPUTS "AV 1 IN" AND "AV 2 IN
- AUDIO/VIDEO OUTPUT "OUTPUT
- PREPARE THE REMOTE CONTROL BY INSERTING THE BATTERIES
- INITIAL OPERATION
- COPYRIGHT PROTECTION
- REGION CODE INFORMATION
- DOLBY DIGITAL
- DISC FORMATS
- FORMATS WHICH ARE NOT SUPPORTED
- HANDLING AND CLEANING DVDS AND CDS
- DISC CLEANING
- PREPARING NEW DISCS WITH ROUGH SPOTS
- SWITCHING ON/OFF
- TO SWITCH ON THE SYSTEM
- TO SWITCH OFF THE SYSTEM
- LOADING A DISC
- EJECTING A DISC
- AUXILIARY LIGHTING
- PERMANENT ON
- AUTOMATIC LIGHTING
- LIGHTING OFF
- TFT DISPLAY
- OPENING THE DISPLAY
- CLOSING THE DISPLAY
- SWIVELLING THE DISPLAY
- SELECTING THE AV SOURCE
- DISPLAY SETTINGS
- BRIGHTNESS
- COLOR SATURATION- (AV1/AV2 ONLY)
- CONTRAST
- COLOR BALANCE - TINT (AV1/AV2 ONLY)
- IMAGE SHARPNESS - (AV1/AV2 ONLY)
- TV STANDARD
- DISPLAY MODE
- INSTALLATION POSITION
- USER SETTINGS
- DEFAULT SETTINGS
- STARTING/STOPPING PLAYBACK
- VIDEO CDS WITH PBC (PLAYBACK CONTROL)
- PAUSE (STILL PICTURE)
- FAST FORWARD/REVERSE
- DVD
- VCD/CD/MP
- SKIPPING CHAPTERS/TRACKS
- REPEATING CHAPTERS/TRACKS
- DURING VCD/CD
- TIME DISPLAYS
- EXAMPLE
- PRESS DISP AGAIN
- PRESS DISP FOR THE THIRD TIME
- PRESS DISP FOR THE FOURTH TIME
- PRESS DISP FOR THE FIFTH TIME
- CD/VCD
- MP
- MENU FUNCTION
- MENU BUTTON
- TITLE BUTTON
- SELECTING AUDIO LANGUAGE
- VCD/CD
- SELECTING SUBTITLE LANGUAGE (DVD ONLY)
- ZOOM (MAGNIFICATION)
- SELECTING THE VIEWING ANGLE (DVD ONLY)
- MP3 DISC PLAYBACK
- WITH MENU
- WITHOUT MENU
- REPEAT FILE/DIRECTORY - REPEAT
- NEXT/PREVIOUS FILES
- JPEG IMAGE CDS
- THE DVD PLAYER SUPPORTS THE DISPLAY OF JPEG IMAGES
- INSERT A DISC WITH JPEG IMAGES IN THE PLAYER
- YOU CAN SWITCH BETWEEN THE LEFT AND RIGHT-HAND COLUMNS USING THE ◀ AND ▶ BUTTONS. YOU CAN SELECT THE DESIRED FILE OR THE DESIRED DIRECTORY USING THE AND BUTTONS
- NEXT/PREVIOUS IMAGE
- IMAGE OVERVIEW (DIGEST MODE)
- SETUP MENU
- MAIN PAGE
- GENERAL SET-UP
- SPEAKER SET-UP
- AUDIO SET-UP
- PREFERENCES
- GENERAL SET-UP MENU
- TV DISPLAY
- NORMAL/PS (FOR 4:3 VIEWING)
- NORMAL/LB (FOR 4:3 VIEWING)
- WIDE (FOR 16:9 VIEWING)
- TV TYPE
- PIC MODE
- ANGLE MARK
- OSD LANG
- CAPTIONS
- SPEAKER SET-UP MENU
- DOWNMIX
- AUDIO SET-UP MENU
- OP MODE
- DUAL MONO
- LPCM OUTPUT
- DRC - DYNAMIC RANGE CONTROL
- PREFERENCES SET-UP MENU
- AUDIO
- SUBTITLE
- DISC MENU
- LOCAL
- PARENTAL
- PASSWORD
- SMART NAV
- DEFAULTS
- REPLACING THE REMOTE CONTROL BATTERIES
- CHANGING BULBS
- CLEANING THE UNIT AND THE REMOTE CONTROL
- DOLBY SURROUND
- DOLBY SURROUND PRO LOGIC
- DRC (DYNAMIC RANGE CONTROL)
- DTS
- DVD (DIGITAL VERSATILE DISC)
- JPEG (JOINT PHOTOGRAPHIC EXPERT GROUP)
- MACROVISION
- OSD (ON SCREEN DISPLAY)
- PARENTAL GUIDANCE FUNCTION
- PBC (PLAYBACK CONTROL)
- SVCD (SUPER VIDEO CD)
- VCD (VIDEO COMPACT DISC)
- VFD (VACUUM FLUORESCENT DISPLAY)
- TFT (THIN FILM TRANSISTOR)
Brand : BLAUPUNKT
Model : IVOD-1002
Category : DVD player