AV226 - Drill Malmbergs - Free user manual and instructions
Find the device manual for free AV226 Malmbergs in PDF.


| Brand | Malmbergs |
| Model | AV226 |
| Product Type | Drill |
| Power Source | Corded electric |
| Voltage | 230 V |
| Power Rating | 600 W (typical) |
| No-Load Speed | 0-2800 rpm |
| Chuck Type | Keyless chuck |
| Chuck Capacity | 1.5-13 mm |
| Drilling Capacity (Steel) | 13 mm |
| Drilling Capacity (Wood) | 30 mm |
| Impact Function | Yes (for masonry) |
| Speed Control | Variable speed trigger |
| Forward/Reverse | Yes |
| Dimensions (L x W x H) | 280 x 70 x 200 mm |
| Weight | 1.6 kg |
| Cable Length | 2.5 m |
| Protection Class | Class II (double insulated) |
| Accessories Included | Depth stop, auxiliary handle, chuck key |
| Maintenance | Keep ventilation slots clean; check carbon brushes periodically |
| Safety Features | Lock-on button, spindle lock |
Frequently Asked Questions - AV226 Malmbergs
User questions about AV226 Malmbergs
0 question about this device. Answer the ones you know or ask your own.
Ask a new question about this device
Download the instructions for your Drill in PDF format for free! Find your manual AV226 - Malmbergs and take your electronic device back in hand. On this page are published all the documents necessary for the use of your device. AV226 by Malmbergs.
USER MANUAL AV226 Malmbergs
natural_image
Teal and black electric drill put tool with handle and screwdriver (no visible text or symbols)SÄKERHETSINSTRUKTIONER
natural_image
Diagram of a drill bit being inserted into a drill bit, showing motion direction (no text or symbols)
START
Kontrollera nätspänningen!
natural_image
Mechanical diagram showing a drill bit being inserted into a drill bit, with no visible text or symbols
ALOITUS
Tarkista verkkojännite!
Read all these instructions before operating the power tool. Save these safety instructions.
Working safely with this machine is possible only when the operating and safety information is read completely and the instructions contained therein are strictly followed.
Before using for the first time, ask for a practical demonstration.
Warning: When using electric tools, basic safety precautions should always be followed to reduce the risk of electric shock, personal injury and fire, including the following:
1. Keep work area clean
Cluttered areas and benches invite injuries. Light metal dust can burn or explode. Always keep the work place clean since material mixtures are especially dangerous.
2. Consider work area environment
Do not expose power tools to rain. Do not use power tools in damp or wet locations. Keep work area well lit. Do not use power tools in presence of flammable liquids or gases.
3. Protect yourself from electric shock
When working with electric power tools, avoid body contact with earthed parts (e.g. pipes, radiators, hobs, refrigerators). If you use electrically conductive coolers or lubricants or if there are extreme conditions for use (e.g. a high degree of humidity, development of metal dust, etc.) when working with electric power tools, use the (FI, DI, PRCD) residual current protection devices at any power outlet point.
4. Keep other people at a distance
Do not let onlookers contact tool or power lead. All onlookers should be kept away from work area.
5. Never allow children to use the machine
6. Store idle power tools safely
When not in use keep tools in a dry place, either locked up or high up, out of reach of children.
7. Never force a power tool
It will do the job better and safer at the rate for which it was intended.
8. Use the right power tool for the job
Do not force small power tools to do the job of a heavy duty tool. Do not use power tools for purpose not intended. Do not, for example, use a circular saw for cutting tree limbs or logs.
9. Dress properly
Do not wear loose clothing or jewellery. They can be caught in moving parts. Rubber gloves and non-skid footwear are recommended when working outdoors. Wear protective hair covering to contain long hair.
10. Wear safety goggles and ear protection
11. Wear dust protection mask
The dust generated during work can be detrimental to health, inflammable or explosive. Suitable safety measures are required.
12. Always direct the cable
to the rear away from the machine.
13. Do not abuse lead
Never carry power tool by lead or yank lead to disconnect tool from receptacle. Keep the lead away from heat, oil and sharp edges.
14. If the cable is damaged
or cut through while working, do not touch the cable and pull the plug out immediately. Never use the machine if the cable is damaged.
15. Secure the work piece
Use clamps or a vice to hold work piece. It is safer than using your hand and it frees both hands to operate the power tool.
16. Always hold the machine firmly
with both hands when working and provide for a secure stance.
17. Do not overreach
Keep proper footing and balance at all times.
18. Always use the auxiliary handle
when operating the machine
19. Place the machine on the nut/screw only when switched off.
-
Be careful when screwing in long screws; danger of sliding off.
-
Maintain tools with care
Keep the tools sharp and clean for better and safer performance. Follow instructions for servicing and changing tools. Inspect power tool leads periodically and, if damaged, have them repaired by an authorised service facility. Inspect extension leads periodically and replace them if damaged. Keep handles dry, clean and free from oil and grease.
- Disconnect power tools
when not in use, before servicing and when changing accessories such as blades, bits and cutters.
- Remove keys and spanners
Form a habit of checking to see that keys and adjusting tools are removed from power tool before turning it on.
- Avoid unintentional starting
Do not carry plugged-in power tool with finger on switch trigger. Be sure switch is turned off when plugging in.
- Outdoor use
Connect the machines that are used in the open via a residual current device (RCD) with an actuating current of 30mA maximum. Do not operate the machine in rain or moisture.
- Outdoor use extension leads
When power tool is used outdoors, use only extension leads intended for use outdoors and so marked.
- Stay alert
Watch what you are doing. Use common sense. Do not operate power tool when you are tired.
- Check power tool for damaged parts
Before further use of the power tool, a guard or other part that is damaged should be carefully checked to determine that it will operate properly and perform its intended function. Check for alignment of moving parts, binding of moving parts, breakage of parts, mounting, and any other condition that may affect the power tool's operation.
A guard or other part that is damaged should be properly repaired or replaced by an authorised service facility unless otherwise indicated in the operating instructions.
Have defective switches replaced by an authorised service facility. Do not use the power tool if the switch does not turn it on and off.
- Warning!
For your safety, use only accessories and attachments which are described in the operating instructions or are provided or recommended by the tool manufacturer. The use of tools other than those described in the operating instructions or in the catalogue of recommended tool inserts or accessories can result in a risk of personal injury.
- Have your power tool repaired by an authorised service facility
Power tools must comply with the relevant safety rules. Repairs should only be carried out by an authorised service facility. Considerable danger to the user may otherwise occur. Malmbergs is able to ensure perfect functioning of the machine only if the original accessories intended for it are used.
- Use suitable detectors to find hidden electric lines or water pipes
Contact with electric lines can lead to fire or electrical shock. Penetrating a water pipe will cause property damage or an electrical shock.
-
After you have switched off the machine always wait until it has come to a standstill before placing it down.
-
Overload clutch
If the drill bit becomes jammed or caught, the drive to the drill spindle is interrupted. Because of the forces that occur as a result, always hold the machine securely with both hands and take a firm stance.
NOISE/VIBRATION INFORMATION
Measured values determined according to EN 50 144. The A-weighted noise levels of the tool are typically
Sound pressure level: 91 dB(A)
Sound power level: 104 dB(A).
Wear ear protection!
The weighted acceleration is typically 12 m/s^2 .
INTENDED USE
This machine is intended for hammer drilling in concrete, brick and stone as well as for light chiselling work. They are also suitable for drilling without impact in wood, metal ceramic and plastic.
Machines with electronic control and right/left rotation are also suitable for screw driving and thread cutting.
PRODUCT ELEMENTS

- Quick change keyless chuck
- SDS-plus quick change drill chuck
- Tool holder (SDS-plus)
- Dust protection cap
- Locking sleeve
- Right/Left rotation switch
- Locking button
- On/Off switch with speed control function
- Release button for mode selector switch
-
Operational mode selection switch
-
Button for depth stop adjustment
- Depth stop
- Auxiliary handle
- Screw for drill chuck*
- Drill chuck*
- SDS-plus adaptor for drill chuck*
- Assembled drill chuck*
* Not all the accessories illustrated or described are included in standard delivery.
OPERATING INSTRUCTIONS
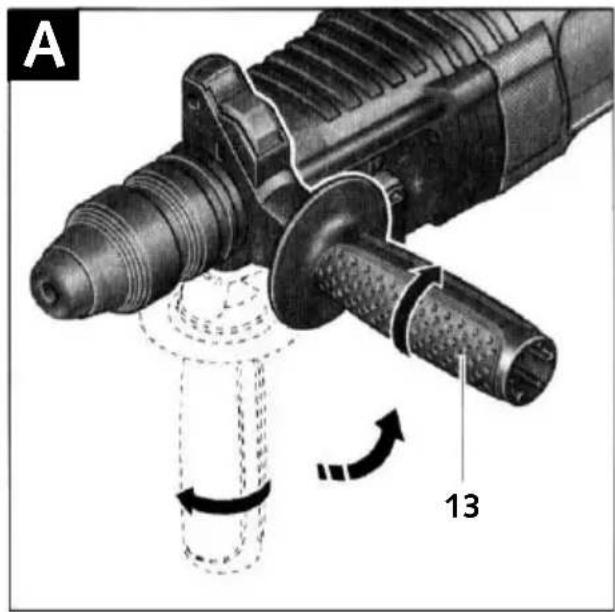
Auxiliary Handle, (see Fig. A)
Operate the machine only with the auxiliary handle (13).
By rotating the auxiliary handle to a comfortable position, a fatigue-free and therefore safe working position can be achieved.
Loosen the auxiliary handle (13) in the counterclockwise direction and adjust the handle to the desired working position. Ensure that the clamping band of the auxiliary handle is located in the groove intended for it in the housing.
Then retighten the auxiliary handle by turning it in clockwise direction.
Selecting Drill Chucks and Tools
For hammer drilling and chiselling, SDS-plus tools are required that are inserted in a SDS-plus drill chuck.
For drilling in steel or wood as well as screw driving and for thread cutting, tools without SDS-plus are used (for example drills with cylindrical shafts).
Do not use tools without SDS-plus for hammer drilling or chiselling! Tools without SDS-plus and their drill chuck are damaged by hammer drilling or chiselling.

Inserting/Replacing the Drill Chuck
Inserting the Drill Chuck for Working with Tools without SDS-plus, (see Fig. B)
To work with tools without SDS-plus (e.g., drills with cylindrical shafts), a suitable drill chuck must be used.
Screw the SDS-plus adaptor (16) (accessory) into the ring gear drill chuck (15). Secure the drill chuck with the screw (14).
Clean the adapter shaft and lightly grease the insertion end before inserting.
Insert the shaft of the assembled drill chuck (17) with a twisting motion into the tool holder (3) until it can be heard to lock.
The adapter shaft locks itself. Check the locking by pulling on the drill chuck.
Removing the Drill Chuck
To remove the drill chuck (17), pull the locking sleeve (5) to the rear, hold in this position and remove the drill chuck from the tool holder.
Inserting/Replacing the Tool
Take care when changing tools that the dust protection cap (4) is not damaged.
SDS-plus Tools
The SDS-plus tool is designed to be freely movable. This causes eccentricity when the machine is not loaded. However, the drill automatically centers itself during operation. This does not affect drilling precision.
Inserting a SDS-plus Tool, (see Fig. C)
Clean the tool before inserting and lightly grease the insertion end.
Insert the tool with a twisting motion into the tool holder (3) until it locks.
The tool locks itself. Check the locking by pulling on the tool.
Removing SDS-plus Tools, (see Fig. D)
Pull the locking sleeve (5) to the rear (a), hold it in this position and remove the tool from the tool holder (b).
Tools without SDS-plus
Do not use tools without SDS-plus for hammer drilling or chiselling! Tools without SDS-plus and their drill chuck are damaged when hammer drilling or chiselling.
Inserting the Tool
Place on the ring gear drill chuck (17).
Turn the sleeve of the ring gear drill chuck in the counter clockwise direction until the tool holder is open wide enough. Insert the tool in the middle of the tool holder and clamp with the drill chuck key uniformly in all three holes.
Tool Removal
Turn the sleeve of the ring gear drill chuck with the aid of the drill chuck key in the counter clockwise direction until the tool can be removed.

natural_image
Mechanical diagram showing a drill bit being inserted into a drill bit, with no visible text or symbols
Always use the correct supply voltage!
The voltage of the power source must agree with the value given on the nameplate of the machine.
Set the Operating Mode
With the operating mode selector switch (10), select the operating mode of the machine.
Change the operating mode only when the machine is switched off! Otherwise, the machine can be damaged.
To change the operating mode, press the locking button (9) and turn the operating mode selector switch (10) to the desired position until it can be heard to latch.

Position for hammer drilling in concrete or stone

Position for drilling in steel or wood, as well as for screwdriving and thread cutting

Position Vario-Lock for adjustment of the chiselling position

Position for chiselling
Setting the Direction of Rotation
With the right/left rotation switch (6), the rotational direction of the machine can be changed.
Change the operating mode only when the machine is switched off! Otherwise, the machine can be damaged.
Right rotation: Turn the right/left rotation switch (6) on both sides to the stop in the position ←.
Left rotation: Turn the right/left rotation switch (6) on both sides to the stop in the position
Set the direction of rotation for hammer drilling and chiselling always for right rotation.
Switching On/Off
ON
To switch on the machine, press the on/off switch (8). To lock, press the on/off switch and lock by pressing the locking button (7).
Setting the Speed
By increasing or decreasing the pressure on the on/off switch (8) the speed of the switched on machine can be continuously regulated.
OFF
To switch off, release the on/off switch (8), when locked, first press the on/off switch and then release.
Reduced speed of the machine facilitates the starting of holes (e.g. on smooth surfaces such as tiles), prevents the slipping of the drill and the splintering of the drilled hole.
Recommended Speed Ranges:
High speed for hammer drilling in concrete • or stone as well as for chiselling.
Medium speed for drilling in steel and wood. Low speed for driving screws and cutting threads.
Working Instructions
Chiselling
The SDS-plus tool can be turned in the tool holder to various positions to achieve an optimum and low-fatigue working position.
Turn the operating mode selection (10) to position (Vario-Lock). Then turn the tool in the tool holder to the desired position.
For chiselling, turn the operating mode selection switch (11) to position 📋 this locks the tool.
TECHNICAL SPECIFICATIONS
Rated input power: 800W
Impact rate at nominal rotational speed: 0...4000/min
Impact energy per stroke: 2.9J
No-load speed: 0...900 rpm
Maximum drill ∅
Masonry (core drill): 68 mm
Concrete: 26 mm
Wood: 30 mm
Steel: 13 mm
Weight without accessories: Approx. 2.4 kg
Safety class:

The specifications apply for the rated voltage of [U] 220/230V. For lower voltages and with models for specific countries, the specifications can vary.
Please take note of the order number of your machine since the trade name of the individual machines can vary.


MALMBERGS
- SÄKERHETSINSTRUKTIONER
- START
- Kontrollera nätspänningen!
- ALOITUS
- Tarkista verkkojännite!
- Keep work area clean
- Consider work area environment
- Protect yourself from electric shock
- Keep other people at a distance
- Never allow children to use the machine
- Store idle power tools safely
- Never force a power tool
- Use the right power tool for the job
- Dress properly
- Wear safety goggles and ear protection
- Wear dust protection mask
- Always direct the cable
- Do not abuse lead
- If the cable is damaged
- Secure the work piece
- Always hold the machine firmly
- Do not overreach
- Always use the auxiliary handle
- Place the machine on the nut/screw only when switched off.
- NOISE/VIBRATION INFORMATION
- Wear ear protection!
- INTENDED USE
- PRODUCT ELEMENTS
- OPERATING INSTRUCTIONS
- Auxiliary Handle, (see Fig. A)
- Selecting Drill Chucks and Tools
- Inserting/Replacing the Drill Chuck
- Inserting the Drill Chuck for Working with Tools without SDS-plus, (see Fig. B)
- Removing the Drill Chuck
- Inserting/Replacing the Tool
- SDS-plus Tools
- Inserting a SDS-plus Tool, (see Fig. C)
- Removing SDS-plus Tools, (see Fig. D)
- Tools without SDS-plus
- Inserting the Tool
- Tool Removal
- Always use the correct supply voltage!
- Set the Operating Mode
- Change the operating mode only when the machine is switched off! Otherwise, the machine can be damaged.
- Setting the Direction of Rotation
- Switching On/Off
- ON
- Setting the Speed
- OFF
- Recommended Speed Ranges:
- Working Instructions
- Chiselling
- TECHNICAL SPECIFICATIONS
- MALMBERGS
Brand : Malmbergs
Model : AV226
Category : Drill