GRM1008 - Kitchen scale Ferm - Free user manual and instructions
Find the device manual for free GRM1008 Ferm in PDF.


| Product Type | Digital Kitchen Scale |
| Brand | Ferm |
| Model | GRM1008 |
| Capacity | 5 kg |
| Graduation | 1 g |
| Units | g, kg, lb, oz, ml, fl.oz |
| Display | LCD, 4 digits |
| Tare Function | Yes |
| Auto-Off | Yes, after 2 minutes of inactivity |
| Power Supply | 2 x AAA batteries (included) |
| Platform Material | Tempered glass |
| Dimensions (W x D x H) | 18 x 14 x 2 cm |
| Weight | 300 g |
| Cleaning | Wipe with a damp cloth; do not immerse in water |
| Safety Instructions | Do not overload; place on a flat, stable surface; keep away from liquids |
| Spare Parts Available | Batteries (AAA) |
| Repairability | Not user-serviceable; contact manufacturer for support |
| Overload Indicator | Displays “EEEEE” or “Err” |
| Low Battery Indicator | Display shows “Lo” or battery symbol |
Frequently Asked Questions - GRM1008 Ferm
User questions about GRM1008 Ferm
0 question about this device. Answer the ones you know or ask your own.
Ask a new question about this device
Download the instructions for your Kitchen scale in PDF format for free! Find your manual GRM1008 - Ferm and take your electronic device back in hand. On this page are published all the documents necessary for the use of your device. GRM1008 by Ferm.
USER MANUAL GRM1008 Ferm
UK Subject to change
Fig. 1

Fig. 2
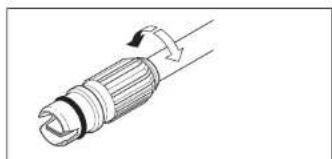
Fig. 3

Fig. 4

Fig. 5
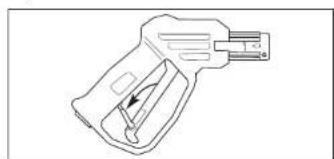
Fig. 6
2 Ferm

Fern 63
SPARE PARTS LIST FHPW-250
| REF NR | DESCRIPTION | POSITION |
| 501094 | FILTER | 1 |
| 501096 | VALVE SET | 2 |
| 800035 | CONDENSATOR 35UF | 3 |
| 501097 | MAINSWITCH | 4 |
| 501102 | HOSE | 5 |
| 501095 | WHEEL | 6 |
| 501104 | HANDLE | 7 |
| 501099 | TRIGGER | 8 |
| 501100 | LANCE EXTENSION | 9 |
| 501101 | LANCE ADJUSTABLE NOZZLE | 10 |

SAFETY AND OPERATING INSTRUCTIONS
High pressure cleaner FHPW-250
THE NUMBERS IN THE FOLLOWING TEXT CORRESPOND WITH THE PICTURES AT PAGE 2.

Always read the instruction for electrical products
carefully before use. It will help you understand your product more easily and avoid unnecessary risks. Keep this instruction manual in a safe place for future use.
CONTENTS:
- Machine data
- Safety instructions
- Assembly
- Use
- Service & maintenance
I. MACHINE DATA
INTRODUCTION
The high pressure cleaner FHPW-250 is quick and efficient for cleaning vehicles, machines, boats, buildings, etc., by the removal of stubborn dirt using clean water and chemical detergents. When using chemical detergents, only use biodegradable types. Only clean vehicle engines in areas in which suitable oil traps are installed.
TECHNICAL SPECIFICATION
| Model | FHPW-250 | |
| Art.nr. | GRM1008 | |
| Voltage | AC 230 V | |
| Input power | 1900 W | |
| Working pressure | 110 bar | |
| Max. working pressure | 200 bar | |
| Max. water temperature | 50°C | |
| Working flow rate | 6.0 l/min | |
| Hose length | 5 m | |
| Weight | | 16 Kg |
| Dimensions | 52 x 52 x 36 cm | |
| Lpa (sound pressure level) | | 83.5 dB (A) |
| Vibration level | | 1.0 m/s 3 |
CONTENTS OF PACKING
• High pressure cleaner
• Hose
• Trigger
• Lance holder
- Hose handle
• Lance extension
• Lance adjustable nozzle
• Detergent spray attachment
• Safety and operating instructions
- Warranty card
FEATURES
Fig. 1
- Water outlet
- Water inlet with filter
- Main switch
- Adjustable spray nozzle
- Lancn extension
- Trigger with lock mechanism
- Trigger Wurlockin
- High pressure loss
- High pressure hose
- Documented attachment
- Detergent spray attachment
- Lance holder
- Hose handle
2. SAFETY INSTRUCTIONS
EXPLANATION OF SYMBOLS
In this manual and/or on the machine the following symbols are used:

Read instructions carefully

In accordance with essential applicable safety standards of European directives

Denotes risk of personal injury, loss of life or damage to the tool in case of non-observance of the instructions in this manual.

Indicates electrical shock hazard

Immediately unplug the plug from the mains electricity in the case that the cord gets damaged and during maintenance.

Faulty and/or discarded electrical or electronic apparatus have to be collected at the appropriate recycling locations.


DO NOT direct the water jet towards people or animals. DO NOT direct the water jet towards the unit itself, electrical parts or towards other electrical
SAFETYINSTRUCTIONS
When using electric machines always observe the safety regulations applicable in your country to reduce the risk of fire, electric shock and personal injury. Read the following safety instructions and also the enclosed safety instructions.
Keep these instructions in a safe place!
ELECTRICAL SAFETY
• Always check if your mains voltage corresponds with the value on the type plate.
- When replacing old cables or plugs:
Throw away old cables or plugs immediately as soon as new ones have replaced these. It is dangerous to put the plug of a loose cable into the socket outlet.
- When using extension cables:
Only use an approved extension cable that is suitable
for the machine's power. The cores must have a diameter of at least 1.5 mm 2 . When the extension cable is on a reel, unroll the cable in its entirety.
- All electrical connections e.g. extension cable, must be of an approved waterproof type for outdoor use and marked accordingly. Extension cables must be threecore, one of which is EARTH.
SWITCH OFF THE MACHINE IMMEDIATELY IN CASE OF
-
Malfunction in the mains plug, power cable or damaging of cable.
-
Broken switch.
- Smoke or stench of scorched insulation.
SPECIFIC SAFETY RULES
The USE and MAINTENANCE manual constitutes an essential part of the cleaner equipment and should be kept in a safe place for future reference. If you sell the cleaner, the manual should be handed on to the new owner.
- Before starting the cleaner, make sure that it is receiving water correctly. Operating the cleaner without water could damage the seals.
- Do not disconnect the plug by pulling on the electrical cable.
- If you are too far from the object you wish to clean, do not move the cleaner nearer by pulling on the high pressure hose; use the handle provided.
- In versions not equipped with TSS device, do not operate the cleaner for more than 1-2 minutes with the gun closed as this could damage the seals.
- Protect the cleaner from freezing during the winter. - Do not obstruct the ventilation grilles during operation.
- The cross-section of any extension cables used must be proportional to their length, i.e. the longer the extension cable, the greater the cross-section; cables with a protection level of "IPXS" must be used.
- Position the cleaner AS NEAR POSSIBLE to the water supply.
- The packaging is easily recyclable, and must be disposed of in compliance with the regulations in force in the country of installation.
- Use the cleaner only with accessories and replacement parts authorized by the manufacturer. The use of original accessories and replacement parts will ensure safe, trouble-free operation.
- The cleaner must be used standing on a secure, stable surface.
- Avoid unintentional firing of the trigger. Do not carry the lance/ trigger assembly with your hand over the trigger. Always use the trigger lock mechanism.
- Ensure that the safety lock on the trigger is used, when you have stopped using the pressure washer to prevent accidental operation. (Fig. 6)
SAFETY "MUST NOTS"
- EXPLOSION OR POISONING. DO NOT use the cleaner with inflammable or toxic liquids, or any products which are not compatible with the correct operation of the cleaner.
- INJURYHAZARD
DO NOT direct the water jet towards people or animals.
- ELECTRIC SHOCK HAZARD. DO NOT direct the water jet towards the unit itself, electrical parts or towards other electrical equipment.
- SHORT CIRCUITH AHAZARD.
DO NOT use the cleaner outdoors in case of rain. INJURYHAZARD
DO NOT allow children or incompetent persons to use the cleaner.
- ELECTRIC SHOCK HAZARD. DO NOT touch the plug and/or socket with wet hands.
- ELECTRIC SHOCK AND SHORT CIRCUIT HAZARD. DO NOT use the cleaner if the electrical ca damaged.
- EXPLOSION HAZARD. DO NOT use the cleaner if the high pressure hose is damaged.
- ACCIDENTHAZARD.
DO NOT jam the trigger in the operating position.
- ACCIDENT HAZARD. Check that the data plates are affixed to the cleaner, if not, inform your dealer. Cleaners without plates must NOT be used as they are unidentifiable and potentially dangerous.
- EXPLOSION HAZARD. DO NOT tamper with or with or alter the calibration of the safety valve.
- HAZARDOUS ALTERATION OF OPERATING PERFORMANCE. DO NOT alter the original diameter of the spray head nozzle.
- ACCIDENT HAZARD.
DO NOT leave the cleaner unattended. - SHORT CIRCUITH AHAZARD. DO NOT move the cleaner by pulling on the electrical cable.
SAFETY "MUSTS"
- SHORT CIRCUIT HAZARD. All electrical conductors MUST BE PROTECTED against the water jet.
- ELECTRIC SHOCK HAZARD. The cleaner MUST ONLY BE CONNECTED to a correctly earthed power supply.
- Use a Residual Current Device (RCD) of not more than 30 mA, at the plug socket when using this appliance.
- INJURY HAZARD. The high pressure may cause materials to bounce off surfaces at speed; therefore protective clothing and safety goggles MUST BE WORN.
- ACCIDENTAL START-UPHAZARD. Before doing work on the cleaner, REMOVE the plug.
- INJURY HAZARD. Before pressing the trigger, GRIP the gun firmly to counteract the recoil.
- CONTAMINATION HAZARD. COMPLY WITH the requirements of the local water supply company. According to DIN 1988, power-jet cleaners may only be connected to the mains
drinking water supply if a backflow preventer valve with drain facility is installed in the supply hose.
- ACCIDENT HAZARD.
Maintenance and/or repair of electrical components
MUST be carried out by qualified staff.
- INJURYHAZARD.
DISCHARGE residual pressure before
disconnecting the cleaner hose.
- ACCIDENT HAZARD
Before using the cleaner, CHECK every time that the
Before using the cleaner, ONER every time an
screws are fully lightened and that there are no broken power parts.
broken or worn parts
- EXPLOSION AND ELECTRIC SHOCK HAZARD
Only USE detergents which will not corrode the
coating materials of the high pressure hose/electrical
cable.
- INJURYHAZARD
ENSURE that all people or animals keep a minimum
distance of 16 yd. (15m) away.
SAFETY VALVE
The safety valve also functions as a pressure limiting valve. When the gun trigger is released, the safety valve opens and the water recirculates through the pump inlet.
3. ASSEMBLY
HANDLE AND EXTENSION REEL ASSEMBLY
(Fig. 5)
-
Connect the detergent tube from the machine to the bottom of the detergent reservoir.
-
Fit together the two upright handles locating the high pressure reel and detergent tank between them
-
Fit the handle assembly into the back of the machine.
-
Fit the loop handle to the top of the handle assembly.
-
Secure the loops handle with fixings provided.
-
Attach the short High Pressure High hose from the pump outlet of the machine to the High pressure hose reel inlet port.
-
Attach the rewind handle to the High Pressure Hose reel.
-
Attach the High Pressure Hose to the water inlet port of the lance assembly.
-
When not in use store the lance in the cup at the bottom of the machine and clip the top of the lance into the bracket of the handle.
Do not allow the end of the lance to come into contact with any debris as contamination will cause operational problems and premature wear of the nozzle assembly.
CONNECTING THE HOSE AND TRIGGER ASSEMBLY
Fig. 1 and 2
Before connecting any hoses or trigger/lance assembly first check all connections to ensure they are free from any blockage.
- Screw the outlet pressure hose (7) onto the machine and ensure a good hand tight fit.
- Connect the spray lance (5) to the trigger (6) by means of the push in and twist bayonet fitting (fig. 2). Ensure that this connection has been performed positively and the bayonet has located correctly. Ensure the hose has no kinks in it.
WATERSUPPLY
- Ensure that you have a suitable water supply to feed the pressure washer. Check that all connections are tight and there are no leaks in the hose.
• The supply tap should be fully open (do not turn on the pressure washer yet).
- Now depress the trigger (unlock trigger lock first) to let water pass through the unit and expel any air.

This unit is to be used with a cold-water source only!
Turn on the pressure washer, once all the air has
been expelled and water has reached the end of the lance.
ELECTRICAL CABLES
Ensure that all cables are damage free before connecting to the power supply. Plug in the pressure washer and turn the unit on with the main switch (3).
4. USE
The cleaner must only be used with clean water; use of unfiltered water or corrosive chemicals will damage the cleaner.
- Turn the motor switch to the "0" position.
- Check that the electrical supply voltage and frequency (Volts/Hz) correspond to those specified on the cleaner data plate.
- If the power supply is correct, you may now plug in the cleaner.
- The electric supply connection shall be made by a qualified electrician. It is recommended that the electric supply to this appliance should include either a residual current device that will interrupt the supply if the leakage current to earth exceeds 30 mA for 30 ms or a device which will prove the earth circuit.
The machine may cause electrical disturbances when starting.
If the motor stops and fails to restart, wait 2-3 minutes before restarting. THERMAL CUTOUT TRIPPED
ADJUSTING THE NOZZLE
Fig. 3
Water may be sprayed out of the nozzle either linearly or in a fan shape. Turn on the pressure first, and then adjust the nozzle.
The water inlet filter must be inspected regularly, so as to avoid blockage and restriction of the water supply to the pump. (Fig 4)
USING THE DETERGENT RESERVOIR
Fill the detergent tank with liquid detergent. When the trigger is now pressed with the machine running, detergent will spray out with the water.
RECOMMENDED CLEANING PROCEDURE
Dissolve dirt by applying detergent with the tan jet to the dry surface. On vertical surfaces, work from the bottom upwards. Leave the detergent to act for 1 to 2 minutes, but do not allow to dry out. Apply the high pressure jet, keeping the nozzle at least 30cm (10 in.) from the surface, working from the bottom upwards. Avoid allowing the rinsing water to run on to unwashed surfaces.
SHUTTING DOWN THE PRESSURE
WASHER
Never disconnect the high-pressure hose from the machine while the system is still pressurized.
Follow the correct procedure:
- Turn off the pressure washer by using the switch on the machine.
- Unplug the unit from the power source.
- Turn off the water supply at the tap.
- Press the trigger of the gun to depressurize the
system.
- Disconnect the supply hose to the machine
- Wipe all surfaces of the unit with a damp clean cloth.
- Engage the safety lock.
TROUBLESHOOTING
- When switched on, the machine will not start
working.
• Plug is not well connected or electric socket is faulty
- Check plug, socket and fuse.
• The mains voltage is lower than the minimum
requirement for start up
- Check that the mains voltage is adequate.
• The pump is stuck
- Refer to after storage instructions
- Switch off the unit and let the motor cool.
• Thermal safety has tripped
- Leave the lance open with water coming through.
- Fluctuating pressure
• Pump sucking ai - Check that hoses and connections are airtight.
• Valves dirty, worn out or stuck. Pump seals worn -
Clean and replace or refer to dealer
-
Water leaking from the pump
- Seals worn out
- Check and replace, or refer to dealer
4. The motor stops suddenly
• Thermal safety switch has tripped due to
overheating.
- Check that the mains voltage corresponds to specifications. An extension cable, which is too thin, and too long can cause a voltage drop and cause the motor to overheat. Leave to cool down. Use heavy duty extension cables.
- The pump does not reach the necessary
pressure.
• Water inlet, filter is clogged
- Clean the water inlet filter
- Pump sucking air from connections or hoses
- Check that all supply connections are tight
• Suction/ delivery valves are clogged or worn out.
- Check that the water feeding hose is not leaking.
• Unloader valve is stuck
- Clear or respire valves
• Lance nozzle incorrect or worn out
- Loosen and re-tighten regulation screw.
- Check and/or replace
CE KONFORMITETSERKLÆRING (DK)
Unplug the electric cable (power source) prior to
any maintenance or preparatory storage
5
Make sure that the machine is not live when carrying out maintenance work on the motor.
• To ensure good performance, check and clean the suction and detergent filters after every 50 hours of operation.
- Long periods of disuse may lead to the formation of lime scale deposits. Working through the hole on the rear, RELEASE the motor using a screwdriver (for models with this feature).
- Then remove the screwdriver and proceed with the restart operations.
Cleaning
Keep the ventilation slots of the machine clean to prevent overheating of the engine.
Clean the housing regularly with a soft cloth, preferably every time it is used. Keep the air vents free dust and dirt. Remove stubborn dirt with a soft rag moistened in soapy water. Do not use any solvents such as petrol, alcohol, ammonia, etc. as such substances can damage the plastic parts.
Lubrication
The appliance does not need any extra lubrication.
Storage and transportation
Keep the high pressure washer in well-ventilated dry
premises with temperature not going below +5°C.
Operate the cleaner with non-corrosive/non-toxic
antifreeze before storing for the winter.
Faults
If a fault arises through wear in an element, please
contact the service address shown on the warranty card.
A drawing of the spare parts that may be obtained is
included at the end of these operating instructions.
ENVIRONMENT
To prevent damage during transport, the appliance is delivered in a solid packaging which consists largely of reusable material. Therefore please make use of options for recycling the packaging.
WARRANTY
Read the terms of warranty on the separate warranty
card which is enclosed.
CE DECLARATION OF CONFORMITY (UK)
We declare under our sole responsibility that this product is in conformity with the following standards or standardized documents
EN60335-2-79:1998
in accordance with the regulations.
98/37/EEC
73/23/EEC
89/336/EEC
from 01-11-2004
ZWOLLENL
W. Kamphof
Quality department

It is our policy to continuously improve our products and we therefore reserve the right to change the product specification without prior notice.

Deutsch
CE ERKLÆRING AVANSVARSFORHOLD (N)
5. SERVICE OG VEDLIKEHOLD
98/37/EEC 73/23/EEC 89/336/EEC
Ab01.11.2004
ZWOLLENL
W. Kamphof Quality Department

Max. water temperature | 50°C Max. water temperature | 6.0 U/min
98/37/ETY 73/23/ETY 89/336/ETY
01.11.2004 lähtien
ZWOLLENL
W. Kamphof Laadunvalvontaosasto

stopcontact is defect
73/23/EEC 89/226/EEC
vanaf 01-11-2004
ZWOLLENL
Quality department

Pression de service | 1900 W
Approvisionnement
- Controller Brocheller Byc But Oct
5. SERVICE & UNDERHÅLL

FÖRVARING OCH TRANSPORT
CE DÉCLARATION DE CONFORMITÉ (F)
98/37/EEC 73/23/EEC 89/336/EEC
INNEHÄLLSFÖRTECKNING:
Residua (Residual Currency Devices, BCD) di
Residual (Residual Current Device - RCD) of
- SAFETY AND OPERATING INSTRUCTIONS
- HIGH PRESSURE CLEANER FHPW-250
- CONTENTS
- MACHINE DATA
- INTRODUCTION
- CONTENTS OF PACKING
- FEATURES
- SAFETY INSTRUCTIONS
- EXPLANATION OF SYMBOLS
- SAFETYINSTRUCTIONS
- ELECTRICAL SAFETY
- SWITCH OFF THE MACHINE IMMEDIATELY IN CASE OF
- SPECIFIC SAFETY RULES
- SAFETY "MUST NOTS
- SAFETY "MUSTS
- SAFETY VALVE
- ASSEMBLY
- HANDLE AND EXTENSION REEL ASSEMBLY
- (FIG. 5)
- CONNECTING THE HOSE AND TRIGGER ASSEMBLY
- FIG. 1 AND 2
- WATERSUPPLY
- ELECTRICAL CABLES
- USE
- ADJUSTING THE NOZZLE
- FIG. 3
- USING THE DETERGENT RESERVOIR
- RECOMMENDED CLEANING PROCEDURE
- SHUTTING DOWN THE PRESSURE
- WASHER
- TROUBLESHOOTING
- THE MOTOR STOPS SUDDENLY
- CE KONFORMITETSERKLÆRING (DK)
- CE DECLARATION OF CONFORMITY (UK)
- EN60335-2-79:1998
- DEUTSCH
- CE ERKLÆRING AVANSVARSFORHOLD (N)
- SERVICE OG VEDLIKEHOLD
- AB01.11.2004
- ZWOLLENL
- VANAF 01-11-2004
- SERVICE & UNDERHÅLL
- FÖRVARING OCH TRANSPORT
- CE DÉCLARATION DE CONFORMITÉ (F)
- INNEHÄLLSFÖRTECKNING
Brand : Ferm
Model : GRM1008
Category : Kitchen scale