
S660 - Smartphone PHILIPS - Free user manual and instructions
Find the device manual for free S660 PHILIPS in PDF.


| Product Type | Smartphone |
| Brand | Philips |
| Model | S660 |
| Dimensions | 145 x 70 x 8 mm |
| Weight | 150 g |
| Battery Type | Lithium-ion |
| Battery Capacity | 2000 mAh |
| Screen Size | 4.5 inches |
| Screen Resolution | 854 x 480 pixels |
| Operating System | Android 6.0 Marshmallow |
| Processor | Quad-core 1.3 GHz |
| RAM | 1 GB |
| Internal Storage | 8 GB |
| Expandable Storage | microSD up to 32 GB |
| Rear Camera | 8 MP |
| Front Camera | 2 MP |
| Connectivity | 3G, Wi-Fi, Bluetooth 4.0, GPS |
| Sensors | Accelerometer, Proximity, Ambient light |
| Power Supply | Micro-USB charger (5V, 1A) |
| Main Functions | Voice calls, SMS, MMS, Internet browsing, Camera, Video playback, Music player, FM radio |
| Care and Cleaning | Wipe with soft dry cloth; avoid liquids and abrasives |
| Safety | Do not expose to water or extreme temperatures; use only approved accessories |
| Spare Parts and Repairability | Replacement battery, screen assembly; repair by authorized service center |
| General Information | Single SIM (nano-SIM); available in black, white, gold colors |
Frequently Asked Questions - S660 PHILIPS
User questions about S660 PHILIPS
0 question about this device. Answer the ones you know or ask your own.
Ask a new question about this device
Download the instructions for your Smartphone in PDF format for free! Find your manual S660 - PHILIPS and take your electronic device back in hand. On this page are published all the documents necessary for the use of your device. S660 by PHILIPS.
USER MANUAL S660 PHILIPS
Philips continuously strives to improve its products. Therefore, Philips reserves the rights to revise this user guide or withdraw it at any time without prior notice. Philips provides this user guide “as is” and does not accept, except as required by applicable law, liability for any error, omission or discrepancy between this user guide and the product described. The device is meant to be connected to GSM/GPRS networks.
How to...
| Switch the phone On/Off | Long press |
| Store Numbers in Phonebook | Enter the phone number and press to save. |
| Make a call | Enter the phone number on the keypad and press to dial. |
| Access the Call logs | Press in idle mode. The Call logs displays the Missed Calls, Dialed Calls and Received Calls. |
| Make a IP call | Enter the phone number on the keypad and long press to dial with IP prefix. |
| Answer a call | Press when your phone rings. |
| End a call | Press |
| Reject a call | Press when your phone rings. |
| Adjust the earpiece volume | Press the up or down volume keys during the call. |
| Adjust ringtone volume | Press the up or down volume keys in idle mode. |
Access the Phone Book Press in idle mode. list
| Access the Main Menu | Press → Menu in idle mode. |
| Switch to silent mode | Long press 🔊 key in idle mode. |
| Turn on the camera | Press 📄 in idle mode. |
| Take photos | Press 📄 or 🔒 with the camera active. |
| Access WAP | Long press 📄 in idle mode. |
| Access Shortcuts | Press ▼ in idle mode. |
| Open Audio Player | Press ▲ in idle mode. |
| Access Write Message | Press ▼ in idle mode. |
| Access Tone Setup | Press ▶ in idle mode. |
| Access Multimedia | Long press 📄 in idle mode. |
| Go to previous menu | Press —. |
| Quickly return to idle | Press 📄. |
Softkeys
The left and right soft keys and located at the top of the keypad allow you to select the corresponding options that appear on the screen immediately above them, including during calls. The functions associated with these keys will vary according to the current content.
Main Menu
| Phone Book Messages Call History | |
| Settings Multimedia File Manager | |
| Fun & Games User Profiles Organizer | |
| Services Extra Shortcuts |
The Main Menu gives you access to all the different features of your mobile phone presented in the form of a grid. The table above summarises the arrangement of the Main Menu.
Press to access the Main Menu when in idle mode, then use the navigation key - which directions are represented in the present guide with the ▲, ▼, ▶ or ▶ signs-to browse the icons and lists. Within lists, press to access the options related to the selected item, press Back to go back one level.
Table of contents
I. Getting Started 4
Insert the SIM card and Battery 4
Switch on the phone 5
Charge the battery 5
Shortcuts function 5
- Calling 6
Make a call 6
Answer and end a call 6
Call handsfree 6
Options during a call 6
Adjust the earpiece volume 7
Quickcall 7
Make an emergency call 7
Handle multiple calls 7
- Text or number Entry 9
Function keys 9
Multitap ABC/abc input 9
Smart ABC/abc input 10
Numeric input 10
- Phone Book 11
Search for a contact in phonebook ..... 11
Manage contacts .... 11
Store a phone number with a name ..... II
Copy the phone book 11
Copy or move a phonebook entry ..... 12
Delete contacts 12
Caller Group 12
Extra Number 13
Settings 13
- Messages 14
SMS 14
MMS 17
Chat 20
Broadcast Message 20
- Call History 21
Missed Calls 21
Dialed Calls 21
Received Calls 21
Delete Call Log 21
Call Time 21
Call Cost 22
SMS Counter 22
GPRS Counter 22
- Settings 23
Phone Setup 23
Call Setup 25
Network Setup 26
Security Setup 27
Philips Authentic Accessories .... 51
Specific Absorption Rate
Information 52
Limited warranty 53
I. Getting Started
Please read the safety instructions in the "Precautions" section before use.
To use your phone, you must insert a valid SIM card supplied by a GSM operator or retailer. The SIM card contains your subscription information, your mobile telephone number, and a memory in which you can store phone numbers and messages (for more information, see "Phone Book").
Insert the SIM card and Battery
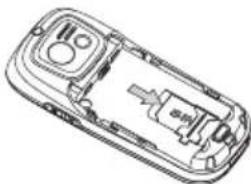
Follow the steps below to insert your new SIM card. Remember to switch off your mobile phone before removing the back cover.
Remove the battery
To insert the SIM card, you must first remove the battery. Press the button on the back and slide the back cover downwards to remove it. Hold the latch to lift up the battery.

natural_image
Two line drawings of a mobile phone casing, one showing internal components and arrows indicating movement (no text or symbols)Insert the SIM card
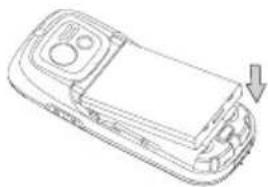
Place the SIM card in the space provided, making sure that the clipped corner of the card is in correct corner and that the gold contacts are facing downwards.
natural_image
Line drawing of a mobile phone casing with internal components (no text or symbols)Place the battery back to its slot, with the gold contacts facing downwards until it snaps into place.
natural_image
Line drawing of a mobile phone casing with a downward arrow indicating compression (no text or symbols)4 Getting Started
Replace the back cover by sliding down into its slots until it stops.
Switch on the phone
To switch on the phone, long-press key. Enter the PIN code if required. A PIN code is a 4- to 8-digit secret code for your SIM card. It is preconfigured and communicated to you by your operator or retailer. For more information on PIN codes, see "Security Setup" on page 27.
If you enter an incorrect PIN code three times, your SIM card will be locked. To unlock request the PUK code from your operator.
Charge the battery
Your phone is powered by a rechargeable battery. A new battery is partially charged and a sound alert will warn you when the battery reaches low.
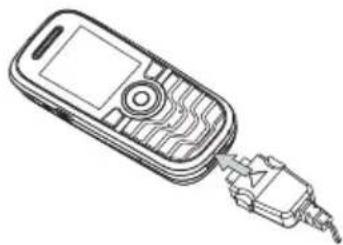
Once the battery is back in place you can charge the phone. Plug in the connector as shown below. Then plug the other end into a main AC power socket.
natural_image
Line drawing of a mobile phone with an attached USB cable (no text or symbols)The battery symbol indicates the state of charge. During charging, the charge indicators will scroll. When all the scroll bars are steady, the battery is fully charged. You can then disconnect the charger.
Keeping the charger plugged to the mobile when the battery is fully charged will not damage the battery. The only way to turn off the charger is to unplug it, so use an easily accessible AC power socket.
Shortcuts function
Your phone provides ten fast ingoing function items. You can modify them according to demands. For more info see "Shortcuts" on page 43.
2. Calling
Make a call
From the idle screen
- In idle mode, enter the phone number using the keypad. To correct an error, press
- Press to dial.
- Press to hang up.
For an international call, shortly press twice to enter the "+" sign for the international prefix.
Using the phonebook
- Press in idle mode.
- Select a contact in the list and press ☐ the selected number is dialled. To select a different number, press ▲ or ▼ (see "Phone Book" for more information).
- Press to hang up.
Answer and end a call
When receiving a call, the number of the caller may be displayed, depending on whether or not the person calling has chosen to display his or her ID. If the number is stored in the selected phonebook, then the corresponding name is displayed instead of the number.
- Answer the call: press
- Reject the call: press (or long press the down volume key). If you have activated Call Divert, the call is diverted to a number or voice mail.
- Hang up: press
The phone will not ring if in silent mode.
If you have selected Any Key, you can accept a call by pressing any key except and.
Call handsfree
For your own comfort and safety, ensure you move the phone away from your ear when calling handsfree, especially when increasing the volume.
Press ☐ H-Free during a call to activate handsfree. To cancel handsfree you can press ☐ H-Held again to deactivate it.
Options during a call
During a call, press ☐ Option to access the following options.
Mute (On/Off)
This option allows you to mute or unmute the microphone so that your caller cannot hear you.
Sound Recorder
In most countries, recording telephone conversation is subject to legislation. We advise you to notify the caller if you intend to record your conversation and only do so if they agree.
To record a conversation during a call, select Sound Recorder and press ☐While recording you can press ☐Pause/Cont. To stop recording, press , enter the name and press to save.
Other options during a call
Press ☐ Option to be able to perform the following tasks while a call is ongoing: Access Phone Book to search entry, select End to hang up, send or read messages.
Adjust the earpiece volume
During a call, press the up or down volume key to increase or decrease the volume.
Quickcall
Quickcall of SIM phonebook
If you have the serial number (for example: 5) of the contact you want to dial in SIM, you can enter 5# in idle mode. The phone will show the corresponding name stored in SIM, press ☐ to call the number.
Quickcall of call logs
In idle mode, press to access Call Logs list. Select a number and press to dial the number.
Make an emergency call
Without SIM card
Switch on your phone, the screen shows the information to remind you to insert SIM, press - SOS to dial emergency call.
With SIM card
In idle mode, enter 112, then press to dial.
Handle multiple calls
The ability to handle two or more calls at one time and to make conference calls is dependent on your operator and/or subscription.
Make a second call
You can make a second call during an active call or with a call on hold. While on the phone, dial a number (or select a contact in the phonebook) and press ☐The first call is put on hold and the second number is dialled. You can then press to access the following options.
- Swap to toggle between calls.
- Conference to introduce the caller into a conference call.
Answer a second call
When you receive a second call while being already in communication, the phone emits a beep alert and the screen displays the info of the call. You can then:
Press ☐ To answer the call (the first one is put on hold).
Press or To reject the call.
Press ☐ Option To open the options list. You can select End to end the current call, then answer the incoming call.
To receive a second call, you must have deactivated the Call Divert and activated Call Waiting.
3. Text or number Entry
You can select the input methods to enter English letters, words, symbols and numbers. Icons appearing on the screen indicated the active text mode.
Function keys

To delete the characters or end the editing mode.
To move the cursor, select letter, monogram, word or symbol from the list, scroll down the list.

To return to idle mode.

To select the outstanding word from the list or enter option menu.

To enter symbols.

To select input method.
Multitap ABC/abc input
To select multitap input method, press until "ABC" or "abc" appear on the screen. This method requires multiple key presses to reach the desired character: the letter "h" is the second letter on the key
4001, so you must press it twice to enter "h". If the letter you enter and the one you just enter are on the same key, just wait for a few seconds for the cursor to appear.
You can press key Ⓞ to insert a space in multitap ABC/abc input.
Example: how to enter the word "home":
Press key 4GH, 4GH (GH) 6MNO, 6MNO, 6MNO (MNO), 6MNO (MNO), 3DEF, 3DEF (DEF).
Letters, numbers and symbols are located on each key as shown in the table below:
| Key Characters in the order displayed | |
| . , - ? ! , @ : # $ / _ 1 | |
| a b c 2 | |
| d e f 3 | |
| g h i 4 | |
| j k l 5 | |
| m n o 6 | |
| p q r s 7 | |
| t u v 8 | |
| w x y z 9 | |
| _ 0 | |
Text or number Entry 9
Smart ABC/abc input
This is an intelligent editing mode for messages including a comprehensive dictionary. It allows you to enter text more quickly. To select Smart input method, press until “eZi ABC” or “eZi abc” appear on the screen. Press only once on the key corresponding to each letter needed to spell a word: keystrokes input are analyzed and the word suggested is displayed. If several words are available according to the keys used, you can press ▲ or ▼ to choose from those proposed by the Smart ABC/abc built-in dictionary (see example below).
Example: how to enter the word "home":
- Press key 4GHI, 6HNO, 6HNO, 3DEF in turn.
The screen displays word: good.
-
Press ▼ to scroll to and select home.
-
Press to confirm the word home.
Numeric input
With this method you can press the corresponding keys to enter numbers.
10 Text or number Entry
4. Phone Book
Contacts are stored in one of the two available phonebooks: in your SIM card (number of entries depending on capacity) or in your phone (up to 200 names). When entering new names, they will only be added to the phonebook you have selected.
Search for a contact in phonebook
Search Entry option
- Access Phone Book in idle mode, select Search Entry.
- Enter a name, then press ☐ Option, press ☐
Phone Book List
Press in idle mode to access phone book list, press the key for the letter that you want to go to in the list (e.g. press key three times to access the letter Y). The first record starting with this letter is selected in the list.
Manage contacts
Select a name in phone book list and press ☐ Option to access the following options.
IP Dial Send SMS
View Edit
Delete Copy
Move Duplicate
Store a phone number with a name
- Access Phone Book in idle mode, then select Add New Entry. Select the storage and press
- If you select To SIM, you need to enter Name and Number. After you finish entering, press □ and enter the number, then press □
- If you select To Phone, the operating steps is the same as above. You can enter Name, Number, Home Number, Company Name, Email Address, Office Number, Fax Number and select Associate Picture, Associate Sound and Caller Group. Press confirm. Your phone will inform you that the name has been saved.
Copy the phone book
You can copy all contacts in phone to SIM card and vice versa.
-
Access Phone Book in idle mode, select Copy All, then press ☐
-
Select From SIM or From Phone, press
-
The suggestive message displays on the screen. Select Yes/No to confirm/cancel the operation.
Copy or move a phonebook entry
- Select a contact in Phone Book List, press ☐ Option.
- Select Copy/ Move/ Duplicate, then press ☐
Copy To copy the contact to another memory.
Move To move the contact to another memory.
Duplicate To copy the contact to the same memory.
Delete contacts
Delete contacts one by one
Method A:
- Access Phone Book in idle mode, select Delete All.
-
Select One By One, then select the contacts you want to delete in phone book list and press Method B:
-
Access Phone Book List in idle mode.
- Select the entry you want to delete and press then select Delete and press
Delete all
- Access Phone Book in idle mode.
- Select Delete All. You need to select From SIM or From Phone.
Caller Group
This option allows you to group the contacts in phonebook in order to be convenient for users.
- Access Phone Book in idle mode, select Caller Group.
- Select a group and press ☐
- Select the corresponding option to modify. You can set the following options:
Ring type To set ring tone for the call from the contacts in the group. Alert type To set alert type for the call from the contacts in the group. Picture To set the picture displaying on the screen when a call is coming from the contacts in the group. Group name To set the name of the group. Member List To add or delete members of the group.
Extra Number
Owner Number
The Owner Number item allows you to store your own phone number. We advise that you enter your mobile number as well as any other relevant information.
Although all its fields can be empty, the Owner Number item can not be deleted.
Service Dial Number
This is a kind of service supplied by network provider. For corresponding function, please ask network provider.
SOS Number
The SOS number will call the emergency services number in your country. In most cases, you can call this number even if you have not yet inserted a SIM card or entered your PIN.
In Europe the standard emergency number is 112, in the UK it is 999.
Settings
Memory Status
Select this menu to display the total number of contacts you have saved in each phonebook, out of the total number available.
Preferred Storage
Select this menu to set default storage to save contacts.
Fields
Select this menu to set the items displayed in phone memory.
5. Messages
SMS
This menu allows you to send text messages using the Short Messaging Service (SMS) and to manage the messages you send and receive.
Write Message
To compose and send an SMS, follow the steps detailed below:
- Select Write Message, enter your text and press to access the next options:
| Done | To finish the message. |
| Use Template | To select a pre-configured message. |
| Insert Object | To add picture, animation, melody and sound to your message. |
| Format Text | To setText Style, Alignmentand the alignment ofNew Paragraph. |
| Input Method | To select input method. |
| 2. Select Done, options: | then pressto access the next |
| Send Only | To send the message. |
| Save and Send | To save the message to outbox and then send the message. |
Save To save the message to outbox.
Send To Many To send the message to many persons.
Send By Group To send the message to all contacts in a caller group.
- Enter Number: press ,enter a number or select a contact and press
When you send message via SMS network, your phone possibly shows “Sent”. It shows that the message has been sent to SMS center, which you have set in SIM card, but it does not show that the message has been sent to destination.
Inbox
This menu allows you to read SMS messages you have received. The messages are displayed in a list. When a message is displayed, press to read it, then press Option to access the menu options listed below.
Reply To reply to the sender.
Forward To forward the selected message.
Chat To chat with the sender.
Edit To edit, modify and resend the SMS to someone.
14 Messages
| Delete | To delete the selected message. |
| Delete All | To delete all messages in inbox. |
| Use Number | To extract the number of the sender or displayed in the message, save the number in SIM card or phone, dial the number. |
| Save Objects | To store multimedia items such as images in the message into your phone. |
| SMS Copy to Phone/ SIM | To copy the selected message stored in SIM/phone to phone/SIM. |
| SMS Move to Phone/ SIM | To move the selected message stored in SIM/phone to phone/SIM. |
| SMS Copy All | To copy all messages stored in SIM/ phone to phone/SIM. |
| SMS Move All | To move all messages stored in SIM/phone to phone/SIM. |
Outbox
Only when you send the message by selecting Save and Send or Save can the message be stored in outbox.
| When a message is displayed, press to read it, then press ☑ Option to access the menu options listed below. | |
| Send | To send the selected message. |
| Edit | To send directly or re-edit then send to other. |
| Delete | To delete the selected message. |
| Delete All | Delete all messages in outbox. |
| Use Number | To extract the number of the recipient or displayed in the message, save the number in SIM card or phone, dial the number. |
| SMS Copy to Phone/SIM | To copy the selected message stored in SIM/phone to phone/SIM. |
| SMS Move to Phone/SIM | To move the selected message stored in SIM/phone to phone/SIM. |
| SMS Copy All | To copy all messages stored in SIM/phone to phone/SIM. |
| SMS Move All | To move all messages stored in SIM/phone to phone/SIM. |
Template
This menu allows you to predefine up to ten messages that you use most frequently. Select a message and press to access the next options.
| Edit | To write a new message or edit the selected predefined message. |
| Erase | To delete the selected predefined message. |
Message Settings
This menu allows you to configure the SMS settings. The options are:
Profile Setting
| SC Address | To select your default SMS centre. If not available on your SIM card, you must enter your SMS centre number. |
| Valid Period | To select the length of time your messages are to be stored in the SMS centre. This is useful when the recipient is not connected to the network (and thus cannot receive your message immediately). This feature is subscription dependent. |
| Message Type | To select the type of the message.This option is network dependent. |
| Profile Name | To edit the name of the profile. |
Common Setting
| Delivery Report | When On, this option will inform you via SMS whether your own SMS was received or not. This feature is subscription dependent. |
| Reply Path | When On, this option allows you to transmit the number of your SMS message centre together with the message. The recipient can then reply using your own SMS centre and not theirs. This speeds up the rate of transmission. This feature is subscription dependent. |
Memory Status
This option is used to display the storage status of the messages saved in SIM card and phone.
Preferred Storage
This option allows you to select preferred storage to save the received messages.
Pref. Bearer
This option allows you to set the preferred transmission mode. For further detail, please contact with network provider.
MMS
Your mobile phone can also send and receive MMS (Multimedia Messaging Service) messages. With MMS you can send messages that contain pictures, sounds and text.
When sending MMS messages, your recipient must also have an MMS-enabled phone in order to be able to view your message.
Write Message
To compose and send an MMS, follow the steps detailed below:
- Select Write Message, enter the following message.
To
To set number or E-mail of the recipient.
Cc
To set number or E-mail of the recipient to be sent the message at the same time.
| Bcc | To set number or E-mail of the recipient to be sent the message in secret. |
| Subject | To set the subject of the message. |
| Edit content | To edit the content of the message. You can add text, image, sound and attachment. |
| 2. Press to finish editing and access the next options. | |
| Send Only | To send the message. |
| Save and Send | To save the message to outbox and then send the message. |
| Save to Drafts | To save the message to drafts for sending later. |
| Send Options | To set the sending option. |
| Exit | To exit from editing mode. A suggestive message will be displayed to ask you whether to save the message. |
Inbox
This menu allows you to read MMS messages you have received. Select a message, then press ☐ to access the following options.
| View | To view the message, you can pressto access option menu and canselect Play/Save image As/Save audio Asto play or save the multimediaitems. |
| Properties | To view the sender, subject, dateand size. |
| Reply | To reply to the sender. |
| Reply to all | To reply to sender and all in To andCc columns. |
| Forward | To send the message to others. |
| Delete | To delete the message. |
| Delete All | To delete all messages in inbox. |
| Use Number | To extract the number in themessage. |
Outbox
This menu is used to save all message by selecting Save and Send. You can do the following operation:
| View | To view the message. |
| Properties | To view the recipient, subject, date and size. |
| Send to Others/ Resend | To send the message to others. If the message has not been sent successfully, it will show Resend. |
| Delete | To delete the message. |
| Delete All | To delete all messages in outbox. |
| Use Number | To extract the number in the message. |
Drafts
Lists all messages by selecting Save to Drafts. You can do the following operation:
| View | To view the message. |
| Properties | To view the recipient, subject, date and size. |
| Send | To send the message. |
| Edit message | To edit the message. |
Delete To delete the message.
Delete All To delete all messages in drafts.
Use Number To extract the number in the message.
If you have not set the recipient for the message in drafts, the Send option will not display in option menu.
Templates
Lists five frequently used messages. You can use these messages when writing a new message. Select a message and press to access the following options.
View To view the content of the message.
Properties To view sender, Cc, subject and size.
Write Message To take the template as a new message. You can edit it.
Message Settings
This menu allows you to set MMS configuration for sending or receiving messages.
Sending To set Validity period, Delivery report, Read report, Priority, Slide Timing and Delivery time options for sending an MMS.
Receiving To set Home network, Roaming, Read Report and Delivery Report options for receiving an MMS.
Filters To set Anonymous, Max Size and Advertisement options.
Edit Profile To set the network configuration. You can contact with network provider.
Auto Signature This option can be set On or Off and allows you to automatically sign your name or other content in your message.
Memory Status To view the storage status of MMS.
Chat
This menu allows you to chat with your contact by SMS.
- Select a chat room, then press
- Select Chat Room Info, enter My Nickname and Destination Number, then press
- Select Start New, enter the message and send it to start chatting.
Voice Mail Server
This menu is used to set mail server number and listen to voice mail. When you receive voice mail, your provider will send a message to your phone.
You can set two groups of voice mail server number. Network service provider supplies the number.
Select an item, then □ to access the following options.
Edit To edit voice mail server number. Connect to Voice To listen to voice mail.
You can quickly access voice mail server by long pressing 1 key in idle mode.
Broadcast Message
This is a kind of public messages broadcasted to a group of mobile users. The message are broadcasted on numbered channels. Generally speaking each broadcast channel can transmit one kind message. Please contact with the network provider, they will supply usable channel and info list.
Receive Mode
This menu is used to set the function of broadcast message. When On, you can receive the broadcast message. When Off, you can not receive messages.
Read Message
To read broadcast message after activating receive mode.
Languages
To set the language of the message that can be received.
Channel Setting
Press to set channel, you can select Select, Add, Edit or Delete.
6. Call History
This menu provides you with the list of outgoing and incoming calls, attempts at auto redialling and call details. The different types of calls (Dialed Calls, Missed Calls and Received Calls) are represented by different icons. They are displayed in chronological order with the most recent on top. If the correspondent is listed stored in your contacts, the corresponding name is displayed.
Missed Calls
This menu allows you to view the lately unanswered calls. You can view the date, time and times of each missed calls.
Select an item and press to view date, time, times and number. Press - Option to access the following options.
| Save to Phone book | Save the number. |
| Delete | Delete the number. |
| Dial | Dial the number. |
| Edit | Edit the number and can save it to phonebook. |
Dialed Calls
This menu allows you to view the lately dialed calls including attempt or successful talk.
Received Calls
This menu allows you to view the calls received lately.
Delete Call Log
This menu allows you to delete Missed Calls, Dialed Calls, Received Calls or Delete All.
Call Time
This menu allows you to view Total Sent, Total Received and Last Call Time (format: hour, minute, second). You can use Reset All Time to reset all call time.
The actual time invoiced for calls and service by your service provider may vary, depending on network features, rounding-off for billing purpose, tax and so forth.
Call Cost
Last Call Cost
This menu is used to display the cost of last call.
Total Cost
To display the total cost of all calls since the cost counter was last reset. If the total cost exceeds the maximum cost set in Max Cost option, you will no longer be able to make any calls until you reset the counter.
Reset Cost
To reset the cost counter, you must enter your PIN2 code first.
Max Cost
To set maximum cost for your calls (need to enter PIN2).
Price Per Unit
Allows you to set one unit for the cost, this price per unit is used for calculating the cost of your calls (need to enter PIN2).
SMS Counter
This menu is used to display the amount of messages that have been sent and received.
GPRS Counter
This menu is used to count the amount of date sent and received via GPRS. You can also reset the counter. The unit is Byte.
7. Settings
This menu allows you to change the settings related to each available option (time and date, security, call divert, etc.) and to customise your phone.
Phone Setup
Time and Date
Allows you to set the time and date using the keypad or with the navigation keys. You can set:
| Set Home City | Select the city you are in. |
| Set Time/Date | Enter the figure using keypad or navigation keys. |
| Set Format | Include Time Format and Date Format. |
Schedule Power On/Off
This menu allows you to set the time to power on or off your phone automatically. Select an item and press to access the following options.
| Status | You can select Enable (the setting is valid) or Disable (the setting is invalid). |
| Power On/Off Time | Select whether to power on or off. Enter the figure to set the time. |
Language
This menu allows you to select a language for all menu texts. Use ▲ or ▼ to browse the list and select a language by pressing ☐
Preferred Input Methods
This menu allows you to set the default input method.
Display Characteristic
This menu allows you to set the options displayed in idle mode.
Wallpaper
Set the background image of main screen displayed in idle mode.
| System | Select the predefined image. |
| User Define | Select the downloaded image. |
Screen Saver
Set the image displayed after being in idle mode for a stated time.
| Setting | Set Status (On/Off) and Waiting (set the time for the appearance of the screen saver image). |
| Select | Select the image for screen saver. |
Power On Display
Allows you to set the image displayed when power on.
System Select the predefined image.
User Define Select the downloaded image.
Power Off Display
Allows you to set the image displayed when power off.
System Select the predefined image.
User Define Select the downloaded image.
Show Date and Time
Allows you to set whether to display date and time in idle mode.
Show Owner Number
Allows you to set whether to display owner number in idle mode.
Contrast
This menu allows you to adjust the contrast of main screen.
You can press • or • to adjust contrast.
Sound Effect
Equalizer
This menu is used to set audio frequency in playing music.
Greeting Text
This menu allows you to set individuation greeting text and it is displayed when you switch your phone on. You need to set the following option, then press Done.
Status Activate/Deactivate the display of greeting text.
Greeting Text Set the content of greeting text.
Speed Dial
This menu allows you to rapidly dial the number stored in phonebook. You can set up to eight speed dial numbers and need to set Enable Speed Dial and Set Number.
Dedicated key
In idle mode, you can quickly access preset functions by pressing the navigation keys. This menu allows you to modify the preset functions according to demands.
Auto update of date and time
This menu is used to update the time in your phone automatically.
Call Setup
Call ID
With the support of the network you can select Set By Network, Hide ID or Send ID to show or hide your identity to your correspondent.
Call Waiting
This option is used to Activate or Deactivate call waiting. When this option is active, you hear a beep if someone tries to call you while already on a call. If this option is inactive, your phone will not inform you and the one tries to call you will hear the busy tone or the call will be diverted to another phone (needs to set Divert If Busy). Select Query Status to find out the status of this option.
Call Divert
To divert incoming calls to your mailb number (whether in your contacts or not).
| Divert All Voice Calls | Will divert all the incoming calls. If you select this option, you will not receive any calls until you deactivate it. |
| Divert If Busy | Divert when you are on a call. |
| Divert If No Answer | Divert when you do not answer the call. |
Divert If Unreachable Divert when your phone is switched off or out of service area.
Divert All Data Calls Divert all data call.
Cancel All Cancel all divert options. Divert
Select Activate and enter the number. Select Query Status to find out the status of corresponding diverting options.
Before activating this option, you must enter your voice mailbox number. This feature is subscription dependent.
Call Barring
Allows you to limit the use of your phone to specific calls. This can be applied to Outgoing Calls (All Calls, International Calls or International Except Home) and/or to Incoming Calls (All Calls or When Roaming). In both cases, the Cancel All option applies to all calls at once. Change Barring PW is used to change the call barring password. Query Status allows you to know whether a type of call is barred or not.
This feature is network dependent and requires a specific call barring password supplied by your service provider.
Line Switching
Some SIM card allow you use two subscriber numbers (network service). This function is available only when the SIM card supports it.
To switch line you can press to select a line.
Call Time Reminder
This menu allows you to set whether to beep according to the call time. You can select Off (not beep), Single (select from 1 to 3000 seconds as the beeping time) or Periodic (select from 30 to 60 seconds as periodic beeping time, your phone will beep in this periodic time every minute).
Call Time Display
This menu is used to set whether to display the call time during a call.
Auto Redial
If the call you make is not answered, your phone will automatically redial this number at intervals. To end redialing you can press or to cancel.
Closed User Group
This function is network dependent. Only after your phone is set by network provider can you use this option. It is mainly used to restrict your correspondent. If this option is active, you can only talk to users in the group.
IP Number
To set IP number in order to make IP calls. This function is subscription and network dependent. Contact your operator for configuration parameters.
Black List
This menu allows you to reject the incoming calls in your black list.
Mode Allows you to set this option On or Off. If you select On, your phone will refuse all calls from the persons in black list.
Black List Set the numbers to be refused.
Number
Network Setup
Network Selection
This menu allows you to select the service network (suggest you to select Automatic).
Automatic You phone will automatically select and register an usable network.
Manual Provides you with a list of the network available in the area. Select the network you want to register with and press ☐ to confirm.
You can select a network other than your home network only if it has a valid roaming agreement with your home network. If you change the network, some problems may arise during the operation of your phone.
Preferred Networks
Allows you to build a network list in order of preference. Once defined, the phone will try to register on the network, according to your preferences.
Band Selection
This menu is used to select the band of network for call.
GPRS Connection
This menu is used to set the connection mode. You can select Always or When Needed.
Security Setup
SIM Lock
When the SIM Lock is active, you must enter the PIN code (PIN code is supplied by the provider with SIM card). If the code you enter is incorrect for three times, you need to enter PUK code (PIN unlocking code). The PUK code is used to unlock or change the locked PIN code. If the PUK code is not offered or lost, you can contact with the network provider.
Enter PIN code, then press ☐If the status of SIM Lock is Off, then its status will be On, otherwise the status will be Off.
Phone Lock
This menu is used to set password for your phone and the default status is Off. Once you set Phone Lock, you must enter password each time you switch on your phone.
Enter the password, then press ☐. If the status of Phone Lock is Off, then its status will be On, otherwise the status will be Off.
Auto Keypad Lock
This menu is used to lock your keypad automatically. Select the interval of locking the keypad, then press to confirm.
To unlock the keypad you can press — Unlock in idle mode. Press when the screen shows “Press Unlock Keypad”.
Fixed Dial
This menu is used to restrict the outgoing calls. You need to enter PIN2 code. The network provider supplies PIN2 code.
| Mode | It has two modes: On (you can dial any number) and Off (you can only dial the numbers stored in Fixed Dial List).To access the fixed dial list. You can press → Add, then enter the name and phone number, press → and enter PIN2 code, then press → |
| Fixed Dial List | To access the fixed dial list. You can press → Add, then enter the name and phone number, press → and enter PIN2 code, then press → |
Not all SIM cards have a PIN2. If your SIM card has not, this option is not usable.
Barred Dial
This menu allows you to restrict different outgoing calls.
With the support of your SIM card, you can activate or deactivate this function.
Change Password
This menu is used to change PIN code, PIN2 code and Phone Lock Password.
PIN
It is supplied with the SIM card. The service provider supplies the default value.
If you enter an incorrect PIN code three times in succession, the PIN code of SIM will lock automatically and you will be asked to enter PUK code to unlock. You can get the code from the service provider. If you enter an incorrect PUK code ten times in succession, the SIM card will be locked forever.
PIN2
It is used to access some special network functions such as charging or fixed dial etc. If you enter an incorrect PIN2 code three times in succession, the PIN2 code of SIM will be locked. To unlock PIN2 code you need to ask the service provider for PUK2 code. If you enter an incorrect PUK2 code ten times in succession, the functions related to PIN2 code can not be used anymore.
Phone Lock Password
It protects your phone against unauthorized use by other people. The password is necessary when you restore factory settings. The initial phone lock password is 1122.
This menu is used to reset your phone to its factory configuration.
Enter the password, then press to confirm.
Once you enter the right password (the passwd is the same as Phone Lock Password, its default value is 1122), your phone will return to its factory configuration.
8. Multimedia
Camera
Your phone features a built-in digital camera. You can take pictures, store them in your phone or transfer them to your PC via cable line, use them as wallpaper or send them to your friends via MMS.
Activate the camera
Select Camera and press or press left side softkey in idle mode to activate the camera.
When the camera is active, the preview screen is displayed.
The table below details the operations of the various keys in camera mode.
Zoom in / out
Increase / decrease exposure compensation
or Take a picture
Exit Camera mode and return to home screen
- Access the Option menu
- Return to previous screen
Set White Balance
2ABC Effect Setting
3DEF Set Delay Timer
4cm Activate / deactivate Cont Shot
Set Image Quality
Set Image Size
Take a picture
-
Frame your picture and press for to take the picture.
-
Once the picture is taken, a view screen is displayed. Press ☐ to save the picture, or press ☐ to ignore the picture.
Option menu in Camera
This section describes in detail the Option menu in Camera
To ImageViewer Access ImageViewer. Set White Balance, Shutter Sound.
Camera Setting Exposure and Banding.
Image Setting Set Image Size and Image Quality.
Effect Setting Set special effect for the picture.
| Add Frame | Add a frame to the picture. Some frames are usable only to some special size. |
| Cont Shot | Take many pictures continuously. |
| Delay Timer | Set delay time. When you press the function key to take a picture, the picture will be taken in the time you set. |
| Restore Default | Reset the camera settings to their default values. |
ImageViewer
| When you take a picture and save it, the file is stored inImageViewerfolder. When you open the menu, your photos are displayed as thumbnails. Use the ▲ and ▼ navigation keys to move through the list. Press [IMAGE]Optionto access the following options. | |
| View | Display the picture. |
| View Mode | Set browse style asList ModeorMatrix Mode. |
| Forward | Apply the picture to other options. |
| Rename | Rename the picture. |
Delete Delete the picture.
Delete All Files Delete all pictures.
Sort Allows you to sort all pictures separately by name, type, time or size.
Video Recorder
This menu is used to record a video, and the format of the video is AVI.
Activate the Video Recorder
Select Video Recorder and press ☐ to activate video recorder.
The table below details the operations of the various keys in video recording mode.
▲▼ Zoom in / out
- Increase / decrease exposure compensation
or Start / Stop recording
Exit video recording mode and return to home screen
- Access the Option menu

Return to previous screen

Effect Setting

Set White Balance
Recording a video
Frame your picture and press 📄 or ⬇ to start recording. While recording you can press — Pause/Resume. Press 📄 or to stop recording and save the video.
The option menu in Video Recorder
This section describes in detail the Option menu in Video Recorder.
To Player Access Video Player.
CamCoder Setting Set White Balance, EV, Frequency and Video Quality.
Effect Setting Set special effect for the video.
Restore Reset the recorder settings to their default values.
Video Player
You can use this option to view the videos you record or prestored in your phone.
Select a video, then press ☐ Option to access the following options.
Delete Delete the video.
Delete All Files Delete all videos.
Sort Allows you to sort all videos separately by name, type, time or size.
Audio Player
This menu allows you to play music. The music stored in player folder can be automatically detected and added to the play list. You can dial or answer a call during the music and the player will pause.
Activate Audio Player
Press ▲ in idle mode or select Audio Player.
The table below lists the operations of the various keys in playing music.
Play/Pause
Stop
Skip to the previous music
Skip to the next music
Volume keys Adjust the volume of the music

Exit Audio Player and return to home screen

Access Play List, press -to access Option menu.

Return to previous screen
Option menu in Audio Player
Play Play the music.
Details Display the info of the music.
Add To Rings Set the music as ring tone.
Refresh List Refresh the play list in Audio Player.
Settings Include List Auto Gen, Repeat (Music repeat mode in playing), Shuffle (Playing order), Background Play (Whether to continue playing when you exit from audio player) and Equalizer.
Add/Delete music
- Switch off your phone.
- Connect your phone with computer by USB cable line. After the computer identify your phone, you can copy the music to your phone or delete music in your phone.
All music to play must be stored in root directory. This is an appointed location and you are not allowed to change.
Sound Recorder
This menu allows you to record sound. You can also play, rename and delete the memo you record. Select a memo then press or press directly to access Option menu.
| Record | Press to start recording, pressto Pause or Cont. recording. Tofinish recording, press Stop.Enter the name then press |
Settings Set the format of the memo.
Play Play the memo.
Append Append sound to the memo.
Rename Rename the memo.
| Delete | Delete the memo. |
| Delete All | Delete all memos. |
| Forward | Apply the memo to other options. |
Melody Composer
This menu allows you to edit melody you like and set it as ring tone.
If there is no melody, you can press Add to create a melody and press to access Option menu during composing. If you select a melody, you can press to access Option menu.
The operations of keys in composing

Insert a rest.

Enter Do-Si.

Insert vibra effect.

Insert back light effect.
▲▼ Change pitch of the note to high, middle or low.
Switch the status of the note to high, normal or low.

Change the tempo.
Press the navigation keys to select the symbol of vibra or back light then press • or • keys to turn the effect on or off.
Option menu in composing
| Play | Play the melody. |
| Play Speed | Select playing speed of the melody. |
| Select Instrument | Select a musical instrument. |
| Save | Save the melody. |
| Help | Display help information. |
Option menu of a melody
| Play | Play the melody. |
| Edit | Edit the melody. |
| Add | Create a new melody. |
| Rename | Rename the melody. |
| Delete | Delete the melody. |
| Delete All Files | Delete all melodies. |
| Forward | Apply the melody to other options. |
| Help | Display help information. |
34 Multimedia
9. File Manager
This menu allows you to manage the image, sound recorder, ring tone and music in your phone. Select D disk, Press ☐ Option to access the following options.
Open
Allows you to open the folder. You can select a file or folder to do the following operation.
- Operations to file
Play (for music file), View (for image file), Forward, Detail, Rename, Copy, Move, Delete, Delete All Files and Sort.
- Operations to folder
Open, Create Folder, Rename, Delete and Sort.
Create Folder
Create a new folder in the file folder.
Format
Format the folder. (Valid for root directory only).
The top right corner of the screen in file manager shows the occupation info of the storage. If you select a folder or file in file manager, the screen will show you date and size info about it at the same corner.
10. Fun & Games
Games
Select a game, press For detail about each game you can refer to the direction on the screen.
Themes
This menu allows you to set the theme of screen color. There are three kinds of themes for you to select. Select a scheme, press ☐ Option to access the following options.
| Activate | Activate the selected theme. |
| Update Period | Set frequency of color updating. |
| Set Order | Set order of color updating. |
No matter which options you set in Update Period or Set Order, you must select Activate after setting.
Game Setting
This menu allows you to turn audio and vibration effect of the games on or off.
Select Game Audio or Game Vibration, press the navigation keys to select On or Off, then press to confirm.
II. User Profiles
This menu allows you to set the ring of the incoming call, new message and so on. It also allows you to set alert type, volume of the ring and answer mode and backlight etc so that your phone can fit all kinds of environments.
Select General, Meeting, Outdoor, Indoor or Headset, press
- Option to access the following options.
Activate The mode you select is in operation.
Customize Allow you to set the selected mode including Tone Setup (Incoming Call, Alarm, Power On, Power Off, Message Tone and Keypad Tone), Volume (Ring Tone and Key Tone), Alert Type (Ring, Vibration Only, Vibra and Ring or Vibra Then Ring), Ring Type (Single, Repeat or Ascending), Extra Tone (Warning, Error, Camp on and Connect), Answer Mode (Any Key) and LCD Backlight (5, 15, 30 or 45 Sec).
The Auto option in Answer Mode shows only in Headset Mode.
The Headset mode needs not to be activated. As long as you plug in the earphone, your phone will switch to Headset mode automatically.
12. Organizer
This menu contains features and options designed to help you organised and informed while on the move.
Calendar
This menu allows you to view calendar, access or edit To Do List.
You can press navigation keys to view the calendar. Select the date to view and press ☐ Option to access the following options.
View Tasks Allows you to set date, time, note and alarm of the schedule. Press ☐ to add new tasks, edit or view the selected task. (For detail please refer to "To Do List").
Jump To Date Allows you to view appointed date quickly. Enter a date then press
A date with a task is displayed with red color.
To Do List
This menu helps you to manage all kinds of things in your work or life. You can set the content, detailed time and alarm of To Do List.
If there is no task in your phone, it shows empty. You can press Add to create a new task. After you edit the task you can press Done.
If you select a task, you can press ☐ Option to access the option menu.
Create a task
Date Allows you to enter the date of the task. Time Allows you to enter the time of the task. The time format you enter must be 24-hour system.
Note Allows you to enter the content of the task. Press Edit, enter the content, then press to save.
Alarm Press the navigation keys to set the status of alarm.
Repeat Allows you to set frequency: Once, Every Day, Day, Weekly, Monthly.
The option menu of a task
View View the settings of the selected task.
Add Add a new task.
Edit Task Edit the selected task.
Delete Task Delete the selected task.
Delete All Delete all tasks in To Do List.
Alarm
Your mobile phone has a built-in alarm clock. You can set up to three separate alarms.
To set an alarm, follow the steps below:
-
Select an alarm and press Edit.
-
Set the status On.
-
Enter the time.
-
Select Repeat, Once, Everyday or Days.
After you finish the setting, press Done.
To use Days mode you can select the week line then set the status of each day in the week one by one. You can switch between On and Off by pressing the left softkey.
World Clock
This menu allows you to check the time in main cities around the world.
Press the navigation keys to select cities, the local date and time will show on the bottom of the screen.
13. Services
This menu contains STK and WAP services.
STK
Function items of this menu are subscription dependent and specific to operators. If the SIM card you insert has STK function, the STK menu will display on the screen.
WAP
This option allows you to access the network. Your phone supplies you with some existent modes to access network. You can browse the network after you activate corresponding mode.
Homepage
You can store a homepage for each mode. When you access WAP, the homepage of the mode will be visited firstly.
Bookmarks
You can save the address in your phone as a bookmark.
Select a bookmark, press ☐ Option to access the following options.
| Goto | Access the website of the selected bookmark. |
| Edit | Edit the selected bookmark. |
| Delete | Delete the selected bookmark. |
| Delete all | Delete all bookmarks. |
| Add Bookmark | Enter Title and Address to create a new bookmark. |
Recent Pages
You can view the websites you visit recently.
Enter Address
You can enter an address to connect your phone to network.
Service Inbox
The WAP messages you received are saved in Service Inbox, the service operator will send the WAP messages to your phone actively.
Settings
Edit Profile
This option is used to set properties of all WAP access mode. Please contact with the network operator to get the right setting.
Select a mode in profile list, then press to access the following options.
Activate Profile Activate the selected WAP access mode.
Edit Profile Edit the properties of WAP access mode.
Browser Options
| Timeout | Set waiting time of the browser. If there is no response in the waiting time, the browser will terminate the connection with the website. |
| Show Images | Set whether to show images when visiting the website. |
Service Message
This menu is used to set whether to receive service message. The service message is saved in Service Inbox.
Clear Cache
The information and data you access is stored in cache of your phone. This option is used to clear the information in the cache.
Clear Cookies
This menu is used to clear cookies.
When you access the website, some info is saved. Suggest you clear these sensitive info termly for fear that personal data will be revealed once your phone is lost.
Trusted Certificates
Some service needs trusted certificates such as bank service. When you download the right certificate, you can save or delete it. If you select save option, the certificate will be added to trusted certificates.
Data Account
This menu is used to set the info of account, the existent account is supplied by the manufacturer.
GSM Data
You can set: Account Name, Number, User Name, Password, Line Type, Speed and DNS.
GPRS
You can set: Account Name, APN, User Name, Password, Auth. Type.
14. Extra
This menu contains features and options designed for your personal use.
Calculator
Your phone has a built-in calculator that you can use to perform basic calculations. Numbers are entered with the keypad and operators with the navigation keys as indicated in the table below:
| • | Add or M+ |
| • | Subtract or M- |
| • | Multiply or MC |
| • | Divide or MR |
| Clear number | |
| Decimal point |
Units Converter
This menu allows you to use conversion function of length and weight units.
Press # key to enter decimal point.
Currency Converter
This menu allows you to convert a sum from one currency into another using the exchange rate of your choice. You can convert from Local to Foreign or vice versa. Enter a rate in the Rate field, press ▼ select Rate Representation (The first line on the screen), enter an amount in either the Local or Foreign fields and press ▼ to get the conversion value.
Rate Representation option allows you to select the Rate you enter is the ratio of Local to Foreign or Foreign to Local. You can enter decimal point by pressing ☐ key.
Health
This menu supplies you with the reference of Body Mass Index and females' Menstrual.
BMI
Select Sex and then enter Height and Weight, press to get the result.
Menstrual
The using method is the same as "BMI". Enter the corresponding data, then press to get the result.
15. Shortcuts
This menu allows you to quickly enter ten items by pressing · in idle mode. You can also modify the default items according to the actual demand.
Change items in Shortcuts
Select an item you want to modify then press ☐ to enter edit mode. Select the replacing item, then press ☐ to confirm.
Icons & symbols
In idle mode, several symbols can be displayed simultaneously on the main screen.
If the network symbol isn't displayed, the network is not currently available. You may be in a bad reception area, moving to a different location may help.

Battery - The bars indicate the battery level(3 bars=full, 0 bar=low).

GSM Network - your phone is connected to a GSM network.
Reception quality-the more bars are shown the better the reception is.

Keypad lock activated.

Alarm activated.

Ring - The alert type is ring.

Vibration only - The alert type is vibration only.

Vibra and ring - The alert type is vibra and ring.

Vibra then ring - The alert type is vibra then ring.

Chat Room1 is in chatting state.

GPRS attach - Your phone is connected to the GPRS network.

Voice mail - You have received a new voice mail.

Call forward - Your phone is in calls-forward state.

Missed call - You have a missed call.

SMS message - You have received a new message.

Line - The current line.

MMS message - You have received a new MMS message.
Precautions
Radio Waves

Your cellular mobile phone is a low power radio transmitter and receiver. When it is operating, it sends and receives radio waves. The radio waves carry your voice or data signal to a base station that is connected to the telephone network. The network controls the power at which the phone transmits.
- Your phone transmits/receives radio waves in the GSM frequency (900 / 1800 MHz).
- The GSM network controls transmission power (0.01 to 2 watts).
- Your phone complies with all relevant safety standards.
- The CE mark on your phone shows with European electromagnetic compatibility (Ref. 89/336/EEC) and low voltage directives (Ref. 73/23/EEC).
Your cellular mobile phone is your responsibility. To avoid damage to yourself, to others or to the phone itself, read and follow all the safety instructions and make them known to anyone borrowing your phone. Furthermore to prevent unauthorised use of your phone:

Keep your phone in a safe place and keep it out of small children's reach.
Avoid writing down your PIN code. Try to remember it instead.
Switch off the phone and remove the battery if you are going to leave it unused for a long time.
Change your PIN code after purchasing the phone and to activate call restriction options.

The design of your phone complies with all applicable laws and regulations. However, your phone may cause interference with other electronic devices. Consequently you follow all local recommendations and ons when using your cellular phone both at and when away. Regulations on the use of phones in vehicles and aircraft are early stringent.
Public concern has been focused for some time on the possible health risks for users of cellular phones. The current research on radio wave technology, including the GSM technology, has been reviewed and safety standards have been drawn up to ensure protection from exposure to radio wave energy. Your cellular telephone complies with all applicable safety standards and the Radio Equipment and Telecommunications Terminal Equipment Directive 1999/5/EC.
Always switch off your phone...
Inadequately protected or sensitive electronic equipment may be affected by radio energy. This interference can lead to accidents.
Before boarding an aircraft and/or when packing the phone in your luggage: the use of mobile phones in an aircraft may be dangerous for the operation of the aircraft, disrupt the mobile phones network and may be illegal.

In hospitals, clinics, other health care centres and anywhere else where you may be in the close vicinity of medical equipment.

In areas with a potentially explosive atmosphere (e.g. petrol stations and also areas where the air contains dust particles, such as metal powders).
In a vehicle transporting flammable products (even if the vehicle is parked) or a vehicle powered by liquefied petroleum gas (LPG), check first that the vehicle complies with the applicable safety rules.
In areas where you are requested to turn off radio transmitting devices, such as quarries or other areas where blasting operations are in progress.

Check with the vehicle manufacturer that electronic equipment used in your vehicle will not be affected by radio energy.
Pacemakers
If you have a pacemaker:
• Always keep the phone more than 15 cm from your pacemaker when the phone is switched on, in order to avoid potential interference.
- Do not carry the phone in a breastpocket.
- Use the ear opposite to the pacemaker to minimise the potential interference.
- Switch off your phone if you suspect that interference is taking place.
Hearing aids
If you are a user of a hearing aid, consult your physician and hearing aid manufacturer to learn whether your particular device is susceptible to cellular phone interference.
Improved performance
In order to improve the performance of your phone, reduce radio energy emission, reduce battery consumption and ensure safe operation adhere to the following guidelines:

For the optimal and satisfactory operation of the phone you are recommended to use the phone in the normal operating position (when not using in hands-free mode or with a hands-free accessory).
- Do not expose your phone to extreme temperatures.
- Treat the phone with care. Any misuse will void the International Guarantee.
- Do not immerse the phone in any liquid; if your phone is damp, switch it off, remove the battery and let them dry for 24hrs before using them again.
• To clean the phone, wipe it with a soft cloth.
- Placing and receiving calls consumes the same amount of battery energy. However, the mobile consumes less energy in idle screen when kept in the same place. When in idle screen and while you are moving, your phone consumes energy to
transmit updated location information to the network. Setting the backlight for a shorter period of time as well as avoiding unnecessary navigating in the menus will also help to save the battery's energy for longer phoning and stand-by performances.
Battery information
- Your phone is powered by a rechargeable battery.
- Use specified charger only.
- Do not incinerate.
- Do not deform or open the battery.
- Do not allow metal objects (such as keys in your pocket) to short circuit the battery contacts.
- A void exposure to excessive 140^ ), moisture or caustic environments.

You should only use Philips authentic battery and accessories, as the use of any other accessories may damage your phone and may be dangerous, and will make all guarantees for your Philips phone null and void. The use of an incorrect type of battery may also cause an explosion.
Your mobile phone and your car

Studies have shown that speaking on the telephone while driving lowers your concentration, which can be dangerous. Adhere to the following guidelines:
- Give your full attention to driving. Pull off the road and park before using the phone.
- Respect the local regulations in countries where you drive and use your GSM phone.
- If you want to use your phone in a vehicle, install the hands-free car kit which is designed for that purpose.
- Ensure that your phone and car kit do not block any air bags or other security devices fitted in your car.
The use of an alarm system to operate a vehicle's light or horn to indicate incoming phone calls is prohibited on public roads in some countries. Check local regulations.
EN 60950 Norm
In hot weather or after prolonged exposure to the sun (e.g., behind a window or a windscreen), the temperature of your phone's casing might increase, especially when featuring a metallic finish. Be very careful in this case when picking up your phone and also avoid using it with an ambient temperature over 40^ C.
Environmental care

Remember to observe the local regulations regarding the disposal of the packaging materials, exhausted batteries and old phone and please promote their recycling.
Philips has marked the battery and packaging with standard symbols designed to promote the recycling and appropriate disposal of your eventual waste.

The battery should not be disposed of with general household waste.

The labelled packaging material is recyclable.

A financial contribution has been made to the associated national packaging recovery and recycling system.

The plastic material is recyclable (also identifies the type of plastic).
Troubleshooting
The phone does not switch on
Remove/reinstall the battery. Then charge the phone until the battery icon stops scrolling. Unplug from charger and try to switch the mobile on.
Your phone doesn't return to the idle screen
Long press or switch off the phone, check that the SIM card and the battery are installed correctly and switch it on again.
The network symbol is not displayed
The network connection is lost. Either you are in a radio shadow (in a tunnel or between tall buildings) or you are outside the network coverage area. Try from another place, try to reconnect to the network (especially when abroad), check that the antenna is in place if your mobile has an external antenna, or contact your network operator for assistance/information.
The display doesn't respond (or the display responds slowly) to key presses
The display responds more slowly at very low temperatures. This is normal and does not affect the operation of the phone. Take the phone to a warmer place and try again. In other cases please contact your phone supplier.
Your battery seems to over heat
You might be using a charger that was not intended for your phone. Make sure you always use the Philips authentic accessory shipped with your phone.
Your phone doesn't display the phone numbers of incoming calls
This feature is network and subscription dependent. If the network doesn't send the caller's number, the phone will display Call 1 or Withheld instead. Contact your operator for detailed information on this subject.
You can't send text messages
Some networks don't allow message exchanges with other networks. First check that you entered the number of your SMS centre, or contact your operator for detailed information on this subject.
You have the feeling that you miss some calls
Check your call divert options.
The display shows SIM failure
Check that the SIM card has been inserted in the right position. If the problem remains, your SIM card may be damaged. Contact your operator.
When attempting to use a feature in the menu, the mobile displays NOT ALLOWED
Some features are network dependent. They are only available, therefore, if the network or your subscription supports them. Contact your operator for detailed information on this subject.
The display shows INSERT YOUR SIM CARD
Check that the SIM card has been inserted in the right position. If the problem remains, your SIM card might be damaged. Contact your operator.
Your phone is not charging
If your battery is completely flat, it might take several minutes of pre-charge (up to 5 minutes in some cases) before the charging icon is displayed on the screen.
Philips Authentic Accessories
Some accessories, such as a battery and a charger, are included as standard in the package of your mobile phone. Additional accessories may also be provided or sold separately. Package contents may therefore vary.
To maximise the performance of your Philips mobile phone and not to void the warranty, always purchase Philips Authentic Accessories that are specially designed for use with your phone. Philips Consumer Electronics cannot be held liable for any damage due to use with non authorised accessories.
Charger
Charges your battery in any AC outlet. Small enough to carry in a briefcase/handbag.
USB cable
The USB cable enables high speed communication between your phone and yout computer. You can manage the information stored in your phone such as image, animation, photo, video and music. You can also use the cable to charge battery (This charging mode is fit for most PC).
Headset
Your phone will activate headset mode automatically when you plug in the earphone. And you can select Auto option in answer mode. If this option's status On, your phone will automatically answer the incoming call in 2 seconds.
USB driver CD
If the operating system of your computer is Windows 98, you can use this CD to drive your computer in order to connect your phone with PC to copy, move or delete images or music etc.
Specific Absorption Rate Information International standards
THIS MOBILE PHONE MEETS THE INTERNATIONAL RECOMMENDATIONS FOR EXPOSURE TO RADIO WAVES
Your mobile phone is a radio transmitter and receiver. It is designed and manufactured not to exceed the limits for exposure to radio frequency (RF) energy defined by the international standards. These recommendations have been established by the International Commission on Non-Ionizing Radiation Protection (ICNIRP) and, the Institute of Electrical and Electronics Engineers - Standards Associations (IEEE-SA) that forecast a substantial safety margin for assuring the protection of all persons, regardless of age and health.
The exposure recommendations for mobile phones use a measurement unit known as the Specific Absorption Rate (SAR). The SAR limit recommended by the ICNIRP for the mobile phones used by the general public is 2,0 W/kg in 10g of tissue and, is 1,6W/kg in 1g of tissue by IEEE-SA (IEEE Std 1528) for the head.
Tests for SAR have been conducted using recommended operating positions with the mobile phone transmitting at its highest certified power level in all tested frequency bands. Although the SAR is determined at the highest certified power level, the actual SAR levels of the mobile phone while operating are generally below the maximum SAR value. This is because the phone is designed to operate at multiple power levels so as to use only the power required to reach the network. In general, the closer you are to a base station antenna, the lower the power output.
While there may be differences between the SAR levels of various phones and at various positions, they all meet the international protection standards for exposure to radio waves.
The highest SAR value for this Philips S660 model phone when tested for compliance against the standard was 0,693W/kg for ICNIRP recommendation and 1,047W/kg for IEEE Standard.
For limiting the radio waves exposure, it is recommended to reduce the mobile phone call duration or to use a headset. The purpose of those precautions is to take the mobile phone away from the head and the body.
52 Specific Absorption Rate Information
Limited warranty
- What Does This Limited Warranty Cover?
Philips warrants to the original retail purchaser (“Consumer” or “You”) that this Philips cellular product and all accessories originally provided by Philips in the sales package (“Product”) are free from defects in materials, design and workmanship under normal use in accordance with the operating instructions and pursuant to the following terms and conditions. This limited warranty extends only to the Consumer for Products purchased and used in the original country of purchase. The limited warranty is valid only in Philips’ intended country of sales of the product.
- How Long is The Limited Warranty Period?
The limited warranty period for the Product extends for ONE (1) YEAR from the date of purchase of the Product, documented by valid proof of purchase. The limited warranty for original Philips rechargeable battery extends for six (6) months from the date of purchase.
- What Will Philips Do if The Product is Not Free From Material Defects in Materials and
Workmanship During The Limited Warranty Period?
During the limited warranty period, Philips or its authorized service representative will, at its option either repair or replace, without charge for parts or labour, a materially defective Product with new or refurbished parts or Product and return such repaired or replaced Product to the Consumer in working condition. Philips will retain defective parts, modules or equipment.
Repaired or replaced Product will be covered by this limited warranty for the balance of the original limited warranty period or ninety (90) days from the date of repair or replacement whichever is longer. Repair or replacement of Product, at Philips' option is your exclusive remedy.
- What is Not Covered By This Limited Warranty?
This limited warranty does not cover:
a) Product that has been subjected to misuse, accident, shipping or other physical damage, improper installation, abnormal operation handling, neglect, inundation, fire, water or other liquid intrusion; or
b) Product that has been damaged due to repair, alteration, or modification by anyone not authorized by Philips; or
c) Product that has reception or operation problems caused by signal conditions, network reliability or cable or antenna systems; or
d) Product defects or problems caused by uses with non-Philips products or accessories; or
c) Product which warranty/quality stickers, product serial number or electronic serial number has been removed, altered or rendered illegible; or
f) Product purchased, used, serviced, or shipped for repair from outside the original country of purchase, or used for commercial or institutional purposes (including but not limited to Products used for rental purposes); or
g) Product returned without valid proof of purchase or which proof of purchase has been altered or is illegible.
h) Normal wear and tear or Force Majeure.
- How Do You Get Warranty Service?
a) Return the Product to an authorized service center of Philips. You may contact the local Philips office for the location of the nearest authorized service center.
b) The SIM card must be removed from the Product before it is given to Philips. Philips assumes no liability for damaged or loss of the SIM card or the data contained therein.
c) If the Product failure is not covered by this limited warranty, or this limited warranty is inapplicable, void or invalid due to any terms and conditions stated herein, the Consumer will be charged for the cost of repair or replacement of the Product and all other related cost incurred in repairing or replacing the Product.
d) IMPORTANT - you are required to return the Product together with a valid proof of purchase which must identify the point of purchase, date of purchase, Product model and Product serial number clearly.
- Other Limitation: This Warranty is The Entire Agreement.
EXCEPT FOR THE EXPRESS WARRANTIES SET FORTH ABOVE AND THOSE IMPLIED BY LAW AND WHICH CANNOT BE EXCLUDED OR MODIFIED BY AGREEMENT, PHILIPS PROVIDES NO OTHER WARRANTY WHETHER EXPRESS OR IMPLIED (WHETHER BY STATUTE, UNDER THE OPERATION OF LAW OR OTHERWISE) AND SPECIALLY DISCLAIMS
ANY WARRANTY OF SATISFACTORY QUALITY MERCHANTABILITY OR FITNESS FOR A PARTICULAR PURPOSE. PHILIPS' TOTAL LIABILITY FOR DAMAGES RELATING TO OR ARISING OUT OF THE PURCHASE OR USE OF THE PRODUCT, REGARDLESS OF THE TYPE OR CAUSE OF SUCH DAMAGE OR THE FORM OR CHARACTERISATION OF THE CLAIM ASSERTED (E.G. CONTRACT OR TOPIT), SHALL NOT EXCEED THE ORIGINAL PURCHASE PRICE PAID FOR THE PRODUCT.
HOWEVER IN NO EVENT SHALL PHILIPS BE LIABLE FOR ANY PUNITIVE, SPECIAL, INCIDENTAL, INDIRECT OR CONSEQUENTIAL DAMAGES (INCLUDING BUT NOT LIMITED TO THE LOSS OF USE, LOSS OF TIME, INCONVENIENCE, COMMERCIAL LOSS, LOST PROFITS, LOST BUSINESS OPPORTUNITIES, COST OF SUBSTITUTION OF GOODS OR SERVICES, INVESTMENTS, DAMAGE TO GOODWILL OR REPUTATION, OR LOSS OF DATA AND CLAIMS BY THIRD PARTIES) RESULTING FROM PURCHASE OR USE OF THE PRODUCT, TO THE FULLEST EXTENT ALLOWED BY LAW, WHETHER OR NOT PHILIPS HAS BEEN ADVISED OF THE POSSIBILITY OF SUCH DAMAGES. THESE LIMITATIONS SHALL APPLY NOTWITHSTANDING THE FAILURE OF THE ESSENTIAL PURPOSE OF ANY LIMITED REMEDY.
This limited warranty represents the complete and exclusive agreement between the Consumer and Philips with respect to this cellular Product and it supersedes all prior agreements between the parties, oral or written, and all other communications between the parties relating to the subject matter of this limited warranty. No carrier, retailer, agent, dealer, employee, thereof, or employee of Philips is authorized to make modifications to this limited warranty and you should not rely on any such representation.
This limited warranty does not affect the Consumer's statutory rights under applicable national laws in force.
Declaration of conformity
We,
Philips (China) Investment Co., Ltd.
BU Wireless China
21F, Tower 1 Kerry Euerbright City
218 Tian Mu Xi Road
Shanghai, P.R.C200010
declare under our sole responsibility that the product
Philips S660
GSM/GPRS Dualband Digital Mobile Phone
TAC: 352422 01
to which this declaration relates, is in conformity with the following Standards:
Safety: EN 60950/2001
SAR: EN 50360:2001/EN 50361:2001
R&TTE: EN301-511 V9.0.2
EMC: EN301489-1 V1.5.1 and
EN301489-7 V1.2.1
We hereby declare that all essential radio test suites have been carried out and that the above named product is in conformity to all the essential requirements of Directive 1999/5/EC.
The conformity assessment procedure referred to in Article 10 and detailed in Annex III or IV of Directive 1999/5/EC has been followed with the involvement of the following Notified Body:
BABT, Belfour House, Churchfield Road, Walton-On-Thames, Surrey, KT12 2TD, UK
Identification mark: 0168
Aug 08th, 2006
Quality Manager

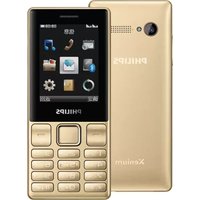


- Softkeys
- Table of contents
- Getting Started
- Insert the SIM card and Battery
- Remove the battery
- Insert the SIM card
- Getting Started
- Switch on the phone
- Charge the battery
- Shortcuts function
- Calling
- Make a call
- From the idle screen
- Using the phonebook
- Answer and end a call
- Call handsfree
- Options during a call
- Mute (On/Off)
- Sound Recorder
- Other options during a call
- Adjust the earpiece volume
- Quickcall
- Quickcall of SIM phonebook
- Quickcall of call logs
- Make an emergency call
- Without SIM card
- With SIM card
- Handle multiple calls
- Make a second call
- Answer a second call
- Text or number Entry
- Function keys
- Multitap ABC/abc input
- Example: how to enter the word "home":
- Smart ABC/abc input
- Numeric input
- Phone Book
- Search for a contact in phonebook
- Search Entry option
- Phone Book List
- Manage contacts
- Store a phone number with a name
- Copy the phone book
- Copy or move a phonebook entry
- Delete contacts
- Delete contacts one by one
- Delete all
- Caller Group
- Extra Number
- Owner Number
- Service Dial Number
- SOS Number
- Settings
- Memory Status
- Preferred Storage
- Fields
- Messages
- SMS
- Write Message
- Inbox
- Messages
- Outbox
- Template
- Message Settings
- Profile Setting
- Common Setting
- Pref. Bearer
- MMS
- Drafts
- Templates
- Chat
- Voice Mail Server
- Broadcast Message
- Receive Mode
- Read Message
- Languages
- Channel Setting
- Call History
- Missed Calls
- Dialed Calls
- Received Calls
- Delete Call Log
- Call Time
- Call Cost
- Last Call Cost
- Total Cost
- Reset Cost
- Max Cost
- Price Per Unit
- SMS Counter
- GPRS Counter
- Settings
- Phone Setup
- Time and Date
- Schedule Power On/Off
- Language
- Preferred Input Methods
- Display Characteristic
- Wallpaper
- Screen Saver
- Power On Display
- Power Off Display
- Show Date and Time
- Show Owner Number
- Contrast
- Sound Effect
- Equalizer
- Greeting Text
- Speed Dial
- Dedicated key
- Auto update of date and time
- Call Setup
- Call ID
- Call Waiting
- Call Divert
- Call Barring
- Line Switching
- Call Time Reminder
- Call Time Display
- Auto Redial
- Closed User Group
- IP Number
- Black List
- Network Setup
- Network Selection
- Preferred Networks
- Band Selection
- GPRS Connection
- Security Setup
- SIM Lock
- Phone Lock
- Auto Keypad Lock
- Fixed Dial
- Barred Dial
- Change Password
- PIN
- PIN2
- Phone Lock Password
- Multimedia
- Camera
- Activate the camera
- Take a picture
- Option menu in Camera
- Video Recorder
- Activate the Video Recorder
- Recording a video
- The option menu in Video Recorder
- Video Player
- Audio Player
- Activate Audio Player
- Add/Delete music
- Melody Composer
- The operations of keys in composing
- Option menu in composing
- Option menu of a melody
- Multimedia
- File Manager
- Open
- Create Folder
- Format
- Fun & Games
- Games
- Themes
- Game Setting
- User Profiles
- Organizer
- Calendar
- To Do List
- Create a task
- The option menu of a task
- Alarm
- World Clock
- Services
- STK
- WAP
- Homepage
- Bookmarks
- Recent Pages
- Enter Address
- Service Inbox
- Edit Profile
- Service Message
- Clear Cache
- Clear Cookies
- Trusted Certificates
- Data Account
- GSM Data
- GPRS
- Extra
- Calculator
- Units Converter
- Currency Converter
- Health
- BMI
- Menstrual
- Shortcuts
- Change items in Shortcuts
- Icons & symbols
- Precautions
- Radio Waves
- Always switch off your phone...
- Pacemakers
- Hearing aids
- Improved performance
- Battery information
- Your mobile phone and your car
- EN 60950 Norm
- Environmental care
- Troubleshooting
- The phone does not switch on
- Your phone doesn't return to the idle screen
- The network symbol is not displayed
- The display doesn't respond (or the display responds slowly) to key presses
- Your battery seems to over heat
- Your phone doesn't display the phone numbers of incoming calls
- You can't send text messages
- You have the feeling that you miss some calls
- The display shows SIM failure
- When attempting to use a feature in the menu, the mobile displays NOT ALLOWED
- The display shows INSERT YOUR SIM CARD
- Your phone is not charging
- Philips Authentic Accessories
- Charger
- USB cable
- Headset
- USB driver CD
- Specific Absorption Rate Information International standards
- Limited warranty
- Declaration of conformity
Brand : PHILIPS
Model : S660
Category : Smartphone