
TAB 10 3G V16 - Tablet Trevi - Free user manual and instructions
Find the device manual for free TAB 10 3G V16 Trevi in PDF.


| Product Type | Android Tablet |
| Brand | Trevi |
| Model | TAB 10 3G V16 |
| Display | 10.1-inch TFT LCD, Capacitive, 1280x800 IPS |
| Processor | ARM Cortex A5, 1.2GHz Quad Core |
| RAM | 1GB LPDDR2 |
| Internal Storage | 4GB |
| Operating System | Android 4.1 |
| Wi-Fi | 802.11 b/g/n |
| Cellular Connectivity | 3G, GSM (850/900/1800/1900), WCDMA (850/2100) |
| Audio Formats | MP3, AAC, OGG, FLAC |
| Video Formats | MP4, MPG, RMVB, MKV |
| Photo Formats | JPEG, BMP, PNG, GIF |
| Battery | Built-in rechargeable (not user replaceable) |
| Charging Methods | DC charger or USB cable (via computer) |
| Ports and Slots | Micro USB, Micro SD card, Mini SIM, Headphone, DC charger |
| Cameras | Front-facing and rear-facing |
| Maintenance | Clean with dry or moist cotton cloth. Do not use alcohol, thinners, benzene or other chemicals. |
| Safety Precautions | Do not expose to water, extreme temperatures, or magnetic fields. Use only supplied accessories. Do not disassemble. |
| Disposal | Observe local regulations. Dispose of separately from household waste. Recycle at appropriate collection centers. |
Frequently Asked Questions - TAB 10 3G V16 Trevi
User questions about TAB 10 3G V16 Trevi
0 question about this device. Answer the ones you know or ask your own.
Ask a new question about this device
Download the instructions for your Tablet in PDF format for free! Find your manual TAB 10 3G V16 - Trevi and take your electronic device back in hand. On this page are published all the documents necessary for the use of your device. TAB 10 3G V16 by Trevi.
USER MANUAL TAB 10 3G V16 Trevi
natural_image
Abstract digital illustration with floating elements and a central logo, no readable text or symbols present.
Tab 10 3G V16
TO SET YOUR LANGUAGE DEVICE
- Swicth on the appliance
- Go to the page with all applications
- Select the "IMPOSTAZIONI" icon
- Scroll through the list and select the icon ⚠ - LINGUA
- Select "LINGUA" and find their own language from those available.
* For information and updates of this product: www.trevi.it
POUR CONFIGURER LANGUE DE VOTRE APPAREIL:
CORRECT DISPOSAL OF THE PRODUCT...... pag.47
INDICE
- Altoparlate
- Camera Frontale
13 Touch panel
natural_image
Simple line drawing of a finger pointing at a horizontal bar (no text or symbols)natural_image
Illustration of a tablet device with a cable inserted into its rear panel (no text or symbols visible)Note:
natural_image
Landscape photo of a calm blue lake with distant hills and small boats (no visible text or symbols)

natural_image
Scenic landscape with a calm lake and distant hills under a clear blue sky (no text or symbols visible)Note:
Immagini
natural_image
Grid of 24 colorful nature and food images including fruits, vegetables, flowers, and berries (no text or symbols)Wi-Fi
RESOLUTION 1280x 800 IPS
CPU ...... ARM Cortex A5, 1.2GHz Quad Core
RAM 1GB LPDDR2
SISTEMA OPERATIVO Android 4.1
MEMORIA INTERNA 4 GB
WIRELESS NETWORK . Wi-Fi (802.11 b/g/n)
3G, GSM . GSM850/900/1800/1900; WCDMA850/2100
FORMATI AUDIO ...... MP3, AAC, OGG, FLAC
FORMATI VIDEO ....MP4, MPG, RMVB, MKV
FORMATI FOTO . JPEG, BMP, PNG, GIF
WELCOME
Thank you for purchasing this tablet.
It brings you much convenience for your business (supports Word, Excel, send & receive e-mails...) and entertainment (supports 3D game, chatting, movie playback, eBooks.....). Running on Android 4.1, with a 1.2GHz Quad Core processor and highly responsive capacitive touch screen IPS, it brings you wonderful user experience.
Before beginning, please refer to this user manual carefully.
IMPORTANT NOTICES
Read this manual thoroughly before first use and keep it in a safe place for future reference, along with the completed warranty card, purchase receipt and carton. The safety precautions enclosed herein reduce the risk of fire, electric shock and injury when correctly adhered to.
- Environment: Do not use this product where it is excessively hot, cold, dusty or humid, or where it is exposed to strong magnetic fields or long periods of sunshine.
- Water: Do not expose this device to water; do not use it where it can fall into water (such as near a pool, pond, bath etc.).
- Handling: Do not drop this product or shake it vigorously to avoid damaging it.
• Volume: Always select the appropriate volume when using the music or video function. The volume should not be too loud when using earphones. If the sound distorts, turn down the volume or turn off the player.
- Battery: Please note that the battery can only reach top performance level after it has been fully charged and discharged two or three times.
- Back-up: To avoid loss of data, we recommend always backing up any important information, especially before upgrading the hardware. We assume no liability for any damage and/or data loss due to lack of back-up.
- Accessories: Only use the device with the battery and power adaptor supplied. Use of other accessories not recommended in this manual may cause damage to the unit and will void your warranty.
- Usage: Only operate the MID (Mobile Internet Device) according to the instructions in this manual. We assume no responsibility for faulty use or inappropriate handling.
- Usage: The equipment is not intended for use by persons (including children) with reduced physical, sensory or mental capabilities, or lack of experience and knowledge, unless they have been given supervision or instruction concerning use of the equipment by a person responsible for their safety.
- Children: Supervise young children to ensure they do not play with the device. Close supervision is necessary when the device is used by or near children.
- Specifications are subject to change and improvement without notice.
- Cleaning: Clean the housing of the device lightly with a dry or moist cotton cloth. Do not use alcohol, thinners, benzene or any other chemical cleaner.
- Repair: This device is a high precision electronic product. It contains no user-serviceable parts inside. Do not try to dismantle, modify or repair it yourself.
- Damage: In case of damage, contact the after sales support line for advice.
DISPOSAL:
- When discarding this device, observe local regulations and dispose of it appropriately for recycling. Contact your local authorities for advice on facilities.
MAINTENANCE:
- Keep the device dry. Do not let the device, battery or charger come into contact with water vapor or operate it with wet hands. Contact with water will cause the device to short circuit, corrode or cause electric shock.
- Do not shock the equipment, batteries and charger, which may cause device or battery failure, fire or explosion.
- Do not expose the device to very low or very high temperatures, which may cause device or battery failure, fire or explosion.
- Do not disassemble the device and accessories. Disassembly by unauthorised persons will void the warranty.
SAFETY:
- Do not use the device while driving, so as not to impede safe driving regulations.
- In health facilities, observe the relevant rules or regulations. Turn off the MID in the vicinity of medical devices.
- Turn off the MID when boarding an airplane in order to avoid interference with aircraft radio signals.
- Stay away from magnetic equipment; MID radiation may erase the information stored on the device.
Abbreviations/Terminology
| MID Mobile Internet Device | |
| Wi-Fi Wireless | Fidelity |
| BT Bluetooth | |
| SD card Secure | Digital flash memory card |
| SIM card Subscriber Identity Module (Mobile service card) | |
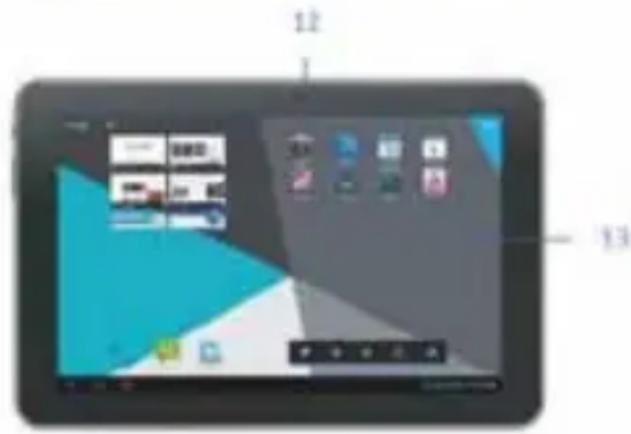
KEYS AND FUNCTIONS

- Power.
- Volume up/down
- Micro SD card slot
- Micro USB socket
- Microphone
- DC charger socket
- Headphone socket
- Rear camera
- Mini SIM card slot
- Reset button
- Speaker
- Front camera
13 Touch panel

Getting Started
Charging the tablet
Before using your Android Tablet for the first time, you need to fully charge the battery.
- When the tablet is off, a charging indicator will briefly appear on screen when the tablet is connected to a charger.
- While charging, with the tablet turned on, a charging symbol will appear in the notification bar.
- Charging times will vary depending on the computer and will generally take longer than using the DC adaptor.
Charging with DC adaptor
- To charge the device, plug the charging adaptor into your mains power supply, and the cable end into the DC socket on the MID.
Charging using USB cable and computer
- To charge the device, plug the large end of the USB cable into a USB port on your computer, and plug the smaller end into the micro USB port on the tablet.
- Ensure that your computer and the tablet are both turned on.
Note: Do not use the USB to DC charging cable with a computer.
MID status and notifications
Notification icons will appear in the lower right corner; below is a description of their meanings. Click on the column box to open the notification list.
 | File being downloaded Blue |  h h | |
 | Installation finished No SD |  | |
 | Connected with PC Wi-Fi co |  ted ted | |
 | GSM signal Common notifi |  | |
 | Alarm clock on Music pla |  | |
 | Download finished Micro S |  ce not enough ce not enough | |
 | Data synchronisation To-do |  ts ts | |
 | 3G Charging |  |
Turning the Tablet on or off
To turn the tablet on:
Press and hold the Power key until the LCD screen turns on. Wait until the Home screen appears; the tablet is now ready for use.
To turn the tablet off:
Press and hold the Power key until the Device Options menu appears.
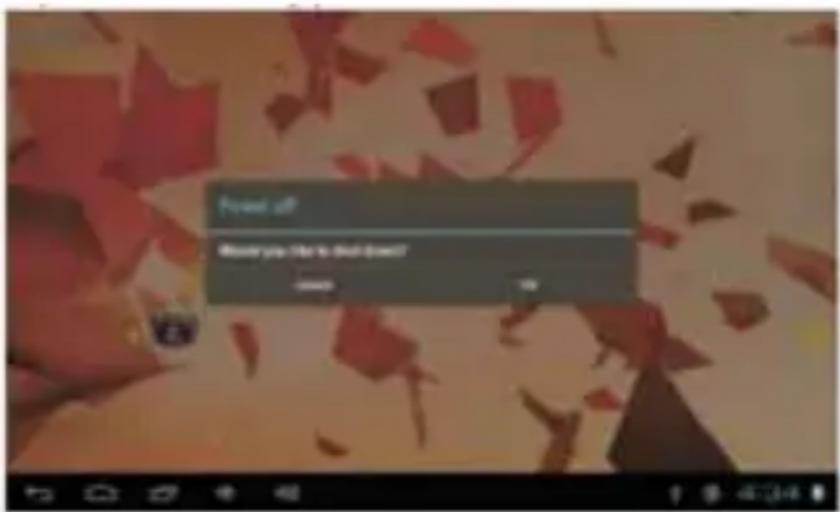
- Touch ok the screen to turn off the tablet.
Turning the Screen On or off (Standby)
When the tablet is on, you can turn off the screen to conserve battery power. Simply press the Power key once to turn the screen off. Press the Power key again to turn the screen back on.

To conserve battery power, the screen can be set to turn off automatically when the tablet is not in use (between 1 minute and 30 minutes). This Screen timeout option can be found in the Display menu.
Unlocking the Screen
When the screen turns off, you will have to unlock the screen when you turn it back on. To unlock the screen, drag the lock icon acrossthe screen towards the lock icon.

About Applications
To open an application, touch the application icon on the home screen or in the Launcher where you can tap the icon right up on the home screen to get in.
Launcher screen:


The screen shown above is for illustrative purposes only. Reserves the right to modify and ve the final list of applications available on the tablet.
Preinstalled Applications
Some applications have been installed on your tablet for your convenience.
These applications include:

Browse the web.
Perform simple mathematical operations.
Take pictures or videos with the frontfacing camera.
Check your e-mail.
Play music.
Access the Settings menu to adjust the tablet's options.
Installing Applications
You can also download an install additional applications from the device's applications marketplace, the web browser, or other sources. The tablet must be set to allow installation of applications from non-Market sources. The Unknown sources option can be set in the Application settings menu.
Connect to a Wi-Fi network
The Notification bar displays icons that indicate your tablet's Wi-Fi status.

Notification that an open Wi-Fi network is in range.

Connected to a Wi-Fi network (waves indicate connection strength).
[no icon] There are no Wi-Fi networks in range, or the Wi-Fi radio is off.
- Turn on the Wi-Fi radio if it is not already on.
To turn on Wi-Fi:
a.Go to the Home screen: Press the Home key.
b.Open the Settings menu: tap the icon right up on the home screen to get into the launch then touch Settings icon.
c.Open the Wireless & networks menu: Slide the icon to ON status.
When Wi-Fi is on, the tablet will look for and display a list of available Wi-Fi networks.

If a network that you have connected to previously is found, the tablet will connect to it. If you don't see your network in the list, you can force the tablet to re-scan. To scan for networks tap the Menu key, and then touch Scan.
- Select an available Wi-Fi network to connect to: In the same Wi-Fi settings menu above, touch a network in the list. If the network is open, the tablet will prompt you to confirm connection to the network. Touch Connect to confirm.
If the network is secured (as indicated by a Lock icon), the tablet will prompt you to enter a password or other credentials. Touch the Wireless password box to show the on-screen keyboard and then use it to enter the password. Touch Connect to confirm.
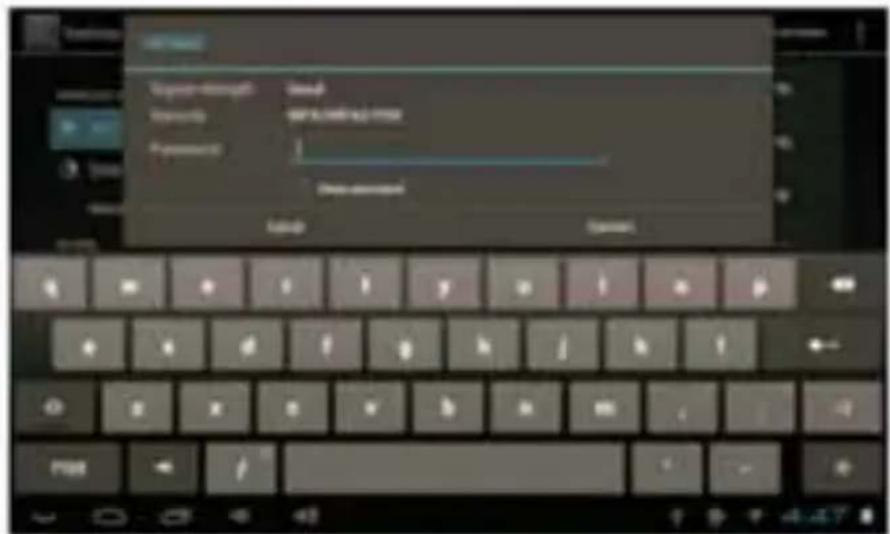
When you have successfully connected to a Wi-Fi network, the Notifications bar at the the low of the screen will show a Wi-Fi signal indicator.


To learn about how to add a Wi-Fi network when it is not in range or when the router is s to obscure the network name (SSID); or to configure advanced Wi-Fi options, please refer to the manual.
COMMUNICATION
TELEPHONE
Make calls
- Tap the icon to launch the phone's interface.
- Enter the number using the dial keypad. To delete a number, press
- Tap the icon 5 part the call.
- Tap the icon 📞 to end the call.

Note: To enter “+” to make international calls, touch and hold [0 +].
Call the contacts on the Address Book
-
- Tap the icon to open the phonebook.
- Scroll through the list of contacts or enter the first letter of the contact you want to
call by tapping the icon - In the list, tap the contact you want to call and select the number to use, if there are several numbers associated with the contact.

Accepting a call
- When you receive a call, select the icon of the large circle.
- Tap the icon 📞 to end the call.

- When you receive a call, select the icon and drag your finger to the left outside of the large circle.
- To send a message when you reject incoming calls, select the icon and drag your finger upward.
Adjusting the volume during a call
To adjust the volume during a call, use the corresponding key up and down to adjust the volume on the left side of the device.
Viewing the Call History
Selecting the recording of calls, you can view missed calls, outgoing calls and received calls. The time of each call is displayed on each record, and, in the same graphical interface, you can set the call, sending messages and add new contacts.

Notes:
- In the Phone function is recommended to use headphones (not supplied) as the sound of the speaker, in very noisy environments, it may not be enough.
MESSAGES
10 3G TAB V16 allows you to send text messages and multimedia messages to anyone of your contacts. Multimedia messages consist of photos, video clips, information, contacts and voice memos. You can also send messages to multiple contacts at once.
Notes:
- Sending and receiving messages while roaming may incur additional charges. to information, contact your service provider.
- Check with your operator the costs for sending SMS and MMS messages.
Send a text message:
- On the Home screen tap the icon


- Select the icon

- Add recipients of your message.
- Enter phone numbers manually, separating them with a semicolon or a comma.
- Select the phone numbers from your Address Book by selecting the icon

- Select "Write message" and enter the message text.
To insert emoticons, press the Menu key and select "Insert smiley."
- Select the icon → to send the message.
Send an MMS message:
- On the Home screen tap the icon

- Select the icon

- Add recipients of your message.
- Enter phone numbers manually, separating them with a semicolon or a comma.
- Select the phone numbers from your Address Book by selecting the icon

- Select "Write message" and enter the message text.
To insert emoticons, press the Menu key and select "Insert smiley."
-
Select the icon and add an item. You can select a file from or take pictures, record video, or sound.
-
Select the icon to send the message > .
With TAB 10 3G V16 votre you can receive e-mail directly on the tablet. you can use GMail account or enter your personal e-mail or work.
GMail:
- From the main page (Home) tap "Applications", ·s select the icon GMail.
- If you already have an account on your GMail select "Existing" and follow the steps entering the data that will be required.
- If you do not have your own GMail account select "New" to create one for you. Follow the steps entering the data that will be required.
Sending an e-mail via GMail:
- From the main page (Home) tap "Applications", ____ select the icon GMail.
- Select the icon
- Enter a name or address in the recipient field.
- Enter a subject and message.
- To attach an image file, press the Menu key and select "Attach File".
- Select the icon ➤ to send the message.
Viewing e-mail via GMail:
- From the main page (Home) tap "Applications", select the icon GMail.
- Select an e-mail message.
From the message view, use the following options:
- To reply to the message, select
- To reply to the message including all recipients, select “Reply All”.
- To forward the message to others, select “Forward”.
- To view an attachment, select VIEW. To save it on your device, select SAVE.
- To archive the message, select
• To delete the message, select - To move to the previous or next message, scroll left or right.
Email:
- From the main page (Home) tap "Applications", select the icon Email.
-
Enter your e-mail address and password.
-
Select "Next".
- Follow the on-screen instructions.
After configuring the e-mail account, messages are downloaded to your device. If you have created more than two accounts, you can switch from one email account to another.
Select a name
account and choose the one from which you want to retrieve the messages.
INTERNET BROWSING
Before connecting to a network, make sure your Wi-Fi connection is active or that the 3G network is available.
- On the main page by tapping the command Google search, you will see Android virtual keyboard, type the Internet address where the site or make a search through the search engine.
- or tap the icon to open the browser.
While browsing, select the icon to one top of the screen to display the settings and sub-menus:
The operating system Android 4.1 supports Adobe Flash Player 11.1. This means you can directly view the videos at the sites without having to download any application.
APPLICATION MANAGEMENT
The TABLET comes with several applications at its core, but it can also support third-party applications.
Install an application from Play Store:
- Go to the “SETTINGS” and select “Developer options” on the right side screen, tap and select “GOOGLE APPLICATION” will appear on the right side a check mark.
- Now, in the applications page, you will see the icon of GOOGLE MARKET. to hide the icon repeat the previous step.
- Connect to the Play Store and search for the desired application after having created a Google account on GMAIL.
Uninstall an application:
- Select the menu "SETTINGS" - "Applications".
- Select the application you want to uninstall.
- Tap the command "UNINSTALL" permanently uninstalls the application.
Optional Connections
Connecting to a Computer
Connect the tablet to a computer to transfer files.
1. Connect your tablet to the computer.
With the included USB cable: Plug the small end of the cable into the USB 2.0 high speed connector of the tablet. Plug the large end of the cable into an available USB 2.0 high speed port on the computer.
- When your tablet is connected, slide up the USB icon right down on the screen and then touch icon USB connected.
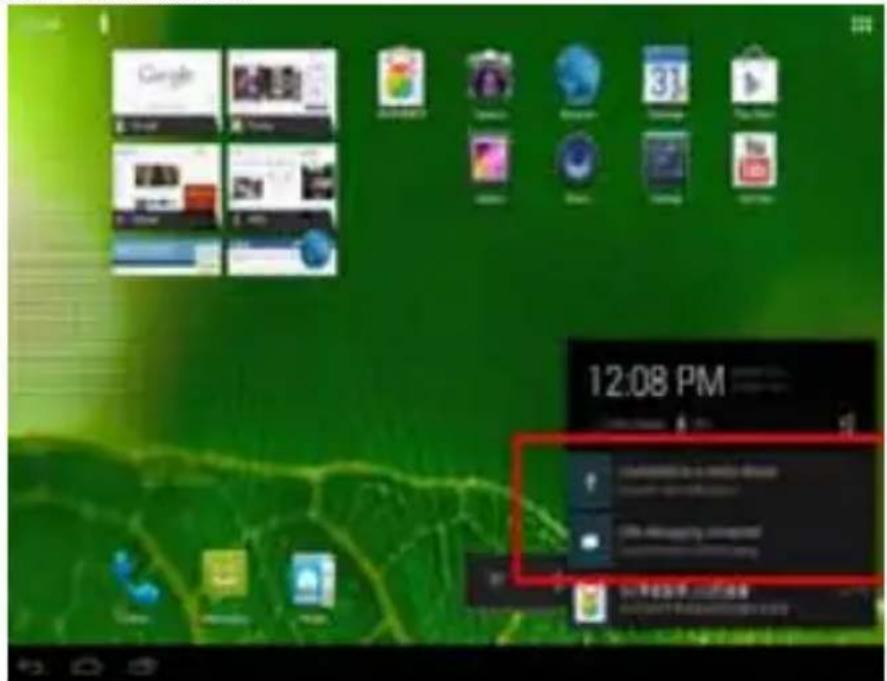
- This opens the following screen, select “Mount SD Card” (the check m appear on the side).

- Then select "Memory" and touch the symbol puter connection.

in the top right. select "USB com-

- The operating system will automatically recognize the device as a device memory and enable exploration and transfer files via the normal operations copy and paste.
If and ‘present an external memory micro SD operating system will see two devices memory (internal memory and the external memory of the tablet) that can be managed independently. Files can be stored freely in the TABLET memory and / or organized in folders (such as My Music for audio, Books for digital books ...) created by the user. We recommend that you do not delete any folders or file system on the device worth fails to operate correctly same.
- Before disconnecting the device from the USB socket on your PC, use the “Removing Hardware” To avoid potential problems such as data loss or malfunction the communication between the TAB 10 3G V16 and the PC.
SETTING
Tap the "Settings" icon to go to settings.
You can check and set wireless networks, sound, display, storage, Battery, Accounts & sync, security, language, date time, about tablet, etc.
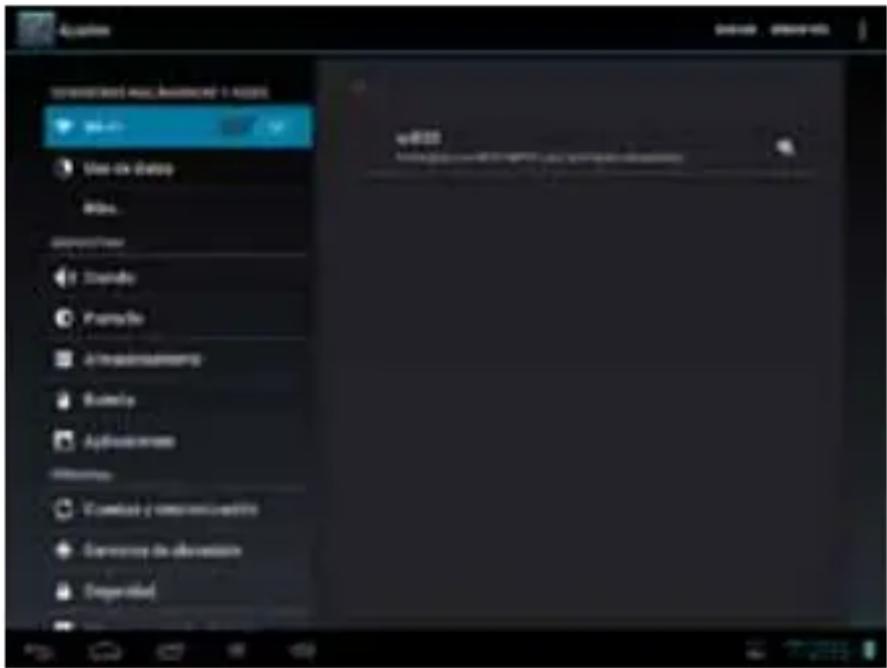
Wi-Fi
Tap “Settings” • “Wireless & networks” to turn on wifi and scan. It will show a list of Wi-Fi networks scanned in range. Choose a strong Wi-Fi network to connect. (You may need to input the password).
Mobile Data
Command to activate and set the network operator, the use of 2G or 3G network and the activation of Roming.
Bluetooth
Command to activate and perform a search for Bluetooth networks. This will display a list of available Bluetooth devices, match your tablet device, and enter the password if required.
Data usage
A graph appears on the flow data used in the mobile and Wi-Fi.
More...
List of networks that can be used to connect the TAB 10 3G V16 unlike the Wi-Fi network. By selecting mobile network for 3G and “3G Support Information” window appears with a list of keys 3G compatible with your device.
Sound
Control to adjust the volumes, choose the ringtone notifications and enable sounds or sound pressure lock screen.
Display
Control to adjust the brightness, the background, adjust the sleep time panel and select the font size.
Storage
Check internal storage here. If you insert a Micro SD card, or USB disk, you can check the total and available space for your Micro SD card or USB disk. Please unmount it to safely remove it.
NOTE: The pre-installed applications and the operating system Android OS occupy a considerable part of the capacity of the internal memory of the device, then it is normal to have a difference between “Available memory space” and “Total capacity”.
Battery
Command to display the percentage charge level, graphically the state of charge of the battery and the time of use.
Apps
Selecting this item allows you to manage the various applications on the device. To delete an application, select it and touch the “Uninstall”.
Location access
To allow or disallow the sending of your location data for Google search results and other Google services and activation of the GPS satellites.
Security
Settings to enter a screen lock or information about the administrator.
Language & input
Selecting this item allows you to set the desired language, spell checking, set some functions of the virtual keyboard, voice commands and set the pointer speed.
Backup and Reset
Selecting this item allows you to make a backup of your data or restore the device with the factory records.
Date and Time
Selecting this item allows you to set the date and time of the device, the time zone, the format and display of the day / month / year.
Accessibility
Selecting this item allows you to set some parameters such as: Talk Back (which provide voice prompts to help users who are blind or visually impaired), Large Text, Auto Rotate, pronunciation of the password, touch delay and improves web accessibility.
Developer option
Selecting this item allows you to set / adjust the more advanced features of your device.
About Tablet
Selecting this item allows you to view all the information about the device.
INFORMATION ON REMOVAL AND DISPOSAL OF THE BATTERY
Caution: This operation is restricted to qualified personnel! The recharge incorporated in this product is not user replaceable.
- Remove the rear of the unit by moving lever up between the front and rear;
- Locate the battery
- Unplug it and remove it.
Whatever type of low battery, it should not be placed in household waste, fire or water. Each type of battery should be recycled or disposed of at an appropriate collection centers dedicated.
TECHNICAL SPECIFICATION
| DISPLAY....10.1-inch TFT LCD, Capacitive RESOLUTION....1280x 800 IPS CPU....ARM Cortex A5, 1.2GHz Quad Core RAM....1GB LPDDR 2 SISTEMA OPERATIVO....Android 4.1 MEMORIA INTERNA....4 GB WIRELESS NETWORK....Wi-Fi (802.11 b/g/n) 3G, GSM....GSM850/900/1800/1900; WCDMA850/2100 FORMATI AUDIO....MP3, AAC, OGG, FLAC FORMATI VIDEO....MP4, MPG, RMVB, MKV FORMATI FOTO....JPEG, BMP, PNG, GIF |
Note
Note
CORRECT DISPOSAL WARNING

Precautions for correct disposal of the product.
The symbol shown on the equipment indicates that waste must be disposed of in “separate collection” and so the product must not be disposed of together with urban waste.
The user must take the product to special “separate waste collection centres” provided by local government, or deliver it to the retailer against the purchase of a new product.
Separate collection of waste and subsequent treatment, recycling and disposal operations promotes the production of equipment with recycled materials and limits negative effects on the environment and on health caused by improper handling of waste.
Illegal disposal of the product leads to the enforcement of administrative penalties.


Trevi S.p.A.
Strada Consolare Rimini-San Marino, 62
47924 RIMINI (RN) Italy
Tel. 0541/756420 - Fax 0541/756430
www.trevi.it - E-mail: info@trevi.it


- Tab 10 3G V16
- TO SET YOUR LANGUAGE DEVICE
- POUR CONFIGURER LANGUE DE VOTRE APPAREIL:
- INDICE
- Note:
- Immagini
- Wi-Fi
- WELCOME
- IMPORTANT NOTICES
- DISPOSAL:
- MAINTENANCE:
- SAFETY:
- KEYS AND FUNCTIONS
- Getting Started
- Charging the tablet
- Charging with DC adaptor
- Charging using USB cable and computer
- MID status and notifications
- Turning the Tablet on or off
- Turning the Screen On or off (Standby)
- Unlocking the Screen
- About Applications
- Preinstalled Applications
- Installing Applications
- Connect to a Wi-Fi network
- COMMUNICATION
- TELEPHONE
- Make calls
- Call the contacts on the Address Book
- Accepting a call
- Adjusting the volume during a call
- Viewing the Call History
- Notes:
- MESSAGES
- Send a text message:
- Send an MMS message:
- GMail:
- Email:
- INTERNET BROWSING
- APPLICATION MANAGEMENT
- Install an application from Play Store:
- Uninstall an application:
- Optional Connections
- Connecting to a Computer
- Connect your tablet to the computer.
- SETTING
- Mobile Data
- Bluetooth
- Data usage
- More...
- Sound
- Display
- Storage
- Battery
- Apps
- Location access
- Security
- Language & input
- Backup and Reset
- Date and Time
- Accessibility
- Developer option
- About Tablet
- INFORMATION ON REMOVAL AND DISPOSAL OF THE BATTERY
- TECHNICAL SPECIFICATION
- Note
- CORRECT DISPOSAL WARNING
- Precautions for correct disposal of the product.
Brand : Trevi
Model : TAB 10 3G V16
Category : Tablet