
G2G 1000 - Tripod Glide Gear - Free user manual and instructions
Find the device manual for free G2G 1000 Glide Gear in PDF.


| Type of Product | Mechanical Gimbal for Motorized Gimbals |
| Brand | Glide Gear |
| Model | G2G 1000 |
| Category | Camera Stabilizer Accessory |
| Weight Capacity | Up to 10 lbs (4.5 kg) |
| Compatible Gimbals | DJI Roni-S, RS2; Zhiyun Crane 3, Weebill-S, Crane 2; Moza Air 3, Aircross |
| Compatible Vest/Arm Systems | Any with pin diameter ≤ 7/8" (22.5 mm) |
| Components | Stand (G), Telescopic Poles (E), Main Pole (D), Gimbal Clamp (B), Mounting Plate (C), Counterweights (H, I, J), 3/8-16 to 1/4-20 Adapters (J), C-Stand Adapter (L) |
| Material | Aluminum alloy and steel (estimated) |
| Mounting Method | Slide handle (A) onto vest arm pin or C-stand adapter |
| Balancing Method | Adjust fulcrum point, counterweights, and telescopic pole length |
| Operating Modes | Jib/Javelin Mode (extended) and Compact Mode |
| Primary Function | Provides smooth pan/tilt control and absorbs large amplitude movements |
| Dimensions (approximate) | Adjustable length: ~20-40 inches (based on telescoping poles) |
| Weight (approx) | ~3-5 lbs (estimated) |
| Maintenance | Keep clean, lubricate moving parts as needed, check screw tightness |
| Safety Notes | Do not exceed weight capacity of vest/arm system; ensure pin is securely locked |
| Spare Parts | Contact Glide Gear for replacement parts |
| Warranty | Not specified, assume standard manufacturer warranty |
| Additional Accessories | Compatible with Glide Gear G2G Vest and G2G Vest Plus |
Frequently Asked Questions - G2G 1000 Glide Gear
User questions about G2G 1000 Glide Gear
0 question about this device. Answer the ones you know or ask your own.
Ask a new question about this device
Download the instructions for your Tripod in PDF format for free! Find your manual G2G 1000 - Glide Gear and take your electronic device back in hand. On this page are published all the documents necessary for the use of your device. G2G 1000 by Glide Gear.
USER MANUAL G2G 1000 Glide Gear
The G2G 1000 is a mechanical gimbal for your motorized gimbal.
Motorized gimbals are great at smoothing small jitters from steps but there is so much they can do to smooth out bounces of bigger amplitudes, when running for instance. Most motorized gimbals can pan and tilt by simply pressing a button or a joystick but panning or tilting with a motorized gimbal does not have the same “floating” feeling that you can have on a traditional mechanical stabilizer. The G2G 1000 can remedy that by allowing you to have almost full control on the pan and tilt of your gimbal give you more freedom to create your shots. Combine the G2G 1000 and a vest and arm system such as the Glide Gear G2G Vest and G2G Vest Plus to get even smoother shot while shooting long without feeling fatigued.
Compatibility
- Compatible with most single handled motorized gimbals including DJI Roni-S, DJI RS2, Zhiyun-Tech Crane 3, Weebill-S and Crane-2 or Moza Air – 3 or Aircross
- Compatible with any vest and arm system with a pin diameter smaller than 7/8" or 22.5mm
- Compatible with any Camera/Gimbal setup up 10lbs
Warning
The overall G2G 1000 weight capacity is conditioned by the weight capacity of the vest and arm system the G2G 1000 is used with.
COMPONENTS
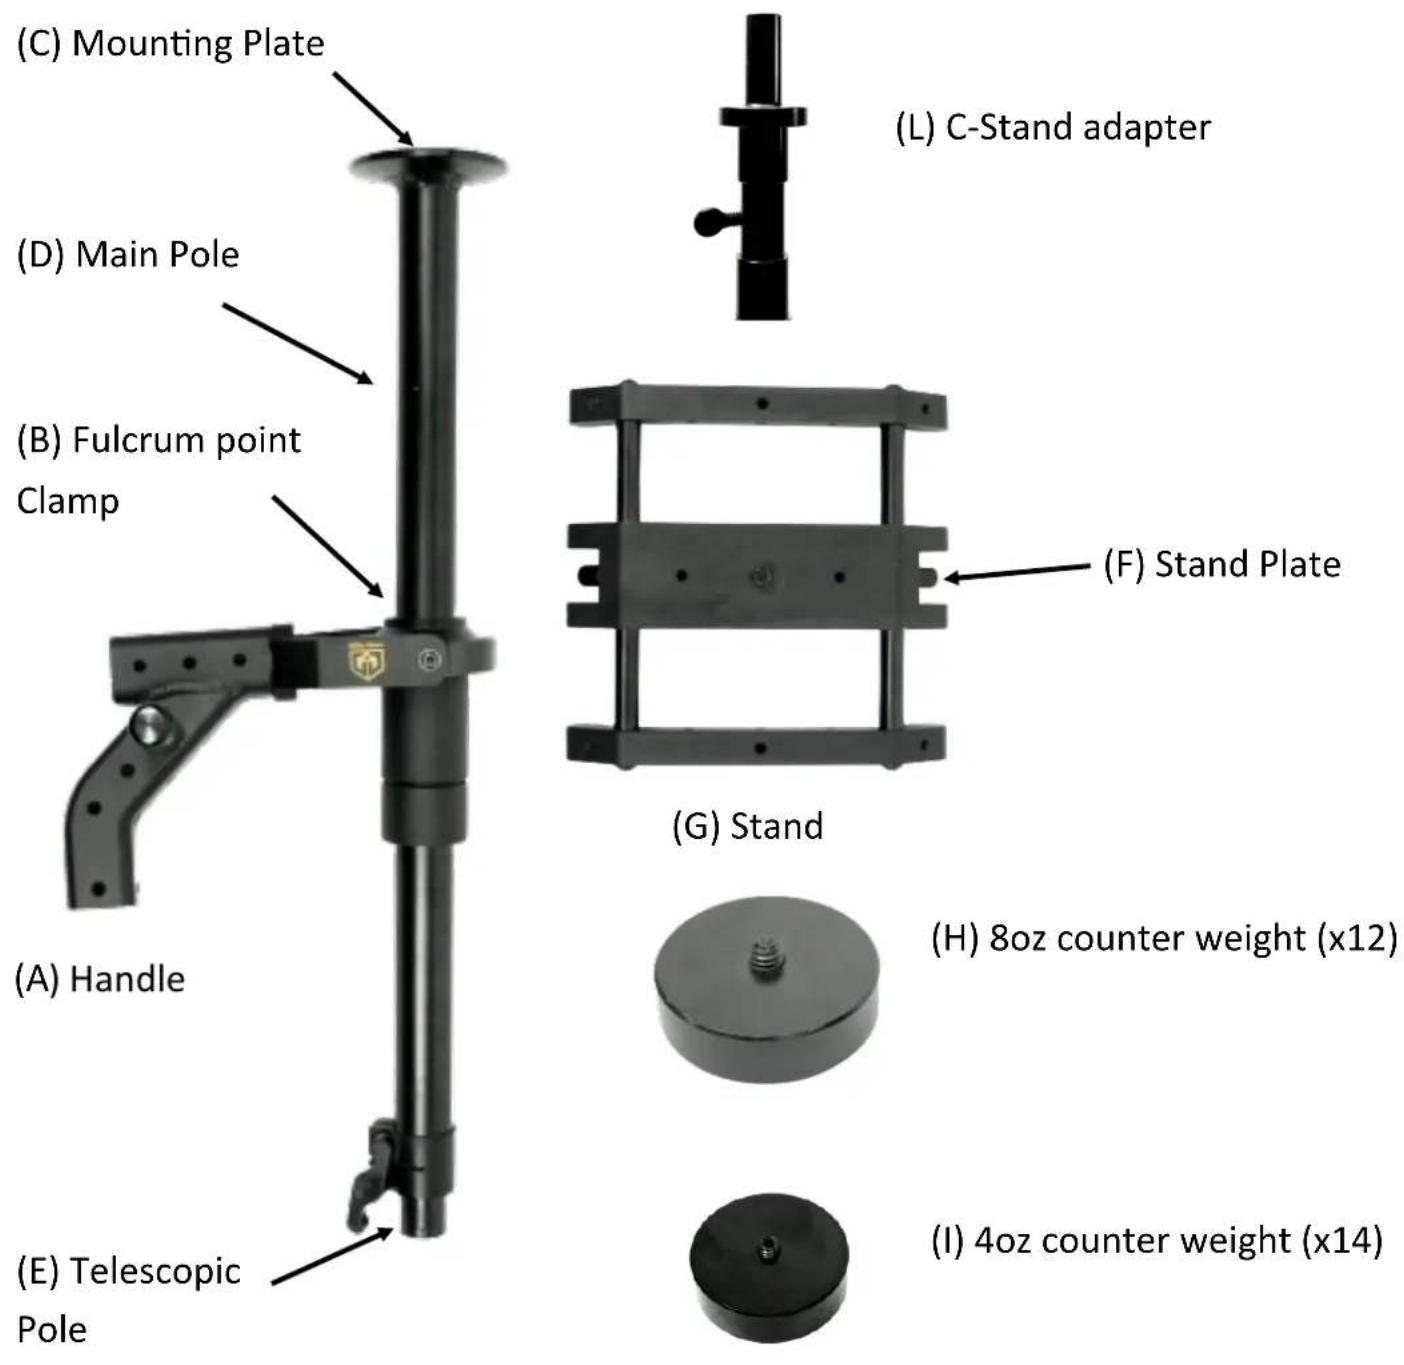

(J) 3/8-16 to 1/4-20 adapters
ASSEMBLY
Assembling your G2G 1000

1 Assemble the Stand (G) to the female end of the Telescopic Poles (E) using the mounting screw on the Stand Plate (F)
② Lock the clamp connecting the 2 Telescopic Poles (E)

natural_image
Close-up of a black mechanical clamp or bracket with a yellow logo, mounted on a vertical pole (no text or symbols visible)3 Lock the gimbal position on along the Main Pole (D) using the gimbal clamp (B)
4 Mount the G2G 1000 on your vest and arm system by sliding the handle (A) onto the pin at the end of the arm.
Note: The pin must have a diameter no greater than 7/8" (22.5mm)
We strongly recommend using a C-Stand when balancing the G2G 1000.
1
Mount the C-Stand Adapter (L) on your C-stand.
2
Mount the G2G 1000 on your C-stand by sliding the handle (A) onto the end of the C-Stand adapter (L).
3
Mount your camera onto your motorized gimbal and balance your gimbal.
4
Mount your motorized gimbal onto the G2G 1000 Mounting Plate (C).
Balancing the G2G 1000 follows the exact same principles used when balancing your classic mechanical gimbal.
5
Start by roughly mounting onto the Stand (G) the equivalent of your camera weight in counter-weights.
Make sure to spread the Counterweights (H, I, J) evenly around the Stand (G).
6
Using the Fulcrum Point Clamp (B), move the fulcrum point to the middle of the Main Pole (D).
7
Center the Stand Plate (F) in the middle of the Stand's rails.
Your setup should look like in the picture on the right.


natural_image
Rohin robotic device with articulated arm and vertical support (no visible text or symbols)BALANCING THE G2G 1000
7 With you G2G 1000 still mounted on the C-Stand, place the G2G 1000 in a vertical position and release it. Adjust the position of the Stand Plate (F) so that the G2G 1000 stands up right when released.
⑦ Next, place the G2G 1000 in a horizontal position and let it go.

natural_image
Mechanical device with black wheels and a vertical shaft, no visible text or symbols
If the Stand's side fall down, you can do one or all of the following:
- Shorten the telescopic pole (E).
- Remove counterweights.
- Move the Fulcrum Point Clamp (D) closer to the Stand (G).
If the camera's side fall down, you can do one of all of the following:
- Extend the telescopic pole (E).
- Add more counterweights.
- Move the Fulcrum Point Clamp (D) closer to the camera.
NOTE: Balancing your G2G 1000 will depend not only on the camera and gimbal you are using it with but also on personal preferences.
MODES
Playing with the balancing of your G2G 1000 can affect greatly the foot print of your setup as well as the type of shots you can achieve. Below are the 2 extreme modes for balancing your G2G 1000.
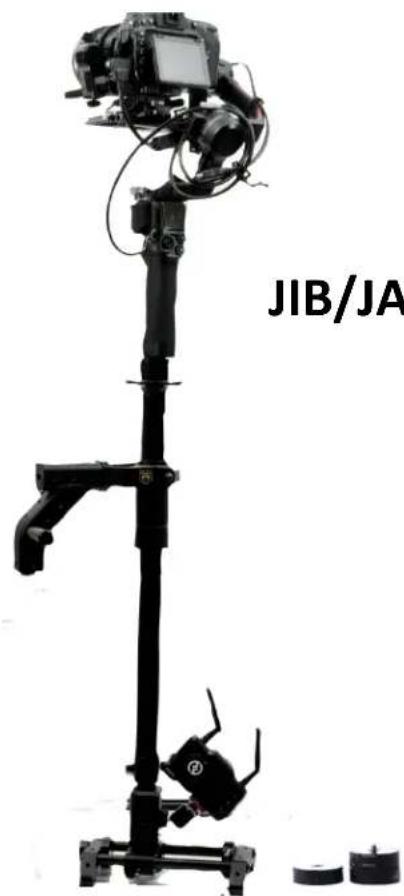
JIB/JAVELIN Mode
VS
COMPACT
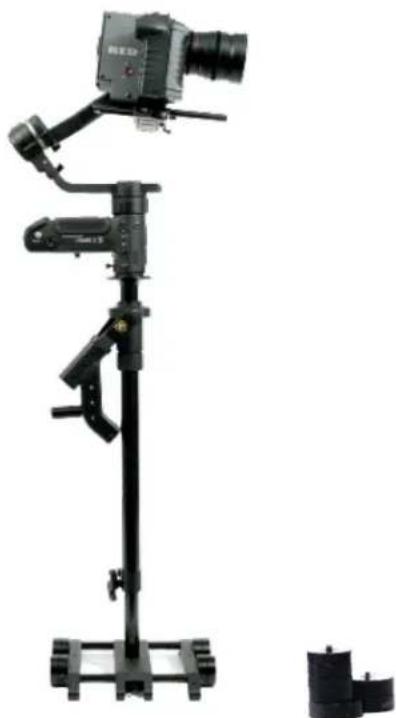
natural_image
Professional camera setup with mounted equipment and a cylindrical base (no visible text or symbols)JIB/JAVELIN MODE:
• Low/High Jib and Javelin Shots
• Telescopic Poles fully extended
- Fulcrum Point Clamp high along the Main Pole
- Lighter setup
- Bigger foot print
COMPACT MODE:
- Limited range of jib motion
- No javelin mode
- Short Telescopic Pole
- Fulcrum Point Clamp further away from the camera
- Heavier setup
- Smaller foot print


Brand : Glide Gear
Model : G2G 1000
Category : Tripod