
G2H 100 - Tripod Glide Gear - Free user manual and instructions
Find the device manual for free G2H 100 Glide Gear in PDF.


| Product Type | Camera Stabilizer Tripod |
| Brand | Glide Gear |
| Model | G2H 100 |
| Primary Function | Balanced camera support in combination with a vest and arm system |
| Frame Material | Aluminum alloy with wooden handles |
| Handle Material | Wood |
| Included Components | Main Frame (A), Vertical Rails (C) x2, Camera Rails (B) x2, Rail Caps (D) x4, Camera Plate (E), Handle (F) |
| Camera Plate | Sliding for roll axis balance adjustment |
| Rail Caps | Screw onto ends of vertical rails |
| Vertical Rails | Attach to main frame clamps |
| Camera Rails | Attach to vertical rails |
| Compatibility | Any vest and arm system with pin diameter less than 7/8" (22.5mm) |
| Recommended Vest | Glide Gear G2G 1000 Vest |
| Assembly | Tool-free assembly; attach rails and caps |
| Balance Adjustment | Move camera plate along camera rails |
| Weight (Estimated) | Approximately 3.5 lbs (1.6 kg) |
| Load Capacity (Estimated) | Up to 10 lbs (4.5 kg) |
| Dimensions (Estimated) | 24 x 12 x 6 inches (61 x 30 x 15 cm) |
| Color | Black |
| Mounting | Via handle to arm pin |
| Use | Professional video stabilization |
| Manual | Available for free download in PDF format |
Frequently Asked Questions - G2H 100 Glide Gear
User questions about G2H 100 Glide Gear
0 question about this device. Answer the ones you know or ask your own.
Ask a new question about this device
Download the instructions for your Tripod in PDF format for free! Find your manual G2H 100 - Glide Gear and take your electronic device back in hand. On this page are published all the documents necessary for the use of your device. G2H 100 by Glide Gear.
USER MANUAL G2H 100 Glide Gear
G2H 100
USER MANUAL

What's included?

For more information please visit our website: www.glidegear.net

Assembly
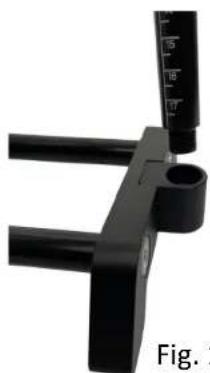
1 Attach the Vertical Rails (C) to the ends of the Camera Rails (B) as shown in Fig. 1. Make sure to insert the Vertical Rails (C) so that the measurements are in the correct orientation.
natural_image
Close-up of a black mechanical clamp or bracket with measurement markings (no visible text or symbols)Fig. 1

Slide the Vertical Rails (C) onto the clamps located at the end of each arm of the Main Frame (A).
Make sure that the Main Frame (A) wooden handles are facing away from the frame's arms as pictured in Fig. 2.
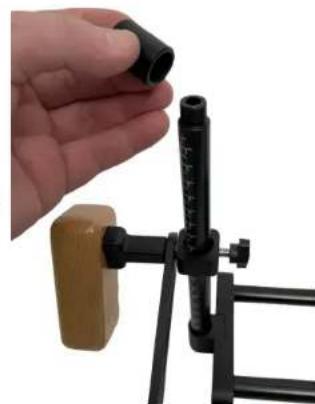
3 Screw the Rail Caps (D) at the end of each Vertical Rails (C) as shown in Fig. 3.
natural_image
Close-up of a hand holding a black cylindrical object mounted on a tripod stand, with a wooden block attached (no visible text or symbols)Fig. 3
4 You can now mount your camera onto the Camera Plate (E).
For more information please visit our website: www.glidegear.net

Adjustments

Move the Camera Plate (E) along the Camera Rails (B) to balance the camera's roll axis
For more information please visit our website: www.glidegear.net

Using the G2H 100 with a vest and arm system
PLEASE NOTE that the G2H 100 needs to be used in combination with a
Vest and Arm system and is compatible with any vest and arm system with a pin diameter smaller than 7/8" or 22.5mm
To use the G2H 100 with your vest and arm system, simply slide the arm's pin inside the G2H 100 handle (F) as shown in Fig. 4
Glide Gear recommends using The G2H 100 with the G2G 1000 Vest.
The G2G 1000 Vest can be used with the arm mounted to the front of the vest as it is usually the case but can also be used with the arm mounted to the back of the vest as it is the case in Fig. 5 which also features the G2H 100.

natural_image
Close-up of a black drone with articulated arms and camera body, labeled 'Fig. 4' (no other text or symbols visible)
natural_image
Person wearing a black and white extravehicular vest holding a camera, with no visible text or symbols on the device itself.


Brand : Glide Gear
Model : G2H 100
Category : Tripod