
TT372EDID - AV Extender Epcom - Free user manual and instructions
Find the device manual for free TT372EDID Epcom in PDF.


| Product Type | HDMI Extender (AV Extender) |
| Brand | Epcom |
| Model | TT372EDID |
| Dimensions (per unit) | 71.8 mm x 48.9 mm x 27.6 mm |
| Weight (per unit) | TX: 70 g, RX: 70 g |
| Power Supply | DC 5V/2A (included) |
| Power Consumption | TX: < 3 W, RX: < 3 W |
| Video Resolution | Up to Full HD 1080p@60Hz |
| Transmission Distance | Up to 50 meters via CAT6 cable |
| Cable Type | CAT6 / CAT6A / CAT7 (IEEE-568B standard) |
| IR Support | 20-60 kHz IR passback, includes IR blaster and receiver cables |
| EDID Management | 3-switch DIP for resolution/audio; can read EDID from loop-out TV |
| Loop-out | HDMI loop-out on transmitter unit |
| POE | Power over cable: receiver powered by transmitter via CAT cable |
| Plug and Play | Yes, no software installation required |
| Zero Latency | Uncompressed transmission with no delay |
| Safety | Do not hot plug; use only supplied power adapter; avoid static discharge |
| Package Contents | Transmitter (TX), Receiver (RX), Power supply, IR blaster cable, IR receiver cable, User manual |
| Color | Black |
Frequently Asked Questions - TT372EDID Epcom
User questions about TT372EDID Epcom
0 question about this device. Answer the ones you know or ask your own.
Ask a new question about this device
Download the instructions for your AV Extender in PDF format for free! Find your manual TT372EDID - Epcom and take your electronic device back in hand. On this page are published all the documents necessary for the use of your device. TT372EDID by Epcom.
USER MANUAL TT372EDID Epcom
Thank you for purchasing this product, for optimum performance and safety, please read the instructions carefully and keep the manual for future reference.
• Important Safety Notice
Please read below safety instructions carefully before installation and operation:
- Do not mix up the transmitter unit (TX) and the receiver unit (RX), IR blaster extension cable and IR receiver extension cable before installation
- Do not hot plug when it is working.
- Use DC5V/2A power supply only. Make sure specification matched if using adapters not supplied by factory.
- This HDMI Extender supports POE to power the receiver (Connect power supply to the transmitter only, and receiver is powered by the Transmitter). Please note that this HDMI Extender can not use with switch or router.
- Static electricity will cause damage of the device, please do ESD protection when using the device.
• Product Introduction
This HDMI Extender includes a transmitter unit (TX) and a receiver unit (RX), working as a pair. It allows for transmission and extension uncompressed full HD 1080p@60Hz HDMI signal via CAT6/6A/7 network cable. The transmission on distance is up to 50 meters with zero latency. It is required to be the power of the transmission device. The transmission device is also used to supports POE to power the receiver (Connect power supply to the Transmitter unit only, each unit willpower up, as the Receiver unit is powered by the Transmitter unit through network cable). This HDMI Extender support IR passback for remote control source device easily. This device is performed in application of HD 1080p@60Hz HDMI signal via CAT6/6A/7 network cable. The transmission is required to provide information about HD video shooting, HD multimedia education system, HD digital advertising and signage etc.
• Product Features
- Uncompressed and zero latency
- Plug and play, without installation
- Transmitter support one HDMI Loop-out.
- Use CAT6/6A/7 for long distance transmission.
- Support resolution is up to full HD 1080p@60Hz.
- Support POE to power the receiver from transmitter.
- Transmission distance up to 50 meters via CAT6 cable.
- With EDID switch for setting a very needed HDMI signal format
- Support IR passback for remote control source device from receiver site easily.
• Package contents

Receiver unit
(16) * 2pts
C
回
IR receiver

User manual • 1pcs
[Non-Text]

Power supply×1pra
• Installation Requirements
-
HDMI source device(computer graphics card, DVD, PS3, HD monitoring equipment etc).
-
HDMI display device like SDTV, HDTV, projector with HDMI port,
- UTP/STP CAT6/6A/7 cable, follow standard IEEE-568B.
- Penal Description
- Transmitter unit(TX)

① IR signal output to connect with
blaster extension cable
② RJ45 signal output
② HDMI signal indicator led: it lights
on all the time when HDMI signal
input flashes when no signal input

④ Reset butten
⑥ DCSV power input
⑤ HOME signal output
⑦ EDID switch
② HDMI signal input
2. Receiver unit (RX)

① DC5V power input
② HDMI signal output
④ IR signal input to connect with
IR receiver extension cable
④ LENGTH: for adjusting to the
length of network cable
① 1045 signal input
⑥ RJ45 indicator led: it lights on all the
time when HDMI signal transmission flashes when no signal transmission
• Installation and Connection
-
How to make a CAT6/6A/7 network cable Follow the standard of IEEE-568B
-
white and orange; 2. orange; 3. white and green; 4. blue; 5. white and blue; 6. green; 7. white and brown; 8. brown.
2.Connection

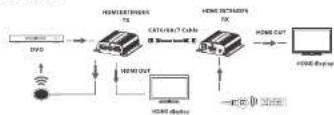
3.Connection instruction
3.1 Connect source device to Transmitter unit (TX), and display device to Receiver unit (RX) via HDMI cables
3.2 Connect Transmitter unit (TX) and Receiver unit (RX) via network cables (CAT6, CAT6A or CAT7)
3.3 Plug the power supply to Transmitter unit only, each unit will power up then initialize itself, this HDMI extender works
[NOTE]It is recommended to use a length range within 15\~50m network cable. If the CAT6 cable is too short, there may be no display output because the signal is too strong. If the CAT6 cable is too long, the output may be with poor quality.
4. IR User Guide
4.1 IR blaster extension cable should plug in the IR OUT port of TX (Sender) of HDMI extender, and the IR receiver extension cable should plug in the IR IN port of the Video wall controller.
4.2 The emitter of IR blaster should as close as possible to the IR receiver window of the signal source device.
4.3 Using the IR remote controller of the signal source device towards the IR receiver (connected to the Video wall controller), to remote control source media playback.
5.EDID Setting
5.1 First of all, set the resolution mode of the source device, please choose "AUTO" of the resolution mode. However, when the resolution mode of your source device is "AUTO" already, and the output resolution (for instance, output is 720p) is still not in accord with the resolution that set by the EDID dip switch (for instance, it is 1080p). At this time, please set the resolution of your device again to make it in accord with the resolution that set by the EDID dip switch (e.g. 1080p)
5.2 HDMI source device reads
the EDID information of the transmitter
(TX) and then output the relative HDMI signal forma.
5.3 It needs to power on again or reset the transmitter unit after re-setting EDID every time
5.4 When connect a TV with loop-out HDMI port of transmitter(TX), it can adjust EDID switch to read and save this TV's EDID information. When we use this function, it should connect TV with transmitter first, and then power on these devices, so that the EDID will be read and saved successfully. At next time, even though do not connect a TV into the loop-out HDMI port, the source device will output the saved EDID information last time.
Switch UP: use the Arabic numeral '1' to represent
Switch DOWN: use the Arabic funeral. "0" to represent
| Switch Status | EDD information | ||
| switch-1 | switch-2 | switch-3 | |
| 0 | 0 | 0 | 720P@5GHz 2.1CH |
| 1 | 0 | 0 | 720P@1GHz 7.1CH |
| 0 | 1 | 0 | 180P@9GHz 2.1CH |
| 1 | 1 | 0 | 180P@5GHz 7.1CH |
| 0 | 0 | 1 | 180P@9GHz 2.1CH |
| 1 | 0 | 1 | 180P@9GHz 2.1CH |
| 0 | 1 | 1 | read and save the EDD of the log-in TV |
| 1 | 1 | 1 | Default EDD 720P@5GHz 2.1CH |
· FAO
Q: No image output or audio and video display is not normal?
A: Press Receiver "LENGTH" button for adjusting this unit to self-adapt to the length of network cable.
Q: Receiver "LINK" led is flashing all the time?
A: 1) Make sure network cable connection follows the standard of IEEE-568B. 2) Check whether Transmitter has HDMI signal input. 3) Reset Transmitter & Receiver and reconnect.
Q: Receiver "LINK" led lights on all the time but no image output?
A: 1) Press Receiver. "LENGTH" button for adjusting to the length of network cable 2) Make sure HDMI cable is well connected with TV. 3) Make sure the network cable is fine copper wires.
- Specification
| Item | Specification |
| HDMI signal | HDMI1.4x |
| HDCP | HDCLP.2x |
| Support resolutions | 480@60Hz, 480p@60Hz, 576@10Hz, 576p@50Hz, 720p@50/60Hz, 1000@50/60Hz, 3D:1080p@60Hz |
| Network cable | Low resistance and consumption oxygen-free copper core (CAT6, CAT6A, CAT7) |
| Transmit distance | Full HD resolution 1080p@60Hz up to 50meters via CAT6 cable |
| IR remote control | Support 20~60kHz wide frequency IR remote control |
| ESID | Support EISID setting function |
| Audio format | PCM、AC3、DT5 |
| Working temperature | DC ~ 60°C |
| Power supply | SVZA |
| Power consumption | TX<3W RX<3W |
| Product dimension | 71.8Ω+48.9WΩ+27.6Hmm*2pcs |
| Weight | TX.70g RX.70g |
| Color | Black |
Disclaimer
The product name and brand name may be registered trademark of related manufacturers. TM and B may be omitted on the user manual. The pictures on the user manual are just for reference, and there may be some slight difference with the real products. We reserve the rights to make changes without further notice to a product or system described here in to improve reliability, function or design.
HDMI EXTENDER
User Manual
EDID

natural_image
Two identical line drawings of a rectangular electronic device with ports and connectors (no text or symbols visible)


Brand : Epcom
Model : TT372EDID
Category : AV Extender