
HM 5551 - Electric mixer MOULINEX - Free user manual and instructions
Find the device manual for free HM 5551 MOULINEX in PDF.

| Product type | Electric hand mixer |
| Brand | MOULINEX |
| Model | HM 5551 |
| Usage | Household |
| Number of speeds | 3 speeds + Turbo boost |
| Included accessories | Multi-wire (or ribbon) whisks, dough hooks, stand (depending on model), bowl, Easy spatula, Easy eggs, multifunctional storage box |
| Main functions | Whisking, mixing, kneading |
| Ejection system | Ejection ring to remove whisks and dough hooks |
| Cord storage | Compartment at the back of the hand mixer with cord winder |
| Cleaning of whisks/dough hooks | Dishwasher safe |
| Cleaning of the motor unit | Do not immerse, clean with a damp sponge |
| Safety | Unplug before cleaning, do not use with wet hands, do not leave children unattended |
| Materials | Compliant with food safety standards |
| Warranty | Household use only, any commercial use voids the warranty |
| Easy eggs accessory | Separates egg white from yolk, max capacity 5 yolks |
| Easy spatula accessory | Automatically brings ingredients back into the mixing zone |
| Multifunctional storage box | Graduated for measuring liquids, flour, sugar; closes with a lid |
| Recycling | Device contains recyclable materials, dispose of at a collection point |
Frequently Asked Questions - HM 5551 MOULINEX
User questions about HM 5551 MOULINEX
0 question about this device. Answer the ones you know or ask your own.
Ask a new question about this device
Download the instructions for your Electric mixer in PDF format for free! Find your manual HM 5551 - MOULINEX and take your electronic device back in hand. On this page are published all the documents necessary for the use of your device. HM 5551 by MOULINEX.
USER MANUAL HM 5551 MOULINEX
natural_image
Line drawing of a hand mixer with two handles and a handle (no text or symbols)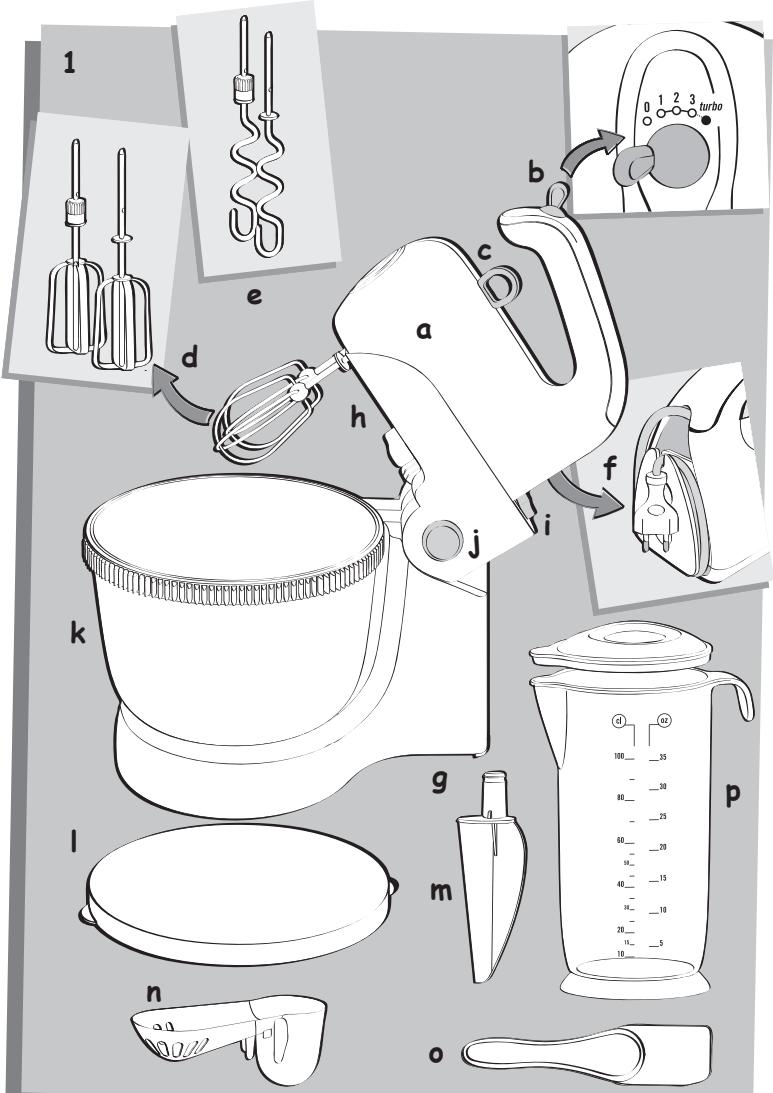
natural_image
Illustration of a kitchen mixer blending liquid into a bowl (no text or symbols)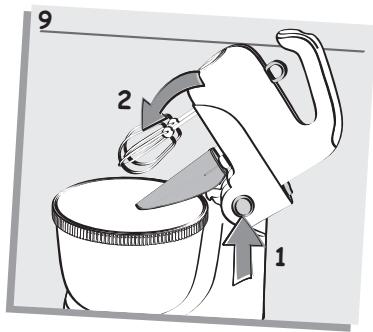
natural_image
Simple line drawing of a trash bin with crossed lines indicating no waste or discharge (no text or symbols)Safety instructions:
- Please read and follow these instructions carefully before using your appliance for the first time. The proper operation of this appliance, your safety and the safety of those around you depend on it.
- Please check that the supply voltage of your appliance corresponds to your electrical installation, before plugging it in. You may damage the appliance or cause injury to yourself if this is not the case. Any error in connection will invalidate the terms of your guarantee.
- This product has been designed for domestic use only. Any commercial use, inappropriate use or failure to comply with the instructions, the manufacturer accepts no responsibility and the guarantee will not apply.
- To avoid electric shocks, never use the appliance with wet hands or on a damp or wet surface. Avoid wetting the appliance's electrical components. Never immerse them in water.
- To prevent accidents, this product must not be used by children or by any persons not having read the instructions first.
- Do not allow children to use the appliance without supervision.
- This appliance is not designed to be used by persons (including children) with reduced physical, sensorial or mental capacities, or by people with no prior knowledge or experience, except where they have benefited from supervision or previous instructions relating to the use of the appliance, from a person responsible for their safety.
- Children should not be allowed to play with the appliance.
- The appliance must be unplugged when no longer in use, during cleaning or in the event of a power cut.
- Do not use your appliance if it does not operate correctly, if it has been damaged or if the power cord or plug is damaged. To maintain safety, these parts must be replaced by an approved service centre (see list in the service booklet).
- Any maintenance other than routine cleaning and upkeep by customers must be carried out by an approved service centre.
- Do not immerse the appliance, cord or plug in liquid.
- The power cord must be kept out of the reach of children and must not be placed near or come into contact with the hot parts of the appliance, sources of heat or sharp corners. Use the cord winder for storage.
- Never attempt to dismantle or repair the appliance yourself. Repairs by unskilled persons may cause damage and the guarantee shall no longer apply. Take your appliance to an approved service centre for repair.
- Do not move or unplug the appliance by pulling on the cord as it may cause an accident or cause the appliance to malfunction.
- The use of elements and accessories not recommended by the
manufacturer may lead to personal injury, damage to the appliance or faulty operation, and the guarantee will no longer apply.
- To avoid electric shocks, ensure that your fingers do not come into contact with the plug pins when you plug in or unplug the appliance.
- Do not leave the appliance switched on or plugged in while unattended, even for a few moments, especially where children are present.
Do not plug any other appliances into the same plug hole using adapters. Electric overload is likely to damage the appliance or cause an accident. Only use an extension after having checked that it is in perfect working order.
- For your safety, this appliance complies with applicable standards and regulations:
- Low Voltage Directive
- Electromagnetic Compatibility
- Environment
- Materials in contact with food
a. Motor unit
b. Speed selector + Turbo
c. Ejection ring (for removing whisks or mixers)
d. Multi-wire whisks for light preparations or dough hooks (depending on model)
e. Mixers for heavy dough
f. Power cord storage
g. Stand (depending on model)
h. Swivel arm (depending on model)
i. Hand mixer lock/unlock button (depending on model)
j. Swivel arm lock/unlock button (depending on model)
k. Bowl (depending on model)
I. Bowl lid (depending on model)
m. Easy spatula (depending on model)
n. Easy eggs (depending on model)
o. Spatula (depending on model)
p. Multi-function storage box (depending on model)
Precautions of use:
- Always make sure that the speed selector is at "0" position before turning on the appliance.
- To avoid accidents, ensure long hair, clothes, such as ties and scarves or other objects do not catch on the moving parts of the appliance.
- In order to prevent injury to yourself and to others, and to avoid damaging the appliance, do not touch the whisks or mixers when the appliance is plugged in or insert any objects (knife, fork, spoon, etc.) into the accessories. A spatula may be used instead, only when the appliance is not in operation.
- To avoid damage to the device, never place the appliance or its accessories in the freezer, oven or microwave.
- The whisks and mixers are designed for preparing food. They must not be used for mixing other products.
- Before using your appliance for the first time, remove the accessories from the packaging and clean them with hot water.
EN
Use:
- By hand:
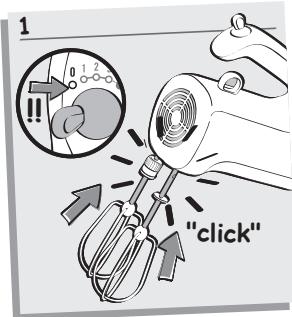
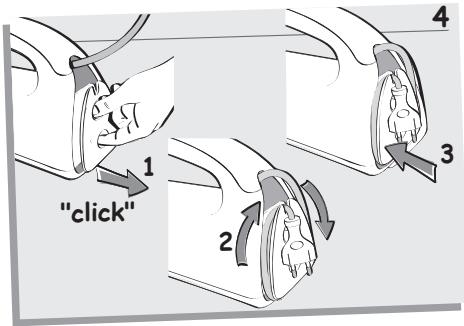
- Check that the speed selector (b) is set at "0". (Fig 1)
- Insert the rods of the whisks (d) or mixers (e) into their holes. Once in place, both the whisks should have the same length. The “click” indicates that the accessories are correctly in place. (Fig. 1)
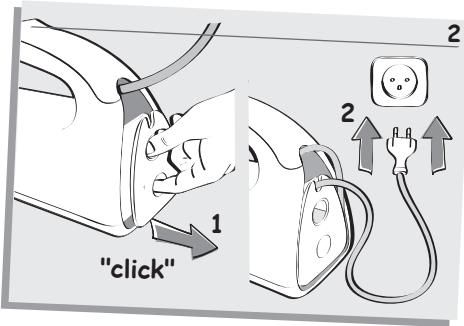
- Pull the "power cord storage" compartment (f) until you hear a "click"; unwind the required cord length, push back the compartment and then plug the appliance in (Fig. 2).
- A deep bowl should be used for mixing.
- To avoid splashing, place the whisks in the preparation before switching the appliance on.
- Press the speed selector (b) to turn the appliance on, first on speed 1 then on speed 2 and 3 as the preparation thickens. Use the “Turbo” position if the recipe requires higher power.
- Switch the appliance off before removing the whisks from the preparation (to avoid splashing).
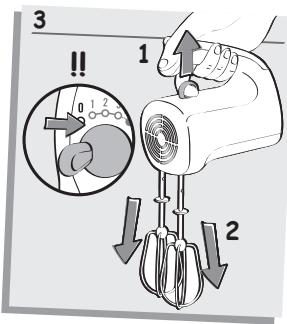
- To remove the whisks (d) or mixers (e), set the speed selector at 0, unplug the appliance and then pull the eject ring (c) upwards. (Fig. 3)
- To store the power cord: pull the compartment behind the hand mixer until you hear a "click", wind the power cord and push the compartment back. (f). (Fig. 4)
- Use on the stand (g) (depending on model):
- Check that the speed selector (b) is set at "0" (Fig 1)
- Insert the rods of the whisks (d) or mixers (e) into their holes. The whisk or mixer with a rotating
ring should be placed on the left, in the hole marked with a grey pictogram. Once in place, both the whisks should have the same length. The "click" indicates that the accessories are correctly in place. (Fig. 1)
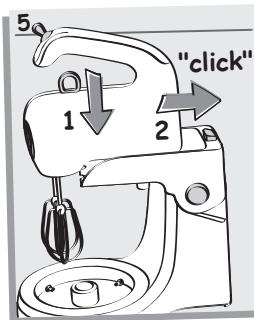
- Place the stand (g) on the countertop.
- Insert the hand mixer on the swivel arm (h) until it clips into place (Fig. 5)
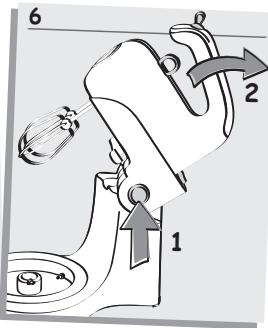
- While holding the swivel arm unlock button (j), tilt the swivel arm up using the hand mixer handle (Fig. 6)
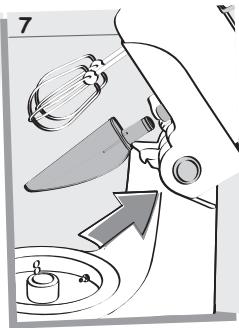
- Insert the Easy spatula (m) (Fig. 7). This spatula automatically brings the ingredients back to the mixing zone of the bowl for more efficiency.
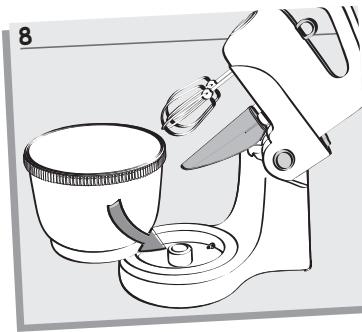
- Position the bowl (k) (Fig. 8)
- Unlock the arm to fold it by pressing the button (j) (Fig. 9)
- Plug in the appliance.
- Your appliance has 3 speeds and a turbo button. Always start by mixing or kneading on position 1 then 2 and then 3 as the preparation thickens. The speed of rotation of the bowl increases with the hand mixer speed. Use the “Turbo” position if the recipe requires higher power. We however recommend that you use it only briefly.
- After completing the operation, turn the speed selector to 0 position.
- Unplug the hand mixer.
- Tilt the swivel arm up by pressing the key (j)
- To remove the whisks or mixers, pull the eject ring (c) upwards (Fig. 3)
- Remove the bowl (k).
- While holding the hand mixer unlock button (i) unclip the hand mixer (a)
- To store the power cord: pull the compartment behind the hand mixer until you hear a "click", wind the power cord and push the compartment back (f) (Fig. 4).
NEVER TURN ON YOUR HAND MIXER BEFORE LOWERING THE SWIVEL ARM.
- Easy eggs accessory (n) (depending on model):
- Your hand mixer is equipped with an accessory to separate egg whites from the yolks easily:
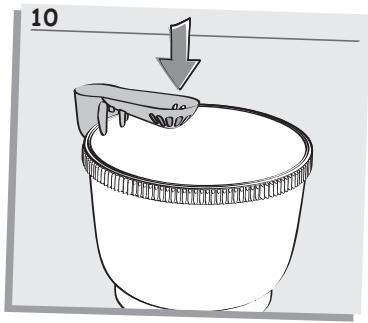
-Place the Easy Eggs accessory on the edge of your bowl (Fig 10)
-Break the egg and pour it on the perforated portion.
- The white separates from the yolk and falls into the bowl.
-Collect the yolk in its container by slightly tilting the accessory outwards.
Caution: the compartment can contain only 5 medium-sized yolks at the same time; remember to transfer the yolks to another container if necessary.
- Storage box (p) (depending on model):
- Your hand mixer is equipped with a multifunction storage box.
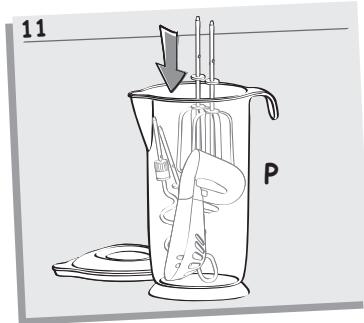
You can store all your hand mixer accessories in it (multi-wire whisks, mixers and Easy eggs) (Fig 11). Use the graduated cup (p) to measure liquids (ml), flour and sugar. You can also close the cup with its lid to store any leftover preparation in your fridge. Do not keep your preparation for more than 24 hours in the refrigerator.
Cleaning:
- Unplug the appliance.
- You must eject the whisks or mixers before cleaning them.
- Clean the whisks or mixers immediately after use to prevent any remaining egg or oil mixturee sticking or drying.
- The whisks and mixers are dishwasher-safe.
- Never immerse the motor unit (a) in water. Never wash it in the dishwasher. Clean the body of the appliance using a damp sponge only and dry it carefully.
- Do not use scouring pads or objects containing metal parts to clean the product and its accessories.
Quantities and preparation times:
| Accessories | Max quantity | Max time | Speed |
| Multi-wire whisksEgg whites | 8 egg whites | 6 min | 30s at V1 then V3 |
| Pound cake | 9 eggs, 470g flour, 470g sugar, 470g melted butter, 1 teaspoon baking powder, 2 pinches of salt, 1 sachet vanilla sugar | 6 min | 30s at V1 then V3 |
| Mixers on standBread dough | 500g flour, 300ml water, 10g salt, 10g baker's yeast | 4 min | 3 min 30s at V3 then 30s at Vturbo |
| Mixers without standBread dough | 500g flour, 300ml water, 10g salt, 10g baker's yeast | 4 min | 3 min 30s at V3 then 30s at Vturbo |
Recycling:
natural_image
Symbol of a trash bin with crossed lines indicating no waste or discharge (no text or labels)Help protect the environment!
① Your appliance contains various materials that can be recovered or recycled.
Take it to a local civic waste disposal centre
If you have any further problems or queries, please call our Customer Relations Team first for expert help and advice:
Helpline:
0845 330 6460 - UK
01 677 4003 - ROI
Or consult our web site: www.krups.co.uk
natural_image
Simple line drawing of a trash bin with crossed lines indicating no waste or discharge (no text or symbols)natural_image
Simple line drawing of a trash bin with crossed lines indicating no waste or discharge (no text or symbols)natural_image
Simple line drawing of a trash bin with crossed lines indicating no waste or plastic (no text or symbols)natural_image
Symbol of a trash bin with crossed lines indicating no waste or discharge (no text or labels)natural_image
Simple line drawing of a trash bin with crossed lines indicating no waste or discharge (no text or symbols)natural_image
Symbol of a trash bin with crossed lines indicating no waste or discharge (no text or labels)natural_image
Simple line drawing of a trash bin with crossed lines indicating no waste or discharge (no text or symbols)natural_image
Symbol of a trash bin with crossed lines indicating no waste or discharge (no text or labels)natural_image
Simple line drawing of a trash bin with crossed lines indicating no waste or plastic discharge (no text or symbols)① Apparatet indeholder materialer, der kan genindvindes eller genbruges.
Apparatet afleveres på en godkendt genbrugsstation eller i en serviceafdeling for at sikre aflevering til genbrug.
natural_image
Symbol of a trash bin with crossed lines indicating no waste or discharge (no text or labels)natural_image
Simple line drawing of a trash bin with crossed lines indicating no waste or discharge (no text or symbols)natural_image
Symbol of a trash bin with crossed lines indicating no waste or discharge (no text or labels)natural_image
Symbol of a trash bin with no text or labelsnatural_image
Simple line drawing of a trash bin with crossed lines indicating no waste or discharge (no text or symbols)natural_image
Simple line drawing of a trash bin with crossed lines indicating no waste or discharge (no text or symbols)FA
Retailer name & address:
/ Nom et adresse du vendeur / Nombre y dirección del minorista / Nome e endereço do revendedor / Nome e indirizzo delnegozzo / Name und Anschrift des Händlers / Naam en adres van de dealer / Forhandler navn & adresse / Äterförsäljarens namn och adress / Forhandler navn og adresse / Jälleenmyyjän nimi ja osoite / nazwa i adres sprzedawcy / Numele şi adresa vânzătorului / Parduotuvés pavadinimas ir adresas / Müüja kauplus ja aadress / Naziv in naslov trgovine / Tipusszám / Názov a adresa predajcu / Veikala nosaukums un adrese / Naziv i adresa maloprodaje / Naziv i adresa prodavca / Naziv i adresa prodajnog mjesta / Nume și adresă vânzător / Název a adresa prodejce / Nama dan alamat peruncit / Nama Toko Penjual dan alamat / Tên và d'ja chi cửa hàng bán/ Satici firmanin adı ve adresi / Название и адрес продавца / Назва і адреса продавця / Търговки обект / Назив и адреса на продавницата / Сатушының аты және мекен-жайы / Епшвуліміа кал дієвθυνση καταστήματος / Чұқұwnnnh ұWIUJUNIUR l huwugbä/ чื่оєң тейоуьчөнгнёнг/ ́лаптнійгід ́零售商的店名和地址/販売店の名前、住所/소매점 이름과 주소/ نام وادرس خردده فروش / اسم بaignع التجزئена оģنوانه
Distributor stamp ....../Cachet distributeur /Sello del distribuidor / Carimbo do revendedor / Timbro del negozzio / Händlerstempel / Stempel van de dealer / Forhandler stempel / Återförsäljarens stämpel / Forhandler stempel / Jälleenmyyjän leima / pieczęć sprzedawcy / Štampila vânzătorului / Antspaudas / Tempel / Žig trgovine / Eladó neve, címe/ Razitko predajcu / Zīmogs / Pečat maloprodaje/ Pečat prodavca / Pečat prodajnog mjesta / Štampila vânzătorului/ Razitko prodejce/ Cap peruncit / Cap dari Toko Penjual / Cúra häng bán dóng dáu/ Satici Firmanin Kaşesi / Печать продавца / Печатка продавця / Печат на търговския обект / Печат на продавницата / Сатушының мөрі / Σφραγίδα καταστήματος / Чшідшпніŋ hُʃʊhpp/ ۱۱۰۲۳۹۶۵۸۴۷۶۸۸۸۸۸۸۸۸۸۸۸۸۸۸۸۸۸۸۸۸۸۸۸۸۸۸۸۸۸۸۸۸۸۸۸۸۸۸۸۸۸۸۸۸۸۸
| FR | p. 2 - 8 |
| EN | p. 9 - 15 |
| NL | p. 16 - 22 |
| DE | p. 23 - 29 |
| ES | p. 30 - 36 |
| IT | p. 37 - 43 |
| PT | p. 44 - 50 |
| EL | p. 51 - 57 |
| TR | p. 58 - 66 |
| NO | p. 67 - 73 |
| DA | p. 74 - 80 |
| SV | p. 81 - 87 |
| FI | p. 88 - 94 |
| RU | p. 95 - 101 |
| UK | p. 102 - 108 |
| AR | p. 109 - 115 |
| FA | p. 116 - 122 |