
HGM7541VGH - Pan HOOVER - Free user manual and instructions
Find the device manual for free HGM7541VGH HOOVER in PDF.


| Product Type | Frying Pan |
| Brand | Hoover |
| Model | HGM7541VGH |
| Diameter | 28 cm |
| Material | Stainless Steel |
| Coating | Non-stick |
| Induction Compatible | Yes |
| Handle Material | Silicone |
| Oven Safe | Up to 180°C |
| Dishwasher Safe | Yes, hand wash recommended |
| Weight | 1.2 kg |
| Power Source | Hob (gas, electric, induction) |
| Warranty | 2 years |
| Maintenance | Hand wash with mild detergent |
| Safety Feature | Cool-touch handle |
Frequently Asked Questions - HGM7541VGH HOOVER
User questions about HGM7541VGH HOOVER
0 question about this device. Answer the ones you know or ask your own.
Ask a new question about this device
Download the instructions for your Pan in PDF format for free! Find your manual HGM7541VGH - HOOVER and take your electronic device back in hand. On this page are published all the documents necessary for the use of your device. HGM7541VGH by HOOVER.
USER MANUAL HGM7541VGH HOOVER
H
natural_image
Diagram of a rope knot being lifted by a hook, showing rope routing and motion direction (no text or symbols)natural_image
Technical line drawing of a mechanical joint or connector (no text or symbols)natural_image
Two diagrams showing mechanical components on a surface, one with a circular component and the other with a black circular component (no text or symbols)* Manufacturer setting
IE cat. He
GB cat. Heha
E
H
This appliance has been designed for non-professional, i.e. domestic, use.

11
INSTRUCTIONS FOR THE INSTALLER INSTALLATION
The Purchaser is responsible for the installation of the hob. The Manufacturer does not accept any responsibility for any damage or loss resulting from incorrect installation, and as such this will not covered by the Manufacturer's Guarantee.
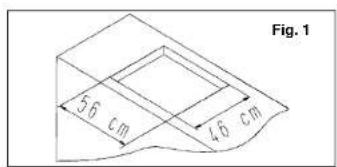
The hob may be installed in any worktop which is heat resistant to a temperature of 100^ C, and has a thickness of 25 - 45 mm. The dimensions of the insert to be cut out of the worktop are in shown in Fig. 1.
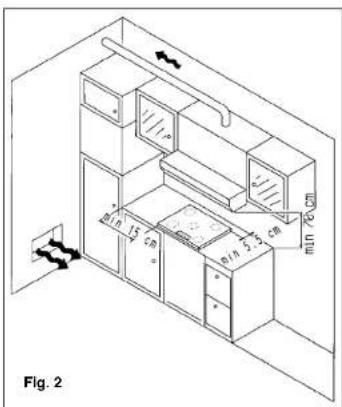
If the Hob is fitted next to a cabinet on either side, the distance between the Hob and the cabinet must be at least 15 cm (see Fig. 2); while the distance between the hob and the rear wall must be at least 5.5 cm.
The distance between the hob and any other unit or appliance above it (e.g. An extractor hood) must be no less than 70 cm (fig.2).
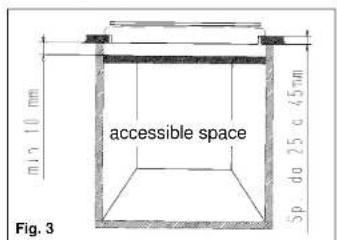
When there is an accessible space between the built-in hob and the cavity below, a dividing wall made of insulating material should be inserted (wood or a similar material) (fig. 3).
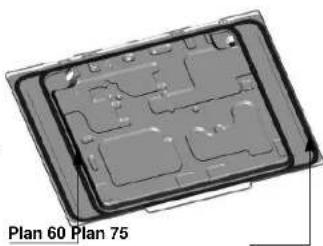
Important - The diagram below shows how the sealant should be applied.
The Hob unit is fitted by attaching the Fixing Clamps supplied, using the holes at the base of the unit.
12

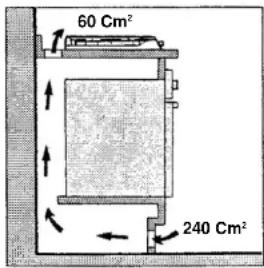
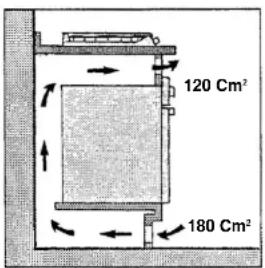
If a hob of 60 cm is fitted above an oven which is not equipped with fan cooling system it is recommended that openings are created within the built in furniture to ensure correct air circulation.
The size of these openings must be at least 300~cm^2 and placed as shown in fig. 4. When a 75~cm hob is fitted over a built in oven, the latter must be fan cooled.
FIG. 4
FOR U.K. ONLY INSTRUCTIONS FOR THE INSTALLER
The following information is intended for qualified and competent persons only who will ensure that your appliance is installed correctly. All current legislation concerning the installation of Gas appliances must be observed by the installer*
* For the U.K. only - By law, the gas installation/commissioning must be carried out by a «Corqi», registered installer.
This appliance must be installed in accordance with applicable regulations and should only be used in well-ventilated locations. Before using this appliance carefully study the instruction book.
Suitable location
A gas-powered cooking appliance produces heat and humidity in the area in which it is installed. For this reason you should ensure good ventilation either by keeping all natural air passages open or by installing an extractor hood with an exhaust flue. Intensive and prolonged use of the appliance may require extra ventilation, such the opening of a window or an increase in speed of the electric fan, if you have one.
If a hood cannot be installed, an electric fan should be fitted to an outside wall or window as long there are air vents in the area.
The electric fan should be able to carry out a complete change of air in the kitchen 3-5 times every hour. The installer should follow the relevant national standards.
ELECTRICAL CONNECTION (FOR U.K. ONLY)
Warning - this appliance must be earthed
This appliance is designed for domestic use only. Connection to the mains supply must be made by a competent electrician, ensuring that all current regulations concerning such installations are observed.
The appliance must only be connected to a suitably rated spur point, a 3 pin 13 amp plug/socket is not suitable. A double pole switch must be provided and the circuit must have appropriate fuse protection. Further details of the power requirement of the individual product will be found in the users' instruction and on the appliance rating plate. In the case of built-in product you are advised, should you wish to use a longer cable than the one supplied, that a suitably rated heat resistant type must be used. The wiring must be connected to the mains supply as follows:
CONNECT TO SPUR TERMINAL
Green & Yellow Wire Earth Connection
Blue Wire Neutral Connection
Brown Wire Live Connection
Note: We do not advocate the use of earth leakage devices with electric cooking appliances installed to spur points because of the «nuisance tripping» which may occur. You are again reminded that the appliance must be correctly earthed, the manufacturer declines any responsibility for any event occurring as a result of incorrect electrical installation.
Declaration of compliance: This equipment, in the parts intended to come into contact with food, complies with the regulations laid down in EEC directives 89/109.
CE This appliance complies with directive 89/336/EEC, 73/23/EEC, 90/396/EEC and the following changes.
GAS CONNECTION (FOR U.K. ONLY)
The labels on the Hob indicate the types of gas that can be used.
It is possible to use other types of gas after carrying out simple modifications.
Warning: If gas can be smelt in the vicinity of this appliance turn off the gas supply to the appliance and call the engineer directly. Do not search for a leak with a naked flame.
ELECTRICAL CONNECTION
Check the data on the rating plate, located on the outside of the unit, to ensure that the supply and input voltage are suitable.
Before connection, check the earthing system.
By Law, this appliance must be earthed. If this regulation is not complied with, the Manufacturer will not be responsible for any damage caused to persons or property. If a plug is not already attached, fit a plug appropriate to the load indicated on the rating plate. The earth wire is coloured yellow/green. The plug should always be accessible. Where the Hob is connected direct to the electricity supply, a circuit breaker must be fitted with at least a 3mm contact spacing when in the open position. If the power supply cord is damaged this is to be replaced by a qualified engineer so as to prevent any potential risk.
The earth wire (green a yellow coloured) must be at least 10 mm longer than the live and neutral wires.
The section of the cable used must be of the correct size in relation to the absorbed power of the hob.
Please check rating plate for the power details and ensure that the power supply cord is of the type H05RR-F, H05VV-F, H05V2V2-F.
| MAINS SUPPLY | LIVE L | BROWN WIRE | ||
| EARTH | GREEN YELLOW WIRE | POWER CABLE | ||
| NEUTRAL N | BLUE WIRE |
GAS CONNECTION
These instructions are for Fitters qualified for installation of equipment in line with the relevant national standard. All work must be carried out with the electricity supply disconnected.
The rating plate on the hob shows the type of gas with which it is designed to be used. It is possible to use other types of gas after carrying out some simple modifications.
(See the instructions in the following paragraphs)
connection to the mains gas supply or gas cylinder should be carried out according to the relevant national standards, after having checked that it is regulated for the type of gas with which it will be supplied. If it is not correctly regulated follow the instructions in the paragraph entitled »Adaption for different types of gas« . For liquid gas (cylinder gas) use pressure regulators which comply with the relevant national standards.
N.B.: for safe operation, economic use of energy and to ensure greater durability of the appliance, make sure that the supply pressure conforms with the values shown in the table on page 44.
Use only pipes, washers and sealing washers which comply with the relevant national standards.
When connecting the hob to the gas supply via use of flexible hoses please ensure that the maximum distance covered by the hose does not exceed 2 metres.
N.B.: carry out a final check for leaks on the pipework using a soapy solution. Never use a flame. Also, make sure that the flexible pipe cannot come into contact with a moving part of the cabinet (eg, a drawer) and that it is not situated where it could be damaged.

To prevent any potential damage to the hob please carry out the installation following this sequence:
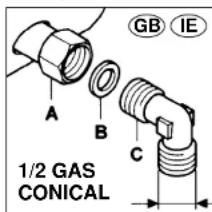
A) As illustrated, assemble parts in sequence: A) fixed pipe B) washer C) Elbow fitting with tapered thred connection
natural_image
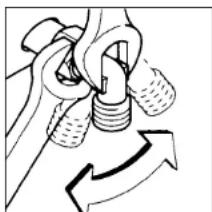
Diagram of a rope knot with a rotating arrow indicating rotational motion (no text or symbols)2) Tighten the joints with the Spanners, remembering to twist the pipes into position.
natural_image
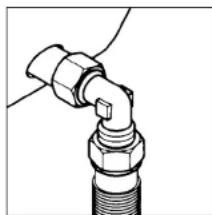
Diagram of a pipe fitting with a flanged connector (no text or symbols)3) Attach fitting C to mains gas supply using rigid copper pipe or flexible steel pipe.
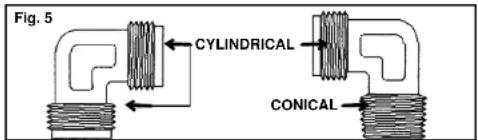
For some models a conic link is furnished to outfit for the installation in the countries where this type of link is obligatory; in the following figures it is pointed out how to recognize the different types of links. In every case the cylindrical part of the link has to be connected to the hob.
ADAPTING THE HOB TO DIFFERENT TYPES OF GAS
To adapt the Hob for use with different types of gas, carry out the following instructions: — remove the grids and burners
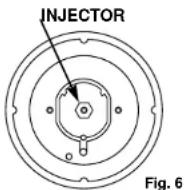
— insert on hexagonal spanner (7 mm) into the burner support (Fig. 6)
— unscrew the injector and replace it with one suitable for the gas to be used (see Table of gas consumption)
16

Table of gas consumption
1 W 0,860 Kcal/h
| G20 G25 | G30 G31 | G2 350 | G20 20mbar G31 37mbar | G30 28-30mbar G250 13mbar | G20 25mbar G30 26mbar | G25 25mbar G31 30mbar | |||||||||||
| Working burner | a gas jet 1:100 mm | a gas jet 1:100 mm | a gas jet 1:100 mm | On kW | Omin W | Ih G20 | Ih G2350 | g/h G30 | g/h G31 | On kW | Omin W | Ih G20 | g/h G30 | On kW | Omin W | Ih G25 | g/h G31 |
| little | 76 | 50 | 104 | 1 | 230 | 95 | 132 | 73 | 71 | 1,2 | 250 | 114 | 97 | 0,8 | 230 | 100 | 64 |
| large | 101 | 66 | 132 | 1,75 | 360 | 167 | 282 | 127 | 125 | 2 | 410 | 190 | 145 | 1,6 | 360 | 177 | 114 |
| medium | 118 | 80 | 160 | 2,5 | 530 | 235 | 531 | 132 | 179 | 2,8 | 820 | 267 | 204 | 2,25 | 530 | 255 | 161 |
| max | 144 | 94 | 190 | 3,5 | 700 | 333 | 463 | 254 | 250 | 4 | 830 | 381 | 291 | 3,2 | 700 | 354 | 229 |
| double ring | 141 | 96 | 191 | 3,5 | 1750 | 333 | 463 | 254 | 250 | 4 | 1900 | 381 | 291 | 3,2 | 1750 | 354 | 229 |
REGULATING THE MINIMUM FLAME
After lighting the burners, turn the control knob to the minimum setting and then remove the knob (this can easily be removed by apply a gentle pressure).
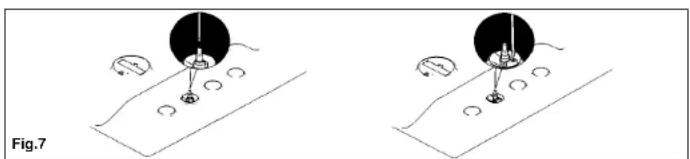
Using a small 'Terminal' type screwdriver the regulating screw can be adjusted as in Fig. 7. Turning the screw clockwise reduces the gas flow, whilst turning it anticlockwise increases the flow – Use this adjustment to obtain a flame of approximately 3 to 4 mm in length and then replace the control knob.
When the gas supply available is LPG (Bottle gas)- the screw to set the idle flame must be turned (clockwise) to the end stop.
Screws regulating (for differend models)
natural_image
Two diagrams showing mechanical components on a surface, with no visible text or symbols.When you have carried out the new gas regulation, replace the old gas rating plate on your appliance with one (supplied with hob) suitable for the type of gas for which it has been regulated.
USE OF HOB USER INSTRUCTIONS
This appliance must only be used for the purpose for which it is intended, domestic cooking, and any other use will be considered improper and could therefore be dangerous. The Manufacturer will not be responsible for any damage or loss resulting from improper use.
To ignite the burners, place a lighted taper close to the burner, press in and turn the control knob anti-clockwise.
If the burners have not been used for a couple of days, wait for a few seconds before lighting the burner, this will allow any air present in the pipes to escape. For appliances fitted with electronic ignition carry out the following:
- push in and turn the knob anticlockwise to the symbol.
- ignite the burner by pressing the sparker button
For hobs fitted with automatic ignition simply push in and turn the knob to the symbol. The ignition system will continue to generate sparks as long as the gas tap is being pressed.
If the burner is not ignited within 5 seconds, turn the knob to the 0 position and repeat the operation.
For models fitted with a safety tap (which cuts-off the flow of gas if the flame is accidentally extinguished) the burners are ignited ad described above, but care must be taken to keep the knob pressed in for 5 or 6 seconds after the flame is ignited.
ATTENTION: Prior to switching on the gas hob ensure that the burners and burner caps are correctly placed within their position.
GENERAL ADVICE
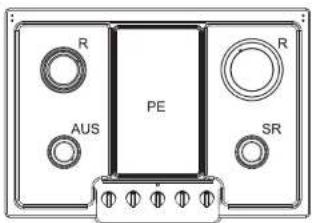
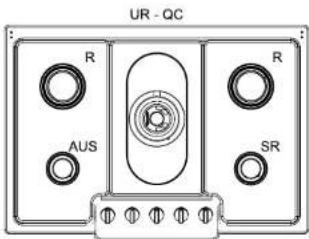
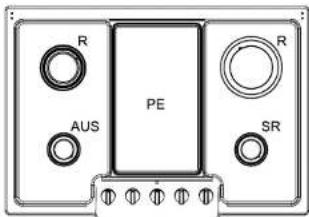
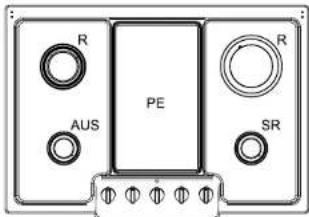
For the best results, the flat-bottomed pans size should match the gas burner size as follows. See fig. pag. 11.
| Hob type Burner type ∅ pan / pot (cm) | ||
| E;H. R/H front burner 12÷18 | ||
| E;H. L/H front burner 10÷18 | ||
| E;H. R/H rear burner | 18÷24 | |
| E;H. L/H rear burner | 18÷24 | |
| E. | Central burner | 24÷28 |
| H. | Central radial plate CX | do not overhang the radiant plate |
For smaller containers the gas burner should be regulated so that the flame does not overlap the base of the pan. Vessels with concave or convex base should not be used. WARNING: If a burner is accidentally extinguished, turn the knob to the off position and do not attempt to re-ignite if for at least 1 minute.
To protect the glass lid from damage and in the interests of safety, the burners/plates must be turned off and the burner/pan support/plate area must be cool before closing the lid down.
If over the years the gas taps become stiff to turn it is necessary to lubricate them. Such operation must be carried out only by qualified Service Engineers.
Warning use the electric ring/hotplate only after reading the paragraph related to choice of pans specifically with reference to "Use of electric hotplates".
USE OF ELECTRIC HOTPLATES OR CERAMIC ELEMENTS.
For the best use of the electric hotplates and to minimise energy consumption, the following recommendations should be noted.
| power setting | food stuff | No. setting ceramic element |
| OFF | 0 | |
| LOW | Simmering, sauces, stews, milk puddings, poached eggs | 1 |
| MODERATE | Vegetables, frozen foods, boiling water | 2 |
| MEDIUM | Fresh Vegetables, pasta, fish, pancakes. | 3 |
| HIGH | Omelettes, steaks | 4 |
The light indicates the hotplate is on irrespective of the power setting.
In the vetroceramic hobs a residual heat indicator light comes on and remains lit till the hob plate is cooled down.
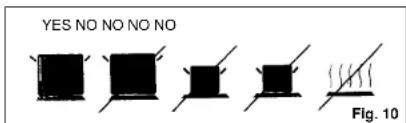
Only pans which have smooth flat bases should be used on the electric hotplates. The size of the pan should be as close as possible to the diameter of the hotplate, and never smaller (see Fig. 10). The base of the pan should be dry and spillages should be avoided. Empty pans should not be left on the plates, nor should the plates left switched on without a pan.
(Ceramic hobs or similar): "WARNING - should any crack appear on the surface turn the appliance off to prevent potential electric shock.

MAINTENANCE AND CLEANING
Before cleaning the Hob, ensure the appliance has cooled down. Remove the plug from the socket or (if connected directly) switch off the electricity supply.
When cleaning the enamelled, varnished or chrome sections, use warm soapy water or a non caustic detergent. For stainless steel use an appropriate cleaning solution. Hotplates should only be cleaned with a cotton cloth coated with vaseline or seed oil.
Never use abrasives, corrosive detergents, bleaching agents or acids. Avoid any acid or alkaline substances (lemon, juice, vinegar etc.) on the enamelled, varnisched or stainless steel sections.
The burners can be cleaned with soapy water. To restore their original shine, use a household stainless steel cleaner. After cleaning, dry the burners and replace.
It is important the Burners are replaced correctly.
(For all hobs): "WARNING - do not use steam cleaners to clean the hobs".
Chromed grids and burners
Chromed grids and burners have the tendency to dark with the use.
This is a normal and inevitable phenomenon, but it doesn't jeopardize absolutely the functionality of the hob.
In anycase from our after sales service centre the spare parts are available.
COVER
The cover is available as optional accessory.
It is not possible to close the lid with the steak griddle placed over a burner.
WARNING - should any spillage occur on the lid ensure the liquid spilt is wiped off the lid before opening the lid and cause the liquid to reach any electric part.
WARNING - Before closing the cover, to protect it from excessive temperature changes, always wait until burners or plates have completely cooled down.
AFTERCARE
Before calling out a Service Engineer please check the following:
– that the plug is correctly inserted and fused;
– that the gas supply is not faulty.
If the fault cannot be identified:
switch off the appliance – do not tamper with it – call the Aftercare Service Centre.
The Manufacturer will not be responsible for any inaccuracy resulting from printing or transcript errors contained in this brochure. We reserve the right to carry out modifications to products as required, including the interests of consumption, without prejudice to the characteristics relating to safety or function.

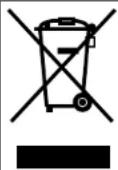
This appliance is marked according to the European directive 2002/96/EC on Waste Electrical and Electronic Equipment (WEEE).
By ensuring this product is disposed of correctly, you will help prevent potential negative consequences for the environment and human health, which could otherwise be caused by inappropriate waste handling of this product.
The symbol on the product indicates that this product may not be treated as household waste. Instead it shall be handed over to the applicable collection point for the recycling of electrical and electronic equipment.
Disposal must be carried out in accordance with local environmental regulations for waste disposal.
For more detailed information about treatment, recovery and recycling of this product, please contact your local city office, your household waste disposal service or the shop where you purchased the product.
Tab. 1
H
natural_image
Diagram of a rope knot with directional arrows indicating motion (no text or symbols)natural_image
Technical line drawing of a mechanical joint or connector (no text or symbols)natural_image
Two diagrams showing circular objects on a surface with directional arrows, labeled Fig. 7 (no text or symbols on objects)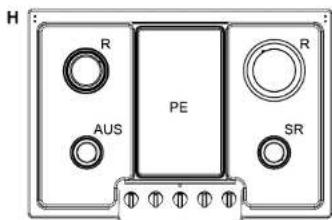
natural_image
Simple line drawing of a kitchen sink with a lamp and brick wall, labeled Fig. 4 (no text or symbols on the diagram itself)natural_image
Diagram of a rope knot being twisted with an arrow indicating rotational motion (no text or symbols)natural_image
Technical line drawing of a mechanical joint or connector (no text or symbols)natural_image
Two diagrams showing mechanical components with rotating arrows, no text or symbols present- INSTRUCTIONS FOR THE INSTALLER INSTALLATION
- FOR U.K. ONLY INSTRUCTIONS FOR THE INSTALLER
- Suitable location
- ELECTRICAL CONNECTION (FOR U.K. ONLY)
- Warning - this appliance must be earthed
- CONNECT TO SPUR TERMINAL
- GAS CONNECTION (FOR U.K. ONLY)
- ELECTRICAL CONNECTION
- GAS CONNECTION
- ADAPTING THE HOB TO DIFFERENT TYPES OF GAS
- REGULATING THE MINIMUM FLAME
- USE OF HOB USER INSTRUCTIONS
- GENERAL ADVICE
- USE OF ELECTRIC HOTPLATES OR CERAMIC ELEMENTS.
- MAINTENANCE AND CLEANING
- Chromed grids and burners
- COVER
- AFTERCARE
Brand : HOOVER
Model : HGM7541VGH
Category : Pan