
99-8208 - Car kit Metra - Free user manual and instructions
Find the device manual for free 99-8208 Metra in PDF.


| Product Type | Car Installation Kit |
| Model Number | 99-8208 |
| Brand | Metra |
| Compatible Vehicles | Select Ford, Lincoln, Mercury models (1990s-2000s) |
| Material | ABS Plastic, Metal Brackets |
| Color | Black |
| Dimensions (L x W x H) | 7.5 x 4.5 x 2.0 inches (190 x 114 x 51 mm) |
| Weight | 0.6 lbs (270 g) |
| Power Requirements | 12V DC (vehicle electrical system) |
| Main Functions | Facilitates aftermarket radio installation, provides mounting brackets and wiring harness adapter |
| Installation Type | Double DIN or Single DIN with pocket |
| Included Components | Dash kit, wiring harness, antenna adapter, mounting screws |
| Maintenance | Wipe with dry cloth; avoid liquids |
| Cleaning | Use mild soap and water; dry thoroughly |
| Safety Warnings | Disconnect vehicle battery before installation; avoid shorts |
| Spare Parts Availability | Replacement brackets and harnesses available from Metra |
| Reparability | User-serviceable; replace components if damaged |
| General Information | Designed for easy installation; color-matched to factory interior |
Frequently Asked Questions - 99-8208 Metra
User questions about 99-8208 Metra
0 question about this device. Answer the ones you know or ask your own.
Ask a new question about this device
Download the instructions for your Car kit in PDF format for free! Find your manual 99-8208 - Metra and take your electronic device back in hand. On this page are published all the documents necessary for the use of your device. 99-8208 by Metra.
USER MANUAL 99-8208 Metra
• DIN head unit provision with pocket
• ISO DIN head unit provision with pocket
KIT COMPONENTS

natural_image
Close-up of a car dashboard with visible electronic display and ventilation grilles (no text or symbols)• A) Radio housing • B) ISO brackets • C) Trim plate
A

natural_image
Line drawing of a rectangular device housing with internal compartments and mounting brackets (no text or symbols)B

natural_image
Technical line drawing of two mechanical bracket components (no text or symbols)C

natural_image
Isometric line drawing of a rectangular frame with two side supports (no text or symbols)WIRING & ANTENNA CONNECTIONS (sold separately)
WiringHarness:
• 70-1761 - Toyota harness 1987-up
• TYTO-01 - Toyota amp interface harness 2003-up
Antenna Adapter:
- Not required
TOOLS REQUIRED
- Phillips screwdriver • Socket wrench

natural_image
Two types of wrench tools shown side by side: a standard and a mechanical clamp (no text or symbols present)Table of Contents
Dash Disassembly
– Toyota Sienna 2004-2010....3
Kit Assembly
- DIN head unit provision with pocket....4
- ISO DIN head unit provision with pocket....5
CAUTION: Metra recommends disconnecting the negative battery terminal before beginning any installation. All accessories, switches, and especially air bag indicator lights must be plugged in before reconnecting the battery or cycling the ignition.
Note: Refer to the instructions included with the aftermarket radio.

KNOWLEDGE IS POWER
Enhance your installation and fabrication skills by enrolling in the most recognized and respected mobile electronics school in our industry. Log onto www.installerinstitute.com or call 800-354-6782 for more information and take steps toward a better tomorrow.

Metra recommends MECP certified technicians
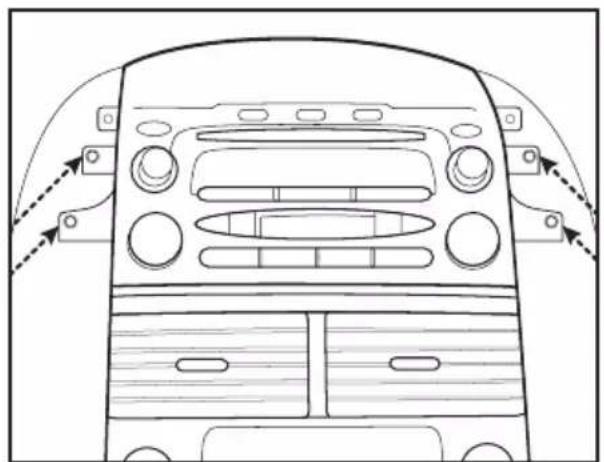
Toyota Sienna 2004-2010
- Unclip and remove panels from left and right side of radio. (Figure A)
- Unclip and remove panel or speaker cover above radio. (Figure B)
- Remove (4) 10 mm bolts from radio to remove. (Figure C)
Continued to kit assembly

natural_image
Top-down line drawing of a car dashboard with control panel and steering wheel (no text or symbols)(Figure A)

natural_image
Technical line drawing of a car interior showing dashboard, steering wheel, and gear mechanism (no text or symbols)(Figure B)
natural_image
Top-down line drawing of a car dashboard with air vent, buttons, and fan (no text or symbols)(Figure C)
DIN head unit provision with pocket
- Slide the DIN cage into the radio housing and secure by bending the metal locking tabs down. (Figure A)
- Slide the after-market head unit into the cage until secure.
- Locate the factory wiring harness in the dash. Metra recommends using the proper mating adapter from Metra or AXXESS. Re-connect the negative battery terminal and test the unit for proper operation.
- Reassemble dash in reverse order of disassembly.

natural_image
Technical line drawing of a mechanical assembly with hands and a tool, no visible text or symbols(Figure A)
ISO DIN head unit provision with pocket
- Mount the ISO Brackets to the head unit with the screw supplied with the unit. (Figure A)
- Slide the head unit into the radio opening until the side clips engage.
- Snap the trim plate into the radio housing.
- Locate the factory wiring harness in the dash. Metra recommends using the proper mating adapter from Metra or AXXESS. Re-connect the negative battery terminal and test the unit for proper operation.
- Reassemble dash in reverse order of disassembly.

natural_image
Illustration of a hand connecting a cable to a computer drive (no text or symbols visible)(Figure A)


Brand : Metra
Model : 99-8208
Category : Car kit