700D - Smartphone UTOK - Free user manual and instructions
Find the device manual for free 700D UTOK in PDF.


| Product Type | Smartphone |
| Brand | UTOK |
| Model | 700D |
| Display | 6.5-inch HD+ IPS LCD |
| Operating System | Android 10 |
| Processor | Quad-core 1.6 GHz |
| RAM | 4 GB |
| Internal Storage | 64 GB |
| Expandable Storage | microSD up to 256 GB |
| Rear Camera | 13 MP + 2 MP dual |
| Front Camera | 8 MP |
| Battery Capacity | 4000 mAh |
| Connectivity | 4G LTE, Wi-Fi 802.11 b/g/n, Bluetooth 4.2, GPS |
| Sensors | Accelerometer, Proximity, Light |
| Security | Fingerprint sensor |
| Dimensions | 165 x 76 x 8.5 mm |
| Weight | 185 g |
| SIM | Dual SIM (Nano-SIM) |
| Ports | microUSB 2.0, 3.5mm headphone jack |
| Charging | 5V/2A standard charging |
Frequently Asked Questions - 700D UTOK
User questions about 700D UTOK
0 question about this device. Answer the ones you know or ask your own.
Ask a new question about this device
Download the instructions for your Smartphone in PDF format for free! Find your manual 700D - UTOK and take your electronic device back in hand. On this page are published all the documents necessary for the use of your device. 700D by UTOK.
USER MANUAL 700D UTOK
natural_image
Row of grayscale icons representing file and media-related objects (no text or symbols)R: JPG, JPEG, BMP and PNG.
DECLARATION OF CONFORMITY....54
- Appereance

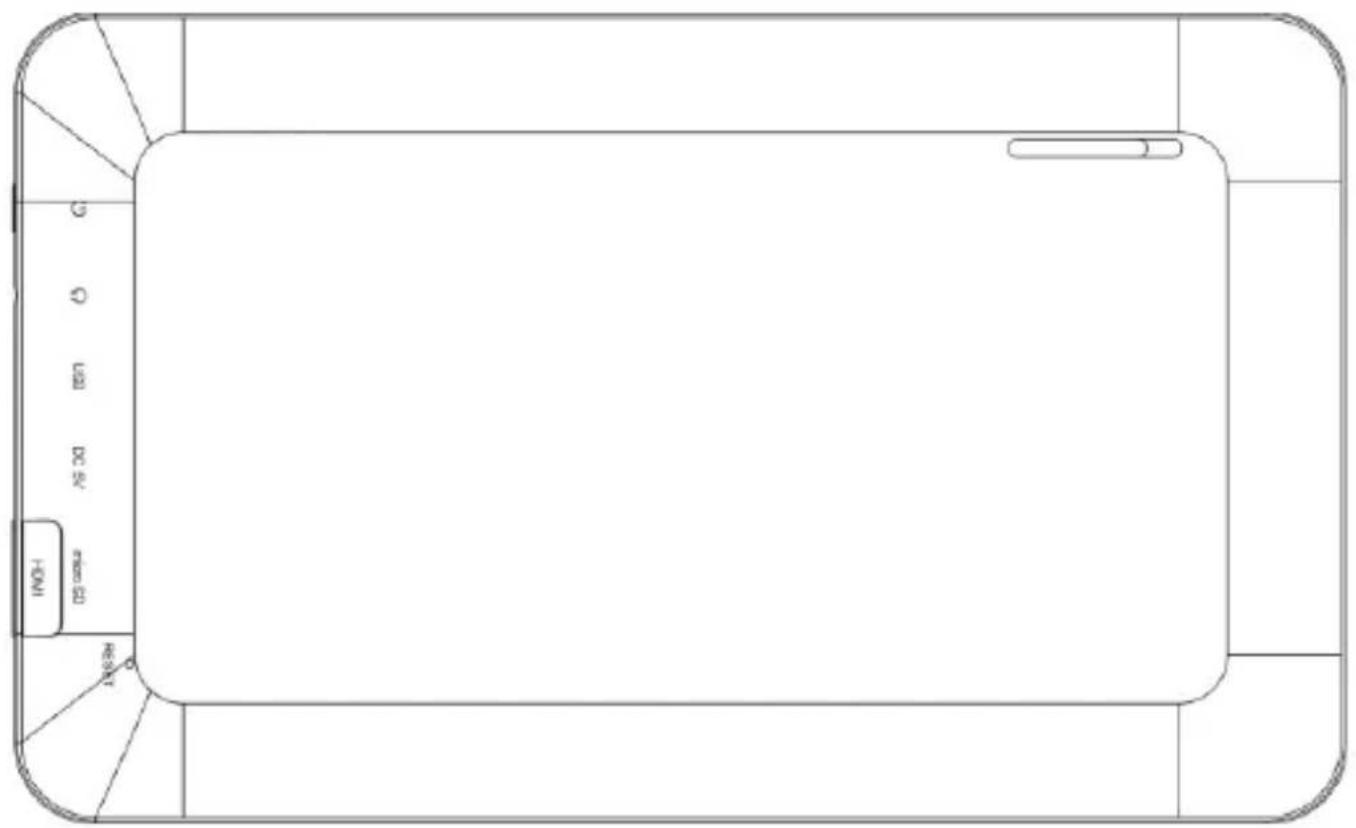
2. Power Switch
Switch on: press and hold the power switch for 3 seconds and wait for startup.
Switch o: press and hold the power switch for 3 seconds → click Power o → click OK.
Lock/unlock screen: briefy press the power switch to lock/unlock the screen.
Forced shout down: if the device has no response, press and hold the power switch for 7 seconds to switch o the device by force.
Warning: forced shut down may cause unexpected errors of the system!
3. Touch Screen
The touch screen is easy and convenient to use.
You can use the touch screen in the following methods:
Single click: briefy touch the screen and then move away.
Click and hold: click the screen with the nger and hold for about 2 seconds.
Drag: click a certain icon in the screen and hold, then move the nger, the icon will move accordingly.
☆ To avoid damage the screen, never put anything on it.
4. Using SD Card
☆ The device supports up to 32GB storage card.
Insert the card into the card slot, and push it in unl a “click” is heard. Now the card is ready for use.
Removing SD card
Close all programs or les on the card rst. Click Sengs → Storage → Remove SD card → OK. Then press the card with your nger, and simply remove it when it is ejected.
☆ Do not insert and remove the card repeatedly in a short me, as this may cause damage to the card.
☆ We suggest you use the card of well-known brand, to ensure compatibility.
5. Geng Started
Charging the device
☆It is not recommended to charge the device via USB cable.
☆You may operate the device while charging it, but this may prolong the charging me. Connect one end of the AC adaptor to the mains supply and the other end to the power jack on the device to charge it (it may take about 5 hours to fully charge the device). The baery icon will roll during charging. When it is full please disconnect the AC adaptor.
Starng the device
Press and hold the power switch for 3 seconds and wait for system startup.
Wi-Fi seng
We suggest you congregate the Wi-Fi network before using, as many funcons require it in order to work normally.
- Click Sengs → Wireless and Network
- Switch the Wi-Fi on.
The device will search and list all available Wi-Fi networks. If an locked icon is displayed, you need to enter a password to connect to such Wi-Fi network. - Click the desired Wi-Fi network → Enter the password (if any) → Click Connect.
- Click Return to return to desktop.
☆ The Wi-Fi set as hidden will not be searched automacally. In this case you need to click Add Wi-Fi Network and enter necessary informaon to add your Wi-Fi.
6. Desktop
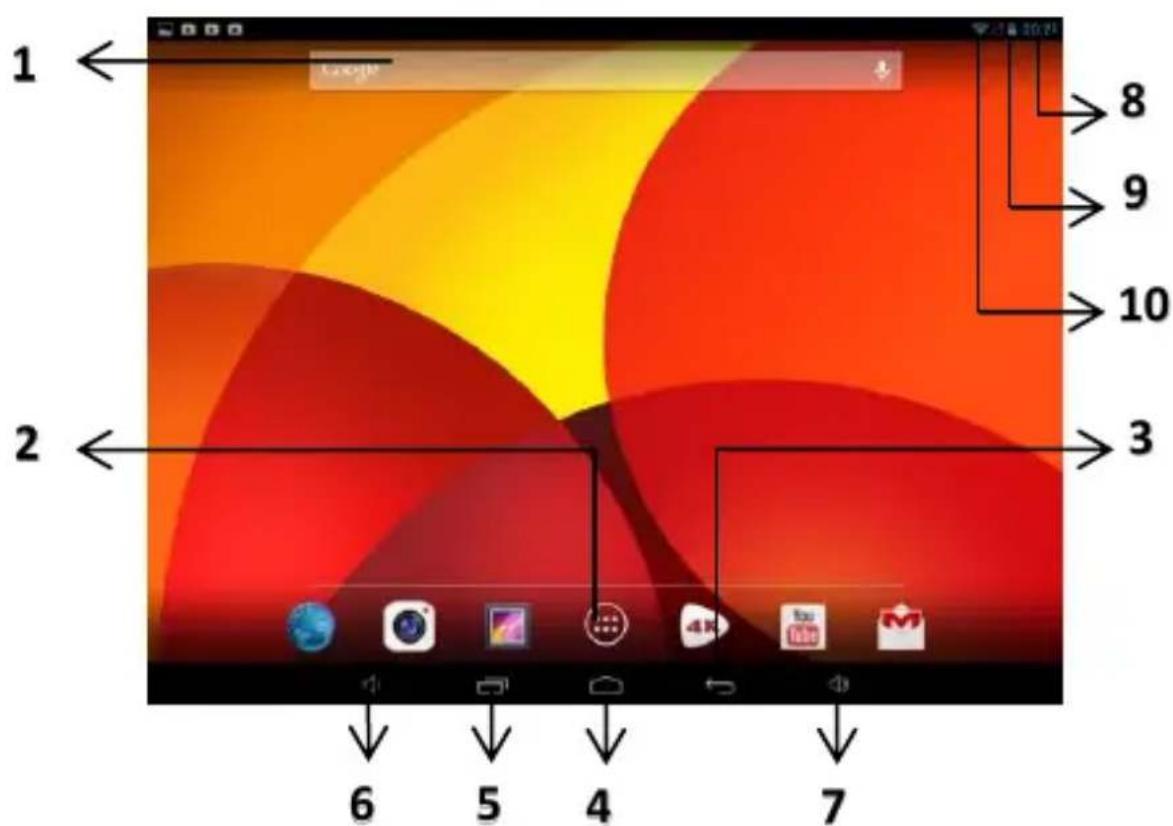
| 1 – Search | 6 – Volume - |
| 2 – Click to go to main menu and view all applicaons | 7 – Volume + |
| 3 – Return | 8 – Current me |
| 4 – Return to desktop directly | 9 – Baery status |
| 5 – See all acve tasks | 10 – WiFi signal level |
☆Click any icon to run it.
☆Click and drag the icon to move it to another place on the screen.
☆Click and drag the icon to to delete it from the desktop.
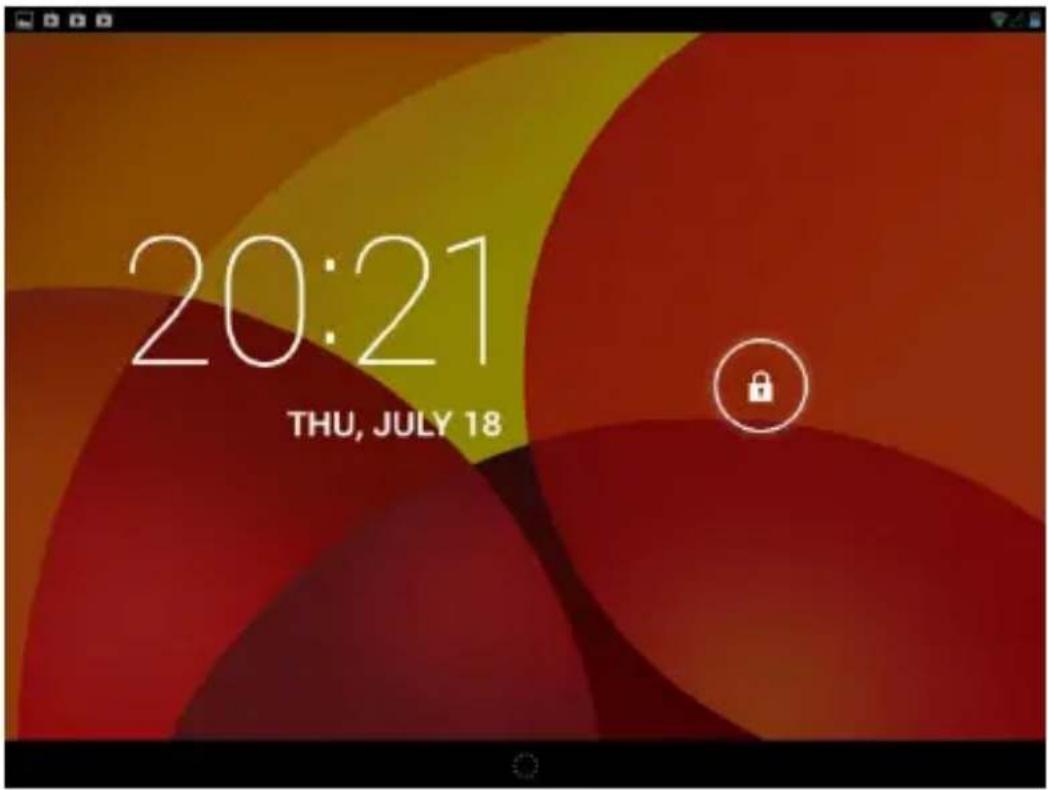
7. Lock Screen
You can set auto lock screen or lock screen manually by pressing the power switch. You can see the lock screen interface below. Slide to the right if you want to unlock the screen.
8. Preinstalled applicaons
 | Play Store | View and download applicaons | |
 | Gallery | Browse photos | |
 | Gmail | Send and receive emails. | |
 | HD video player | Manage and play video les. | |
 | Calculator | Perform simple mathemacal operaons |
 | Browser | Browse the Web |
 | Sound Recorder | Record and play sounds |
 | Calendar | Manager your personal agenda. |
 | Sengs | Acces the Sengs menu to adjust the tablet's opons |
 | Clock | Set the current me and alarm. |
 | Search | Google Search opons |
 | File Manager | Manage les |
 | Downloads | View downloaded le |
 | Camera | Photo camera |
 | Music | Play music |
☆ Click and drag the icon to move it to another place on the screen.
☆ Click and drag the icon to if you want to delete it from the desktop. In
the applicaon list, click and drag the icon to to uninstall the applicaon from the device.
9. Desktop Menu
On the desktop, click 📋 icon to display the main menu and the list of applicaons.

10. Managing Applicaons
Installing
☆ You can nd many interesng and free Android applicaons through the internet. Simply open the browser and search for “Android Applicaons”. The purchased or downloaded Android applicaons can be quickly and
simply installed from the File Manager applicaon

-
Copy the .apk le you want to install to the SD card or USB disk → insert the card or connect the USB disk to the device.
-
Click the File Manager icon
-
Click or and the folders containing .apk les.
-
Select a .apk le → Install.
Now the applicaon is installed and it's icon will be displayed in the applicaons interface.
- Click Open to run the applicaon, or click Complete to return to File Browser interface.
Downloading applicaons from Internet
You can directly download Android applicaons from the Internet and install it into the device conveniently.

- Click Browser icon to connect to Internet.
- Enter the URL and click the link of the applicaon you want to install.
- Aer the applicaon is downloaded, press and hold the downloaded le (in Downloaded Files interface) → Click to open → Install.
Uninstalling the applicaon
You can conveniently uninstall the Android applicaons.

- Click → Sengs → Applicaons → Manage Applicaons.
- Click the applicaon you want to uninstall → Uninstall.
- Click OK to uninstall the applicaon.
11. Clock
Click Clock icon to view the current date and me.
Alarm clock
The device supports more than one clock at the same me.
☆ When the icon

ears in the status bar on the top of the screen,
it means at least one alarm is acvated.
Add alarm clock
- Click Clock icon
- Double click Set alarm clock → + Add alarm clock.

- Set your desired alarm me.
- Click Acvate the alarm.
- Click Complete.
Stop the alarm clock
When the set me is reached, a window will pop up showing the name of the alarm. If you want the alarm to acvate again 10 minutes later, you can click Pause and repeat. Click Cancel to stop the alarm clock.
Edit the alarm clock
- Click Clock icon

Click

- Click the alarm clock you want to edit → Edit the alarm clock.
Delete the alarm clock
- Click Clock icon

Click

- Click the alarm clock you want to delete.
- Click to delete the alarm clock.
Click return to desktop.
12. Installing Soware Online
There are many applicaons available in the Installing Soware Online interface. You can easily and quickly download them into your device.
Download the applicaon
- Click the Installing Soware Online icon, or Google Play icon

☆ If this is the rst me you use this funcon, the system will ask to register and login. If you don't have a registered account, you need to click Register to establish a Google account. If you already have a Google account, simply click Login and enter your account informaon.
- You can select applicaon from the recommendaon list, or the list of classicaon or ranking. You can also search for the applicaon you want by entering a speci name.
- Click an applicaon → Download.
- When downloading completes, click Install.
- Click Open to run the applicaon, or click Complete to return to Installing Soware Online interface.
Record
When downloading completes, click Record to manage the installed applicaon. You can submit your comments to the applicaon or view other users' comments. You can also uninstall the applicaons.
Menu funcon
Click to display the menu funcon of the Installing Soware Online.
Personal folder Click to view personal informaon. You can change your password, change email address and save your password here. Click the Logout at the top right corner of the personal folder to logout your account.
13. Browser
The user can connect to the internet through the browser.
Click the Browser icon on the desktop to open the browser.
14. Calendar
Click the Calendar icon

If this is the rst me you use this funcon, you need to open an Exchange account rst. Enter your email address and password, click Next, and complete the conguraon of the account following the instrucons. Now you can use the Calendar.
New acvity
- In calendar interface, click the date you want to add an acvity.
-
Select me of the acvity enter the details of the acvity in the eld.
-
Click Complete.
-
Click icon to select your desired calendar interface.
☆ The date with agenda is displayed in grey.
15. Camera
Click Camera icon

Menu funcon
- Press the Menu buon to pop up the menu list, which includes: Switch to video / Switch to camera and My album/My video.
- In camera interface, click My album to enter the album to view the taken photos.
- In video recording interface, click My video to enter the video list.
Take a photo
- In camera interface, click to take a photo.
- The photo will be saved automacally.
- Click the thumbnail to enter My album to view full size photos.
- Click Return to return to camera.
- Click exit camera and return to the desktop.
Record a video
- Click to switch to video, and you can record videos.

- Click to start recording, click to stop.
- The recorded video will be saved automacally.
- Click the thumbnail to play the video.
-
Click Return to return to camera.
-
Click to switch back to camera interface.
-
Click exit camera and return to the desktop.

16. Calculator

- Click the Calculator icon
- Click the numbers and operators to make operaons.
- Click Clear to clear the entry one by one, or click and hold Clear to clear all entries.
17. Sound recorder

- Click the Sound Recorder icon
- Click the icon to start recording.
- When recording completes, click the icon to stop recording.
- Click the Play icon to play the recorded sound.
18. Email
☆Support POP3 and SMTP accounts.
New email account
You enter one or more email accounts that you want to use on the device.

- Click the Email icon
- In Your account interface, click Next
- Click Email address opon → Enter your email address
- In the Password opon → Enter the password of your email
- Click complete
- Manual seng (oponal): the server will select email provider (such as gmail.com) according to the email address you have entered automacally. However, if you need to change the server seng, you can click Manual seng and make necessary changes.
- Click Next.
-
Oponal: enter account name.
-
Enter the signature→ Click Complete.
☆ When seng completes, if you cannot connect to a free email account, please conrm with your email provider whether there sever supports (POP) and (SMTP) protocols or not.
Inbox
- Click the Email icon

- If only one email account is set, such account will be opened directly. If more than one is set, all email accounts will be listed.
- Click the email account that you want to open → Click Inbox.
Open an email
- In Inbox interface, click an email to open it.
- If there is aachment, click Open to acvate the corresponding applicaon to open it, or click Save to save it to SD card.
- If you want to reply, click Reply or Reply all.
a. Enter the message you want to reply.
b. Click Send to send the email. If you save it as dra, the message will be saved but not sent; if you don't save it or sent it, it will be discarded.
- Click Cancel to cancel an email immediately.
Compose an email
- In Inbox interface, click → compose your email.
- Click Send to opon, then enter the address of the Receiver.
- Or, if you want cc or bcc to others, click the icon → Add cc and bcc, then enter the email address of the receiver.
- In the tle bar of the email, enter the subject of your email.
- Click Compose email opon to enter your message.
- If necessary, click → add aachment to add aachment.
- When composition completes, click +2 Send.
Edit email account
- Click the Email icon

- In Inbox interface, click

-
Choose the email account sengs according to your needs.
-
Click to return to Inbox interface.
19. File Manager
to view the les in all storage mediums (internal SD card, USB disk), and you can quickly and easily install to the device. Funcons of the icons in the screen are

Previous folder

View

Mul select

Send email

Previous folder
Copy les between PC and device
You can use the File Browser to copy les between PC and the external/internal storage mediums. To copy les into the device, you can rstly copy them to SD card or USB disk.
☆ The folder name of the internal storage medium is “Local”, the name of the storage card is “sdcard”, and the name of the USB disk is “udisk”.
☆ The following example is that you copy le into the device from SD card or USB disk. You can use the same way to copy the le from the device to the SD
card or USB disk. Then connect your storage medium to your PC and copy the les into the desired folder.


- Click or to display the les in the storage medium.
- Click and hold the le or folder you want to copy → click Copy.

- Click icon to return to internal storage medium → click the folder you want to copy to → click Paste.
Delete a le
Select the le or folder you want to delete → click Delete → click OK to delete.
20. Music
☆ Support MP1, MP2, MP3, WMA, OGG, APE, FLAC, WAV, AC3, AAC, AMR, DTS, RA, M4A formats.
Play music

- Click My music icon
- Select the track you want to play from All/Album/Arst/Album/Track/Play list/Now playing
- Click the track to play
- To return to previous interface while playing a track, click the return to Desktop.
Operate the track and play list
New play list
- Click seng, and click Add to play list
- Enter the name of the play list.
- Click OK.
Rename or delete the play list
Click and hold the play lists → click Rename or Delete.
New track
Click and hold the track you want to add to play list, → click "Add to play list"
Delete track
Click and hold the track you want to delete click Delete.
21. HD Video Player
☆ Support RM, RMVB, MKV (H.264), MPEG (AVI), MOV, FLV, MPG, VOB, MPE, DAT formats. Support 2160P, 3840×2160.
☆ Supported picture format: JPG, JPEG, BMP and PNG.

-
Click the HD Video Player icon
-
Select the video or picture you want to play from All/Content/My favorite/Personal list
-
Click on the screen to adjust the video (including volume, pause/play, brightness, etc.).
-
Click the picture to preview or play in slide.
-
Click return to list.
22. Sengs
| Wireless and network | Wi-Fi | Enable Wi-Fi |
| Wi-Fi | Settings | |
| Mobile network | Set roaming, network, APN option | |
| Bluetooth | Bluetooth | Enable Bluetooth |
| Bluetooth | Search for Bluetooth devices nearby and when the device is paired, select the desired item | |
| Mute mode | Mute except media and alarm clock | |
| Sound | Volume | Adjust volume of media, alarm clock and notification. Click and move the slider  then click OK then click OK |
| Notification ringtone | Select desired notification ringtone | |
| Operation tone | Tone played when selecting on screen | |
| Screen lock promote tone | Tone played when  locking/unlocking screen locking/unlocking screen | |
| Display | Brightness | Click and move slider to adjust brightness of the screen and click OK to confirm |
| Auto rotate screen | When it is selected, the screen will switch between Portrait and Landscape according to the direction of the device | |
| G-sensor coordinate system | Use the different coordinate system mode, which is necessary under certain conditions | |
| Animation | Choose whether to display or not the operations in animation | |
| Screen timeout | Adjust the time before screen lock | |
| Location and | Use wireless network | Use wireless network to view location in applications (such as Google map) |
| Set screen lock | Use picture, PIN or password to lock screen | |
| Visible password | The entered password is visible | |
| Select device | Add or delete device manager | |
| security | manager | |
| Use security credential | Allow application to access to security credentials and other credentials | |
| Install from TF card | Install encrypted certificate from SD card | |
| Set password | Set or change credential password | |
| Clear storage | Clear all credentials | |
| Applications | Unknown source | Allow installing applications supplied by electronic market |
| Manage application | Manage and delete installed applications | |
| Service in process | View and control the services in process | |
| Storage status | View the space occupation of the application. | |
| Development | Set application development options | |
| Account and synchronization | Background data | Set whether or not the applications will synchronize, send and receiver data from time to time |
| Auto synchronization | Auto data synchronization of the application | |
| Privacy | Back up my data | Back up the application data, wifi password and other settings to Google server |
| Auto recovery | When an application is reinstalled, the system will recover the back up setting or other data | |
| Restore factory setting | Click to clear all data on the device.Click Reset the device will be reset, orclick  ncel and return to previous screen. Warning: the following data will be deleted from the device: ~ Google account. ~ Data and settings of the system and applications. ~ All downloaded applications. The following data will not be deleted: ~ System software and preinstalled applications. ~ Files in SD card, such as music and photos. ncel and return to previous screen. Warning: the following data will be deleted from the device: ~ Google account. ~ Data and settings of the system and applications. ~ All downloaded applications. The following data will not be deleted: ~ System software and preinstalled applications. ~ Files in SD card, such as music and photos. | |
| Storage | Total capacity, free space | Display when a TF card or USB disk is inserted |
| Remove SD card/USB disk | When a TF card or USB disk is inserted, click Remove SD card/USB disk to remove them | |
| Format SD card/USB disk | Format (clear) TF card/USB disk | |
| Language and input/outp | Select language | Select language according to your location. |
| Personal dictionary | Add words to the user dictionary | |
| Android keypad | Screen keypad setting | |
| Listening example | Play short voice examples | |
| Preferred engine | Set the voice combination engine for switching between text and voice | |
| Voice speed | Play speed after the texts are convertedinto voice | |
| ut | ||
| Pico TTS | Pico TTS setting | |
| Date and time | Auto | Use the network value, i.e. to synchronize with the network time |
| Set date | Set date | |
| Set time | Set time | |
| Select time zone | Select time zone | |
| Use 24-hour time system | Select 24-hour time system or 12-hour time system | |
| Select date format | Select date format. | |
| About the device | View status, battery status, legal information, model, Android version, kernel version and version number |
23. FAQ
Android
Q: What is the Android version?
A: 4.2
Basic funcon of the device
Q: Do I need to charge the device before use?
A: You need to charge the baery for at least 4 hours, but you can operate the device while charging. When charging, always use a AC adaptor.
Q: May I use my own email address to send and receive emails?
A: The device support POP3 and SMTP accounts. The device may not support some free email accounts. Please consult the email provider for details.
Storage card
Q: What storage card does the device support?
A: mini SD card.
Music
Q: What audio formats does the device support?
A: MP2, MP3, WAV, AAC, WMA
Q: How can I add music into the device?
A: You can copy the audio les from PC to SD card or USB disk, then copy them into the device through File Browser.
Picture
Q: What picture formats does the device support?
A: JPG, JPEG, BMP and PNG.
Q: How can I add pictures into the device?
A: You can copy the picture les from PC to SD card or USB disk, then copy them into the device through File Browser.
Video
Q: What video formats does the device support?
A: MPEG1/2/4, MJPG, H263, H264. H264 supports 720×480, other formats support 1280×720.
Q: Are videos in YouTube playable by the device?
A: Yes. You can click YouTube icon to play videos.
Q: How can I add videos into the device?
A: You can copy the video les from PC to SD card or USB disk, then copy them into the device through File Browser.
Wi-Fi
Q: Do I need an external Wi-Fi device to connect to internet?
A: No. The device has built in Wi-Fi funcon.
Baery management
The baery is not fully charged when leaving the factory, so we suggest you charge the baery for at least 4 hours before using.
The useful life of the baery is usually counted by charging mes. However, you can try the following dos to prolong its useful life:
- Use the device at least once every week.
- Regularly fully charge the baery.
- Never keep the baery empty for a long me.
- Keep the device and the baery away from heat.
Charging the baery
Connect one end of the AC adaptor to the mains supply and the other end to the power jack on the device (it takes about 5 hours to fully charge).
When the baery is full, the baery icon will display
It takes about 5 hours to fully charge an empty baery. You can operate the device while charging.
Important safety instrucon
Please follow the following safety instrucons while using the device to avoid risk of re, electric shock or injury:
- Keep the product away from rain and humidity.
- Keep the product away from direct sunlight and heat.
- Protect the power core. When connecng the power core, do not trample on it or place anything on it. Use care to protect the connectors of the power core.
- Please only use the approved AC adaptor for charging. Using other adaptors may cause damage.
- Never dissemble or try to repair the device.
Clean the device
Clean the screen soly. To clean the ingerprints or dust on the screen, we suggest you use the so cloth used for camera lens. Do not use any rough cloth, as the screen may get not pleasant scratches.
SPECIFICATIONS
| Operang System | Android 4.2 JellyBean |
| CPU | Dual Core 1,2 Ghz, Allwinner A20 |
| Display | 7" 800x480 Capacive, multouch, 5 points |
| RAM Memory | 512 MB DDR 3 |
| Memory | 8 GB ash memory |
| Video Chipset | Dual Core Mali 400 |
| Speaker | 1 W |
| Web Camera | Front: 0.3 MP; Back: 2 MP |
| Ports | HDMI, Micro USB, Micro SD (up to 32 GB), Headphone Jack |
| Dimensions | 192 x 117 x 10,7 mm |
| Weight | 250 g |
| Wi-Fi | 802.11 b/g/n |
| 3G | external 3G USB Dongle |
| Baery | Li-Polymer 2400mAh, 5-6h autonomy |
| Video Formats | VC-1, MPEG-2, MPEG4, XviD/DivX, AVI, RM, RMVB, PMP, FLV, MP4, M4V, VOB, WMV, 3GP, MKV |
| Audio Formats | MP3, WMA, APE, FLAC, OGG, WAV |
| eBook Formats | ePub, PDF |
| Photo Formats | JPEG, GIF, PNG, BMP |
| Others | 3D Games support, G-Sensor, Microphone |
| Package contains | 1 x UTOK 700 D Tablet;1 x Charger;1 x USB Cable;1 x OTG Cable;1 x User Manual |
DECLARATION OF CONFORMITY
UTOK Product, Model 700 D
We, S.C. SKIN MEDIA S.R.L., based in Ocna Sibiului street 46-48, Bucharest 1, with cercate no. 1049291 from 03.07.2007, J40/8241/2000, CIF RO13348504, as importer and distributor, make, guarantee and declare on his own responsibility that electrical and electronic equipment to which this declaraon relates complies with the requirements of HG 1022/2002, according to Art. 5, regarding the products and services that may endanger the life, health, work safety and environmental protecon and do not have a negave impact on the environment.
Electrical and electronic equipment imported and distributed on the market by our company comply with the following regulaons: Decision no.
1022/2002, H.G. 497/2003 (Electromagnec Compatibility), H.G. 457/2003, amended by Decision 1514/2003 (regarding the safety of users of electrical, low voltage) and all incidental acts, H.G. 992/2005 (the Restricon of Hazardous Substances), H.G. 448/2005 (the prevenon of waste electrical and electronic equipment) and EU Directves 2002/95/EC, 1999/5/EC.
The product has been assessed according to the following standards listed in Annex II to HG 88/2003: EN 62479, EN 60950-1, EN 301 489-1, EN 301 489-17, EN 300 328. All documents received from the producer regarding the evaluaons are stored at our headquarter.
The product has CE marking.
Product warranty is provided in accordance with O.G. 21/1992, Law 449/2003, Law 296/2004 and O.U.G. 174/2008 regarding the consumer protecon.
This statement is valid for the product UTOK, model 700 D. The declaraon of conformity is also available on web address www.utok.com.
07.08.2013
Director,
Camil Perian

- Power Switch
- Touch Screen
- Using SD Card
- Removing SD card
- Geng Started
- Starng the device
- Wi-Fi seng
- Desktop
- Lock Screen
- Preinstalled applicaons
- Desktop Menu
- Managing Applicaons
- Installing
- Downloading applicaons from Internet
- Uninstalling the applicaon
- Clock
- Alarm clock
- Add alarm clock
- Stop the alarm clock
- Edit the alarm clock
- Delete the alarm clock
- Installing Soware Online
- Download the applicaon
- Record
- Menu funcon
- Browser
- Calendar
- New acvity
- Camera
- Take a photo
- Record a video
- Calculator
- Sound recorder
- New email account
- Inbox
- Open an email
- Compose an email
- Edit email account
- File Manager
- Copy les between PC and device
- Delete a le
- Music
- Play music
- Operate the track and play list
- New play list
- Rename or delete the play list
- New track
- Delete track
- HD Video Player
- Sengs
- FAQ
- Android
- Basic funcon of the device
- Storage card
- Music
- Picture
- Video
- Wi-Fi
- Baery management
- Charging the baery
- Important safety instrucon
- Clean the device
- DECLARATION OF CONFORMITY
Brand : UTOK
Model : 700D
Category : Smartphone