450D - Smartphone UTOK - Free user manual and instructions
Find the device manual for free 450D UTOK in PDF.


| Product Type | Smartphone |
| Model | UTOK 450D |
| Operating System | Android 4.2 |
| Processor | Dual Core 1.2 GHz |
| Display | 4.5-inch IPS touchscreen, 854 x 480 pixels |
| RAM | 512 MB |
| Internal Storage | 4 GB (expandable via microSD) |
| Rear Camera | 5 MP with flash |
| Front Camera | 0.3 MP |
| Battery | 1750 mAh Li-ion |
| Dimensions | 132 x 66.8 x 9.5 mm |
| Weight | 140 g |
| Network | 2G (850/900/1800/1900 MHz), 3G (900/2100 MHz) |
| SIM Card | Dual SIM (1 Normal + 1 Micro SIM) |
| Connectivity | Wi-Fi, Bluetooth, GPS, microUSB, 3.5mm audio jack |
| Sensors | Proximity sensor, Accelerometer |
| SAR Value | 0.327 W/kg (head) |
| Package Contents | Phone, Battery, USB Cable, Charger, Earphones, User Manual |
| Safety Information | Do not use while driving; keep away from medical implants; use original accessories; avoid flammable areas; operating temperature 5-35°C. |
| Multimedia Support | Audio: MP3, MIDI, WAV, AAC, AMR; Video: AVI, MP4, 3GP, RMVB |
Frequently Asked Questions - 450D UTOK
User questions about 450D UTOK
0 question about this device. Answer the ones you know or ask your own.
Ask a new question about this device
Download the instructions for your Smartphone in PDF format for free! Find your manual 450D - UTOK and take your electronic device back in hand. On this page are published all the documents necessary for the use of your device. 450D by UTOK.
USER MANUAL 450D UTOK
natural_image
Three views of a smartphone showing internal components and red arrows indicating movement or change (no text or symbols present)natural_image
Three views of a smartphone showing internal components and a red arrow indicating a specific area (no text or symbols present)Incarcarea bateriei
4. ECRANUL PRINCIPAL
4.2 CUSTOMIZAREA ECRANULUI
7.11 ACCES LA LOCATIE
Aparatul suporta Global Posioning System (GPS).
7.12 SECURITATE
Pute proteja dispozivul de ulizatorii neautoriza setand codul PIN sau introducand o parola.
7.19 D ESPR E T ELEF ON
- Understanding your device 32
- Geng started 34
- Basic operaons 37
- Home screen 42
- Mulmedia 44
- Network 46
- Sengs 48
- Aplicaons and ulies 52
- Technical specicaons 54
©2013. All rights are reserved. No part of this document can be reproduced without permission. All trademarks and brand names menoned in this publicaon are property of their respective owners. While all the eorts have been made to ensure the accuracy of contents in this manual, we presume no responsibility for errors or omissions or statements of any kind, whether such errors are omissions or statements resulting from negligence, accidents, or any other cause. We operate a policy of connuous development and reserve the right to make changes, modicaons and improvements to the device, device features/speciaons or any of its parts without prior noce. Your device may have preinstalled bookmarks and links for third party internet sites and may allow you to access third party sites. These are no aliated with us, and we do not endorse or assume liability for them. If you access such sites, take precautions for security or content. The limited warranty does not cover user manuals or any third party soware, sengs, content, data or links, whether included/downloaded in the product, whether included during installment, assembly, shipping or any other me in the delivery chain or otherwise and in any way acquired by you. To the extent permied by applicable law(s), we do not warrant that any our soware will meet your requirements, will work in combinaon with any hardware or soware applicaons provided by a third party, that the operaons of the soware will be uninterrupted.
User's Manual is provided just to guide the user about the funconality of the device. It is not a cercate of technology. Some funcons may vary due to modicaons and up-gradaons of soware or due to prinng mistake.
Please read the following safety guidelines before using the device.
- Do not use the phone while you are driving.
- Do not place magnec storage media near your phone. Radiaon from the phone may erase the informaon stored on them.
- Keep your phone and its accessories away from children.
- Mobile phones can interfere with the funconing of medical devices such as hearing aids or pacemakers. People having acve medical implants should keep their cell phone at least 15 cm away from the implant.
- Permanent hearing loss may occur if you use earphones or headphones at high volume.
- Use a wireless hands-free system (headphone/headset) with a low power Bluetooth emier.
- Make sure the cell phone has a low SAR.
- Keep your calls short or send a text message (SMS) instead. This advice applies specially to children adolescents and pregnant women.
- Use cell phone when the signal quality is good.
Noce:
Do not dismantle the device or accessories, otherwise the manufacturer will not be liable to pay for damages as the device and accessories are not covered by warranty.
Use only original baeries and charging devices.
➢ Please back up your important data mely and keep them properly. The company is not liable for any failure to call or loss of data due to mis-operaon, poor signal or power cut, etc.
Do not put use it in a place with ammable gas such as a petrol pumps. The temperature recommended for using the device is 5-35°C. Do not touch the charger, power cable or socket with wet hands. This may cause an electric shock.
All the screens in this manual are for reference only, and some contents actually displayed may depend upon the preseng of the service provider or the network operator, or the SIM card. If any funcons referred to in this manual are dierent from those of your device, please follow your device.

If your phone or any of its accessories do not funcon normally, then please visit your nearest authorized service facility. The qualified personnel will assist you, and if necessary, will arrange for the service.
1. UNDERSTANDING YOUR DEVICE
1.1 GENERAL INFO
UTOK 450D is a mul SIM phone that encloses features, such as Andriod version 4.2, Wi-Fi, 1.2 GHz Dual Core Processor, 5 MP digital Camera, etc. This phone is provided with two SIM slots for two dierent SIM cards. The SIM card inserted in the slot1 is called SIM1, and the second one in the slot2 is known as SIM2. You can select to operate SIMs as per your personal and professional needs.
1.2 DEVICE OVERVIEW
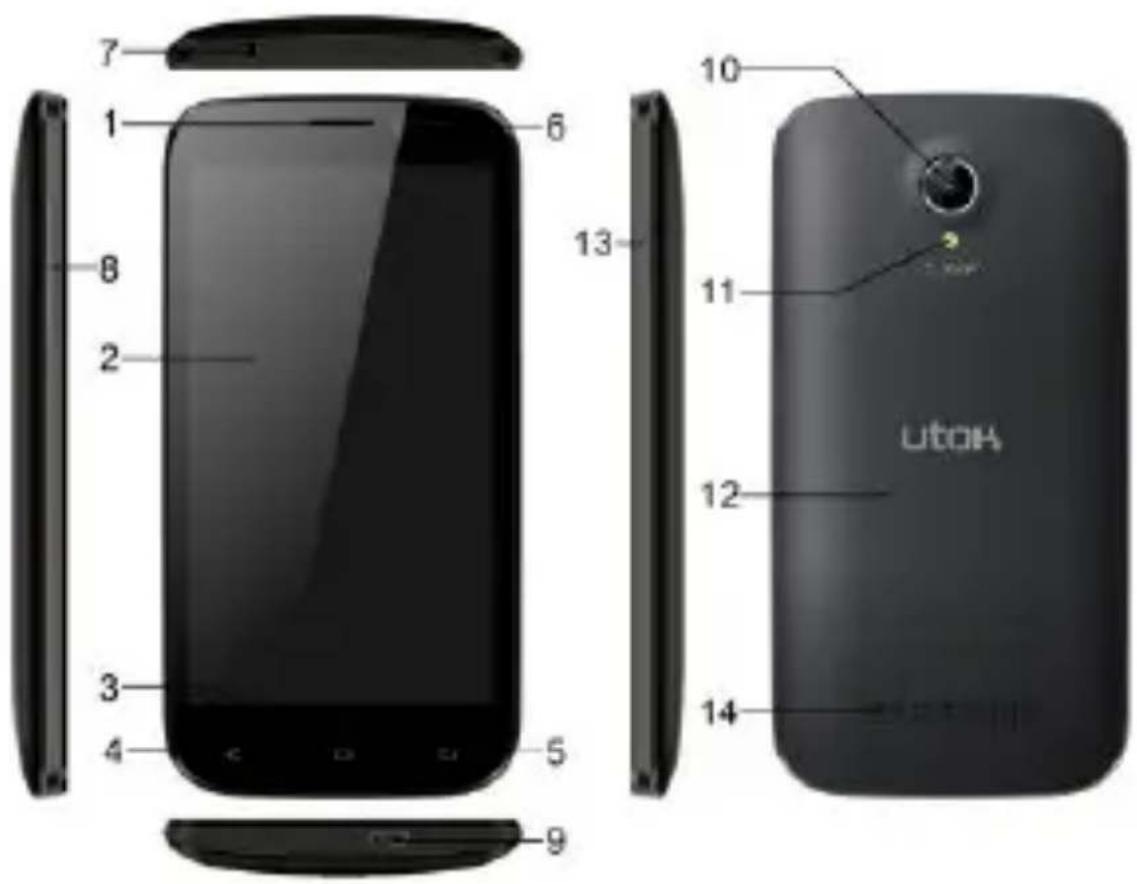
| 1. Earpiece | 2. Touch Screen |
| 3. Home Key | 4. Menu Key |
| 5. Back Key | 6. Front camera lens |
| 7. Earphone Jack | 8. Volume control key |
| 9. USB port | 10. Camera lens |
| 11. Torch | 12. Baery cover |
| 13. Power Key | 14. Speaker |
2. GETTING STARTED
2.1 INSTALLING C A RDS & BATTERY
Please switch o your device before inserng or removing the baery / SIM card or memory card.
Installing SIM Card and Baery
Your device is provided with two SIM slots for two dierent SIM cards. In order to install baery and SIM card in the device, please follow the steps menoned below:
Remove the back cover of the device.
Hold the device with the front facing downwards and pull the baery cover.
Insert the SIM cards in the device.
Aach the baery.
➢ Push the baery cover unl it clicks into place.

natural_image
Three views of a smartphone showing internal components and red arrows indicating movement or flow (no text or symbols present)Installing Memory Card
Your device supports T-Flash card, which is a mulmedia memory card used to mulply the memory of the device. The T-ash card is small and should be pulled out and installed carefully and prudently in order to avoid any kind of damage.
Please follow the steps menoned below to install the memory card in the device:
Switch o your device.
Remove the baery cover.
Slot the T-Flash memory card into the slot.
Aach the baery.
➢ Fix the baery cover unl it mount properly into place.

natural_image
Three views of a smartphone showing internal components and a red arrow indicating a specific area (no text or symbols present)Charging the Baery
The device prompts a warning tone and message stang insucient baery when the baery power is low.
Please follow the instrucons menoned below to charge your device:
Plug the connector of the charger into the jack of the device.
Plug the charger into a standard AC wall outlet.
Charging...... Fully Charged......

You should fully charge the baery before using the device for the rst me. It is recommended to charge the baery for three hours before using the device for the rst me.
2.2 POWERING ON/OFF THE DEVICE
Turning On the Device
Aer installing the SIM cards and charging the baery, you are now ready to turn on your device.
➢ Long press and hold the Power Key to turn on the device.
The rst screen that appears is known as the home Screen.
Drag the lock icon sidewards to unlock the screen.
If the screen turns o, then short press the Power Key to turn on the display.
Turning O the Device
➢ Press and hold the Power Key for 3 seconds.
A pop-up window appears, select Power o.
Select OK to conrm.
3. BASIC OPERATIONS
3.1 CALLING
To Make Calls
If the icon appears on the screen, then you can make or receive calls.
To make a call, please follow the steps menoned below:
Enter the Main Menu, select Phone.
➢ Enter the phone number using the on-screen keyboard.

Tap to delete a wrong number. Tap and
hold it to erase the entire number.
Aer entering phone number, tap.

To end the call, tap

Answer/Reject an Incoming Call
When you receive an incoming call, a nocaon message
appears on the screen. In order to accept the call, drag
towards right. If you wish to reject the call, drag towards le.
Other Opons during the call
To put a call on hold
If you are having a call conversaon and there is another incoming call, select hold to put the first call on hold. To unhold the call, select unhold.
To set up conference calls
If you are already having a call conversaon, select Hold to put the call on hold.
Select Add Call to make another call.
Aer connecng to the second call, select merge calls to set up the conference call.
3.2 M E S S A G I N G
Your device features sending and receiving of SMS (Short Message Service) and MMS (Mulmedia Message Service). Go to Main Menu and then select Messaging.
Creang a Message
Tap Compose new message.
In To eld; enter the recipient's phone number.
▶ Type message in the Type to compose eld.
Tap to Send.
Receiving and Managing Messages
When you send and receive messages to or from a contact, these messages are grouped as a message thread. A message thread looks like an exchanged conversaon.
To reply to a text message
Enter the Main Menu, select Messaging.
Select a message thread to open it.
Select Type to compose to enter your message.
Tap to Send.
To forward a text message
Enter the Main Menu, select Messaging.
Tap to view a message thread.
➢ Press and hold a message to view the message opons.
Select Forward.
In the To eld, enter the recipient's phone number.
Tap to Send.
To delete all text messages
Enter the Main Menu, select Messaging.
Tap Menu > Delete all threads.
All the messages will be deleted.
To copy message text
You can use this funcon to copy the text from a message to a new message you are composing.
Enter the Main Menu, select Messaging.
Select a message thread to open it.
➢ Press and hold the message to view the submenu opons.
Select 'Copy'.
➢ Go to Compose new message.
➢ Press and hold Type to compose.
Select 'Paste' to paste the copied text to your new message.
MULTIMEDIA MESSAGE
A Mulmedia message or MMS can contain leers, an image, an audio or video le. To create and send a MMS, please follow the steps menoned below:
Enter the Main Menu, select Messaging.
Tap Compose new message.
Select Menu > Add subject.
In the To eld, enter the recipient's phone number or email address and enter the Subject.

To insert a picture or video le, etc, tap

To insert text, tap Type to Compose, and then enter your message.
3.3 CONTACTS
Contacts refer to the phonebook that lets you store names, phone numbers, e-mail addresses and other informaon. You can save informaon such as name, picture, phone numbers, e-mail addresses, etc for each contact listed in your Contacts menu.
To add a Contact
Enter the Main Menu select Phone.
Enter number > Tap Menu key > Add to contacts > Create New contact.
Select the storage
You can enter contact informaon such as name, phone number, email address etc, if you select storage as "Phone".
Tap Done to save the contact.
Tip: Or enter the Main Menu and select People, tap

create New contact.
To import contacts
Enter the Main Menu select People.
Tap Menu key > Import/Export.
Select to import contacts from Phone contact/ Phone storage/ SIM Card/ SD Card.
Select a parcular source to import the contacts from.
Select Next.
Select the desnaon, such as Phone to copy contacts to.
Select Next.
Select "Select All" to import all contacts or mark the required contacts.
Select OK.
3.4 EMAIL
Your device allows you to compose, read and send emails.
3.5 BROW SE R
Browser is a tool which enables you to access the Internet.
4. HOME SCREEN
From Home screen, you can quickly access common features, view nocaons of missed calls, received messages and check conncon status.
4.1 ST AT US B AR
The Status bar icons indicate dierent types of informaon. The table below lists various icons that might appear on the status bar of the device.
 | Network intensity of SIM card 1 or SIM card 2 |
 | Baery level of the device |
 | New short message |
 | Missed call nocaon |
 | USB connected |
 | Wi-Fi is connected. |
 | Bluetooth is acvated |
 | GPRS network is in use. |
4.2 APPLICATION TAB
Tap Applicaon Drawer to access applicaons and sengs of the device. The Applicaon tab enables you to access the Main Menu and choose among the various ulies / features available in the device.
4.3 CUSTOMIZING SCREEN
The device features a touch screen with acve displays and access to ulies at just one-touch. So swipe right or le to navigate through various screens accessing your favorite
features without entering the main menu. Each screen can be customized by adding various widgets, shortcuts and folders.
Shortcuts
In order to add a shortcut on the screen: Long press on the desired applicaon to add on the screen.
Widgets
Save me with live updates right on Home screen and get all of your personalized updates at one place.
Seng the wallpaper
You can customize the wallpaper of your Home screen with default wallpaper or with pictures taken from your device.
In the idle mode, tap Menu Key > Wallpaper.
Select your desired wallpaper from the various opons: ES File Explorer, Gallery, Live Wallpapers, Video Wallpaper, Wallpaper.
Rotang Your Mobile Phone Screen
The orientaon of most screens will change to landscape or portrait view when you rotate your phone sideways.
On the Home screen, tap 📋 > Sengs > Display > Auto-rotate screen to disable this funcon.
5. MULTIMEDIA
Your device features various mulmedia opons, such as Music Player, Camera and Video Player.
5.1 FILE MANAGER
You can browse, open and manage the data saved in the Device and Memory card by accessing the File Manager sub-menu. The device provides a certain space for users to manage les and supports the T-Flash card. You can use the le browser to conveniently manage various directories and les on the T-Flash card.
5.2 MUS IC
Use the Music player to play music les. The songs saved in your SD Card can be played using the Music Player of the device.
Tap select Applicaon tab
Select Music
The songs are categorized by Arsts, Albums and Songs. You can make your favorite playlist by long pressing on a song and selecng Add to Playlist.
5.3 CA MERA
Your device is equipped with camera and camcorder, which enables you to capture photos and videos.
5.4 SOUND RECORDER
You can use the sound recorder to record sounds and also
select to save the recordings in your phone.
Tap > Sound Recorder. When in the sound recorder interface, press menu key to select recording mode.
5.5 G A L L E R Y
You can view the captured images, recorded video clips, and downloaded images in the Gallery.
The picture folder and video folder will be displayed.
Select to view the camera pictures or camera videos. The images or videos will be displayed in thumbnails.
5.6 FM radio
You can use your phone to listen to FM radio staons once the original Headset is plugged into the connector. Please press the side key to adjust music volume.
Tap to exit FM radio funcon. Tap the ( to search the channels.
6. NETWORK
6.1 WI-FI
Connect to a wireless network to browse Internet.
Enter Main Menu and tap Sengs.
Tap 'ON' to acvate Wi-Fi.

Tap Wi-Fi > Network nocaon to start detectcng networks. The available networks will then be listed.
Tap Add Wi-Fi network to add a conncon.
Note:
If the device before the conncon is successful, the equipment informaon will be saved in the pop-up window selected conncon, select forget to remove device informaon.
If the device does not encrypt selected conncon in the pop-up window to connect.
If the device is encrypted, the pop-up window will appear, enter the password.
Network conncon is successful; the status bar icon appears Wi-Fi conncon.
6.23G
The device supports WCDMA protocol. Please make sure that you device is turned o, then insert or remove the SIM card.
6. 3 B LUE TO OT H
You can transfer data, such as music to other device using Bluetooth. Search the device and accept/transfer data. The received data is automacally stored in the directory.
Access Sengs by entering the main menu
▶ Check Bluetooth to turn on Bluetooth
To make your device discoverable, select bluetooth sengs and check discoverable.
7. SETTINGS
Select Sengs to view and adjust the sengs of your device. The Sengs menu is categorized into: Wireless & networks, Audio proles, Display, Storage, Baery, Apps, Locaon services, Security, Language & input, Backup & reset, Accounts and System.
7.1 SIM MAN A GE MENT
Your device supports two SIM cards, which can be managed by accessing the SIM Management sub-menu. You can view/change the roaming sengs of the cards using this menu.
7.2 W IRELESS & NE TWO KS
Access this sub-menu to change/view the Wi-Fi, Bluetooth, Mobile Networks, VPN sengs, etc. Please refer to network secon for detailed informaon on Wi-Fi and bluetooth.
7.3 AUDIO P ROFILES
Your device provides four pre-dened user proles that allow the operaons of the device to best suit the environment you
are in. The proles are General, Silent, Meeng and Outdoor.
The Touch icon adds a new prole; tap the icon to select Reset to restore the default sengs.
7.4 DIS PLAY
With this funcon you can congregate the display characteristics of the device including brightness, Auto-rotate screen, etc.
7.5 STORAGE
View and manage the data storage of your device:
Total Space and Available Space: Lists the amount of space on the microSD card installed in your device and the amount you have used to store photos, videos, music, and other les.
Un-mount SD Card: Un-mounts the microSD card from your device so that you can format the card or safely remove it when the device is on.
Available Space: The amount of internal phone storage used by the operang system, its components, applicaons (including those you downloaded), and their permanent and temporary data.
7.6 BATTERY
You can check the baery status of the device by accessing
this sub-menu.
7.7 APPLICATIONS
This sub-menu enables you to manage all the installed, running and applicaons saved in the device memory and SD card. You can remove and manage installed applicaons, view and control running applicaons, allow installaon of non we build in market applicaons.
7.8 LOCATION ACCESS
Your device supports Global Poisoning System (GPS).
7.9 SEC U RITY
You can protect your device from unauthorized users by seng the PIN code or entering a password.
Enable or Disable SIM card PIN
When PIN code is enabled, you are required to enter the PIN code before making a call.
➢ Go to Applicaon Drawer > Sengs > Security.
On the SIM card lock tab, select Set up SIM card lock.
Select a SIM card.
Tap Lock SIM card to use PIN. Check to enable, uncheck to disable.
Enter the current PIN code.
To change the PIN code, select Change PIN.
Enter the old PIN code.
Enter the new PIN code and conrm.
Setup Screen Lock
You can set up a lock for your screen in form of Paern, PIN code or password.
Go to Sengs > Security
▶ Set up screen lock
Select a desired form (None, Slide, Paern, PIN or password)
7. 10 LANGUAGE AND INPUT
Use the Language & Keyboard sengs to select the language for the text on your device and for conguring the onscreen keyboard, including words that you've added to its dictionary.
You can use the Privacy sengs to manage your personal informaon, such as back up my data, automac restore and factory date reset.
7.12 A C COU NTS
Use the Accounts to add, remove, and manage your Google and other supported accounts. You also use these sengs to control how and whether all applicaons send, receive, and sync data on their own schedules, and whether all applicaons can synchronize user data automacally.
7.13 DATE AND TIME
You can select to set date, me and me zone using this sub-menu.
Use Automac unless you need to override the network values.
Use 24-hour format: Select to set 24-hour formats on or o.
Choose Date format: Select from a variety of formats.
7.14 SCHEDULE POWER ON/OF F
You can set the me for auto power on /o. Do turn the status on before using that funcon, and then the me.
7.15 ACCES S I BILIT Y
You can use the Accessibility sengs to congregate any accessibility plug-ins you have installed on your device.
7.16 ABOUT PHO NE
You can view system informaon Including Status, Legal informaon, Model number, Android version and so on.
8. APPLICATIONS & UTILITIES
For your entertainment purpose, your device is provided with several interesng games, applicaons and ulies. Please
ensure that you have GPRS seng in your device to access the applicaons. Contact your operator for GPRS sengs.
8.1 CA LC UL AT OR
Calculator helps you perform basic arithmec funcons, such as addition, subtracon, mulplicaon and division.
8.2 CLOCK
This funcon gives you an access to the alarm clock.
Go to → Clock
➢ Tap > tap to add alarm.
8.3 GMA IL
Gmail is Google's web-based email service. Google Mail is congured when you rst set up your device. Depending on your synchronizaon sengs, Google Mail on your device is automacally synchronized with your Google Mail account on the web.
Go to Main Menu > Gmail.
Select Create or Sign in your Google account.
Follow the on screen instrucons to login or create your Gmail username and password.
Once logged in, you can begin reading and sending emails from your Gmail account.
8.4 LOCAL
Places helps you discover nearby places you'll love. Quickly search for Restaurants, Cafes, Bars and other places, while on the go. Places also makes it easy to quickly rate the places you visit. By rang places you'll get place recommendaons based on the places you like and recommendaons from your friends.
8.5 PLAY STORE
Play store allows you to nd and download applicaons and fun games for your device.
➢ Go to Main Menu > Play Store and setup your Google account.
Select Create to create a new account or Sign in to sign in your existing account.
Once you are signed in you can begin searching and downloading programs from the market. Tap Apps to view the list of applicaons available and tap Games to view the list of games available.
9. SPECIFICATIONS
| OS | Android 4.2 |
| Color front/back | Black/Black |
| CPU | Dual Core 1,2 GHz |
| Display | 4,5" IPS |
| Resoluon | 854 × 480 |
| Display type | Multouch, 5 points |
| Dual Sim | Yes |
| Sim Type | 1 Normal SIM + 1 Micro SIM |
| 2G Network | 850/900/1800/1900 |
| 3G Network | 900/2100 |
| Front camera | 0,3 MP |
| Back camera | 5MP, Flash |
| RAM | 512 MB |
| Flash memory | 4 GB |
| Wi-Fi | Yes |
| Bluetooth | Yes |
| GPS | Yes |
| EDGE | Yes, Class 10 |
| GPRS | Yes, Class 12 |
| Speaker | 0,5 W |
| Ports | audio jack, microUSB |
| Dimensions | 132 x 66.8 x 9.5 mm |
| Weight | 140 g |
| Baery | 1750 mAh |
| Video Formats | AVI, MP4, 3GP, RMVB |
| Audio Formats | MP3, MIDI, WAV, AAC, AMR |
| Photo Formats | JPG, BMP, PNG |
| Others | FM Radio, Proximity sensor, Accelerometer |
| Package contains | 1 x UTOK 450D Smartphone; 1 x Baery; 1 x USB Cable; 1 x Charger; 1 x Earphones; 1 x User Manual. |
| SAR VALUE | 0,327 W/Kg |
| Maximum value for SAR | 2,0 W/Kg |
* The standby me and maximum talk me depend upon the network signals and sengs.
Declaraon of conformity for UTOK product, model 450 D is available online at www.utok.com
- Incarcarea bateriei
- ECRANUL PRINCIPAL
- CUSTOMIZAREA ECRANULUI
- ACCES LA LOCATIE
- SECURITATE
- D ESPR E T ELEF ON
- Noce:
- UNDERSTANDING YOUR DEVICE
- GENERAL INFO
- DEVICE OVERVIEW
- GETTING STARTED
- INSTALLING C A RDS & BATTERY
- Installing SIM Card and Baery
- Installing Memory Card
- Charging the Baery
- POWERING ON/OFF THE DEVICE
- Turning On the Device
- Turning O the Device
- BASIC OPERATIONS
- CALLING
- To Make Calls
- Answer/Reject an Incoming Call
- Other Opons during the call
- To put a call on hold
- To set up conference calls
- M E S S A G I N G
- Creang a Message
- Receiving and Managing Messages
- To reply to a text message
- To forward a text message
- To delete all text messages
- To copy message text
- MULTIMEDIA MESSAGE
- CONTACTS
- To add a Contact
- To import contacts
- BROW SE R
- HOME SCREEN
- ST AT US B AR
- APPLICATION TAB
- CUSTOMIZING SCREEN
- Shortcuts
- Widgets
- Seng the wallpaper
- Rotang Your Mobile Phone Screen
- MULTIMEDIA
- FILE MANAGER
- MUS IC
- CA MERA
- SOUND RECORDER
- G A L L E R Y
- FM radio
- NETWORK
- WI-FI
- Note:
- 6.23G
- 3 B LUE TO OT H
- SETTINGS
- SIM MAN A GE MENT
- W IRELESS & NE TWO KS
- AUDIO P ROFILES
- DIS PLAY
- STORAGE
- BATTERY
- APPLICATIONS
- LOCATION ACCESS
- SEC U RITY
- Enable or Disable SIM card PIN
- Setup Screen Lock
- 10 LANGUAGE AND INPUT
- A C COU NTS
- DATE AND TIME
- SCHEDULE POWER ON/OF F
- ACCES S I BILIT Y
- ABOUT PHO NE
- APPLICATIONS & UTILITIES
- CA LC UL AT OR
- CLOCK
- GMA IL
- LOCAL
- PLAY STORE
- SPECIFICATIONS
Brand : UTOK
Model : 450D
Category : Smartphone