
MP525 - Lawn mower JATA - Free user manual and instructions
Find the device manual for free MP525 JATA in PDF.


| Product type | Electric hair clipper |
| Brand | Jata |
| Model | MP525 |
| Power supply | Mains (power cord) |
| Number of cutting guides | 4 |
| Available cutting lengths | 3 mm, 6 mm, 9 mm, 12 mm |
| Blade type | Stainless steel (estimated) |
| Adjustable lever | Yes, for progressive cut adjustment |
| Recommended use | Hair, beard, mustache trimming |
| Lubrication | Lubricating oil provided, before each use |
| Maintenance | Brush blades after use; clean exterior with a damp cloth; do not immerse |
| Blade cleaning | Brush hair residues; possibility to disassemble the blade for thorough cleaning |
| Safety | Do not use near water; do not immerse; unplug before cleaning; do not use if blade damaged |
| Blade replacement | Possible, requires adjustment: the teeth of the upper blade should be offset about 1.2 mm backward relative to the lower blade |
| Included accessories | 4 cutting guides, comb, scissors, brush, lubricating oil |
| Environmental instructions | Do not dispose of in household waste; deposit at recycling center |
Frequently Asked Questions - MP525 JATA
User questions about MP525 JATA
0 question about this device. Answer the ones you know or ask your own.
Ask a new question about this device
Download the instructions for your Lawn mower in PDF format for free! Find your manual MP525 - JATA and take your electronic device back in hand. On this page are published all the documents necessary for the use of your device. MP525 by JATA.
USER MANUAL MP525 JATA
DATOS TÉCNICOS • DADOS TECNICOS • TECHNICAL DATA
MOD. MP525 230V.\~ 50 Hz. 7 W.
natural_image
Close-up of a person's head with a hairpin labeled 'A' (no other text or symbols visible)

natural_image
Side profile of a person receiving neck massage, no visible text or symbolsTercer paso: LADOS
natural_image
Side profile of a person with an updo hairstyle and ear, viewed from the side (no text or symbols visible)natural_image
Black-and-white photo of a person styling their hair with a comb (no visible text or symbols)Quinto paso: EL TOQUE FINAL
natural_image
Close-up black-and-white photo of a man's face with beard and short hair, no visible text or symbols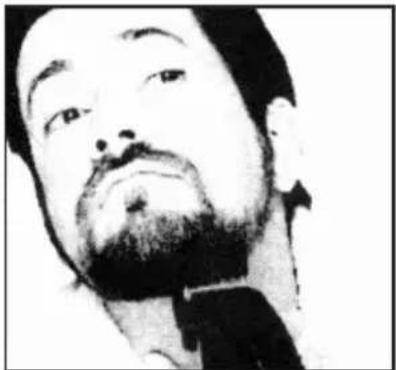
natural_image
Black-and-white portrait of a man with a beard and mustache (no text or symbols visible)REPASO DEL BIGOTE
natural_image
Close-up of a person's head with a hairpin labeled 'A' (no other text or symbols visible)
Segundo passo: PARTE POSTERIOR DA CABEZA
natural_image
Side profile of a person receiving neck massage, hand adjusting head (no text or symbols visible)natural_image
Side profile of a person with a hairpin in a bun, viewed from the side (no text or symbols visible)Quinto paso: EL TOQUE FINAL
natural_image
Black-and-white photo of a person with short hair and a hair accessory, no visible text or symbolsALAVANCA AJUSTÁVEL
natural_image
Black-and-white close-up portrait of a man with beard and short hair (no visible text or symbols)
natural_image
Black-and-white portrait of a man with a beard and mustache (no text or symbols visible)RETOQUE DO BIGODE
- Carefully read these instructions before using the appliance for the first time and keep the for future enquiries.
-
This appliance is not intended for use by persons (including children) with reduced physical, sensory or mental capabilities, or lack of experience and knowledge, unless they have been given supervision or instruction concerning use of the appliances by a person responsible for their safety.
-
Keep all plastic bags and packaging components out of the reach of children. They are potentially dangerous.
- Do not connect the appliance to the mains without checking that the voltage indicated in the rating label and that of your household are the same.
- Do not use it near the water contained in bathtubs, wash basins or other containers.
- Don’t allow children play with the appliance.
- Keep away from any sources of heat.
- Do not use it if the cutting guides have cracks or the blade does not have all the teeth in perfect condition. They could be the cause of serious injuries.
- Do not leave on clothes or any other object while in use, in order to avoid possible blockage. It must not be left connected on flat surfaces such as tables or counter tops, as the vibration of the appliance may cause it to slide off and break.
- Do not use on injured skin or if you have any skin diseases.
- This appliance has been designed for domestic use only.
- If you are using it in a bathroom, it is advisable to install in the electrical circuit of the bathroom a residual differential current device (DDR) of differential current of assigned capacity that does not exceed 30 mA. Ask your supplier for advice.
- VERY IMPORTANT: The hair clippers, the adapter and the base must never be immersed in water.
- It must not be used outdoors.
- If there is any nylon filament found on the blades, it's due to the quality control made in each unit.
- If the cable were to deteriorate it must be changed by an Authorised Service Centre.
LUBRIFICATION
- For the hair clipper to work correctly it is absolutely necessary to lubricate the blades with oil before each use.
- Carefully pour a few drops of oil, which is provided, between the teeth of the blade, or if you have run out, with another high quality, acid free oil.
- Turn the hair clipper on for a few seconds and clean the excess oil off with a cloth.
CUTTING GUIDES
- The hair clipper is equipped with four cutting guides which allow for a accurate height of cut in four different lengths (3-6-9 and 12 mm.)
- To assemble the chosen guide place it in the blade and press the bottom flange of the guide to be inserted.
BEGINNING THE CUT
- Relax and work slowly. Make short cuts. Do not go on to the final cut of one side or the back straight away. Work gradually and all over the head.
- It is better to cut a little each time to be able to cut some more later on.
- While you are working and before you begin, comb the hair frequently to the chosen style.
- It is better to cut the hair when it is dry, not wet. It is easier to see and control the amount of hair you are cutting.
- The first time you use the appliance it is advisable to cut a small portion of hair until you get used to the different lengths of the guides. At first use the guide which allows the longer cutting length (guide of 12 mm.). With a little practice you will soon choose the most adequate guide for the length you wish to have.
• After combing your hair following its natural direction, proceed as follows to obtain a perfect hair cut.
First step: NAPE
- Set the guide to the position corresponding to lowest length of cut (3 mm). Start cutting at the centre of the nape and at the bottom of the neck. Hold the hair clippers softly against the head with the teeth of the guide pointing upwards.
- Go up gradually, working your way upwards and outwards, just cutting a little hair at a time.
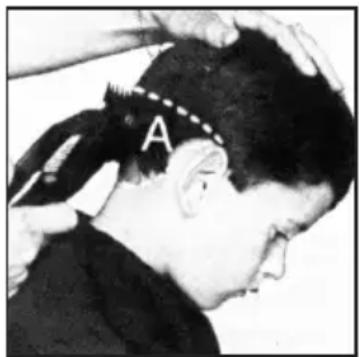
When cutting raise the head of the clippers towards you little by little. Continue cutting at the back of the head from the base of nape to the area just above the ears (Zone "A" of the figure).
Second step: THE BACK OF THE HEAD
- Put in one of the two guides corresponding to the desired length of 6 or 9 mm. and cut the area at the back of the head, identified as zone "B" in the figure.
Third step: SIDES
- Using the 3 or 6 mm. cutting guides, start cutting the side burns and the area close to the ears. Next, use the guide corresponding to the cutting length 9 or 12 mm. to go on cutting the hair at the top of the head.
Fourth step: The top of the head
- Put in the guide corresponding to the longest cutting length (12 mm.) and start cutting from the crown forwards against the growth of the hair. In some cases you will have to cut from the front backwards.
- To leave your hair longer use a comb to lift the hair at the back of the head and cut above the comb; or else hold the lock of hair between your fingers and cut off the to the desired length.


natural_image
Side profile of a person receiving hair styling, no visible text or symbols• Always working your way from the back of the head, gradually cut the hair, shorter each time by reducing the space between the comb or your fingers to the hair. Frequently comb your hair to check for any differences in its length and to eliminate the hair which has already been cut.
Fifth step: THE FINAL TOUCHES
- Do not use any guides for the final touches.
- To get an exact hair cut, and the side burns, nape and the area around the ears with straight lines, turn the hair clippers round and place them at a straight angle with your head so the blade is in slight contact with the skin, and shave downwards. This way you will get a perfect finish, as if shaving.
ADJUSTABLE LEVER

natural_image
Side profile of a person with a hairpin in the bun, viewed from the side (no text or symbols visible)- You can use the adjustable lever for finished and retouched, specially round the neck and ears.
- To increase the cut distance put down the lever.
• To reduce the cut distance put up the lever.
TRIM THE BEARD
• Always remember you must begin with the longest cutting guide (12 mm.) before using one of the shorter guides.
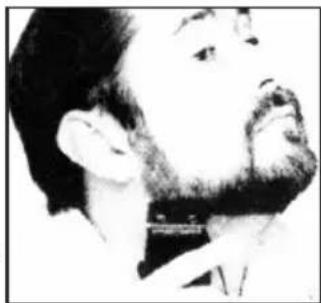
- Start by cutting from below the chin and moving the clipper with soft movements upwards and outwards.
- For the final touches and the edges always use the hair clipper without any guide.
REVISION OF MUSTACHE
- Comb the moustache downwards.
- Start with the higher cutting guide. Later you may use the shorter cutting guides.
natural_image
Close-up black-and-white photo of a man's face with beard and short hair (no visible text or symbols)
natural_image
Black-and-white portrait of a man with a beard and mustache (no text or symbols visible)
natural_image
Black-and-white photo of a person applying makeup to their ear (no visible text or symbols)MAINTENANCE AND CLEANING
- Before doing anything, make sure the clipper is unplugged from the mains.
- Use the brush to take off rests of hair in the blade.
- In case the blade has been dismantled for its replacement or cleaning, it must be adjusted again. To do so, slacken lightly the screws placed at the bottom of the blade
- Use your fingers to move horizontally the blade until the ends are in perfectly aligned.
- The tooth of the up blade must be moved back 1, 2 mm. approximately, with regard to the tooth of the down blade
- Use a slightly damp cloth to clean the outside of the appliance.
- Do not use in cleaning chemical products or abrasives, metallic scourers and similar, which may deteriorate the surfaces.
ENVIRONMENT PROTECTION
- Dispose the appliance according to the local garbage regulations.
- Never throw it away to the rubbish. So you will help to the improvement of the environment.

ATTENTION
natural_image
Close-up of a person's head with a hairpin and headband labeled 'A', no visible text or symbols beyond the labelnatural_image
Side profile of a person receiving hair styling, no visible text or symbolsnatural_image
Side profile of a person with a hairpin in a bun, viewed from the side (no text or symbols visible)natural_image
Black-and-white photo of a person holding a small object, possibly a hair clip or tool, with no visible text or symbols.natural_image
Black-and-white portrait of a man with beard and short hair, looking upward (no text or symbols visible)
natural_image
Black-and-white portrait of a man with beard and mustache (no text or symbols visible)RETOUCHE MOUSTACHE
natural_image
Close-up of a person's head with a headband labeled 'A' (no other text or symbols visible)Primo passo: NUCA
natural_image
Side profile of a person receiving hair styling, no visible text or symbolsnatural_image
Side profile of a person with a hair tied up, showing head and neck (no text or symbols visible)
natural_image
Black-and-white photo of a person styling hair with a comb (no visible text or symbols)natural_image
Close-up black-and-white photo of a man's face with beard and short hair, no visible text or symbols
natural_image
Black-and-white portrait of a man with beard and mustache (no text or symbols visible)GARANTIA GERAL (2 ANOS) - GARANTIA TOTAL
In the rest of countries, the holder of the guarantee will enjoy all the rights that his legislation in force concedes.
FRANÇAIS:
- DATOS TÉCNICOS • DADOS TECNICOS • TECHNICAL DATA
- Tercer paso: LADOS
- Quinto paso: EL TOQUE FINAL
- REPASO DEL BIGOTE
- Segundo passo: PARTE POSTERIOR DA CABEZA
- ALAVANCA AJUSTÁVEL
- RETOQUE DO BIGODE
- LUBRIFICATION
- CUTTING GUIDES
- BEGINNING THE CUT
- First step: NAPE
- Second step: THE BACK OF THE HEAD
- Third step: SIDES
- Fourth step: The top of the head
- Fifth step: THE FINAL TOUCHES
- ADJUSTABLE LEVER
- TRIM THE BEARD
- REVISION OF MUSTACHE
- MAINTENANCE AND CLEANING
- ENVIRONMENT PROTECTION
- ATTENTION
- RETOUCHE MOUSTACHE
- Primo passo: NUCA
- GARANTIA GERAL (2 ANOS) - GARANTIA TOTAL
- FRANÇAIS:
Brand : JATA
Model : MP525
Category : Lawn mower