Siroco 4 - Tablet Primux - Free user manual and instructions
Find the device manual for free Siroco 4 Primux in PDF.


| Product Type | Tablet |
| Brand | Primux |
| Model | Siroco 4 |
| Operating System | Android |
| Display Size | 10.1 inches |
| Display Resolution | 1280 x 800 pixels |
| Processor | Quad-core 1.3 GHz |
| RAM | 2 GB |
| Internal Storage | 32 GB |
| Expandable Storage | microSD up to 128 GB |
| Rear Camera | 5 MP |
| Front Camera | 2 MP |
| Battery Capacity | 6000 mAh |
| Dimensions (W x D x H) | 240 x 160 x 9 mm |
| Weight | 500 g |
| Connectivity | Wi-Fi 802.11 b/g/n, Bluetooth 4.0 |
| Ports | microUSB, 3.5 mm headphone jack |
| Sensors | Accelerometer, light sensor |
| Power Supply | 5V/2A via microUSB |
| Cleaning | Wipe with a soft, dry cloth; avoid liquids |
| Safety | Do not expose to extreme temperatures or moisture |
| Spare Parts & Repairability | Battery and screen replaceable by qualified technician |
| General Information | Includes USB cable, charger, and user manual |
Frequently Asked Questions - Siroco 4 Primux
User questions about Siroco 4 Primux
0 question about this device. Answer the ones you know or ask your own.
Ask a new question about this device
Download the instructions for your Tablet in PDF format for free! Find your manual Siroco 4 - Primux and take your electronic device back in hand. On this page are published all the documents necessary for the use of your device. Siroco 4 by Primux.
USER MANUAL Siroco 4 Primux
MANUAL DE USUARIO
Español / English
Encender/Apagar 4
Usar la pantalla digital .... 4
Interfaces 5
- Escritorio....5
- Pantalla bloqueada (modificada) 6
Programas operativos 7
12. Email
☆Admite POP3 and SMTP.
Cargar
- Desktop 27
- Locked screen (modified) 28
Operating programs 28
- Player 28
- Music.... 29
- Recorder.... 30
- Camera 30
- Browser 31
- Play store 32
- Calendar 32
- Clock 32
- Calculator.... 33
- Downloading 33
- Map 34
- Email 34
- File manager.... 36
Settings 37
Wi-Fi settings.... 38
3G settings.... 39
Use of extended storage 40
- Using USB disk 40
- Using TF card.... 40
Downloading, installing/uninstalling applications 40
Connecting to PC 41
Charging 42
Precautions 42

Power on/off
Power on: press and hold the power key for 5 seconds
Power off: press and hold the power key for 5 seconds→ click Power off → click OK
Lock/unlock screen: press the power key swiftly to lock/unlock the screen
Forced shutdown: in case of no response of the device, press the Reset key to reset the device by force
Note: do not use forced shutdown unless necessary. Shutdown the device following power off steps.
Reset key: press this key to reset the device.
Using touch screen
Single click: click an icon to select the option you require.
Press and hold: select an icon and hold to drag it to the desktop.
Drag: drag on the desk to switch among different interfaces.
- To avoid scratching or damaging the screen, never put any thing on it.
Interfaces
5. Desktop

1: View all applications 2: Shortcut to voice search 3: google search
4: Return 5: Return to desktop 6: Select maltitaxk
7: Shortcut to menu 8: USB logo 9: TF card status
10: Time 11: 3G/WIFI status 12: Battery status
On the desktop, use the Menu button

to display function list

where you can operate accordingly. You can set frequently used programs on the top of the desktop by clicking and holding the program you want and dragging it to the desktop.
2. Locked screen (modified)

If there is no operation for a long time, or when you press the power key, the device will enter standby mode. There are two standby modes, one is sleep mode, the screen is off in this mode, and if you press the button key, it will wake up and enter nap mode, as shown in the picture. In this mode, click and hold
Lock/unlock icon , there identifiers at A\B\C positions will appear as
shown in the picture. In this interface, Camera icon is at A position, Unlock icon is at B position, and Google icon is at C position. The system will prompt you the currently activated path, as shown in the picture, the ripples at B position show the activated path. You can click and drag the Lock/unlock icon to B position to unlock the screen, to A position to activate the camera, or to C position to activate Google browser.
Operating programs
1. Player
☆ AVI, WMV, RM, RMVB, 3GP, MKV, MP4, ASF, VOB, MPG, MOV up to 1080P
HD-Definition
Playing video
★ Supported image formats: JPEG, BMP, GIF, PNG.

-
Click Video er player interface.
-
Select a video file to play and the system will enter video playing interface. Click icons on the screen to adjust the video accordingly (volume +/-, playing process bar, storage play, brightness +/-, pause/play, next video, screen size, desktop play, return, menu).

Note: System ver. 4.1 supports desktop multi-menu video playing mode. You can simply desktop-play the video by selecting the desktop playing menu. With this function more than one video can be played at the same time on the same device.
-
Select picture to enter Picture viewing interface, and slide the screen to view pictures.
-
Select icon ☐ top right corner to view details of the video, or to select the functions such as auto viewing, rotating or cutting the pictures.
-
Select icon 📄 top right corner to delete files in the player.
2. Music
-
Supported audio formats: MP3, WMA, OGG, FLAC, WAV, ACC.
-
Click the icon enter player interface.
-
Select the music you want to play from track/album/artist/playlist.
-
Click Previous→Pause→Next icons to operate the playing.
-
You can click ← to back to previous interface or click to return to desktop while keeping the music playing.

You can operate the playing music by using the menu key. The interface is as follow:

Click icon See of Records Inter recorder mode (see the picture).
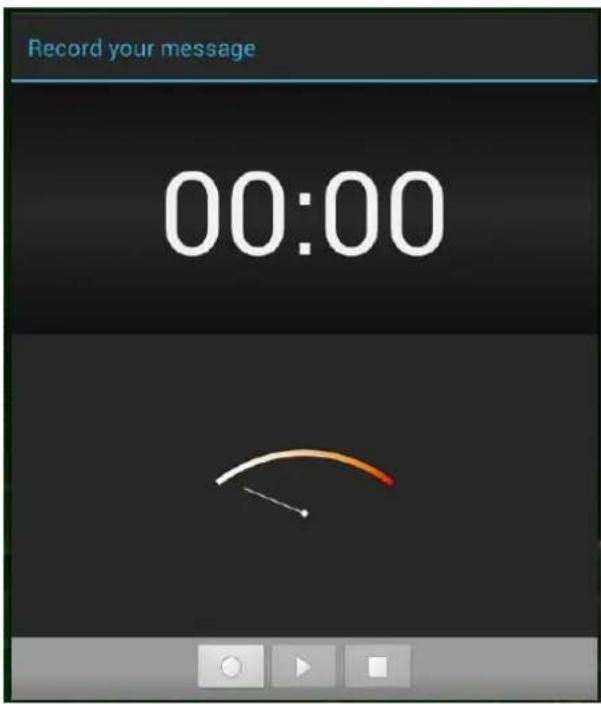
Click to start recording, and click to stop. Click to play the
recorded audio. The recorded files are named according to the recording time. You can select any one to play. In the above picture, the finger shows the sound wave intensity and the time shows the recording time.
4. Camera
Click icon enable the camera, the interface will appear.a
Taking a photo
-
In camera interface, click
-
The photo will be saved.
-
For system ver. 4.1, you can drag the taken photo to enter the album directly. When entering album from camera mode, you can view the pictures in thumbnails and up to three pictures.
-
Click Return to go back to album
-
Click to enter camera settings.
Recording a video
- Click to switch to video. You can record video.
- Click to start recording and click to stop.
- The video file will be saved.
- Click the thumbnail to play this video.
- Click Return to return to camera.
- Click to switch back to camera interface.
- Click to enter recorder settings.

Note: you can click to switch between front and rear camera (only available in models with double cameras).
5. Browser
Click icon browser inter browser interface

PRiMux ^ TECH

1: The previous page, you can select and view; 2: The current; 3: Add new page
4: Menu key
Note: The system ver. 4.1 includes Google browser. You will be asked to select browser mode when using for the first time, and you can
6. Play store

Open Play Store to view and download applications.
When running play store for the first time, you will be asked to login with your google account, (if you don't have a gmail account, apply one at http://gmail.google.com).
7. Calendar

Click Calendar icon.
When running the calendar for the first time, you will be asked to login. Input your email address and password, click next, and complete the settings according to the guide. Then you can use the calendar.
New event
- In Calendar interface, click the date you want to add a new event to.
- Select the time of the event → Input the details of the event in each field.
- Click Complete.
- Select the calendar interface you want according to the menu.
- Date showing in gray means there is an agenda.
8. Clock

Click ☐ lock icon. You can view the current date and time.
Alarm clock
You can set more than one alarm clocks at the same time.
- When icon 📄 appears on the screen, it means at least one alarm clock is activated.
Adding alarm clock

- Click click icon.
- Click menu→ Add alarm clock
- Set the alarm clock you required.
If Repeat is not selected, the alarm clock will be deleted after alarming.
- Click Activate clock.
- Click Complete.
Closing alarm clock
When reaching the set alarm time, a window with the name of the alarm clock will pop up.
If want the clock to alarm again after 10 minutes, click Pause and
alarm again.
Click Cancel to stop the alarm.
Activating alarm clock
If the alarm clock is set to repeat, you may want to pause the alarm instead of deleting it.
- In alarm clock interface, click the icon clock you want to activate.

after the alarm
- Click to reactivate.
Editing alarm clock

- Click
Clock icon, → Click

- Click and enter the alarm clock you want to edit → Edit.
Deleting alarm clock

- Click
Clock icon, → Click

- Click and enter the alarm clock you want to delete.
- Click Delete alarm clock.
Click

urn to desktop.
9. Calculator

- Click
Calculator icon. - Click numbers and operators to calculate.
- Click Clear to clear the input one by one, or click and hold Clear to clear all inputs.
10. Downloading

- Click Downloads icon.
- You can view the downloaded software and select one to install.
11. Map
☆To use this function, make sure you have an Internet access.

When there is an internet access, click icon Maps to open the map where you locate. You can search for the information you want as shown in the picture.

12. Email
★Support POP3 and SMTP.
Adding email account
You can input one or more email addresses you want to use on the device.

-
Click icon.
-
In Your account interface, click Next.
-
Click Email address option→ Input your email address.
-
In Password option → Input your account password.
-
Click Complete.
-
Manual setting (optional): the server will select provider (gmail.com, etc.) automatically according to your email account. However, if you want to change server settings, you can click Manual setting and make changes.
-
Click Next.
-
Optional: input account name.
-
Input name to display when sending message → Click Complete.
-
After setting, if you cannot connect to a free email account, please confirm with your email provider if their server support POP and SMTP or not.
Inbox

-
Click email icon.
-
If you set only one email account, it will open directly. If you set more than one email accounts, you will see the email account list.
-
Click the email account you want to open → Click Inbox.
Opening an email
-
In Inbox interface, click an email to open it.
-
Click an attachment (if any) to enable a corresponding application to open it, or you can click Save to save it to SD card.
-
If you want to Reply, Click Reply or Reply all.
a. Enter the message you want to reply in Writing email option. b. Click Send to send the email; you can also save it as draft without sending it. The email will be deleted if you don't save or send it.
- To delete an email, click Delete.
Writing a new email
- In Inbox interface, click Menu→Write
- Click Send to option, then enter address of the Receiver.
- If you want to cc or bcc to other receivers, click Menu → Add cc and bcc, then enter the email address of the receiver.
- Enter the subject in the title bar.
- Click Write an email option to enter your personal information.
- If necessary, click Menu → Add attachment to add attachment files.
- When you complete writing, click Menu→ Send.
Editing email account

-
Click email icon.
-
In Inbox interface, click Menu→ Account setting.
-
Set your email account according to your needs.
-
Click 3urn to Inbox interface.
Deleting an email account
☆If you have more than one accounts, and if you delete the default account, the next one in the list will become default.

-
Click email icon.
-
In Inbox interface, click Menu→ Account.
- Click and hold the account you want to delete.
- In the pop up Account option window, click Delete account.
- Click Yes to confirm to delete.
Setting default account
You must always have a default account. Therefore, if you have more than one email accounts, you can select one as default.

-
Click icon
-
In Inbox interface, click Menu→ Account setting.
- Click Default account to select it.
If you delete the default account, the next one in the list will become default.
13. File manager

Click File Manager File manager icon to view all files saved in the device (internal store, SD card, USB disk), and you can install Android applications to your device in a fast and convenient way.

-
Return
-
Internal storage
-
Micro SD card
-
USB disk
-
Pictures
-
Videos
-
Toolbox
-
File management
Copying files between devices
You can use file browser to copy files among external storage, internal storage and PC. To copy a file into the device, you must firstly copy it to
SD card or USB disk.
- Click to display files saved in the storage device.
-
Click and hold the file or folder you want to copy → click Copy.
-
Click icon 📋 to return to internal storage of the device → click the folder you want to copy to → click Paste.
Deleting a file
Click and hold the file or folder you want to delete → Click Delete → Click Yes to confirm to delete.
Settings
| Wireless network | ||
| Wi-Fi | Set and manage wireless access point (refer to WIFI setting for details). | |
| Traffic Set and manage data traffic. | ||
| More.. | Flight mode Enable/disable flight mode | |
| Ethernet Configure wired network. | ||
| VPN Configure VPN network | ||
| Mobile network Set 3G network (refer to 3G settings for details) | ||
| 3G support info. | Display 3G dongle model supported by the device | |
| Device | ||
| Sound | Volume | Adjust volume of media, alarm clock and notification. Click and slide  to adjust volume and then click OK. to adjust volume and then click OK. |
| Notifying ringtone | Select the notifying ringtone you want. | |
| Screen lock prompt tone | Prompt tone when screen is locked/unlocked | |
| Display | Brightness | Click and slide  to adjust brightness and then click OK. to adjust brightness and then click OK. |
| Wallpaper | Set wallpaper | |
| Auto rotating screen | If this option is checked, the screen will switch between horizontal and vertical according to the direction of rotation. | |
| Sleep | Adjust sleep time. | |
| Font size | Adjust font size in the interface. | |
| G-sensor coordinates | Select coordinates. Some games require special coordinates. | |
| Screen adapting | Adjust screen display size for some games. | |
| Storage | Display storage status. | |
| Format SD card | Delete all data saved in SD card. | |
| Battery Display battery status. | ||
| Applications | Manage and display status of applications in the device. | |
| Personal | ||
| Account and sync | Add and manage | accounts in the device. |
| Location service | Set Google location service and Google search applications. | |
| Security | Screen saver Set | screen saver |
| Password Password | word input settings. | |
| Device management | 1. Add or delete device manager.2. Unknown source APK installation settings. | |
| Credential storage | Manage application access surety credentials and other credentials. | |
| Language and input method | Set default language | |
| Keyboard and input method Set | default keyboard and input method | |
| Mouse/Touchpad | Adjust mouse speed. | |
| Backup and reset | 1. Backup/restore device data.2. Restore default settings. | |
| System | ||
| Date and time | Set or adjust time and date in the device. | |
| Auxiliary functions | Set auto rotation, display font and touch screen effect. | |
| Developer options | Basic applications for developers. | |
| About the tablet PC | View system status, battery status, legal info, model, Android version, core version and version number. | |
Wi-Fi settings
Many functions require Wi-Fi connect, so we suggest you use the preset Wi-Fi network.
4. Click Settings → Settings → Wireless and network
5. Enable Wi-Fi.
The device will search and list all available Wi-Fi networks automatically.
The icon

beside Wi-Fi means you need to enter a password to
connect to it.
- Click the Wi-Fi network you want to connect to → if there is password, you need to enter the password → Click Connect. After connecting to
WIFI network, you will see icon the desktop.
- Click to return to desktop.

☆ If your Wi-Fi is set to hidden, it will not be searched automatically.
You need to click Add Wi-Fi network, and then enter required information to add your Wi-Fi.
3G settings
- Before connecting to a 3G network, make sure you are using a 3G network card supported by the device. This device only supports external USB 3G network card. You can view all 3G models supported by
the device from

Settings → Wireless and network→More→
3G support info
-
After install a SIM UIM card to 3G network card, install the 3G network card on USB OTG connection wire, and the connect to the device.
-
After connecting to 3G network card, click Settings → Wireless and network→More→Mobile network for 3G network settings.
-
Enable mobile network and check Enable data traffic→Data roaming, then select Access point name, select Menu and then select: Add APN for network setting.
Take China Union 3G network for example, the settings are as following:
Name: 3GWAP / APN:3gnet / Proxy: Not set/ Port: 80 / Username: Not set/ Password: Not set/ Server: Not set/ MMSC: Not set / MMS proxy: Not set/ MMS Port: Not set / MCC:460/ MNC:01/ Authentication type: Not set/ APN type: Not set/ APN protocol: Not set
After setting, you will be able to connect to 3G network, when you will see the
icon ■ in the screen. When this icon is gray, it means the system is searching for network, and when it is blue, it means the network is successfully
connected. The icon

means there are data transmission.
Use of extended storage
1. Using USB disk
Insert the USB disk into OTG connection wire, → then insert the OTG connection wire into the USB OTG port of the device. You can use the U disk when it is ready.
Do not insert and remove USB disk repeatedly in a short time, otherwise it may damage the USB disk.
2. Using TF card
☆The device supports up to 32GB storage card.
Insert the storage card into the card slot, and press it down with your finger, the message Preparing for SD card will display on screen. When this message disappears, it means the TF card is ready, and you can use it.
Removing TF card
Close all applications or files on the card. Click Settings → Settings → TF card and device storage → Remove TF card. Tender press down the card and it will be ejected. Then move it out.
☆Do not insert and remove
the card repeatedly in a short time, otherwise it may be damaged.
☆We recommend you to use
card with famous brand to avoid incompatibility.
Downloading, installing/uninstalling applications
☆You can find many free interesting Android applications in the internet.
Simply open the browser and search for "Android applications".
The Android applications you purchased or downloaded can be installed

through File Manage File manager in a fast and easy way.
- Copy the .apk file you want to install to SD card or USB disk → Insert the card or connect USB disk to the device.

- Click File Manage File manager icon.

-
Click or and find the folder in which .apk file is saved.
-
Select a .apk file → Install. After installing, the icon of the application will display in the interface where all applications are displayed.
- Click to run the application directly, or click Complete to return to File manager interface.
Downloading and installing application from internet
You can download Android applications from internet or other e-market directly and install them into your device quickly and conveniently.

Browser icon to connect to internet.
1. Click
2. Enter address and click the download link of the application you want to download to the device.
3. After downloading, click and hold the download file (in download record interface), → Click Open → Install.
Uninstalling application
You can uninstall any installed Android application conveniently.
- Click Menu → Settings → Applications → Manage applications.
- Click the application you want to uninstall, → Uninstall.
- Click Yes to confirm to uninstall.
Connecting to PC
-
Connect the device to a PC, then this device can be used as a mobile storage device. When using a USB cable to connect to PC, connect one end of the cable to the USB OTG port of the device, and the other end to USB port of PC.
-
After connection, the device will prompt icon


click it and select, then select Enable USB device, then you can save data to the device via PC, as shown in the following picture:

Charging
Connect one end of the power adaptor to supply socket, and the other end to the power socket of the device for charging.
During charging, the icon of battery will be 📄 and when charging
completes, the icon will be

- You can charge the device via USB cable.
- You can still use the device while charging, but this will prolong the charging time.
- Use the device at least once every week.
- Fully charge the battery regularly.
- Don't keep the battery empty for a long time.
Precautions
Please follow the following safety precautions when using your device. 当
- Do not expose the product to direct rain or humidity.
- Keep the device away from direct sunlight or heat source.
- Protect the power cable. When connecting the power cable, do not step on it, put anything on it or press it by force. Give a special protection to the plugs of the power cable.
- Please use approved power adaptor for charging, otherwise it may cause damage.
- Never disassemble or repair your device without authorization.
- Always touch the screen tenderly. If you want to clean the fingerprint or dust on the screen, please use a soft cloth such as lens cloth but do not use a coarse cloth.
- Pictures in this manual are for demonstration purpose only and may differ from the real product.
"Product names, logos, brands, and other trademarks featured or referred to herein are the property of the respective trademark
holders.
Trademark holders are not affiliated with the product manufacturer or reseller and do not sponsor or endorse this product."
For more information, visit www.primux.es
PRiMux®
TECH
- MANUAL DE USUARIO
- Cargar
- Power on/off
- Using touch screen
- Interfaces
- Desktop
- Locked screen (modified)
- Operating programs
- Player
- Music
- Camera
- Taking a photo
- Recording a video
- Browser
- Play store
- Calendar
- New event
- Clock
- Alarm clock
- Adding alarm clock
- Closing alarm clock
- alarm again.
- Activating alarm clock
- Editing alarm clock
- Deleting alarm clock
- Calculator
- Downloading
- Map
- Adding email account
- Inbox
- Opening an email
- Writing a new email
- Editing email account
- Deleting an email account
- Setting default account
- File manager
- Copying files between devices
- Deleting a file
- Wi-Fi settings
- Click Settings → Settings → Wireless and network
- Enable Wi-Fi.
- 3G settings
- 3G support info
- Use of extended storage
- Using USB disk
- Using TF card
- Removing TF card
- Downloading, installing/uninstalling applications
- Downloading and installing application from internet
- Uninstalling application
- Connecting to PC
- Charging
- Precautions
- PRiMux®
- TECH
Brand : Primux
Model : Siroco 4
Category : Tablet