
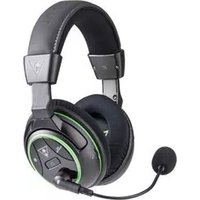
Ear Force Stealth 450 DTS - Headphones TURTLE BEACH - Free user manual and instructions
Find the device manual for free Ear Force Stealth 450 DTS TURTLE BEACH in PDF.


| Product Type | Wireless Gaming Headset |
| Brand | Turtle Beach |
| Model | Ear Force Stealth 450 DTS |
| Connectivity | Wireless via USB transmitter |
| Drivers | 50mm neodymium |
| Frequency Response | 20Hz - 20kHz |
| Surround Sound | DTS Headphone:X v2.0 |
| Microphone | Detachable, flip-to-mute |
| Microphone Pattern | Omnidirectional |
| Battery Type | Rechargeable lithium-ion |
| Battery Life | Up to 15 hours |
| Charging Time | Approximately 4 hours |
| Charging Port | Micro-USB |
| Color | Black with blue accents |
| Weight | 395 g |
| Dimensions (HxWxD) | 20 x 18 x 10 cm |
| Compatibility | PC, PlayStation 4, PlayStation 5 |
| Preset Modes | 4 equalizer presets |
| Included Accessories | Wireless USB transmitter, Micro-USB charging cable, detachable microphone |
| Warranty | 1 year limited warranty |
| Cleaning | Wipe with a soft, dry cloth |
Frequently Asked Questions - Ear Force Stealth 450 DTS TURTLE BEACH
User questions about Ear Force Stealth 450 DTS TURTLE BEACH
0 question about this device. Answer the ones you know or ask your own.
Ask a new question about this device
Download the instructions for your Headphones in PDF format for free! Find your manual Ear Force Stealth 450 DTS - TURTLE BEACH and take your electronic device back in hand. On this page are published all the documents necessary for the use of your device. Ear Force Stealth 450 DTS by TURTLE BEACH.
USER MANUAL Ear Force Stealth 450 DTS TURTLE BEACH

EAR FORCE®
STEALTH
450
WIRELESS
SURROUND SOUND
GAMING HEADSET
USER GUIDE
EAR FORCE STEALTH 450 PREMIUM WIRELESS GAMING HEADSET

natural_image
Black and white photo of a 450 headboard with red-lit headlight, next to a USB device (no visible text or symbols)Congratulations on your purchase of the Ear Force Stealth 450 headset from Turtle Beach. Designed for PC Gaming, the Stealth 450 also supports music, movies, and 100% Wireless Chat. Turtle Beach brings over 45 years of expertise to transforming your listening experience.
In the Box
For our Knowledgebase and Technical Support please visit turtlebeach.com/support
A

natural_image
Line drawing of a pair of 480+ headphones (no text or symbols)Ear Force Stealth 450 Gaming Headset
B

Ear Force Stealth 450 Wireless Transmitter
C

D

natural_image
Line drawing of a mechanical clamp or connector with a handle and connector (no text or symbols)E

USB Charging CableMobile Cable Rem

natural_image
Close-up of headphones with glowing red circular graphics and star patterns (no text or symbols)Table of Contents
About the Stealth 450 P5
Overview P6
Parts and Controls P7
Headset Charging P8
PC Surround Sound Setup P9
Mobile Setup P13
Pairing the Headset and Transmitter P14
Adjusting Sound (PC) P15
Specifications P16
Troubleshooting Tips P17
Important Safety Information P19
About the Stealth 450
natural_image
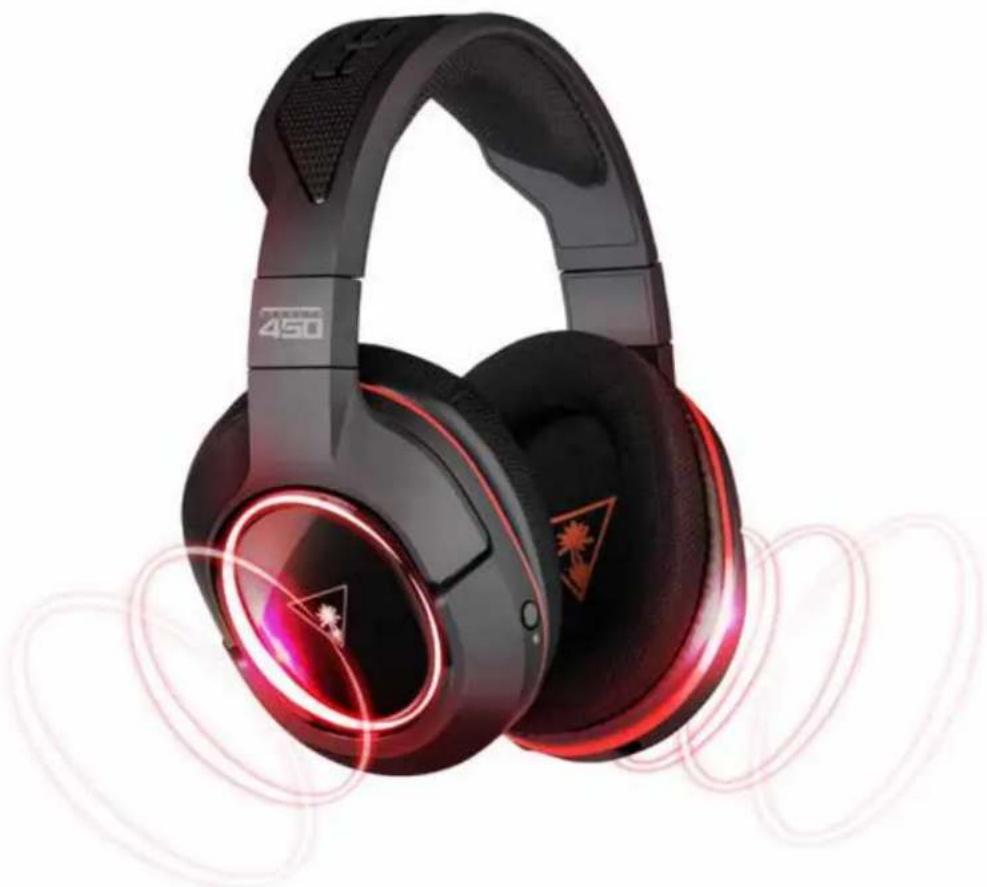
Black and red headboard with '450' branding and abstract light patterns (no text or symbols on the headphones or background)Experience the freedom of completely wireless gaming. The officially licensed Stealth 450 delivers stunning, ultra-clear wireless sound and truly wireless chat. Turtle Beach gives you every advantage, so fire up your presets, crank up the volume and dominate the competition.
Overview
Climb the leaderboards with the Ear Force® Stealth 450. Go Fully Wireless, with no wires or adapters and Four EQ Presets to personalize your audio. Built-in rechargeable battery provides up to 15 hours of wireless game play. The Stealth 450 plugs directly into your mobile devices.
Overview
 | Superior ComfortBreathable Fabric Mesh provides superior comfort and improved bass response. |
 | Stop Shouting!Variable Mic Monitoring lets you hear your own voice in the headset to avoid shouting. |
 | Awesome Turtle Beach AudioCustomize your gaming experience with four EQ Presets including Bass Boost. |
 | Rechargeable BatteryBuilt-in rechargeable battery delivers over 15 hours of wireless game play. |
 | Removable MicThe removable, high-sensitivity mic and Mic Monitoring will keep you from having to shout to be heard. |
 | For All Your Audio NeedsConnect the included Mobile Cable* for wired gaming, music and movies on any mobile device. |
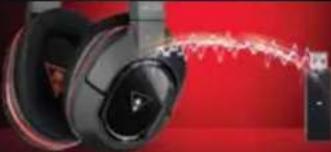 | Step up to STEALTHThe Stealth 450 delivers truly wireless audio. |
Parts and Controls
Headset Controls: Right Earcup

Transmitter

Headset Charging
The Ear Force Stealth 450 uses an internal amplifier and so requires power from a rechargeable battery. The Stealth 450 gets up to 15 hours of wireless gaming from a single charge and will charge to full within 3 hours.
- Connect the included USB Charging Cable to the USB Port on the bottom of the Right Earcup of the Headset.
- Connect the other end of the USB Cable to any powered USB Port. (We suggest using your PC for convenience.) The Power LED on the Headset will change to Red to indicate charging.
- Charging is complete when the Power LED on the Headset changes from Red to White.


Note: Make sure to charge your headset regularly.
Note: Always charge your headset before storing it for more than three months. Never store the headset in temperatures above 113 F/45 C.
PC Surround Sound Setup
The Ear Force Stealth 450 headset is designed for use with Windows 7 and up.
STEP.1
Insert Stealth 450 Transmitter into your PC and allow windows automatic installation to occur. This may take a couple minutes

natural_image
Diagram showing a USB device connected to a battery with an icon of a plug (no text or symbols present)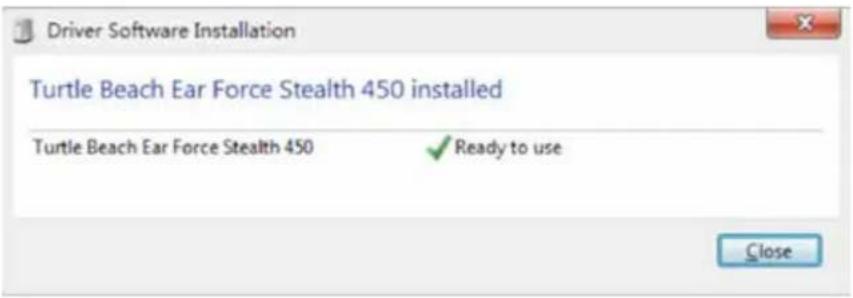
STEP.2
Download the installation tool from the Stealth 450 product page at:
http://www.turtlebeach.com/Stealth450

natural_image
Laptop screen displaying a triangular logo with a palm tree silhouette (no text or symbols visible)STEP.3
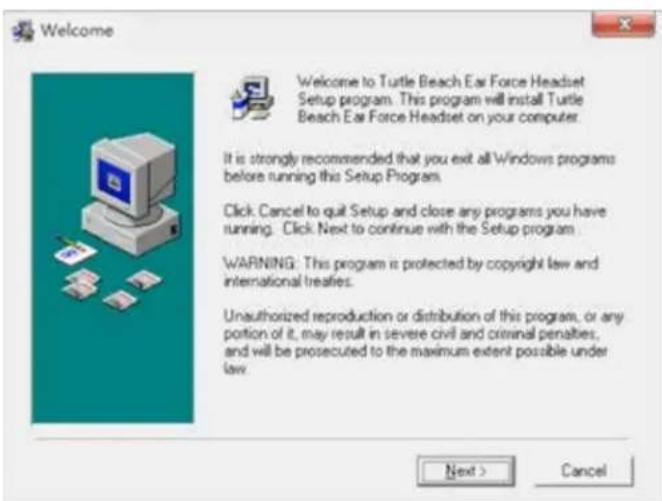
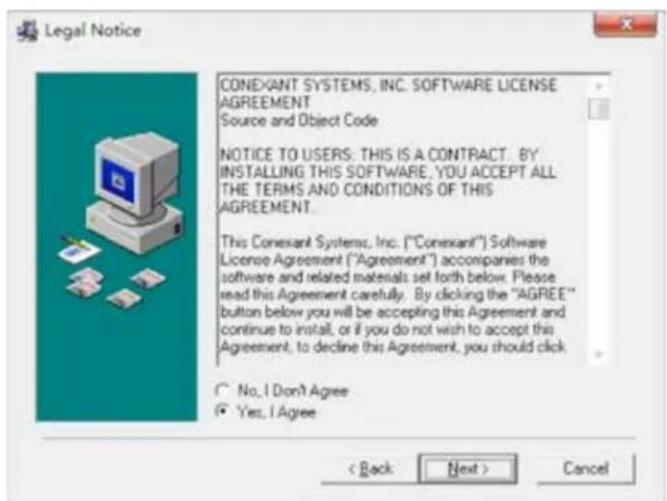
Run the Installer and accept the user agreement.
PC Surround Sound Setup
STEP.4
Select Turtle Beach Stealth 450 if prompted.

STEP.5
After the installation completes make sure to restart your PC.

STEP.6
Right-Click the Speaker Icon in the bottom right corner of your taskbar.
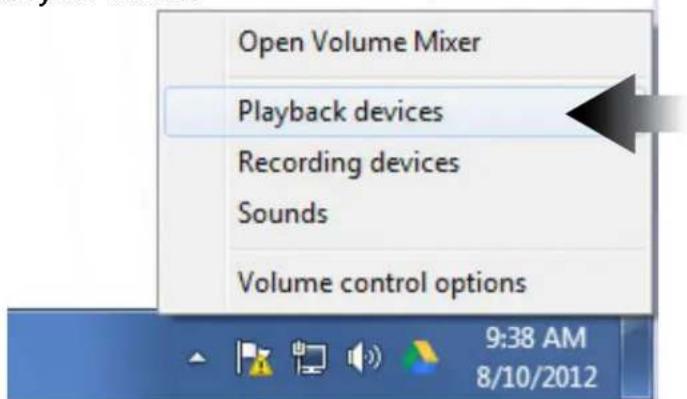
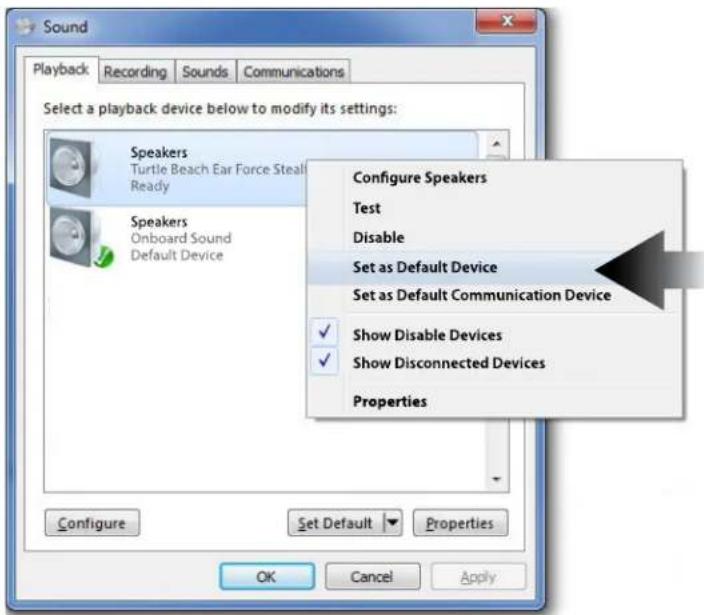
STEP.7 Right-Click Turtle Beach Ear Force Stealth 450 and Set as Default Device.
PC Surround Sound Setup
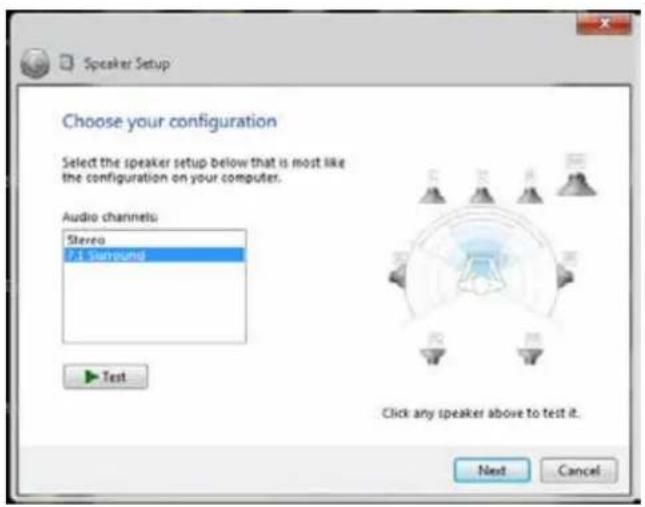
STEP.8 Select Configure and set to 7.1 Surround.
STEP.9
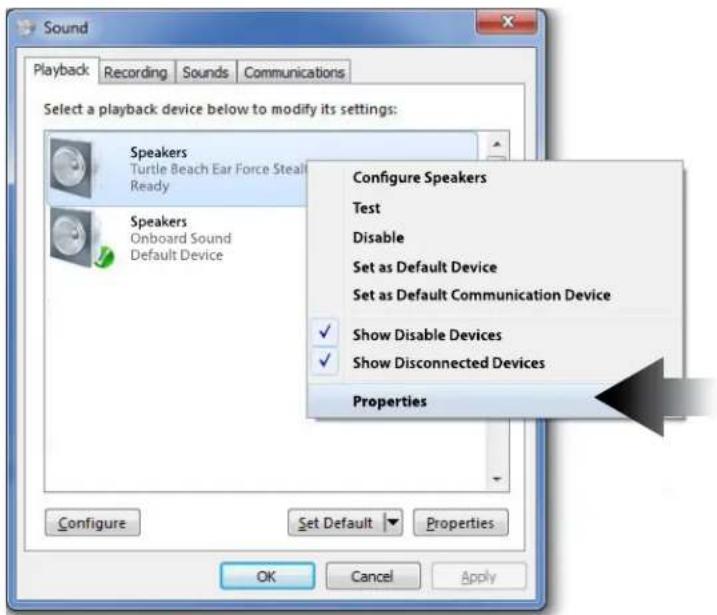
Right click the Stealth 450 device and select Properties.
PC Surround Sound Setup
STEP.10 Select the Turtle Beach Audio Settings tab; From here you can configure your advanced audio settings.

On the Turtle Beach Audio Settings Tab multiple DTS Headphone:X 7.1 Surround Sound Modes are available to select from. Each mode provides an unique sonic environment:
Game Mode Movie Mode Music Mode Stereo Mode
To bypass DTS Headphone:X and use the headset in stereo mode, select Surround Off.
Superhuman Hearing
Here you can manually engage Superhuman Hearing or set a Hotkey so it can be conveniently engaged mid-game while you are away from the Turtle Beach Audio Settings Menu.

natural_image
Game scene with soldiers in combat gear amidst flames and smoke, no visible text or symbols


Use Superhuman Hearing™ Mode in combination with DTS Headphone:X 7.1 Surround Sound to pinpoint quiet audio cues like enemy footsteps and weapon reloads.
Mobile Setup

* Note: The headset must be powered on for mobile use.
- Power ON the Ear Force Stealth 450 Headset.
- Insert the Mobile Cable into the Jack on the bottom of the Right Earcup.
- Connect the other end to your preferred mobile device.
Note: When using the Stealth 450 away from your PC (Mobile Connection Only) after 15 minutes you may hear a prompt indicating that you must press the Power Button in order to continue use. This is built in for battery conservation, just press the power button to continue listening to music without interruption.
Pairing the Headset and Transmitter
The Stealth 450 Wireless Transmitter sends audio and chat between your PC and your Headset via digital radio frequency signal, so a direct line of sight is not required. When the headset and transmitter are communicating, the Connection Status LED on the Wireless Transmitter will stay lit.
NOTE: Your Stealth 450 Headset ships already paired for communication with your Wireless Transmitter. In normal operation, it should not be necessary for you to pair the two again. You should only need to perform pairing yourself in the event that wireless communication fails. First check that the headset is powered on and is within range. If the Connection Status LED on the Wireless Transmitter is still pulsing, the Wireless Transmitter can't communicate with the Headset. Perform the following pairing procedure.
- The Headset should be powered OFF. If it's on, press and hold the Power Button on the right Earcup for five seconds to power OFF.

- The Pair Button on the Transmitter is recessed in a pinhole to prevent accidental operation. Insert a paperclip (or something similar) into the pinhole until the transmitter's Connection Status LED flashes rapidly.

natural_image
Illustration of a hand pointing to a circular device with a clock, next to a pair of hardcover headphones (no text or symbols present)- Press and hold the Power Button on the Headset until the headset Charge/Pairing Status LED flashes rapidly and the Headset announces "Pairing".
- Within a few seconds the Connection Status LED on the Transmitter and the power LED on the Headset will turn Solid. The Headset will also announce "Headset Paired" to confirm that pairing was successful.
Adjusting Sound (PC)
| If you want to... Then... | |
| Adjust Master Volume Use the Master Volume Control on the Headset. | |
| Turn the microphone on or off. Press the Mic Button on the Headset. | |
| Adjust Equalization (EQ)Note: EQ Audio Presets only effect Game Audio. | You can optimize the sound for your specific game, movie or music. Press the EQ Preset Button on the Headset to cycle through the these modes:Natural Sound - Turtle Beach tuned Natural Sound, hear your media just as the creators intended.Bass Boost - Turn up the Bass, feel the deep sound effects in your games and the punch of bass heavy music tracks.Bass & Treble Boost - Turn everything up, increased lows and highs give you more of everything for a more powerful audio experience.Vocal Boost - Tune in to the vocals on music tracks and dialog in games and movies, makes your team-mates, characters and stories come alive as you've never heard before. |
| Adjust DTS Headphone: X 7.1 Surround Sound Modes | Go to Sound >Playback Devices > Turtle Beach Stealth 450 and select Properties. Select the Turtle Beach Audio Settings Tab and choose between 3 Custom Room Models.DTS Headphone:X Game ModeDTS Headphone:X Movie ModeDTS Headphone:X Music ModeIn addition if you are listening to content which you do not want to have processed by the DTS Headphone:X 7.1 Surround Sound Processing you can select “Surround Off” to bypass. |
| Adjust Superhuman Hearing | Go to Sound > Playback Devices > Turtle Beach Stealth 450 and select Properties. Select the Turtle Beach Audio Settings Tab and manually engage Superhuman Hearing.Alternatively you can set a keyboard hotkey so that you can easily engage/disengage Superhuman Hearing mid-game. |
Specifications
Headset
Speakers 50mm with Neodymium Magnets
· Frequency Response 20Hz - 20kHz
· Earpad Material Fabric(Black) with Foam Cushion
· Earcup Design Over-Ear (Closed)
- Microphone Design Removable Omni-Directional Microphone
Transmitter
• Game Input USB
- Chat/Mic Input/Output USB
• Surround Sound Processing Software-based DTS Headphone:X 7.1 Surround Sound
- Wireless Connection RF with Intelligent Channel Hopping
· Wireless Range Up to 30ft
Power USB

natural_image
Line drawing of a 450D headband and USB flash drive (no text or symbols)Troubleshooting Tips
No Sound
| Possible cause Solution | |
| Power is off | Confirm that the Headset is on. The Power LED should be illuminated White. Note: The Headset muse be powered on for use, even when you're connected via the Mobile Cable. |
| Dead/low battery | Confirm that the Headset Battery is charged. If the Headset will not power on, leave the headset to charge overnight. |
| Loose connection | Make sure the USB Transmitter is fully inserted into a USB Port on your PC. |
| Lost pairing | Confirm that the Connection Status LED on the Wireless Transmitter stays on. If the LED is pulsing, it indicates that the Wireless Transmitter isn't communicating with the Headset. See Pairing the Headset and the Transmitter (pg 14) |
| Surround Sound Driver Installed in incorrect location | Make sure the Surround Sound driver has been installed to the root folder of your primary drive. |
Audio Drops, Popping or Click Sounds
| Possible cause Solution | |
| Poor Wi-Fi transmission | For best performance, stand within 20 feet from the Wireless Transmitter.Confirm that there is no wall or other large object between the Headset and Wireless Transmitter.Confirm that the location of the Wireless Transmitter is clear of obstructions and isolated from Wi-Fi base stations or other potential sources of interference. |
Troubleshooting Tips
Voice Chat Issues
| Possible cause Solution | |
| Incorrect Windows Setup | Confirm that your Headset/Mic is selected as the default audio device in the Windows Playback/Recording Devices Tabs. |
| Mic muted | Press the Mic Button on the Headset to toggle the Mic Mute.Note: Mic Monitor is always ON even when the mic is muted. |
| Mic disconnected | Confirm that the Removable Mic Boom is firmly inserted into the Headset. The Mic should be interested into the “D” Slot on the bottom of the left earcup NOT the Mobile Connection jack on the bottom of the right earcup. |
| Incorrect Program Settings | Some programs have their own audio settings, if you encounter trouble with chat only in a certain program check that you are configured correctly. |
If your issue is not resolved by these steps, please visit turtlebeach.com/support
Important Safety Information
To avoid potential damage to the device, always disconnect all cables before transporting it.
WARNING: Permanent hearing damage can occur if a headset is used at high volumes for extended periods of time, so it is important to keep the volume at a safe level. Over time, your ears adapt to loud volume levels, so a level that may not cause initial discomfort can still damage your hearing. If you experience ringing in your ears after listening with the headset, it means the volume is set too loud.
The louder the volume is set, the less time it takes to affect your hearing. So, please take care to listen at moderate levels.
- Before placing a headset on your ears, turn the volume down completely, then slowly increase it to a comfortable level.
· Turn down the volume if you can't hear people speaking near you. - Avoid turning up the volume to block out noisy surroundings.
Regulatory Compliance Statements for the EAR FORCE Stealth 450 RX & TX
Federal Communications Commission (FCC) Compliance Notices
This section includes the following FCC statements for the EAR FORCE Stealth 450 RX & TX:
· FCC ID: XGB-TB6160 (Headset)
· FCC ID: XGB-TB6161 (Transmitter)
- Class B Interference Statement
· RF Radiation Exposure & Hazard Warning
- Non-Modification Statement
Deployment Statement
Class B Interference Statement
This equipment has been tested and found to comply with the limits for a Class B digital device, pursuant to Part 15 of the FCC Rules. These limits are designed to provide reasonable protection against harmful interference in a residential installation. This equipment generates, uses, and can radiate radio frequency energy and, if not installed and used in accordance with the instructions, may cause harmful interference to radio communications. However, there is no guarantee that interference will not occur in a particular installation. If this equipment does cause harmful interference to radio or television reception, which can be determined by turning the equipment off and on, the user is encouraged to try to correct the interference by one or more of the following measures:
- Reorient or relocate the receiving antenna.
- Increase the separation between the equipment and receiver.
- Connect the equipment into an outlet on a circuit different from that to which the receiver is connected.
- Consult the dealer or an experienced radio/TV technician for help.
FCC Caution:
This device complies with Part 15 of the FCC Rules. Operation is subject to the following two conditions: (1) This device may not cause harmful interference, and (2) this device must accept any interference received, including interference that may cause undesired operation.
Non-Modification Statement
Use only the supplied internal antenna. Unauthorized antennas, modifications, or attachments could damage the EAR FORCE Stealth 450 RX & TX Models and violate FCC regulations. Any changes or modifications not expressly approved by the party responsible for compliance could void the user's authority to operate this equipment. Please contact Turtle Beach for a list of approved 2.4 GHz antennas.antennas.
Canadian ICES Statements IC: 3879A-TB6160 (Headset) 3879A-TB26161 (Transmitter)
This device complies with ICES-003 and RSS-247 of Industry Canada. Operation is subject to the following two conditions:
-
This device may not cause interference, and
-
This device must accept any interference, including interference that may cause undesired operation of the device.
To prevent radio interference to the licensed service (i.e. co-channel Mobile Satellite systems) this device is intended to be operated indoors and away from windows to provide maximum shielding. Equipment (or its transmit antenna) that is installed outdoors is subject to licensing and not supported by EAR FORCE Stealth 450 RX & TX Models.
RF Radiation Exposure & Hazard Statement
To ensure compliance with RSS-102 RF exposure requirements, this device must be installed in a location such that the antenna of the device will be greater than 2 cm (0.8 in.) away from all persons. Using higher gain antennas and types of antennas not covered under the IC certification of this product is not allowed. Installers of the radio and end users of the product must adhere to the installation instructions provided in this manual. This transmitter must not be co-located or operated in conjunction with any other antenna or transmitter.
Exposition aux radiations RF & Mention de danger
European Union and European Fair Trade Association Regulatory Compliance
This equipment may be operated in the countries that comprise the member countries of the European Union and the European Fair Trade Association. These countries, listed below, are referred to as The European Community throughout this document:
AUSTRIA, BELGIUM, BULGARIA, CYPRUS, CZECH REPUBLIC, DENMARK, ESTONIA, FINLAND, FRANCE,, GERMANY, GREECE, HUNGARY, IRELAND, ITALY, LATVIA, LITHUANIA, LUXEMBOURG, MALTA, NETHERLANDS, POLAND, PORTUGAL, ROMANIA, SLOVAKIA, SLOVENIA, SPAIN, SWEDEN, UNITED KINGDOM, ICELAND, LICHTENSTEIN, NORWAY, SWITZERLAND
Declaration of Conformity
Marking by this symbol:

indicates compliance with the Essential Requirements of the R&TTE Directive of the European Union (1999/5/EC). This equipment meets the following conformance standards:
Safety: EN 60950-1: 2006 + A11: 2009 + A1: 2010 + A12: 2011 + A2: 2014 (T-Mark License).
IEC 60950-1: 2005 (2nd Edition) + Am 1: 2009 + Am 2: 2013 (CB Scheme Report/Certificate),
EN 50332-1: 2000, EN 50332-2: 2003, EN 71-3: 2013
EMC: EN 55022: 2010 + AC: 2011, EN 301 489-1 v1.9.2 (2011-09), EN 301 489-17 v2.1.1 (2009-05),
EN 61000-4-2: 2009, EN 61000-4-3: 2006 + A1: 2008 + A2: 2010, EN 61000-4-8: 2010
Radio: EN 300 328 v1.8.1 (2012-06)
SAR: EN 62311: 2008
Environmental: Low Voltage Directive 2014/35/EU, RoHS 2011/65/EU, WEEE 2012/19/EU, REACH 2006/1907/EC, Packaging 94/62/EC, Battery 2006/66/EC, Toys Safety Directive 2009/48/EC
Warning!
This is a Class B product. In a domestic environment, this product may cause radio interference, in which case, the user may be required to take appropriate measures.
Achtung!
This symbol on the product or its packaging indicates that this product must not be disposed of with your other household waste. Instead, it is your responsibility to dispose of your waste equipment by handing it over to a designated collection point for the recycling of waste electrical and electronic equipment. The separate collection and recycling of your waste equipment at the time of disposal will help conserve natural resources and ensure that it is recycled in a manner that protects human health and the environment. For more information about where you can drop off your waste for recycling, please contact your local authority, or where you purchased your product.
Please visit the following URL for a complete copy of the declaration of conformity:
http://www.turtlebeach.com/homologation
LIMITED ONE YEAR WARRANTY FOR TURTLE BEACH PRODUCTS:
Voyetra Turtle Beach, Inc. ("VTB") warrants to the original end-user purchaser ("Purchaser") that the retail Turtle Beach hardware product herein ("Product") will be free of defects in materials and workmanship for a period of one year from the date of purchase by the Purchaser ("Warranty Period"). Any Extended Warranty or Service Plans purchased through a Retail store are not honored by VTB. The Warranty refers to the repair/replacement of a defective product during this period and not a refund.
This limited warranty is extended only to the original Purchaser of a new product, which was not sold "AS IS". It is not transferable or assignable to any subsequent purchaser. This limited warranty is applicable only in the country or territory where the Product was purchased from an authorized VTB retailer and does not apply to a Product that has been purchased as used or refurbished or was included as part of a non-VTB product.
WARRANTY SERVICE:
In the USA and CANADA Warranty Service is provided by our Turtle Beach USA offices and in all other Countries it is provided by our local International Distributors when available. Refurbished/Recertified products are sold on an AS IS basis with a 90-day Warranty or less in accordance with each vendor's policy.
VTB does not warrant uninterrupted or error-free operation of the Product and is under no obligation to support the Product for all computer operating systems or future versions of such operating systems.
If a defect should occur during the Warranty Period, Purchaser must contact VTB to obtain a Return Merchandise Authorization ("RMA") number on the basis of the dated purchase receipt. Purchaser will be responsible for shipping costs incurred in returning the defective Product to an authorized VTB service center, or to the repair facility located at VTB's corporate headquarters. VTB will not be responsible for other products or accessories included with the defective Product sent to VTB. The RMA number must be clearly indicated on the outside of the package. Packages without an RMA number will be refused by VTB or its representatives and returned to sender at the sender's expense.
In the event of a defect, Purchaser's sole and exclusive remedy, and VTB's sole liability, is expressly limited to the correction of the defect by adjustment, repair, or replacement of the Product at VTB's sole option and expense. VTB owns all Products it has replaced and all parts removed from repaired Products. VTB uses new and reconditioned parts made by various manufacturers in performing warranty repairs and building replacement products. If VTB repairs or replaces a product, the original Warranty Period is not extended, however, VTB warrants that repaired or replacement parts will be free from defects in material and workmanship for a period of thirty (30) days from the date of repair or replacement, or for the remainder of the Warranty Period, whichever is greater.
This warranty does not apply to any Product that has had its serial number altered, removed or defaced, or any Product damage caused by shipping, improper storage, accident, problems with electrical power, abuse, misuse, neglect, ordinary wear, acts of God (e.g. flood), failure to follow directions, improper maintenance, use not in accordance with product instructions, unauthorized modification or service of the Product or damage resulting from the use of the Product with hardware, software or other products not provided by or specifically recommended by VTB.
NOTES:
- Replacement Parts and accessories that are subject to “wear and tear” such as earpads, mic foam covers, talkback cables, etc. have a three (3) month Warranty.
- Replacement Parts for Discontinued Products are sold on an AS IS basis, they are not supported and come with a 30 day Warranty.
THIS LIMITED WARRANTY IS PURCHASER'S SOLE AND EXCLUSIVE REMEDY AND IS IN LIEU OF ALL OTHER WARRANTIES, EXPRESS OR IMPLIED. TO THE EXTENT PERMITTED BY APPLICABLE LAW, VTB HEREBY DISCLAIMS THE APPLICABILITY OF ANY IMPLIED WARRANTY OF MERCHANTABILITY, FITNESS FOR A PARTICULAR PURPOSE OR USE FOR THE PRODUCT. IF SUCH A DISCLAIMER IS PROHIBITED BY APPLICABLE LAW, THE IMPLIED WARRANTY IS LIMITED TO THE DURATION OF THE FOREGOING LIMITED WRITTEN WARRANTY.
IN NO EVENT SHALL VTB BE LIABLE FOR ANY INDIRECT, INCIDENTAL, SPECIAL, PUNITIVE OR CONSEQUENTIAL DAMAGES, OR DAMAGES, INCLUDING BUT NOT LIMITED TO ANY LOST PROFITS, DATA, OR LOSS OF USE, ANY THIRD PARTY CLAIMS, AND ANY INJURY TO PROPERTY OR BODILY INJURY (INCLUDING DEATH) TO ANY PERSON, ARISING FROM OR RELATING TO THE USE OF THIS PRODUCT OR ARISING FROM BREACH OF THE WARRANTY, BREACH OF CONTRACT, NEGLIGENCE, TORT, OR STRICT LIABILITY, EVEN IF VTB HAS BEEN ADVISED OF THE POSSIBILITY OF SUCH DAMAGES.
This warranty supersedes all prior agreements or understandings, oral or written, relating to the Product, and no representation, promise or condition not contained herein will modify these terms. Some states do not allow the exclusion or limitation of incidental or consequential damages, so the above exclusion or limitation may not apply to you. This warranty gives you specific legal rights. You may also have other rights, which vary from state to state. Any action or lawsuit for breach of warranty must be commenced within eighteen (18) months following the purchase of the Product.
EXCLUSIONS FROM LIMITED WARRANTY:
This Limited Warranty shall not apply and VTB has no liability under this Limited Warranty if the Turtle Beach Product:
- is used for commercial purposes such as "LAN, Call Centers" (including rental or lease);
- is modified or tampered with;
- is damaged by Acts of God, power surge, misuse, abuse, negligence, accident, wear and tear, mishandling, misapplication, or other causes unrelated to defective materials or workmanship;
- serial number is defaced, altered or removed;
- is not used in accordance with the documentation and use instructions; or
- is repaired, modified or altered by other than authorized repair centers.
- is no longer available because it was discarded.

Watch Turtle Beach product training videos at: youtube.com/TurtleBeachVideos

Product support and warranty information: TurtleBeach.com/support
- STEALTH
- 450
- EAR FORCE STEALTH 450 PREMIUM WIRELESS GAMING HEADSET
- In the Box
- Table of Contents
- About the Stealth 450
- Overview
- Parts and Controls
- Headset Charging
- PC Surround Sound Setup
- STEP.1
- STEP.2
- STEP.3
- STEP.4
- STEP.5
- STEP.6
- STEP.9
- Superhuman Hearing
- Mobile Setup
- Pairing the Headset and Transmitter
- Adjusting Sound (PC)
- Specifications
- Headset
- Transmitter
- Troubleshooting Tips
- Important Safety Information
- Regulatory Compliance Statements for the EAR FORCE Stealth 450 RX & TX
- Federal Communications Commission (FCC) Compliance Notices
- This section includes the following FCC statements for the EAR FORCE Stealth 450 RX & TX:
- Class B Interference Statement
- FCC Caution:
- Non-Modification Statement
- Canadian ICES Statements IC: 3879A-TB6160 (Headset) 3879A-TB26161 (Transmitter)
- RF Radiation Exposure & Hazard Statement
- Exposition aux radiations RF & Mention de danger
- European Union and European Fair Trade Association Regulatory Compliance
- Declaration of Conformity
- Warning!
- Achtung!
- LIMITED ONE YEAR WARRANTY FOR TURTLE BEACH PRODUCTS:
- WARRANTY SERVICE:
- NOTES:
- EXCLUSIONS FROM LIMITED WARRANTY:
Brand : TURTLE BEACH
Model : Ear Force Stealth 450 DTS
Category : Headphones