
H-SPARTAN-1 - Audio/video converter Thor - Free user manual and instructions
Find the device manual for free H-SPARTAN-1 Thor in PDF.


| Brand | Thor |
| Model | H-SPARTAN-1 |
| Product Type | Audio/Video Converter |
| Dimensions (W x H x D) | 12.5 x 3.0 x 8.5 cm |
| Weight | 0.35 kg |
| Power Supply | 5V DC via USB |
| Power Consumption | 2.5 W |
| Input Interfaces | HDMI, USB |
| Output Interfaces | HDMI, 3.5mm Audio Jack |
| Supported Video Resolutions | 720p, 1080p, 4K@30Hz |
| Supported Audio Formats | PCM, Dolby Digital, DTS |
| Conversion Type | Analog to Digital / Digital to Analog |
| Main Functions | Signal conversion, scaling, audio extraction |
| Operation Temperature | 0°C to 45°C |
| Storage Temperature | -10°C to 60°C |
| Material | Aluminum alloy case |
| Included Accessories | USB cable, user manual |
| Certifications | CE, FCC, RoHS |
| Maintenance & Cleaning | Wipe with dry cloth; avoid liquids |
| Safety Precautions | Do not expose to moisture or extreme heat |
| Spare Parts & Repairability | Contact Thor support for replacement |
Frequently Asked Questions - H-SPARTAN-1 Thor
User questions about H-SPARTAN-1 Thor
0 question about this device. Answer the ones you know or ask your own.
Ask a new question about this device
Download the instructions for your Audio/video converter in PDF format for free! Find your manual H-SPARTAN-1 - Thor and take your electronic device back in hand. On this page are published all the documents necessary for the use of your device. H-SPARTAN-1 by Thor.
USER MANUAL H-SPARTAN-1 Thor
H.264 (HDMI/ SDI/ CVBS) IP Video Encode

H-SPARTAN-1
| Interfaces | |
| Input | 1×HDMI, 1×SDI, 1×CVBS |
| Output | UDP/RTP(Unicast/Multicast), HLS, HTTP, RTMP, RTMP Live (Youtube Live stream) |
| Control | LCD with 6 keys & 1 x RJ45 (Web NMS) |
| Network Interface | |
| Management | 1x1000Base-T Ethernet(RJ 45) |
| Data | 1x1000Base-T Ethernet(RJ 45) |
| Protocol | IEEE 802.3 Ethernet |
| Video Encoding | |
| Format | HD: H.264 AVC/HP@L4.0 SD:MPEG-2 MP/@ML |
| Resolution | Input : 1080 50/60p, 1080 50/60i,720 50/60p, 480i, 576iOutput: up to 1080 30p |
| Bitrate | HDMI:2~12Mbps SDI:2~12Mbps CVBS:2~6Mbps |
| Rate Control | CBR/VBR |
| Chroma Sample | 4:2:0, 4:2:2 |
| H.264 Profile | High/Main Profile |
| H.264 Level | 3.0, 3.1, 3.2, 4.0, 4.1, 4.2 |
| GOP Structure | IBP/IPPP |
| Close Caption | 608/708 |
| Audio Encoding | |
| Format | Mpeg1L2, AAC, AC3 |
| Bitrate | 64 ~ 384Kbps |
| Sample Rate | 44.1KHz, 48.0KHz |
| General | |
| Power Supply | AC 100~240V 50/60Hz |
| Display | LCD panel @ 2×16 characters, LED×5 PW(Red)/HDMI(Blue)/ SDI (Green)/ CVBS(Yellow)/ IP(Blue) |
| Dimension | 483×135×45mm |
| Weight | 1000g |
| Environmental For Operating | Temperature: 5°C- 40°CRelative Humidity: 80% @ 30°C |

flowchart
graph TD
    A["DVD player"] -->|1×CVBS| B["Router or Switch"]
    C["Set-Top-Box"] -->|1×SDI| B
    D["DVR"] --> E["Smart TV"]
    F["Media player"] --> G["Video Decoder"]
    G --> H["HD TV"]
    B --> I["NMS Control"]
    I --> J["Computer"]
    J --> K["Mobile Device"]
    B --> L["LAN"]
    L --> M["Network Gateway"]
    style A fill:#f9f,stroke:#333
    style C fill:#f9f,stroke:#333
    style D fill:#f9f,stroke:#333
    style F fill:#f9f,stroke:#333
    style B fill:#ccf,stroke:#333
    style I fill:#cff,stroke:#333
    style J fill:#ffc,stroke:#333
    style K fill:#cfc,stroke:#333
HDMI: Blue SDI: Green CVBS: Yellow IP: Blue
| HDMI LED: Blue | SDI LED: Green | CVBS LED: Yellow | IP Output LED: Blue | ||
| HDMI source | Plug in and Encoder TS Input | Blue light | X | X | Blue light |
| Blue light blinks (The settings of DATA IF and LAN are different)* | |||||
| RJ45 cable unplug | X | ||||
| Unplug or Encoder TS Stop Input | Blue light blinks | X | X | X | |
| SDI source | Plug in and Encoder TS Input | X | Green light | X | Blue light |
| Blue light blinks (The settings of DATA IF and LAN are different)* | |||||
| RJ45 cable unplug | X | ||||
| Unplug or Encoder TS Stop Input | X | Green light blinks | X | ||
| CVBS source | Plug in or Encoder TS Input | X | X | Yellow light | Blue light |
| Blue light blinks (The settings of DATA IF and LAN are different)* | |||||
| RJ45 cable unplug | X | ||||
| Unplug or Encoder TS Stop Input | X | X | Yellow light blinks | X |
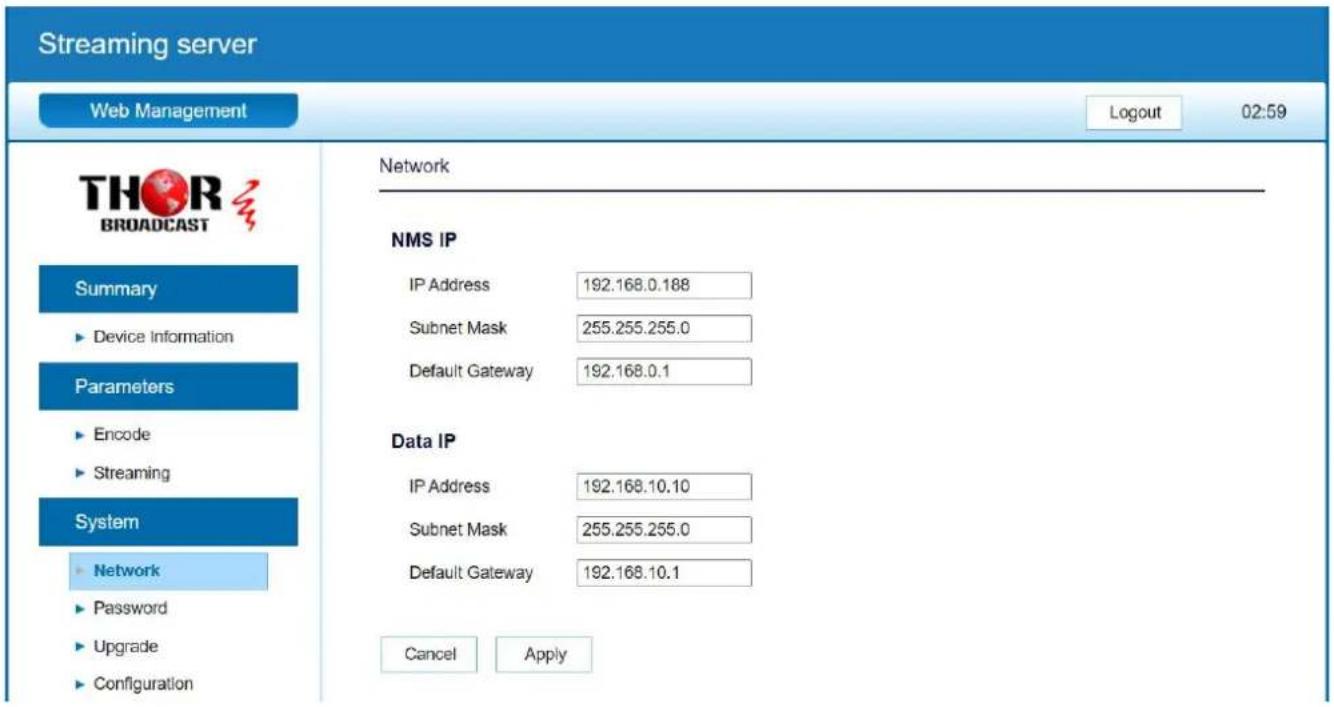
* DATA IP Default: 192.168.10.10
The device is configured using NMS. Access to the NMS is via the network connection
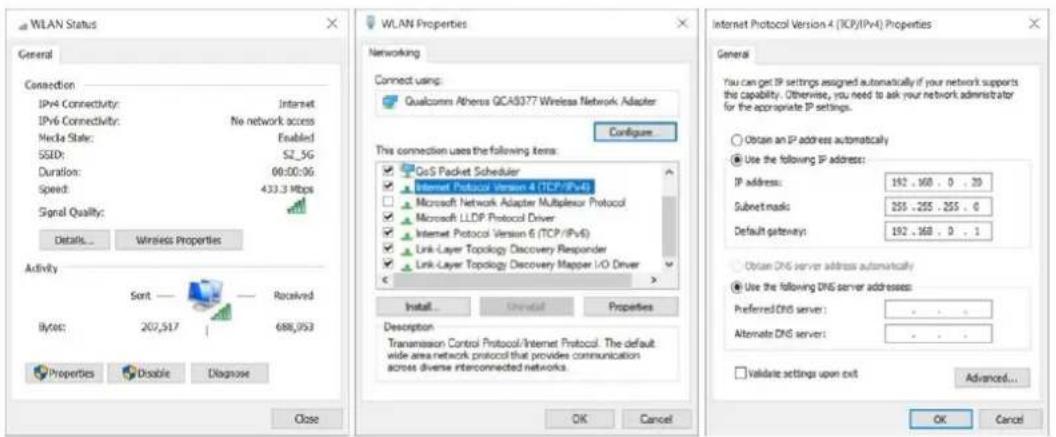
1. Set the Static Computer IP address
We must choose the static IP address according to the default gateway address. The fi three numbers must be the same (192.168.0.x in the example).
System Control> Network Connections> LAN Connection> Properties> Internet Protocol Version 4 TCP/IPv4 > Properties> Use the following IP address:
IP address Computer: 192.168.0.20 and Subnet mask: 255.255.255.0.
2. NMS connection
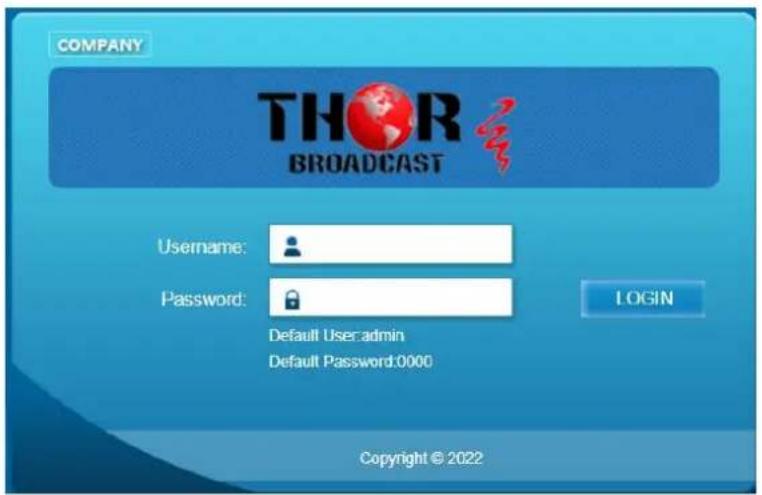
2.1 Each machine can have different username and password settings.
2.2 Please log in before operation. Default IP is 192.168.0.188; Password: 0000
3. NMS Home Page & Status
Contents of the home page includes: Device Information/Encoder Setup/Streaming Setup/Network/ Password/Upgrade/Configuration.
And device's Device Information details are also show on this page. Here you can know
Model Name, Serial Number, Firmware version, Boot Version, Encoder Version, Data MAC Address, NMS MAC Address.

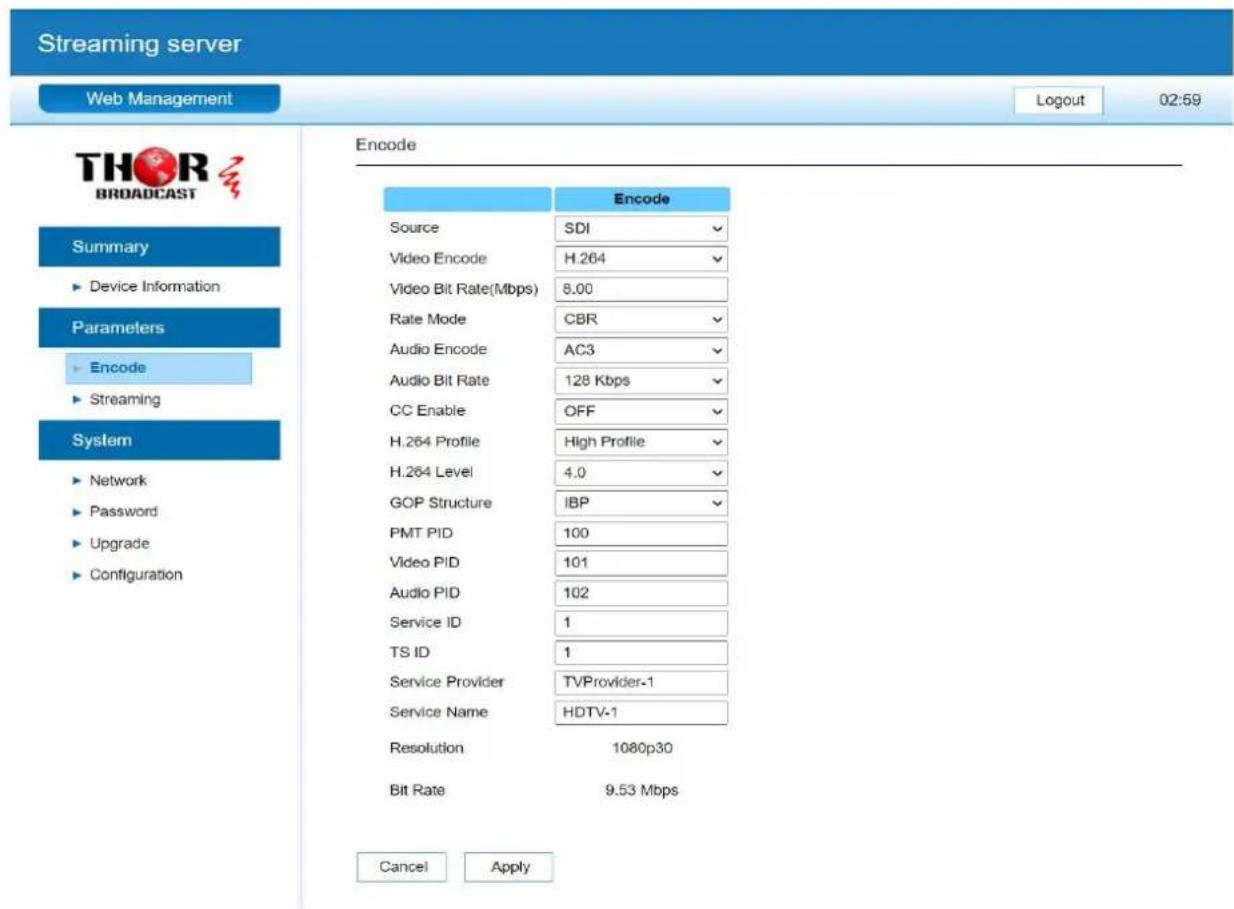
4. Encoder Setup
Use the Setting Setup Page to set the Encoder setup. You can change the program name choose the signal source is HDMI or CVBS or SDI. You can also change the Viedo Encode (HDMI / SDI Only H.264/ CVBS can chose H.264/mpeg)You can also change the Source, Video Encoder,Video Bitrate,Rate Mode, Audio Encoder, Audio Bitrate, CC Enable, H.264 Profile, H.264 Level, GOP Structure, PMT PID, Video PID, Audio PID, Service provider service Name .


5. Streaming Setup
Use the Streaming Setup Page to setup your required streaming method. You can choose UDP/RTP (unicast and multicast), HLS, HTTP, RTMP, RTMP Live. When choosing HLS/HTTP/RTMP/RTMP Live, the Video Bitrate is recommended to be below 4Mbps
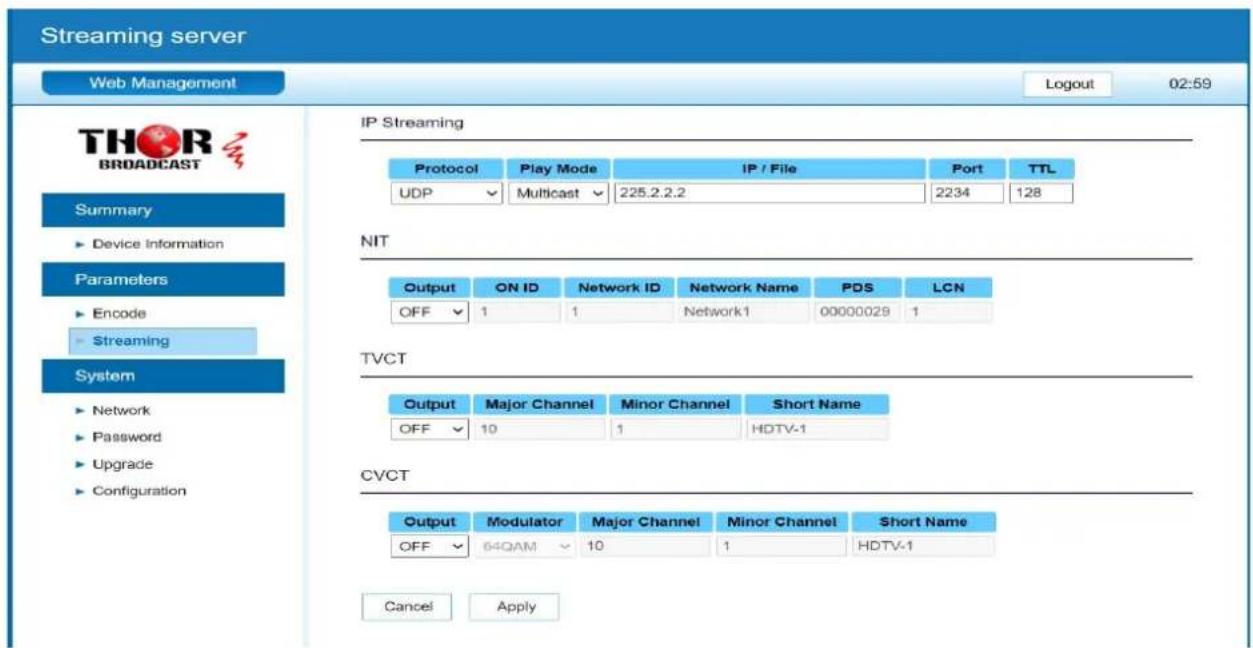
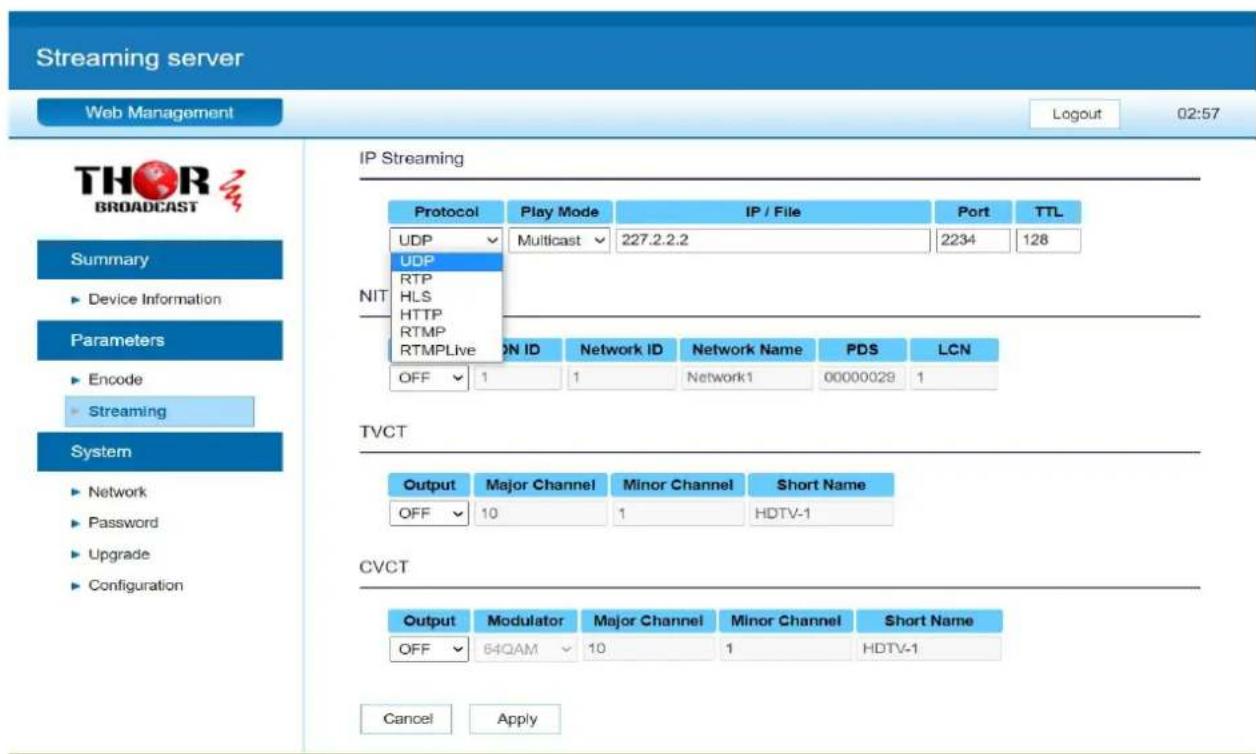
live stream on YouTube or Facebook
Step1. Select "RTMP Live" item
Step2. Step3. Enter RTMP URL and Private Key
Step3. Press the apply button
6. Network Setup
The Web Management default setting 192.168.0.188.
7. Password
You can modify the user name and password. In the New password field, enter the new password you want to change, also the same password as the new password to confirm.

8. Update Page

9. Configuration
Use the "Factory Reset" to reset configuration to factory default.
Use the "Download Config" to saved device setting configuration setting to PC.
Use the "Upload Config" to upload the file with pre-saved configuration settings to device

Brand : Thor
Model : H-SPARTAN-1
Category : Audio/video converter