
Ultimate SU740 - SSD XPG - Free user manual and instructions
Find the device manual for free Ultimate SU740 XPG in PDF.


| Product Type | SSD (Solid State Drive) |
| Brand | XPG |
| Model | Ultimate SU740 |
| Form Factor | M.2 2280 |
| Interface | PCIe Gen4 x4, NVMe 1.4 |
| Capacity | Up to 2TB |
| Sequential Read Speed | Up to 5,000 MB/s |
| Sequential Write Speed | Up to 4,500 MB/s |
| NAND Flash Type | 3D TLC |
| TBW (Terabytes Written) | Up to 1,200 TBW (for 2TB model) |
| MTBF | 2,000,000 hours |
| Dimensions (W x D x H) | 22 x 80 x 2.4 mm |
| Weight | Approx. 8 g |
| Power Consumption (Active) | Up to 6.5 W |
| Power Consumption (Idle) | Up to 1.2 W |
| Operating Temperature | 0°C to 70°C |
| Storage Temperature | -40°C to 85°C |
| Shock Resistance | 1,500 G / 0.5 ms |
| Warranty | 5 years limited |
| Key Features | PCIe Gen4 performance, low latency, efficient power management |
| Maintenance | No regular maintenance required; firmware updates via XPG software |
| Security | No built-in hardware encryption; software encryption support (e.g., BitLocker) |
| Spare Parts & Repairability | Not user-serviceable; no replaceable parts; warranty covers defects |
Frequently Asked Questions - Ultimate SU740 XPG
User questions about Ultimate SU740 XPG
0 question about this device. Answer the ones you know or ask your own.
Ask a new question about this device
Download the instructions for your SSD in PDF format for free! Find your manual Ultimate SU740 - XPG and take your electronic device back in hand. On this page are published all the documents necessary for the use of your device. Ultimate SU740 by XPG.
USER MANUAL Ultimate SU740 XPG
INSTALLING AN 2.5" SATA SSD ON A LAPTOP PC

BEFORE INSTALLATION

natural_image
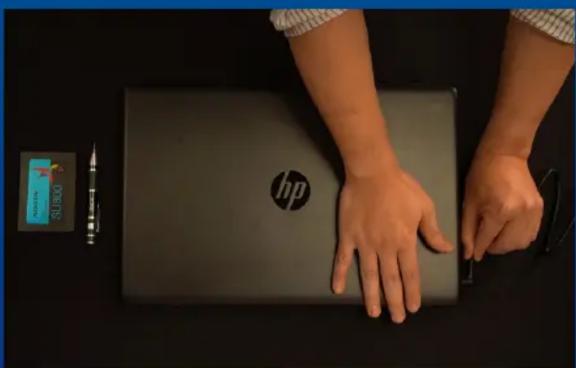
Exterior view of a HP laptop with a small Sony brand card and cable (no visible text or symbols on the device body)1. GATHER THE THINGS YOU'LL NEED
PC, Phillips screwdriver, and ADATA 2.5" SATA SSD
*Please use a standard Phillips screwdriver (3.5mm) for disassembling the case.

Make sure to backup the important data on your PC to an external device, such as an external HDD, before starting installation.

After backing up your data, power off your PC to avoid data loss or damage to other components during installation.
natural_image
Top-down view of hands holding a HP laptop with a small device nearby (no visible text or symbols on the device itself)4. UNPLUG POWER CORD AND BATTERY
This action is necessary to discharge residual power that can damage your PC and its components.
*The battery removal step applies only to laptops when it's possible to remove the battery. To see how to remove the battery, refer to your user manual.
INSTALLATION
natural_image
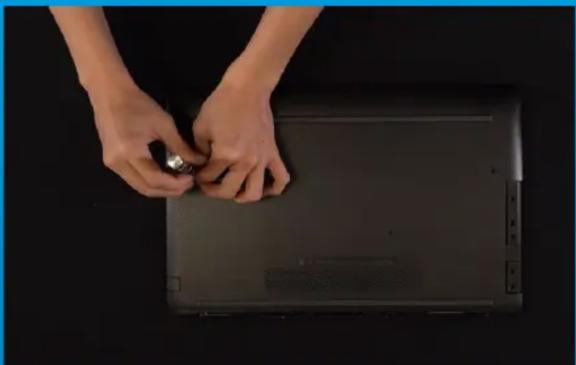
Close-up of hands holding a small object on a black electronic device casing (no visible text or symbols)1. REMOVE YOUR PC'S BACK PLATE
Use your standard Phillips screwdriver to loosen the screws and then remove the back plate.
*If you are unsure how to do this, refer to your user manual

natural_image
Person assembling a laptop motherboard with visible circuit board and drive slots (no text or symbols)2. REMOVE THE MOUNTING BRACKET AND CABLES
*The bracket is used to secure the solid state drive, because the slot is not exactly the same size as the solid state drive.

natural_image
Close-up of hands installing a CD-ROM drive into a motherboard (no visible text or symbols)3. CONNECT CABLES AND ATTACH BRACKET TO THE NEW 2.5" SSD.
There is a row of pins on the cable as well as on the SSD. Align to the correct orientation and place the bracket back into the slot.
*The slot has a foolproof design. Please insert the SSD in the direction corresponding to the pins on the solid state drive and the slot. Do not insert it forcibly to avoid damage to the product.

natural_image
Two hands holding a black rectangular electronic device against a dark background (no text or symbols visible)4. SECURE THE BACK PLATE INTO PLACE
*Do not overtighten the screws as it may cause damage

natural_image
Top-down view of hands operating a HP branded device on a dark surface, with a small electronic device visible nearby (no text or symbols on the device itself)5. PLUG IN THE POWER CORD AND POWER ON THE PC TO COMPLETE INSTALLATION





- INSTALLING AN 2.5" SATA SSD ON A LAPTOP PC
- BEFORE INSTALLATION
- GATHER THE THINGS YOU'LL NEED
- UNPLUG POWER CORD AND BATTERY
- INSTALLATION
- REMOVE YOUR PC'S BACK PLATE
- REMOVE THE MOUNTING BRACKET AND CABLES
- CONNECT CABLES AND ATTACH BRACKET TO THE NEW 2.5" SSD.
- SECURE THE BACK PLATE INTO PLACE
- PLUG IN THE POWER CORD AND POWER ON THE PC TO COMPLETE INSTALLATION
Brand : XPG
Model : Ultimate SU740
Category : SSD