
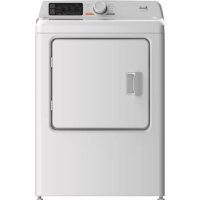
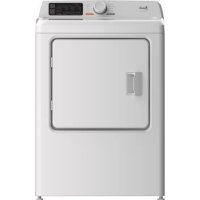
D-24 - Tumble dryer Avanti - Free user manual and instructions
Find the device manual for free D-24 Avanti in PDF.


| Product Type | Tumble Dryer |
| Brand | Avanti |
| Model | D-24 |
| Color | White |
| Power Supply | 240 V AC, 60 Hz |
| Heating Power | 2000 W |
| Motor Type | Induction, 2-pole |
| Exhaust System | Top exhaust (convertible to rear, side, or bottom) |
| Control Type | Electronic with LED display |
| Fabric Programs | Cotton, Perm Press, Delicates, Knit |
| Temperature Settings | High, Medium, Low, Cold (no heat) |
| Drying Time Range | 20–90 minutes (10-minute increments) |
| Wrinkle Ease | Anti-crease cycle with indicator light |
| Buzzer | End-of-cycle buzzer with indicator light |
| Lint Filter | Removable, clean before every load |
| Drum Material | Stainless steel |
| Door | Front loading, reversible |
| Installation | Freestanding or in closet; requires outdoor exhaust |
| Safety Features | Overheat thermostat, door switch, grounding |
| Warranty | 1 year parts and labor; 5 years on drum |
| Included Documentation | User manual, registration card, parts breakdown |
Frequently Asked Questions - D-24 Avanti
User questions about D-24 Avanti
0 question about this device. Answer the ones you know or ask your own.
Ask a new question about this device
Download the instructions for your Tumble dryer in PDF format for free! Find your manual D-24 - Avanti and take your electronic device back in hand. On this page are published all the documents necessary for the use of your device. D-24 by Avanti.
USER MANUAL D-24 Avanti
natural_image
Illustration of a washing machine with lid and front panel (no text or symbols)CAUTION:
BEFORE USE, PLEASE READ AND FOLLOW ALL SAFETY RULES AND OPERATING INSTRUCTIONS. SAVE THESE INSTRUCTIONS.
Avanti has a policy of continuous improvement on its products and reserves the right to change materials and specifications without notice.
Avanti Products
Registration Card
Thank you for purchasing this fine Avanti product. Please fill out this card and return it within 100 days of purchase and receive these important benefits:
> Protect your product:
We will keep the model number and date of purchase of your new Avanti product on file to help you refer to this information in the event of an insurance claim such as fire or theft.
> Promote better products:
We value your input. Your responses will help us develop products designed to best meet your future needs.
(detach here)
Avanti Registration Card
| Name | Model # | Serial # | ||
| Address | Date Purchased | Store/Dealer Name | ||
| City | State | Zip | Occupation | |
| Area Code | Phone Number | As Your Primary Residence, Do You: | ||
| □ Own | □ Rent | |||

Did You Purchase An Additional Warranty:
| □ Extended □ Food Loss □ None Reason For Choosing This Avanti Product: Please indicate the most important factors that influenced your decision to purchase this product. □ Price □ Product Features □ Avanti Reputation □ Product Quality □ Salesperson Recommendation □ Friend/Relative Recommendation □ Warranty □ Other | □ under 18 □ 18-25 □ 25-30 □ 31-35 □ 36-50 □ over 50 Marital Status: □ Married □ Single Is This Product Used In The: □ Home □ Business How Did You Learn About This Product: □ Advertising □ Product Features □ In Store Demo □ Personal Demo □ Other ____ Comments ____ |
Help Us Help You...
HELP US HELP YOU...
Read this guide carefully.
It is intended to help you operate and maintain your new appliance properly.
Keep it handy to answer your questions. If you don't understand something or your need more help, please call:
Avanti Customer Service 800-220-5570
Keep proof of original purchase date (such as your sales slip) with this guide to establish the warranty period.
Write down the model and serial numbers.
You'll find them on a plate located on the back wall of the appliance.
Please write these numbers here:
Date of Purchase
Model Number
Serial Number
Use these numbers in any correspondence or service calls concerning your appliance.
If you received a damaged appliance, immediately contact the dealer (or builder) that sold you the appliance.
Save time and money. Before you call for service, check the Troubleshooting Guide. It lists causes of minor operating problems that you can correct yourself.
IF YOU NEED SERVICE
We're proud of our service and want you to be pleased. If for some reason you are not happy with the service you receive, here are some steps to follow for further help.
FIRST, contact the people who serviced your appliance. Explain why you are not pleased. In most cases, this will solve the problem.
NEXT. if you are still not pleased, write all the details, including your telephone number, and send to:
Customer Service
Avanti Products
10880 NW 30 Street
Miami, FL 33172

Table of Contents
Registration Card 2
Help Us Help You
Help us help you ....3
If you need service ....3
Safety Instructions 5,6
Installation Instructions
Installation instructions exhaust .....7
Exhaust length calculation ....8
Exhaust directions 8
Special installation requirements .....9
Electrical power supply 9
Operating Instructions, Tips
About the dryer control panel(D-24) .....10
How to operate your dryer....11
Operating your dryer 12
How to load the clothes .....12
Suggested fabric and drying selections .....13
Care and Cleaning
Clean the filter before every dryer use ....14
Care and cleaning 14
Maximize your dryer efficiency by keeping
the exhaust duct clean 15
Cleaning lint from your dryer .....15
Problem Solver
Questions? Use this problem solver .....16
Your Avanti Products Warranty
What is covered limited one-year warranty .....17
Limited 5 year warranty ....17
What is not covered ....17
Parts Breakdown
Parts Breakdown/Parts List....18\~22
Wiring Digram 23
Schematic Diagram 24
Safety Instructions
Read all instructions before using this appliance

WARNING - It is extremely important that you read and adhere to the following instructions. Failure to do so could cause bodily injuries and/or property damage due to fire
- Use this appliance only for its intended purpose as described in this Owner's Manual.
- This dryer must be properly installed and located in accordance with the Installation Instructions before it is used.
- Properly ground to conform with Local Codes. Follow details in Installation Instructions.
- Locate where the temperature is above 50°F.(10°C.) for satisfactory operation of the dryer control system. Do not install or store the dryer where it will be exposed to the weather.
- Connect to a properly rated, protected and sized power supply circuit to avoid electrical overload.
- Exhausting to the outside is STRONGLY RECOMMENDED to prevent large amounts of moisture and lint from being blown into the room. Carefully follow the Exhausting Details in the Installation Instructions.
- Do not repair or replace any part of the appliance or attempt any servicing unless specifically recommended in this Owner's Manual.
- When disconnecting this appliance pull by the plug rather than the cord to avoid damage to the cord or junction of cord and plug. Make sure that the cord is located so that it will not be stepped on, tripped over or otherwise subjected to damage or stress.
- This dryer is intended for use only with fabrics that have been washed with water as a cleaning agent.
To Minimize the Possibility of a Fire Hazard
- Exhaust Duct - See Installation Instructions. Use only rigid metal or flexible metal 4" diameter ductwork for exhausting to the outside. USE OF PLASTIC OR OTHER COMBUSTIBLE DUCTWORK CAN CAUSE A FIRE. FOIL OR OTHER EASILY PUNCTURED DUCTWORK CAN CAUSE A FIRE IF IT COLLAPSES OR BECOMES OTHERWISE RESTRICTED IN USE OR DURING INSTALLATION.
- Do not use heat to dry articles containing rubber, plastic, or similar materials (such as padded bras, tennis shoes, galoshes, bath mats, rugs, bibs, pillows, baby pants, plastic bags, etc.) as these materials may melt or burn. Also, some rubber materials, when heated, can under certain circumstances produce fire by spontaneous combustion.
- Do not store items that may burn or melt (such as clothing, paper material, plastics or plastic containers, etc.) on top of the dryer during the operation.
• Garments labeled "Dry Away from Heat" must not be put in your dryer. - Do not wash or dry articles that have been cleaned in, washed in, soaked in, or spotted with combustible or explosive substances (such as wax, paint, gasoline degreasers, dry-cleaning solvents, kerosene, etc.) which may ignite or explode. Do not add these substances to the wash water. Do not use these substances around your washer and/or dryer during operation.
- Any article on which you have used a cleaning solvent, or which contains flammable materials (such as cleaning cloths, mops, towels used in beauty salons, restaurants or barber shops, etc.) must not be placed in or near the dryer until all traces of these flammable liquids or solids and their fumes have been removed. There are many highly flammable items used in homes such as: acetone, denatured alcohol, gasoline, kerosene, some household cleaners, some spot removers, turpentines, waxes, wax removers and products containing petroleum distillates.
Safety Instructions

- Clean the lint filter before each load to prevent lint accumulation inside the dryer or in the room. DO NOT OPERATE THE DRYER WITHOUT THE LINT FILTER IN PLACE.
- Keep the area around the exhaust opening, and around and underneath your appliances free from the accumulation of combustible materials, such as lint, paper, rags, chemicals, etc.
- Regularly inspect the exhaust duct to be sure it has not been crushed or otherwise restricted.
- The interior of the dryer cabinet and the exhaust duct connection inside the dryer should be cleaned every 2 to 3 years, or more often if needed, by a qualified service person.
To Minimize the Possibility of Injury
- Never reach into the dryer while the drum is moving. Before loading, unloading or adding clothes, wait until the drum has completely stopped.
- Do not dry fiberglass articles in your dryer. Skin irritation could result from the remaining glass particles that may be picked up by clothing during subsequent dryer uses.
- The laundry process can reduce the flame retardance of fabrics. To avoid such a result, the garment manufacturer's care instructions should be followed very carefully.
- Close supervision is necessary if this appliance is used by or near children. Do not allow children to play inside, on, or with this appliance or any discarded appliance. Dispose of discarded appliances and shipping or packing materials properly. Before discarding a dryer, or removing from service, remove the door of the dryer compartment.
- Keep all laundry aids (such as detergents, bleaches, fabric softeners, etc.) out of the reach of children, preferably in a locked cabinet. Observe all warnings on container labels to avoid personal injury.
- Keep the floor around your appliances clean and dry to reduce the possibility of slipping.
- To minimize the possibility of electric shock, unplug this appliance from the power supply before attempting any maintenance or cleaning (except the removal and cleaning of the lint filter).
• Do not tamper with the controls. - Do not operate this appliance if it is damaged, malfunctioning, partially disassembled, or has missing or broken parts, including a damaged cord or plug.
- Never climb on or stand on the dryer top.
- DO NOT place items exposed to cooking oils in your dryer. Items contaminated with cooking oils may contribute to a chemical reaction that could cause a clothes load to catch fire.
• The plug must be reachable after installing the appliance.

SAVE THESE INSTRUCTIONS
Installation Instructions
INSTALLATION INSTRUCTIONS EXHAUST
Installation and service must be performed by a qualified installer, service agency IMPORTANT: Have your dryer installed properly. NOTE: The WARNING and IMPORTANT instructions appearing in this manual are not meant to cover all possible conditions and situations that may occur. It must be understood that common sense, caution, and carefulness are factors that CANNOT be built into the dryer. These factors MUST BE supplied by the person(s) installing, maintaining, or operating the dryer.
the dryer. Failure to install, maintain, and/or operate this machine according to the manufacturer's instructions may result in conditions which can produce bodily injury, electric shock and/or property damage.
This dryer comes ready for top exhausting.
WARNINGS
• DO NOT USE NON METALLIC FLEXIBLE DUCT.
- Never use flexible duct inside the dryer.
- Do not terminate exhaust in a chimney, range hood, gas vent, floor or attic. The combination of lint and grease could create a fire hazard or damages.
- Provide an access for inspection and cleaning the exhaust system at least once a year.
EXHAUST LENGTH
The MAXIMUM ALLOWABLE length of the exhaust system depends upon the type of duct, number of turns, the type of exhaust hood (wall cap), and all conditions noted below. The maximum allowable length for both rigid and flexible metal duct is shown in the table 1 (next page). More than four 90irc turns is not recommended.
EXHAUST SYSTEM CHECK LIST HOOD or WALL CAP
• Terminate in a manner to prevent back drafts or entry of birds or other wildlife.
• Termination should present minimal resistance to the exhaust air flow and should require little or no maintenance to prevent clogging.
- Wall caps must be installed at least 300 mm (12") above ground level or any other obstruction with the opening pointed down.
- If roof vents or louvered plenums are used, they must be equivalent to a 100 mm (4") dampered wall cap in regard to resistance to air flow, prevention of back
drafts and maintenance required to prevent clogging.
SEPARATION OF TURNS
Separate all turns by at least 1m(3ft.) of straight duct, including distance between last turn and dampered wall cap. If two turns must be closer than 1 m (3 ft.) deduct 3 m (10 ft.) from the maximum lengths shown in the table for each occurrence.
TURNS OTHER THAN 90°
• One turn of 45° or less may be ignored.
- Two 45° turns should be treated as one 90°.
• Each turn over 45irc should be treated as one 90irc .
SEALING OF JOINTS
- All joints should be tight to avoid leaks. The male end of each section of duct must point away from the dryer.
- Do not assemble the duct work with fastener that extend into the duct. They will serve as a collection point for lint.
- Duct joints can be made air and moisture-tight by wrapping the overlapped joints with duct tape.
INSULATION
- Duct work which runs through an unheated area or is near an air conditioning duct, should be insulated to reduce condensation and lint build up and be sloped down toward outdoors.
NOTE: Never install screen inside exhaust duct.
WARNING: THE DRYER MUST
EXHAUST TO THE OUTDOORS.
TO PREVENT LARGE AMOUNTS OF LINT AND MOISTURE FROM ACCUMULATING AND TO MAINTAIN DRYING EFFICIENCY. THIS MACHINE MUST BE EXHAUSTED OUTDOORS.
Installation Instructions
EXHAUST LENGTH CALCULATION
Table 1: RECOMMENDED MAXIMUM LENGTH
| ELECTRIC DRYERS | ||||
| Weather Hood Type | ||||
| Recommended | Use only for short run installations | |||
 |  -1/2"16.35cm) -1/2"16.35cm) | |||
| No. of 90° elbows | Rigid | Metallic Flexible* | Rigid | Metallic Flexible* |
| 0 | 14m(46ft.) | 9m(30ft.) | 11m(37ft.) | 7m(24ft.) |
| 1 | 11m(38ft.) | 7.5m(25ft.) | 9m(30ft.) | 6m(20ft.) |
| 2 | 9m(31ft.) | 6m(20ft.) | 6.5m(22ft.) | 4m(14ft.) |
| 3 | 7m(24ft.) | 5m(16ft.) | 4.5m(15ft.) | 3m(10ft.) |
* Do not use non metallic flexible duct.
EXHAUST DIRECTIONS
All dryers shipped from the factory are set up for rear exhausting. However exhausting can be on the right or left side of the cabinet or the bottom of the dryer.
- Remove access panel at back of dryer to gain access to internal ducts.
- Disconnect duct exhaust from blower housing.
- Remove desired knockout plate (either right or left side).
- Attach a 90irc elbow duct to blower housing and facing desired opening.
- Reinstall rear access panel.


EXHAUST DUCT LOCATING DIMENSIONS
NOTE: Non-metallic ducts must never be used inside dryer cabinet.
Installation Instructions
SPECIAL INSTALLATION REQUIREMENTS
ALCOVE OR CLOSET INSTALLATION
- WARNING: To reduce the risk of fire, this dryer MUST BE EXHAUSTED TO THE OUTDOORS. See EXHAUST INFORMATION section.
- Minimum clearances between dryer cabinet and adjacent walls or other surfaces are: 2" either side 3" front and rear
- Minimum vertical space from floor to overhead cabinets, ceilings, etc. is 52" (132cm).
- Closet door must be louvered or otherwise ventilated and must contain a minimum of 60 sq. in. of open area equally distributed. If this closet contains both a washer and a dryer, doors must contain a minimum of 120 sq. in. of open area equally distributed.
- No other fuel-burning appliance shall be installed in the same closet with the dryer.
MINIMUM CLEARANCES OTHER THAN ALCOVE OR CLOSET INSTALLATIONS.
- Minimum clearances to combustible surfaces: 2" clearance both sides and 3" rear.
MOBILE HOME INSTALLATION
- The dryer must be exhausted to the outdoors with the termination securely fastened to the mobile home structure. (See EXHAUST INFORMATION section.)
• The exhaust MUST NOT be terminated beneath the mobile home. - Provisions must be made for the introduction of outside air into the dryer. The free air opening shall not be less than 80 cm 2 (12 in 2 )
• The exhaust duct material MUST BE METAL. - The dryer must be attached to the floor following instructions available from the dealer.
• Installation must comply with the current CAN/CSA Z240 MH series Mobile Home Installation Codes.
NOTE: CONSIDERATION MUST BE GIVEN TO INSTALLING AND SERVICING THE APPLIANCE.
ELECTRICAL POWER SUPPLY
CAUTION: NEVER USE AN EXTENSION CORD WITH THIS APPLIANCE.
- This dryer must be connected to an individual circuit identical to the one specified on the rating plate of the loading port, protected by fuses or circuit breaker conforming to local codes. THIS APPLIANCE MUST BE PROPERLY GROUNDED.
GROUNDING INSTRUCTIONS
- This appliance must be grounded. In the event of malfunction or breakdown, grounding will reduce the risk of electric shock by providing a path of least resistance for electric current. The plug must be plugged into an appropriate outlet that is properly installed and grounded in accordance with all local codes and ordinances.
WARNING:
- Improper connection of the equipment grounding conductor can result in a risk of electric shock. Check with a qualified electrician or serviceman if you are in doubt as to whether the appliance is properly grounded.
- Do not modify the plug provided with the appliance - if it will not fit the outlet, have a proper outlet installed by a qualified electrician.
Note: If the electrical power supply provided does not meet the specifications listed below, call a licensed electrician.


Operating Instructions, Tips
WARNING - To reduce the risk of fire, electric shock or injury to persons, read the IMPORTANT SAFETY INSTRUCTIONS before operating this appliance.
ABOUT THE DRYER CONTROL PANEL (D-24)

flowchart
graph TD
    A["Start Time"] --> B["1: MRRINGLE EASE"]
    A --> C["2: BLUTTER"]
    A --> D["3: TEMP"]
    A --> E["4: FABRICS"]
    A --> F["5: DRYING TIME"]
    A --> G["6: OUT"]
    A --> H["7: POWER"]
    A --> I["8: POWER"]
    J["Mid-Cause"] --> K["End of Cycle"]
    L["COOL"] --> M["COOL"]
    N["MODM"] --> O["MODM"]
    P["TEMPRESS"] --> Q["TEMPRESS"]
    R["DELICATES"] --> S["DELICATES"]
    T["OUT"] --> U["OUT"]
    V["STANTIPULSE"] --> W["START Time"]
1. Display
2. Wrinkle Ease button
Press the button to turn Anti-crease indication lamp ON. Then, press the button once more to turn the lamp OFF. You may make use of the button, when doing anti-crease your laundry.
3. Buzzer button
Press the button to turn End of Cycle indication lamp ON. When the cycle is finished, buzzer makes sound. On the other hand, press the button once more to turn End of Cycle indication lamp OFF.
4. Temperature button
Press the button to select dry temperature that you want. You may select HIGH → MEDIUM → LOW → COLD (no heating) in order, by pressing the button continuously.
5. Fabrics button
Press the button to set temperature automatically for drying, depending upon types of selected clothes. You may select COTTON → PERM PRESS → DELICATES → KNIT in order, by pressing the button continuously. At this time, you may select temperature by pressing TEMP button. You may also select HIGH, MEDIUM, LOW and COLD, etc by using COTTON and PERM PRESS mode, or may select LOW and COLD mode by using DELICATES and KNIT mode.
6. Drying Time button
Press the button to set drying time and to make dry your laundry as you want. You may select drying time (minutes) of 90 → 80 → 70 → 60 → 50 → 40 → 30 → 20 in order by pressing the button continuously.
7. Start/Pause button
Press the button to start and pause the system.
8. Power button
Press the button one time to turn the system ON, and press it once more to turn the system OFF. When the system turns ON for longer than 10 minutes without pressing any button, it automatically turns OFF.

Operating Instructions, Tips
To dry clothes using the Fabrics programs
- Open the door and put the laundry in the dryer.
- Press the power button.
- Choose the Fabrics program to the type of clothes you are drying. You will see the indications light up on the control panel.
- At this time you can control the temperature button.
- Press the Start/Pause button and dry cycle will begin.
Prepare the laundry
- To prevent tangled bundles of laundry: Close zip fasteners: button-up bed linen and pillow cases: tie-together loose tapes. e.g. aprons.
- Empty all pockets.
- Remove all metal objects (paper clips pins etc.)
- Untangle the laundry.
3-Wire System for Electric Dryers
- Remove the cover of power supply connection.
- Insert the power cord into the power cord hole, and connect with strain relief.
- Connect each conductor on the terminal block following the sketch below. Neural(center conductor) to center terminal of terminal block. Others to other terminals of terminal block.
- Fix the cover of power supply connection.

Operating Instructions, Tips
Polyester Knits & Permanent Press Drying Tips
- DO NOT OVERLOAD- Garments being dried or dewrinkled should tumble freely.
- REMOVE CLOTHES PROMPTLY- To help prevent wrinkling, remove clothes from the dryer promptly at the end of the drying cycles.
- PLACE ON HANGERS- Permanent press and polyester knit garments look best if placed on hangers after drying.
HOW TO LOAD THE CLOTHES
Don't overload your dryer. Crowded loads don't dry efficiently and clothes may be unnecessarily wrinkled.
HOW TO LOAD THE CLOTHES
As a general rule, sort clothes by surface texture, fabric, color and weight, as you would for your washer.
Do not add fabric softener sheets once the load has become warm.
Do not overload. This wastes energy and caused wrinkling.
Do not dry the following items: fiberglass items, woolens, rubber-coated items, plastics, items with plastic trim and foam-filled items.
Operating Instructions, Tips
SUGGESTED FABRIC AND DRYING SELECTIONS
| Cycle Suggested | For Clothes Load / Fabrics such as: | Drying Selection |
| Cottons | • Cottons and linens | High. Medium low, Cold(no heating) |
| Perm Press | • Permanent press fabrics with cotton• Down-filled garments. if machine washing and drying is recommended• Synthetics | ” |
| Delicates | • Silks and wools• Rayon and acetate | Low, Cold (no heating) |
| Knit | • Knit | ” |
The terms High, Medium and Low Heat are those usually found on fabric care labels.
For best results, follow your fabric care labels.

MAY BE DRIED
IN A TUMBLE
DRYER AT
MEDIUM TO
MEDIUM REGULAR
REGULAR SETTING.
(green)
MAY BE
DBIED IN A
TUMBLE
TOMBOE DRYSER AT
DATE
LOW
(yellow)
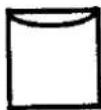
SHOULD BE
HUNG TO
DAY.
(green)

SHOULD BE
HUNG
SOAKING WET
TO DRIP CAY.
(green)
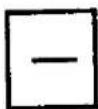
SHOULD BE
DRIED ON A
FLAT
SURFACE
(green)
Care and Cleaning
CLEAN THE FILTER BEFORE EVERY DRYER USE
Slide the grid out as shown
Clean the lint filter.
Put your moistened fingers at one corner of the filter and wipe in a sideways motion all the way across to the other corner.
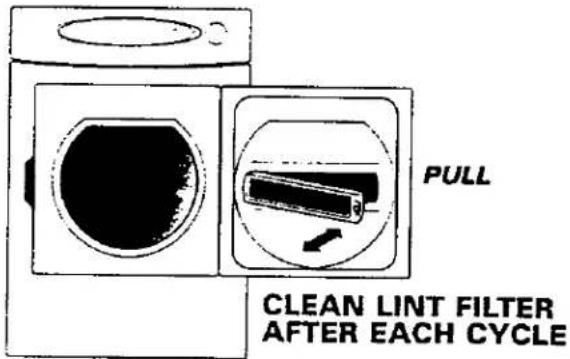
Do not operate the dryer without the grid in place.
Do not operate the dryer without the filter in place.
Periodically, remove the lint filter (it snaps in and out) and insert the suction hose adapter from your vacuum cleaner into the opening.
Do the same through the rectangular opening at top or bottom of the door and at the louvers on the cabinet front.
CARE AND CLEANING
Dryer Exterior
Wipe off any spills or washing compounds. Wipe or dust with a damp cloth. Try not to strike the surface with sharp objects.
Dryer control panel and finishes may be damaged by some laundry pre-treatment soil and stain remover products if such products are sprayed on or have direct contact with the dryer.
Apply these pre-treatment products away from the dryer. The fabric may then be washed and dried normally. Damage to your dryer caused by pre-treatment products is not covered by your warranty.


Care and Cleaning
MAXIMIZE YOUR DRYER EFFICIENCY BY KEEPING THE EXHAUST DUCT CLEAN.
- Disconnect or Turn off electrical power.
- Disconnect duct from dryer.
- Clean exhaust duct from end where dryer is connected to the exhaust hood using:
• the hose attachment of your vacuum cleaner:
- a dust rag attached to a pole (for straight stretches) or to a drain_cleaning wire (for less accessible turns).
-
Inspect exhaust hood. To minimize resistance to the exhaust air flow:
-
flap must move freely (you may check with a mirror):
- flap should be fully open when dryer is on;
- ensure that no wildlife (birds. insects,...) have nested inside the duct.


CLEANING LINT FROM YOUR DRYER
Combustible lint may collect on the inside of the dryer cabinet. CLEAN EVERY 2 TO 3 YEARS OR MORE OFTEN DEPENDING ON USAGE.
Cleaning should be done by a qualified service person.
ALWAYS VERIFY PROPER OPERATION AFTER SERVICING
Problem Solver
QUESTIONS? USE THIS PROBLEM SOLVER
| PROBLEM | POSSIBLE CAUSE |
| DRYER WON'T START | Dryer unplugged. Make sure power cord is plugged in.No power to dryer. Check fuses and circuit breakers to make sure dryer is getting current. Most electric dryers use two.Controls improperly set. Make sure controls are and that the Start button is pressed. Opening the door during operation stops the dryer. To restart, close the door and push the Start button.Dryer door is open. Close door securely - dryer will not run with door open.Circuit is overloaded. Do not operate other appliances on the same electrical outlet or circuit while the dryer is in operation. |
| CLOTHES TAKE TOO LONG TO DRY | Controls improperly set. Check all controls to make sure they are correctly set for the load you want to dry. See the How to Operate Your Dryer section. See the Care and Cleaning section.Clogged lint filter. Clean filter before every load. Periodically remove lint filter and clean area under it with vacuum cleaner.Improper ducting. Make sure dryer is ducted in accordance with the Installation Instructions.Obstruction in exhaust ducting. Make sure ducting is clean and free of obstruction: make sure damper in outside wall cap operates easily. If flexible ducting is used, be sure it is not kinked and is properly installed according to the Installation Instructions.Blow n fuses or tripped circuit breakers. Check household fuses or circuit breakers. Most electric dryers use two. It is possible for one to be blown or tripped and the dryer still tumble without heat.Improper sorting. Do not mix heavy, hard-to-dry items with lightweight articles.Large loads of moisture-holding fabrics, such as beach towels, take a long time to remove moisture.Too many items in dryer. Dry only one washer load at a time. Do not combine loads.Too few items in dryer. If drying only one article, add two more similar articles, even if dry, to ensure proper tumbling. |
| SHRINKAGE,GENERAL | Some fabrics will shrink whether machine washed and tumble dried or washed by hand and drip dried; others may be safely washed but will shrink in a dryer. Follow Garment Manufacturers' Care Labels exactly. If in doubt, do not machine wash or tumble dry. |
| WRINKLING | Leaving clothes in dryer after tumbling stops. Remove clothes promptly and hang them immediately.Improper loads. Avoid laundering heavy Permanent Press items, such as work clothes, with lighter Permanent Press items, such as shirts or blouses. Do not wash or dry Permanent Press with regular laundry.Failure to use fabric softener. Proper use of fabric softener will minimize wrinkling. |
| TO REMOVE WRINKLES | Try one or more of these suggestionsRetumble on Perm-Press setting.Rerinse and dry on Perma Press setting.If unsuccessful, retumble on high heat for 10-12 minutes and hung immediatelyIron carefullySend to dry cleaners for pressingSome wrinkles may remain which cannot be removed.*NOTE: If you follow good laundry procedures and Permanent Press clothes still come out wrinkled the finish may not be good quality. Also, in permanent press synthetic/cotton blends the cotton portion of the fabric can eventually wear away leaving only the synthenc. Since it's the cotton portion which is treated for Permanent Press, a loss or decrease of Permanent Press performance will result. "Easy Care" fabrics may eventually lose their finish and wrinkle even with proper care. |
Your Avanti Products Warranty
WHAT IS COVERED LIMITED ONE-YEAR WARRANTY
For one year from the date of purchase by the original owner, Avanti Products will, at its option, repair or replace any part of the appliance that proves to be defective in material or workmanship under normal use. During this period Avanti Products will provide all parts and labor necessary to correct such defects free of charge, so long as the appliance has been installed and operated in accordance with the written instructions in this manual. In rental or commercial use, the warranty period is 90 days.
Staple your sales receipt here. Proof of original purchase date is needed to obtain service under warranty.
LIMITED 5 YEAR WARRANTY
After one year and until five years from date of purchase. Avanti will furnish a replacement drum, which is defective in material or workmanship. You will be charged for labor.
WHAT IS NOT COVERED
- Incidental or consequential damages.
• Service calls to:
• Correct the installation of your dryer.
• Instruction on how to use your dryer.
- Replace house fuses or incorrect house wiring or plumbing.
• Repairs performed by unauthorized servicers.
• Repairs when your dryer is used in other than normal, single-family household use.
• Service calls that are related to external problems, such as abuse, misuse, inadequate electrical power, accidents, fire, floods, or acts of God.
- Failure of the product if it is used for other than its intended purpose.
- Pickup and delivery. Your driver is designed to be repaired in the home.
• Repairs caused by unauthorized modifications made to the appliance.
• This warranty does not apply outside the Continental U.S.A..

PARTS BREAKDOWN

PARTS LIST
| No. | Code No. | Description | Specification | Q'ty | Remarks |
| 1 | DC97-01091R | ASSY-PANEL CONTROL | D-24.AVANT/DRYER/OEM | 1 | |
| 2 | DC64-00013Y | INLAY-PANEL | D-24.PC.-L/GRY.-AVANT/DRYER | 1 | PANEL |
| 3 | DC63-00055A | PANEL-DRAWER | D-24.ABS(HG-0780),PEARL_WHT(W9737),DRYER/AVAN | 1 | |
| 4 | DC64-00036F | INLAY-DETERGENT | D-24.PC.-L/GRY.-AVANT/DRYER/ | 1 | PANEL-DRAWER |
| 5 | DC63-00118A | COVER-DRAWER | D-24/DRYER,EGI.T0.5.-UL | 1 | PANEL-DRAWER |
| 6 | DC60-20030A | SCREW TAPPING | FH.-1.D4.L12,NTR.- | 1 | PANEL+FRAME |
| 7 | DC60-20054C | SCREW TAPPING | TH.-1.D4.L12.FE FZY.- | 1 | PANEL+DRAWER |
| 8 | MF-D24JW-00 | ASSY-PCB PARTS | D-24 | 1 | |
| 9 | DC60-20049A | SCREW TAPPING | SCM430.2.PH.+D4.L12.-.-.- | 3 | C-PANEL+PCB |
| 10 | DC61-30044A | FRAME-PLATE(U) | EGI.NTR.SWF-P12 | 1 | |
| 11 | 6009-001240 | SCREW-SPECIAL | SM10C.-TH.,M5.L12,ZPC(YEL),1 | 2 | PLATE(U) |
| 12 | DC60-20060A | SCREW TAPPING | TH.+2.D4.L8.FE,FZY | 4 | FRAME-PLATE(U) |
| 13 | DC97-00851D | ASSY-COVER TOP | DV5008J/DRYER,WOODWHT(W9737)/TAPE | 1 | |
| 14 | DC60-30015B | SCREW-SPECIAL | FLANGE.PH.+D4.L12.ZnFe(YEL).- | 2 | COVER-TOP+FRAME |
| 15 | DC99-00095A | ASSY-PAINT FRAME | DV5008J,DRYERWHT | 1 | |
| 16 | DC81-40081A | HOLDER-WIRE | NYLON66.-,DAWH-2NC,NTR(PI18.5) | 16 | FRAME |
| 17 | DC97-01428A | ASSY-GASKET PAD | DV5008J,GASKET-FELT/REAR | 1 | |
| 18 | ASSY-MOTOR DUCT | D-24.240V/60Hz | 1 | ||
| 19 | DC60-10019B | SCREW MACHINE | RH.-M5.L12.STS430,SEAL-LOCK | 4 | MOTOR+FRAME |
| 20 | DC63-00108A | SPONGE-PLATE | DV5008J.PU-FOAM.T13.W15.L440,GRY,DRYER/PLATE( | 1 | PLATE-LOWER |
| 21 | DC61-10672A | COVER-FRONT(L) | SWF-P12.PP(BJ-730),.-,WHT(W9737),.- | 1 | |
| 22 | DC63-00136A | CAP-LOWER PLATE | DV5008J,EPDM.-,BLACK,DRYER/HARDNESS_60,- | 1 | LOWER-PLATE |
| 23 | DD60-20010D | SCREW TAPPING | TH.+2.D4.L12,ZPC2(NTR).- | 3 | DUCT-FRONT+FRAME |
| 24 | DC61-00214A | LEG | DV5008J,ABS(VE0856),5V,WHITE(W9737),,DRYER | 4 | |
| 25 | DC66-00121A | BELT-TRANSMISSION | DV5008J,RUBBERL1975,REINFORCED,DRYER/DAYCO | 1 | |
| 26 | DC97-01424B | ASSY-DRUM | DV5008J,DRYER/STS | 1 | |
| 27 | DC61-00215A | PLATE-SPRING | SK5.T0.3,SDF-50V1,DRYER | 1 | |
| 28 | DC66-00062A | BUSH-SHAFT | POM(TS-22),ID13.2,OD18.6,DRYER/WHT | 1 | |
| 29 | DC60-20054C | SCREW TAPPING | TH.-1.D4.L12.FE FZY.- | 4 | BUSH+FRAME |
| 30 | DC60-60003A | WASHER-PULSATOR | -ID13.2,OD24,T1.5,SBHG,STS304 | 1 | F/SHAFT |
| 31 | 6044-001042 | RING-E | ID10,OD20,T1,BLK,SK5 | 1 | F-SHAFT |
| 32 | DC63-00045A | COVER-BUSHING | DV5008J/DRYER,PP(TBS4),.-,WHT(W9711),.- | 1 | |
| 33 | DC60-20054C | SCREW TAPPING | TH.-1.D4.L12.FE FZY.- | 1 | COVER-BUSH |
| 34 | DC63-00049A | COVER-POWER CORD | DV5008J,SECCP.T0.6.-,DRYER.- | 1 | |
| 35 | DC60-20060A | SCREW TAPPING | TH.-2.D4.L8.FE,FZY | 1 | C/POWER+FRAME |
| 36 | 3716-001155 | TERMINAL-BLOCK | NON SOLDER.6P,-,600V.30A | 1 | |
| 37 | DC61-00222A | BRACKET-TERMINAL BLOCK | EGI.T0.5,SDF-50V1,-,DRYER,-.-.- | 1 | |
| 38 | DD60-20010D | SCREW TAPPING | TH.-2.D4.L12,ZPC2(NTR).- | 2 | TERMINAL-BLOCK |
| 39 | DC60-20060A | SCREW TAPPING | TH.-2.D4.L8.FE,FZY | 1 | BK-THER+FRAME |
| 40 | DC60-10023A | SCREW MACHINE | TH.-D4.L10,ZPC2,TAP-TITE | 1 | EARTH-WIRE |
| 41 | DC47-00005D | HEATER | IRCA,DV5008J,MICA.2000W.8A.230V.-L170.W80.-FOR | 1 | |
| 42 | 6031-001258 | WASHER-PLAIN | STS304-ID6.5,OD17.8.T2.0,PASS | 2 | HEATER |
| 43 | DC63-00059A | COVER-HEATER | DV5008J,SECCP.T0.6.-,DRYER.- | 1 | |
| 44 | DC60-50019A | NUT-FLANGE | -M4.-MSWR10.- | 2 | HEATER+COVER-HEATER |
| 45 | DC60-20060A | SCREW TAPPING | TH.-2.D4.L8.FE,FZY | 4 | CHEATER+FRAME |
| 46 | DC61-00300A | BRACKET-HEATER | DV5008J,EGI.-,T0.6.-,DRYER | 1 | |
| 47 | DC60-20060A | SCREW TAPPING | TH.-2.D4.L8.FE,FZY | 1 | BK-HEATER |
| 48 | DC47-00002C | THERMOSTAT | SDF-V501.-250V.16A.145.-.-.-ZENTAN | 1 | DUCT-INLET |
| 50 | 6002-000588 | SCREW-TAPPING | TH.-2.M4.L5,ZPC(YEL),MSWR10 | 2 | THERMOSTAT |
| 51 | DC62-00060A | DUCT-OUTLET | DV5008J.GI.T0.5,OD100.L350,ID97,DRYER | 1 | |
| 52 | DC63-00050A | COVER-BACK | DV5008J,SECCP.T0.5.-,DRYER.- | 1 | |
| 53 | DC60-20060A | SCREW-TAPPING | TH.-2.D4.L8.FE,FZY | 3 | C-BACK-FRAME |
| 54 | DC96-00224A | ASSY-WIRE HARNESS | SDF-50V1.MIUJ | 1 |

PARTS BREAKDOWN


| No. | Code No. | Description | Specification | Q'ty | Remarks |
| 1 | DC61-00210A | SUPPORT-DRUM | DV5008J,PP(TH54M),WHT(W9711),----,DRYER | 1 | |
| 3 | DC63-00138A | CAP-LAMP | D-24,SILICON,--,NTR,DRYER/HARDNESS_65,- | 1 | |
| 4 | DC69-00154A | PAD-GASKET | PE-FELT,..,SDF-50V1,DRYER(FRONT) | 1 | |
| 5 | DC66-00070A | BUSH-SUPPORT DRUM | POM(FL20-03)+TEFRON,--,DV5008J/WHT | 4 | |
| 6 | DC99-00096A | ASSY-PAINT FRONT | DV5008J/DRYER,FRAME-FRONT,WHT | 1 | |
| 7 | DC60-20060A | SCREW TAPPING | TH,+2,D4,L8,FE,FZY | 8 | FRAME-FRONT |
| 8 | DC64-00129A | DOOR-S/W | ----,SDF-50V1,.,WHT,DC24V(PUSH-S/W) | 1 | |
| 9 | DC97-01429A | ASSY-GUIDE LEVER | DV5008J,DRYER/PP+SK5 | 4 | |
| 10 | DC63-00097A | CAP-FRONT FRAME | DV5008J,PP(TBS4),..,WHT(W9711),DRYER,- | 2 | |
| 11 | 6002-000445 | SCREW-TAPPING | TH,+2S,M4,L18,NTR,STS304 | 4 | SUPPORT-D+FRAME-F |
| 12 | DC63-00108B | SPONGE-PLATE | DV5008J,PU-FOAM,T13,W35,L440,GRY,DRYER/FRONT | 1 | FRAME-FRONT |
| 13 | DC62-00069A | DUCT-FRONT | DV5008J,PP(TH54M),..,WHT/DRYER | 1 | |
| 14 | DC63-00062A | SPONGE-UCT | DC5008J,PE-FOAM,T6,W6,L660,GRY,DRYER/FRONT | 2 | DUCT-FRONT |
| 15 | DC63-00063A | SPONGE-UCT | DV5008J/DRYER,PU-FOAM,T13,W10,L435,BLACK,REAR | 1 | DUCT-FRONT |
| 16 | DC61-00305A | FIXER-HINGE | -,DV5008J,PP(TBS4)/WHT(W9711),--,DRYER | 2 | DUCT-FRONT |
| 17 | DD60-20010C | SCREW TAPPING | TH,+2,D4,L12,ZPC2(NTR),- | 2 | DUCT-F+FIXER-HINGE |
| 18 | 6002-000445 | SCREW-TAPPING | TH,+2S,M4,L18,NTR,STS304 | 2 | DUCT-F+FRAME-F |
| 19 | ASSY-DOOR | DV5008J,DRYER/WHT | 1 | ||
| 20 | DC60-20140B | SCREW TAPPING | FH,+1,D4,L20,STS304,.. | 4 | HINGE+FRONT-FRAME |
PARTS BREAKDOWN


| No. | Code No. | Description | Specification | Q'ty | Remarks |
| 1 | DC62-00064A | SEAL-DOOR | PVC.GRY.DRYER,L1189,T0.5.W9 | 1 | |
| 2 | DC62-00064B | SEAL-DOOR | PVC.GRY.DRYER,L805.T0.5.W9 | 1 | |
| 3 | DC63-00096A | COVER-HINGE | DV5008J.PP(TB54),.-,WHT(W9711),DRYER,- | 2 | |
| 4 | DC63-00046A | COVER-DOOR | DV5008J.PP(TH54M),.-,WHT(W9711),DRYER,- | 1 | |
| 5 | DC64-00099A | DOOR-FRONT | EGLT0.6,.-,SDF-50V1,.-,DRYER | 1 | |
| 6 | 6002-001139 | SCREW-TAPPING | FH.,-1.M3.L16,BLK,SWRCH18A | 4 | COVER-DOOR+DOOR-F |
| 7 | DC66-00112A | LEVER-DOOR | DV5008J.POM(FL20-03),T3,.-,,WHT(W9711),DRYER | 2 | DOOR |
| 8 | DC60-20030A | SCREW TAPPING | FH.,-1.D4.L12,NTR,- | 2 | LEVER-DOOR |
| 9 | DC63-00058A | COVER-SCREW | DV5008J.PP(TB54),.-,WHT(W9711),DRYER,- | 2 | COVER-DOOR |
| 10 | DC64-00096A | HANDLE-DOOR | DV5008J.ABS(VE0856),.-,PEARL_WHT(W9737),5V,-,DRYER | 1 | |
| 11 | DC97-01490A | ASSY-HINGE | DV5008J.STS430/2T | 2 | |
| 12 | DC60-20030A | SCREW TAPPING | FH.,-1.D4.L12,NTR,- | 4 | HINGE+COVER-DOOR |
| 13 | DC97-01427A | ASSY-FILTER | DV5008J.DRYER/WHT/PP(TB54) | 1 | |
| 14 | DC62-00058A | FILTER | PP(TB54),NYLON MESH,DV5008J.DRYER,WHT(W9711) | 1 | |
| 15 | DC63-00057A | COVER-FILTER | DV5008J.PP(TB54),.-,WHT(W9711),DRYER,- | 1 |
PARTS BREAKDOWN
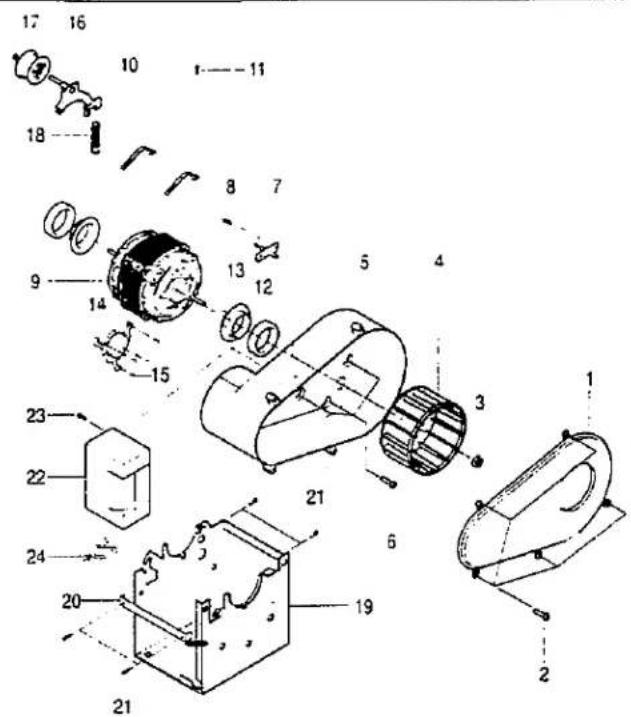
| No. | Code No. | Description | Specification | Q'ty | Remarks |
| 1 | DC63-00056A | COVER-DUCT FAN | SDF-50V1,PP(TH54M),.-,WHT,DRYER,- | 1 | - |
| 2 | DD60-20010D | SCREW TAPPING | TH,+2,D4,L12,ZPC2(NTR),- | 5 | COVER-DUCT+DUCT |
| 3 | DC60-50148A | NUT-HEX | SM20C(NYLON),M8,-,ZPC3(YEL),-,HEX,SQ-PROJECT | 1 | FAN |
| 4 | DC66-00063A | FAN | PP(A353),DRYER,NTR | 1 | - |
| 5 | DC62-00056A | DUCT-FAN | DV5008J,PP(TH54M)/WHT,-,..,DRYER | 1 | - |
| 6 | DC60-20060A | SCREW TAPPING | TH,+2,D4,L8,FE,FZY | 3 | DUCT+MOTOR |
| 7 | DC90-10128H | ASSY-THERMISTOR | KS-PJT,RUBBER ADD | 1 | DUCT-FAN |
| 8 | DD60-20010D | SCREW TAPPING | TH,+2,D4,L12,ZPC2(NTR),- | 1 | THERMIS+DUCT |
| 9 | DC31-00024A | MOTOR-DRYER | IC-14240SSWA,DRYER,-,60Hz,-,3000,-,240V,B,-,2POLE | 1 | - |
| 10 | DC61-00218A | FIXER-MOTOR | EGI,T1,SDF-50V1,DRYER,-,- | 2 | - |
| 11 | DC60-20060A | SCREW TAPPING | TH,+2,D4,L8,FE,FZY | 2 | FIXER+BUSH-MOTOR |
| 12 | DC61-00304A | CUSHION-MOTOR | -DV5008J,CR,-,DRYER | 2 | - |
| 13 | DC66-00111A | BUSH-MOTOR | POM(FL20-03),ID40,OD62,DV5008J(DRYER) | 2 | - |
| 14 | DC61-00244A | SUPPORT-MOTOR | EGI,T1.0,SDF-50V1,-,DRYER,-,..,- | 2 | - |
| 15 | DC60-10003A | SCREW MACHINE | -,M4,L6,FZY,- | 6 | SUPPORT-MOTOR |
| 16 | DC61-00302A | BRACKET-IDLER | DV5008J,GI(HOT GI),-,T2.0,-,DRYER | 1 | - |
| 17 | DC66-00077A | ROLLER-BELT | DV5008J,POM(FL20-03),-,WHT,-,DRYER | 1 | - |
| 18 | DC61-00306A | SPRING-TENSIONER | DV5008J,HDSW-C,*2.0,-,L68,18,OD16.7,-,NTR,-,- | 1 | - |
| 19 | DC61-00217A | BRACKET-MOTOR | EGI,T1.6,SDF-50V1,-,DRYER,-,..,- | 1 | - |
| 20 | DC61-00301A | SUPPORT-BRACKET MOTOR | DV5008J,EGI,-,T0.6,L112,W10,DRYER | 2 | - |
| 21 | DC60-20060A | SCREW TAPPING | TH,+2,D4,L8,FE,FZY | 4 | B/K-SUPPORT-MOTOR |
| 22 | DC62-00070D | CONDENSER-M.F | ABS,L74,W35,-,DRYER(450VAC,6MFD) | 1 | - |
| 23 | DD60-20010D | SCREW TAPPING | TH,+2,D4,L12,ZPC2(NTR),- | 1 | CONDENSOR |
| 24 | DC61-40081A | HOLDER-WIRE | NYLON66,-,DAWH-2NC,NTR(PI18.5) | 1 | B/K-MOTOR |
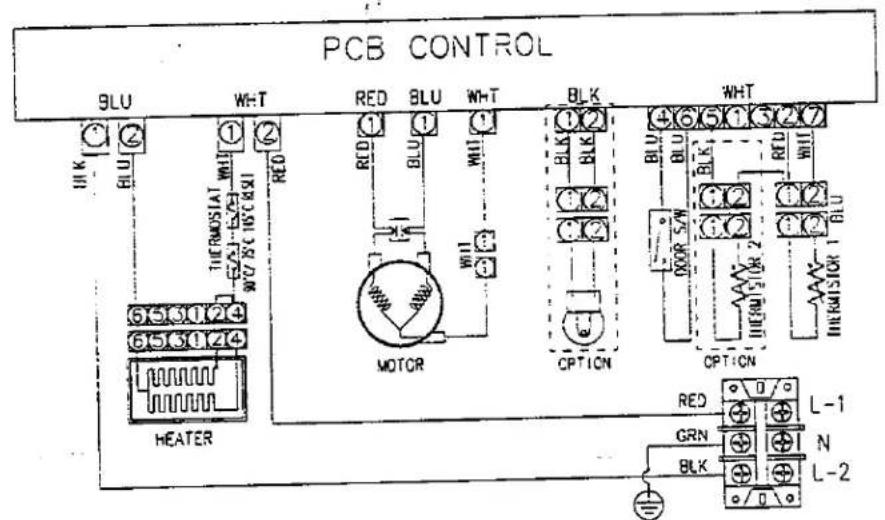
WIRING DIAGRAM


SCHEMATIC DIAGRAM
SCHEMAT.C D.AGRAM
DC68-00551A
- Registration Card
- > Protect your product:
- > Promote better products:
- Help Us Help You...
- Avanti Customer Service 800-220-5570
- IF YOU NEED SERVICE
- Table of Contents
- Registration Card 2
- Help Us Help You
- Safety Instructions 5,6
- Installation Instructions
- Operating Instructions, Tips
- Care and Cleaning
- Problem Solver
- Your Avanti Products Warranty
- Parts Breakdown
- Safety Instructions
- Read all instructions before using this appliance
- To Minimize the Possibility of a Fire Hazard
- To Minimize the Possibility of Injury
- SAVE THESE INSTRUCTIONS
- INSTALLATION INSTRUCTIONS EXHAUST
- WARNINGS
- EXHAUST LENGTH
- EXHAUST SYSTEM CHECK LIST HOOD or WALL CAP
- SEPARATION OF TURNS
- TURNS OTHER THAN 90°
- SEALING OF JOINTS
- INSULATION
- EXHAUST LENGTH CALCULATION
- EXHAUST DIRECTIONS
- SPECIAL INSTALLATION REQUIREMENTS
- ALCOVE OR CLOSET INSTALLATION
- MINIMUM CLEARANCES OTHER THAN ALCOVE OR CLOSET INSTALLATIONS.
- MOBILE HOME INSTALLATION
- ELECTRICAL POWER SUPPLY
- GROUNDING INSTRUCTIONS
- WARNING:
- Display
- Wrinkle Ease button
- Buzzer button
- Temperature button
- Fabrics button
- Drying Time button
- Start/Pause button
- Power button
- To dry clothes using the Fabrics programs
- Prepare the laundry
- 3-Wire System for Electric Dryers
- HOW TO LOAD THE CLOTHES
- CLEAN THE FILTER BEFORE EVERY DRYER USE
- Dryer Exterior
- MAXIMIZE YOUR DRYER EFFICIENCY BY KEEPING THE EXHAUST DUCT CLEAN.
- CLEANING LINT FROM YOUR DRYER
- WHAT IS COVERED LIMITED ONE-YEAR WARRANTY
- LIMITED 5 YEAR WARRANTY
- WHAT IS NOT COVERED
- WIRING DIAGRAM
- SCHEMATIC DIAGRAM
Brand : Avanti
Model : D-24
Category : Tumble dryer