
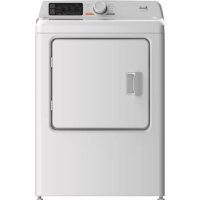
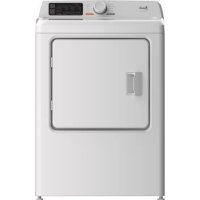
D110 - Tumble dryer Avanti - Free user manual and instructions
Find the device manual for free D110 Avanti in PDF.


| Product Type | Tumble Dryer |
| Brand | Avanti |
| Model | D110 |
| Dimensions (H x W x D) | 85 x 60 x 60 cm |
| Weight | 35 kg |
| Power Supply | 220-240 V ~ 50 Hz |
| Power Consumption | 2000 W |
| Drying Capacity | 7 kg |
| Drying Programs | Cotton, Synthetics, Delicates, Timed, Anti-Crease |
| Energy Efficiency Class | C |
| Noise Level | 65 dB |
| Lint Filter | Removable, washable |
| Condenser Unit | Self-cleaning condenser |
| Control Type | Electronic with LED display |
| Door Type | Reversible hinge |
| Safety Features | Child lock, overheating protection, door open indicator |
| Maintenance | Clean lint filter after each cycle; clean condenser annually |
| Repairability Index | 6.5 / 10 |
| Spare Parts Availability | Motor, belt, heating element, control board |
| Warranty | 2 years |
Frequently Asked Questions - D110 Avanti
User questions about D110 Avanti
0 question about this device. Answer the ones you know or ask your own.
Ask a new question about this device
Download the instructions for your Tumble dryer in PDF format for free! Find your manual D110 - Avanti and take your electronic device back in hand. On this page are published all the documents necessary for the use of your device. D110 by Avanti.
USER MANUAL D110 Avanti
natural_image
Line drawing of a washing machine with front panel and control buttons (no text or symbols)CAUTION:
BEFORE USE, PLEASE READ AND FOLLOW ALL SAFETY RULES AND OPERATING INSTRUCTIONS.
Avanti has a policy of continuous improvement on its products and reserves the right to change materials and specifications without notice.
Avanti Products
P.O. Box 520604 - Miami, Florida 33152
www.avantiproducts.com
TABLE OF CONTENTS
Appliance Safety 3
Important Safeguards 4
Help Us Help You 5
Parts and Features 6
Important Safety Instructions 7
Installation Instructions 7
Before Using Your Dryer 7
Wall Mounting Instructions 8 – 10
Leveling Legs 11
Electrical Connection 11
Control Panel 11
Operating Your Appliance 12
Drying Time Reference 12
Sorting Fabrics 13
Fabric Care Sheet 14
Care and Maintenance 15
Cleaning Your Appliance Exterior 15
Cleaning the Filters 15
Troubleshooting Guide 16
Service for Your Appliance 16
Your Avanti Products Warranty 17
Registration Information and Registration Card 19
APPLIANCE SAFETY
Your safety and the safety of others are very important.
We have provided many important safety messages in this manual and on your appliance. Always read and obey all safety messages.

This is the Safety Alert Symbol. This symbol alerts you to potential hazards that can kill or injure you and others. All safety messages will follow the Safety Alert Symbol and either the words" DANGER", "WARNING" or "CAUTION".

DANGER!
Danger means that failure to heed this safety statement may result in severe personal injury or death.

WARNING
Warning means that failure to heed this safety statement may result in extensive product damage, serious personal injury, or death.
CAUTION
Caution means that failure to heed this safety statement may result in minor or moderate personal injury, or property or equipment damage.
All safety messages will alert you to what the potential hazard is, tell you how to reduce the chance of injury, and let you know what can happen if the instructions are not followed.
IMPORTANT SAFEGUARDS

Before the appliance is used, it must be properly positioned and installed as described in this manual, so read the manual carefully. To reduce the risk of fire, electrical shock or injury when using the appliance, follow basic precautions, including the following:

DANGER

- Plug into a grounded 3-prong outlet, do not remove grounding prong, do not use an adapter, and do not use an extension cord
- Replace all panels before operating
- It is recommended that a separate circuit, serving only your appliance, be provided. Use receptacles that cannot be turned off by a switch or pull chain
- Never clean appliance parts with flammable fluids. These fumes can create a fire hazard or explosion. And do not store or use gasoline or other flammable vapors and liquids in the vicinity of this or any other appliance. The fumes can create a fire hazard or explosion.
- Before proceeding with cleaning and maintenance operations, make sure the power line of the unit is disconnected.
- Do not connect or disconnect the electric plug when your hands are wet
- Unplug the appliance or disconnect the power before cleaning or servicing. Failure to do so can result in electrical shock or death.
- Do not attempt to repair or replace any part of your appliance unless it is specifically recommended in this material. All other servicing should be referred to a qualified technician.

WARNING

- Use two or more people to move and install the appliance. Failure to do so can result in back or other injury.
- To ensure proper ventilation for your appliance, the front of the unit must be completely unobstructed. Choose a well-ventilated area with temperatures above 55ircF ( 13ircC ) and below 90ircF ( 32ircC ). This unit must be installed in an area protected from the elements, such as wind, rain, water spray or sunlight.
- The appliance should not be located next to ovens, grills or other sources of high heat.
- The appliance must be installed with all electrical, water and drain connections in accordance with state and local codes. A standard electrical supply (115 V AC only, 60 Hz), properly grounded in accordance with the National Electrical Code and local codes and ordinances is required.
- Do not kink or pinch the power supply cord of the appliance.
- The fuse (or circuit breaker) size should be 15 amperes.
- It is important for the appliance to be leveled in order to work properly. You may need to make several adjustments to level it.
- All installation must be in accordance with local plumbing code requirements.
- Make certain that the pipes are not pinched or kinked or damaged during installation.
- Check for leaks after connection.
- Never allow children to operate, play with or crawl inside the appliance
- Do not use solvent-based cleaning agents or abrasives on the interior. These cleaners may damage or discolor the interior.
- Do not use this apparatus for other than its intended purpose.
HELP US HELP YOU...
Read this guide carefully.
It is intended to help you operate and maintain your new appliance properly.
Keep it handy to answer your questions. If you don't understand something or your need more help, please call:
Avanti Customer Service 800-220-5570
Keep proof of original purchase date (such as your sales slip) with this guide to establish the warranty period.
Write down the model and serial numbers.
You'll find them on a plate located on the back wall of the appliance.
Please write these numbers here:
Date of Purchase
Model Number
Serial Number
Use these numbers in any correspondence or service calls concerning your appliance.
If you received a damaged appliance, immediately contact the dealer (or builder) that sold you the appliance.
Save time and money. Before you call for service, check the Troubleshooting Guide. It lists causes of minor operating problems that you can correct yourself.
IF YOU NEED SERVICE
We're proud of our service and want you to be pleased. If for some reason you are not happy with the service you receive, here are some steps to follow for further help.
FIRST, contact the people who serviced your appliance. Explain why you are not pleased. In most cases, this will solve the problem.
NEXT, if you are still not pleased, write all the details, including your telephone number, and send to:
Customer
Service
Avanti Products
10880 NW 30 Street
Miami, FL 33172
PARTS AND FEATURES

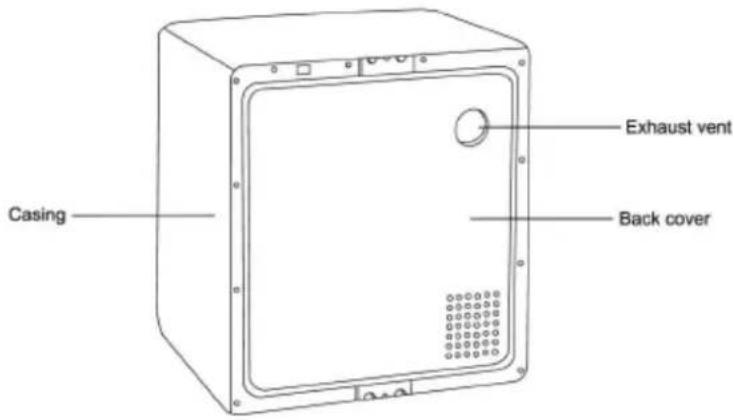
Important Safety Instructions
| WARNING | To reduce the risk of fire, electrical shock, or injury when using your appliance, follow these basic precautions: |
| Read all instructions before using the appliance.DANGER or WARNING:Risk of child entrapment.Child entrapment and suffocation are not problems of the past. Junked or abandoned appliances are still dangerous. . . even if they will “just sit in the garage a few days.”Before you throw away your old appliance:Take off the door so that children may not easily climb inside.Never allow children to operate, play with, or crawl inside the appliance.Never clean appliance parts with flammable fluids. The fumes can create a fire hazard or explosion.Do not place the dryer in steamy rooms or where the dryer is directly exposed to rain. Moisture may destroy the electrical insulation causing an electrical shock hazard.During spinning, don’t put your hand in the spin basket: Because the spin basket is rotating at high speed, rotating parts may injure your hand.Do not store or use gasoline or any other flammable vapors and liquids in the vicinity of this or any other appliance. The fumes can create a fire hazard or explosion.-Save these instructions- | |
Installation Instruction
Before Using Your Appliance
- Remove the exterior and interior packing.
- Check to be sure you have all of the following parts:
• Instruction Manual
- Wall Mounting Kit (See "Wall Mounting Instructions")
- Allow at least 5 inches of space between the sides of the appliance.
- Put your laundry into the dryer evenly. Uneven laundry may cause noise or vibration.
- Before drying, check all pockets. If nails or pins remain in pockets, they may damage the dryer or clothes.
- Never splash water on the control panel.
- Plug the dryer into an exclusive properly installed-grounded wall outlet. Do not under any circumstances cut or remove the third (ground) prong from the power cord. Any questions concerning power and or grounding should be directed toward a certified electrician or an authorized Avanti Products service center.
▶ Selecting a Location
Before you install the dryer, select a location with the following characteristics:
- A hard level surface (if the surface is uneven, see "Adjusting the Leveling Legs").
- If you are going to wall mount your dryer using the wall mounting kit included (see "Wall Mounting Instructions").
- Away from direct sunlight. Direct sunlight may affect the acrylic coating, plastic and electrical components.
- Adequate ventilation
• Room temperature that will not fall below 0irc C. - Away from sources of heat such as coal or gas. Make sure that the dryer does not stand on its power cord. Ventilation openings must not be obstructed by carpeting when the dryer is installed on a carpeted floor.
▶ Wall Mounting Instructions
| Tools Required (Not Included) | ||
| Tools and parts required for Plaster and or Wood Installation | Drill & Drill Bit 1 | |
| Phillips Head Screw Driver 1 | ||
| Expanding Wall Anchor 8 | ||
| Wooden Slats 2 | ||
| Wall Mounting Kit Includes the following: | ||
| Description | Wall Hanging Bracket 2 | |
| 1" Phillips Head Screws 4 | ||
| Plastic Spacers 2 | ||
| 12 " Phillips Flat Head Screws 2 | ||
| Exhaust Pipe 1 | ||
| 12 " Phillips Round Head Screws 3 | ||
| ** It is recommended to complete the following procedure with at least 2 people **As wall materials vary, supplied hardware for fixing to the wall may be inappropriate for your wall type.Consult your local hardware / home improvement center for suggestions on the necessary hardware for your particular wall type. | ||
| a) | Determine the position where you will be installing the mounting bracket.This dryer is not designed to sit on top of your washing machine.A minimum of 2 inches is required between the top of the dryer and the ceiling above to allow easy installation and adequate spacing for exhaust.If mounting above a top load washing machine, allow sufficient spacing to open the lid of the washer or in the case of a front loading washer allow sufficient breathing space. | |
| b) | Although the supplied mounting brackets can be installed directly to the wall using the existing wooden studs, the preferred method of installation is using wooden slats that provide a flat level installation surface and added stability to the whole wall installation. | |
| c)d) | Use two wooden slats (not included) between the studs to mount the brackets.Required wooden slat size 23" Long x 3 1⁄2" High x 1" DeepWhen using the wooden slats to install on drywall material you must use expansion wall anchor bolts to safely secure the slats to the drywall.Install the wall mounting brackets to the wooden slats installed in the previous step.Using the (4)1” Phillips Round head screws included, affix the mounting bracket to the wooden slats as shown in the diagram to the right. |  Fig. 2 Fig. 2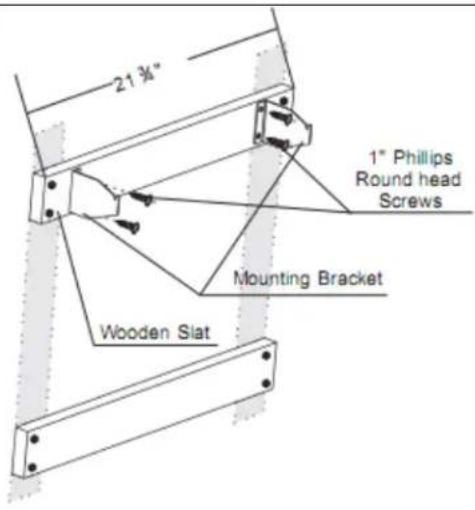 |
| e)f) | Install the exhaust pipe as shown in the illustration using the (3) 1⁄2” long Phillips Flat head screws included.For a downward exhaust join the sections (1) pointing downward.For an upward exhaust join the sections (2) pointing upwardInstall the lower wall spacers (included) using the (2 ) 1⁄2" long Phillips Round head screws (included).These spaces are required when installing the unit on the wall to allow the necessary ventilation for efficient operation.Failure to install the spacers will both reduce the ventilation needed to operate your unit as well as put the appliance in tilted position on the wall which could present a possible unstable wall installation. | Fig. 3Section 1 Fig. 4 Fig. 4 |
| g) | Mounting the dryer to the wall hanging assembly.With the assistance of 2nd person lift the dryer and align the mounting holes at the rear of the dryer with the mounting brackets.Tilting the dryer to a 45° angle insert the hanging brackets into the mounting holes on the dryer as shown in the figure to the right.Once the dryer mounts are in place slowly lower the dryer in place and check all installation points for stress or weakened contact. | Fig. 5 |
Adjusting the leveling legs
To install and adjust the leveling legs see the illustration to the right.
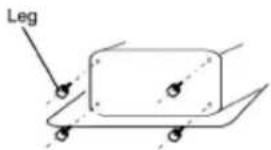
If the floor is uneven adjust the legs (do not insert pieces of wood, or any other objects under the legs)
- Adjust the height level of the legs accordingly.
Place the dryer on a sturdy flat surface.
If the dryer is placed on an uneven or weak surface, noise or vibration will occur. (Allowable is 1irc )
Electrical Connection
Warning
Improper use of the grounded plug can result in the risk of electrical shock. If the power cord is damaged, have it replaced by an authorized Avanti Products service center.
This appliance should be properly grounded for your safety. The power cord of this appliance is equipped with a three-prong plug which mates with standard three prong wall outlets to minimize the possibility of electrical shock.
Do not under any circumstances cut or remove the third ground prong from the power cord supplied.
Use of extension cord is not recommended.
This appliance requires a standard 115/120-volt, 60Hz electrical outlet with three-prong ground.
The cord should be secured behind the appliance and not left exposed or dangling to prevent accidental injury.
CONTROL PANEL
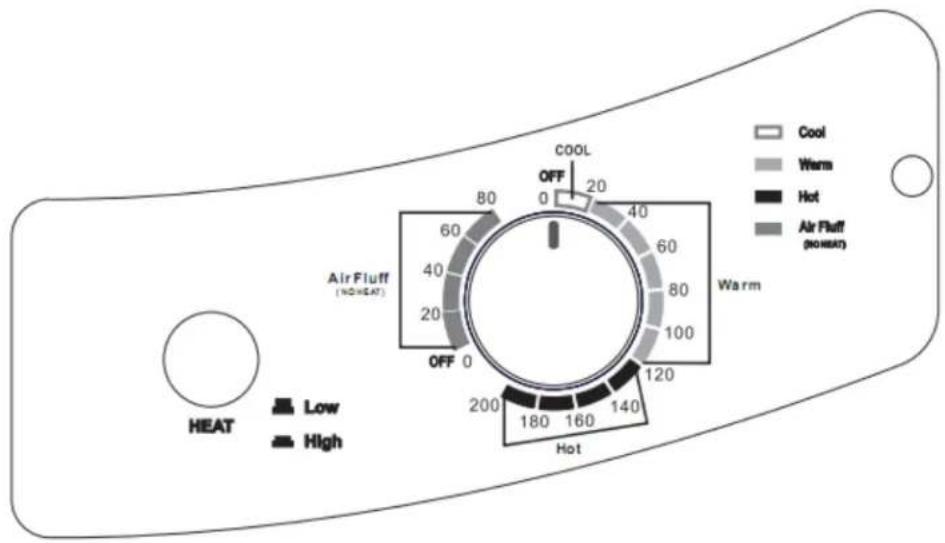
radar
| Temperature Level | Air Fluff (kW) | | ------------------ | -------------- | | Low | 20 | | High | 180 | | Medium | 160 | | High | 140 | | Low | 200 | | High | 200 | | Medium | 120 | | High | 100 | | Low | 80 | | High | 60 | | Medium | 40 | | High | 20 | | Low | 0 | | High | 0 | | Medium | 0 | | High | 0 | | Low | 0 | | High | 0 | | Medium | 0 | | High | 0 | | Low | 0 | | High | 0 | | Medium | 0 | | High | 0 | | Low | 0 | | High | 0 | | Medium | 0 | | High | 0 | | Low (AIR Fluff) | 0 | | Medium (AIR Fluff)| 0 | | High (AIR Fluff) | 0 |OPERATING INSTRUCTIONS

flowchart
graph TD
    A["Air Fluff (NO HEAT):"] --> B["Off"]
    B --> C["COOL"]
    C --> D["WARM"]
    D --> E["High heat setting"]
    E --> F["HOT"]
    F --> G["OFF"]
    G --> H["Air Fluff (NO HEAT):"]
    style A fill:#f9f,stroke:#333
    style B fill:#ccf,stroke:#333
    style C fill:#cfc,stroke:#333
    style D fill:#fcc,stroke:#333
    style E fill:#cff,stroke:#333
    style F fill:#ffc,stroke:#333
    style G fill:#cfc,stroke:#333
    style H fill:#fcc,stroke:#333


LOW HIGH
Heat Selector Knob
DRYING TIME REFERENCE
** LOAD WEIGHTS AND RESPECTIVE DRYING TIMES ARE APPROXIMATE **
| Drying Capacity Drying Times | ||
| High Heat Low Heat | ||
| 3 (Three) Lbs 30 Minutes 55 Minutes | ||
| 5 (Five) Lbs 60 Minutes 110 Minutes | ||
| 7 (Seven) Lbs 120 Minutes | ||
| 9 (Nine) Lbs 200 Minutes | ||
Sorting Fabrics
For the best drying results, clothes should be sorted properly. Separate the lint shedders (chenille and terry cloth) from the lint collectors (synthetics, flannel and fabrics with a nap, such as velveteen and corduroy). Separate non-colorfast from light colored items, heavy fabrics from light weight fabrics and permanent press from heavy, bulky items.
Do not tumble dry
Read all permanent care labels carefully. If a garment's care label says "Drip Dry", "Line Dry" or "Dry Flat", do not dry in the dryer. Certain materials will melt or become dangerously flammable if heated, while others may lose their shape. Other items that should not be tumble dried are:
- Items that have been dry-cleaned at home.
- Wool (unless the garment's manufacturer recommends it)
- Fiberglass
- Laminated or rubber coated items
- Vinyl or plastic
- Do not use fabric softeners or products to eliminate static unless recommended by manufacturer of the fabric softener or product.
WARNING:
To reduce the risk of fire, electric shock, or injury to persons, read the IMPORTANT SAFETY INSTRUCTIONS before operating this appliance.
Drying Time
Drying time depends on many factors, such as the amount of washing, how damp it is, the type of fabrics, rated power of the machine and the temperature of the room. It also, of course, depends on how dry you want the washing when you take it out of the machine.
Shrinkage
Knitted fabrics in particular are liable to shrink. Do not use the extra dry program for these materials, and always stretch them out directly after drying.
Dryer Added Fabric Softeners
Because some dryer added fabric softeners may cause damage to automatic dryers, use only ones that the manufacturers give a written assurance that their softeners can safely be used in your dryer.
Single Items
Use the timed program when there is only one item to be dried. This is because the automatic program may turn off the heating too early, so that the item is not properly dried.
If The Washing Is Not Dry After Tumble-Drying
When using the automatic programs, it can happen that not all of the washing is properly dry. This may be due to such reasons as very heavy fabrics or thick seams. To dry these items, give a further 10 minutes or so in the timed program. Also do not overload the dryer. If the dryer is overloaded, its efficiency is lessened and clothes may not dry evenly.
Do not over-dry
When using the timed program, it is possible to over-dry fabrics, if too long a time has been set. This can cause the fabrics to wrinkle, shrink or feel harsh. Synthetic materials can also become charged with static electricity.
Fabric Care Chart
| Resistant material | Can be ironed at 100°C max | ||
| Delicate fabric | Do not iron | ||
| Item may be washed at 95°C | A | Can be dry cleaned using any Solvent | |
| Item may be washed at 60°C | P | Dry clean with perchloride, lighter fuel, pure alcohol or R113 only | |
| Item may be washed at 40°C | F | Dry clean with aviation fuel, pure alcohol or R113 only | |
| Item may be washed at 30°C | Do not dry clean | ||
| Item may be hand washed | Dry flat | ||
| Dry clean only | Can be hung to dry | ||
| Can be bleached in clod water | Dry on clothes hanger | ||
| Do not bleach | Tumble dry, normal heat | ||
| Can be ironed at 200°C max | Tumble dry, reduced heat | ||
| Can be ironed at 150°C max | Do not tumble dry |
CARE AND MAINTENANCE
▶ Cleaning the Exterior
- Wipe the dryer surfaces, including the control panel, with a soft cloth and non-abrasive household detergents.
- Use a soft cloth to dry the surfaces.
- Do not pour water on the dryer.
▶ Cleaning the Filters
Unplug the power cord prior to any cleaning.
| Cleaning the Lint Filter: | ||
| a) | Removing the Lint Filters:Remove by pulling outward using the four (4) grip holes in the filter assembly. | ALL FILTERS MUST BE IN PLACE WHEN DRYING FILTERS MUST BE CLEANED BEFORE AND AFTER EACH USE. |
| b) | The filter assembly consists of three (3) parts(See illustration)a) Exhaust Vent Shroudb) Lint Filterc) Exhaust Filter | 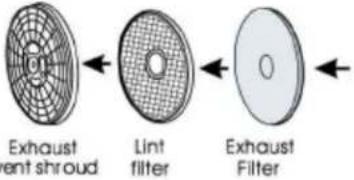 |
| c) | Separate each of the above parts and clean the individual pieces using a SOFT brush or vacuum cleaner. DO NOT damage the filters | 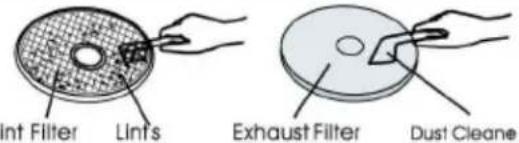 |
| d) | Re-install the filter assemblyReassemble the filter assembly in order Exhaust Filter – Lint Filter – Exhaust ShroudAlign the entire assembly with the recessed position in the back of the drum and press firmly until the entire assembly is secure. |  Figure 3 Figure 3 |
| Cleaning the Air Intake Filter | ||
| a) | Removing the Air Intake Filter:Remove by pulling outward holding the filter housing by the top and bottom. |  |
| b) | Remove the filter inside the housing and clean using a SOFT brush or vacuum cleaner. | 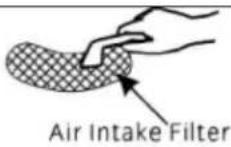 |
| c) | Replace the filter housing by pushing upwards with your thumb until the latch is secure. | |
PROBLEMS WITH YOUR DRYER?
You can solve many common appliance problems easily, saving you the cost of a possible service call. Try the suggestions below to see if you can solve the problem before calling the servicer.
TROUBLESHOOTING GUIDE
| PROBLEM | POSSIBLE |
| Timer knob will not rotateDryer does not operate.Drum does not rotate | Not plugged in.The circuit breaker tripped or blown fuse.Door is not closed. |
| Laundry not completely dry Clean the Filter | Reduce the amount of clothing loaded in the dryer.Re-dry the loaded itemsEnsure items are not knotted or bulked together.Dryer is not located in a well ventilated area. |
CAUSE
SERVICE FOR YOUR DRYER
We are proud of our customer service organization and the network of professional service technicians that provide service on your Avanti appliances. With the purchase of your Avanti dryer, you can have the confidence that if you ever need additional information or assistance, the Avanti Products Customer Service team will be here for you. Just call us toll-free.
AVANTI PRODUCTS CUSTOMER SERVICES
| Product Information800-323-5029 | Whatever your questions are about our products, help is available. |
| Part Orders800-220-5570 | You may order parts and accessories that will be delivered directly to your home.You may order these items by personal check, money order, Master Card, or Visa. |
| In-Home Repair Service800-220-5570 | An Avanti Products authorized service center will provide expert repair service, scheduled at a time that is convenient for you. Our trained servicers know your dryer inside and out. |
WHAT IS COVERED LIMITED ONE-YEAR WARRANTY
For one year from the date of purchase by the original owner, Avanti Products will, at its option, repair or replace any part of the appliance that proves to be defective in material or workmanship under normal use. During this period Avanti Products will provide all parts and labor necessary to correct such defects free of charge, so long as the appliance has been installed and operated in accordance with the written instructions in this manual. Avanti Products will provide you with a reasonably similar replacement product that is either new or factory refurbished. In rental or commercial use, the warranty period is 90 days.
LIMITED 7 YEAR WARRANTY ON STAINLESS STEEL TUB
After one year and until seven years from date of purchase, Avanti will furnish a replacement stainless steel tub which is defective in material or workmanship. You will be charged for labor.
WHAT IS NOT COVERED
- Incidental or consequential damages.
• Service calls to: - Correct the installation of your dryer.
- Instruction on how to use your dryer.
- Replace house fuses or incorrect house wiring or plumbing.
• Repairs performed by unauthorized servicers. - Repairs when your dryer is used in other than normal, single-family household use.
- Shipping and handling costs associated with the replacement of the unit.
- Service calls that are related to external problems, such as abuse, misuse, inadequate electrical power, accidents, fire, floods, or acts of God.
- Surcharges including, but not limited to, any after hour, weekend, or holiday service calls, tolls, ferry trip charges, or mileage expense for service calls to remote areas, including the State of Alaska.
- Failure of the product if it is used for other than its intended purpose.
- Pickup and delivery. Your dryer is designed to be repaired in the home.
- Repairs caused by unauthorized modifications made to the appliance.
- This warranty does not apply outside the Continental U.S.A.
Registration Information
Thank you for purchasing this fine Avanti product. Please fill out this card and return it within 100 days of purchase and receive these important benefits:
Protect your product:
We will keep the model number and date of purchase of your new Avanti product on file to help you refer to this information in the event of an insurance claim such as fire or theft.
➢ Promote better products:
We value your input. Your responses will help us develop products designed to best meet your future needs.
(detach here)-
Avanti Registration Card
| Name | Model # | Serial # | ||||
| Address | Date | Purchased | Store/Dealer | Name | ||
| City | State | Zip | Occupation |
As Your Primary Residence, Do You:
| Area Code | Phone Number | □Own | □Rent |
| Did You Purchase An Additional Warranty: | Your Age: | ||
| □Extended | □None | □under 18 | □18-25 □26-30 |
| Reason For Choosing This Avanti Product: | □31-35 | □36-50 □over 50 | |
| Please indicate the most important factors that influenced your decision to purchase this product. | Marital Status: | ||
| □Married | □Single | ||
| Is This Product Used In The: | |||
| □Price | □Home | □Business | |
| □Product Features | How Did You Learn About This Product: | ||
| □Avanti Reputation | □Advertising | □Product Features | |
| □Product Quality | □In Store Demo | □Personal Demo | |
| □Salesperson Recommendation | □Other | ||
| □Friend/Relative Recommendation | Comments | ||
| □Warranty | |||
| □Other | |||
PRINTED IN CHINA
- TABLE OF CONTENTS
- APPLIANCE SAFETY
- IMPORTANT SAFEGUARDS
- DANGER
- WARNING
- HELP US HELP YOU...
- Read this guide carefully.
- Avanti Customer Service 800-220-5570
- Write down the model and serial numbers.
- IF YOU NEED SERVICE
- Important Safety Instructions
- Installation Instruction
- Before Using Your Appliance
- ▶ Selecting a Location
- ▶ Wall Mounting Instructions
- Adjusting the leveling legs
- Electrical Connection
- CONTROL PANEL
- OPERATING INSTRUCTIONS
- DRYING TIME REFERENCE
- Sorting Fabrics
- Do not tumble dry
- WARNING:
- Drying Time
- Shrinkage
- Dryer Added Fabric Softeners
- Single Items
- If The Washing Is Not Dry After Tumble-Drying
- Do not over-dry
- CARE AND MAINTENANCE
- ▶ Cleaning the Exterior
- ▶ Cleaning the Filters
- PROBLEMS WITH YOUR DRYER?
- TROUBLESHOOTING GUIDE
- SERVICE FOR YOUR DRYER
- AVANTI PRODUCTS CUSTOMER SERVICES
- WHAT IS COVERED LIMITED ONE-YEAR WARRANTY
- LIMITED 7 YEAR WARRANTY ON STAINLESS STEEL TUB
- WHAT IS NOT COVERED
- Registration Information
- Protect your product:
- ➢ Promote better products:
Brand : Avanti
Model : D110
Category : Tumble dryer