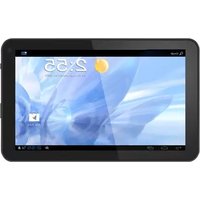
Brisa - Tablet Primux - Free user manual and instructions
Find the device manual for free Brisa Primux in PDF.


| Product Type | Tablet |
| Brand | Primux |
| Model | Brisa |
| Dimensions | 240 x 160 x 9 mm |
| Weight | 400 g |
| Display Size | 10.1 inches |
| Resolution | 1280 x 800 pixels |
| Processor | Quad-core 1.5 GHz |
| RAM | 2 GB |
| Storage | 32 GB |
| Battery Capacity | 4000 mAh |
| Operating System | Android 10 |
| Connectivity | Wi-Fi 802.11 b/g/n, Bluetooth 4.0 |
| Camera (Rear) | 5 MP |
| Camera (Front) | 2 MP |
| Ports | Micro USB, 3.5 mm headphone jack |
| Power Supply | 5V/2A charger (via Micro USB) |
| Cleaning | Wipe with a soft, dry cloth. Avoid liquids. |
| Safety | Do not expose to extreme temperatures or moisture. |
| Spare Parts | Contact Primux support for replacement parts. |
Frequently Asked Questions - Brisa Primux
User questions about Brisa Primux
0 question about this device. Answer the ones you know or ask your own.
Ask a new question about this device
Download the instructions for your Tablet in PDF format for free! Find your manual Brisa - Primux and take your electronic device back in hand. On this page are published all the documents necessary for the use of your device. Brisa by Primux.
USER MANUAL Brisa Primux
natural_image
Close-up of a black USB cable with metal connector (no text or symbols visible)Cable USB
Disco duro
natural_image
Camera interface showing camera, lens, and screen icons (no text or symbols)
comenzar.
- Appearance....31
- Power switch usage 32
- Touch screen.... 32
- Adapter cable....32
- TF card usage....33
- Getting started.... 33
Charging the device....33
Battery management 34
Start-up 34
Wi-Fi network settings 34
- Desktop....36
- Locking desktop 37
- Programs 39
- Desktop menu function 40
- Program Manager 40
Installing programs....40
Downloading applications from Internet directly....40
Uninstalling the application 41
- Sound recorder 42
- Clock 42
- Downloads 43
- Browser 44
- Calendar....45
- Camera 45
- Calculator....46
- E-mail 46
- File Manager 48
Copying files between PC and the device 49
Deleting files 49
- My music....50
- My video....50
- Gallery 51
- Maps 51
- Local search....52
- E-market....52
- Settings 53
Appendix: Optional accessory and model....55
Tips
When you use this device, please follow the safety notice below to prevent fire, electric shock and injury.
- Keep the device away from rain and moisture.
- Keep the device away from direct sunlight and heat source.
- Protect the power cord. When connect the power cord, do not step onto it or place any object on it, which may cause extrusion. Protect the connector of the power cord connected devices specially.
- Please use the original power adapter for charging. Nonconforming chargers may cause harms.
- Do not disassemble the shell or repair it without authorization.
Cleaning
Handle the screen gently. To clear the fingerprints or dust on the screen, use soft cloth dedicated for camera lens instead of gauze.
1. Appearance
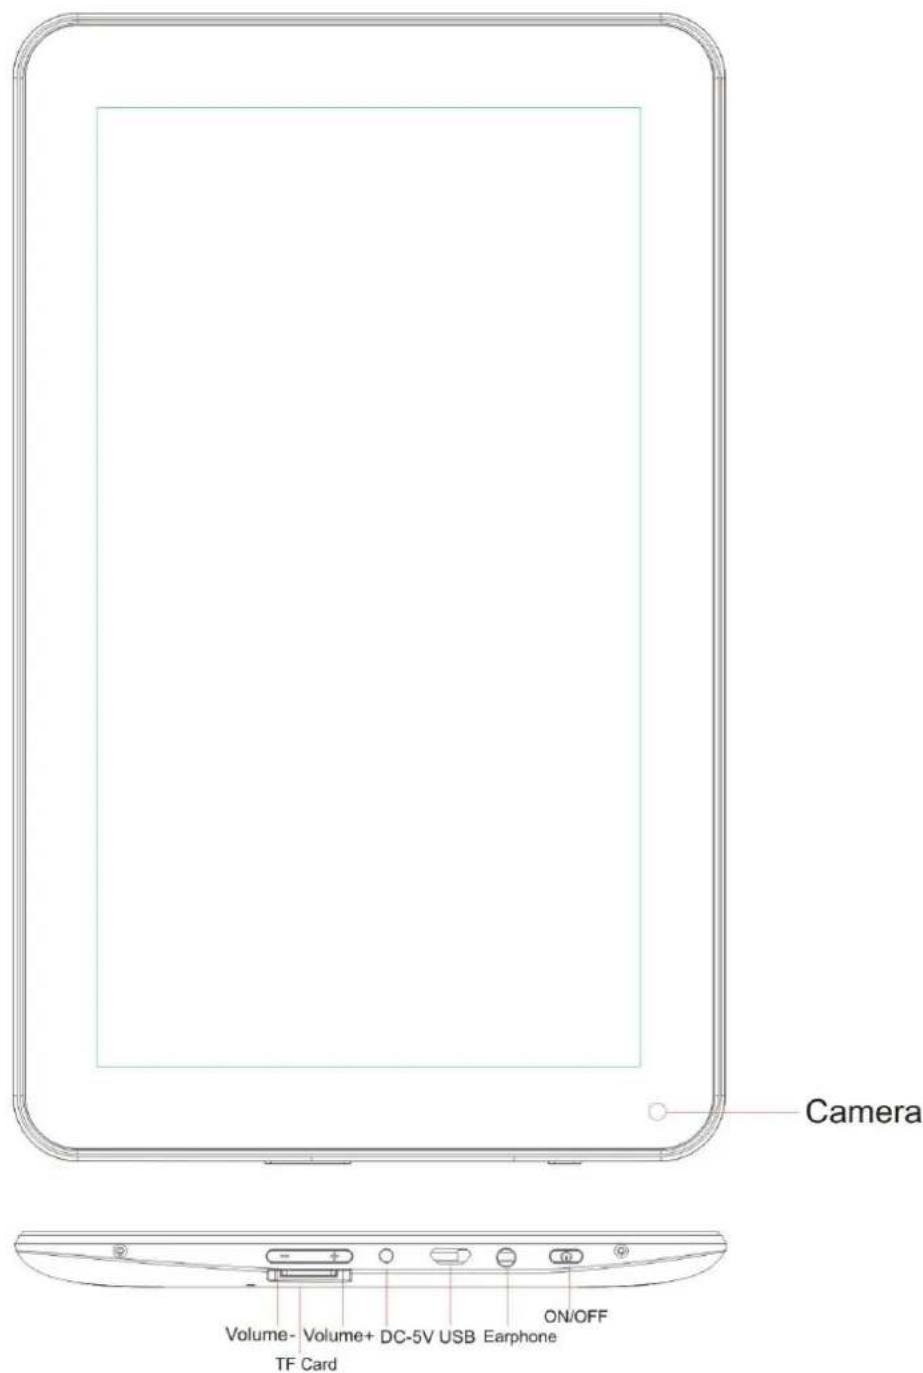
2. Power switch usage
Turning on: Press and hold the power switch for five seconds
Turning off: Press and hold the power switch for five seconds – Tap Turn Off – Tap OK
Screen locking/unlocking: Press the power switch to lock/unlock the screen.
Force shut-down: If the device doesn't have response, press the Reset key to restart the device.
Note: Do not force shut down the device unless necessary. Under normal condition, please follow the normal procedure to turn off the device.
Reset key: Press the Reset key to restart the device.
3. Touch screen
The operation of touch screen is fast, easy and convenient.
The User Instructions guide you to operate the touch screen as follows:
Tap: Tap to select an icon or option.
Tap and hold: Tap and hold an icon to drag it to the desktop.
Drag and drop: Drag and drop on the desktop to switch among different interfaces.
★ To avoid scratching or breaking the screen, do not put any object on it.
4. Adapter cable
To use USB storage device, it is required to connect the adapter cable and then connect to PC.

natural_image
Close-up of a black USB cable with coiled wires (no text or symbols visible)USB cable
USB flash drive
Connect one end of the OTG cable to the flash drive and the other end to the USB OTG interface of the device. You can use the flash drive when it is ready.
Do not insert/remove the USB flash drive frequently, or else it may
5. TF card usage
★ The device supports memory card up to 32GB.
Insert the memory card into the slot, press with fingers to clamp it; the screen will show Preparing SD card, and the TF card is ready for use when the characters disappear. You can operate when the card is ready.
Removing TF card

Close all programs or files opened from the memory card. Tap Settings TF card and device memory → Remove TF card. Press the card and it will eject.
Do not insert/remove the memory card repeatedly, or else it may damage the card.
★ Please use qualified memory card to avoid incompatibility.
6. Getting started
Charging the device
Connect one end of the power adapter to the socket and the other end to the power jack to charge the device.
During charging, the battery symbol is _i after charged, the battery symbol
turns into

★ You can use USB cable to charge the device.
★ You can use the device while charging; however, it will extend the charging time.
Battery management
The battery electricity isn't full when it is packed. It is recommended to charge at least four hours before using the device.
The charging time and discharging time of the battery are limited. However, you can try the following measures to extend the life of the battery.
- Use the device at least once every week.
- Charge the battery regularly.
- Do not keep the battery too low for long time.
• Always keep the device and battery away from heat source.
Start-up
Press and hold the power switch for five seconds.
Wi-Fi network settings
Since many functions require Wi-Fi connection, please configure the Wi-Fi network before operation.

-
Click Setting Wireless and network.
-
Select to turn on Wi-Fi.
The device will automatically scan and list all available Wi-Fi networks. If
the Wi-Fi connection has icon, you need to enter the valid password.
- Tap a Wi-Fi connection → if password is required, please enter the valid password → tap Connect, and the icon appears on the desktop after connecting to Wi-Fi network.

- Tap return to the desktop.
★ If you set to hide Wi-Fi, it won't be scanned automatically. Please tap Add Wi-Fi Network, and then enter corresponding information to add the Wi-Fi.
3G network settings
- To connect to 3G network, please select the 3G Doogle that the device supports. The device only supports external USB 3G Doogles. The 3G
support list can be found in Settings → Wireless and network → More → 3G support.

- After installing the SIM card into the 3G NIC, install the 3G NIC to the USB OTG cable and then connect to the device;

- After connecting to the 3G NIC, tap
→ Wireless and network → More →
Mobile network to perform 3G Internet access settings.
4. Turn on the mobile network and select Enabled data flow → Data roaming, then select APN, enter and select Menu key: create new APN for Internet access. For China Unicom 3G Internet access, please set as follows:
Name: 3GWAP / APN: 3gnet / Proxy: Not set/ Port: 80 / Username: Not set/
Password: Not set / Server: Not set / MMSC: Not set / MMC proxy: Not set /
MMC port: Not set / MCC: 460 / MNC: 01/ Authentication type: Not set / APN
type: Not set / APN type: Not set
Connect to 3G network after setting; the connecting to 3G network.

symbol appears on the screen after
If the symbol is grey, it is scanning the network; blue symbol indicates that the network is connected, and the 3G symbol indicates data transmitting.

- Desktop

①: Tap to view all applications
②: Voice search shortcut
③: Browser shortcut
④: Return to current operation
⑤: Return to desktop directly from the program interface
⑥: Multipage task selection key
⑦: Menu function shortcut
⑧: USB connection symbol
A: TF card connection status
B: Current time
C: 3G/WIFI connection signal symbol
D: Battery status
★ Tap any application icon to run it.
★ Tap and hold the icon to drag and drop to other position on the screen.
★ Tap and hold the icon to drag and drop to the desktop.

to delete from
8. Locking desktop
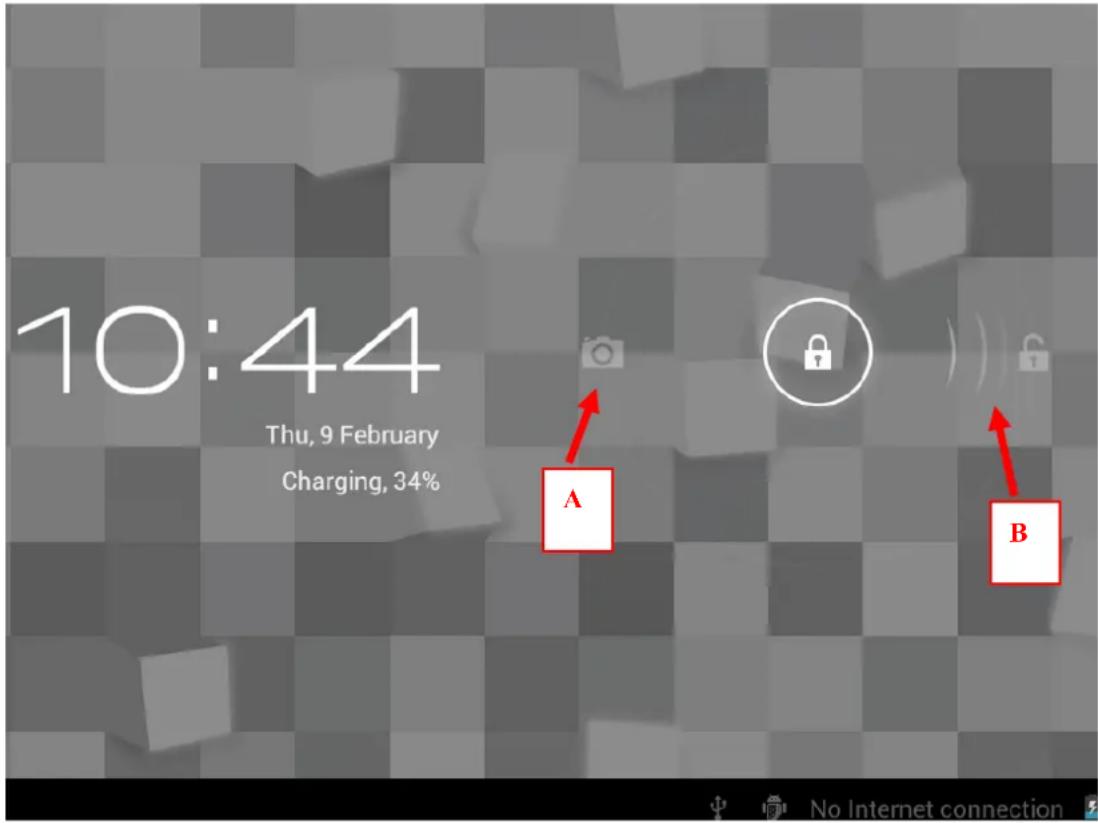
If the PC won't be used for a long time, or the power switch is tapped, the device enters standby state. The standby has two states. One is deep-sleep standby, in which the screen is turned off; the other is light standby after pressing the power switch. The picture shows the default light standby state. Tap and hold the unlocking

switch, and the A, B symbols as shown in the picture appear; point A is the camera icon and point B is the unlocking icon. The system will prompt about the path of unlocking. The ripple at point B in the picture is the path of the prompt. Tap and drag the unlocking switch to point B to unlock the screen, tap and drag the unlocking switch to point A to activate the camera function.
9. Programs

Recorder Record external sound
Clock Display time and set the clock

Downloads Install the downloaded applications quickly

Browser Connect to Internet browser
Calendar Set the calendar of the event
Camera Take pictures
Calculator Do simple arithmetic

E-mail Send and receive e-mail with existing e-mail address

File View and manage files and programs. Install Android Manager applications and back up files in SD card.
 | My Music Play and manage music files | |
 | My Video Play and manage video files | |
 | Gallery Browse and manage picture files | |
 | Map Connect to the Internet and view current position in the map | |
 | Local Search Connect to the Internet and view the information of the facilities near current position | |
 | E-market Log in and download system application | |
 | Search Enter the desired data directly | |
 | Settings Perform personalized setting | |
★ Tap and hold the icon to drag and drop to other position on the screen.
★ Tap and hold the icon to drag and drop to desktop.
On desktop, tap the Menu key bw the menu list and


perform the operation. At the same time, set common programs on desktop by tapping and holding the program icon to move to the desktop;
11. Program Manager
Installing programs
★ It is possible to download interesting and free Android applications. You just need to start the browser and search for "Android applications". You can install the purchased or downloaded Android applications quickly

through
- Copy desired .apk files to SD card or USB storage device → insert the card into the device or connect USB flash drive to the device.

-
Tap the file manager icon
-
Tap for and find the folder that saves .apk files.
-
Select an .apk file → Install. After the application is installed, the icon will appear in the interface that shows all applications.
-
Tap to run the application directly, or tap OK to return to the File Manager interface.
Downloading applications from Internet directly
You can download Android applications from the Internet directly, and install in the device quickly.

-
Click the icon to connect to the Internet.
-
Enter the URL and tap the download link of desired application.
-
After downloading, tap and hold the downloaded files (in download log interface), → click Open → Install.
Connecting to PC to save files
- Connect the tablet PC to PC and the tablet PC can be used as mobile storage device; to connect to PC, connect one end of the USB cable to the USB OTG interface of the tablet PC and the other end to the USB interface of PC;

- After connected, the tablet PC will promptly check the icon and then select Turn on USB storage to transmit data between PC and tablet PC, as shown below:

Uninstalling the application
You can uninstall the Android application quickly.
-
Tap Menu key → Settings → Application → Manage applications.
-
Tap an application → Uninstall.
-
Tap OK to uninstall.
12. Sound recorder

Click the sound recorder icon
The following interface appears

Tap to start recording, tap to stop the recording, tap to view the recording files, which will be named by time; select a recording file to play; tap to perform sound recording setting according to the prompt.
13. Clock
Tap the clock icon Clock new current date and time.
Alarm clock
You can set several alarm clocks at the same time.
When the icon appears in the upper status bar of the screen, at least one alarm clock is activated.
Adding alarm clock

- Tap the clock icon
- Press the Menu key → Add alarm clock.
- Set the alarm clock accordingly.
If you don't select Repeat, the alarm clock will be deleted automatically after the alarm time.
- Tap Enable alarm clock.
- Tap OK.
Turning off alarm prompt
When the alarm time is out, a window with the name of alarm clock will pop up.
If you want to repeat the alarm clock in 10 minutes, tap Snooze.
Tap Cancel to stop the prompt.
Enabling alarm clock
If you select Repeat in the settings, the alarm clock will be deactivated temporarily, but won't be deleted.
-
In the alarm clock interface, tap the icon after desired alarm clock.
-
Tap to re-activate the alarm clock.
Editing alarm clock


- Tap the clock icon Clock p.
- Tap a desired alarm clock → edit.
Deleting alarm clock
- Tap the clock icon
- Tap desired alarm clock and enter.
- Tap Delete.


Tap
to return to the desktop.
4. Downloads
- Tap the download icon

- View currently downloaded applications in PC, select and install.
15. Browser
You can connect to the Internet through the browser.

Tap the browser icon 📋 BROWNER 📁 Laptop to access the Internet:

①: Previous web; select to view; ②: Current web; ③: Add web; ④: Menu key
16. Calendar
Tap the calendar icon

When the calendar is used for the first time, you need to add an Exchange account. Enter the e-mail address and password of the account, tap Next and follow the prompt the finish the account setting, and then the calendar is available.
New event
- In the Calendar interface, tap the date you want to create an event.
- Select the time → enter the details in each field.
- Tap OK.
- Tap the Menu key to select desired calendar interface.
☆ The dates displayed in grey have events.
17. Camera

Tap the camera icon to search on the camera and the interface

natural_image
Digital camera interface showing a blue circular button, white rings, and control icons (no text or symbols)appears.
Taking pictures

- In the camera interface, tap to take pictures.
- The pictures will be saved automatically.

- Tap the thumbnail of the picture to view the original in Gallery.
-
Press the Back key to return to the camera.
-
Tap the icon to perform camera setting.
Recording video
- Tap to switch to the video mode, in which you can record video.


- Tap to start recording, and tap to stop recording.
-
The video files will be saved automatically.
-
Tap the video thumbnail to play the video.
- Press the Back key to return to the camera.
- Tap to switch to camera interface.
- Press the key to perform settings for video recording.
Note: You can tap to switch between front camera and rear camera to take pictures and record video.
18. Calculator
- Tap the calculator icon

- Tap the figures and operators to calculate.
- Tap Clear to delete one, or tap and hold Clear to clear all the results.
19. E-mail
★Support POP3 and SMTP accounts.
Adding e-mail account
You can enter one or several desired e-mail addresses on the device.

- Tap the e-mail icon
-
In Your account interface, tap Next.
-
In e-mail address option, enter your e-mail address.
-
In password option, → enter your e-mail password.
-
Tap OK.
-
Manual setting (optional): The server fills the supplier (i.e. gmail.com) automatically according to your e-mail account. However, if you need to change the server setting, click Manual setting to make necessary change.
-
Tap Next.
-
Optional: Enter the account name.
-
Enter the name of the message → Tap OK.
After setting, if you can't access a free e-mail account, please check with your e-mail service provider whether their server support POP and SMTP protocol.
Inbox

-
Tap the e-mail icon
-
If you only set one e-mail account, it will be opened directly. If you have set several accounts the account list will be displayed.
-
Tap desired e-mail account → tap Inbox.
Opening e-mail
- In the Inbox interface, tap and open an e-mail.
- For attachment, tap Open to start respective application, or tap Save to save the attachment to SD card.
-
To Reply, tap Reply or Reply to all.
a) Write the message you want to send.
b) Tap Send to send the e-mail immediately; tap Drafts to save but do not send the e-mail, or delete directly but do not save or send. -
To delete the e-mail directly, tap Delete.
Writing new e-mail
- In Inbox interface, press the Menu key → Write.
- Tap Send to, and then enter the address of the recipient.
- Or if you want to send a cc or bcc, press the Menu key → Add cc and bcc, and enter the e-mail addresses of the recipients.
- Enter desired subject in the title bar of the e-mail.
- Tap Write option to enter your personal information.
- If necessary, press the Menu key → tap Add attachment to add the attachment file.
- After writing, press the Menu key → tap Send.
Editing e-mail account
- Tap the e-mail icon

- In the Inbox interface, press the Menu key → tap Account setting.
- Set your e-mail account accordingly.

- Tap 2 n to the Inbox interface.
Deleting e-mail account
★ If you have several accounts and have deleted the default account, the next e-mail account in the list will be set to default automatically.

- Tap the e-mail icon
- In the Inbox interface, press the Menu key → tap Account.
- Tap and hold the account you want to delete.
- In the popup Account option window, tap Delete account.
- Tap OK to confirm the operation.
Setting default e-mail account
You should always have a default account. Therefore, if you have several e-mail accounts, you can set anyone to default.

- Tap the e-mail icon
- In the Inbox interface, press the Menu key tap → Account setting.
- Tap Default account to select it.
If you delete the default account, the next e-mail account in the list will be set to default automatically.

20. File Manager

Tap the file manager icon file Managew the files in all storage devices (internal memory, SD card, USB storage), and install Android applications to the device quickly.
The icons in the top of the screen have the following functions:

Internal memory

Your memory card

USB flash drive (needs adapter cable)
Back to previous folder

Create new folder
Set file content

Picture files
Copying files between PC and the device
You can copy files between external storage device, internal memory and the PC through File Manager. To copy files to the device, it is required to copy to SD card or USB storage device first.
The folder of the internal memory is "LocalDisk", the memory card is "sdcard", and the USB storage device is "udisk".
To copy files from SD card or USB storage to the device, you can copy the files to SD card or USB storage in the same way, then connect the storage device to PC and copy the files to your folder.
- Tap to show the files in your storage device.
-
Tap and hold the desired file or folder and tap Copy.
-
Tap the icon to return to the internal memory, tap the target folder and then tap Paste.
Deleting files
Tap and hold the file or folder, tap Delete and then tap OK to delete.
21. My music
☆ The compatible audio formats are: MP3, WMA, OGG, FLAC, WAV, ACC
Playing music

- Tap My Music icon
-
Select desired music to play from the music/album/artist/playing list.
-
Tap Previous→Pause → Next icon

for operation.
- To return to previous interface while playing music, tap


to return to the desktop.
Press the Menu key for music operation, as in the interface below:

★ AVI, WMV, RM, RMVB, 3GP, MKV, MP4, ASF, VOB, MPG, MOV up to 1080P HD-Definition
Playing video

- Tap My Video icon
-
Select desired video to play from the all/contents/my favorite/custom list.
-
Tap on the screen to adjust the video (including volume, pause/play, brightness, etc.)
-
Press the Back key or tap the icon to return to My Video interface.
23. Gallery
★ The compatible picture formats are: JPEG, BMP, GIF, PNG

- Tap the gallery icon Gallery then tap a picture group.
- Tap a picture to browse.
- Press the Back key to return to the picture group interface.
- Tap the icon to play the lantern slides. The lantern slide modes include common, classic, dynamic, sweet, warm and party.
- Tap to arrange the pictures by color
- Tap to arrange the pictures by time.
- Tap to arrange the pictures by name.
Enter a picture group, tap and hold a picture to enter multiple choices state, in which you can delete pictures and switch dynamic wallpaper
-
- Multiple choices
-
Delete
-
-- Dynamic wallpaper switch
24. Maps
★ This function requires Internet connection.
After connecting to the Internet, tap the map icon maps to open your current position automatically; as shown below, you can search desired information;

25. Local search
★ Similar to the map function, it can save a large number of environmental information
26. E-market
Turn on E-market to query and download applications.
When E-market is run for the first time, the system will ask to log in with GMAIL account (if you don't have a GMAIL account, please apply at http://gmail.google.com).
After downloading, install the applications.
- Settings
| Wireless and network | Wi-Fi Turn on Wi-Fi | |
| Wi-Fi settings Set | and manage wireless access point | |
| Flight mode Turn off wireless connection | ||
| 3G network settings Set 3G network | ||
| Wired network | Configure wired network | |
| Dial-up setting | Access the Internet through ADSL dial-up. Enter the username and password to connect | |
| USB | Mass storage Configure USB to mass storage | |
| ADB Configure USB to ADB | ||
| Sound | Silent mode | All sounds are disabled except media and alarm clock |
| Volume | Adjust the volume of media, alarm clock and notification by tapping and dragging the slider  and then tapping OK and then tapping OK | |
| Notification ringtone | Select desired notification ringtone | |
| Audible selection | Play sound when making screen selection | |
| Screen lock sounds Play sound | when locking and unlocking the screen | |
| Display | Brightness | Adjust the brightness of the screen by tapping and dragging the slider  , and then tapping OK , and then tapping OK |
| Auto-rotate screen | Switch orientation automatically when rotating the device | |
| Screen time-out | Adjust the delay before the screen automatically turns off | |
| System hibernate | Adjust the delay before the system automatically hibernates | |
| Security | Set up screen lock | Lock screen with a pattern, PIN, or password |
| Visible passwords | Show password as you type | |
| Select device administrators | Add or remove device administrators | |
| Use secure credentials | Allow applications to access secure certifications and other credentials | |
| Install from USB storage Install encrypted certificates from USB storage | ||
| Set password Set or change the credential storage password | ||
| Clear storage | Clear credential storage of all contents and reset its password. | |
| Application | Unknown sources Allow installation of non-Market applications | |
| Manage applications | Manage and remove installed applications | |
| Running services | View and control currently running service | |
| Development Set options for application development | ||
| Privacy | Factory data reset | Tap to clear all data in your device. Tap Reset to reset the device, or tap  and return to previous screenWarning! This will erase all data from your device's internal storage, including:~ Your Google account~ System and application data and settings~ Downloaded applicationsThe following won't be erased:~ Current system software and bundled applications~ TF files, such as music and photos and return to previous screenWarning! This will erase all data from your device's internal storage, including:~ Your Google account~ System and application data and settings~ Downloaded applicationsThe following won't be erased:~ Current system software and bundled applications~ TF files, such as music and photos |
| TF card and storage | Total space, available space | Display when TF card is inserted |
| Unmount TF card | Unmount TF card to safely remove it | |
| Format TF card | Format (erase) TF card | |
| Language and keypad | Select language | Select corresponding language according to your location |
| Android keypad | Screen keypad setting | |
| User dictionary | Add words to user dictionary | |
| Date and time | Set date | Set the date |
| Select time zone | Select time zone. | |
| Set time | Set the time | |
| Use 24-hour format | User 24-hour format or 12-hour format | |
| Select date format | Select date format | |
| About device | View status, battery usage, legal information, model number, Android version, kernel version and build version | |
Appendix: Optional accessory and model
| Accessory Model | ||
| 3G Wireless Modem | TD-SCDMA | |
| WCDMA | huawei E230, E176G, E160E, E182G, E1782, E1750 | |
| ZTE MF633BP-1, MF633, MF637U. | ||
| EVDO | huawei E150, EC1231, EC122, EC156 EC1270, ZTE AC580, ZTE AC2736, AC2746. | |
- Disco duro
- Appendix: Optional accessory and model....55
- Tips
- Cleaning
- Appearance
- Power switch usage
- Touch screen
- Adapter cable
- USB flash drive
- TF card usage
- Removing TF card
- Getting started
- Charging the device
- turns into
- Battery management
- Start-up
- Wi-Fi network settings
- 3G network settings
- Locking desktop
- Programs
- Program Manager
- Installing programs
- Downloading applications from Internet directly
- Connecting to PC to save files
- Uninstalling the application
- Sound recorder
- Clock
- Alarm clock
- Adding alarm clock
- Turning off alarm prompt
- Enabling alarm clock
- Editing alarm clock
- Deleting alarm clock
- Downloads
- Browser
- Calendar
- New event
- Camera
- Taking pictures
- Recording video
- Calculator
- Adding e-mail account
- Inbox
- Opening e-mail
- Writing new e-mail
- Editing e-mail account
- Deleting e-mail account
- Setting default e-mail account
- File Manager
- Copying files between PC and the device
- Deleting files
- My music
- Playing music
- Playing video
- Gallery
- Maps
- Local search
- E-market
Brand : Primux
Model : Brisa
Category : Tablet