
CD-940DVD - Car radio ROADSTAR - Free user manual and instructions
Find the device manual for free CD-940DVD ROADSTAR in PDF.


| Product Type | Car Stereo with DVD Player |
| Brand | Roadstar |
| Model | CD-940DVD |
| Form Factor | 1-DIN |
| Dimensions (W x H x D) | 178 x 50 x 160 mm |
| Weight | 1.5 kg |
| Power Supply | 12V DC (negative ground) |
| Max Power Output | 4 x 50 Watts |
| Playback Formats | DVD, DVD-R/RW, CD, CD-R/RW, MP3, WMA, JPEG |
| Radio Tuner | FM/AM with 30 presets |
| Display | 3.5-inch TFT LCD, 16:9 |
| Connectivity | USB 2.0, SD/MMC card slot, AUX input, RCA pre-outs (2 pairs) |
| Bluetooth | Hands-free calling and audio streaming (v2.1+EDR) |
| Remote Control | IR remote included |
| Other Features | 3D surround sound, EQ presets, volume control, clock display |
| Safety | Fuse protection (10A mini blade) |
| Cleaning & Maintenance | Wipe with dry soft cloth; avoid solvents |
| Spare Parts & Repairability | Contact Roadstar support for service |
Frequently Asked Questions - CD-940DVD ROADSTAR
User questions about CD-940DVD ROADSTAR
0 question about this device. Answer the ones you know or ask your own.
Ask a new question about this device
Download the instructions for your Car radio in PDF format for free! Find your manual CD-940DVD - ROADSTAR and take your electronic device back in hand. On this page are published all the documents necessary for the use of your device. CD-940DVD by ROADSTAR.
USER MANUAL CD-940DVD ROADSTAR
This product meets the essential requirements laid down by EEC Directive 89/336 and has been built in accordance with European standards EN50013, EN50020.
natural_image
Exploded view diagram of a mechanical assembly showing internal components and motion arrows (no text or labels)Wenn nötig,
natural_image
Pure technical diagram of a rectangular component with internal channels and labeled point A (no text or symbols beyond label)natural_image
Simple line drawing of a rectangular block with a labeled point B, no text or symbols present.Bedienteil
natural_image
Line drawing of a rectangular electronic device with a side panel and internal slots (no text or symbols)FERNBEDIENUNG
3. UNTERTITEL (SUBTITLE)
Car Tuner with DVD / SVCD / VCD / MP3 / CD / JPEG playback, flip-down detachable front panel, multi-colour LCD Display, FM-band PLL radio with RDS and multi-function remote control. 4 x 40 Watt Max.
INTRODUCTION
Dear Customers
May we take this opportunity to thank you for purchasing this Roadstar DVD/MP3/CD player. We strongly recommend that you carefully study the operating instructions before attempting to operate the unit and that you note the listed precautions.
Safety Information
- Note:
This unit can be used with 12 V DC.
CAUTION:
° DVD PLAYER IS A CLASS 1 LASER PRODUCT.
HOWEVER THIS PLAYER USES A VISIBLE LASER BEAM WHICH COULD CAUSE HAZARDOUS RADIATION EXPOSURE IF DIRECTED. BE SURE TO OPERATE THE PLAYER CORRECTLY AS INSTRUCTED.
• WHEN THIS PLAYER IS PLUGGED TO THE WALL OUTLET, DO NOT PLACE YOUR EYES CLOSE TO THE OPENINGS TO LOOK INTO THE INSIDE OF THIS PLAYER.
• USE OF CONTROLS OR ADJUSTMENTS OTHER THAN THOSE SPECIFIED HEREIN MAY RESULT ON HAZARDOUS RADIATION EXPOSURE.
• DO NOT OPEN COVERS OR ATTEMPT TO REPAIR THIS PRODUCT BY YOURSELF. ALWAYS REFER SERVICING TO QUALIFIED PERSONNEL.
WARNING:
° TO REDUCE THE RISK OF FIRE OR ELECTRIC SHOCK, DO NOT EXPOSE THIS EQUIPMENT TO RAIN OR MOISTURE.
° TO REDUCE THE RISK OF FIRE, ELECTRIC SHOCK OR PICTURE & SOUND INTERFERENCE, USE THE RECOMMENDED ACCESSORIES ONLY.
CD-940DVD
Car Tuner with DVD / SVCD / VCD / MP3 / CD / JPEG playback, flip-down detachable front panel, multi-colour LCD Display, FM-band PLL radio with RDS and multi-function remote control. 4 x 40 Watt Max.
INTRODUCTION
Dear Customers
May we take this opportunity to thank you for purchasing this Roadstar DVD/MP3/CD player. We strongly recommend that you carefully study the operating instructions before attempting to operate the unit and that you note the listed precautions.
Safety Information
- Note:
This unit can be used with 12 V DC.
CAUTION:
° DVD PLAYER IS A CLASS 1 LASER PRODUCT.
HOWEVER THIS PLAYER USES A VISIBLE LASER BEAM WHICH COULD CAUSE HAZARDOUS RADIATION EXPOSURE IF DIRECTED. BE SURE TO OPERATE THE PLAYER CORRECTLY AS INSTRUCTED.
° WHEN THIS PLAYER IS PLUGGED TO THE WALL OUTLET, DO NOT PLACE YOUR EYES CLOSE TO THE OPENINGS TO LOOK INTO THE INSIDE OF THIS PLAYER.
° USE OF CONTROLS OR ADJUSTMENTS OTHER THAN THOSE SPECIFIED HEREIN MAY RESULT ON HAZARDOUS RADIATION EXPOSURE.
° DO NOT OPEN COVERS OR ATTEMPT TO REPAIR THIS PRODUCT BY YOURSELF. ALWAYS REFER SERVICING TO QUALIFIED PERSONNEL.
WARNING:
° TO REDUCE THE RISK OF FIRE OR ELECTRIC SHOCK, DO NOT EXPOSE THIS EQUIPMENT TO RAIN OR MOISTURE.
° TO REDUCE THE RISK OF FIRE, ELECTRIC SHOCK OR PICTURE & SOUND INTERFERENCE, USE THE RECOMMENDED ACCESSORIES ONLY.
° TO REDUCE THE RISK OF FIRE OR ELECTRIC SHOCK, DO NOT EXPOSE THIS EQUIPMENT TO RAIN OR MOISTURE. ° TO REDUCE THE RISK OF FIRE, ELECTRIC SHOCK OR PICTURE & SOUND INTERFERENCE, USE THE RECOMMENDED ACCESSORIES ONLY.
2
English
Important Information
Precautions
To avoid a malfunction of this product and to protect against electric shock, fire or personal injury, please observe the following.
° Hold the plug firmly when connecting or disconnecting the DC power supply to this unit.
° Do not connect or disconnect the DC power supply when your hands are wet.
° Keep the DC power cord away from heating appliances.
° Never put heavy objects on the power cord.
a Do not attempt to repair or reconstruct the power cord in any way.
° Placement
Avoid placing the unit in areas of:
° Direct sunlight.
° High temperature (over 35°É) or high humidity (over 90%)
° High levels of dust
a Non-use Periods
° When not in use, switch off the unit
* When left unused for a long period of time, the unit should be unplugged from the DC supply.
° Foreign Objects
° Touching internal parts of this unit is dangerous and may damage the player. Never attempt to disassemble the unit.
° Do not put any foreign objects on the disc tray.
° Keep away from water / magnetic fields
° If liquids are spilled into the unit, serious damage will occur.
° Do not place magnetic objects (such as speakers) close to this unit.
°Condensation
° If moisture forms inside this unit, it may not operate properly. In this case, turn on the power and wait about one hour for the moisture to evaporate.
English
3
Important Information
Discs you can play

Digital video discs
5", single or double sided, single or dual layer. DVDs are high density optical discs on which high quality picture and audio are recorded by means of digital signals.

Audio CDs 5"

CD-R/CD-RW in MP3 format
Disc Functions
Functions and information available on the DVDs (titles, chapters, subtitles, ratings, multi angles and more) may differ from disc to disc.
- When 📋 appears on screen, it indicates an invalid button press.
Discs that cannot be played
CD-I, CD-ROM, DVD-ROM, DVD-RAM discs cannot be played in this unit. CD-G can play audio only, not graphics.
COPYPROTECTION
- Many DVD discs are encoded with copy protection. Because of this, you should only connect your DVD player directly to your TV, not to a VCR. Connecting to a VCR results in a distorted picture from copy-protected DVD discs.
- This product incorporates copyright protection technology that is protected by methods claims of certain U.S. patents and other intellectual property rights owned by the Macrovision Corporation and other rights owners. Use of this copyright protection technology must be authorized by the Macrovision Corporation, and is intended for home and other limited viewing uses only unless otherwise authorized by Macrovision Corporation. Reverse engineering or disassembly is prohibited.
4
English
TABLE OF CONTENTS
Introduction....1
Important Information 2
Index 4
Your New DVD Player 5
Description of the rear connectors....6
Description of the LCD on the front panel 6
Installation 7
Detaching and attaching the front panel 7
Remote Control 9
Using the Remote Control 10
Connections 11
Connecting Power and Speaker output 11
Basic operation 12
Basic operations DVD 12
To check the state of playback 13
Scanning to the Desired Screen/Song 13
Repeating Playback (DVD.CD) 14
Special Functions 14
Selecting Subtitle Language 15
Changing the Camera Angle (DVD only) 15
JPEGPlayback 15
Playback with MP3 16
Setup Menu System 17
General Setup 17
Speaker Setup 19
Audio Setup 19
Preferences 20
RADIO Mode 21
Troubleshooting 24
Accessories 25
Specifications 26
English
YOUR NEW CD/DVD PLAYER

-
LED INDICATOR: Flashing when detachable panel is removed.
-
RESET BUTTON: Press it to rehabilitate the distorted program to zero.
-
CD/DVD EJECT BUTTON : Press to Eject the CD/DVD.
DESCRIPTION OF THE REAR CONNECTORS

1.2. VIDEO OUTPUT (2 RCA jacks)
Use a video cable to connect the video output signal to the external video monitors.
- WIRING CONNECTING SOCKET
DESCRIPTION OF THE LCD ON THE FRONT PANEL

- DVD/VCD/CD/MP3 indicators
- Playing status indicators
- Repeat playback indicators (single or all for DVD disc, single for VCD/CD disc, single, folder and all for MP3 disc)
- Title number indicator
- Chapter number indicator
-
Disc playing time indicator for DVD/VCD, track time indicator for CD/MP3
-
Dolby digital indicator
- RDS indicator such as AF, EON, TA, TP and PTY.
- Disc rotation indicator
- RANDOM indicator
- LOUDNESS indicator
- SPECTRUM indicator
- VOCAL, POP and ROCK equalizer curves ind.
- STEREO indicator
INSTALLATION
PRECAUTIONS
- Choose the mounting location carefully so that the unit will not interfere with the normal driving functions of the driver.
- Avoid installing the unit where it would be subject to high temperatures, such as from direct sunlight or hot air from the heater, or where it would be subject to dust, dirt or excessive vibration.
• Use only the supplied mounting hardware for a safe and secure installation. - Be sure to remove the front panel before installing the unit.
Mounting angle adjustment
Adjust the mounting angle to less than 20°.
MOUNTING EXAMPLE
Installation in the dashboard

Note: Keep the release key in the safe place as you may need it in future to remove the unit from the car.
DETACHING AND ATTACHING THE FRONT PANEL
The front panel of this unit can be detached in order to prevent the unit from being stolen.
FOLDING DOWN AND DETACHING THE FRONT PANEL
Before detaching the front panel, be sure to press the PWR button (13) OFF first.
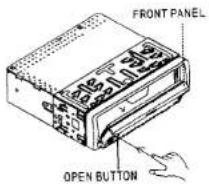
Then press the OPEN button (1), let the Front Panel arrive in horizontal position and detach the panel by pulling it towards you as illustrated.
Pull out the panel towards you in order to detach completely the panel from the main unit. Detachable panel can be removed as in Fig. 2.
English
8
English
Press the top left side of the black metallic panel to fold back the black metallic panel on to the main unit.
(FIG.1)

(FIG.2)

FRONT PANEL

FRONT PANEL
(FIG.3)
(FIG.4)
ATTACHING THE FRONT PANEL
IMPORTANT: make sure the black metallic panel is closed.
Make sure the front panel is the right way up when attaching it to the unit as it cannot be
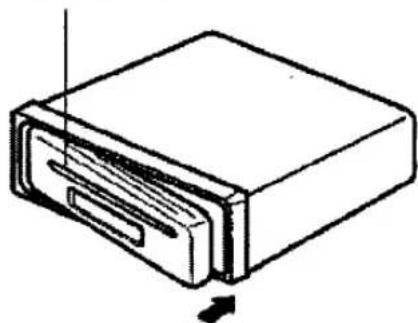
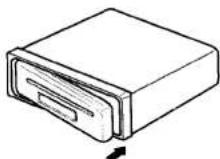
attached upside down. Bring side B of panel to side A of main unit.
attached upside down. Bring close up to insert the panel in and push until it clicks
Panel is attached.
Main unit
Rear of the front panel


Front panel
English
9
REMOTE CONTROL
- MODE BUTTON
2 SEL BUTTON
-
POWER BUTTON
-
JOG UP/SEEK UP BUTTON
-
F.FWD/NEXT BUTTON
-
JOG RIGHT BUTTON
-
F.BWD/PREV. BUTTON
-
JOG DN/SEEK DN BUTTON
-
MENU/BAND BUTTON
-
PLAY/PAUSE BUTTON
-
NUMBER/PRESET
MEMORY/AF/TA/PTY BUTTONS
-
ANGLE BUTTON
-
MUTE
-
CLOCK BUTTON
-
DSP BUTTON
-
TITLE/PBC AND A/P BUTTON
-
AUDIO BUTTON
-
OSD BUTTON
-
SUBTITLE AND LOUD BUTTON
-
REPEAT BUTTON
-
STOP BUTTON
-
VOLUME - BUTTON
-
JOG LEFT BUTTON
-
VOLUME + BUTTON
-
ENTER BUTTON

USING THE REMOTE CONTROL
Preparing the Remote Control
Inserting the Batteries
- Open the battery compartment cover.
- Insert one CR 2025 type battery. Insert new batteries. Ensure that the polarities are correct when inserting.
- Close the cover.
Using the Remote Control
Face the remote control towards the player front.
The effective operating range of the remote control is 6 m, and 30 left and right degrees from the DVD receiver.
Battery Handling Precautions
• Incorrect use of the battery causes battery leakage or corrosion.
- Ensure that polarities are correct when inserting batteries.
- Do not impose heat or fire to the batteries. Do not disassemble or short-circuit the batteries.
- Ensure that exhausted batteries are not inserted into the remote control.
- Do not use different types of batteries together. Do not use old batteries together with new ones.
- If you don't use the remote control for a long period of time, remove the batteries to avoid possible damage from battery corrosion.
- Replace the batteries with new ones if the remote control does not operate smoothly or the operating distance comes to be short.
- If battery leakage occurs, clean the liquid completely from the remote control and insert new batteries.
CONNECTIONS
Connect the DVD player to your TV.
- Connect the audio cables between the AUDIO OUT L and R jacks on the back of your DVD player and the corresponding Audio Input jacks on your TV.
- Connect the video cable between the VIDEO OUT jack on the back of your DVD player and the corresponding Video Input jack on your TV.
NOTES: When you connect the DVD player to your TV, be sure to turn off the power and unplug both units from power source.
CONNECTING POWER AND SPEAKER OUTPUT
RCA Jack Line Out (Rear) -
Gray : Red (right)
White (left)
Note: RED wire (connector A no. 7) must be connected by car ignition key in order to avoid that car battery becomes weak when the car will be not used for long period.
CONNECTORB
- VIOLET: REAR RIGHT SPEAKER (+)
- VIOLET/BLACK: REAR RIGHT SPEAKER (-)
- GRAY: FRONT RIGHT SPEAKER (+)
- GRAY/BLACK: FRONT RIGHT SPEAKER (-)
- WHITE: FRONT LEFT SPEAKER (+)
- WHITE /BLACK : FRONT LEFT SPEAKER (-)
- GREEN: REAR LEFT SPEAKER (+)
- GREEN/BLACK: REAR LEFT SPEAKER (-)
![8[6]4[2] 7[5]3[1] A 8[6]4[2] 7[5]3[1] B](/content/2026/05/1075505/images/04177bc6e737f9a2e95c6a804b682a62bcd7a388c1e4445f1a01af8567e58058.jpg)
12
English
BASIC OPERATION
Loading a DVD/CD Disc
- Press the POWER button (13).
- Then press the OPEN button (1), let the Front Panel arrive in horizontal position.
- Insert the disc with printed side facing up into the disc slot.
- Bring back the front panel in vertical position until it clicks.
- The player starts playback automatically.
Ejecting a Disc
Press EJECT button (3), with the Front Panel in horizontal position, to eject the disc.
BASIC OPERATIONS DVD
Before Playing Your DVD Disc
Ensure that your DVD player is connected correctly to the TV, which are output components.
Turn on the power of the TV
To Play a DVD Disc
1 Press the POWER button.
2 Insert your DVD disc into the disc slot. Ensure that the labeled surface (not the surface where data is recorded) is at the top when placing it.
3 Press the PLAY button
Your DVD disc will be played depending on the current program mode.
- Your DVD disc is played automatically.
- The Disc menu is displayed on the screen. Choose MENU option using the arrow buttons or numeric buttons and press the ENTER button to play your DVD disc.
STOP: Press this button to stop playing.
Press the ENTER button to play your DVD disc from the stopped position. Press the STOP button twice and the ENTER button again to play your DVD disc from the starting position.
PAUSE: Press this button to stop disc play temporarily.
Press the PLAY/ PAUSE button again to resume disc play.
NOTE When one minute elapses since disc play has stopped, your DVD player will enter screen save mode to protect your TV.
English
13
TO CHECK THE STATE OF PLAYBACK
Press the OSD button.
• DVD
The current title, chapter, and elapsed time are displayed on the screen.
Each press of the OSD button displays the information in the sequence of
Title remaining time > Chapter elapsed time > Chapter remaining time > Display OFF
- CD/MP3
Each press of the OSD button displays the information in the sequence of Current song elapsed time > Current song remaining time > Total elapsed time > Total remaining time > Display OFF.
SCANNING TO THE DESIRED SCREEN/SONG
You can find the desired screen or song during disc play by using the following functions
To Scan Screens or Songs Fast (DVD, CD, MP3)
Press the FR (◀) or FF (▶) button during disc play.
• DVD
Each press of the button changes the play speed in the sequence of 2X > 4X > 6X > 8X > NORMAL.
- MP3
Each press of the button changes the play speed in the sequence of 2X > NORMAL.
Press the PLAY/ PAUSE button twice or ENTER button to play your DVD/MP3 disc at normal speed.
To Skip Chapters (DVD, CD, MP3)
Press the PREV (◀) or NEXT (▶) button during disc play.
- Press the NEXT (▶) button to go to the next chapter.
- Press the PREV (◀) button to go to the previous chapter.
Press the PREV (✗) or NEXT (✗) button during disc play. - Press the NEXT (✗) button to go to the next chapter. - Press the PREV (✗) button to go to the previous chapter.
REPEATING PLAYBACK (DVD.CD)
You can play the desired title, chapter repeatedly.
To Repeat a Chapter, Title, or Track (Song)
Press the REPEAT button during disc play.
- Each press of the REPEAT button changes the repeat mode in the following sequence.
DVD
CHAPTER REPEAT ON > TITLE REPEAT ON > REPEAT OFF
• CHAPTERREPEATON
Choose this mode to play repeatedly the chapter currently being played.
• TITLEREPEATON
Choose this mode to play repeatedly the title currently being played.
- REP-ONE
Choose this mode to play repeatedly the track or song currently being played.
- REP-ALL
Choose this mode to play repeatedly the entire disc.
- REPEATOFF
Choose this mode to stop any repeat mode.
SPECIAL FUNCTIONS
In CD/MP3 Mode, press:
- TOP button (Preset 1) to pause CD playback, press it again to resume CDP playback.
Press it hold for more than about 0.5 seconds to play the first track of the disc. - RPT button (Preset 2) to play the current track repeatedly.
Press it again to cancel this mode. - INT button (Preset 3) to play the first 10 seconds part of each track, press it again to stop INT mode and retain playing the track currently selected.
- RDM button (Preset 4) to play the tracks in random order. Press it again to cancel this mode.
MUTE BUTTON (MU)(11)
Press the button to eliminate or resume the sound immediately.
SELECTING SUBTITLE LANGUAGE
When a DVD is recorded with subtitles, you can use the subtitle feature to view the subtitles on the screen.
1 Press the SUBTITLE button during disc play
The subtitle info banner appears. The default is SUBTITLE OFF.
If no subtitles are recorded, the (if) icon will appear.
2 Press the SUBTITLE button repeatedly until the desired subtitle language is displayed.
3 To turn subtitle off, press the SUBTITLE button until SUBTITLE OFF is displayed.
NOTE This function is a disc dependent. There are some DVD discs
that prevent selecting subtitle even if it supports multiple subtitles.
In this case, the subtitle should be selected via disc menu.
CHANGING THE CAMERA ANGLE (DVD ONLY)
Some DVDs contain scenes which have been shot simultaneously from multiple angles.
1 Press the ANGLE button on the remote control during disc play.
The ANGLE icon (m) appears.
If no additional camera angles are recorded, the ( πn1 ) icon will be displayed.
2 If multiple camera angles are recorded, the ANGLE (m) icon
displays the current angle number and the number of available angles.
3 Press the ANGLE button again to go to the next camera angle.
NOTE This feature does not work if a DVD has not been recorded with multiple camera angles.
JPEG PLAYBACK (PICTURE CD)
Some CD-Rs may contain pictures in a JPEG format. For example, you may have photographic film developed with pictures stored in JPEG format. Then you can playback those JPEG files in this player.
PLAYBACK WITH MP3
To play an MP3 file
1 Load an MP3 disc.
First, select Preferences in the Setup menu and set the SMART NAVI menu to "With Menu".
When an MP3 disc is loaded, the MP3 menu screen is displayed depending on the MP3 disc's directory.
2 Select a desired directory or file. First, press the STOP button and then use the arrow buttons (◀▶▶▼) to select a directory. (Making a selection on the MP3 menus is available only in stop state.)
3 Use the NUMERIC buttons to select an MP3 file you want to listen to. Press ENTER. Then the song you selected will start playing.
To play an MP3 file repeatedly
1 Press the REPEAT button repeatedly. The Play Mode on the bottom will show its submenus in the following sequence REP-ONE > FOLDER REP > FOLDER
| REP-ONE: | Repeats the song under play. |
| FOLDERREP: | Repeats all the songs saved in the proper directory. |
| FOLDER: | Plays the songs in the current directory in sequence. |
When PLAY MODE is selected, press (▲/▼) to change between the following mode: SINGLE > REP-ONE > FOLDER > FOLDER REP > DISC SCAN > DISC > DISC REP > RANDOM > SHUFFLE ON > PROG-END
In the playback, use (▲) or (▼) to skip an item ahead or back.
(◀) (◀): Rapid reverse
(▶) (▶): Rapid advance
Note: The FOLDER cannot be selected during playing. It can be selected after STOP button pressed.
SETUP MENU
Using the Menu System
1 Press the SETUP button when no disc is being played.
The main page of the Setup menu appears.
2 Go to the desired Setup menu option using the UP/DOWN (▲▼) buttons.
3 Press the ENTER button. The corresponding sub-menu appears.
4 Go to the desired menu option using the UP/DOWN (▲▼) buttons.
5 Go to the desired detailed item using the RIGHT (▶) button.
6 Choose the desired item using the UP/DOWN (▲▼) buttons.
7 Press the ENTER button to start the selected item.

GENERAL SETUP
1. TV DISPLAY
You can select a TV screen aspect ratio according to your TV.
If the TV on which the movie is played is of "WIDE" type, choose "WIDE".
If it is of '4:3' type, choose NORMAL/PS (Pan & Scan) or NORMAL/LB (Letter Box).
NORMAL/PS: Choose this setting if you want the movie to fill the entire screen of your TV. This might mean that the left and right edges won't be seen.

18
English
NORMAL/LB: Choose this setting if you want to see movies in their original aspect ratio. The movie might appear with black bars at top and bottom of the screen.
WIDE: Choose this setting if your DVD player is connected to a wide screen TV.
2. PIC MODE
Use this option to adjust picture state.
AUTO: Choose this setting to set screen resolution automatically.
HUBS: Choose this setting to set the screen to high resolution.
N-FLICKER: Choose this setting if the screen trembles during playback.
3. ANGLE MARK
This option is available only when the disc is with angle marks.
ON: When selected, the screen will show angle mark during disc play.
OFF: When selected, no angle mark is shown on the screen.
4. OSD LANG
Use this option to set the on-screen display language (OSD).
Different languages are available currently.
5. CAPTIONS
CLOSED CAPTION mode
ON: Choose this setting to display captions
OFF: Choose this setting to close captions.
6. SCR SAVER (SCREEN SAVER)
The screen saver is useful to prevent your display from becoming damaged.
The screen saver picture (a moving DVD logo) appears when you leave the DVD player in stop mode for about three minutes.
ON: Choose this setting to activate screen protection.
OFF: Choose this setting to cancel screen protection.
English
19
SPEAKER SETUP
1. DOWNMIX
Use this function to reproduce the proper analog audio when the audio channel recorded on the disc differs from the output audio channel configuration.
LT/RT:
Choose this setting to play the disc with Dolby Pro Logic stereo effect.
The signals decoded by the built-in decoder of your DVD player will create this sound effect even at your home.
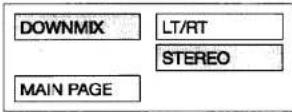
STEREO:
Choose this setting to play the disc with stereo signal. In 5.1 channel output, the audio output will have a 2-channel signal from the left/right channels; in a 2-channel output, the audio will output common stereo signals.
AUDIO SETUP
1. AUDIO OUT
Use this option to set the type of the audio output jack of your TV or audio system.
ANALOG: Choose this setting when your DVD player is connected to an analog audio output jack.
SPDIF/RAW: Choose this setting when your DVD player is connected to an amplifier using a coaxial output jack.
SPDIF/PCM: Choose this setting when your DVD player is connected to an amplifier with 2-channel digital stereo sound.
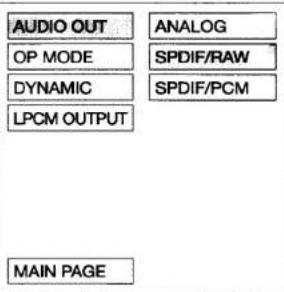
2. OP MODE (OPERATIONAL MODE)
LINE OUT: Linear compression to input signals.
Choose this setting when connecting to an amplifier.
20
English
3. DYNAMIC
This feature compresses the dynamic range (the quietest sounds to the loudest ones) of a disc's soundtrack. Select this option if you want to listen to a movie at a lower volume without losing dialogue intelligibility.
4. DIGITAL OUT SETTING
LPCM Output: select between LPCM 48k or LPCM 96k.
PREFERENCES
You can set Preferences by pressing the Setup button on the remote control in no disc state or by stopping disc play completely and then entering the Setup menu.
1. TV TYPE
Choose a proper setting according to the color system of the TV connected to your DVD player. AUTO: Choose this setting for AUTO mode TV. NTSC: Choose this setting for NTSC mode TV. PAL: Choose this setting for PAL mode TV.
| TV TYPE | AUTO |
| AUDIO | NTSC |
| SUBTITLE | PAL |
| DISC MENU | |
| PARENTAL | |
| PASSWORD | |
| DEFAULTS | |
| SMART NAV | |
| MAIN PAGE |
2. AUDIO
Use the Audio menu to select the soundtrack language that you prefer (English, French, Spanish, Chinese, Japanese). If the disc you are playing has that language available, it will play in that language. If your preferred audio language isn't available, the disc's default language will be played.
3. SUBTITLE
Use the Subtitle language menu to select the subtitle language (English, French, Spanish, Chinese, Japanese) that you prefer. If the disc you are playing has that language available, it will display subtitle in that language. If your preferred subtitle language isn't available, the disc's default language will be displayed.
4. DISC MENU
Use the Disc Menu option to select the language you want a DVD's disc menu to be displayed in (not the same as the player menu).
English
21
5. PARENTAL
The Parental feature is a rating limit system, like movie ratings.
It works with DVD discs that have been assigned a rating.
This option lets you determine how your player will react to discs that contain movies that are rated (in the U.S.A., the Motion Pictures Association of America rates movies as G, PG, PG-13, etc.). You decide which ratings require a password and which ones don't.
6. PASSWORD
Use this menu option to change the saved password to a new one. To change the password, enter the existing password in OLD PASSWORD, and enter a new one in NEW PASSWORD. Then, enter the new password in CONFIRM PWD for confirmation. (The default password is 3010.)
7. DEFAULTS
Use this option to RESET ALL options to the factory defaults.
8. SMART NAV (MP3 Only)
This SMART NAV feature shows the information about the MP3 disc under play.
First, select Preferences in the Setup menu and set the SMART NAV menu to "With Menu."
RADIO MODE
1. MODE BUTTON (MD/TA)
By pressing this key, user can select RADIO mode or CD/MP3 PLAYER mode.
2. BAND BUTTON (BAND)
Each band is toggled cyclically by pressing this key FM1---FM2---FM3.
3. RADIO TUNING UP AND DN BUTTONS (^ / v)
FORWARD AND REVERSE TRACK SEARCH (or changing songs)
1) In RADIO mode, press ^ or v button shortly and repeatedly to manually tune up or down for the desired radio station with step by step. Press ^ or v button hold for more than 0.5 seconds to automatically tune up or down for the radio station of strong signal.
4. AUTO SEEK SEARCH TUNING (AS/PS)
By pressing shortly, the radio searches for each preset station.
When field strength level is bigger than the threshold level of stop level, the radio is holding at that preset number for 5 sec. with releasing mute, and then searches again.
By pressing longer than 1 sec, and then 6 strongest stations are preset to the corresponding preset number. When AS operation is finished, the radio executes the preset scan.
English
5. PRESET STATIONS (1,2,3,4,5,6)
RADIO MODE:
When pressed short, these keys select a preset station directly. When pressed longer than 1 sec., current station is stored in preset memory bank.
USING THE RDS FUNCTION
What is RDS?
The RDS (Radio Data System) is a digital information system developed by the EBU (European Broadcast Union). Piggy-backed on normal FM broadcasts, RDS offers a variety of information services and automatic retuning functions for RDS-compatible car stereos. In 1988, RDS became available in the United Kingdom, France, West Germany, Ireland and Sweden. Test transmissions are being conducted in many other european countries. It is expected that RDS will be available in most western european countries in the near future.
1 'AF/REG' function (ALTERNATIVE FREQUENCIES)
When pressed short, AF switching mode is selected and the state of AF switching mode is displayed by AF segment in display.
Segment off: AF switching mode off.
Segment on: AF switching mode on, and has RDS information.
Segment flashing: AF switching mode on, but RDS information is not received yet.
When AF switching mode is selected, the radio checks the signal strength of AF all the time. The interval of checking time of each AFs depends on the signal strength of current station, from a few minute for strong station to a few seconds for weak station. Every time that new AF is stronger than current station, it switches over to that frequency for very short time, and NEW FREQUENCY is displayed for 1-2 second. Because the mute time of AF switching Or checking time is very short, it is almost inaudible in case of normal program.
During FM mode, when AF is on, SEEK, (SCAN), AUTO-MEMORY function can only receive and save RDS program.
When pressed long, AF mode is converted to REGION ON/OFF mode.
- Regional mode ON:
AF switching or PI SEEK is implemented to the station which have all PI codes same as current station. REG segment is turned on, in LCD display.
- Regional mode OFF
The regional code in the format of PI code is ignored when AF switching or PI SEEK is implemented.
2. 'TA' function (TRAFFIC ANNOUNCEMENT)
When press the button, it is activated as TA mode on or off.
English
When TA mode is on (TP is displayed on LCD), it will begin to seek TA station. When traffic announcement is transmitted:
1) If the unit is in CD mode, it will switch to radio mode temporarily.
2) Temporarily switch over to an EON linked station when EON detects a traffic announcement on that other program, and TP will be displayed on LCD
3) If volume level is below 20, volume level is raised to 20, and returns to its previous mode and volume level when the traffic announcement is over. If volume is adjusted during traffic announcement, only the previous volume is valid.
* TA interruption function:
The current traffic announcement is canceled by pressing this key. But the TA mode will not be off.
When TA is on, SEEK, (SCAN), AUTO MEMORY function can be received or saved only when traffic program identification code has been received.
When TA is ON, traffic program identification code is not received during specified time.
3. 'PTY' function (PROGRAM TYPE)
While selecting PTY type, its selection is implemented by preset buttons as described in preset key. When PTY is selected, the radio starts to search corresponding PTY information, and stops if the corresponding PTY information, is detected.
Press it shortly to display PTY and flash NEWS. Press it hold to display NEWS and then press VOL+ or VOL- button to select one of PTY programs:
PTY music group ---- PTY speech group ---- OFF
MUSIC
-
POP M, ROCK M
-
M.O.R.M, LIGHT M
-
CLASSICS, OTHER M
-
JAZZ, COUNTRY
-
NATION M, OLDIES
-
FOLKM
SPEECH
-
NEWS, AFFAIRS, INFO
-
SPORT, EDUCATE, DRAMA
-
CULTURE, SCIENCE, VARIED
-
WEATHER, FINANCE, CHILDREN
-
SOCIAL, RELIGION, PHONE IN
-
TRAVEL, HOBBIES, DOCUMENT
RESET BUTTON
Reset button (2) is placed on the housing.
The reset button is to be activated for the following reason:
- Initial installation of the unit when all wiring is completed.
• All the funciton button do not operate - Error symbol on the display.
TROUBLESHOOTING
| Symptom | Correction |
| No power. | Insert the DC power plug securely into the power outlet. |
| Play fails to start even when PLAY is pressed.Play starts but then stops immediately. | Condensation has formed: wait about 1 to 2 hours to allow the player to dry out.This player cannot play a disc other than DVD and CD.The disc may be dirty and may require cleaning.Ensure that the disc is installed with the label side up. |
| No picture. | Ensure that the equipment is connected properly.Ensure that the input setting for the TV is "Video". |
| No sound.Distorted sound. | Ensure that the equipment is connected properly.Ensure that the input setting for the TV and stereo system are correct. |
| Picture is distorted during rapid advance or rapid reverse. | The picture will be somewhat distorted at times: this is normal. |
| No rapid advance (or rapid reverse play. | Some discs may have sections which prohibit rapid advance (or rapid reverse.) |
| No 4:3 (16:9) picture. | Choose the correct setup "TV Aspect" item which matches the TV set used. |
| No on-screen display. | The "Off" setting is selected for "On-Screen Messages": select "On". |
| No operations can be performed with the remote control unit. | Check the batteries are installed with the correct polarities (+ and -).The batteries are exhausted: replace them with new ones.Point the remote control unit at the remote control sensor and operateOperate the remote control unit at a distance of not more than 7 m from the remote control sensor.Remove the obstacles between the remote control unit and remote control sensor. |
| Symptom | Correction |
| No key operation (by the main unit and/or the remote control unit) is effective. | Alternatively, press POWER to set the player to thstandby mode, disconnect the power plug and then re-connect it. (The player may not be operating properly due to light ning, static electricity or some other external factor.) |
| Play does not start even when title is selected. | Confirm the "Ratings" setting. |
| Audio soundtrack and/or subtitle language is not the initial settings. | If the audio soundtrack and/or subtitle language does not exist on the disc, the language selected at the initial settings will not be seen/heard. |
| No subtitles. | Subtitles appear only with discs which contain them. |
| Alternative audio soundtrack (or subtitle) languages fail to be selected. | An alternative language is not selected with discs which do not contain more than one language.In the case of some discs, the alternative language cannot be selected by operating the AUDIO or SUBTITLE button. Try selecting it from the DVD menu if one is available. |
| Angle cannot be changed. | This function is dependent on software availability. Even if a disc has a number of angles recorded, these |
ACCESSORIES
- Remote control
English
SPECIFICATIONS
| Supply Voltage | :12V DC (11V-15V) |
| Current Consumption | :Less than 2A |
| Signal System | :Compositive video 1.0Vp-p 75Ohm |
| Discs Played | :(1) DVD-Disc5" (12 cm) single-sided, single-layer5" (12 cm) single-sided, double-layer:(2) Compact Disc (CD-DA)5" (12cm) disc |
| Audio Output Level | : 600Ohm (2 ch 2.0 Vrms) |
| Audio Signal Output Characteristics | :(1) Frequency Response 20 Hz - 20 KHz:(2) S/N Ratio 90 dB (JIS):(3) Wow and FlutterBelow measurable limits |
| TUNER | |
| Sensitivity | 3 μV |
| Frequency range | 87.5-108 MHz |
| Channel step | 50 kHz |
| Intermediate frequency | 10.7 MHz |
| LINE-OUT | |
| Output | 350mV max. |
| GENERAL | |
| Speaker impedance | 4 ohm |
| Output power | 40W x 4CH |
Note: Specifications and the design are subject to possible modifications without notice.
CD-940DVD ERRATA CORRIGE
ENGLISH: PLEASE NOTE
SECTION: SPEAKER SETUP (page 19)
This model has the following Speaker output mode:
DUAL MONO STEREO
L-MONO
R-MONO
MX-MONO
Instead of the DOWNMIX mode.
SECTION: AUDIO SETUP (page 19)
This model has the following Audio output mode: "DOLBY PROLOGIC",
Instead of AUDIO OUT ANALOG
SPDIF/RAW
SPDIF/PCM
- FERNBEDIENUNG
- UNTERTITEL (SUBTITLE)
- INTRODUCTION
- Dear Customers
- Safety Information
- CAUTION:
- WARNING:
- CD-940DVD
- English
- Important Information
- Precautions
- Disc Functions
- Discs that cannot be played
- COPYPROTECTION
- TABLE OF CONTENTS
- YOUR NEW CD/DVD PLAYER
- DESCRIPTION OF THE REAR CONNECTORS
- DESCRIPTION OF THE LCD ON THE FRONT PANEL
- INSTALLATION
- Mounting angle adjustment
- MOUNTING EXAMPLE
- DETACHING AND ATTACHING THE FRONT PANEL
- FOLDING DOWN AND DETACHING THE FRONT PANEL
- ATTACHING THE FRONT PANEL
- REMOTE CONTROL
- USING THE REMOTE CONTROL
- Preparing the Remote Control
- Battery Handling Precautions
- CONNECTIONS
- CONNECTING POWER AND SPEAKER OUTPUT
- CONNECTORB
- BASIC OPERATION
- Loading a DVD/CD Disc
- Ejecting a Disc
- BASIC OPERATIONS DVD
- Before Playing Your DVD Disc
- To Play a DVD Disc
- STOP: Press this button to stop playing.
- PAUSE: Press this button to stop disc play temporarily.
- TO CHECK THE STATE OF PLAYBACK
- • DVD
- - CD/MP3
- SCANNING TO THE DESIRED SCREEN/SONG
- To Scan Screens or Songs Fast (DVD, CD, MP3)
- To Skip Chapters (DVD, CD, MP3)
- REPEATING PLAYBACK (DVD.CD)
- To Repeat a Chapter, Title, or Track (Song)
- SPECIAL FUNCTIONS
- In CD/MP3 Mode, press:
- MUTE BUTTON (MU)(11)
- SELECTING SUBTITLE LANGUAGE
- CHANGING THE CAMERA ANGLE (DVD ONLY)
- JPEG PLAYBACK (PICTURE CD)
- PLAYBACK WITH MP3
- To play an MP3 file
- To play an MP3 file repeatedly
- SETUP MENU
- Using the Menu System
- GENERAL SETUP
- TV DISPLAY
- PIC MODE
- ANGLE MARK
- OSD LANG
- CAPTIONS
- SCR SAVER (SCREEN SAVER)
- SPEAKER SETUP
- DOWNMIX
- LT/RT:
- STEREO:
- AUDIO SETUP
- AUDIO OUT
- OP MODE (OPERATIONAL MODE)
- DYNAMIC
- DIGITAL OUT SETTING
- PREFERENCES
- TV TYPE
- AUDIO
- SUBTITLE
- DISC MENU
- PARENTAL
- PASSWORD
- DEFAULTS
- SMART NAV (MP3 Only)
- RADIO MODE
- MODE BUTTON (MD/TA)
- BAND BUTTON (BAND)
- RADIO TUNING UP AND DN BUTTONS (^ / v)
- FORWARD AND REVERSE TRACK SEARCH (or changing songs)
- AUTO SEEK SEARCH TUNING (AS/PS)
- PRESET STATIONS (1,2,3,4,5,6)
- RADIO MODE:
- USING THE RDS FUNCTION
- What is RDS?
- 'AF/REG' function (ALTERNATIVE FREQUENCIES)
- 'TA' function (TRAFFIC ANNOUNCEMENT)
- 'PTY' function (PROGRAM TYPE)
- MUSIC
- SPEECH
- RESET BUTTON
- ACCESSORIES
- CD-940DVD ERRATA CORRIGE
- ENGLISH: PLEASE NOTE
Brand : ROADSTAR
Model : CD-940DVD
Category : Car radio