
510H - Headphones ALIENWARE - Free user manual and instructions
Find the device manual for free 510H ALIENWARE in PDF.


| Product Type | Wired Gaming Headset |
| Brand | Alienware |
| Model | 510H |
| Connectivity | 3.5mm audio jack, USB (for virtual surround) |
| Driver Diameter | 50 mm |
| Frequency Response | 20 Hz - 20 kHz |
| Impedance | 32 ohms |
| Sensitivity | 107 dB |
| Microphone | Unidirectional, noise-cancelling, removable |
| Weight | 340 g |
| Cable Length | 2.0 m |
| Controls | In-line remote with volume wheel and mute switch |
| Compatibility | PC, PlayStation 4/5, Xbox One/Series X|S, Nintendo Switch, mobile devices |
| Surround Sound | 7.1 virtual surround (via USB) |
| Ear Cushions | Breathable mesh fabric, over-ear design |
| Headband | Adjustable, padded with leatherette |
| Power Source | USB powered for virtual surround; no battery required |
| Cleaning Instructions | Wipe with a soft, dry cloth. Do not use liquids or solvents. |
| Safety Warnings | Avoid prolonged use at high volume to prevent hearing damage. |
| Spare Parts Availability | Ear pads and cables available from Alienware support. |
| Repairability | User-replaceable ear pads and cable; warranty covers defects. |
Frequently Asked Questions - 510H ALIENWARE
User questions about 510H ALIENWARE
0 question about this device. Answer the ones you know or ask your own.
Ask a new question about this device
Download the instructions for your Headphones in PDF format for free! Find your manual 510H - ALIENWARE and take your electronic device back in hand. On this page are published all the documents necessary for the use of your device. 510H by ALIENWARE.
USER MANUAL 510H ALIENWARE
Alienware 510H 7.1 Gaming Headset User Guide
Notes, cautions, and warnings
NOTE: A NOTE indicates important information that helps you make better use of your computer.
△ CAUTION: A CAUTION indicates potential damage to hardware or loss of data if instructions are not followed.
⚠ WARNING: A WARNING indicates a potential for property damage, personal injury, or death.
Copyright © 2019 Dell Inc. or its subsidiaries. All rights reserved. Dell, EMC, and other trademarks are trademarks of Dell Inc. or its subsidiaries. Other trademarks may be trademarks of their respective owners.
2019 - 07
Rev. A00
Contents
What's in the box....5
Features 6
Headset 6
Audio cable 6
USB cable with DAC. 7
Setting up your headset 8
Connecting the headset to your computer using the USB cable with DAC. 8
Connecting the headset to your computer using the audio cable and Y-cable 8
Connecting the headset to your mobile device. ..... 9
Configuring the headset 9
Alienware Command Center 12
Installing Alienware Command Center (AWCC) .....12
Using the headset 14
Adjusting the headset....14
Adjusting the volume .....15
Muting/unmuting the microphone .....15
Replacing the ear pads . . . . . . . . . . . . . . . . . . . . . . . . . . . . . . . . . . . . . . . . . . . . . . . 16
Specifications....17
General 17
Physical characteristics .....17
Environmental .....17
Troubleshooting....18
Warranty information 20
Limited warranty and return policies 20
For U.S. customers: 20
For European, Middle Eastern and African customers: . . 20
For non-U.S. customers: 20
What's in the box

1 Alienware 510H 7.1 Gaming Headset
3 Y-cable with audio and microphone connectors (0.15 m)
5 Documents
2 Audio cable
(with microphone mute and
volume control)
4 USB cable with DAC (Digital/Analog converter)

NOTE: The documents shipped with your headset may vary depending on the region.
Features
Headset

1 Ear pads 2 3.5 mm audio port
3 Retractable boom
microphone
Audio cable

natural_image
Line drawing of a cable with two connectors and a central connector, labeled with numbers 1 and 2 (no text or symbols on the diagram itself)1 Microphone mute switch 2 Volume control wheel
USB cable with DAC
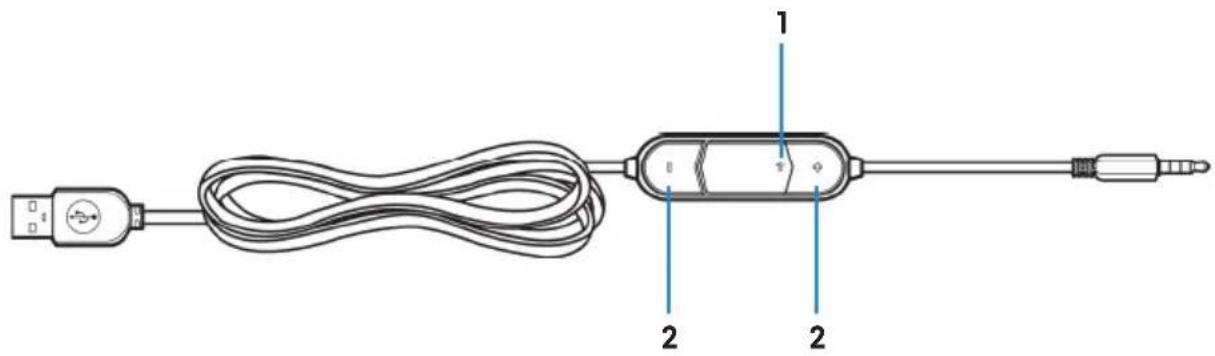
1 Microphone mute switch 2 Volume (+/-) buttons
Setting up your headset
Connecting the headset to your computer using the USB cable with DAC
Connect one end of the USB cable with DAC to the 3.5 mm audio port on your headset, and connect the other end to the USB port on your computer.

Connecting the headset to your computer using the audio cable and Y-cable
To connect the headset to your computer using the audio cable, you have to attach it with a Y-cable. The Y-cable has two 3.5 mm plugs.
- Connect one end of the audio cable to the 3.5 mm audio port on your headset, and connect the other end to the female jack on the Y-cable.
- Connect the other end of the Y-cable (marked in green) to the headphone port on your computer.
- Connect the other end of the Y-cable (marked in red) to the microphone port on your computer.

Connecting the headset to your mobile device
Connect one end of the audio cable to the 3.5 mm audio port on your headset, and connect the other end to the headset port on your mobile device.
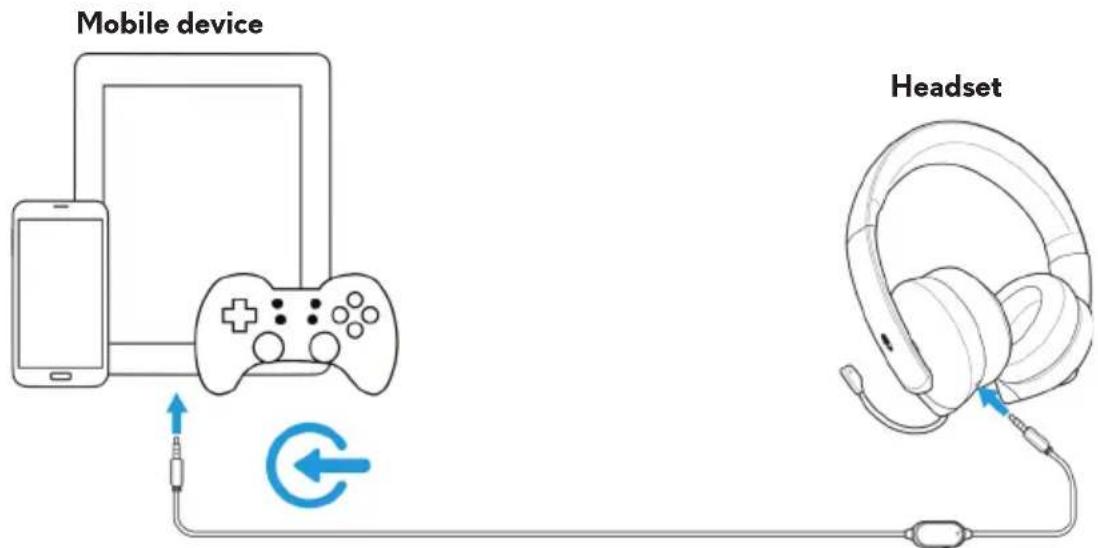

NOTE: USB-C to 3.5 mm converter is not included.
Configuring the headset
Connect the headset to your computer using the audio cable and the Y-cable or the USB cable with DAC. Once the headset is detected, it is ready to use. To use your headset for gaming or to listen to music from your computer, it has to be selected as the default playback device and the default recording device in Windows Audio Settings.
- On Windows toolbar, right-click the speaker icon and select Sounds to access the Windows Audio Settings. The Sound dialog box appears.
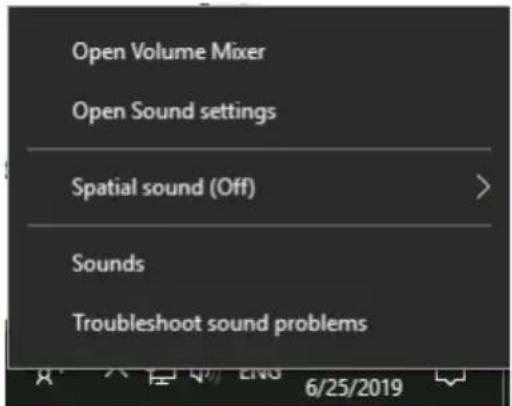
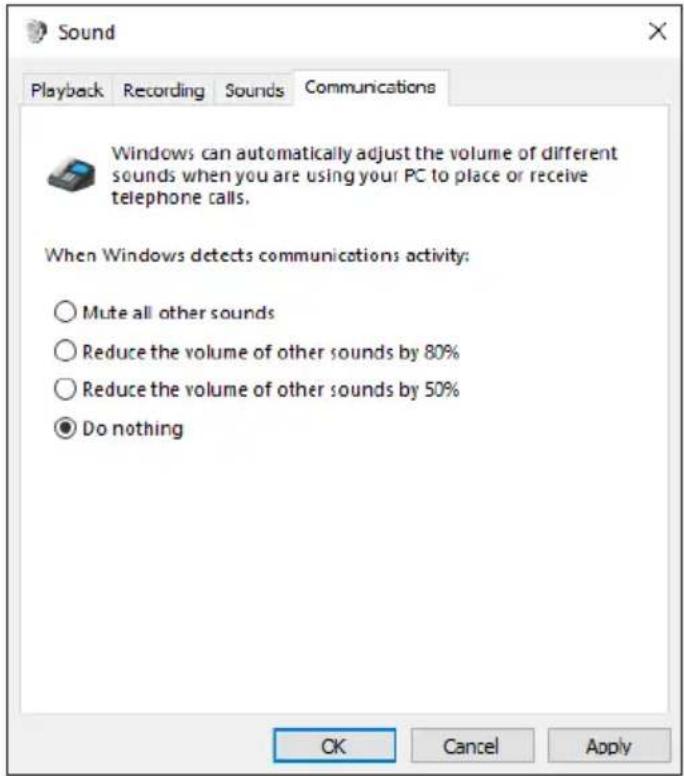
- Click the Playback tab, set the Alienware 510H as the default device.

- Click the Recording tab, set the Alienware 510H as the default device.

- Click the Communications tab, select Do nothing. Click Apply.
Alienware Command Center
Installing Alienware Command Center (AWCC)
Alienware Command Center (AWCC) provides a single interface to transform your Windows computer into an enhanced gaming environment. To use the AWCC features, uninstall Alienware Headset Center (AWHC) if you have already installed AWHC on your computer.
You need to install Alienware Command Center (AWCC) to configure the features available in Alienware 510H 7.1 Gaming Headset.
Before installing AWCC on your computer, ensure that your computer is connected to Internet. If your computer is preinstalled with AWCC 5.0 or later, you can configure your Alienware gaming headset through FX available in AWCC.
If your computer is not preinstalled with AWCC 5.0 or later, install AWCC through Windows Update or from the Dell Support website at www.dell.com/support. AWCC requires Windows 10 version 16299 or later.
Installing AWCC through Windows Update
-
Connect your Alienware USB Cable with DAC to your computer through the USB port. The AWCC application is downloaded and installed automatically. AWCC installation may take up to 10 minutes to complete.
-
Go to the program folder to ensure that the AWCC installation is complete.
-
Launch AWCC. Perform the following steps to download additional software components:
- In the Settings window, click Windows Update, and then click Check for updates to check the Alienware driver update progress.
- If the driver update is not responding on your computer, install AWCC from the Dell Support website.
Installing AWCC from the Dell Support website
-
Download the latest version of the following applications at www.dell.com/support/drivers.
-
Alienware Command Center
-
Alienware Gaming Headset driver
-
Go to the folder where you saved the setup files.
-
Double-click the setup file and follow the on-screen instructions to install the application.

NOTE: You can customize the headset feature by using the Alienware Command Center.
Using the headset
Adjusting the headset
Adjust the ear pads to find an optimal fit for your head. When using the retractable microphone, position it approximately two centimeters away from your mouth.
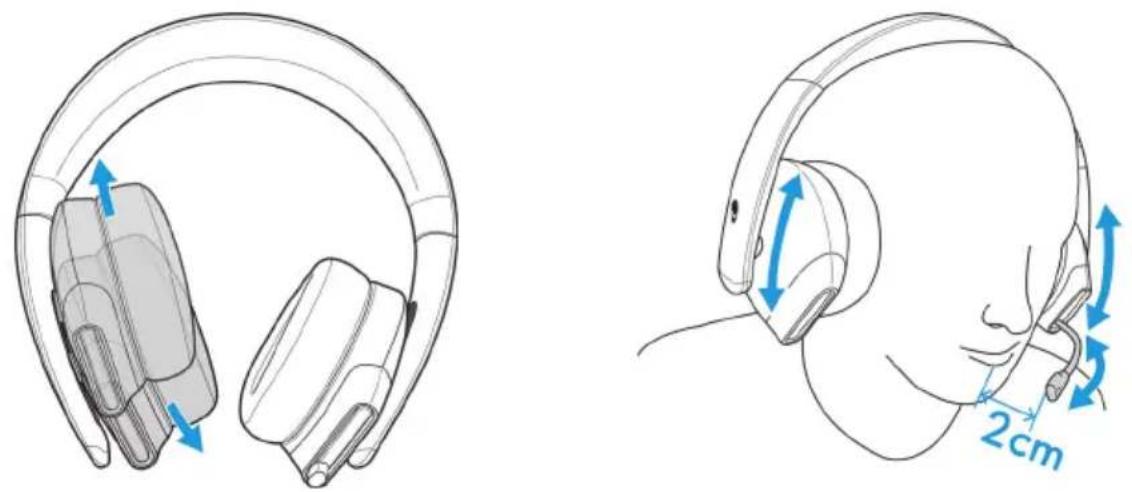
The earcups can be rotated to wear the headset around the neck comfortably, or for easier storage.

Adjusting the volume
Use the volume control wheel on the audio cable or the volume (+/-) buttons on the USB cable with DAC to adjust the speaker volume.
In the audio cable, scroll the volume control wheel up to increase the volume, or down to decrease the volume.
In the USB cable with DAC, press the volume (+) button to increase the volume, or the volume (-) button to decrease the volume.

Audio cable USB cable with DAC
Muting/unmuting the microphone
Slide the microphone mute switch on the audio cable or the USB cable with DAC down to mute the microphone. To unmute the microphone, slide the microphone mute switch up.

Audio cable USB cable with DAC

NOTE: When using the USB cable with DAC, you can hear an audio prompt ("Mute") when you slide the microphone mute switch down, indicating that the microphone is in mute.
Replacing the ear pads
The ear pads can be removed and replaced, if necessary.
To remove the ear pads, hold the ear pads firmly and rotate counter-clockwise, and then pull the ear pads away from the headset.
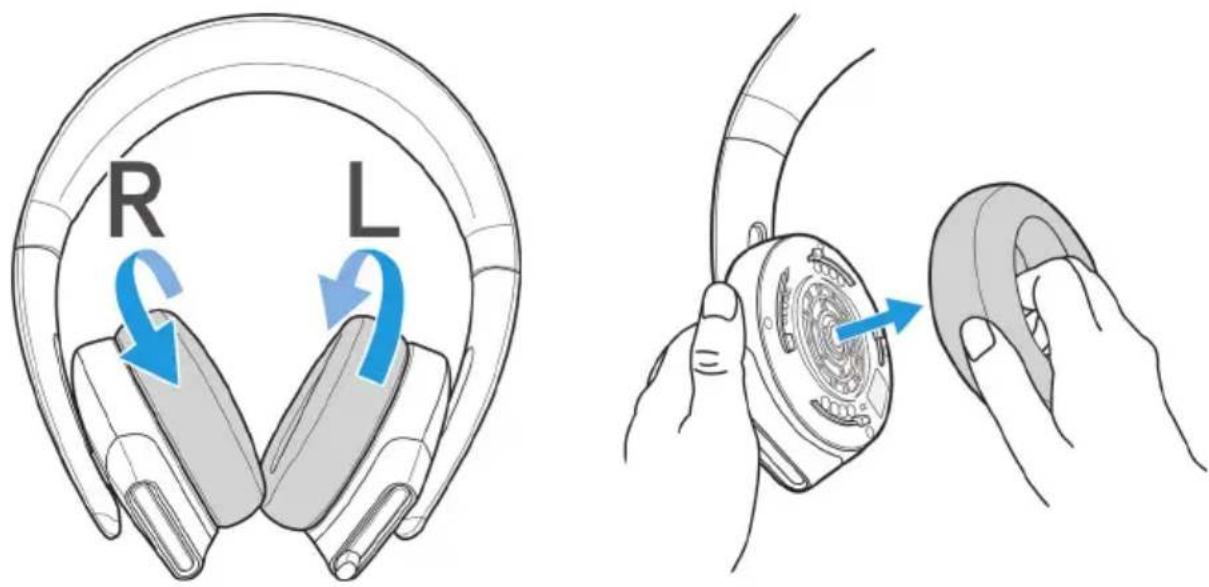
To replace the ear pads, fit them around the edges of the earcup firmly and rotate them into position.

Specifications
General
Model number AW510H
Supported operating systems Windows 10
Physical characteristics
Weight (headset only) 370 (+/- 5) g
Dimensions (headset only) 217.50 mm x 202 mm x 104 mm
Washable item None (general cleaning with damp cloth)
Environmental
Operating temperature 5^ C to 40^ C ( 41^ F to 104^ F)
Storage temperature -5^ to 45^ ( 23^ to 113^ )
Operating humidity 5% to 90% relative humidity
Troubleshooting
Problems Possible solutions
| Headset has no sound · Ensure that the headset is connected to the computer using an audio cable with the Y-cable or the USB cable with DAC, or the smartphone or tablet using an audio cable. · Try using the headset on another computer, smartphone, or tablet. · Ensure that the audio player is playing music, and that the computer volume and media player volume are on and not muted. - Click the speaker icon on the system tray in your computer. - Adjust the volume level on the volume bar. · Sound is not configured to use this connection on the computer as the Audio Output/Input. | |
| The person on the other end cannot hear me | · Ensure that the microphone is positioned close to the mouth. · Ensure that the microphone is not muted. · If using the Y-cable, ensure that it is connected to the correct ports. · If using the native audio cable, ensure that it is connected to the correct port. · Ensure that the 3.5 mm jack is fully inserted into the headset port. |
| Abnormal sound is coming out of the headset | · Adjust the volume level up and down, and check if the abnormal sound changes. · Ensure that the 3.5 mm jack is fully inserted into the headset port. · Ensure that the audio cable is fully inserted into the audio port of the mobile device (if connected through the audio cable). |
Problems Possible solutions
| Unbalanced sound in the headset | Check the computer Volume Balance is set correctly.- Right-click the speaker icon on the system tray in your computer.- Select Sounds and select Playback tab.- Double-click on speakers, and select the Levels tab.- Click Balance. Ensure that the 1 and 2 values are the same. |
| Microphone picks up too much background noise | · Ensure that the microphone is positioned close to the mouth.· Remove any direct air flow (such as fan or air conditioner) to the microphone. |
| Microphone mute is not working when connected with audio cable | Ensure that the microphone mute switch on the audio cable is set to MUTE OFF. |
| Microphone works intermittently or cannot be heard by the other party | · Increase the microphone volume.· Set the microphone noise reduction level in chat application to a lower level. |
Warranty information
Limited warranty and return policies
The Alienware 510H 7.1 Gaming Headset carries a 2-year limited hardware warranty. If purchased together with a Dell computer, it will follow the system warranty.
For U.S. customers:
This purchase and your use of this product are subject to Dell's end user agreement, which you can find at www.dell.com/terms. This document contains a binding arbitration clause.
For European, Middle Eastern and African customers:
Dell-branded products that are sold and used are subject to applicable national consumer legal rights, the terms of any retailer sale agreement that you have entered into (which will apply between you and the retailer) and Dell's end user contract terms.
Dell may also provide an additional hardware warranty – full details of the Dell end user contract and warranty terms can be found by going to www.dell.com, select your country from the list at the bottom of the "home" page, and then click the "terms and conditions" link for the end user terms or the "support" link for the warranty terms.
For non-U.S. customers:
Dell-branded products that are sold and used are subject to applicable national consumer legal rights, the terms of any retailer sale agreement that you have entered into (which will apply between you and the retailer) and Dell's warranty terms. Dell may also provide an additional hardware warranty – full details of Dell's warranty terms can be found by going to: www.dell.com/terms, select your country from the list at the bottom of the "home" page, and then click the "terms and conditions" link or the "support" link for the warranty terms.


- Alienware 510H 7.1 Gaming Headset User Guide
- Notes, cautions, and warnings
- Contents
- What's in the box....5
- Features 6
- Setting up your headset 8
- Alienware Command Center 12
- Using the headset 14
- Specifications....17
- Troubleshooting....18
- Warranty information 20
- What's in the box
- Features
- Headset
- Audio cable
- USB cable with DAC
- Setting up your headset
- Connecting the headset to your computer using the USB cable with DAC
- Connecting the headset to your computer using the audio cable and Y-cable
- Connecting the headset to your mobile device
- Configuring the headset
- Alienware Command Center
- Installing Alienware Command Center (AWCC)
- Installing AWCC through Windows Update
- Installing AWCC from the Dell Support website
- Using the headset
- Adjusting the headset
- Adjusting the volume
- Muting/unmuting the microphone
- Replacing the ear pads
- Specifications
- General
- Physical characteristics
- Environmental
- Troubleshooting
- Problems Possible solutions
- Warranty information
- Limited warranty and return policies
- For U.S. customers:
- For European, Middle Eastern and African customers:
- For non-U.S. customers:
Brand : ALIENWARE
Model : 510H
Category : Headphones