
COM-843 - Network card Steren - Free user manual and instructions
Find the device manual for free COM-843 Steren in PDF.


| Product Type | Network Interface Card (NIC) |
| Brand | Steren |
| Model | COM-843 |
| Interface | PCI Express (PCIe) |
| Network Standards | IEEE 802.3, IEEE 802.3u, IEEE 802.3ab |
| Data Transfer Rate | 10/100/1000 Mbps (Gigabit Ethernet) |
| Connector Type | RJ-45 |
| Bus Type | PCI Express x1 |
| Compatible Operating Systems | Windows, Linux, macOS |
| Power Consumption | 2.5 W (typical) |
| Operating Temperature | 0°C to 50°C |
| Storage Temperature | -20°C to 70°C |
| Humidity | 10% to 90% (non-condensing) |
| Dimensions (L x W x H) | 120 x 80 x 20 mm |
| Weight | 80 g |
| LED Indicators | Link/Act, Speed |
| Wake-on-LAN (WOL) | Supported |
| Compliance | RoHS, FCC |
| Package Contents | Network card, low-profile bracket, driver CD, manual |
| Care and Cleaning | Disconnect power before cleaning. Use a dry, soft cloth. Avoid liquids and abrasive cleaners. |
| Safety Precautions | Install in a well-ventilated area. Do not expose to moisture. Ensure proper grounding. |
| Spare Parts and Repairability | No user-serviceable parts. Contact Steren support for warranty service. |
Frequently Asked Questions - COM-843 Steren
User questions about COM-843 Steren
0 question about this device. Answer the ones you know or ask your own.
Ask a new question about this device
Download the instructions for your Network card in PDF format for free! Find your manual COM-843 - Steren and take your electronic device back in hand. On this page are published all the documents necessary for the use of your device. COM-843 by Steren.
USER MANUAL COM-843 Steren
- Presione Siguiente.
USB Wireless LAN Driver
Instruction manual
0614b
V2.0
300 Mbps WIRELESS USB ADAPTER
COM-843
Thank You on purchasing your new Steren product.
This manual includes all the feature operations and troubleshooting necessary to install and operate your new Steren's 300 Mbps wireless USB adapter.
Please review this manual thoroughly to ensure proper installation and operation of this product. For support, shopping, and everything new at Steren, visit our website:
www.steren.com

The instructions of this manual are for reference about the product. There may be differences due to updates.
Please check our website (www.steren.com) to obtain the latest version of the instruction manual.

"The operation of this equipment is subject to the following two conditions: (1) it is possible that this equipment or device may not cause harmful interference, and (2) this device or device must accept any interference, including interference that may cause undesired operation."
IMPORTANT
- Do not try to open the device, may cause damages and warranty will be void.
- Do not expose to extreme temperatures.
• To prevent fire or shock hazard, do not expose the device to rain or moisture.
- Do not expose the device or accessories to dust, smoke or steam.
- Do not mix electric and electronics products with domestic garbage. Help to avoid adverse effects on human health and the environment. Contact your local authority for detailed reports on the collection of electrical and electronic equipment.
- Clean with a soft, dry cloth.
1. HIGHLIGHTS
The Wireless –N USB 2.0 adapter allows you to connect your desktop or laptop to a local network, wirelessly.
It complies with EEE802.11n / IEEE802.11g / IEEE802.11b standards, allowing you to get access to a wireless local network through an access point or router, with your desktop or laptop.
- USB port.
- MIMO technology for data transfers up to 300 Mbps.
- Easy and secure installation, monitoring and configuration.
- Compatible with WPS wireless security.
- Supports WPA data security, IEEE802.1x authentication, TKIP/AES encryption, and 64/128/152bit WEP advanced data security.
2. DRIVERS AND HARDWARE INSTALLATION WINDOWS 7
Turn on the computer and insert the included CD into your CD-ROM drive. The installation screen appears. Otherwise, press the Start button and choose Run, enter D:\setup.exe (if drive D is your CD-ROM drive if not, enter the correct drive).

- Press Next.
Follow the install instructions.
Below is the installation on Windows 7. Steps and screens are similar in other Windows operating systems.

Once the installation is complete, the system will ask you if you want to restart the computer.
This can be done immediately or later. Connect the adapter when setup program requires it.

In Windows 8 you don't need to install additional drivers or software.
This wireless adapter has two modes of use: station and access point. The default mode is station. You can choose a router or wireless remote access point to connect in station mode. In access point mode, the USB adapter acts as a wireless access point that wireless clients can connect and share a connection.
Use the wireless LAN utility to search for available wireless networks, check connection information or create profiles that contain different configuration parameters. You can give double clicking the icon on your desktop to run it.
Alternatively, press start > programs > COM-844 USB Wireless LAN Utility > COM-844 USB wireless LAN utility.
3.1 General
The General option displays basic information of the wireless connection.

-Status: Associated wireless network, Ad Hoc mode or not associated.
-Speed: Shows the speed of transmission and reception of data for the current connection.
-Type: Current wireless connection type - infrastructure or Ad Hoc.
-Encryption: Encryption type of the current connection.
-SSID: Name of the wireless network in which the wireless adapter is connected.
-Signal strength: Indicates the quality of the connection signal.
-Link quality: Refers to the link quality in the current connection.
- Network address
-MAC address: Refers to the MAC address of the adapter.
-IP address: Refers to the IP address of the adapter.
-Subnet mask: Refers to the adapter subnet mask.
-Gateway: The default gateway of the adapter.
-Press "Renew IP" to change the IP address of the adapter.
- Other
-Show tray icon: Shows the USB Wireless LAN icon in the Windows taskbar.
-Disable adapter: Disable the wireless network card.
-Radio disabled: Turn on the wireless adapter radio transmission.
-Virtual WiFi allowed: Allows the use of the adaptor as access point.
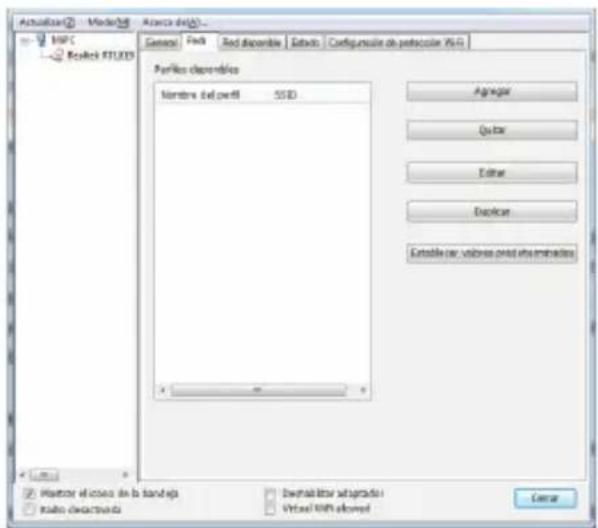
3.2 Profi le
You can use this profile setting to add, delete, edit and duplicate profi les, as well as set a default profi le.

Useful to create a new profile.
- Select the Add button to create a new profile.
When the network information window appears, type the name of the new profile that will be generated.
Enter the network SSID, select network authentication mode and entry the data type, confirm the network key.
Select OK.
If you want your wireless computers to communicate directly with each other, select the Add button to create a new ad hoc profi le, then select this window:
and select the operation channel for the network from the channel drop-down menu.
Select network authentication mode and the type of data entry, confirm the network key. Select OK.
3.2.2 Remove
Select the unwanted profi le and delete it with the "Remove" button.

Select profile and press the "Edit" button to start editing. Make the changes you require and confirm with OK.
3.2.4 Duplicate
Select the profile that you want to copy and select the "Duplicate" button. Enter the name of the new profile in the text box.
3.2.5 Set defaults
When you want to set as the default wireless connection profile, you must select the profile and select the "Set defaults" button.
In this way the wireless network card will use this profile (after running applications again) to automatically connect.
3.3 Available network
Here you can see all available wireless networks. If you want to add some as a profi le, double-click on it or use the "Add to profile" button. To renew the list press "Renew".

3.4 Status
The status window displays data from the adapter.
3.5 Statistics
The statistics table shows data packets transmitted and received during this session. You can click the "Reset" button to clear these values and restore the account.
3.6 WiFi security settings
Note: You can use WPS only if the router also has the WPS feature.
A: By NIP
Select the "Protection WiFi settings" tab in the adaptor utility.
To choose the WPS NIP select "Input NIP from AP" box, provide WPS NIP and click "Input pin configuration". This PIN is usually printed on a label on the router. If it is not on the router or has been changed, it is possible you may need to access the router interface.
If you prefer, you can choose to use the NIP that offers this wireless adapter, click input pin configuration (PIN Input Config) and insert the PIN in the router interface.
B: By button
Press and hold the WPS button on the back of the router until the LED blinks (or as marked on the manufacturer's manual).
Press the WPS button on your wireless network adapter and hold for 3-5 seconds.
A secure connection is established automatically.
It can also be used in reverse order - press and hold the WPS button on the adapter briefly, then press and hold the WPS button on the router.
If there is more than one access point when using the method button, it can be session conflict. Please use the PIN method or wait to press the button again.
3.7 Easy Sharing
You can configure folders so that they are easily shared wirelessly with other devices on the network. Select "Manage Shared Folder(s)". Select the folder that you want to share with the "Select" button and confirm with "Add". Use the "Delete" button to delete a folder from the list and press "OK" to close the settings.
4. ACCESS POINT MODE
The USB adapter can be used as an access point for wireless visitors to connect if configured in access point mode. You can share Internet access with other devices. There are two options to initiate this mode:
A: Select the "Virtual WiFi allowed" checkbox. The Virtual WiFi tab will appear.
To start the access point mode, select the "Start flexible Virtual WiFi AP" box. Use the "Settings" button to assign the network name and key. Click OK to save the data.
Check the “Set Internet connection sharing (ICS)” box to share a connection to the Internet from your computer. The public network automatic mode is selected by default. If you want to share another connection, uncheck “Automatic public network” and select the connection from the drop-down menu.
B: Click on mode in the menu bar and select access point. Automatically switches to access point mode.
5. TROUBLESHOOTING
PROBLEM SOLUTION
| The adapter does not work properly. | Reconnect the wireless USB adapter 11N to your computer's USB.Then right click on my Properties. Select the Device Manager and click on the network adapter. You will find the adapter if it is successfully installed. If you notice the yellow exclamation mark, the resources are in conflict.You will see the status of the adapter. If a yellow interrogation mark appears, please check the following:-Make sure that your PC has a free IRQ (Interrupt ReQuest) (interrupted request) (a hardware interrupted in a PC).- Make sure that you have inserted the correct adapter and install the appropriate disk. If the adapter is not working after trying the above steps, remove the adapter and do the following:-Uninstall the software from your PC's drive.-Restart your computer and repeat the hardware and the software installation as described in this user guide. |
| You can not communicate with other computers linked in the infrastructure confi guration. | -Make sure that all related devices are switched on.-Make sure that your adapter is configured on the same channel and the same security options as with the other computers in the confi guration of the infrastructure. |
| What can you do when the computer with the installed adapter is not connected to the wireless network or the Internet? | -Check that LED indicators to the broadband MODEM are indicating normal activity. If there is a problem with band connection broadband.-Check that the LED on the wireless router indicators is functioning properly. If it is not, check that the power cord and Ethernet cables are securely connected.-Check that the IP address, subnet mask, gateway and DNS settings are correctly entered in the network.In infrastructure mode, make sure that the SSID is specified in the settings for wireless visitors and access points.In ad hoc mode, both wireless visitors will need to have the same SSID. Please note that it will be necessary to configure a client to establish a BSS (Basic service Set) (basic service set) and wait briefly before configuring other visitors. This prevents several visitors to try to establish a BSS at the same time, which can result in a multiple BSS being established instead of a single BSS with multiple associated visitors.Check that the network connection for the wireless visitors are properly configured.If security is enabled, ensure that occurrences of the number keys are entered both the adapter and the access point. |
6. SPECIFICATIONS
| Standards: | IEEE 802.11n (draft 2.0); IEEE 802.11g; IEEE 802.11b; CSMA/CA with ACK |
| Wireless signalrates with automatic fallback: | 11n: 270/243/216/162/108/54/27 Mbps135/121.5/108/81/54/40.5/27/13.5 Mbps130/117/104/78/52/39/26/13 Mbps65/58.5/52/39/26/19.5/13/6.5 Mbps11g: 54/48/36/24/18/12/11/9/6 Mbps (adaptive)11b: 11/5.5/2/1 Mbps (adaptive) |
| Frequency range: 2.4-2, 484 GHz | |
| Wireless transmit power: 17 dBm (max) | |
| Modulation type: | OFDM/CCK/16-QAM/64-QAM/BPSK/QPSR/DQPSR/DBPSK |
| Receiver sensitivity: | 270 M: -68 dmM@10% PER,130 M: -68 dBm@10% PER,108 M: -68 dBm@10% PER,54 M: -68 dBm@10% PER,11 M: -85 dBm@8% PER,6 M: -88 dBm@10% PER,1 m: -90 dBm@8% PER |
| Security: | 64/128 bit WEP, WPA/WPA2,WPA-PSK/WPA2-PSK (TKIP/AES) |
| Support operating system: Windows 2000/XP/Vista | |
| Interface: USB 2.0 Hi-Speed | |
| Antenna type: Internal omni-directional antennas | |
| Certifi cations: CE, FCC | |
| Operating temperature: 0°C~40°C (32°F~104°F) | |
| Storage temperature: -20°C~70°C (-4°F~158°F) | |
| Relative humidity: 10% ~ 90%, non condensation | |
| Storage humidity: 5%~95% non-condensing |

Product design and specifications are subject to change, without notice.
Product: 300 Mbps wireless USB 2.0 adapter
Part number: COM-843
Brand: Steren
WARRANTY
This Steren product is warranted under normal usage against defects in workmanship and materials to the original purchaser for one year from the date of purchase.
CONDITIONS
-
This warranty card with all the required information, invoice, product box or package, and product, must be presented when warranty service is required.
-
If the product is in the warranty time, the company will repair it free of charge.
-
The repairing time will not exceed 30 natural days, from the day the claim was received.
-
Steren sell parts, components, consumables and accessories to customer, as well as warranty service, at any of the addresses mentioned later.
THIS WARRANTY IS VOID IN THE NEXT CASES:
If the product has been damaged by an accident, acts of God, mishandling, leaky batteries, failure to follow enclosed instructions, improper repair by unauthorized personnel, improper safe keeping, among others.
a) The consumer can also claim the warranty service in the purchase establishment.
b) If you lose the warranty card, we can reissue it, if you show the invoice or purchase ticket.
RETAILER INFORMATION
Name of the retailer ____
Address
Product ____
Brand
Part number ____
Serial number ____
Date of delivery ____

In case your product fails or have questions, please contact your nearest dealer. If you are in Mexico, please call to our Call Center.
01 800 500 9000

STEREN
Help us to improve this instruction manual, call us:

01800 500 9000
Customer Service Center
www.steren.com
- 300 MBPS WIRELESS USB ADAPTER
- IMPORTANT
- HIGHLIGHTS
- DRIVERS AND HARDWARE INSTALLATION WINDOWS 7
- 3.1 GENERAL
- NETWORK ADDRESS
- OTHER
- 3.2 PROFI LE
- 3.2.2 REMOVE
- 3.2.4 DUPLICATE
- 3.2.5 SET DEFAULTS
- 3.3 AVAILABLE NETWORK
- 3.4 STATUS
- 3.5 STATISTICS
- 3.6 WIFI SECURITY SETTINGS
- A: BY NIP
- B: BY BUTTON
- 3.7 EASY SHARING
- ACCESS POINT MODE
- TROUBLESHOOTING
- SPECIFICATIONS
- WARRANTY
- CONDITIONS
- THIS WARRANTY IS VOID IN THE NEXT CASES
- RETAILER INFORMATION
- STEREN
Brand : Steren
Model : COM-843
Category : Network card