
FV-HBVK1 - Home Automation PANASONIC - Free user manual and instructions
Find the device manual for free FV-HBVK1 PANASONIC in PDF.


| Product Type | Home Automation Ventilation Fan |
| Brand | Panasonic |
| Model | FV-HBVK1 |
| Dimensions (W x H x D) | 12 x 12 x 8 inches |
| Weight | 5.0 lbs |
| Power Supply | 120 VAC, 60 Hz |
| Power Consumption | 30 W |
| Airflow | 110 CFM |
| Noise Level | 1.0 sones |
| Motor Type | DC Motor |
| Control Type | Wall switch (optional remote) |
| Installation | Ceiling mount |
| Duct Size | 4 inches |
| Humidity Sensor | Yes |
| Motion Sensor | No (optional) |
| Night Light | No |
| Energy Star Certified | Yes |
| Warranty | 3 years |
| Maintenance | Clean cover and filter regularly |
| Safety | UL Listed |
| Included Accessories | Mounting brackets, duct connector |
| Function | Exhaust, humidity sensing, continuous ventilation |
Frequently Asked Questions - FV-HBVK1 PANASONIC
User questions about FV-HBVK1 PANASONIC
0 question about this device. Answer the ones you know or ask your own.
Ask a new question about this device
Download the instructions for your Home Automation in PDF format for free! Find your manual FV-HBVK1 - PANASONIC and take your electronic device back in hand. On this page are published all the documents necessary for the use of your device. FV-HBVK1 by PANASONIC.
USER MANUAL FV-HBVK1 PANASONIC
natural_image
3D rendered image of a square-shaped object with a dark top and small dot on the front face (no text or symbols)
Thank you for purchasing a Panasonic product.
This document explains how to configure the hub and access it using a mobile device. These steps must be followed before you can use the system.
For details about how to use the system, refer to the User's Guide (page 18).
Please read this document before using the unit and save it for future reference.
Printed in China
Table of Contents
Introduction
Accessory information ....3
Important Information
Graphical symbols for use on equipment and their descriptions 6
About this system 7
For your safety ....7 Important safety instructions ....8
Security cautions 8
For best performance ....9 Other information ....9
Setup
Part names and functions ......11
LED indicator 11
Connections 12
Wi-Fi® settings 13
Registering another mobile device .....16
Registering other devices to the hub .....16
Appendix
Wireless communication range (DECT) .....18
Accessing the User's Guide ....18
Wall mounting 19
Specifications 21
Open source software notice .....21
Software information 21
FCC and other information 22
Customer services 24
Limited Warranty 25
Accessory information
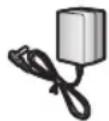
Supplied accessories
| No. | Accessory item/Part number Quantity | |
| 1 | AC adaptor/PNLV236-0Y 1 | |
| 2 | Wall mounting adaptor/PNKL1049Z1 1 |
①
②

Additional accessories
microSD card (not supplied)
A commercially-available microSD card must be inserted into the hub in order to record images from cameras. The following types of microSD cards are supported.
- microSD / SDHC card: Up to 32 GB
Other information
- Design and specifications are subject to change without notice.
- The illustrations in these instructions may vary slightly from the actual product.
Trademarks
- microSDHC Logo is a trademark of SD-3C, LLC.
- iPhone and iPad are trademarks of Apple Inc., registered in the U.S. and other countries.
- Android and Google Play are registered trademarks or trademarks of Google Inc.
- Microsoft, Windows, and Internet Explorer are either registered trademarks or trademarks of Microsoft Corporation in the United States and/or other countries.
- Wi-Fi ^ , WPA ^TM , and WPA2 ^TM are registered trademarks or trademarks of Wi-Fi Alliance ^ .
- All other trademarks identified herein are the property of their respective owners.
Notice
- The hub supports microSD and microSDHC memory cards. In this document, the term "microSD card" is used as a generic term for any of the supported cards.
Introduction
Expanding the Panasonic Home Network System
The Panasonic Home Network System is a wireless system that lets you create a powerful network of devices, such as cameras, sensors, and smart plugs, and control them all with an easy-to-use app.
Compatible devices are explained below. For information about the Home Network app, refer to the User's Guide (page 18).
The maximum number of devices for each device type is listed below.
| Digital Cordless Handset (KX-HNH100: 6 max.*1)● Makes and receives calls using your home landline● Can be used to change the system's arm mode● Displays system status● Receives notification when the sensors are triggered |  |
| Indoor Camera (KX-HNC210: 4 max.*2)● Full-color camera and built-in microphone for live monitoring and recording● Built-in visual sensor, audio sensor, and temperature sensor can be used to trigger other actions (camera recording, turning on a light, etc.)● Built-in microphone and speaker for two-way communication | 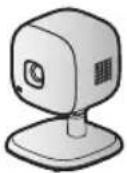 |
| Outdoor Camera (KX-HNC600: 4 max.*2)● Full-color camera with built-in microphone for live monitoring and recording● Built-in visual sensor and infrared sensor can be used to trigger other actions (camera recording, turning on a light, etc.)● Built-in microphone and speaker for two-way communication● Splash proof design for permanent, outdoor installation |  |
| Window/Door Sensor (KX-HNS101: 50 max.*2)● Detects when the corresponding window or door is opened● Can be used to trigger other events (camera recording, turning on a light, etc.) | 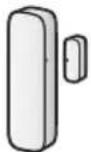 |
| Motion Sensor (KX-HNS102: 50 max.*2)● Detects motion in the surrounding area● Can be used to trigger other events (camera recording, turning on a light, etc.) |  |
Introduction
Smart Plug (KX-HNA101: 50 max.2)
- Can be turned on and off using the handset or Home Network app, when triggered by a sensor, or according to a schedule
- Built-in overcurrent and overwattage detection for added peace of mind
● Power consumption is logged for your reference

*1 Optional handsets may be a different color from that of the handset supplied as part of a pre-configured bundle.
*2 A total of 6 cordless handsets, 4 cameras, and 50 fans or other devices (motion sensors, window/door sensors, smart plugs, etc.) can be registered to the hub.
The Home Network System product lineup is growing!
You can look forward to new devices that will make your Home Network System even more useful and convenient.
For information about the latest devices and bundles, visit the website below.
http://shop.panasonic.com/support
Mobile devices
Your mobile devices: 8 max.\*1
You can expand the system by installing the Home Network app on your mobile devices (smartphones, tablets, etc.) and registering your mobile devices to the hub.
See page 13 for more information about the Home Network app.
Note:
- You must configure the hub's Wi-Fi settings before you can use the app.

natural_image
Illustration of two smartphones, one small and one large, with no visible text or symbols.*1 8 mobile devices can be registered to the hub, however, only the first 4 can use phone features.
Graphical symbols for use on equipment and their descriptions
| Symbol Explanation Symbol Explanation | |||
 | Alternating current (A.C.) Class II  | equipment(equipment in which protection against electric shock relies on Double Insulation or Reinforced Insulation) | |
 | Direct current (D.C.) “ON” (power) | ||
 | Protective earth “OFF” (power)  | ||
Protective bonding earth Stand-by   | |||
 | Functional earth “ON”/“OFF” (power  ) ) | push-push) | |
 | For indoor use only Caution, risk of electric  | shock | |
Important Information
About this system
- This system is an auxiliary system; it is not designed to provide complete protection from property loss. Panasonic will not be held responsible in the event that property loss occurs while this system is in operation.
- The system's wireless features are subject to interference, therefore functionality in all situations cannot be guaranteed. Panasonic will not be held responsible for injury or damage to property that occurs in the event of wireless communication error or failure.
For your safety
To prevent severe injury and loss of life/property, read this section carefully before using the product to ensure proper and safe operation of your product.

WARNING
Power connection
- Use only the power source marked on the product.
- Do not overload power outlets and extension cords. This can result in the risk of fire or electric shock.
- Completely insert the AC adaptor/power plug into the power outlet. Failure to do so may cause electric shock and/or excessive heat resulting in a fire.
- Regularly remove any dust, etc. from the AC adaptor/power plug by pulling it from the power outlet, then wiping with a dry cloth. Accumulated dust may cause an insulation defect from moisture, etc. resulting in a fire.
- Unplug the product from power outlets if it emits smoke, an abnormal smell, or makes an unusual noise. These conditions can cause fire or electric shock. Confirm that smoke has stopped emitting and contact us at http://shop.panasonic.com/support
- Unplug from power outlets and never touch the inside of the product if its casing has
been broken open. Danger of electric shock exists.
- Never touch the plug with wet hands. Danger of electric shock exists.
- Do not connect non-specified devices.
Installation
- prevent the risk of fire or electrical shock, do not expose the product to rain or any type of moisture.
- Do not place or use this product near automatically controlled devices such as automatic doors and fire alarms. Radio waves emitted from this product may cause such devices to malfunction resulting in an accident.
- Do not allow the AC adaptor or telephone line cord to be excessively pulled, bent or placed under heavy objects.
- Keep small parts, such as microSD cards, out of the reach of children. There is a risk of swallowing. In the event they are swallowed, seek medical advice immediately.
Operating safeguards
- Uplug the product from power outlets before cleaning. Do not use liquid or aerosol cleaners.
- Do not disassemble the product.
- Do not spill liquids (detergents, cleansers, etc.) onto the telephone line cord plug, or allow it to become wet at all. This may cause a fire. If the telephone line cord plug becomes wet, immediately pull it from the telephone wall jack, and do not use.
- Never put metal objects inside the product. If metal objects enter the product, turn off the circuit breaker and contact an authorized service center.
Medical
- Consult the manufacturer of any personal medical devices, such as pacemakers or hearing aids, to determine if they are adequately shielded from external RF (radio frequency) energy. DECT features operate between 1.92 GHz and 1.93 GHz with a peak transmission power of 115 mW. Wi-Fi features operate between 2.412 GHz
Important Information
and 2.462 GHz with a peak transmission power of 100 mW.
- Do not use the product in health care facilities if any regulations posted in the area instruct you not to do so. Hospitals or health care facilities may be using equipment that could be sensitive to external RF energy.

CAUTION
Installation and location
- Never install wiring during a lightning storm.
- Never install telephone line jacks in wet locations unless the jack is specifically designed for wet locations.
- Never touch uninsulated telephone wires or terminals unless the telephone line has been disconnected at the network interface.
- Use caution when installing or modifying telephone lines.
- The AC adaptor is used as the main disconnect device. Ensure that the AC outlet is installed near the product and is easily accessible.
- This product is unable to make calls when: – there is a power failure.
- when the cordless handset or mobile device's batteries need recharging or have failed.
Important safety instructions
When using your product, basic safety precautions should always be followed to reduce the risk of fire, electric shock, and injury to persons, including the following:
-
Do not use this product near water for example, near a bathtub, washbowl, kitchen sink, or laundry tub, in a wet basement or near a swimming pool.
-
Avoid using a telephone (other than a cordless type) during an electrical storm. There may be a remote risk of electric shock from lightning.
-
Do not use the telephone to report a gas leak in the vicinity of the leak.
-
Use only the power cord indicated in this document.
SAVE THESE INSTRUCTIONS
Security cautions
Take appropriate measures to avoid the following security breaches when using this product.
– Leaks of private information
– Unauthorized use of this product
– Unauthorized interference or suspension of the use of this product
Take the following measures to avoid security breaches.
- Configure the wireless router that connects your mobile device to this product to use encryption for all wireless communication.
- You may be vulnerable to security breaches if the unit is used with the login password, disarm code, or PIN code, or other settings at their defaults values. Configure your own values for these settings.
- Do not use passwords that could be easily guessed by a third party. If you keep a record of your passwords, protect that record. Change passwords regularly.
- If you lose your mobile device, change the password used to access this product.
- If you enable the product's auto login feature, enable the screen lock or similar security feature on your mobile device.
- Take care when performing important security related operations such as deleting MAC address, unit IDs, etc.
- To prevent disclosure of personal information, enable the screen lock or similar security feature on your mobile device.
- When submitting the product for repair, make a note of any important information stored in the product, as this information may be erased or changed as part of the repair process.
- Before handing the product over to a third party for repair or other purposes, perform a factory data reset to erase any data
Important Information
stored in the product and remove the microSD card. Use only trusted repair services authorized by Panasonic.
- Before disposing of the product, perform a factory data reset to erase any data stored in the product. Remove and erase the microSD card.
- If your mobile device will no longer be used with the product, delete your mobile device's registration from the product and delete the corresponding app from your mobile device.
- If this product experiences a power outage, its date and time setting may become incorrect. In this case, the date and time setting will be automatically corrected when your mobile device and this product are connected to the same wireless network.
Additionally, note the following.
- Multiple hubs cannot be used on the same network.
- Only one mobile device can access this product while away from home. If a second mobile device connects to this product while away from home, the first mobile device is disconnected.
- Communications may be interrupted depending on network conditions and wireless signal quality.
- This product may be used in ways that violate the privacy or publicity rights of others. You are responsible for the ways in which this product is used.
For best performance
Hub location/avoiding noise
The hub and other compatible Panasonic devices use radio waves to communicate with each other.
- For maximum coverage and noise-free communications, place your hub:
– at a convenient, high, and central location with no obstructions between the devices and hub in an indoor environment.
– away from electronic appliances such as TVs, radios, personal computers, wireless devices, or other phones.
– facing away from radio frequency transmitters, such as external antennas of mobile phone cell stations. (Avoid putting the hub on a bay window or near a window.)
- Coverage and voice quality depends on the local environmental conditions.
- If the reception for a hub location is not satisfactory, move the hub to another location for better reception.
Environment
- Keep the product away from electrical noise generating devices, such as fluorescent lamps and motors.
- The product should be kept free from excessive smoke, dust, high temperature, and vibration.
- The product should not be exposed to direct sunlight.
- Do not place heavy objects on top of the product.
- When you leave the product unused for a long period of time, unplug the product from the power outlet.
- The product should be kept away from heat sources such as heaters, kitchen stoves, etc. It should not be placed in rooms where the temperature is less than 0 °C (32 °F) or greater than 40 °C (104 °F). Damp basements should also be avoided.
- The maximum communication range may be shortened when the product is used in the following places: Near obstacles such as hills, tunnels, underground, near metal objects such as wire fences, etc.
- Operating the product near electrical appliances may cause interference. Move away from the electrical appliances.
Other information
Routine care
- Pipe the outer surface of the product with a soft moist cloth.
Important Information
- Do not use benzine, thinner, or any abrasive powder.
Protecting your recordings
- Do not remove the microSD card or disconnect the hub's AC adaptor while reading or writing data to the microSD card. Data on the card could become corrupted.
- If a microSD card malfunctions or is exposed to electromagnetic waves or static electricity, data on the card could become corrupted or erased. Therefore we recommend backing up important data to a computer or other device.
Notice for product disposal, transfer, or return
- This product can store your private/confidential information. To protect your privacy/confidentiality, we recommend that you erase information such as phonebook or caller list entries from the memory before you dispose of, transfer, or return the product.
Notice
- This product is designed for use in the United States of America. Sale or use of this product in other countries may violate local laws.
- Cet appareil est conçu pour être utilisé aux États-Unis d'Amérique. La vente ou l'emploi de cet appareil dans certains autres pays peut constituer une infraction à la législation locale.
- Este producto está diseñado para usarse en los Estados Unidos de América. La venta o el empleo de este producto en ciertos países puede constituir violación de la legislación local.
- 本產品專為美國使用而設。若在其他國家銷售或使用,可能會違反當地法例。
- この製品は、日本国外での使用を目的として設計されており、日本国内での使用は法律違反となります。従って、当社では日本国内においては原則として修理などのサービスは致しかねます。
Part names and functions
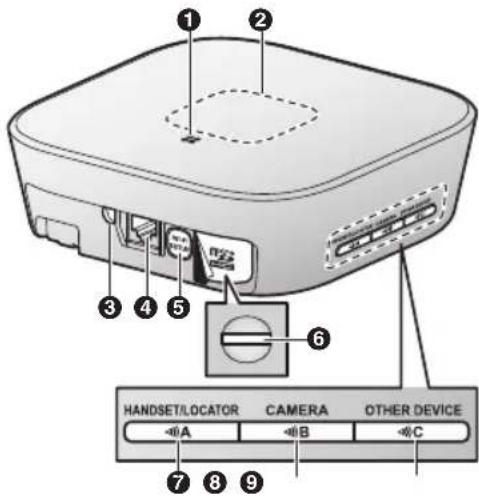
① Speaker
② LED indicator
③ DC jack
4 LINE jack
⑤ [Wi-Fi SETUP]
Used when performing initial setup.
⑥ microSD card slot
Used when inserting a microSD card. Remove the label when inserting.
7 【·】HANDSET/LOCATOR】
Used when registering a handset. You can also press this button to locate a misplaced handset.
8 【-】BAMERA】
Used when registering a camera.
9 【OTHER DEVICE】
Used when registering other devices, such as sensors and smart plugs.
LED indicator
You can use the LED indicator to confirm the hub's status.
| Indicator Status | |
| Off No power, or LED | indicator is turned off*1 |
| Green, lit Normal operation, connected to wireless router*1 | |
| Green, blinking slowly | Registration mode |
| Green, blinking quickly | Hub is searching for wireless router |
| Alternating: Green, blinking slowly Yellow, blinking slowly | Hub is starting up (cannot be used yet)*2 |
| Red, lit Alarm system is armed*1 | |
| Red, blinking quickly | Alarm system was triggered |
| Yellow, lit Initial setup | required |
| Yellow, blinking slowly | Initial setup in progress, mobile device connected |
| Yellow, blinking Initial | setup is starting |
*1 You can configure the hub so that its LED indicator does not light during normal operation. For more information, refer to the User's Guide (page 18).
*2 It may take some time for the hub to finish starting up.
Setup
Connections
① Insert the AC adaptor plug firmly into the DC jack.
② Secure the AC adaptor cord by wrapping it around the hook.
③ Connect the AC adaptor to the power outlet.
④ Insert the telephone line cord into the LINE jack and a single-line telephone jack (RJ11C) until you hear a click.*1
⑤ DSL/ADSL service users only: Connect your DSL/ADSL filter (not supplied). ^1
⑥ Outdoor Camera (KX-HNC600) or Indoor Camera (KX-HNC210) users only: Remove the label covering the card slot and then insert the microSD card (not supplied) into the slot. Make sure the notched corner of the card is in the position shown (①).
*1 This step is only necessary if you want to use the landline phone features. For details about the landline phone features, refer to the User's Guide (page 18).
Note:
- Use only the supplied Panasonic AC adaptor PNLV236.
- A microSD card (not supplied) is required to record images from cameras. Refer to the information about the available microSD card (page 3).
- To remove the microSD card, push in the microSD card and then remove it.

Note about power connections
AC adaptor connection
- The AC adaptor must remain connected at all times. (It is normal for the adaptor to feel warm during use.)
- The AC adaptor should be connected to a vertically oriented or floor-mounted AC outlet. Do not connect the AC adaptor to a ceiling-mounted AC outlet, as the weight of the adaptor may cause it to become disconnected.
Power failure
• The hub will not work during a power failure.
- The hub's telephone features will not work during a power failure. We recommend connecting a corded-type telephone that does not use an AC adaptor to your telephone line.
Wi-Fi® settings
After you have connected your hub, here is what you will need to do in order to access the system from your mobile device. Each procedure is explained in this chapter.
1 Download
Download the [Home Network] app to your mobile device.
2 Initial setup
Use the [Home Network] app to configure the hub to connect to your wireless router, and then register your mobile device to the hub.
Downloading the [Home Network] app
Download information is available at the web page listed below.
![PANASONIC FV-HBVK1 - Downloading the [Home Network] app - 1](/content/2026/05/1074540/images/c2664c4b1de828331c5e5565644a32588bc4f1ece4aef962793af8471c95cfde.jpg)
www.panasonic.net/pcc/support/tel/homenetwork/
Compatible mobile devices
- iPhone 4 and later, iPad (iOS 6.0 and later)
- Android™ smartphones and tablets (Android 4.0 and later)
Note:
- The [Home Network] app may not function properly depending on the system environment, such as the model of your mobile device, peripherals connected to your mobile device, and the apps installed on your mobile device.
- The following Android devices are not compatible with the [Home Network] app.
- Android devices that are not supported by Google Play™
- Android devices with limited hardware features (Bluetooth, Wi-Fi, and microphone support are required.)
Initial setup
Confirm the following before you begin.
- Make sure you have installed the [Home Network] app on your mobile device
- Make sure the hub and your wireless router are turned on and the hub's LED indicator is lit in yellow
- Make sure the hub is located within range of your wireless router
- Make sure your mobile device is connected to your wireless router
- Make sure your mobile device can connect to the Internet
- Make sure you know the network name (SSID) and password assigned to your wireless router
Initial setup for iPhone, iPad
1 S tart the [Home Network] app.
- If prompted, follow the on-screen instructions and select the appropriate region/country.
- If prompted to select the device to be set up, tap [Hub].
2 When prompted, tap [Set up the Hub].
3 When prompted, press [Wi-Fi SETUP] on the hub.
• The LED indicator blinks in yellow.
Setup
4 C hange your mobile device's Wi-Fi setting temporarily so that it connects to the hub directly.
- Open your mobile device's [Settings] app, tap [Wi-Fi], select "HOME_NETWORK_Panasonic", enter "00000000" as the password, and then tap [Join].
- If more than 1 item named "HOME_NETWORK_Panasonic" is displayed, wait approx. 10 minutes and perform this procedure from the beginning.
5 Start the [Home Network] app again.
6 If necessary, enter the password required to connect to your wireless router and then tap [Next].
- The hub and your mobile device connect to your wireless router.
- If prompted, follow the on-screen instructions and connect your mobile device to your wireless router, start the app again, and then tap [Add This Mobile Device].
- If you enter the wrong Wi-Fi password, [Setup failed.] is displayed and the hub's LED indicator lights. Proceed as follows according to the color of the hub's LED indicator.
- If the LED indicator is lit in yellow, repeat the initial setup procedure from the beginning.
- If the LED indicator is blinking in green, you must reset the hub's Wi-Fi settings. See "If the hub's LED indicator blinks in green", page 14.
7 When prompted, press [Wi-Fi SETUP] on the hub.
- Your mobile device will be registered to the hub.
8 When prompted, follow the on-screen instructions and set the password used to log in to the hub while away from home and then tap [OK].
9 When prompted, enter a name for the hub and for your mobile device and then tap [OK].
- The hub name setting is used by your mobile device to identify the hub. This is useful when you have multiple hubs.
- The mobile device name setting is used by the hub and other system users to identify your mobile device. This is useful when performing certain operations, such as deregistering or making intercom calls using a cordless handset.
10 When prompted, select whether you want to customize device profiles, i.e., the device name, location, and other settings for your devices.
- If you choose not to customize the device profiles now, you can change them later if desired. For details about customizing device profiles, refer to the User's Guide (page 18).
- If you choose to customize the device profiles now, change each setting as desired. When finished, tap
repeatedly until the "completed" message is displayed.
- The app's home screen is displayed when initial setup is complete.
If the hub's LED indicator blinks in green If you enter the wrong Wi-Fi password during the initial setup procedure for iPhone or iPad, [Setup failed.] is displayed and the hub's LED indicator blinks quickly in green. In this case, perform the following.
-
Press and hold the 3 registration buttons on the side of the hub and [Wi-Fi SETUP] on the back of the hub at the same time (4 buttons total) until the hub's LED indicator blinks slowly in green and yellow.
-
Wait for the hub's LED indicator to light in yellow.
-
Repeat the initial setup procedure ("Initial setup for iPhone, iPad", page 13).
Initial setup for Android devices
1 S tart the [Home Network] app.
- If prompted, follow the on-screen instructions and select the appropriate region/country.
- If prompted to select the device to be set up, tap [Hub].
2 When prompted, tap [Set up the Hub].
3 When prompted, press [Wi-Fi SETUP] on the hub.
• The LED indicator blinks in yellow.
- The app temporarily changes your mobile device's Wi-Fi setting so that it connects to the hub directly.
4 If necessary, enter the password required to connect to your wireless router and then tap [Next].
- The hub and your mobile device connect to your wireless router.
5 When prompted, press [Wi-Fi SETUP] on the hub.
- Your mobile device will be registered to the hub.
6 When prompted, follow the on-screen instructions and set the password used to log in to the hub while away from home and then tap [OK].
7 When prompted, enter a name for the hub and for your mobile device and then tap [OK].
- The hub name setting is used by your mobile device to identify the hub. This is useful when you have multiple hubs.
- The mobile device name setting is used by the hub and other system users to identify your mobile device. This is useful when performing certain operations, such as deregistering or making intercom calls using a cordless handset.
8 When prompted, select whether you want to customize device profiles, i.e., the device name, location, and other settings for your devices.
- If you choose not to customize the device profiles now, you can change them later if desired. For details about
customizing device profiles, refer to the User's Guide (page 18).
- If you choose to customize the device profiles now, change each setting as desired. When finished, press your device's "back" button repeatedly until the "completed" message is displayed.
- The app's home screen is displayed when initial setup is complete.
Information about Wi-Fi communication
The hub uses Wi-Fi to communicate with your wireless router. Refer to the following information when planning where to place the hub.
- Do not use the hub in the following areas or locations. Malfunction or interference to radio communication may result.
- Indoor areas that have certain types of radio or mobile communications equipment
– Locations near microwave ovens or Bluetooth devices
- Indoor areas where antitheft devices or 2.4 GHz frequency devices such as POS systems are used
- Do not place the hub in areas where the following materials or objects are located between the hub and the wireless router. These materials and objects may interfere with wireless communication or cause wireless transmission speed to become slower.
– Metallic doors or shutters
– Walls containing aluminum-sheet insulation
– Walls made of concrete, stone, brick, or tin
- Multiple walls
- Steel shelving
- Fireproof glass
Setup
Registering another mobile device
In order to access the system from a mobile device, you must first register the mobile device to the hub. You can register up to 8 mobile devices to a hub.
Confirm the following before you begin.
- Make sure you have completed the initial setup procedure
- Make sure your mobile device can connect to the Internet
- Make sure your wireless router and the hub are turned on
- Make sure your mobile device and the hub are connected to the same wireless router
1 Using the mobile device that you want to register, download the [Home Network] app and then start the app.
- If prompted, follow the on-screen instructions and select the appropriate region/country.
- If prompted to select the device to be set up, tap [Hub].
2 When prompted, tap [Add This Mobile Device].
3 When prompted, press [Wi-Fi SETUP] on the hub.
- Your mobile device will be registered to the hub.
4 When prompted, follow the on-screen instructions and enter the password used to log in to the hub while away from home.
5 When prompted, enter a name for your mobile device and then tap [OK].
- This setting allows you to change the name assigned to your device. It can help you identify your mobile device when performing certain operations, such as deregistering or making intercom calls using a cordless handset.
- The app's home screen is displayed when initial setup is complete.
Registering other devices to the hub
This procedure is not required for compatible fans already installed in your home.
Before you can use devices such as cameras, sensors, and smart plugs, they must be registered to the hub.
You can register each device by using the registration buttons or the [Home Network] app.
Using registration buttons
1 P ress and hold the appropriate registration button on the side of the hub (page 11) until the hub's LED indicator blinks slowly in green.
- When registering a handset: [●●●] A HANDSET/LOCATOR
- When registering a camera: [●●●]B CAMERA
- When registering any other device: 【●】C OTHER DEVICE
2 w hen registering a handset: Place the handset on the charger.
When registering any other device: Press and hold the device's registration button until the device's LED indicator blinks slowly in green.
- When registration is complete, the hub sounds one long beep.
Note:
- If registration fails, the hub sounds several short beeps.
- To register a mobile device, use the procedure described on page 16.
Using the app
1 S tart the [Home Network] app.
2 From the [Home Network] app home screen, tap [Settings].
3 Tap [Device Registration].
4 Tap [Registration].
Setup
5 S elect the type of device that you want to register.
6 When registering a handset:
Place the handset on the charger.
When registering any other device:
Press and hold the registration button on the device you want to register until the device's LED indicator blinks slowly in green.
- When registration is complete, the hub sounds one long beep.
Note:
- If registration fails, the hub sounds several short beeps.
Appendix
Wireless communication range (DECT)
The wireless communication range of each device in the system from the hub is approximately 50 m (160 feet) indoors and approximately 300 m (1,000 feet) outdoors. Wireless communication may be unreliable when the following obstacles are located between the hub and other system devices.
• Metal doors or screens
• Walls containing aluminum-sheet insulation
- Walls made of concrete or corrugated iron
• Double-pane glass windows
- Multiple walls
- When using each device on separate floors or in different buildings
Accessing the User's Guide
The User's Guide is a collection of online documentation that helps you get the most out of the [Home Network] app.
1 iPhone/iPad
Tap :≡ in the app's home screen.
Android devices
Tap : or press your mobile device's menu button in the app's home screen.
2 Tap [User's Guide].
Note:
- Microsoft Windows® Internet Explorer® 8 and earlier versions are not supported.
- Android 4.1 or later versions are recommended.
- You can also access the User's Guide at the web page listed below.

www.panasonic.net/pcc/support/tel/homenetwork/manual/
DECT Module Installation Manual for installers
In order for the hub to communicate with a compatible fan or other compatible device, a DECT Module must be installed in the device. To download the Installation Manual or check the latest information about installing and configuring the DECT Module, please visit the following web page.
www.panasonic.net/pcc/support/tel/homenetwork/
Appendix
Wall mounting
You can use the included wall mounting adaptor to wall mount the hub if desired.
Note:
- Make sure that the wall and the fixing method are strong enough to support the weight of the unit.
1 Connect the AC adaptor and the telephone line cord to the hub.
- Secure the AC adaptor cord by wrapping it around the hook.

natural_image
Diagram of a mechanical or electrical component with internal wiring and a central shaft (no text or symbols)2 S lide the wall mounting adaptor up until it clicks into place.
- Make sure the "UP" mark on the wall mounting adaptor faces upwards.
- Align and insert the tabs (1) of the wall mounting adaptor to the grooves (2) of the hub.

Appendix
3 M ount the hub on a wall then slide down to secure in place.
- Pass the AC adaptor cord and the telephone line cord through the groove (1) in the wall mounting adaptor. Wrap up the telephone line cord as shown to prevent the cord from being pinched.
- This product is compliant with the following wall phone plate sizes (2 types).
② 83 mm (3 1/4 inches)
③ 102 mm (4 inches) - Fit the slots of the hub onto the corresponding wall phone plate tabs for (4) and (5) respectively.

Removing the wall mounting adaptor
While pushing the release levers (1) away from the center of the wall mounting adaptor, slide the adaptor down (2).

Specifications
- \$andards
DECT:
DECT (Digital Enhanced Cordless
Telecommunications)
Wi-Fi:
IEEE 802.11b/g/n
- Frequency range
DECT:
1.92 GHz - 1.93 GHz
Wi-Fi:
2.412 GHz - 2.462 GHz
(channels 1 - 11)
• RF transmission power
DECT:
115 mW (max.)
Wi-Fi:
100 mW (peak transmission power)
- Encryption
WPA2™-PSK (TKIP/AES), WPA™-PSK
(TKIP/AES), WEP (128/64 bit)
- Simplified configuration
WPS (PBC)
- Power source
120 V AC, 60 Hz
• Power consumption
Standby: Approx. 3.5 W
Maximum: Approx. 4.0 W
- Operating conditions
0^ C-40^ C (32°F-104°F)
20% - 80% relative air humidity (dry)
- Alert tone volume
High alert level: approx. 90 dB
Low alert level: approx. 73 dB
(measured approx. 10 cm (3 15/16 inches)
in front of the center of the unit)
- Dimensions (height × width × depth)
Approx. 42 mm × 130 mm × 130 mm
(1 21/32 inches × 5 1/8 inches ×
5 1/8 inches)
- Mass (weight)
Approx. 257 g (0.57 lb)
Open source software notice
- Parts of this product use open source software supplied based on the relevant conditions of the Free Software Foundation's GPL and/or LGPL and other conditions. Please read all licence information and copyright notices related to the open source software used by this product. This information is available at the following web page:
www.panasonic.net/pcc/support/tel/homenetwork/
At least three (3) years from delivery of this product, Panasonic Corporation will give to any third party who contacts us at the contact information provided below, for a charge of no more than the cost of physically distributing source code, a complete machine-readable copy of the corresponding source code and the copyright notices covered under the GPL and the LGPL. Please note that software licensed under the GPL and the LGPL is not under warranty.
www.panasonic.net/pcc/support/tel/homenetwork/
Software information
- The End User License Agreement (EULA) for the Home Network app is available at the following web page:
www.panasonic.net/pcc/support/tel/homenetwork/
Appendix
FCC and other information
This equipment complies with Part 68 of the FCC rules and the requirements adopted by the ACTA. On the bottom of this equipment is a label that contains, among other information, a product identifier in the format US:ACJ----.
If requested, this number must be provided to the telephone company.
- Registration No......(found on the bottom of the unit)
• Ringer Equivalence No. (REN).....0.1B
A plug and jack used to connect this equipment to the premises wiring and telephone network must comply with the applicable FCC Part 68 rules and requirements adopted by the ACTA. A compliant telephone cord and modular plug is provided with the product. It is designed to be connected to a compatible modular jack that is also compliant.
The REN is used to determine the number of devices that may be connected to a telephone line. Excessive RENs on a telephone line may result in the devices not ringing in response to an incoming call. In most but not all areas, the sum of RENs should not exceed five (5.0). To be certain of the number of devices that may be connected to a line, as determined by the total RENs, contact the local telephone company. For products approved after July 23, 2001, the REN for the product is part of the product identifier that has the format US:AAAEQ##TXXXX. The digits represented by ## are the REN without a decimal point (e.g., 03 is a REN of 0.3).
If this equipment causes harm to the telephone network, the telephone company will notify you in advance that temporary discontinuance of service may be required. But if advance notice isn't practical, the telephone company will notify the customer as soon as possible. Also, you will be advised of your right to file a complaint with the FCC if you believe it is necessary.
The telephone company may make changes in its facilities, equipment, operations or procedures that could affect the operation of the equipment. If this happens the telephone company will provide advance notice in order for you to make necessary modifications to maintain uninterrupted service.
If trouble is experienced with this equipment, for repair or warranty information, please contact a Factory Service Center or other Authorized Servicer. If the equipment is causing harm to the telephone network, the telephone company may request that you disconnect the equipment until the problem is resolved.
Connection to party line service is subject to state tariffs. Contact the state public utility commission, public service commission or corporation commission for information.
If your home has specially wired alarm equipment connected to the telephone line, ensure the installation of this equipment does not disable your alarm equipment. If you have questions about what will disable alarm equipment, consult your telephone company or a qualified installer.
This equipment is hearing aid compatible as defined by the FCC in 47 CFR Section 68.316.
When you hold the phone to your ear, noise might be heard in your Hearing Aid. Some Hearing Aids are not adequately shielded from external RF (radio frequency) energy. If noise occurs, use an optional headset accessory or the speakerphone option (if applicable) when using this phone. Consult with your audiologist or Hearing Aid manufacturer about the availability of Hearing Aids which provide adequate shielding to RF energy commonly emitted by digital devices.
WHEN PROGRAMMING EMERGENCY NUMBERS AND(OR) MAKING TEST CALLS TO EMERGENCY NUMBERS:
- Remain on the line and briefly explain to the dispatcher the reason for the call.
Appendix
- Perform such activities in the off-peak hours, such as early morning or late evenings.
This device complies with Part 15 of the FCC Rules. Operation is subject to the following two conditions:
(1) This device may not cause harmful interference, and (2) this device must accept any interference received, including interference that may cause undesired operation.
Privacy of communications may not be ensured when using this device.
CAUTION:
Any changes or modifications not expressly approved by the party responsible for compliance could void the user's authority to operate this device.
NOTE:
This equipment has been tested and found to comply with the limits for a Class B digital device, pursuant to Part 15 of the FCC Rules. These limits are designed to provide reasonable protection against harmful interference in a residential installation. This equipment generates, uses, and can radiate radio frequency energy and, if not installed and used in accordance with the instructions, may cause harmful interference to radio communications. However, there is no guarantee that interference will not occur in a particular installation. If this equipment does cause harmful interference to radio or television reception, which can be determined by turning the equipment off and on, the user is encouraged to try to correct the interference by one or more of the following measures:
– Reorient or relocate the receiving antenna.
– Increase the separation between the equipment and receiver.
- Connect the equipment into an outlet on a circuit different from that to which the receiver is connected.
- Consult the dealer or an experienced radio/TV technician for help.
Some devices operate at frequencies that may cause interference to nearby TVs and VCRs. To minimize or prevent such interference, this
device should not be placed near or on top of a TV or VCR. If interference is experienced, move this device further away from the TV or VCR. This will often reduce or eliminate interference.
FCC RF Exposure Warning:
- This product complies with FCC radiation exposure limits set forth for an uncontrolled environment.
- To comply with FCC RF exposure requirements, the hub must be installed and operated 20 cm (8 inches) or more between the product and all person's body.
- This product may not be collocated or operated in conjunction with any other antenna or transmitter.
- For body-worn operation, the device must be used only with a non-metallic accessory. Use of other accessories may not ensure compliance with FCC RF exposure requirements.
Notice:
- FCC ID can be found on the bottom of the unit.
Customer services
Customer Services Directory
Obtain Product Information and Operating Assistance; locate your nearest distributor, or make Customer Service and Literature requests by visiting our Web Site at:
us.panasonic.com/ventfans
or send your request by E-mail to:
ventfans@us.panasonic.com
You may also contact us directly at:
1-866-292-7299 Monday-Friday 9 am-8 pm, EST.
For hearing or speech impaired TTY users, TTY: 1-877-833-8855
Accessory Purchases
Purchase Parts and Accessories for Panasonic Ventilation
Products by visiting our Website:
Consumers:
www.buypanasonicparts.com
or send your request by Email to: panasoniccare@encompass.com
or pstcparts@us.panasonic.com
You may also contact us directly at 1-800-332-5368
(Monday-Friday 8 am to 6 pm, EST.)
Distributors:
Send your request by Email to: pstcparts@us.panasonic.com
You may also contact us directly at 1-866-292-7299
(Monday-Friday 10 am to 6 pm, EST.)
Panasonic Consumer Electronics Company
Customer Experience Group
2 Riverfront Plaza, Newark, NJ 07102
For hearing or speech impaired TTY users, TTY: 1-877-833-8855
Limited Warranty
Panasonic Eco Solutions North America (PESNA)
Unit of Panasonic Corporation of North America
2 Riverfront Plaza
Newark, NJ 07102
Panasonic Hub Limited Warranty
Panasonic Eco Solutions North America (“the Warrantor”) will, at its sole discretion, replace this product with new parts or exchange this product, free of charge, in the USA, in the event of defects in material or workmanship in accordance to the following:
Hub: For period of 1 year (12 months) from the date of the original purchase.
Service, in the USA, can be obtained during the warranty period by contacting the selling Distributor or Panasonic Customer Call Center at 866-292-7299, toll free.
This warranty does not cover labor charges for removal and installation of parts. This warranty is extended only to the original purchaser of a new product, which was not sold “as is”. This warranty only applies to products purchased in the United States. This warranty only covers failures due to defects in materials or workmanship that occur during normal use and does not cover shipping damages, whether visible or concealed, normal wear or cosmetic damage. The warranty does not cover failures that are caused by products and peripherals not supplied by the Warrantor, or failures which result from accident, misuse, abuse, negligence, mishandling, misapplication, alteration, modification, faulty installation, improper setups or adjustments, improper or lack of maintenance, alterations or modifications, power line surge, improper line voltage, lightning damage, or damage that is attributable to acts of God.
LIMITS AND EXCLUSIONS
There are no express warranties except as listed above. THE WARRANTOR SHALL NOT BE LIABLE FOR INCIDENTAL CONSEQUENTIAL, OR PUNITIVE DAMAGES, INCLUDING, WITHOUT LIMITATION, LOSS OF GOODWILL, PROFITS OR REVENUE, LOSS OF USE OF THIS PRODUCT OR ANY ASSOCIATED EQUIPMENT, COST OF SUBSTITUTE PRODUCT, DOWNTIME COST, OR CLAIMS OF ANY PARTY DEALING WITH BUYER FOR SUCH DAMAGES, RESULTING FROM THE USE OF THIS PRODUCT OR ARISING FROM BREACH OF WARRANTY OR CONTRACT, NEGLIGENCE OR ANY OTHER LEGAL THEORY, EXCEPT AS EXPRESSLY PROVIDED ABOVE. THERE IS NO WARRANTY OR ANY OTHER KIND, EXPRESS OR IMPLIED, THERE ARE NO WARRANTIES WHICH EXTEND BEYOND THE DESCRIPTION ON THE FACE HEREOF.
Appendix
Some states do not allow the exclusion or limitation of incidental or consequential damages, or limitations on how long an implied warranty lasts, so the above exclusions or limitations may not apply to you.
This warranty gives you specific legal rights and you may also have other rights which vary from state to state.
If a problem with this product develops during or after the warranty period, you may contact your Distributor or Panasonic Customer Call Center. If the problem is not handled to your satisfaction, then write to Panasonic Eco Solutions North America at the address listed at the top of the warranty.
Notes
IMPORTANT!
If your product is not working properly...
① Make sure the AC adaptor is connected.
and refer to the Troubleshooting section.

Visit our Web site: http://shop.panasonic.com/support
- FAQ and troubleshooting hints are available.
For your future reference
We recommend keeping a record of the following information to assist with any repair under warranty.
Serial No. Date of purchase
(found on the bottom of the unit)
Name and address of dealer
Attach your purchase receipt here.
Panasonic Corporation of North America
Two Riverfront Plaza, Newark, NJ 07102
© Panasonic Corporation 2016
Panasonic®
natural_image
3D rendered image of a square-shaped object with a dark top and small dot on the surface (no text or symbols)
natural_image
Pure electrical circuit lines without any symbols
natural_image
Illustration of hands holding a device casing with an arrow indicating rotation (no text or symbols)Apéndice
Atención al Cliente

- Thank you for purchasing a Panasonic product.
- Table of Contents
- Introduction
- Important Information
- Setup
- Appendix
- Accessory information
- Supplied accessories
- Additional accessories
- microSD card (not supplied)
- Other information
- Trademarks
- Notice
- Expanding the Panasonic Home Network System
- Smart Plug (KX-HNA101: 50 max.2)
- The Home Network System product lineup is growing!
- Mobile devices
- Your mobile devices: 8 max.\*1
- Note:
- About this system
- For your safety
- WARNING
- Power connection
- Installation
- Operating safeguards
- Medical
- CAUTION
- Installation and location
- Important safety instructions
- SAVE THESE INSTRUCTIONS
- Security cautions
- For best performance
- Hub location/avoiding noise
- Environment
- Routine care
- Protecting your recordings
- Notice for product disposal, transfer, or return
- LED indicator
- Connections
- Note about power connections
- AC adaptor connection
- Power failure
- Wi-Fi® settings
- Download
- Initial setup
- Downloading the [Home Network] app
- Compatible mobile devices
- Initial setup
- Initial setup for iPhone, iPad
- Initial setup for Android devices
- Information about Wi-Fi communication
- Registering another mobile device
- Registering other devices to the hub
- Using registration buttons
- Using the app
- Wireless communication range (DECT)
- Accessing the User's Guide
- iPhone/iPad
- Android devices
- Tap [User's Guide].
- DECT Module Installation Manual for installers
- Wall mounting
- Removing the wall mounting adaptor
- Specifications
- Open source software notice
- Software information
- FCC and other information
- CAUTION:
- FCC RF Exposure Warning:
- Notice:
- Customer services
- Customer Services Directory
- Accessory Purchases
- Consumers:
- Distributors:
- Limited Warranty
- Panasonic Hub Limited Warranty
- LIMITS AND EXCLUSIONS
- IMPORTANT!
- For your future reference
- Panasonic®
- Apéndice
- Atención al Cliente
Brand : PANASONIC
Model : FV-HBVK1
Category : Home Automation