
GS1 - Video projector BENQ - Free user manual and instructions
Find the device manual for free GS1 BENQ in PDF.


| Product Type | Digital Portable LED Projector |
| Native Resolution | 1280 x 720 (720p) |
| Brightness | 300 lumens |
| Display Technology | LED (DLP) |
| Lamp Type | OSRAM Q8 LED |
| Lamp Life | 20,000 hours (Normal) / 30,000 hours (Economic) |
| Projection Lens | F = 1.5, f = 5.53 mm |
| Throw Ratio | Short throw: 60" diagonal from 1m |
| Keystone Correction | Automatic (Auto Keystone) and manual |
| 3D Support | Yes, via HDMI (Frame Packing, Top-Bottom, Side-by-Side) |
| Bluetooth | Bluetooth 4.0 for audio pairing |
| Wireless | Wi-Fi 2.4 GHz (2T2R), 802.11 b/g/n |
| Speakers | 2 x 2W stereo |
| Input Ports | HDMI x1, USB 2.0 x1, USB 3.0 x1, microSD card slot |
| Power Supply | AC 100-240V, 50-60 Hz (auto-switching) |
| Power Consumption | 45 W |
| Dimensions (with battery) | 146 x 139.2 x 65.7 mm |
| Weight (projector only) | 570 g |
| Battery | Removable GSI battery, 400 g, charge via micro USB or DC-in |
| Durability | Drop proof (60 cm), Splash proof (IPX1) with protective case |
| Supported File Formats | PDF, PPT, Excel, Word, JPG, BMP, MP3, AAC, AVI, MPG, etc. |
| Operating Temperature | 0°C to 40°C (sea level) |
| High Altitude Mode | Yes, for altitudes 1500-3000 m |
Frequently Asked Questions - GS1 BENQ
User questions about GS1 BENQ
0 question about this device. Answer the ones you know or ask your own.
Ask a new question about this device
Download the instructions for your Video projector in PDF format for free! Find your manual GS1 - BENQ and take your electronic device back in hand. On this page are published all the documents necessary for the use of your device. GS1 by BENQ.
USER MANUAL GS1 BENQ
Digital Portable LED Projector
Outdoor Leisure Series
User Manual

natural_image
Abstract gradient pattern with concentric dotted lines and a central wavy band (no text or symbols)Copyright and disclaimer
Copyright
Copyright © 2018 by BenQ Corporation. All rights reserved. No part of this publication may be reproduced, transmitted, transcribed, stored in a retrieval system or translated into any language or computer language, in any form or by any means, electronic, mechanical, magnetic, optical, chemical, manual or otherwise, without the prior written permission of BenQ Corporation.
All other logos, products, or company names mentioned in this manual may be the registered trademarks or copyrights of their respective companies, and are used for informational purposes only.
The Bluetooth® word mark and logos are registered trademarks owned by Bluetooth SIG, Inc. and any use of such marks by BenQ Corporation is under license.
Disclaimer
BenQ Corporation makes no representations or warranties, either expressed or implied, with respect to the contents hereof and specifically disclaims any warranties, merchantability or fitness for any particular purpose. Further, BenQ Corporation reserves the right to revise this publication and to make changes from time to time in the contents hereof without obligation of BenQ Corporation to notify any person of such revision or changes. This user manual aims to provide the most updated and accurate information to customers, and thus all contents may be modified from time to time without prior notice. Please visit http://www.benq.com for the latest version of this manual.
Warranty
BenQ warrants this product against any defects in material and workmanship, under normal usage and storage.
Proof of purchase date will be required with any warranty claim. In the event this product is found to be defective within the warranty period, BenQ's only obligation and your exclusive remedy shall be replacement of any defective parts (labor included). To obtain warranty service, immediately notify the dealer from which you purchased the product of any defects.
Important: The above warranty shall be void if the customer fails to operate the product in accordance with BenQ's written instructions, especially the ambient humidity must be in-between 10% and 90%, temperature in-between 0^ C and 35^ C, altitude lower than 3000 meters, and avoiding to operate the projector in a dusty environment. This warranty gives you specific legal rights, and you may have other rights which vary from country to country.
For other information, please visit www.BenQ.com.
Statement regarding hyperlinks and third-party websites
BenQ is not responsible for the content of the websites or of similar resources, which are maintained and controlled by third parties, that may be linked from this product. Providing links to those websites or to similar resources does not mean that BenQ makes any warranty or representation to their content by expression or by implication.
Any third party content or service preinstalled in this product is provided "as is". BenQ does not, by expression or by implication, make any warrant to the content or to the services provided by third parties. BenQ does not warrant or guarantee that the content or services provided by third parties are accurate, effective, most up-to-date, legal, or complete. Under no circumstances shall BenQ be liable for the content or services provided by third parties including their negligence.
Services provided by third parties may be terminated temporarily or permanently. BenQ does not warrant or guarantee that any content or services provided by third parties are in good condition at any time, and is not liable for the termination of the said content and services.
In addition, BenQ is not involved in any transactions you conduct in the websites or similar resources maintained by third parties.
You should contact the content or service providers for any questions, concerns, or disputes.
Table of contents
Copyright and disclaimer 2
Copyright 2
Disclaimer 2
Warranty 2
Statement regarding hyperlinks and third-party websites 3
Package contents ...... I I
Standard accessories....11
Introduction 13
Projector features....13
Projector exterior view 15
Front and upper side view 15
Rear and upper side view 16
Front and bottom side view 18
Controls and functions....19
Control panel 19
Remote control 21
Installation 25
Choosing a location....25
Obtaining a preferred projected image size 27
Projection dimensions....27
Connection 29
Connecting with video equipment 30
Connecting HDMI devices.... 31
Connecting with a computer 32
Connecting a USB flash drive.... 33
Connecting a microSD memory card....33
Operations 34
Starting up the projector 34
Shutting down the projector 40
Operating in a high altitude environment 40
Securing the projector 42
Using the Kensington lock....42
Selecting an input source 43
Adjusting the projected image 44
Adjusting the projection angle....44
Fine-tuning the image clarity 45
Correcting keystone 45
Wireless Internet Connection 46
Bluetooth pairing....49
Pairing with a Bluetooth speaker or headphones 49
Ending a Bluetooth connection 52
Deactivating the Bluetooth speaker or headphones 52
BenQ Launcher 53
Operating under the BenQ Launcher mode....53
Accessing the BenQ Launcher main page 53
Using the BenQ Launcher applications....54
Accessing the BenQ Launcher menus....54
Using the BenQ Launcher Settings page.... 57
Using the All Apps page 59
Changing network settings....60
Inputting text....60
Navigating the OSD menus 62
About the OSD menus....62
Using the OSD menu....64
Accessories 71
GSI Battery....71
Rear View....71
Charging the battery 72
Installing the battery 73
Connections 74
Removing the battery 74
Instructions and requirements for handling the battery 75
Protective Case 79
Installing the protective case....79
Maintenance 80
Care of the projector....80
Cleaning the lens 80
Cleaning the projector case....80
Storing the projector....81
Transporting the projector....81
LED Lamp information....81
Getting to know the lamp hour....81
Extending lamp life 81
Indicators 83
Troubleshooting 85
Specifications 87
Projector specifications 87
Dimensions (with battery installed) 89
Timing chart....90
Supported file formats....93
Regulatory Statements 94
5/15/2018
Important safety instructions
Your projector is designed and tested to meet the latest standards for safety of information technology equipment. However, to ensure safe use of this product, it is important that you follow the instructions mentioned in this manual and marked on the product.
I. Please read this user manual before you operate your projector. Keep this manual in a safe place for future reference.

-
Always place the projector on a level, horizontal surface during operation.
-
Do not place the projector on an unstable cart, stand, or table as it may fall and be damaged.
- Do not place inflammables near the projector.
- Do not use if tilted at an angle of more than 10 degrees left to right, nor at angle of more than 15 degrees front to back.

- Do not store the projector on end vertically. Doing so may cause the projector to fall over, causing injury or resulting in damage.

-
Do not place the projector in any of the following environments:
-
Space that is poorly ventilated or confined. Allow at least 50 cm clearance from walls and free flow of air around the projector.
- Locations where temperatures may become excessively high, such as the inside of a car with all windows closed.
- Locations where excessive humidity, dust, or cigarette smoke may contaminate optical components, shorten the projector's lifespan and darken the screen.

natural_image
Simple line drawing of a laboratory setup with a teapot, two beakers, and a broom (no text or symbols)- Locations near fire alarms.
- Locations with an ambient temperature above 35°C/95°F.
- Locations where the altitudes are higher than 3000 m (10000 feet).

- Do not block the vents holes while the projector is on (even in standby mode).
- Do not cover the projector with any item.
- Do not place the projector on a blanket, bedding or any other soft surface.

- In areas where the mains power supply voltage may fluctuate by ±10 volts, it is recommended that you connect the projector through a power stabilizer, surge protector or uninterruptible power supply (UPS) as appropriate to your situation.

- Do not step on the projector or place any objects upon it.

- Do not place liquids near or on the projector. Liquids spilled into the projector will void your warranty. If the projector does become wet, disconnect it from the power point and call BenQ to have the projector repaired.

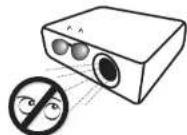
- Do not look straight into the projector lens during operation. It may harm your sight.
- Do not operate the projector lamp beyond the rated lamp life. Excessive operation of lamps beyond the rated life could cause a lamp to break on rare occasions.
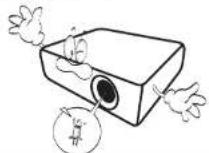
- The lamp becomes extremely hot during operation. Allow the projector to cool for approximately 45 minutes prior to removing the lamp assembly for replacement.

- This projector is capable of displaying inverted images for ceiling installation.

- Do not attempt to disassemble this projector. There are dangerous high voltages inside which may cause death if you should come into contact with live parts.
Under no circumstances should you ever undo or remove any other covers. Refer servicing only to suitably qualified professional service personnel.

Please keep the original packing for possible future shipment. If you need to pack your projector after use, adjust the projection lens to an appropriate position, put the lens cushion around the lens, and fit the lens cushion and projector cushion together to prevent damage during transportation.
- When you think service or repair is required, take the projector only to a suitably qualified technician.

Moisture condensation
Never operate the projector immediately after moving it from a cold location to a hot location. When the projector is exposed to such a change in temperature, moisture may condense on the crucial internal parts. To prevent the projector from possible damage, do not use the projector for at least 2 hours when there is a sudden change in temperature.
Avoid volatile liquids
Do not use volatile liquids, such as insecticide or certain types of cleaner, near the projector. Do not have rubber or plastic products touching the projector for a long time. They will leave marks on the finish. If cleaning with a chemically treated cloth, be sure to follow the cleaning product's safety instructions.
Disposal
This product contains the following materials which are harmful to human bodies and environment.
- Lead, which is contained in solder.
• Mercury, which is used in the lamp.
To dispose of the product or used lamps, consult your local environment authorities for regulations.
The illustrations and the images shown in this document are for your reference. The actual content may vary by the product supplied for your region.
Package contents
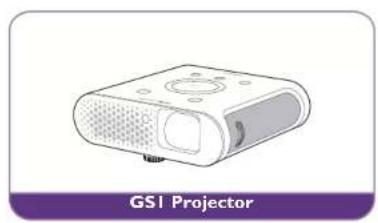
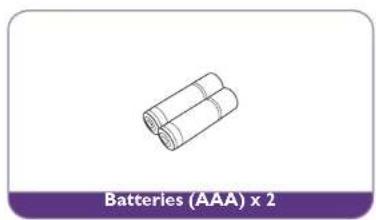
Carefully unpack and verify that you have the items below. Some of the items may not be available depending on your region of purchase. Please check with your place of purchase.
Standard accessories
natural_image
Illustration of a GSI projector device with no visible text or symbols on the device itself
natural_image
Line drawing of a GSI battery module (no text or symbols on the diagram itself)

natural_image
Line drawing of an adapter with a power plug and cable (no text or symbols)
natural_image
Line drawing of a HDMI cable with a coiled cable (no text or symbols on the cable itself)
natural_image
Line drawing of a protective case with a rounded rectangular object and mounting holes (no text or symbols on the object itself)
natural_image
Simple line drawing of two rolled batteries labeled 'Batteries (AAA) x 2' below (no other text or symbols)


• Some of the accessories may vary from region to region.
- The warranty card is only supplied in some specific regions. Please consult your dealer for detailed information.
Introduction
Projector features
• Full HD compatible
The projector is compatible with Standard Definition TV (SDTV) 480i, Enhanced Definition television (EDTV) 480p, 576i, 576p and High Definition TV (HDTV) 720p, 1080i/p 60Hz formats, with the 1080p format providing clear image reproduction. The native resolution for the GSI is 1280x720.
• Good picture quality
The projector provides excellent picture quality due to its resolution, 300 lm brightness, high contrast ratio, vivid color and rich gray-scale reproduction.
- Bluetooth streaming function
Enjoy endless possibilities with Bluetooth:
Entertaining friends and family in style is easy with the GSI. With Bluetooth 4.0 intelligent connection to your wireless devices like speakers, headsets and keyboards has never been easier. GSI will connect from 10m to your other Bluetooth devices making it ideal for entertaining outdoors.
With Bluetooth 4.0 you will waste less battery power because unless critical data is being shared the connection is dormant. So you can connect to your devices without draining the battery.
• Multimedia entertainment at your finger tips
With built-in USB readers watching content like movies, music and videos in seconds has never been simpler. You can even connect your Bluetooth speakers for great audio.
Use the BenQ phone App and share content direct from your phone, so you can share special photos from your day in the wild and everyone can enjoy them without huddling around a small screen.
- Convenient Android-based BenQ Launcher
The projector operates using the Android-based BenQ Launcher which complemented by a WLAN connection allows you to project/broadcast media via embedded or downloaded streaming apps.
• Advanced LED light source
The projector features a long lasting LED lightbulb that provides a longer lifespan than traditional bulbs.
- Short throw lens
Impress friends and family with a 60" screen from just 1m. If you have big groups to entertain you can use the screen accessory for a blockbuster cinema experience under the stars. Whether camping on a small site or a forest, GSI is the hassle free way to entertain outdoors.
• Auto Keystone
The projector offers an automatic keystone adjustment function which adjusts the projected image accordingly.
- 3D function
To enjoy the 3D movies, videos, and sporting events in a more realistic way by presenting the depth of the images through HDMI.
• Media playback from USB storage devices
The projector supports playing of media including multiple video and music file formats that are located on any USB storage devices connected to the USB port on the projector.
- Portability
The projector is small and light, making it useful for business trips and leisure activities. You can view documents, videos and photos anywhere.
- Stream online content instantly
Keep even the fussiest teenagers happy, if you're on a site with internet you can share and stream instantly. So you can access content to suit the group and relax.
You'll be the envy of other campers, you can just sit back, relax and enjoy some well-earned downtime.
- Drop proof
If children are running around playing games or an adult trips, even if it's accidentally knocked onto the floor, the GSI with its case is Drop proof, which means it will even survive a fall of 60cm.
- Splash proof
Perhaps you've put the GSI on the camping table ready for the movie to begin. What if a drink gets spilt? There's no need to worry because GSI's rubberized case is also IPXI Splash Proof.
- Low heat
Unlike other projectors, the GSI emits low heat making it safe enough for inquisitive children to touch without hurting their hands.
Projector exterior view
Front and upper side view
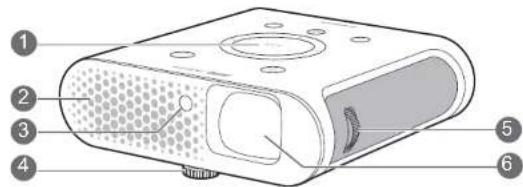
I. Control Panel (See Control panel on page 19 for details.)
2. Vent (cool air intake)
3. Front IR sensor
4. Angle adjust dial (located underneath the projector)
Turn this dial to adjust the projection angle. See Adjusting the projection angle on page 44 for details.
- Focus ring
- Projection lens
Rear and upper side view
See Connection on page 29 for connection details.

- LED Indicator lights (See Indicators on page 83 for details)
- Audio output jack
- MicroSD card slot
Used to connect microSD memory cards to project/broadcast media stored on the card.
- HDMI port
This port can also be used for charging the connected HDMI compatible smart device as long as the power is fed to the projector.
II. USB 3.0 Type-A port
Used to connect a USB storage device to project/broadcast media stored on the device. You may also connect a wireless keyboard/mouse via this USB port.

This USB port also allows you to charge attached USB-enabled devices (i.e. a smartphone, tablet, etc.).
- USB 2.0 Type-A port
Used to connect a USB storage device to project/broadcast media stored on the device. You may also connect a wireless keyboard/mouse via this USB port.
- DC-IN power jack

Please only use the supplied power adapter to avoid possible dangers such as electric shock and fire.
- Speaker grill
Inside the speaker grill is the right speaker.
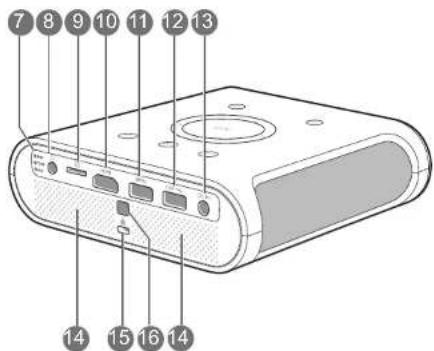
-
Kensington lock slot (See Securing the projector on page 42 for details)
-
Rear IR sensor
Front and bottom side view

natural_image
Technical line drawing of a mechanical device with numbered components (no text or symbols)17. Vents (hot air release)
18. Battery Connector
When properly installed on the battery this connector is used to transfer power between the projector and the GSI Battery (see Installing the battery on page 73 for details).
Controls and functions
Control panel

I. Focus ring
Adjusts the focus of the projected image.
2. ⏻ POWER
Toggles the projector between standby mode and on. See Starting up the projector on page 34 for more details.
3. Arrow keys ( Left, Right, Up▲Down)
- When the OSD menu is activated, these keys are used as directional arrows to select the desired menu items and to make adjustments.
- When the OSD menu is off and you are under the BenQ Launcher mode, these keys are used as directional arrows to select the desired menu items and to make adjustments.
4. OK
- Confirms the selected OSD menu item.
- When the OSD menu is off and you are under BenQ Launcher mode, use the key to confirm the selection on the BenQ Launcher menu.
5. BACK
- Goes back to previous OSD menu, exits and saves menu settings.
- When the OSD menu is off and you are under BenQ Launcher mode, use the key to return to the previous layer.
6. HOME
Press this key to enter the home menu of the BenQ Launcher mode.

This key is only active when the projector is under BenQ Launcher mode.

7. Source
Launches the Source On-Screen Display (OSD) menu (the source menu will automatically close after 30 seconds of inactivity).
8. MENU
Opens the projectors OSD menu.
Remote control

I. ⏻ Power
Toggles the projector between on and off mode.
2. Source
Launches the Source On-Screen Display (OSD) menu (the source menu will automatically close after 30 seconds of inactivity).
3. Arrow keys ( Left, Right, Up, Down)
- When the OSD menu is activated, these keys are used as directional arrows to select the desired menu items and to make adjustments.
- When the OSD menu is off and you are under the BenQ Launcher mode, these keys are used as directional arrows to select the desired menu items and to make adjustments.
4. OK
- Confirms the selected OSD menu item.
- When the OSD menu is off and you are under BenQ Launcher mode, use the key to confirm the selection on the BenQ Launcher menu.
5. BACK
- Goes back to previous OSD menu, exits and saves menu settings.
- When the OSD menu is off and you are under BenQ Launcher mode, use the key to return to the previous layer.
6. HOME
Press this key to enter the home menu of the BenQ Launcher mode.

This key is only active when the projector is under BenQ Launcher mode.

7. Volume Down
Decreases the projector volume.
8. Mute
Toggles projector audio between on and off.
9. BLANK
Switches the projected image to either a blank screen or switches the blank screen back to the original projected image.
10. MENU
Opens the projectors OSD menu.
11. : Options
Launches the options menu for the currently opened app in BenQ Launcher mode.
12. Volume Up
Increases the projector volume.
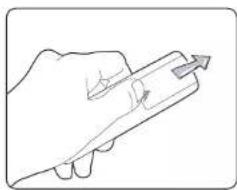
Replacing the remote control battery
natural_image
Line drawing of a hand holding a pen with an arrow pointing upward (no text or symbols)I. Push and hold the arrow on battery cover while pushing out the battery cover.
-
Insert the two new batteries in the battery slots. Note that the battery contacts should be orientated to match the orientation etched on the battery slots.
-
Push the battery cover back onto the remote control.

- Avoid leaving the remote control and battery in an excessive heat or humid environment like the kitchen, bathroom, sauna, sunroom or in a closed car.
- Replace only with the same or equivalent type recommended by the battery manufacturer.
- Dispose of the used batteries according to the manufacturer's instructions and local environment regulations for your region.
- Never throw the battery into a fire. There may be danger of an explosion.
- If the battery is drained or if you will not be using the remote control for an extended period of time, remove the battery to avoid damage to the remote control from possible battery leakage.
Remote control effective range
The remote control must be held at an angle within 15 degrees perpendicular to the projector's IR remote control sensor(s) to function correctly. The distance between the remote control and the sensor(s) should not exceed 8 meters (\~ 26 feet).
Make sure that there are no obstacles between the remote control and the IR sensor(s) on the projector.
- Operating the projector from the front

natural_image
Line drawing of a projector with a remote and lens, showing light path and control panel (no text or symbols)- Operating the projector from the rear
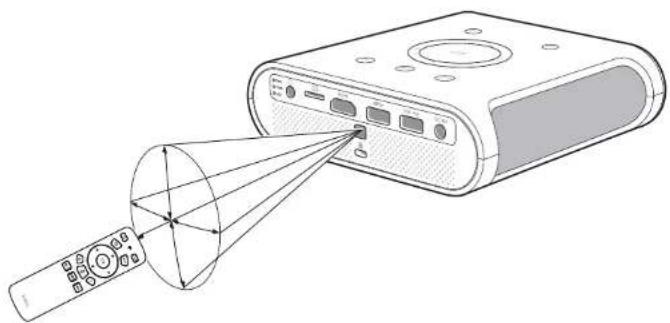
natural_image
Line drawing of a projector with a remote and lens, showing light path from inside to external ports (no text or symbols)Installation
Choosing a location
Before choosing an installation location for your projector, take the following factors into consideration:
- Size and position of your screen
• Electrical outlet location - Location and distance between the projector and the rest of your equipment
- Location and distance between the projector and the wireless access point, or if using a LAN cable, the internet hub.
You can install your projector in the following ways.
I. Front Table:
Select this location with the projector placed near the floor in front of the screen.
This is the most common way to position the projector for quick setup and portability.
Turn on the projector and make the following settings:
MENU > Settings > Projector Position > Front Table

2. Rear Table:
Select this location with the projector placed near the floor behind the screen.
Turn on the projector and make the following settings:
MENU > Settings > Projector Position > Rear Table


A special rear projection screen is required.
3. Front Ceiling:
Select this location with the projector elevated near the ceiling in front of the screen.
Turn on the projector and make the following settings:
MENU > Settings > Projector Position > Front Ceiling

The projector does not feature ceiling mount components/equipment so when choosing to use a front ceiling location you must place it on an elevated location of your choice.
4. Rear Ceiling:
Select this location with the projector elevated from the ceiling behind the screen.
Turn on the projector and make the following settings:
MENU > Settings > Projector Position > Rear Ceiling

A special rear projection screen is required.

The projector does not feature ceiling mount components/equipment so when choosing to use a front ceiling location you must place it on an elevated location of your choice.


Obtaining a preferred projected image size
The projected image size is determined by the distance from the projector lens to the screen, and the video format.
Projection dimensions
Use the illustration and tables below to help you determine the projection distance.

| Screen size Projector distance (mm) | ||||
| Diagonal | H (mm) W (mm) Average | |||
| Inch mm | ||||
| 60 1524 747 | 328 1076 | |||
| 70 1778 872 | 550 1255 | |||
| 80 2032 996 | 771 1435 | |||
| 90 2286 1121 | 1992 1614 | |||
| 100 2540 1245 | 2214 1793 | |||
| 110 2794 1370 | 2435 1972 | |||
| 120 3048 1494 | 2657 2152 | |||
| 140 3556 1743 | 3099 2510 | |||
| 160 4064 1992 | 3542 2869 | |||
| 180 4572 2241 | 3985 3228 | |||
| 200 5080 2491 | 4428 3586 | |||

All measurements are approximate and may vary from the actual sizes. If you want a permanent installation of the projector, we recommend that you use the actual projector to physically test the projection size, distance, and the projector's optical characteristics prior to the installation. This helps you determine the exact mounting position which best suits your installation.
Connection
When connecting a signal source to the projector, be sure to:
I. Turn all equipment off before making any connections.
2. Use the correct signal cables for each source.
3. Make sure the cables are firmly inserted.
4. Place the projector within range of the wireless AP you plan to connect it to.

flowchart
graph TD
    A["Notebook or Desktop Computer"] --> B["Bluetooth Speakers"]
    C["A/V Device"] --> D["Wireless AP"]
    E["Smartphone or Tablet PC"] --> F["MHL"]
    G[" Speakers"] --> H["USB"]
    I["Bluetooth Speakers"] --> J["Internet"]
    K["Bluetooth Speakers"] --> L["Internet"]
    M["Bluetooth Speakers"] --> N["Internet"]
    O["Bluetooth Speakers"] --> P["Internet"]
    Q["Bluetooth Speakers"] --> R["Internet"]
    S["Bluetooth Speakers"] --> T["Internet"]
    U["Bluetooth Speakers"] --> V["Internet"]
    W["Bluetooth Speakers"] --> X["Internet"]
    Y["Bluetooth Speakers"] --> Z["Internet"]
    AA["Bluetooth Speakers"] --> AB["Internet"]
    AC["Bluetooth Speakers"] --> AD["Internet"]
    AE["Bluetooth Speakers"] --> AF["Internet"]
    AG["Bluetooth Speakers"] --> AH["Internet"]
    AI["Bluetooth Speakers"] --> AJ["Internet"]
    AK["Bluetooth Speakers"] --> AL["Internet"]
    AM["Bluetooth Speakers"] --> AN["Internet"]
    AO["Bluetooth Speakers"] --> AP["Internet"]
    AQ["Bluetooth Speakers"] --> AR["Internet"]
    AS["Bluetooth Speakers"] --> AT["Internet"]
    AU["Bluetooth Speakers"] --> AV["Internet"]
    AW["Bluetooth Speakers"] --> AX["Internet"]
    AY["Notebook or Desktop Computer"] --> AZ["Notebook or Desktop Computer"]
    BA["A/V Device"] --> BB["A/V Device"]

- In the connection illustrations shown above, some cables may not be included with the projector (see Package contents on page 11). They are commercially available from electronics stores.
- The illustrations above are for reference only. The rear connecting jacks available on the projector vary with each projector model.
I. HDMI cable
2. HDMI to Micro USB cable
3. Audio 3.5" cable
Connecting with video equipment
You only need to connect the projector to a video source device using the HDMI port. The HDMI port provides the best picture quality. Use of the HDMI port depends upon the availability of matching terminals on the video source device as described below:
| Terminal name | Terminal appearance | Reference | Picture quality |
| HDMI | Connecting HDMI devicesConnecting smart devices | Best |

In the connection illustrations shown below, some cables may not be included with the projector (see Package contents on page 11). They are commercially available from electronics stores.
Connecting HDMI devices
HDMI (High-Definition Multimedia Interface) supports uncompressed video data transmission between compatible devices like DTV tuners, DVD players, Blu-ray players and displays over a single cable. You should use an HDMI cable when making a connection between the projector and HDMI devices.
HDMI device: DVD player, digital tuner, etc.

Connecting with a computer
Using an HDMI cable
Connect the projector to a computer with an HDMI cable.
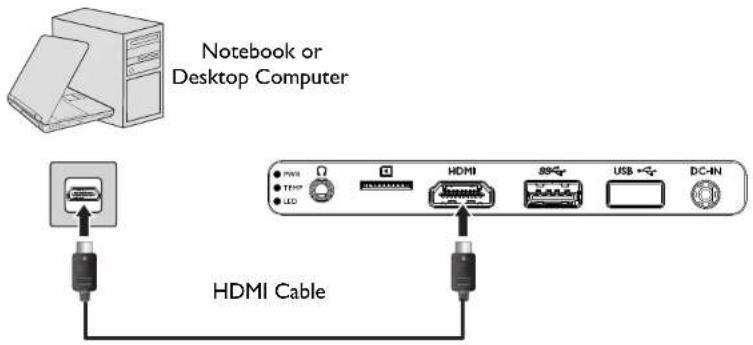

• Some computers feature HDMI ports that do not transmit audio, in such cases a separate audio device and cable must be connected to the projector.
- Many laptops do not turn on their external video ports when connected to a projector. Usually a key combination like Fn + F3 or CRT/LCD key turns the external display on/off. Locate a function key labeled CRT/LCD or a function key with a monitor symbol on the laptop. Press Fn and the labeled function key simultaneously. Refer to your laptop's documentation to discover your laptop's key combination.
Connecting a USB flash drive
Connect a USB flash drive to one of the USB ports on the rear of the projector to view media files stored on the flash drive.
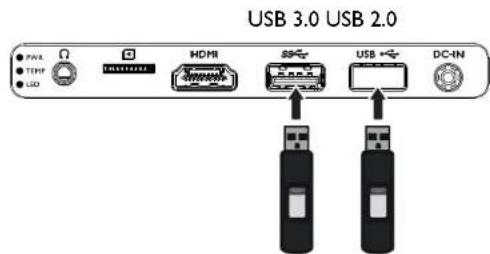
USB Flash Drive
Connecting a microSD memory card
Connect a microSD memory card to the microSD memory card slot on the rear of the projector to view media files stored on the memory card.

microSD Memory Card

- When a microSD card featuring supported media files is inserted into the projector, the projector will automatically launch the media player app for playback of the media files.
- Only FAT32 format memory cards are supported by the projector
Operations
Starting up the projector
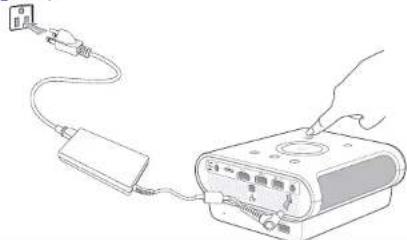
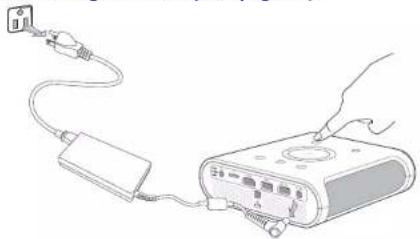
I. Supply power to the projector using one of the following methods:
- Plug the supplied power adapter into the projector and a power outlet.

natural_image
Line drawing of a hand inserting a plug into a device connected to a power strip (no text or symbols)• Install the projector onto a charged GSI battery (see Installing the battery on page 73).

natural_image
Line drawing of a hand inserting a device into a device casing (no text or symbols)• Install the projector onto a GSI battery (see Installing the battery on page 73) and then plug the supplied power adapter into the projector and a power outlet (see Connections on page 74).
natural_image
Simple line drawing of a hand holding a power outlet connected to a device with cables (no text or symbols)
When supplying power directly to the projector please use the supplied power cable to avoid possible dangers such as electric shock and fire.

When the projector is installed onto the GSI Battery and the supplied power adapter is plugged into the projector the adapter will charge the GSI battery.

When the projector is installed onto the GSI Battery and a Micro USB adapter is plugged into the GSI battery the following situations will occur:
- The adapter will charge the GSI battery when the projector is powered off.
- The adapter will not provide power to both the battery or projector when the projector is powered on (i.e. projector will only run on battery power when the projector is powered on).
-
Turn on the power outlet switch (where fitted). The PWR indicator light on the projector lights orange after power has been applied.
-
Connect any video equipment to the respective port on the rear of the projector. If you do not want to project video via such equipment but want to access the BenQ Launcher, you do not need to connect any video equipment.

For more details on connection options, see Connection on page 29.
- Press ⏻ on the projector or the remote control to start the projector. As soon as the lamp lights up, the PWR indicator light flashes green and stays green when the projector is on.
The fans starts operating, and a start-up image displays on the screen while it warms up, this process may take a few minutes. The projector does not respond to further commands while it is warming up.
- If this is the first time you turn on the projector, the setup wizard appears to guide you through setting up the projector. If you have already done this, skip this step and move on to step 6.
• Use the ◀a▶r▲r▼ow keys ( / / / ) on your remote control to mo
• Use OK to confirm the selected menu item.

The Setup Wizard screenshots below are for reference only and may differ from the actual design.
Step 1:
Specify Projector Position.


For more information about projector position, see Choosing a location on page 25.
Step 2:
Specify OSD Language.


Available languages may vary by the product supplied for your region and may be updated without prior notice.
Step 3:
Specify Auto Keystone.

Step 4:
Specify the Network Settings (connecting to a WLAN AP).

You may need to enter a password if you choose to connect to a WLAN AP.


For more information about changing your network settings, see Choosing a location on page 25.
Step 5: Specify the Time Zone.
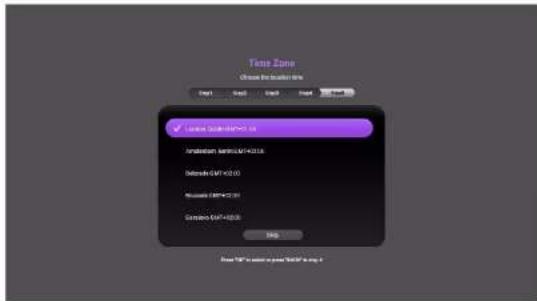
Now you've completed the initial setup.

- Switch on the connected equipment.
- The projector starts to search for available input signals. The current input signal being scanned displays on the screen. If the projector is unable to detect a valid signal, the projector will automatically open the BenQ Launcher. You may press ⊖ on your remote control to select your desired input signal.
- If the horizontal frequency of the input source exceeds the range supported by the projector, the "No Signal" message displays on the screen. It will remain on-screen until you change the horizontal frequency of the input source to an appropriate one.
Shutting down the projector
I. Press ⏻ on the projector or your remote control. The projector displays a shutdown confirmation message.
2. Press ⏻ a second time. The PWR indicator light flashes orange and the fans run for about two minutes to cool the lamp. The projector does not respond to any commands during the cooling process.
3. When the cooling process ends, the PWR indicator light will show a solid orange.
If the projector will not be used for an extended period, unplug the power cable from the power outlet or remove the projector from the GSI Battery (see Removing the battery on page 74).
natural_image
Line drawing of a device with connected cables and a plug, no text or symbols present
natural_image
Line drawing of a device with plug, power cord, and cable (no text or symbols)
- Avoid turning on the projector immediately after turning it off as excessive heat may shorten lamp life.
• The actual lamp life may vary due to different environmental conditions and usage.
Operating in a high altitude environment
We recommend you use the High Altitude Mode when your environment is between 1500 m –3000 m above sea level, and ambient temperature is between 0°C – 30°C.

Do not use the High Altitude Mode if your altitude is between 0 m and 1499 m and ambient temperature is between 0°C and 35°C. The projector will be over cooled, if you turn the mode on under such a condition.
To activate the High Altitude Mode:
I. Press MENU on the projector or the remote control.
2. Select Settings and press OK.
- Select High Altitude Mode and press OK to set High Altitude Mode to On.
- To leave the OSD, press until the projector returns to the home screen, or press to go back to the home screen directly.
Operation under High Altitude Mode may cause a higher decibel operating noise level because of increased fan speed necessary to improve overall system cooling and performance.
If you use this projector under other extreme conditions excluding the above, it may display auto shut-down symptoms, which is designed to protect your projector from overheating. In cases like this, you should switch to High Altitude mode to solve these symptoms. However, this is not to state that this projector can operate under any and all harsh or extreme conditions.
Securing the projector
Using the Kensington lock
The projector has to be installed in a safe place to prevent theft. It has a Kensington lock slot located at the rear of the projector which you can use to secure the projector via a Kensington lock cable.

Selecting an input source
The projector can be connected to multiple equipment at the same time. However, it only displays one full screen at a time. When starting up, the projector automatically searches for the available signals.
To select the video source:
I. Press ⊖ on the projector or your remote control to display the source selection bar.

- Press ▲/▼ until your desired signal is selected and press OK.
Once detected, the selected source information displays on the screen for seconds. If there are multiple pieces of equipment connected to the projector, repeat steps 1-2 to search for another signal.

The native display resolution of this projector is in a 16:9 aspect ratio. For best display picture results, you should select and use an input signal which outputs at this resolution. Any other resolutions will be scaled by the projector depending upon the Aspect Ratio setting, which may cause some image distortion or loss of picture clarity. See Aspect Ratio on page 67 for details.
Adjusting the projected image
Adjusting the projection angle
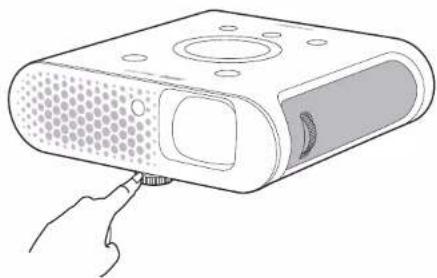
The projector is equipped with an angle adjust dial which changes the image height and projection angle.
To adjust the projection angle:
• Turn the dial to the right to slowly raise the front of the projector until the image is positioned as desired.
- Turn the dial to the left to slowly lower the front of the projector.

- The angle adjust dial works in the same manner when the projector is installed on the GSI Battery.
- If the screen and the projector are not perpendicular to each other, the projected image becomes vertical trapezoidal. To correct this, see Auto Keystone on page 69 for details.
- When the angle adjust dial is set high you will not be able to remove the projector from the battery. To remove the projector from the battery ensure that the angle adjust dial is set to a low position.
natural_image
Line drawing of a handheld electronic device with a handle and ventilation slots (no text or symbols)
natural_image
Line drawing of a projector with a handle and ventilation slots (no text or symbols)
Do not look into the lens while the lamp is on. The strong light from the lamp may cause damage to your eyes.
Fine-tuning the image clarity
To sharpen the picture, rotate the focus ring on the projector.

flowchart
graph TD
    A["Image of Arc de Triomphe"] --> B["Downward Arrow"]
    C["Aden Pyramid"] --> D["Upward Arrow"]
    B --> D
    D --> E["Downward Arrow"]
Correcting keystone
Keystoning refers to the situation where the projected image is noticeably wider at either the top or bottom. It occurs when the projector is not perpendicular to the screen.
You may correct this in the following way.
• Using the OSD settings menu
- Select Keystone.
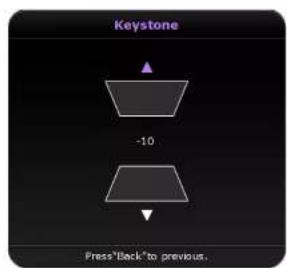

• To correct keystoning at the top of the image, use o▲ your remote control.
- To correct keystoning at the bottom of the image, use on your remote control.
- When done, press BACK to save your changes and exit.

You may only make these adjustments if Auto Keystone is disabled in the Setting menu, see Auto Keystone on page 69 for details.
Wireless Internet Connection
To connect your projector to the internet, or to switch wireless internet connection:
I. Power on the projector.
2. Select Settings in the main menu of the BenQ Launcher interface.

- Select Internet in the Settings menu.

- Select Wireless in the Internet menu.

- Select the SSID for the wireless AP you want to connect to.

- If you chose a secured SSID for the first time, a window appears to prompt you to enter the appropriate password. Press ▲/▶/▲/▼ on your remote control to select the corresponding keys on the virtual keypad to enter your password. After you have entered the password, select (1) Next and then (2) Connect to connect.


The password will be stored in the projector's memory. In the future, if you select the same SSID again, you will not be prompted to enter a password unless you delete the SSID from the projector's memory.
- Once you have successfully connected to the wireless AP a wireless connection icon will appear at the top right corner of the BenQ Launcher interface.

Bluetooth pairing
The projector allows you to output audio directly to any Bluetooth-enabled speaker or headphones for greater sound particularly in outdoor settings.
Pairing with a Bluetooth speaker or headphones
Pairing is the process by which your projector creates a connection to a Bluetooth speaker or headphones for the first time. Once both devices have been successfully paired each device will have the corresponding device's pairing information stored internally and both will be able to connect automatically when they are within \~10 meter range of each other and Bluetooth is enabled on the projector.
To pair your projector to a Bluetooth speaker or headphones:
I. Power on the projector.
2. Press ⊖ on the projector or your remote control to display the source selection bar.
- Select Bluetooth in the source list, the Bluetooth setting menu will launch.
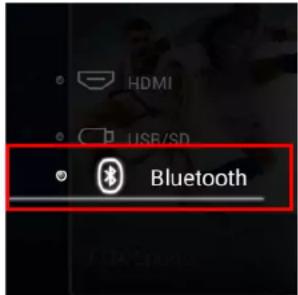
- Select Bluetooth in the Bluetooth setting menu and press OK on the projector or your remote control so that the Bluetooth status is set to On.

-
Activate Bluetooth-pairing mode on the speaker or headphones.
-
Select Device List in the Bluetooth setting menu.

- Select the speaker or headphones from the list of Bluetooth devices in the Bluetooth setting menu.
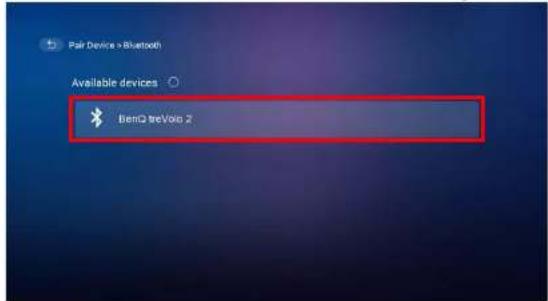

If you are unable to find the speaker or headphones from the list of Bluetooth devices on the first try, ensure that pairing mode is activated on the device, then restart the scanning process.
- When the projector and speaker or headphones have successfully connected the device listing in the Bluetooth setting menu will be labeled Connected, you can now output the audio from the projector to the speaker or headphone.
Once you have successfully paired your mobile device with the Bluetooth speaker, pairing information will be stored on both devices and a connection will automatically be made when Bluetooth is enabled on both devices and both devices are within range of each other.
Ending a Bluetooth connection
In cases where you want to disconnect a speaker or headphones from the projector and connect to another speaker or headphones follow the steps below:
I. Press ⊖ on the projector or your remote control to display the source selection bar.
2. Select Bluetooth in the source list, the Bluetooth setting menu will launch.
3. Select the already connected speaker or headphones from the list of Bluetooth devices in the Bluetooth setting menu and press OK.
4. Confirm that you want to disconnect the speaker or headphones from the projector.
5. Activate Bluetooth-pairing mode on the new speaker or headphones.
6. Select the new speaker or headphones from the list of Bluetooth devices in the Bluetooth setting menu.

If you are unable to find the speaker or headphones from the list of Bluetooth devices on the first try, ensure that pairing mode is activated on the device, then select Scan for devices in the Bluetooth setting menu to restart the scanning process.
Deactivating the Bluetooth speaker or headphones
To deactivate Bluetooth on the projector so that it no longer outputs its audio to a separate speaker or headphones:
I. Press ☐ on the projector or your remote control to display the source selection bar.
2. Select Bluetooth in the source list, the Bluetooth setting menu will launch.
3. Select the Bluetooth switch in the Bluetooth setting menu and press OK on the projector or your remote control so that the Bluetooth switch is in the disabled position.
BenQ Launcher
BenQ Launcher is a multimedia platform that integrates various applications ranging from entertainment, education, games, online shopping, TV, and other practical functions that caters to your everyday needs.

Under BenQ Launcher mode, please use your remote control or an optional wireless keyboard/mouse for operating BenQ Launcher functions. The projector's control panel keys are limited to control projector functions.
Operating under the BenQ Launcher mode
Accessing the BenQ Launcher main page
When the projector is not projecting an image from a connected source it will be in BenQ Launcher mode by default. If the projector is projecting a source you can return to BenQ Launcher mode by pressing 🔒 on your remote control.


Actual screen may vary based on your BenQ Launcher firmware version.
Using the BenQ Launcher applications

Before you start using BenQ Launcher applications, make sure you are connected to the Internet via a wireless connection. See Changing network settings on page 60 for connection instructions.
The main menu of the BenQ Launcher mode features four main sections.
• Videos section - Shortcuts to direct streaming of sports or family shows.
- Recommended section - A rotating selection of recommended websites BenQ selects for users of the projector.
- Applications section - A group of apps that help you configure the BenQ Launcher, and access more apps from the BenQ Launcher. They include the following menus:
- Aptoide TV - A marketplace which allows you to download and install various apps for the projector.
- Settings - Basic settings for the projector and BenQ Launcher. See the Using the BenQ Launcher Settings page on page 57 for more details.
• All Apps - A menu of all apps installed on the projector.
- App Shortcuts section - A group of shortcuts to apps installed on the projector. See Adding/Removing app shortcuts on page 59 for more details.

Navigating to the very left side of the main page will bring up the input source list.
Navigating the BenQ Launcher:
I. From the BenQ Launcher main menu, press ◀/▶/▲/▼ on your remote control to select the desired service and press OK.
2. Follow on screen instructions for further operations.
Accessing the BenQ Launcher menus
Within the BenQ Launcher mode there are multiple menus that can be accessed pressing ◀/▶/ ▲/ ▼ on your remote control from the main menu.
Using the Notification menu and Clean Tool function
Press ▲ twice on your remote control from the main menu to choose either the Notification menu or Clean Tool function and press OK to enter the menu.
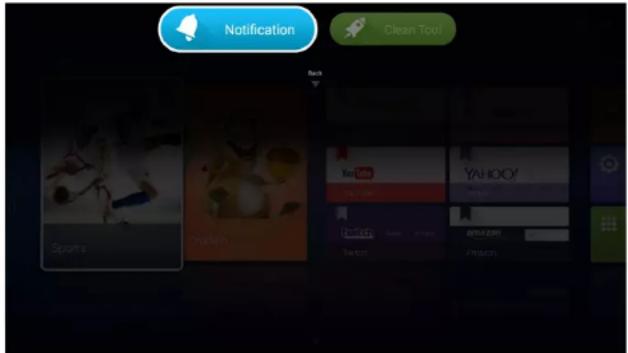

Actual screen may vary based on your BenQ Launcher firmware version.
- Notification - Select this menu to view any app or system related messages for the projector.
- Clean Tool - Select this function to clear the memory cache for the projector, which speeds up the performance of the BenQ Launcher.
Using the History menu
Press ▼ twice on your remote control from the main menu to view a list of recently opened apps.


Actual screen may vary based on your BenQ Launcher firmware version.
To re-open an app from the History menu use ◀/▶ on your remote control to navigate to the app you want to re-open, and then press OK to re-open that app.
To clear an app from the History menu use ▶/▶ on your remote control to navigate to the app you want to clear, and then press ▼ to clear that app from the History menu, you can also press and hold ▼ to clear all apps from the History menu.
Using the input source menu
Press ▶ on your remote control from the main menu to access the input source menu. See Selecting an input source on page 43 for more details on input sources.
Using the BenQ Launcher Settings page
The Settings page for the BenQ Launcher offers a set of configurations that allow you to make adjustments to the BenQ Launcher environment.


Actual screen may vary based on your BenQ Launcher firmware version.
BenQ Launcher Settings overview
| Submenu Functions and Descriptions | |
| Internet | Allows you to:Connect to the Internet via a wireless connection. See Using the All Apps page on page 59 for more details.Perform Network diagnostic.Test the speed of your Internet connection. |
| Pair Device | Allows you to:Show the connected smart device’s screen from the projector. To perform the screen mirroring function, follow the instructions in the connected device’s user manual.Enable or disable Bluetooth on your projector and pair with a Bluetooth speaker or headphones to output the projector’s audio in outdoor settings See Wireless Internet Connection on page 46 for more details. |
| General Settings | Allows you to:Change the input type.Change the language for the projector.Change the time zone.Change the wallpaper.Change the layout of the BenQ Launcher main page. See Operating under the BenQ Launcher mode on page 53 for more details.Change the LED Mode. See LED Mode on page 69 for more details.Change the default Home app for the projector. |
| System Information | Allows you to:Manage the apps installed on the projector.Upgrade the system to the latest version via the Internet or the connected media flash drive.For each system upgrade, the system will send a notice message to remind all users to undergo system upgrade. Make sure you have stable wireless connection during system upgrades.View the following system information:Available storageDev ic e n a m eDev ic e m o d e lNetwork addressesPlatform versionView operation instructions, such FAQ and user manualComplete a factory data reset.When you perform a factory data reset all the data stored in your projector will be deleted including apps, and media files. The settings for the projector will also revert back to the factory default settings. |
Using the All Apps page
The All Apps page in the system section of the main page allows you view and launch all apps installed on the projector.
To open an app:
I. Press ◀/▶/▲/▼ on your remote control to select the App you want to launch and press OK to launch.
Adding/Removing app shortcuts
To add an app to the App Shortcuts section of the main page:
I. Select the + box from the App Shortcuts section on the main page, a menu of all the apps installed on your projector will be displayed.
- From the list of apps press OK on your remote control to check the box for the apps you want to add to the App Shortcuts section, or press OK on your remote control un-check the box for the apps you want to remove from the App Shortcuts section.
- Press to confirm your selections and return to the BenQ Launcher main page.
Deleting an app from the All Apps page
To delete an app from the All Apps page:
I. Press ◀/▶/▲/▼ on your remote control to select the App you want to delete and then press and hold OK for a few seconds.
2. Confirm that you want to delete the app from the All Apps page.
Changing network settings
The BenQ Launcher allows you to change your wireless connection settings via the WLAN Settings menu within the Internet menu, which can be accessed by selecting the Settings menu from the System section in the main menu.
To change or connect to the Internet via Wireless LAN:
I. Ensure WLAN is enabled in the WLAN field.
2. Press ▲/▼ on your remote control to select the desired SSID for the Wireless AP you want to connect to and press OK.
3. When connecting to an SSID:
- If you chose a secured SSID for the first time, a window appears to prompt you to enter the appropriate password. Press ▲/▶/▲/▼ on your remote control to select the corresponding keys on the virtual keypad to enter your password. After you have entered the password, select Connect and press OK to connect.

The password will be stored in the projector's memory. In the future, if you select the same SSID again, you will not be prompted to enter a password unless you delete the SSID from the projector's memory.
Inputting text
Various menus within the BenQ Launcher may require that you input text. To input text in a text field:
I. Select the text field where you want to input text.
2. Press OK on your remote control, a full alphanumeric keyboard will appear on screen.
- Press ▶/▶/▲/▼ on your remote control to navigate the keyboard, and press OK to select the letter/key/symbol you want to enter into the text field.
- Press at anytime to exit out of the keyboard.
Navigating the OSD menus
About the OSD menus
To let you make various adjustments or settings on the projector and the projected image, the projector provides multilingual On-Screen Display (OSD) menus, which contains primary menu functions. (See Using the OSD menu on page 64)
To access the OSD menu, press MENU on your remote control.
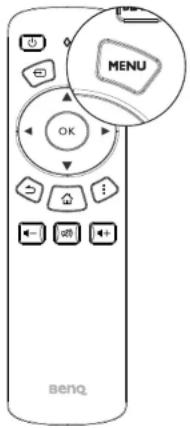
The following is the OSD menu:


Use the arrow keys (◄/►/▲/▼) on your remote control to move through the menu items, and use OK to confirm the selected menu item.
The following is the Settings menu of the OSD menu:


When selecting items within the Setting menu press OK, and then (◄/►/) to toggle through the options. Press → when you want to confirm your selection and return to navigating the Settings menu.
Using the OSD menu
The OSD menu provides primary menu functions. Available menu items may vary depending on the connected video sources or specified settings. Menu options that are not available will become grayed out.
To access the OSD menu, press MENU on your remote control.
• Use the arrow keys (◀/▶/▲/▼) to move through the menu items.
• U s e OK to confirm the selected menu item.

Certain menu items may appear only when input signals are connected and may not appear when no input signals are connected.
| Menu Submenus and descriptions | ||
| Picture Mode | Selects a preset picture mode to suit your operating environment and input signal picture type.The preset picture modes are described as below: | |
| Bright | Maximizes the brightness of the projected image. This mode is suitable for environments where extra-high brightness is required, such as using the projector in well lit rooms. | |
| Office Emphasizes brightness to match coloring from a PC. | ||
| Camping | Being slightly brighter than Movie mode, it is suitable for playing movies in the outdoors where there is a small amount of ambient light at night. | |
| Movie | Well-balanced color saturation and contrast with a low brightness level, this mode is most suitable for enjoying movies in a totally dark environment (as you would find in a commercial cinema). | |
| Vivid Color | Well-saturated color, fine-tuned sharpness and a higher brightness level, this mode is most suitable for watching movies in a room where there is a small amount of ambient light. | |
| 3D Picture settings appropriate for playing video games. | ||
| User Recalls the customized settings. | ||
| Environment Lit | Adjusts the overall black level of the picture. When adjusting this control the black areas of the picture appear just as black and details in the dark areas are visible. | |
| Daytime | Adjusts the black level of the picture to create a clearer image when atmospheric light is brighter than the picture. | |
| Evening | Adjusts the black level of the picture to create a darker foregrounds and brighter backgrounds when atmospheric light is dimming. | |
| Camp Fire | Adjusts the black level of the picture for settings when atmospheric light is slightly bright. | |
| Star Night | Adjusts the black level of the picture for settings when atmospheric light is dim. | |
| Normal | Adjusts the black level of the picture for settings when atmospheric light is dark. | |
| Color Saturation | Adjusts the color saturation level -- the amount of each color in a video picture. Lower settings produce less saturated colors; setting to the minimum value makes the image black and white.If the image setting is too high, colors on the image will be overpowering, which makes the image unrealistic.[IMAGE] Color Saturationsettings can only be adjusted when either HDMI, USB flash drive, or microSD memory card is selected as the source. | |
| Sharpness | Adjusts the sharpness of the image -- the distinctness of the boundaries between different tones or colors. The higher the value the sharper the image, while the lower the value the less sharp the image is. | |
| Color Temperature | The options available for color temperature*settings vary according to the connected input signal.[IMAGE] There are many different shades that are considered to be "white" for various purposes. One of the common methods of representing white color is known as the "color temperature". A white color with a low color temperature appears to be reddish white. A white color with a high color temperature appears to have more blue in it.[IMAGE] Color Temperaturesettings can only be adjusted when thePicture Modeis set to eitherCamping, Movie, or Vivid Color. | |
| NormalMaintains the normal colorings for white. | ||
| CoolMakes images appear bluish white. | ||
| WarmMakes images appear reddish white. | ||
| Sound Mode | Selects a sound effect mode to your preference.The following preset sound modes are provided:Camping, Movie, and Music. | |
| Aspect Ratio | The native display resolution of this projector is in a 16:9 aspect ratio. However you may use this function to display projected pictures in a different aspect ratioIn the following illustrations, the black portions are inactive areas and the white portions are active areas.Aspect Ratio settings can only be adjusted when HDMI is selected as the source. | |
| Auto | Scales a picture proportionally to fit the projector's native resolution in its horizontal and vertical width.This makes the most use of the screen and maintains the aspect ratio of a picture. | |
| 4:3 | Scales the picture so that it is displayed in the center of the screen with a 4:3 aspect ratio.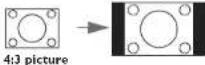 | |
| 16:9 | Scales the picture so that it is displayed in the center of the screen with a 16:9 aspect ratio.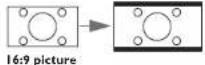 | |
| Wall Color | Adjusts the color settings of the image to suit the color of the wall on which the image is projected.The following Wall Color options are provided: Off, Light Yellow, Pink, and Blue. | |
| 3D | This projector supports playing three-dimensional (3D) content transferred through your 3D-compatible video devices and contents, such as game consoles (with 3D game discs), 3D Blu-ray players (with 3D Blu-ray discs), 3D TV (with 3D channel), and so on. After you have connected the 3D video devices to the projector, wear the BenQ 3D glasses and make sure the power is on to view 3D contents.When watching 3D contents:The image may seem misplaced, however, this is not a product malfunction.Take appropriate breaks when watching 3D content.Stop watching 3D content if you feel fatigue or discomfort.Keep a distance from the screen of about three times the effective height of the screen when watching 3D content.Children and people with a history of oversensitivity to light, heart problems, or have any other existing medical condition should be refrained from watching 3D content.The default setting isAutoand the projector automatically chooses an appropriate 3D format when detecting 3D contents. If the projector cannot recognize the 3D format, manually choose a 3D mode according to your preference.When this function is enabled:The brightness level of the projected image decreases.The Picture Mode cannot be adjusted. | |
| Settings | PressOKto enter its submenu. See below for more details.When selecting items within theSettingsmenu press OK, and then (◄/►/) to toggle through the options. Press → when you want to confirm your selection and return to navigating theSettingsmenu. | |
| LanguageSets the language for the On-Screen Display (OSD) menus and theBenQ Launcher. | ||
| Projector PositionThe projector can be installed in a high location or behind a screen. SeeChoosing a location on page 25for details. | ||
| Test PatternEnable this function to display the grid test pattern, which helps you adjust the image size and focus so as to check if the projected image is free of distortion. | ||
| Auto Power OffSets the time interval in which the projector will automatically power off when inactive.The following Auto Power Off options are provided:Disable, 5 mins, 10 mins, 15 mins, 20 mins, 25 mins, and 30 mins. | ||
| Menu Submenus and descriptions | ||
| Settings | Menu Display Time | Sets the length of inactive time before the OSD menu on the screen disappears. The following Menu Display Time options are provided: Always On, 5 sec, 10 sec, 15 sec, 20 sec, 25 sec, and 30 sec. |
| High Altitude Mode | Sets whether the projector increases fan speed in high altitude settings to increase the intake of air to cool the projector. Select On to enable an increased fan speed. Select Off to keep the projector's fan working at normal speed. | |
| LED Mode | Selects the projector LED lamp power from the following modes.• Normal: Provides full lamp brightness.• Economic: Reduces system noise and power consumption by 30%. If Economic mode is selected, the light output will be reduced and result in darker projected pictures.• SmartEco: Adjusts the visual settings of the projector based on the projected image to lower power consumption while keeping the brightness and color consistent with Normal mode (power consumption and system noise reduction varies based on the adjusted image). | |
| Auto Keystone | Enable this function to allow the projector to automatically adjust the keystone settings when powered on. See Correcting keystone on page 45 for more details. | |
| Keystone | Adjusts the keystone settings for the projected image. See Correcting keystone on page 45 for more details.This function is only available when Auto Keystone is disabled. | |
| Reset All Settings | Returns all settings to the factory preset values.The following settings will still remain: Keystone, Language and Projector Position. | |
| Settings Information | Displays the following information about your projector.Source: Displays the current signal source.Picture Mode: Displays the current Picture Mode.Resolution: Displays the native resolution of the input source.Color System: Displays input system format.Equivalent Lamp Hour: Displays the number of hours the lamp has been used.Software Version: Displays the firmware version of your projector.Some information is given only when certain input sources are in use. | |
Accessories
GSI Battery
Your projector comes with an attachable battery which is suitable for use in outdoor situations when a traditional power outlet is not readily available.
Rear View

I. Charge indicator light
The indicator light lights up blue when the GSI battery is charging.
- Micro USB Type-B port
Used to charge the GSI Battery via a traditional Micro-USB power adapter.

An adapter for the GSI Battery is not supplied with the package.
- USB Type-A port
Used to connect to other devices (e.g. a smartphone, tablet, etc.) to supply power to the connected device.

This USB port only outputs power to devices, it does not support data transfer of any kind.
- Projector Connector
Used to connect and supply power to the projector (see Installing the battery on page 73 for details).
Charging the battery
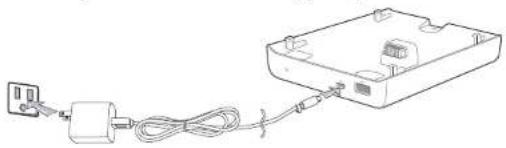
There are two ways to charge the GSI battery:
- Connect a traditional Micro USB Type-B power adapter to the Micro USB Type-B port at the rear of the battery.
natural_image
Simple line drawing of an electronic device with a power plug, cable, and housing (no text or symbols)
When the projector is installed onto the GSI Battery and a Micro USB adapter is plugged into the GSI battery the following situations will occur:
- The adapter will charge the GSI battery when the projector is powered off.
- The adapter will not provide power to both the battery or projector when the projector is powered on (i.e. projector will only run on battery power when the projector is powered on).
• Install the projector onto the battery (see Installing the battery on page 73 for details), and then plug the supplied power adapter into the DC-IN power jack at the rear of the projector.

natural_image
Line drawing of a portable electronic device connected to a power outlet (no text or symbols)
- Due to differences in power adapter throughput the charging time for the two charging methods vary, with charging via the projector's DC-IN power jack being faster than charging via a Micro USB Type-B adapter.
• To view the charge level for the GSI battery enter the BenQ Launcher interface and check the battery icon at the top right of the screen.
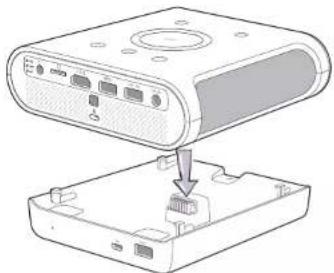
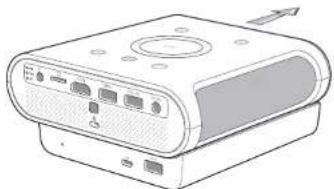
Installing the battery
I. Ensure that there are no connections to the ports on the projector or battery before installing the battery.
2. Place the projector on top of the battery so that the projector connector and securing tabs on the battery fits into the battery connector and securing slots on the projector respectively.
natural_image
Diagram showing a device with ports and an internal component being inserted into a housing (no text or symbols present)- Push the projector forward on the battery until it clicks in place.
natural_image
Line drawing of a computer drive with ports and an arrow indicating direction (no text or symbols)Connections
Connect the GSI Battery to other devices using a USB cable to supply power from the GSI Battery to the connected device.

Mobile device (smartphone, tablet, etc.)
Removing the battery
I. Ensure that there are no connections to the ports on the projector or battery before removing the battery.
- Push the projector backwards on the battery so that it unlocks from the battery.
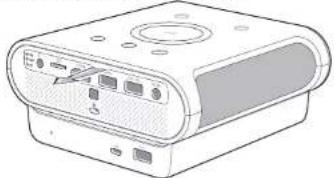
natural_image
Line drawing of a portable electronic device with ports and buttons (no text or symbols)- Slowly lift the projector off the battery.
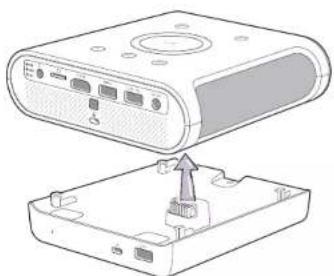
natural_image
Diagram of a device showing an open rear panel with internal components and a close-up view of the front panel (no text or symbols present)
When the angle adjust dial is set high you will not be able to remove the projector from the battery. To remove the projector from the battery ensure that the angle adjust dial is set to a low position. See Adjusting the projection angle on page 44 for details
Instructions and requirements for handling the battery
- Recommending usage
Please read the battery instructions and the label on its surface before use.
Use the battery indoors under normal condition, temperature: (25±3)°C, absolute humidity: 65±20%
When in use, the battery shall be kept out of heat, high voltage and avoided children's touching. Do not drop the battery.
Use the compatible charger. Do not put the battery into the charger over 24 hours.
Do not contact contacts together. Do not demolish or disassembly the battery by yourself. Do not put the battery in the damp place to avoid danger.
Do not wrap it with conduct material to avoid the damage caused by the direct contact between the metal and battery. Keep the battery in day places.
Well disposed the disused battery. Do not put it into fire or water.
- Hazard warning
- Forbid disassemble batteries
The battery has protective component and circuit internally to avoid danger. Mishandling such as improper disassembly will destroy its protective function and make it heat, smoke, distort or burning.
- Forbid short-circuit batteries
Do not touch the plus and minus contactor with metals. Do not put the battery with metal element together in either storage or movement. If the battery is short-circuit, it carries magnified current, which will cause damage and make the battery heat, smoke, distort or burning.
- Forbid heat and burn the battery
If heating or burning the battery, it will caused the isolated element in the battery dissolved, protection function stopped or the electrode burning, over heated, which will make the battery heat, smoke, distort or burning.
• To avoid use the battery near the heat
Do not use the battery near the fire and stove, or over 60^ C, and over heating will cause the battery internal short-circuit and make it heat, smoke, distort or burning
- Forbid bathing the battery
Do not dampen the battery, or even immerse it in the water, which will cause internal protection circuit and its function lost or abnormal chemical reactions, which will lead to heating, smoking, distortion or burning.
- Avoid charging near fire or in the sunlight
Otherwise, it will cause internal protection circuit and its function lost or abnormal chemical reactions, which will lead to heating, smoking, distortion or burning.
- Danger in using non-indicated chargers in
Charging in abnormal condition, the battery will cause internal protection circuit and its function lost or abnormal chemical reactions, which will lead to heating, smoking, distortion or burning.
- Forbid damage battery
Do not allow damage the battery with the metals gouged, forged or dropped etc. otherwise, it will cause over-heated, distort, smoke or burning, even in danger.
- Forbid directly welding on the battery
Over-heated will cause the isolated element dissolved in the battery and losing protective function its cycle life, even will cause over heated, distort, smoke or burning.
- Forbid directly charging on the power socket or car kit cigarette.
High voltage and amplified current will damage the battery and reduce its cycle life, even will cause overheated, distort, smoke or burning.
- Do not use this battery for other equipment
Inappropriate usage will damage the battery and reduce its cycle life, even will cause over-heated, distort, smoke or burning.
- Do not touch the leaking battery
The leaking electrolyte will cause the skin uncomfortable. If it drops into eyes, do not rob the eyes but wash in time, and go to hospital for treatment.
- Warning
- Do not mix with other battery
This battery cannot mix with deposal or twice- recycled batteries in use. Otherwise, for its abnormal charge and discharge, it will cause over-heated, distort, smoke or burning.
Keep the battery out of children's area and prevent them biting or swallowing the battery.
Do not insert the battery onto the charger for a long time If charging beyond the normal time, the battery is still in the charger, please stop charging. The abnormal charging will cause battery over-heated, distort, smoke or burning.
Do not put into microwave stove or any other pressure apparatus. Take the battery away from the projector or the charger if it is instant heated or leaking (or odors) and depose it. The bad battery will causes over-heated, smoke or burning.
• C a u t i o n s
- Notice
The battery shall be prevented to be exposed in effulgence so as not to cause over-heated, distort, smoke and weaken its performance and cycle life.
- Electro static-free
There is a protective circuit inside the battery to prevent contingency. Do not use the battery in the Electro static circumstances, (above 1000V), for it is easily destroyed the circuit board so that the battery doses not work and causes over-heated, distort, smoke or burning.
• Discharging temperature range
Recommended discharging temperature range is 0-60°C, beyond which it will result in decadence of the battery performance and shortness of its life.
- Read carefully the manual before use or whenever in need.
- Charging method
Use the special chargers in the recommended charging method to charge the battery.
- First usage
When you use the battery for its first time, do not put it into the equipment once you find it in unusual conditions such as uncleanness or odors. The battery should be returned to the vendor.
- Children use
When Children use the battery, they should be under their parents' instructions and superintend in use.
- Avoid children's touch
Battery should keep out of the area where children in reach. Prevent children taking the battery out of the charger or the equipment to play. To avoid the leak-out liquid be exposed to the skin or clothes. If touched, please wash by clean water so as not to cause the skin uncomfortable.
- Consultation
When you buy the battery, please note how to contact with the vendors, so that you may get in touch with vendors for consultation whenever in need.
• Safety usage guarantee
If the battery is used on other instruments, please contact with your manufacturer for how to get the best performance, at least consult its maximum current, fast charge and special application.
Protective Case
Your projector comes with a rubber protective case which helps prevent damage caused by accidental spillage or unintended impact, particularly in outdoor situations.
Installing the protective case
To install the protective case on the projector slide the projector (with battery installed) into the opening at the rear of the protective case until the case wraps around the edges of the projector.

natural_image
Line drawing of two electronic devices with ports and connectors, no text or symbols present
- The projector should only be placed in the protective case after it has already been installed onto the GSI battery.
- Ensure that there are no connections to the ports on the projector or battery before installing the protective case.
Maintenance
Care of the projector
Your projector needs little maintenance. The only thing you have to do on a regular basis is keep the lens clean.
Never remove any parts of the projector. Contact your dealer or local customer service center if the projector fails to operate as expected.
Cleaning the lens
Clean the lens whenever you notice dirt or dust on the surface.
Before cleaning any part of the projector, turn it off using the proper shutdown procedure (see Shutting down the projector on page 40), unplug the power cable, and let it cool down completely.
- Use a canister of compressed air to remove dust.
• If there is dirt or smears, use lens-cleaning paper or moisten a soft cloth with lens cleaner and gently wipe the lens surface. - Never use any type of abrasive pad, alkaline/acid cleaner, scouring powder, or volatile solvent, such as alcohol, benzene, thinner or insecticide. Using such materials or maintaining prolonged contact with rubber or vinyl materials may result in damage to the projector surface and cabinet material.

Never touch the lens with your finger or rub the lens with abrasive materials. Even paper towels can damage the lens coating. Only ever use a proper photographic lens brush, cloth, and cleaning solution. Do not attempt to clean the lens while the projector is switched on or is still hot from previous use.
Cleaning the projector case
Before cleaning any part of the projector, turn it off using the proper shutdown procedure (see Shutting down the projector on page 40), unplug the power cable, and let it cool down completely.
- To remove dirt or dust, wipe the case with a soft, dry, lint-free cloth.
• To remove stubborn dirt or stains, moisten a soft cloth with water and a neutral detergent. Then wipe the case.

Never use wax, alcohol, benzene, thinner or other chemical detergents. These can damage the case.
Storing the projector
To store the projector for an extended time:
- Make sure the temperature and humidity of the storage area are within the recommended range for the projector. Refer to Specifications or consult your dealer about the range.
- Retract the adjuster feet.
- Remove the batteries from the remote control.
- Pack the projector in its original packing or equivalent.
Transporting the projector
It is recommended that you ship the projector with its original packing or equivalent.
LED Lamp information
Getting to know the lamp hour
When the projector is in operation, the duration (in hours) of lamp usage is automatically calculated by the built-in timer.
To obtain the lamp hour information:
I. Press MENU and then use the arrow keys (◀/▶/▲/▼) to go to Settings > Information and press OK.
2. The Equivalent Lamp Hour information displays.
3. Press BACK to exit.
Extending lamp life
The projection lamp is an 300AL LED bulb which features an lamp life far beyond traditional bulbs, yet it is still a consumable item. To keep the lamp life as long as possible, you can change the following settings via the OSD menu.
To access the OSD menu, see Using the OSD menu on page 64 for details.
Setting LED Mode
Setting the projector in Economic mode extends the lamp life.
| LED mode Description | |
| Normal 100% lamp brightness | |
| Economic | Economic mode dims the projector's LED lamp which will lower power consumption, extend the LED lamp life and reduce the projector's noise level. The reduced light output will result in darker projected pictures. If you set your projector to Economic mode choose Normal to return to the default normal mode. |
| SmartEco | SmartEco mode adjusts the visual settings of the projector based on the projected image to lower power consumption while keeping the brightness and color consistent with Normal mode. |
I. Select MENU > Settings > LED Mode and press OK.
2. Press (◄/►) to move to your desired mode, and press OK.
3. When done, press to your changes and exit.
Setting Auto Power Off
This function allows the projector to turn off automatically if no input source is detected after a set period of time.
I. Select MENU > Settings > Auto Power Off and press OK.
2. Press (◄/►) to select a time period. If the preset time lengths are not suitable for your presentation, select Disable, and the projector will not automatically shut down.
3. When done, press to save your changes and exit.
Indicators
There are three indicators which show the status of the projector. Check the following information about the indicator lights. If there is anything wrong, turn the projector off and contact your dealer.
- When the projector is in a normal state
| PWR TEMP | LED Status & description | |
| Orange Off | Off Projector and Bluetooth in stand-by mode | |
| Green Flashing | Off Off Projector is powering up | |
| Green Off | Off Projector is operating | |
| Orange Flashing | Off Off Projector is powering-down and in cooling mode | |
| Green Off | Off Burn-in ON | |
| Green Green | Red Flashing Burn-in OFF | |
- When the projector is undergoing system updates or in an abnormal state
| PWR TEMP | LED Status & description | ||
| Red Flashing | Red Flashing | Red Flashing | Projector is undergoing a firmware update |
| Green | Off | Red | Firmware update process is finished, the projector will automatically restart after. |
| Off | Red | Off | File download via USB port has failed |
| Green Flashing | Green Flashing | Off | Projector is in the process of downloading files via the USB port |
| Off | Off | Red | Lamp error |
| Off | Off | Flashing Red | Lamp is not lit up |
| Red Red | Off Fan error | ||
| Green | Red | Off | The air vent has exceeded the temperature limit. |
| Green | Red Flashing | Off | The air vent has encountered an error. |
| PWR TEMP | LED Status & description | |
| Green Flashing | Red Off The LED has exceeded the temperature limit. | |
| Green Flashing | Red Flashing Off The LED has encountered an error. |
Troubleshooting
| Problem Cause Remedy | ||
| The projector does not turn on. | There is no power from the power cable. | Plug the power cable into the AC inlet on the rear of the projector, and plug the power cable into to the power outlet. If the power outlet has a switch, make sure that it is switched on. |
| Attempting to turn the projector on again during the cooling process. | Wait until the cooling down process has completed. | |
| No picture. | The video source is not turned on or connected correctly. | Turn the video source on and check that the signal cable is connected correctly. |
| The projector is not correctly connected to the input source device. | Check the connection. | |
| The input source has not been correctly selected. | Select the correct source with the key on the remote control. | |
| Image is unstable. | The connection cables are not securely connected to the projector or the signal source. | Correctly connect the cables to the appropriate terminals. |
| Picture is blurred. | The projection lens is not correctly focused. | Adjust the focus of the lens using the focus ring. |
| The projector and the screen are not aligned properly. | Adjust the projection angle and direction as well as the height of this projector if necessary. | |
| The lens cover is still closed. Remove the lens cover. | ||
| Remote control does not work correctly. | The batteries are out of power. | Replace both of the batteries with new ones. |
| There is an obstacle between the remote control and the projector. | Remove the obstacle. | |
| You are too far away from the projector. | Stand within 8 meters (26.2 feet) of the projector. | |
| 3D content does not display correctly | The 3D glasses are out of battery. Recharge the 3D glasses. | |
| The settings in the 3D menu are not set correctly. | Correctly set the settings in the 3D menu. | |
| Your Blu-ray Disc is not in 3D format. Use a | 3D Blu-ray Disc and try again. | |
| The input source has not been correctly selected. | Select the correct source with the SOURCE key on the projector or remote control. | |
Specifications
Projector specifications

All specifications are subject to change without notice.
| Category Item Specification | ||
| Optical | Resolution 1280 (H) x 720 (V), 0.3" | |
| Display system Mstar ARM A7 Quad-Core CPU | ||
| Lens F/Number F = 1.5, f = 5.53 mm | ||
| Lamp type OSRAM Q8 | ||
| Lamp Life (Normal/Economic) | 20,000/30,000 hours ^[2465] Lamp life results will vary depending on environmental conditions and usage. | |
| Audio Supported audio | • Supports LPCM, two audio channels• Supported audio sampling rates: 32kHz, 44.1kHz and 48kHz• Supported audio bit rates: 16 bits, 20 bits, and 24 bits | |
| Electrical | Power supply AC100–240V, 50-60 Hz (Automatic) | |
| Power consumption 45 W | ||
| Mechanical Weight | Projector: 570 g (1.25lbs)Battery: 400 g (0.88 lbs) | |
| Output Terminals | Speaker (Stereo) 2 watt x 2 | |
| Audio signal output Audio jack x I | ||
| USB | USB port 2.0 Type-A x IUSB port 3.0 Type A x I | |
| Control IR receiver x 2 | ||
| Input Terminals | Video signal input | SD/HDTV signal inputDigital - HDMI x I |
| USB | USB port 2.0 Type-A x IUSB port 3.0 Type A x I | |
| microSD card microSD card reader x I | ||
| Environmental Requirements | Operating temperature 0°C-40°C at sea level | |
| Operating relative humidity 10%-90% (without condensation) | ||
| Operating altitude 0-1499 m at 0°C-35°C | ||
| Wireless | 2.4G, Single band, 2T2RFrequency band: 2400 - 2483.5 MHzMaximum Output Power: 19.31 dbm |
Dimensions (with battery installed)
146 mm × 139.2 mm × 65.7 mm (W × D × H)

Timing chart
Supported timing for video input
| Timing | Resolution | H. Frequency (KHz) | V. Frequency (KHz) | Dot Clock Frequency (MHz) |
| 480i**** 720 (1440) x 480 15.73 59.95 27 | ||||
| 480p**** 720 x 480 31.47 59.94 27 | ||||
| 576i 720 (1440) x 576 15.63 50 27 | ||||
| 576p 720 x 576 31.25 50 27 | ||||
| 720/50p** 1280 x 720 37.5 50 74.25 | ||||
| 720/60p* | 1280 x 720 | 45.00 60 74.25 | ||
| 1080/24P** | 1920x1080 | 27 24 74.25 | ||
| 1080/25P | 1920x1080 | 28.13 25 74.25 | ||
| 1080/30P | 1920x1080 | 33.75 30 74.25 | ||
| 1080/50i***** | 1920x1080 | 28.13 50 74.25 | ||
| 1080/60i***** | 1920x1080 | 33.75 60 74.25 | ||
| 1080/50p*** | 1920x1080 | 56.25 50 148.5 | ||
| 1080/60p*** | 1920x1080 | 67.5 60 | 148.5 |

*Supported timing for 3D signal with Frame Packing, Top-Bottom format, Side-by-Side, and Frame Sequential format.
**Supported timing for 3D signal with Frame Packing, Top-Bottom format, and Side-by-Side format.
**Supported timing for 3D signal with Top-Bottom and Side-by-Side format.
****Supported timing for 3D signal with Frame Sequential format.
*****Supported timing for 3D signal with Side-by-Side format.
Supported timing for PC input
| Timing | Resolution | H. Frequency (KHz) | V. Frequency (KHz) | Dot Clock Frequency (MHz) |
| 640 x 480 | VGA_60 59.940 31.469 25.175 | |||
| VGA_72 72.809 37.861 31.500 | ||||
| VGA_75 75.000 37.500 31.500 | ||||
| VGA_85 85.008 43.269 36.000 | ||||
| 800 x 600 | SVGA_60 60.317 37.879 40.000 | |||
| SVGA_72 72.188 48.077 50.000 | ||||
| SVGA_75 75.000 46.875 49.500 | ||||
| SVGA_85 85.061 53.674 56.250 | ||||
| 1024 x 768 | XGA_60* 60.004 48.363 65.000 | |||
| XGA_70 70.069 56.476 75.000 | ||||
| XGA_75 75.029 60.023 78.750 | ||||
| XGA_85 84.997 68.667 94.500 | ||||
| 1152 x 864 1152 x 864_75 75.00 67.500 108.000 | ||||
| 1280 x 720 | 1280 x 720_60* 60 | 45.000 74.250 | ||
| 1280 x 720_120 120 | 90.000 148.500 | |||
| 1280 x 768 1280 x 768_60 59.870 47.776 | 79.5 | |||
| 1280 x 800 | WXGA_60* 59.810 49.702 83.500 | |||
| WXGA_75 74.934 62.795 106.500 | ||||
| WXGA_85 84.880 71.554 122.500 | ||||
| 1280 x 1024 | SXGA_60 60.020 63.981 108.000 | |||
| SXGA_75 75.025 79.976 135.000 | ||||
| 1280 x 960 | 1280 x 960_60 60.000 60.000 108 | |||
| 1280 x 960_85 85.002 85.938 148.500 | ||||
| 1360 x 768 | 360 x 768_60 60.015 47.712 85.500 | ||||
| 1440 x 900 WXGA+_60 59.887 55.935 106.500 | ||||
| 1400 x 1050 SXGA+_60 59.978 65.317 121.750 | ||||
| 1600 x 1200 UXGA 60.000 75.000 162.000 | ||||
| 1680 x 1050 | 680 x 1050_60 59.954 65.290 | 46.250 | ||||
| 640 x 480@67Hz MAC13 66.667 35.000 30.240 | ||||
| 832 x 624@75Hz MAC16 74.546 49.722 57.280 | ||||
| 1024 x 768@75Hz MAC19 75.020 | 60.241 | 80.000 | ||
| 1152 x 870@75Hz MAC21 75.06 | 68.68 | 100.00 | ||
| 1920 x 1080@60Hz | 1920 x 1080_60 (Reduce Blanking) 60 | 67.5 | 148.5 | ||
| 1920 x 1200@60Hz | 1920 x 1200_60 (Reduce Blanking) 59.95 | 74.038 154 | |||

The timings showing above may not be supported for due to EDID file and VGA graphic card limitations. It is possible that some timings cannot be chosen.
Supported file formats
| File type File extension Description | ||
| Documents | Adobe PDF (.pdf) | |
| MS PowerPoint 97 - 2010 (.ppt, .pptx) | ||
| MS Excel 97 - 2010 (.xls, .xlsx) | ||
| MS Word 97 - 2010 (.doc, .docx) | ||
| Photos JPG (.jpg, .jpeg), BMP (.bmp) | ||
| Music MP3, MP2, MPI | AAC, WAV | |
| Video | AVI (XVID, MJPEG) | |
| DVIX (MJPEG, XVID) | ||
| DAT (MPEGI) | ||
| MPG (MPEGI) | ||
| Subtitles SRT (.srt), SMI (.smi) | • Subtitle files must be in the same directory as the video files.• The name of subtitle files must be the same as the name of the corresponding video files.• SRT and SMI only supports UTF (unicode 8). | |

Bit rate range: If the peak bit rate of a video file is larger than 10MB, it might cause video playback lag.
Regulatory Statements
For Assessment of Photobiological Safety of Lamps and Lamp Systems
Risk Group I
According to the classification of photobiological safety of lamps and lamp systems, this product is Risk Group I, IEC 62471-5:2015 and/or IEC 62471-1:2006 (if applicable).
Risk Group 2
I. According to the classification of photobiological safety of lamps and lamp systems, this product is Risk Group 2, IEC 62471-5:2015 (as Figure 1) and/or IEC 62471-1:2006 (Figure 2) (if applicable).
2. Possibly hazardous optical radiation emitted from this product
3. Do not stare at operating lamp. May be harmful to the eyes.
4. As with any bright source, do not stare into the direct beam.

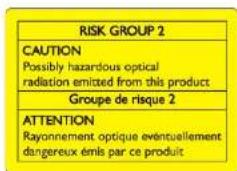
I. According to the classification of photobiological safety of lamps and lamp systems, this product is Risk Group 3, IEC 62471-5:2015 and/or IEC 62471-1:2006 (if applicable).
2. Possibly hazardous optical radiation emitted from this product
3. Do not look at operating lamp. Eye injury may result.
4. No direct exposure to the beam shall be permitted.
- Operators shall control access to the beam within the hazard distance or install the product at the height that will prevent spectators' eyes from being in the hazard distance.
- Hazard distance (HD): Refer to the user manual of the purchased model.
Battery caution (if product includes remote control)
- Do not put the remote control in the direct heat, humidity & Avoid fire.
- Do not drop the remote control.
- Do not expose the remote control to water or moisture, this could result in malfunction.
- Confirm there is no object between the remote control and the remote sensor of the product.
- When the remote control will not be used for an extended period, remove the batteries.
Battery safety notice (if product includes remote control)
The use of the wrong type of batteries may cause chemical leaks or explosion. Please note the following:
- Always ensure that the batteries are inserted with the positive and negative terminals in the correct direction as shown in the battery compartment.
- Different types of batteries have different characteristics. Do not mix different types.
• Do not mix old and new batteries. Mixing old and new batteries will shorten battery life or cause chemical leaks from the old batteries. - When batteries fail to function, replace them immediately.
- Chemicals which leak from batteries may cause skin irritation. If any chemical matter seeps out of the batteries, wipe it up immediately using a dry cloth, and replace the batteries as soon as possible.
- Due to varying storage conditions, the battery life for the batteries included with your product may be shortened. Replace them within 3 months or as soon as you can after initial use.
• There may be local restrictions on the disposal or recycling of batteries. Consult your local regulations or waste disposal provider.
For UAE
TRA Registered No.: ER50551/16
Dealer No.: DA0045787/10
FCC statement (for the United States only)
Federal Communication Commission Interference Statement
This equipment has been tested and found to comply with the limits for a Class B digital device, pursuant to Part 15 of the FCC Rules. These limits are designed to provide reasonable protection against harmful interference in a residential installation. This equipment generates, uses and can radiate radio frequency energy and, if not installed and used in accordance with the instructions, may cause harmful interference to radio communications. However, there is no guarantee that interference will not occur in a particular installation. If this equipment does cause harmful interference to radio or television reception, which can be determined by turning the equipment off and on, the user is encouraged to try to correct the interference by one of the following measures:
- Reorient or relocate the receiving antenna.
- Increase the separation between the equipment and receiver.
- Connect the equipment into an outlet on a circuit different from that to which the receiver is connected.
- Consult the dealer or an experienced radio/TV technician for help.
This device complies with Part 15 of the FCC Rules. Operation is subject to the following two conditions: (1) This device may not cause harmful interference, and (2) this device must accept any interference received, including interference that may cause undesired operation.
FCC Caution: Any changes or modifications not expressly approved by the party responsible for compliance could void the user's authority to operate this equipment.
FCC Radiation Exposure Statement
This equipment complies with FCC RF radiation exposure limits set forth for an uncontrolled environment. This equipment should be installed and operated with a minimum distance of 20 centimeters between the radiator and your body.
Accessibility Requirements for Rehabilitation Act of 1973, Section 508
BenQ's commitment to accessible products allows us to support government in making accessible technology choices. BenQ's LCD monitors and projectors are compliant with Section 508 guidelines by including the assistive features as below:
- BenQ's monitors have colored "Power" indicators. While the indicator shows green, it means that the monitor is using the full power. While the indicator shows yellow or amber, it means that the monitor is in suspend or sleep mode and is using less than 2 watts of electricity.
-
BenQ's monitors have a variety of settings of pre-programmed flicker-free timing to make the screen shown on the monitor readily accessible. The default timing setting is automatically turned on every time the monitor is powered up, and thus reduces the hassle of user intervention.
-
BenQ's monitors and projectors have options for brightness and contrast adjustments that text and images could be displayed differently to meet the demands of the visually impaired. Other similar adjustments are also available by using the On-Screen Display (OSD) controls on the products.
- BenQ's multimedia monitors and projectors usually have one or two speakers for audio performance which allow users (including hearing impaired) to interact with the computer systems connected. Speaker controls are typically located on the front-panel.
- Firmware of BenQ's monitors and projectors contain unique product information that helps computer systems to identify BenQ products and activate their Plug-and-Play function when connected.
- All BenQ's monitors and projectors are compatible with the PC99 standard. For example, connectors are color-coded to help users easily connecting products to computer systems correctly.
- Some models of BenQ's monitors and projectors contain additional USB and DVI ports for connection to more devices such as a special headphone to assist the hearing impaired.
- All BenQ monitors and projectors come with user manuals on compact discs which could be easily read by commercial software such as Adobe Reader via a connected computer system. These documents are also available on the BenQ's web site (www.BenQ.com). Other types of documents may be available upon requests.
• BenQ's customer service provides answers and assistance to all our customers through phone calls, facsimiles, e-mails, or web sites.
RoHS Statement
This product is compliant to implemented RoHS (Restriction of Hazardous Substances) type regulations worldwide, including but not limited to China, India, Japan, Korea and European Union.
Turkey RoHS
Restriction on Hazardous Substances statement(India)
This product complies with the "India" E-waste Rule 2016" and prohibits use of lead, mercury, hexavalent chromium, polybrominated biphenyls or PolyBrominated Diphenyl Ethers in concentrations exceeding 0.1 weight% and 0.01 weight for cadmium except for exemptions set in Schedule 2 of the Rule.
Vietnam RoHS
IC statement (for Canadian users)
This Class B digital apparatus complies with Canadian ICES-3 (B).
This device complies with Industry Canada license-exempt RSS standard(s). Operation is subject to the following two conditions: (1) this device may not cause interference, and (2) this device must accept any interference, including interference that may cause undesired operation of the device.
This equipment should be installed and operated with a minimum distance of 20 centimeters between the radiator and your body.
For UK only
• The mains lead (power cable) on the equipment comes with a moulded plug incorporating a fuse.
- The rating of the fuse is indicated on the pin face of the plug and, if it requires replacing, a fuse approved by ASTA or BSI to BS 1362 of the same rating must be used.
• If the plug has a detachable fuse cover, remember to place the fuse cover back if you need to change the fuse.
- Do NOT use a plug without the fuse cover. If the fuse cover is missing, contact your nearest BenQ Customer Service Center for assistance.
CE DOC
DECLARATION OF CONFORMITY (English)
The device complies with the requirements set out in the Council Directives on the Approximation of the Laws of the Member States relating Electromagnetic Compatibility (2014/30/EU) and Low Voltage Directive (2014/35/EU) and Radio Equipment Directive (2014/53/EU), the Restriction of The Use of Certain Hazardous Substances in Electrical And Electronic Equipment Directive (2011/65/EU), Turkish EEE Directive; Turkish ErP (Decision 2010/643);the Commission Regulation (EC) No 1275/2008 implementing Directive 2005/32/EC of the European Parliament and of the Council with regard to eco-design requirements for standby and off mode electric power consumption of electrical and electronic household and office equipment, and the Directive 2009/125/EC of the European parliament and of the council establishing a framework for the setting of eco-design requirements for energy-related products.
DÉCLARATION DE CONFORMITÉ (Français)
SAMSVARSERKLÆRING (Norwegian)
WEEE directive (English)

WEEE

Battery
Disposal of Waste Electrical and Electronic Equipment and/or Battery by users in private households in the European Union.
This symbol on the product or on the packaging indicates that this can not be disposed of as household waste. You must dispose of your waste equipment and/or battery by handling it over to the applicable take-back scheme for the recycling of electrical and electronic equipment and/or battery. For more information about recycling of this equipment and/or battery, please contact your city office, the shop where you purchased the equipment or your household waste disposal service. The recycling of materials will help to conserve natural resources and ensure that it is recycled in a manner that protects human health and environment.
Recycling information: See http://www.benq.com/support/recycle for details.
Recycling information: See http://www.benq.com/support/recycle for details.
Recycling information: See http://www.benq.com/support/recycle for details.
Recycling information: See http://www.benq.com/support/recycle for details.
Recycling information: See http://www.benq.com/support/recycle for details.
Директива WEEE (Русский)

Recycling information: See http://www.benq.com/support/recycle for details.
Recycling information: See http://www.benq.com/support/recycle for details.
Recycling information: See http://www.benq.com/support/recycle for details.
Recycling information: See http://www.benq.com/support/recycle for details.
Recycling information: See http://www.benq.com/support/recycle for details.
Recycling information: See http://www.benq.com/support/recycle for details.
Recycling information: See http://www.benq.com/support/recycle for details.
Recycling information: See http://www.benq.com/support/recycle for details.
Recycling information: See http://www.benq.com/support/recycle for details.
Recycling information: See http://www.benq.com/support/recycle for details.
Recycling information: See http://www.benq.com/support/recycle for details.
Recycling information: See http://www.benq.com/support/recycle for details.
WEEE-direktiv (Dansk)

WEEE

Batteri
For Mexico only (for RF module only)
- Copyright and disclaimer
- Copyright
- Disclaimer
- Warranty
- Statement regarding hyperlinks and third-party websites
- Table of contents
- Troubleshooting 85
- Specifications 87
- Regulatory Statements 94
- Important safety instructions
- Moisture condensation
- Avoid volatile liquids
- Disposal
- Package contents
- Standard accessories
- Introduction
- Projector features
- • Full HD compatible
- • Good picture quality
- - Bluetooth streaming function
- • Multimedia entertainment at your finger tips
- - Convenient Android-based BenQ Launcher
- • Advanced LED light source
- - Short throw lens
- • Auto Keystone
- - 3D function
- • Media playback from USB storage devices
- - Portability
- - Stream online content instantly
- - Drop proof
- - Splash proof
- - Low heat
- Projector exterior view
- Front and upper side view
- Rear and upper side view
- Front and bottom side view
- Vents (hot air release)
- Battery Connector
- Controls and functions
- Control panel
- Focus ring
- ⏻ POWER
- Arrow keys ( Left, Right, Up▲Down)
- OK
- BACK
- HOME
- Source
- MENU
- Remote control
- ⏻ Power
- Source
- Arrow keys ( Left, Right, Up, Down)
- Volume Down
- Mute
- BLANK
- MENU
- : Options
- Volume Up
- Replacing the remote control battery
- Remote control effective range
- Installation
- Choosing a location
- Front Table:
- Rear Table:
- Front Ceiling:
- Rear Ceiling:
- Obtaining a preferred projected image size
- Projection dimensions
- Connection
- Connecting with video equipment
- Connecting HDMI devices
- Connecting with a computer
- Connecting a USB flash drive
- Connecting a microSD memory card
- Operations
- Starting up the projector
- Shutting down the projector
- Operating in a high altitude environment
- Securing the projector
- Using the Kensington lock
- Selecting an input source
- Adjusting the projected image
- Adjusting the projection angle
- Fine-tuning the image clarity
- Correcting keystone
- Wireless Internet Connection
- Bluetooth pairing
- Pairing with a Bluetooth speaker or headphones
- Ending a Bluetooth connection
- Deactivating the Bluetooth speaker or headphones
- BenQ Launcher
- Operating under the BenQ Launcher mode
- Accessing the BenQ Launcher main page
- Using the BenQ Launcher applications
- Navigating the BenQ Launcher:
- Accessing the BenQ Launcher menus
- Using the Notification menu and Clean Tool function
- Using the History menu
- Using the input source menu
- Using the BenQ Launcher Settings page
- BenQ Launcher Settings overview
- Using the All Apps page
- Adding/Removing app shortcuts
- Deleting an app from the All Apps page
- Changing network settings
- Inputting text
- Navigating the OSD menus
- About the OSD menus
- Using the OSD menu
- Accessories
- GSI Battery
- Rear View
- Charging the battery
- Installing the battery
- Connections
- Removing the battery
- Instructions and requirements for handling the battery
- - Recommending usage
- - Hazard warning
- - Forbid disassemble batteries
- - Forbid short-circuit batteries
- - Forbid heat and burn the battery
- • To avoid use the battery near the heat
- - Forbid bathing the battery
- - Avoid charging near fire or in the sunlight
- - Danger in using non-indicated chargers in
- - Forbid damage battery
- - Forbid directly welding on the battery
- Protective Case
- Installing the protective case
- Maintenance
- Care of the projector
- Cleaning the lens
- Cleaning the projector case
- Storing the projector
- Transporting the projector
- LED Lamp information
- Getting to know the lamp hour
- Extending lamp life
- Setting LED Mode
- Setting Auto Power Off
- Indicators
- Specifications
- Projector specifications
- Dimensions (with battery installed)
- Timing chart
- Regulatory Statements
- Battery caution (if product includes remote control)
- Battery safety notice (if product includes remote control)
- For UAE
- FCC statement (for the United States only)
- Accessibility Requirements for Rehabilitation Act of 1973, Section 508
- RoHS Statement
- Vietnam RoHS
- IC statement (for Canadian users)
- For UK only
- CE DOC
- DECLARATION OF CONFORMITY (English)
- DÉCLARATION DE CONFORMITÉ (Français)
- Директива WEEE (Русский)
- WEEE-direktiv (Dansk)
- For Mexico only (for RF module only)
Brand : BENQ
Model : GS1
Category : Video projector