
CSR200 - Iron Cellini - Free user manual and instructions
Find the device manual for free CSR200 Cellini in PDF.


| Type of product | Steam iron |
| Brand | Cellini |
| Model | CSR200 |
| Dimensions (approx.) | 300 x 150 x 150 mm |
| Weight | 1.2 kg |
| Power supply | 2400 W |
| Voltage | 220-240 V, 50/60 Hz |
| Water tank capacity | 300 ml |
| Soleplate material | Stainless steel |
| Steam output | Up to 35 g/min continuous steam |
| Steam boost | Up to 120 g/min |
| Temperature settings | Adjustable thermostat with fabric guide |
| Anti-drip system | Yes |
| Self-cleaning function | Yes |
| Auto shut-off | Yes, after 8 minutes of inactivity (vertical/horizontal) |
| Cord length | 2.5 m |
| Safety features | Auto shut-off, thermal fuse, non-slip handle |
| Maintenance and cleaning | Use self-cleaning function; wipe soleplate with damp cloth; descale regularly with vinegar solution |
| Spare parts and repairability | Available: soleplate, water tank cap, spray nozzle; refer to authorized service center for repairs |
| General information | For dry and steam ironing; vertical steam for hanging garments; spray function included |
Frequently Asked Questions - CSR200 Cellini
User questions about CSR200 Cellini
0 question about this device. Answer the ones you know or ask your own.
Ask a new question about this device
Download the instructions for your Iron in PDF format for free! Find your manual CSR200 - Cellini and take your electronic device back in hand. On this page are published all the documents necessary for the use of your device. CSR200 by Cellini.
USER MANUAL CSR200 Cellini
natural_image
Close-up of a black steam iron with a pink handle and black iron, no visible text or symbolsIMPORTANT SAFEGUARDS
Before using this appliance, the following basic safety precautions should always be followed including:
- Before using this appliance, read this instruction manual carefully.
- Verify that the main voltage is the same as that indicated on the rating plate on the appliance before use. If this is not the case, contact your dealer and do not use the iron.
- Burns may occur from touching hot metal parts, hot water, or steam. Use caution when you turn a steam iron upside down as there may be hot water in water tank.
- Do not continue to use the appliance if the power cord, plug, indicator light or any part is damaged and contact your dealer or authorized service facility for repair.
- Do not use the appliance if the indicator is out of function, the iron fail to work, and contact your dealer or authorized service facility for repair.
- Do not allow cord to hang over the edge of table or hot surface to avoid hazard or damage to the cord.
- Remove the plug from the wall socket when not in use or before cleaning. Allow the appliance to cool down completely before cleaning.
- Do not immerse the appliance into water or other liquid; this could cause fire hazard, electric shock or injury to persons.
- Make sure that the appliance is outside the reach of children so that burn and damage from children pulling the cord or striking the iron can be avoided. Never leave the iron unattended when it is switched on.
- Place appliance on flat surface or table, do not hang appliance over the edge of table or counter.
- Do not allow children to operate this appliance.
- The use of other accessories not recommended by the manufacturer may result in fire, electrical shock or creating hazard for the user.
- Never use the appliance for other than its intended use.
- Save this instruction manual for future reference.
This appliance is for HOUSEHOLD USE ONLY
- KNOW YOUR STEAM IRON
Burst steam button
Pressing this button instantly produces a powerful shot of steam from soleplate to eliminate stubborn wrinkles.
Spray button
Pressing this button instantly provides a fine mist spray to dampen hard-to-iron textile.
Steam knob
Move this slider to select your desired steam output for each garment or self-clean function (Refer to Fig. 3).
Water inlet cover
Fill water into water tank through it. Make sure that water should not exceed MAX level as indicated on the tank surface.
Spray nozzle
When pressing the spray button, water is sprayed from this spray nozzle.
Temperature control dial
Turn this dial to appropriate temperature setting varying from different garments.
Indicator light
The light is illuminated and sparkling while the iron is heating up, and then keeps on once the iron reaches the set temperature. During ironing, the light cycles sparkling and keeping on to maintain the set temperature.
Ceramic glide soleplate
Flat surface of the iron, which is heated electrically and pressed against textile materials while ironing
BEFORE THE FIRST USE
- Remove any sticker, protective foil or storage cover from the soleplate.
- Fill the water tank of the iron to capacity specified by the MAX level indicator. Heat up the iron to maximum temperature and iron over a piece of damp cloth for several minutes on the purpose of removing any residue on the soleplate.

Fig. 1

natural_image
Line drawing of a vintage iron iron with visible internal components (no text or symbols)Fig. 2

natural_image
Top-down line drawing of a boat's deck and side view, showing hull, hull, and side elements (no text or symbols)Fig. 3
stubborn creases. Anti-calcium function is included when burst steaming.
The iron has an anti-drip function: if ironing garments for long time, soleplate temperature will drop, the iron will stop generating steam automatically and no water droplets can come out from soleplate.
CLEANING AND MAINTENANCE
After ironing
- Disconnect power supply and empty the water left in water tank. Install and close the water inlet cover after draining.
- Reconnect to the power supply and turn the temperature control dial to MAX position to dry the soleplate. Disconnect after indicator light goes off.
- Let the iron completely cool down, and then clean the upper part of iron with a damp cloth. Wipe residue on the soleplate.
Always store the emptied iron horizontally on a flat dry surface with a cloth protecting the soleplate.
SELF-CLEAN FUNCTION
Clean the appliance regularly according to hardness of water and using frequency.
- Fill water into the water tank.
-
Connect into power socket and set the temperature control dial to Max position, then indicator light will be illuminated, then place iron as Fig. 2.
WARNING: Never pour white vinegar or other liquid cleaners into water tank! -
Once the light is off, hold the iron over the sink and move and hold steam knob to self-clean position (Fig 3). Steam and boiling water will come out of the soleplate while impurities and flakes will be flushed out.
-
Move the temperature control dial to 0 setting as soon as water in the water tank has been used up.
WARNING: In order to keep soleplate smooth, never let any metal materials rubs against it!
- IRONING TIPS
- Always check first whether a label with ironing instructions is attached to the article. ( refer to the table below for direction.) Follow these ironing instructions in any case.
- If no ironing-instruction label is provided, but you know the fabric material, please refer to the table below for direction.
The table below is not applicable to those fabrics through special treatment (e.g. shining, frill, projecting etc.). Use low temperature to iron particular fabrics. - Always at first divide the clothes according to ironing temperatures. Woolen fabrics and cotton fabrics etc. should be ironed separately.
The iron heats up quicker than cooling it down, therefore, you should start ironing the articles requiring the lowest temperature such as those made of synthetic fiber. - If the fabric consists of various kinds of fibers, you must always select the lowest ironing temperature to iron the composition of those fibers. If you don't know what kinds of fiber the fabric is made of, choose one piece that can not be seen easily to find out the best ironing temperature. ( start from low temperature until the most suitable temperature is obtained )
- Pure wool fabrics (100% wool) may be ironed with the iron set to a steam position. Preferably set steam knob to the maximum position and set the temperature dial to
Additional table
| Symbol | Fabric | Temp. | Variable steam | Steam shot | Spraying water | Self-clean |
 | Synthetic fibers/silk |  | × | × | √ | × |
 | Wool | √ | × | √ | √ | |
 | Cotton Linen | MAX | √ | √ | √ | √ |
 | Note:The symbol means: This article cannot be ironed! | |||||
Note : "√"stands for being able to use ;
“×”stands for being NOT able to use.
ENVIRONMENT FRIENDLY DISPOSAL
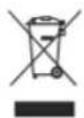
You can help protect the environment!
Please remember to respect the local regulations: hand in the non-working electrical equipments to an appropriate waste disposal center.
重要安全指引
使用本產品前,請遵照如下基本安全指引:
natural_image
Top-down line drawing of a boat hull with marked compartments and side features (no text or symbols)图 3

- IMPORTANT SAFEGUARDS
- This appliance is for HOUSEHOLD USE ONLY
- Burst steam button
- Spray button
- Steam knob
- Water inlet cover
- Spray nozzle
- Temperature control dial
- Indicator light
- Ceramic glide soleplate
- BEFORE THE FIRST USE
- CLEANING AND MAINTENANCE
- After ironing
- SELF-CLEAN FUNCTION
- - IRONING TIPS
- ENVIRONMENT FRIENDLY DISPOSAL
- 重要安全指引
Brand : Cellini
Model : CSR200
Category : Iron