
Plaza ST 100 - Satellite receiver MANHATTAN - Free user manual and instructions
Find the device manual for free Plaza ST 100 MANHATTAN in PDF.


| Product Type | Satellite Receiver |
| Brand | Manhattan |
| Model | Plaza ST 100 |
| Dimension (W x D x H) | 280 x 180 x 50 mm |
| Weight | 0.5 kg |
| Power Supply | 12V DC / 1A (external adapter) |
| Power Consumption | 15 W (max) |
| Tuner Type | DVB-S/S2 |
| Video Output | HDMI, SCART, Composite |
| Audio Output | HDMI, RCA (stereo), Digital Optical |
| Input Connections | F-type (LNB input), Loop-through output |
| Recording | USB recording (PVR ready, external storage) |
| Media Playback | USB playback: MP3, JPEG, AVI, MKV |
| Electronic Program Guide (EPG) | Yes, 7-day EPG |
| Remote Control | Included (IR, 2x AAA batteries) |
| Maintenance | Clean with a soft, dry cloth; do not use liquids |
| Safety | Do not expose to moisture or extreme temperatures |
| Spare Parts & Repairability | Contact Manhattan customer support or authorized service centers |
| General Information | Designed for digital satellite TV reception; supports multiple satellite positions |
Frequently Asked Questions - Plaza ST 100 MANHATTAN
User questions about Plaza ST 100 MANHATTAN
0 question about this device. Answer the ones you know or ask your own.
Ask a new question about this device
Download the instructions for your Satellite receiver in PDF format for free! Find your manual Plaza ST 100 - MANHATTAN and take your electronic device back in hand. On this page are published all the documents necessary for the use of your device. Plaza ST 100 by MANHATTAN.
USER MANUAL Plaza ST 100 MANHATTAN
Manhattan® TECHNOLOGY WITH VISION
Digital Satellite Receiver

PLAZA MODELS
ST 100 / ST 120 ST 200 / ST 300
Instruction Manual (English)
http://www.plaza-st.com
CONTENTS
INTRODUCTION....2
FEATURES 3
CONNECTORS AND DEFINITIONS 4
FRONT PANEL CONNECTORS....4
CONTROLS AND DEFINITIONS....4
INSTALLATION....5
TUNING YOUR TV TO UHF OUTPUT 5
MAIN MENU 5
INSTALL Menu....6
CONFIGURING YOUR ANTENNA....6
DiSEqC 1.2 menu (Manual positioner) 7
DiSEqC USALS menu (Automatic positioner) 7
CHANNEL SEARCH -- Automatic Scan and Search 7
CHANNEL SEARCH: Manual Scan and Search....8
ADVANCE SEARCH: Special Feature 9
TO CHANGE CHANNEL OR SATELLITE....9
SORTING THE CHANNEL LIST....9
SATELLI TE LIST....10
SELECTING RADIO CHANNELS 10
CONDITIONAL ACCESS (for models with CI)....10
UPGRADING SOFTWARE 10
UPGRADING SOFTWARE VIA PC....11
TELETEXT FUNCTION....11
TO SELECT SUBTITLES ON A CHANNEL....11
TO SELECT AUDIO LANGUAGE....11
TO ACTIVATE SLEEP TIMER....11
CHANNEL BANNER....11
ELECTRONIC PROGRAM GUI DE (EPG) 12
INSTALLING FAVORITE CHANNELS....12
VIEWING FAVORITE CHANNELS 12
TO RESET YOUR RECEIVER TO DEFAULT SETTINGS....12
TO LOCK MENU AND CHANNELS 12
CHANNEL EDIT 12
TO DELETE CHANNELS 12
TO RENAME CHANNEL....13
TO MOVE CHANNEL....13
SATELLITE / TP EDIT....13
TO RENAME A SATELLITE....13
TO SORT SATELLI TE LIST....13
TO RENAME A TP 13
TO SORT TP LIST 13
RECEIVER TO RECEIVER COPY FUNCTION....13
TROUBLE SHOOTING GUIDE....14
SPECIFICATIONS....14
Eurosat reserves the right to alter product specifications without prior notice....15
MASTER PASSWORD 6699....15
INTRODUCTION
Welcome to the world of Manhattan digital satellite receiver that will make your life closer to your dream. Before using your new receiver, we suggest that you carefully read this manual and the following safety notice.
The PLAZA model is an advanced digital satellite receiver with the unique option of Blind Search Facility and is designed to cope with the many different operating requirements of broadcast standards worldwide. During development, we have evolved with the best possible solutions to create the next generation of satellite receivers together with the most up-to-date electronics and easy to use on-screen menu system. The new digital satellite receiver is designed to give you outstanding pictures and CD-quality audio with a touch of a button.
FEATURES
• 1 LNB input, IF signal loop through, supports Universal, Single, C Band and Wide Band LNB
• Multiple LNB switching 0/12V, 14/18 volts, 22KHz and DiSEqC 1.2
• 2 SCART, TV (CVBS / RGB) and VCR/DVD with loop through facility
- RS – 232 port for PC connections and software upgrade
- 5 RCA sockets (Audio L & R, Video, 0/12V, Digital Audio (S/P DIF)
• PLL RF modulator (CH 21---CH 69 PAL G, I, K, M)
• 100 – 240V AC 50/60 Hz SMPS PSU.
• 4 Digit LED front panel display
• Supports Multi TV Standards PAL G, I, K, M & NTSC M with screen formats 4:3 and 16:9
- Up to 5000 channels TV or RADIO programmable
• DiSEqC 1.3 with USALS function
- On screen language support for up to 15 languages
• Fully automatic Scan & Store of TV & Radio channels of
- Channel search option by All, FTA, Network, TP with option of including Data channels.
- Advanced (Blind Search) search option by All, FTA, All + Data
• Built in Teletext Supporting Teletext and DVB Subtitle function
• SATCODX compatibility.
- EPG access for current, next and 7 days for on screen channel information
- Parental control facility by channel and menu locks
• 22 different favorite groups (11 TV & 11 Radio)
- Last channel recall facility and Last viewed channel remembered after power down
• Over The Air (OTA) software upgrade facility.
• Time display on Info banner and on front panel.
- Edit functions with picture in menu (Add, Delete, Name, Move and Sort) Channel, TP and Satellite
- Receiver to receiver full user settings and channel data copying facility
• 1 year, 10 event VCR/PVR timer facility
• Multiple audio selection (L, R, Stereo & Mono)
• Programmable sleep timer up to 2 hours
• Supports multiple Audio language broadcasts
- Includes 4 on screen games (Tetris, Minesweeper, Black Jack, and Video Poker)
Models with CI and IR (Irdeto)
• Embedded IRDETO CI card slot
• DVB Common Interface with dual CAM slots
SAFETY NOTICE
DANGER: HIGH VOLTAGE! RISK OF ELECTRIC SHOCK!
● DO NOT open top cover. High voltages inside. Please refer all servicing to qualified service agents.
● DO NOT obstruct the ventilation slots on the top cover. Install the receiver in a well-ventilated location.
● DO NOT insert or drop small objects into the receiver.
● DO NOT expose the receiver to water, moisture, extreme cold or direct sunlight.
● DO NOT use solvents of any kind to clean the unit, only use a soft-dry cloth.
● DO unplug the receiver from the mains outlet before connecting or disconnecting anything.
● DO unplug the receiver from the mains, TV, and the satellite LNB feed when a thunderstorm is expected.
● DO unplug the receiver from mains out let before cleaning the unit.
REAR PANEL CONNECTIONS

CONNECTORS AND DEFINITIONS
Please do not connect the power to the receiver until all other connections have been made and checked.
R1: AC IN (Power Cord) Connect this lead to the mains outlet (100-240 V AC 50/60 Hz)
R2: LNB IN (IF Input) Connect the IF cable from your LNB to this connector.
R3: LOOP OUT If you have a second satellite receiver, connect the receivers LNB input to this connector.
R4: ANT IN Connect your UHF TV antenna to this connector.
R5: TV OUT (UHF Modulator Output) Connect your TV or VCR to this connector.
R6: EUROSCART FOR TV Connect your TV via a SCART cable to this connector.
R7: EUROSCART FOR VCR Connect your VCR or DVD Player via a SCART cable to this connector.
R8: VIDEO Composite video output for connecting to an AV monitor etc.
R9: 0/12V Switched + 12V DC output for use with LNB switches.
R10: AUDIO LEFT / RIGHT Audio outputs for connecting to a Hi-Fi system.
R11: RS-232 Connect your PC to this connector using a NULL MODEM (female to female) cable for software upgrade. Connect STB for channel data transfer from another receiver of same model.
R12: SP / DIF Digital audio output for connecting to a Hi-Fi system
R13: S-VIDEO Additional video output for connecting to a VCR or CAMCORDER with S-VIDEO capability
FRONT PANEL CONTROLS
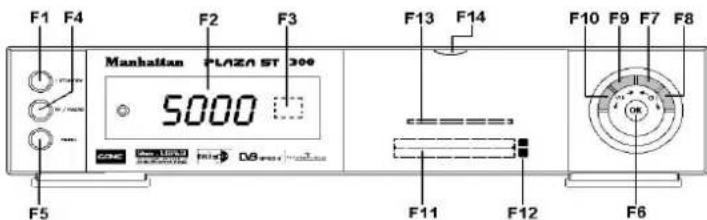
CONTROLS AND DEFINITIONS
F1: STANDBY / ON After connecting the power, press this button to switch ON the receiver or to switch to STANDBY
F2: DIGIT LED DISPLAY This will display the channel number or certain programming functions when using the menus. In standby mode it will display the time.
F3: REMOTE CONTROL SENSOR Location of the infrared receiver. Do not obstruct this when using the remote control.
F4: TV / RADIO Press this button to change from TV channels to RADIO channels and vise versa.
F5: MENU Press this button to enter the programming menus. To exit the menus, press it again.
F6: OK In viewing mode press this button to display channel list. In menu mode this button is used to enter the programming parameters.
F7: CH UP In viewing mode it will step up channels sequentially. In programming mode it will move the cursor upwards in the menu.
F8: CH DOWN In viewing mode it will step down channels sequentially. In programming mode it will move the cursor downwards in the menu.
F9: VOL UP In viewing mode it will increase the sound. In programming mode it will move the cursor to the right or change a function.
F10: VOL DOWN In viewing mode it will decrease the sound. In programming mode it will move the cursor to the left or change a function.
F11: COMMON INTERFACE (For models with CI) SLOTS A AND B Your receiver is equipped with two slots (behind the front flap) accepting Type 1 and Type 2 PCMCIA modules. Open flap from top catch (F14) and Insert CI module together with smart card into either of these slots.
F12: CI SLOTS A AND B EJECT When you want to remove a cam press the eject button.
F13: IRDETO CARD SLOT (For Models with embedded Irdeto) Insert your smart card into this slot.
REMOTE CONTROL FUNCTIONS
We recommend that you familiarize yourself with the remote control handset prior to installing the receiver.

OPERATION IN PROGRAMMING MODE
The menus are designed to assist you from the moment you switch on the receiver. Follow the help messages at the bottom of the menu.

INSTALLATION
For digital quality picture, connect the receiver to your TV using a fully wired SCART lead. If using the UHF TV OUT connector then follow below step.
TUNING YOUR TV TO UHF OUTPUT
Connect your TV using a UHF (co-axial) lead and switch on the receiver. After initialising the digit LED (F2) will display "NOCH". The receiver has been factory set to channel 64. Select a spare channel on your TV and tune it until you see the following OSD Settings menu. Finally store the settings on your TV.
MAIN MENU
Press the MENU key to configure all your settings.
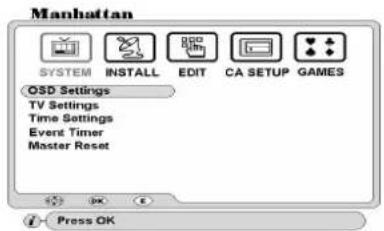
To select, press CH up / down or VOL up / down key. To enter, press OK key.
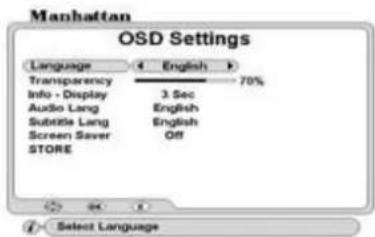
Language: Select the required OSD language.
Transparency: Adjust transparency of channel banner and channel browser.
Info-Display: Select display time of the channel banner. If you select On it will remain on until exit key is pressed.
Audio Lang / Subtitle Lang: Select default language. This sets all channels to that language
Screen Saver: Select time to turn ON screen saver in radio mode. After the seconds have lapsed, the screen will change to revolving radio banner.
STORE: After above settings move to store and press OK key.

TV Settings
TV Standard: Select the output for your TV. Example: for UK select PAL I. If your TV supports 'Auto Sensing' then select Auto.
Screen Format: Select the picture aspect ratio for your TV.
Video Output: Select signal output for your TV. If the teletext function on your TV does not work when viewing channels from other sources such as terrestrial TV, select COMP mode.
UHF Channel: Select a UHF channel between 21 – 69.
STORE: After above settings move to store and press OK key.

Time Settings
The front display in standby mode, and the channel banner in user mode will indicate the time.
Year / Month / Date / Hour / Minutes: Press VOL up / down to set.
STORE: After above settings move to store and press OK key.

Event Timer
You can program up to 10 events for the receiver to switch on automatically.
Event No: Select event number you are setting.
Timer: To turn on an event, select VCR SCART.
TV / Radio: Select TV or Radio mode.
Satellite: Select name of the satellite.
Channel: Press OK and select the channel you want to record.
Month / Date: Select month and date the event is to come on.
On Time / Off Time: Using 0-9 keys enter the time.
STORE: After above settings move to store and press OK key

To reset the receiver to factory default settings, select Master Reset and press OK. A PASSWORD window will appear. Using 0-9 keys enter your password and the WARNING message will appear. Press OK to reset or EXIT to abandon resetting.
INSTALL Menu
CONFIGURING YOUR ANTENNA
Your receiver is preset to UNIVERSAL LNB for all LNB numbers (1-50). If you are using one Universal LNB, then you do not need to change any settings. You can re-program these when using more than one LNB.

LNB No: Select reference number.
LNB Type: Select type and press OK to configure LO settings.
LO SETTINGS:
● Universal --- Low 9750, High 10600, 22 KHz tone is automatic.
● Single 1 ---- 10750, 22 KHz tone is selectable.
● Single 2 ---- 10700, 22 KHz tone is selectable.
● Single 3 ---- 11300, 22 KHz tone is selectable.
● C Band ---- 5150, 22 KHz tone is selectable.
● Wide ---- Low 9750, High 10750, 22KHz tone is selectable
You can change the LO figure for any of these settings to suit your LNB
LNB POWER
● V / H ----Both polarities are selected. V = Vertical 14V. H = Horizontal 18 V
● 14V Skew On ---- 14V vertical or lower band for Wideband LNB
● 18V Skew On ---- 18V horizontal or higher band for Wideband LNB
- Off ---- No power output.
22KHz Tone: When using other than Universal LNB, you can select tone status.
DiSEqC: When using more than one LNB for fixed installation with a DiSEqC switch. See following example.
EXAMPLE: To configure four LNB
Astra 2 (28.2E), select LNB No 1 and set DiSEqC to 1 Astra 1 (19.2E), select LNB No 2 and set DiSEqC to 2 Hotbird 1-6 (13E), select LNB No 3 and set DiSEqC to 3 Thor 2, 3 (1W), select LNB No 4 and set DiSEqC to 4
EXAMPLE: To configure MONOBLOCK LNB
Astra 1(19.2E), select LNB No 1 and set DiSEqC to Mini-A Hotbird 1-6(13E), select LNB No 2 and set DiSEqC to Mini-B
CONFIGURING WIDEBAND LNB
Set LNB No 1 to 14V Skew On (for Low Band Vertical polarity) Set LNB No 2 to 14V Skew On (for Low Band Horizontal polarity) Set LNB No 3 to 18V Skew On (for High Band Vertical polarity) Set LNB No 4 to 18V Skew On (for High Band Horizontal polarity)
NOTE: This receiver does not provide Mechanical Polarizer Output Connectors. Therefore for tuning Wideband LNB you need to provide external means of adjusting skew on the LNB.
12V: To select 12 volts output for relay type LNB switch.
STORE: After above settings move to store and press OK key
DiSEqC 1.2 menu (Manual positioner)
With DiSEqC 1.2 antenna positioner, you can search and download individual satellites with manual positioning.

In Channel Search menu go to Positioner and select DiSEqC 1.2 and press OK key. A sub menu will appear.
Move: Move antenna furthest possible East or West and enter the limits below.
East Limit: After furthest East enter the limit here
West Limit: After furthest West enter the limit here
Erase Limits: To clear limits press OK
0 Position: To move to 0 position on motor.
LOCATING PRE-STORED SATELLITES
Re-sync:
First find one of the listed satellites manually by obtaining maximum signal and quality. Then select Re-sync and press OK key. All other listed satellites can now be found automatically during channel search.
STORE: After above settings move to store and press OK key
DiSEqC USALS menu (Automatic positioner)
You can search and download up to 40 satellites at a time automatically using the DiSEqC USALS menu.

In channel search menu go to Positioner and select DiSEqC USALS and press OK key. A sub menu will appear.
Longitude: Enter your location using 0-9 keys and then PAGE up / down keys to enter E (East) or W (West).
Latitude: Enter your location using 0-9 keys and then PAGE up / down keys to enter N (North) or S (South). EXAMPLE: London – Longitude = 0 and Latitude = 51.5N
USALS: Press OK to move antenna automatically to required satellite.
0 Position: To move to 0 position on motor
STORE: After above settings move to store and press OK key
CHANNEL SEARCH -- Automatic Scan and Search

Using DiSEqC USALS menu you can search and download up to 40 satellites automatically at a time. Follow settings below.
Multisat Search: Set index numbers for each satellite you wish to search. LNB No: If you are using more than one LNB, select LNB No as configured previously. If you are using one LNB then this may remain as 1.
Satellite: Press OK and select satellite name. Remember that you have to select a different name for each index number.
Search Mode: Select search option for each satellite. See below for options. Options with + D will also include data channels
● Auto All - All TP, Video and Radio channels.
● Auto All + D -All TP, Video, Radio and Data channels.
● Auto FTA - All TP for Free To Air Video and Radio channels.
● NIT All – All TP, Video and Radio channels with Network Identification Table.
● NIT All + D – All TP, Video, Radio and Data channels with Network Identification Table.
● NIT FTA -- All TP for Free to Air Video and Radio channels with Network Identification Table.
- TP All -- Selected TP for all Video and Radio channels. To select move to TP Data and press OK for TP list.
- TP All + D -- Selected TP for all Video, Radio and Data channels.
● TP FTA -- Selected TP for Free to Air Video and Radio channels.
- Manual All – Single TP for all Video and Radio channels. To select go to TP Data and press OK for sub menu.
- Manual All + D – Single TP for all Video, Radio and Data channels.
- Manual FTA – Single TP for Free To Air Video and Radio channels.
ADD OR EDIT A TP
Go to TP Data and press OK key.

To change TP, press VOL up / down. To add or edit, follow below settings. To add select User Defined.
Freq: Enter using 0-9 keys.
Polarity: Select polarity
S / R: Enter using 0-9 keys
FEC: Select FEC
Video PID / Audio PID / PCR PID Enter the channel PID using 0-9 keys
STORE: After above settings move to store and press OK key.
If you have added a TP, this will appear at the end of the list. Repeat above steps for all the satellites you wish to search.
NOTE: SIGNAL AND QUALITY (Channel Search Menu)
In channel search, the signal and quality conditions shown are as below.
• Blue: Indicates noise only with no actual signal
• Green: Indicates actual signal
Positioner: Move down to Positioner and select DiSEqC USALS
Now go to START and press OK key. The antenna will move to the first satellite in the index and Searching will start. After completing channel search, it will automatically scan and search the next satellite in the index. This process is repeated until all satellites in the index are searched.

When searching, this page will show the TV and Radio channels it found. After completing the index, the positioner will move the antenna to the first satellite.
CHANNEL SEARCH: Manual Scan and Search
Configure Channel Search as described earlier then go to Positioner and select DiSEqC 1.2.
Move the antenna until you find the correct position, maximum signal and quality and store the position
START: Press OK to start search.
TUNING WIDEBAND LNB (configure LNB as described earlier)
NOTE: Mechanical Output Connectors not provided with this model. The skew should be adjusted by external means.
Select a satellite.
Set Multisat Search 1, LNB No 1 and select vertical TP from low band. Adjust skew (externally) to + value for maximum signal and quality.
Set Multisat Search 2, LNB No 2 and select horizontal TP from low band. Adjust skew (externally) to - value for maximum signal and quality.
Set Multisat Search 3, LNB No 3 and select vertical TP from high band. Adjust skew (externally) to + value for maximum signal and quality.
Set Multisat Search 4, LNB No 4 and select horizontal TP from high band. Adjust skew (externally) to - value for maximum signal and quality.
Finally press OK key on Start.
ADVANCE SEARCH: Special Feature
This feature is used when you want to search a satellite for any new channels or those not included in the Database or you do not have the full data of the channel. In INSTALL menu, go to Advance Search
NOTE: Searching with this feature is slower than normal search.
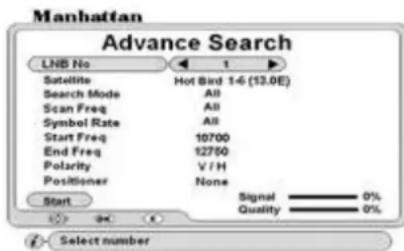
LNB No: Select number.
Satellite: Select satellite name.
Search Mode: Select search option. Option + D includes data channels
- ALL - All Video and Radio channels.
● FTA - Free To Air Video and Radio channels - ALL + D -All Video, Radio and Data channels.
Scan Freq: Select option. If you select All it will scan the complete frequency related to the LNB type you have selected. To define the frequency, select User
Defined. This will allow you to enter the frequency on below menu lines.
Symbol Rate: Select option. If you select ALL it will scan with all Symbol Rates applicable. To define symbol rate, select User Defined and press OK. A sub menu will appear. Select and press OK on the symbol rates you wish to apply and finally EXIT.
Start Freq: Using 0-9 keys, enter the start frequency here. The search will start from this frequency
End Freq: Using 0-9 keys, enter the end frequency here. The search will stop after this frequency
Polarity: select polarity.
Positioner: Select positioner if required. Configure this as described earlier.
Start: Press OK. TP search will start. Below Searching page will appear.
TUNING WI DEBAND LNB (in Advance Search)
NOTE: It is not possible to do index search in Advance Search and therefore each LNB No has to be tuned individually. Configure LNB as described earlier. Go to Advance Search and perform search for each LNB No that is pre adjusted for skew by external means.

Shows serial number of TP, Frequency, Symbol Rate (S/R), Polarity and FEC.
After the search for TP has finished, it will start channel search automatically and display the TV and Radio channels found.
TO CHANGE CHANNEL OR SATELLITE
There are two ways of changing channel or satellite as below.

TO SELECT A CHANNEL WITHIN THE SAME SATELLITE
Press OK key and browser will appear on your screen.
- Use CH and PAGE up / down keys to scroll through the list.
- Press OK on required channel
TO SELECT A CHANNEL FROM ANOTHER SATELLITE
● Use VOL up / down to change the list.
● Use CH and PAGE up / down to scroll through the list
- Press OK on required channel. The antenna positioner will automatically move to that satellite. If you are using DiSEqC switch, then it will switch to that antenna.
SORTING THE CHANNEL LIST
Press Green key to sort channels alphabetically.
Press Yellow key to sort channels Free To Air first followed by Scrambled.
Press Red key to return to normal list.
SATELLI TE LIST
Press SAT key and the combined channel and satellite list will appear. Select a channel from this list and exit.

TO SELECT A CHANNEL FROM ANOTHER SATELLITE
● Use CH and PAGE up / down to scroll through the satellite list
- Press OK onrequired satellite, the channel list will change and the cursor will also move to channel list.
● Use CH and PAGE up / down to scroll through the channel list
- Press OK on required channel. The antenna positioner will automatically move to that satellite. If you are using DiSEqC switch, then it will switch to that antenna. Finally press EXIT.
SELECTING RADIO CHANNELS
Press TV / RADIO key once and it will change to Radio mode. Press it again to change back to TV mode. Follow above steps for changing the channel.
CONDITIONAL ACCESS (for models with CI)
![graph LR A["smart card"] --> B["PCMCIA"] C["card contacts"] --> B B --> D["SLOT A or B"]](/content/2026/05/1071077/images/eebb345a878a2b929aad885fa887c3bbe306d450c14bc55800adf7d027f9414f.jpg)
VIEWING SCRAMBLED CHANNELS
Open the flap (F14) from top and you will find two CI slots behind it. Insert CAM in either of the slots together with a valid card as shown below. To display CAM and card parameters go to CA Setup.

Common Interface
After inserting card and CAM slots A or B will initialize, showing the CAM type. Select the slot you are using and press OK for sub menu. Follow the menu instructions for checking or changing any parameters.
Irdeto: For models with Embedded Irdeto. Shows Irdeto card and Loader Information. Follow the menu instructions for checking any parameters
I RDETO CARD SLOT -- For models with embedded I rdeto systems.
Insert your card into slot F13 with the card contacts facing down.
UPGRADING SOFTWARE
You can upgrade the software of your receiver when this is available. Your current software version is displayed in the Data Download menu, Loader Status in OTA Loader menu. There are two ways to upgrade see below.
- Via satellite using the OTA Loader and OTA Upgrade menus. To upgrade your dish must be positioned on Hot Bird 1-6 (13.0E). This satellite provides the OTA Upgrade.
- Via your PC using a NULL MODEM cable connected to RS232 connector R11. The software is available on our website: http://www.plaza-st.com
CHECKING SOFTWARE DOWNLOAD VERSION
Go to INSTALL menu and select Data download. Enter your password and select OTA Loader. Then select Loader Status. The Download Version number is displayed on the second line from top on the right. When calling for technical help line it may be necessary to refer to this version number.
OTA Loader: This menu is used when upgrading the receiver software via satellite. Go to INSTALL menu and select Data Download. Then select OTA Loader and finally select OTA Upgrade. See following menus.

Loader Status: Press OK to display detailed software parameters. OTA Upgrade: Press OK to upgrade software via satellite and follow below menu
NOTE: Upgrading via satellite may take up to 20 minutes.
This menu is pre-configured and ready to upgrade. Select Start and press OK. If you have a motorized antenna, it will automatically move to Hot Bird 1-6 (13.0E).

This may change to a different satellite in future. In this case follow as below
Satellite: Select the satellite providing the OTA Upgrade.
LNB No: Select number.
Freq: Enter the TP frequency using 0-9 keys
Polarity: Select polarity
S / R: Enter symbol rate using 0-9 keys
Load PID: Enter the PID for the channel using 0-9 keys.
Start: Press OK to commence download
NOTE: The receiver will check for any available upgrade and start download. If the software in the receiver is the same as in OTA Upgrade, then it will display "Latest Software installed". After upgrading software, it may be necessary to reset your receiver using Master Reset function.
UPGRADING SOFTWARE VIA PC
The software is available on our website http://www.plaza-st.com Follow instructions contained within the zipped file. To connect via your PC the following type cable is required.

TELETEXT FUNCTION
The receiver has a built in Teletext function to call up text pages when transmitted.
● To enter Teletext mode press T. TEXT (Green) key on your remote.
● To call up a page enter using 0-9 keys
● To change page sequentially, use PAGE up / down keys
● To exit from Teletext mode, press T. TEXT key again or press EXIT.
TO SELECT SUBTITLES ON A CHANNEL
Press SUB.T (Blue) key. Select required language and press OK. The subtitles will appear after a few seconds. If not transmitted, it will state No Subtitles available.
TO SELECT AUDIO LANGUAGE
You can select an audio by pressing LANG key. The screen will display options on the top left. Select required language and press OK. To change the output, press the AUDIO key repeatedly.
TO ACTIVATE SLEEP TIMER
Press SLEEP key repeatedly to switch on and select duration of the timer. The time (minutes) will be displayed on the top left. You can program the timer for maximum 2 hours. After the time has lapsed, the receiver will switch to standby.
CHANNEL BANNER
Press INFO key once to display the channel banner. Press INFO key again and channel data will appear above the channel banner.

ELECTRONIC PROGRAM GUIDE (EPG)
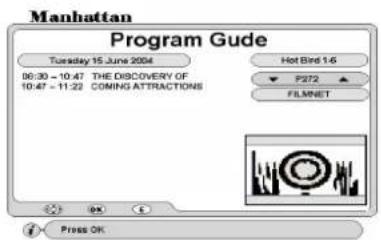
To display correct EPG it is important to set the time first.
To display EPG, what's on now and next, press EPG (red) key.
Channel No. Select channel and press OK
Highlighted Event. Press OK for details and PAGE up / down for next page.
NOTE: If there is no EPG transmitted, it will state 'No Data'. After changing channel please allow few seconds before you press EPG key.
INSTALLING FAVORITE CHANNELS
There are 11 TV and 11 Radio channel lists you can create. You can rename the headings to your requirement. Go to INSTALL menu and select Favorite Channels. Follow below steps.
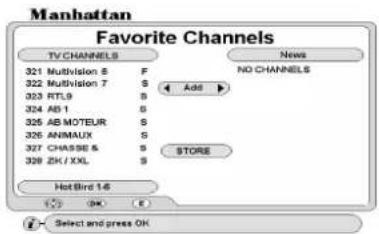
To change a heading: Press FAV key
To change channel list: Press SAT key
To add channels: Press OK on Add, the cursor will move to channel list. Select channel and press OK. This channel name will appear on the right under the favorite heading. Finally press EXIT. Then store the settings.
To rename a heading: Select Rename and press OK. A keypad will appear. Select character and press OK. After naming press EXIT key. Then store the settings.
To delete a favorite channel
Select Delete and press OK, the cursor will move to channel list on the right. Select channel and press OK. Finally press EXIT. Then store the settings.
STORE: After above settings and exiting, move down to STORE and press OK
VIEWING FAVORITE CHANNELS
To select favorite channel, press FAV key. Press VOL up / down key to change list and press OK on required channel. To go back to normal channel list press SAT key and select a channel from its list and exit.
TO RESET YOUR RECEIVER TO DEFAULT SETTINGS
Go to SYSTEM menu and select Master Reset. Enter your PASSWORD, a WARNING message will appear. Press OK to reset.
TO LOCK MENU AND CHANNELS

Go to INSTALL menu and select Parental Lock.
Lock: Press VOL up / down to turn it on.
Old Password: Use 0-9 keys and enter 0000. This is the default password.
New Password: Use 0-9 keys and enter four digits of your choice.
Confirm: Use 0-9 keys and re-enter four digits of your choice.
STORE: Press OK to store the settings.
NOTE: After locking you can only access a locked channel or the menus by entering your password.
CHANNEL EDIT
This section describes the use of the EDIT menu. It includes Channel, Satellite and TP edit functions.
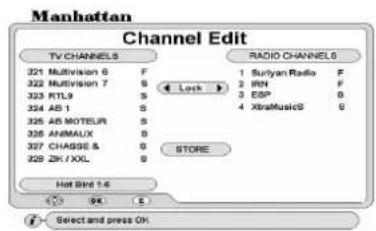
In EDIT menu select 'Channel Edit'. Press VOL up / down to select Lock, Delete, Rename or Move function.
TO LOCK CHANNELS
Select Lock and press OK. The cursor will move to TV channel list. Press VOL up / down if you want to select Radio Channel list. Select channel and press OK. A padlock icon will appear against the channel. Finally press EXIT. Then store the settings.
TO DELETE CHANNELS
Select Delete and press OK. The cursor will move to TV channel list. To delete individual channel, press OK twice on the channel. This will highlight it in red. To delete a group of channels, press OK once on the first channel. Then scroll down wards this will highlight these in mauve. Finally press OK on the last channel in the
group and this will highlight these in red. When finished, press EXIT. Then store the settings.
TO RENAME CHANNEL
Select Rename and press OK. Select channel and press OK, a keypad will appear. Select character and press OK. After naming press EXIT. Then store the settings.
TO MOVE CHANNEL
Select Move and press OK. To move individual channel, press OK twice on the channel. This will highlight it in mauve. Then select a position in the list and press OK. To move a group of channels, press OK once on the first channel. Then scroll down wards this will highlight these in mauve. Press OK on the last channel in the group. Select a position in the list and press OK. When finished, press EXIT. Then store the settings.
STORE: After all above settings and exiting, move down to STORE and press OK
SATELLI TE / TP EDIT

Go to EDIT menu and select Satellite / TP Edit. Select Satellite or TP option.
TO ADD A SATELLITE --- Select Satellite option.
Select Add and press OK, a keypad will appear. Select character and press OK.
After naming press EXIT. The new satellite will be entered at the bottom of the list. Now enter the Angle of the satellite using 0-9 keys. After this press EXIT. Then store the settings.
TO DELETE A SATELLITE
Select Delete and press OK, the cursor will move to satellite list. Select the satellite you want to delete and press OK. After this press EXIT. Then store the settings.
TO RENAME A SATELLITE
Select Rename and press OK. Select the satellite you want to rename and press OK. A keypad will appear. Select character and press OK. After naming press EXIT. Then store the settings.
TO SORT SATELLI TE LIST
After adding a satellite select Sort and press OK. The list will be sorted by satellite positions in degrees.
STORE: After all above settings and exiting, move down to STORE and press OK
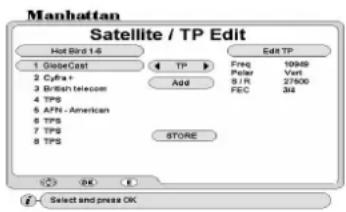
TO EDIT A TP --- Select TP option and press OK
The cursor will move to TP list. Select the TP you want to edit and press OK. Cursor will move to Edit TP. Now enter the Frequency, Polarity, S / R and FEC of the TP. After this press EXIT. Then store the settings.
TO ADD A TP
Select Add and press OK, a keypad will appear. Select character and press OK. After naming press EXIT. The new TP will be entered at the bottom of the list. Now enter the Frequency, Polarity, S / R and FEC of the TP. After this press EXIT. Then store the settings.
TO DELETE A TP
Select Delete and press OK, the cursor will move to TP list. Select the TP you want to delete and press OK. After this press EXIT. Then store the settings.
TO RENAME A TP
Select Rename and press OK. Select the TP you want to rename and press OK. A keypad will appear. Select character and press OK. After naming press EXIT. Then store the settings.
TO SORT TP LIST
Select Sort and press OK. This will sort the TP list in the order of lowest frequency first.
STORE: After all above settings and exiting, move down to STORE and press OK
RECEI VER TO RECEI VER COPY FUNCTION
You can copy the channel and user settings onto another receiver of the same model. Follow below steps.
- Connect download cable to 'RS232' connectors (R11) on both the receivers.
- Connect power to the master receiver from which you want to copy the data and switch it on. Go to INSTALL menu and select Data Download. Enter your password and the menu will open. Select STB to STB Download and press OK.
-
Power on the slave receiver on which you want to copy the data. This receiver will then display the loader menu and the download progress.
-
When finished the slave receiver will reboot and come up with a channel.
TROUBLE SHOOTING GUI DE
If you suspect there is a problem with your receiver, please check the following trouble shooting guide before calling a Manhattan authorised service agent.
WARNING! Do NOT attempt to repair the receiver yourself. Tampering with the receiver may result in fatal electric shock and will invalidate your warranty.
Symptoms --- Possible cause / solutions
Front display not lit --- Check that the mains lead is plugged into the power socket. Check that your TV is tuned for the correct UHF channel or is switched to correct AV input.
No picture or sound or any menus --- No signal. Channel is scrambled. The antenna is not in correct position. Check LNB wire is not damaged or shorting. Check LNB may be faulty. Unplug receiver from power socket and retry.
Interference, on picture, using UHF output --- Local terrestrial TV interference. Change the UHF output channel to different one then re-tune your TV. Select the appropriate 'TV Standard' using TV Settings menu.
Bad picture with blocking or frozen --- Signal weak or noisy. Check signal quality. Antenna not in correct position
Not responding to remote control --- Check the batteries in your remote control. Replace with new.
You have lost or forgotten your password --- Apply master password or contact your Manhattan dealer.
SPECIFICATIONS
TUNER
| Input Connector | F-type IEC 169-24 Female |
| Frequency Range | 950MHz to 2150MHz |
| Input Impedance 75 Ohm | |
| Signal Level | -25 to - 65 dBm |
| LNB Power & Polarization Protection) | Vertical +14V, Horizontal +18V (600mA Max. with Overload |
| LNB Control | 22KHz ± 4 KHz, Tone burst A/B and DiSEqC 1.2 |
| 22 KHz Tone Amplitude | 0.6Vpp (±0.2V) |
| Input Symbol Rate | 2~45 Msps |
| FEC Decoder | Auto, 1/2, 2/3, 3/4, 5/6, 7/8 |
SYSTEM
| Transmission Standard | DVB MPEG-2 |
| Input Data Rate | Max 15Mb/s |
| Aspect Ratio | 4:3, 16:9 |
| Video Resolution | 720 x 480 NTSC, 720 x 576 PAL |
| Audio Decoding | MPEG Layer 1 & 2 |
| Audio Mode | Single channel / Dual Channel/Joint Stereo / Mono |
| Sampling Rate | 32KHz, 44.1 KHz, 48 KHz, 96 KHz, |
COMMON INTERFACE (optional)
| Slots | 2 slots type 1 and type 2 |
| PCMCIA | DVB Common Interface Standard |
I RDETO EMBEDDED CI (optional)
| Card Slot | 1 Slot |
| PCMCIA | DVB Common Interface Standard |
| CONNECTORS | |
| RGB, CVBS | 2 SCART sockets (TV/VCR), 1 PHONO RCA |
| Audio Output | 2 SCART sockets (TV/VCR), 2 x PHONO (L, R) / RCA |
| Digital Audio Output | 1 PHONO RCA (S/P DIF) |
| Data Interface | 1 RS232 (Bit Rate: 115,200 baud Connector: 9-pin D-sub type) |
| RF connectors | 75 Ohm IEC 169-2 Male/Female |
RF MODULATOR
Frequency 470MHz to 860 MHz
Channel Range UHF CH21 to 69
TV standard PAL BG/ I /K PAL M, NTSC M
POWER SUPPLY
Input Voltage 100 -- 240 V AC, 50/60Hz \~
Type SMPS
Power Consumption Max 30W
Protection Separate Internal Fuse
PHYSICAL DIMENSIONS
Size (W X H X D) 300 X 67 X 240 mm
Eurosat ® and Manhattan ® are registered trademarks of Eurosat Distribution Ltd. Eurosat reserves the right to alter product specifications without prior notice.
MASTER PASSWORD 6699
This is the master password for your receiver. Cut this section out and keep it in a safe place. It will be useful later if you forget or lose your password:
- MANHATTAN® TECHNOLOGY WITH VISION
- PLAZA MODELS
- ST 100 / ST 120 ST 200 / ST 300
- CONTENTS
- INTRODUCTION
- FEATURES
- MODELS WITH CI AND IR (IRDETO)
- SAFETY NOTICE
- DANGER: HIGH VOLTAGE! RISK OF ELECTRIC SHOCK
- REAR PANEL CONNECTIONS
- CONNECTORS AND DEFINITIONS
- FRONT PANEL CONTROLS
- CONTROLS AND DEFINITIONS
- REMOTE CONTROL FUNCTIONS
- OPERATION IN PROGRAMMING MODE
- INSTALLATION
- TUNING YOUR TV TO UHF OUTPUT
- MAIN MENU
- TV SETTINGS
- TIME SETTINGS
- EVENT TIMER
- INSTALL MENU
- CONFIGURING YOUR ANTENNA
- LNB POWER
- EXAMPLE: TO CONFIGURE FOUR LNB
- EXAMPLE: TO CONFIGURE MONOBLOCK LNB
- CONFIGURING WIDEBAND LNB
- DISEQC 1.2 MENU (MANUAL POSITIONER)
- LOCATING PRE-STORED SATELLITES
- RE-SYNC
- DISEQC USALS MENU (AUTOMATIC POSITIONER)
- ADD OR EDIT A TP
- NOTE: SIGNAL AND QUALITY (CHANNEL SEARCH MENU)
- POSITIONER: MOVE DOWN TO POSITIONER AND SELECT DISEQC USALS
- CHANNEL SEARCH: MANUAL SCAN AND SEARCH
- TUNING WIDEBAND LNB (CONFIGURE LNB AS DESCRIBED EARLIER)
- NOTE: MECHANICAL OUTPUT CONNECTORS NOT PROVIDED WITH THIS MODEL. THE SKEW SHOULD BE ADJUSTED BY EXTERNAL MEANS
- ADVANCE SEARCH: SPECIAL FEATURE
- TUNING WI DEBAND LNB (IN ADVANCE SEARCH)
- TO CHANGE CHANNEL OR SATELLITE
- TO SELECT A CHANNEL WITHIN THE SAME SATELLITE
- TO SELECT A CHANNEL FROM ANOTHER SATELLITE
- SORTING THE CHANNEL LIST
- SATELLI TE LIST
- SELECTING RADIO CHANNELS
- CONDITIONAL ACCESS (FOR MODELS WITH CI)
- VIEWING SCRAMBLED CHANNELS
- COMMON INTERFACE
- I RDETO CARD SLOT -- FOR MODELS WITH EMBEDDED I RDETO SYSTEMS
- UPGRADING SOFTWARE
- CHECKING SOFTWARE DOWNLOAD VERSION
- UPGRADING SOFTWARE VIA PC
- TELETEXT FUNCTION
- TO SELECT SUBTITLES ON A CHANNEL
- TO SELECT AUDIO LANGUAGE
- TO ACTIVATE SLEEP TIMER
- CHANNEL BANNER
- ELECTRONIC PROGRAM GUIDE (EPG)
- INSTALLING FAVORITE CHANNELS
- TO DELETE A FAVORITE CHANNEL
- VIEWING FAVORITE CHANNELS
- TO RESET YOUR RECEIVER TO DEFAULT SETTINGS
- TO LOCK MENU AND CHANNELS
- CHANNEL EDIT
- TO LOCK CHANNELS
- TO DELETE CHANNELS
- TO RENAME CHANNEL
- TO MOVE CHANNEL
- STORE: AFTER ALL ABOVE SETTINGS AND EXITING, MOVE DOWN TO STORE AND PRESS OK
- SATELLI TE / TP EDIT
- TO ADD A SATELLITE --- SELECT SATELLITE OPTION
- TO DELETE A SATELLITE
- TO RENAME A SATELLITE
- TO SORT SATELLI TE LIST
- TO EDIT A TP --- SELECT TP OPTION AND PRESS OK
- TO ADD A TP
- TO DELETE A TP
- TO RENAME A TP
- TO SORT TP LIST
- RECEI VER TO RECEI VER COPY FUNCTION
- TROUBLE SHOOTING GUI DE
- SYMPTOMS --- POSSIBLE CAUSE / SOLUTIONS
- SPECIFICATIONS
- RF MODULATOR
- POWER SUPPLY
- PHYSICAL DIMENSIONS
- MASTER PASSWORD 6699
Brand : MANHATTAN
Model : Plaza ST 100
Category : Satellite receiver