
SF-9345 - Heating ALPINA - Free user manual and instructions
Find the device manual for free SF-9345 ALPINA in PDF.


| Product Type | Portable Kerosene Heater (Convection) |
| Model Number | SF-9345 |
| Brand | Alpina |
| Dimensions (W x D x H) | 18.7 x 18.7 x 22.5 inches |
| Weight (empty) | Approx. 28 lbs |
| Fuel Type | Water-clear 1-K Kerosene only |
| Tank Capacity | 1.9 US gallons |
| Max Fuel Consumption | 0.14 US gallons per hour |
| Max Heating Output | 4400 kcal/hr |
| Continuous Combustion Time | Approx. 8–12 hours |
| Wick Height (burning) | 25/64 inch (10 mm) |
| Ignition System | Automatic (requires 2 C batteries) or match |
| Safety Features | Automatic safety shut-off device (pendulum-based), manual shut-off knob |
| Controls | Wick adjuster knob, ignition lever, burner knob |
| Construction | Metal cabinet with guard grille, top plate, drip tray |
| Maintenance Requirements | Regular dry burning to remove carbon; periodic wick replacement |
| Storage | Store with wick lowered, safety device deactivated, in dry ventilated area |
| Warranty | Refer to manufacturer |
Frequently Asked Questions - SF-9345 ALPINA
User questions about SF-9345 ALPINA
0 question about this device. Answer the ones you know or ask your own.
Ask a new question about this device
Download the instructions for your Heating in PDF format for free! Find your manual SF-9345 - ALPINA and take your electronic device back in hand. On this page are published all the documents necessary for the use of your device. SF-9345 by ALPINA.
USER MANUAL SF-9345 ALPINA
SF-9345
EN SF-9340 Portable Kerosene Heater
EN: For your own safety read these instructions carefully before using the appliances.
Before using your heater, basic safety precautions should be followed:
- Never use any fuel other than water-clear 1-K kerosene.
- Never use fuel such as gasoline, benzene, paint thinners or other oil compounds in this heater.
- Never use refill heater fuel tank when heater is operating or still hot.
- Never use heater in areas where flammable vapors or gases may be present.
- Never fill heater fuel tank in living space; fill tank in outdoors.
- Never store or transfer kerosene other than metal or plastic container that is acceptable for kerosene, Non-red in color, and clearly marked 'Kerosene'. Do not store kerosene in living space; It should be stored in a Well ventilated place outside the living area.
- The unit is Extremely hot while in operation due to hight surface temperature, Keep children, clothing, furniture, and other combustible objects at least 36" away from top and front area.
- Never leave heater operating if you intend to leave for any period of time. Always make sure to turn heater off and inspect to insure that is completely extinguished prior to going to bed.
- Never use as a source of heat for drying objects.
- Never place objects on the top plate.
- Never use heater to heat or boil water or use as a cooking appliance.
- Never leave heater unattended while burning.
WARNING: FAILURE TO INSTALL, MAINTAIN, AND/OR OPERATE THIS KEROSENE HEATER ACCORDING TO MANUFACTURER'S INSTRUCTIONS MAY RESULT IN CONDITIONS WHICH CAN INJURE BODY AND/OR PROPERTY DAMAGE.
RISK OF BURNS: DO NOT OPERATE THE HEATER WITHOUT THE GUARD OR GRILLE COMPLETELY ATTACHED.
IF POOR QUALITY KERSONE is used a rapid accumulation of carbon and tar is likely. This may cause a strong odor and will destroy the wick. Additional heater damage may occur as the wick becomes more difficult to adjust. The use of poor quality fuel could also make the wick very hard to extinguish. Always make sure the fire is out.
ADJUSTMENT OF ROOM TEMPERATURE cannot be changed by adjusting the heater. A kerosene heater is either on or off. There is no temperature adjustment if heater output is reduced by lowering the wick in any way, improper combustion will occur producing odors and an accumulation of tar and carbon. If your room becomes too hot, open a door or a window or turn off the heater.
NOTE: The WARNING and IMPORTANT instructions appearing in this manual are not meant to cover all possible conditions and situations that may occur. It must be understood that commonsense, caution, and carefulness are factors which cannot be built into this heater. These factors must be supplied by the person(s) installing, maintaining, or operating the kerosene heater.
Always contact your dealer, distributor, service agent, or the manufacturer on any problems or conditions you do not understand.
PARTS OF DESCRIPTION
- Top plate
- Carrying handle
- Guard grille
- Fuel gauge
- Ignition lever
- Burner
- Wick adjuster knob
- Fuel cap
- Battery case (Back side)
- Drip tray
- Manual shut-off knob

ENGLISH
UNPACKING AND ASSEMBLY
- Remove the heater and all packing materials from the box.
Note: Save the shipping carton and packing materials for future storage
-
Remove the protective packing materials from the burner.
-
Keep all packing materials in the carton box.
-
Position the burner
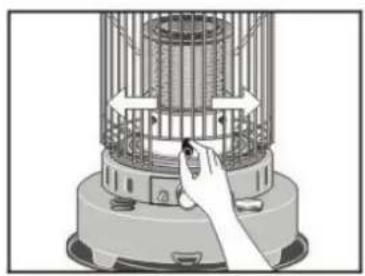
- Position the burner on the wick adjuster.
- To confirm proper placement of the burner, grab the burner knob and rotate the burner back and forth three or four times until burner sets properly on the wick adjuster.
- Installing carrying handle
- Insert the carrying handle into the holes on the bracket of guard grille by aligning holes on top plate.
- Installing drip tray
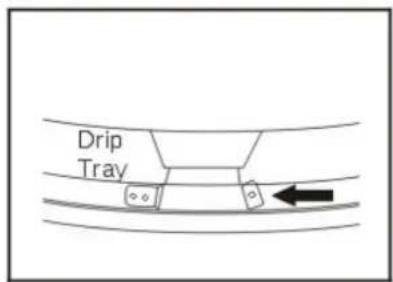
- Place the heater on the drip tray with four legs (4) of the heater located next to four tabs (4) on the drip tray.
- Turn the heater clockwise until the feet slide into their tabs and stop
- Installing batteries
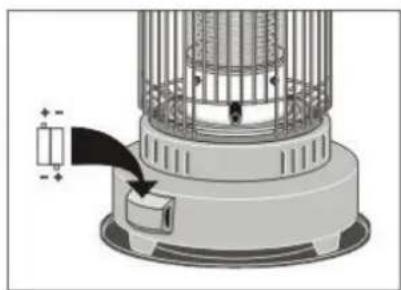
- Battery holder is located on the back of the heater.
- Open the battery cover from the battery case.
- Insert two (2) "C" cell batteries according to the plus (+) and minus (-) markings inside of the holder.
- Replace the battery cover to the heater.


KEROSENE (1-K Only)
It is EXTREMELY IMPORTANT in operating this heater to use the proper grade of kerosene. The proper grade of kerosene is identified as 1-K Kerosene. DO NOT OPERATE THIS HEATER WITH ANY FUEL OTHER THAN 1-K KEROSENE. 1-K Kerosene has been refined to virtually eliminate contaminants such as sulfur, which can cause a rotten egg odor during operation of the heater.
1-K KEROSENE IS COLORLESS AND WATER-CLEAR.
To be sure that you are using good, 1-K Kerosene, pour some in a glass to verify that there is no visible yellow tint.
KEROSENE SHOULD ONLY BE STORED IN A BLUE CONTAINER THAT IS CLEARLY MARKED "KEROSENE". DO NOT STORE KEROSENE IN A RED CONTAINER. Red containers are associated with gasoline.
NEVER store kerosene in living space. Kerosene should be stored in a wel ventilated place outside the living area.
NEVER use any fuel other than water-clear 1-K Kerosene.
NEVER use fuel such as gasoline, benzene, alcohol, white gas, camp stove fuel, paint thinners, or other oil compounds in this heater. These are volatile fules that can cause explosion or uncontrolled flames.
The best way to purchase kerosene is in pre-packed, metal or plastic, blue colored container.
The second choice would be to buy from a dealer who stores it in a 55 gallon drum. The third choice is to buy it from a dealer who stores it in a large underground(or above ground)tank. Kerosene that is contaminated with even a small amount of water will prevent a kerosene heater from functioning properly. As you move from the first choice in purchasing kerosene (pre-packed container) to the third choice(large storage tank), The likelihood of water being present from condensation increases. If you purchase kerosene in bulk, know your dealer.
It is normal for a kerosene heater to give a slight odor upon start-up and shut-down. After 5-10 minutes of operation, the heater should have reached its normal operating temperature and any odor should be very slight.
NEVER store kerosene in direct sunlight or near surface of heat.
NEVER use kerosene that has been stored from one season to the next. Kerosene deteriorates over time.
"OLD KEROSENE WILL NOT BURN PROPERLY IN THIS HEATER.
A variety of problems can result from using poor quality kerosene – smoke, odor, low flame, difficult ignition, difficult shutdown, flame flickers and dies, excessive burning down of the wick, reduced wick life, wick adjuster sticking, excessive deposits on the wick, etc. If you encounter any of the problems listed above, check your kerosene. If you discover that the kerosene is the problem, get a fresh supply of WATER-CLEAR 1-K KEROSENE before using your heater again.
FUELLING YOUR HEATER
NEVER FILL THE HEATER FUEL TANK IN THE LIVING SPACE:
FILL THE TANK OUTDOORS.
Before fueling the heater, take the heater, the kerosene, and the manual siphon pump outdoors. To use the manual siphon pump, tighten the cap on the top of the siphon, place the straight tube into the kerosene container, and insert the flexible tube in to the opening of the fuel tank. By squeezing the bulb of the siphon pump, fuel will be transferred from the kerosene container into the heater tank. Carefully watch the fuel gauge on the base of the heater so that you will know when the tank is getting full. When you approach the full mark, loosen the cap on top of the siphon pump. This will stop the flow of the kerosene.
DO NOT OVERFILL YOUR HEATER.

ENGLISH
Allow the siphon pump to drain thoroughly before you remove it from the tank and the kerosene container.
After fueling the fuel tank of the heater by using siphon pump, make sure that you loosen (counter clockwise) the cap on the siphon pump to drain thoroughly the remaining kerosene in the siphon pump.
For the reuse of siphon pump, make sure that you tighten (clockwise) the cap on the siphon pump to transfer the kerosene into the fuel tank properly.

IMPORTANT NOTICE REGARDING FUELING OF THE HEATER: When fueling your heater for the first time and any other time when the tank has been completely empty, as in Dry Burning, make sure to allow the wick to soak a minimum 60 minutes before you attempt to light the heater. (Take note of the time you started to soak the wick or use a kitchen timer or wristwatch with an alarm feature). Failure to properly soak the wick can trap air pockets in the wick causing the heater to burn poorly. Premature ignition can destroy your wick.
IMPORTANT NOTICE REGARDING FIRST IGNITION OF HEATER
The first time you light your heater there may be some odor due to the burning off of oils used in the manufacturing process. To avoid this, you may wish to burn the heater outside on a calm and windless day. If it's windy, consider a porch or garage or other room where the windows can be open to disperse the odor.
For safety and convenience, this heater features an automatic ignition system 2 "C" cell batteries, included with the heater, provide the power for the igniter which lights the wick once it has been raised to its maximum height.
To use the automatic ignition system:
- Make sure the batteries have been installed.
- Turn the wick adjuster knob clockwise until the wick has been raised into its maximum height
- Push the ignition lever to bring the growing igniter into contact with the wick. This will cause ignition to occur.
- As soon as you see that the wick has been lit, release the ignition lever. This will automatically lower the burn chamber backdown over the wick.
- Rotate the burner knob from side to side a few times to make sure that the burner is positioned properly on the wick adjuster.
- Then begin following the steps outlined in "Adjusting the wick".


IGNITION VIA MATCH
If you encounter a problem with the ignition mechanism, or if you have dead batteries, it is possible to light the heater with a match.
The procedure is as follows:
— Turn the wick adjuster knob clockwise until the wick has been raised to its maximum height.
— Lift the burn chamber by using the burner knob.
- Touch a lighted match to the exposed top edge of the wick.
- Once you see that the wick has been lit, lower the burn chamber back down over the wick.
- Rotate the burner knob from side to side a few times to make sure that the burner is positioned properly on the wick adjuster.
— Then begin following the steps outlined in "Adjusting the wick".

CAUTION: Make sure that you do not leave the match, or any portion of it (match head, etc.) in the burner area. Debris left from the match can cause an uneven alignment of the burner and may result in smoke, incomplete combustion, odor, or fire.


CHECKING THE IGNITION SYSTEM
If the automatic ignition system fails to operate properly, Perform the following methods:
— BATTERIES -2 "C" cell batteries are located at the rear of the heater. Replace with new batteries.
- IGNITER PLUG – If the automatic ignition system still doesn't work after replacing the batteries, check the igniter plug. If the glow coil filament is broken, bent, or doesn't glow when engaged via the ignition lever, it must be replaced.
CAUTION: Be sure igniter plug is Type "B", 2.5V DC, IA only.
To replace the igniter plug:
- Remove the batteries.
— Remove the 2 cabinet screws and lift off the cabinet and grille assembly.
— Pull the ignition lever to raise the igniter plug.
— Push the igniter plug in and turn in a clockwise direction to remove.
— Install a new igniter plug (Type "B", 2.5V DC, IA only by pushing it in and turning it in a counter-clockwise direction.
— Reassemble the heater and replace the batteries.
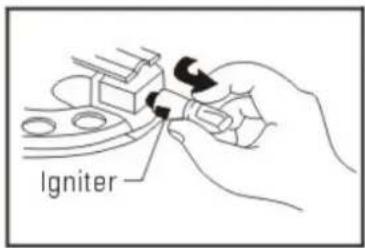
TEST IGNITION – Using the wick adjuster knob, raise the wick to its maximum height. Pull the ignition lever. The igniter plug should be within 1\~2mm of the wick when the ignition lever is fully engaged.
ADJUSTING THE WICK
After lighting the heater, it is important to check the heater flame within the first 5-7 minutes of operation. During the first 5 minutes after ignition, the burner chamber warms up and flames will become visible at the top of burner. These flames will gradually build up. After 5-7 minutes of operation, you should use the wick adjuster knob to obtain the proper flame height. The proper flame height is a flame of no more than 1/2" at the top of the burner, with an even distribution of flame around the flame spreader disk which is positioned in the center of the top portion of the burner.
ENGLISH
As you continue to operate the heater, the temperature of the heater and the temperature of the room will continue to change. As the heater warms up, the kerosene in the tank will vaporize faster, and this could require adjusting the wick adjuster down in order to maintain the desired 1/2" flame. Therefore, it is necessary to continue to monitor the flame height, and to make adjustments using the wick adjuster knob to keep the proper flame height. It is recommended that the heater be checked every 30 minutes in order to keep the proper adjustment because periodic adjustment is required.
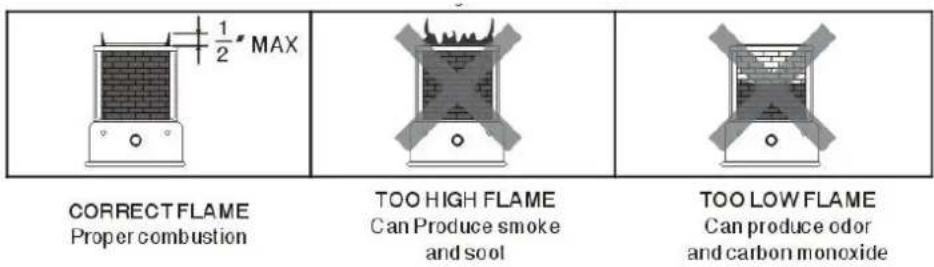
IMPORTANT NOTE: NEVER LEAVE THE HEATER UNATTENDED WHILE BURNING
Always make sure to turn the heater off and inspect it to insure that it is completely extinguished prior to going to bed.
NOTE: During start-up, small adjustments to the flame can be performed by using the burner knob on the front of the burner and MOVING THE BURNER FROM SIDE TO SIDE until the flame at the top of the burner is as even as possible. DO NOT TOUCH THE BURNER KNOB ONCE THE HEATER HAS REACHED NORMAL OPERATING TEMPERATURE AND THE FLAME HAS STABILIZED. THE BURNER KNOB IS VERY HOT DURING OPERATION.
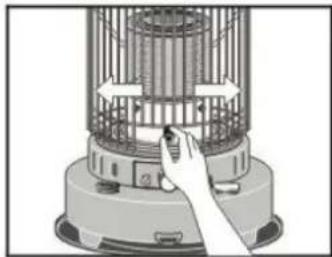
NOTE: If you find that the wick will not raise, push the safety reset lever to engage the safety shut-off device. Then dial the wick adjuster knob.
WARNING: RISK OF INDOOR AIR POLLUTION AND FIRE, DO NOT OPERATE HEATER AT WICK SETTING LOWER THAN MINIMUM WICK-STOP SETTING.
WICK MAINTENANCE / HOW TO CHECK THE CONDITION OF YOUR WICK
Failure to clean your heater's wick may result in low heat output, cause your heater to burn with an annoying odor and could damage or destroy the wick adjusting assembly. It can also make it very difficult to light the wick. Carbon and tar will accumulate on top of the wick as the kerosene burns and must be removed. How often you need to "Dry Burn" depends on your use of the heater and the quality of fuel available. The best way to know is to check the wick often.
Check Your Wick Often!
√ If the wick is hard to light using the heater's ignition system.
√ If the wick is hard to raise or difficult to adjust by turning the knob.
√ If the wick fails to drop completely when you push the shut-off knob.
√ If the top of the wick is stiff and hard like a bristle brush it is time to DRY BURN your heater. A wick that is in good condition will feel soft to the touch, light easily and extinguish quickly.
Note: Poor fuel or fuel contaminated with water will also turn the wick hard.
"DRY BURNING" YOUR HEATER / REMOVING CARBON FROM YOUR WICK
"Dry burning" your heater will cause a strong odor. For this reason it is best to "dry burn" your heater outdoors on a day that is completely calm and windless. If it's too windy outside you can consider a porch, breezeway or other room with all of the windows open to disperse the strong odor.
Step 1 With your fuel tank nearly empty, burn your heater (without refueling) until the flames starts to burn out then raise the wick to its highest possible setting and leave it there until it burns out completely. Wait 60 minutes then re-light the wick (with a match if necessary) and allow it to burn out again. Once the heater is cool to the touch, remove the cabinet and brush the top of the wick with an old toothbrush, or other stiff bristle brush to remove any remaining ash. A canister type vacuum cleaner may be a useful tool in removing this ash.
Step 2 The first step should remove most carbon and your wick should feel softer to the touch. If any part still feels hard, you can use small pliers to pinch these hard spots and breakup the carbon into pieces. After doing this, replace the cabinet, add a small amount of fuel, wait at least one hour and then repeat Step 1.
Carry out Carbon Removal/Dry Burning within 5-7 days after your first use of your new heater to reduce carbon build-up on the wick's burning surface. Afterwards, Dry burn your heater anytime the wick appears to be hard. CHECK YOUR WICK OFTEN! Dry burn your heater and remove all fuel from your heater at the end of the heating seasonl.
Note: Burn your heater Dry, as noted above, weekly during the heating season. Check your wick often to see if CARBON REMOVAL/DRY BURNING is necessary. Carbon removal will NOT be effective if your fuel has been contaminated by water or any other liquid. In this case you must clean the fuel tank, replace the wick and soak it for 60 minutes in Fresh, 1-K Kerosene.
WICK ASSEMBLY – Check at least once a month !!
The burner assembly sits on top of the wick guide. Over time, tar deposits can accumulate on the wick guide, and this can prevent the burner assembly from searing properly. This can result in poor combustion, smoke, odor, etc.. To prevent this from happening, tar deposits on the wick guide can be removed as follows:
- Make sure that the heater is both cool and turned off, lower the wick to the "off" position.
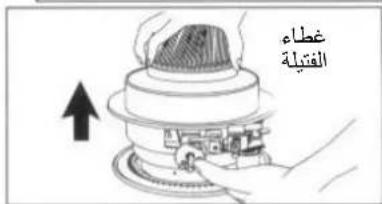
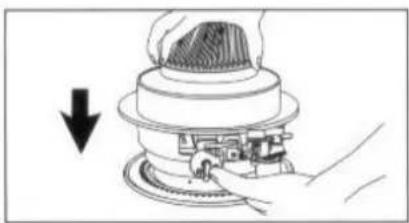
– Remove the 2 cabinet screws. Lift off the cabinet and grille assembly as shown in illustration (Fig. A).
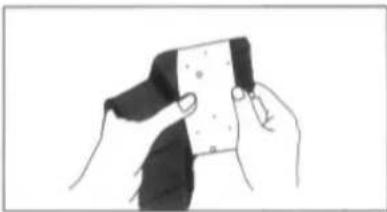
- Using the wick adjuster knob, raise the top of the wick until it is even with the top of the wick guide. Using a fat-edge screwdriver, scrape off the tar deposits. Be careful not to allow any of the tar deposits to drop into the grooves of the wick guide. A small vacuum cleaner can be used to remove the tar deposits that have been scraped off (Fig. B).
- Reassemble the heater.

Fig. A

Fig. B
WICK REPLACEMENT
The wick in your heater needs replacing if, after repeated cleanings, any of the following conditions still exist slow to light hard movement of the wick adjuster knob, kerosene odor while burning, low heat output, slow warm up, damaged wick.
Use only a genuine replacement wick.
ENGLISH
If cleaning the wick does not improve performance, you will need to replace the wick. Refer to the "TROUBLESHOOTING GUIDE", which outlines conditions under which the wick should be replaced.
CAUTION: Use only a genuine replacement wick. DO NOT attempt to substitute any other type of Wick device or a Wick designed for another brand or model heater. You could damage the heater and create a potential fire hazard.
ATTENTION: The only tools needed to replace the Wick are:
- A Pair of Pliers
• A Flatblade Screwdriver
• A Plastic Bag with a Twist Tie
-
Push down the manual shut-off knob.
-
Use Pliers to loosen and remove cabinet screws on either side of the Heater Cabinet.
-
Use the Carrying Handle to lift the Cabinet straight up and away from the heater.
-
Gently pull the Wick Adjustment Knob off the heater.
-
Remove the Cabinet Base by lifting it from the back and tilting it forward to clear the Wick Adjuster Assembly
-
Trip the pendulum on the Automatic Safety Shut-off system to activate it.
-
Remove the four wing nuts which hold the Wick Assembly to the heater and carefully lift the Wick Assembly from the heater.
-
Replace the Wick Adjustment Knob temporarily. Turn the Knob clockwise to raise the wick.
-
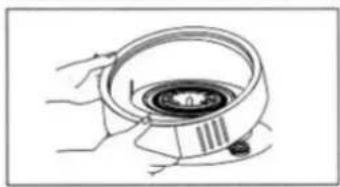
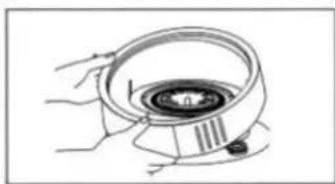
While still holding the Wick Assembly upside down, grasp the Wick Cover firmly and PULL it off with a sharp tug. CAUTION: The inside of Wick Cover has sharp teeth. The use of work gloves is suggested to avoid injury




-
Remove the wick while folding it to the inside. Remove the Wick Sleeve together with the wick.
-
Reinstall a new wick and insert the 3 pins on a new wick into the 3 holes on the Wick Sleeve in the upward direction. (See the marked “ up” on the Wick Sleeve).
-
Push the new wick into the retainer teeth of the Wick Sleeve so that the wick adheres tightly around the inside of the Wick Sleeve so that it is not loose anywhere.
NOTE: DO NOT DISASSEMBLE THE STAINLESS STEEL WICK HOLDER.
- While pressing each of the three pins of the wick (attached to the wick sleeve) toward the inside, insert the three Pins into the slanted grooves of the Wick Guide. Press on each of the three pins, inserting them securely in the holes.
NOTE: Turn the Wick Adjustment Knob and check that the Wick moves up and down.
- The Wick height will automatically be set to the correct burning height of 3/8" (10mm).
NOTE: Be sure to check Wick height it should be 3/8" (10mm).
-
Turn the Wick Assembly upside down to replace the Wick Cover.
-
Align the tabs on the wick cover with the four screw holes on the Bottom of the Assembly, as shown, and snap it into place. Be certain of firm contact at all points.
-
Turn the Wick Adjustment Knob to the fully raised position. Pull lightly on the skirt of the wick to remove any slack. Press lightly to secure the skirt to the Retainer Teeth on the Wick Cover.
ENGLISH
-
Replace the Wick Assembly on the heater with the Wick raised. Be sure the rubber seal on tank is properly seated. You will need to hold the knob in the clockwise position to keep the Wick raised. The Wick adjuster knob will need to be positioned between the Caution and Warnings labels. Replace two diagonally opposite Wing Nuts first, then the remaining two. Tighten each of the four Wing Nuts gradually until the Wick assembly is firmly in place.
-
While your heater is disassembled, check the Automatic Safety Shutoff System. Trip the Automatic Shutoff System by nudging the Pendulum. Raise the wick by turning wick adjuster knob. Trip it again to make certain it is operating correctly.
-
Turn the Wick Adjustment Knob to test its operation. Be certain the Wick operates smoothly as the Knob is turned CLOCKWISE and COUNTER-CLOCKWISE.


- Remove Wick Adjustment Knob which you had temporarily replaced to test Wick operation.
- Replace the CABINET BASE making certain to align the Automatic Safety Shut-off System Lever and the Wick Adjustment Shaft, which holds the Knob, with the appropriate slots in the CABINET BASE. Begin by aligning them and gently snap the CABINET BASE in place over the Wick Assembly.
- Replace the heater Cabinet. Make certain the Guard Grille prongs are inserted securely into the proper holes in the heater and the Front Cabinet matches the front of the heater.
- Fasten the Cabinet to the heater with the two screws.
- Replace the Wick Adjustment Knob. To be certain it is properly positioned on the Wick Adjustment Shaft, raise the Wick to its full height.
- Be sure to check that the wick is set at the correct height of 3/8" (10mm) after reassembling the heater.
EXTINGUISHING THE HEATER
To extinguish the heater, push down on the manual shut-off knob with one hand while holding the wick adjuster knob in the other hand. You will feel the pressure of spring action attempting to turn the wick adjuster knob in a counter-clockwise direction in your hand. By slowly relaxing your grip on the wick adjuster knob, you will allow the spring to gradually lower the wick and extinguish the flame. When there is no further pressure from the spring action, confirm that the wick has been fully lowered by turning the wick adjuster knob in a counter-clockwise direction as far as it will go. After 10-15 seconds, open the door on the body of the heater, lift the burner using the burner knob, and visually confirm that there are no flames present. This will confirm that the heater is completely extinguished.

CAUTION: After extinguishing the heater, allow at least 10 minutes before reigniting the heater. This allows the heater time to cool off and return to a normal temperature. Failure to allow the 10 minute cooling off period before reigniting the heater will result in the creation of a strong odor and possible flare-up.
WARNING: Carbon and tar can build up on the wick after the heater has been in use for a while. This can interfere with the ability of the wick to be lowered into the body of the heater, and can result in the flame not extinguishing completely. It is the responsibility of the owner to inspect the wick, to maintain proper maintenance of the wick, and to replace the wick when necessary in order to prevent the build up of carbon and tar from creating a dangerous situation where the heater does not fully extinguish.
AUTOMATIC SAFETY SHUT-OFF DEVICE
This heater is equipped with an automatic safety shut-off device. The purpose of this device is to quickly and efficiently shut-off the heater should the heater be jarred or flipped over while in operation. This is the main safety system that is built into the heater, and it functions to prevent the flame from spreading if the heater is knocked over.
The automatic safety shut-off device is built into the mechanism that raises and lowers the wick. It has been designed so that if the pendulum is jarred by a shock of some sort, it retracts a latch from the wick control shaft ratchet, and a torsion spring reacts to drop the wick to its fully lowered position. This rapid lowering of the wick extinguishes the flame.
If you find that the wick will not raise, push the safety reset lever (see diagram – Fig. 1) to engage the automatic safety shut-off device. Then dial the wick up via the wick adjuster knob.
IMPORTANT NOTICE: For the safety shut-off device to function properly, the wick must be free of carbon and tar deposits. Regularly performing the Carbon Removal/Dry Burning" procedure described in the "Wick Maintenance" and Carbon Removal/Dry Burning" is very important to the proper functioning of this important safety device.
IMPORTANT NOTICE: PLEASE CHECK THE SAFETY SHUT-OFF DEVICE ONCE A WEEK DURING THE HEATING SEASON TO INSURE THAT IT IS FUNCTIONING PROPERLY.
IMPORTANT NOTICE: EVERY TIME THE WICK IS REMOVED OR REPLACED, THE SAFETY SHUT-OFF DEVICE MUST BE TESTED TO INSURE THAT IT IS FUNCTIONING PROPERLY.
TESTING THE SAFETY SHUT-OFF DEVICE: At least once a week during the heating season, it is important to test the safety shut-off device to be sure that it is operating properly. WITH THE HEATER TURNED OFF, raise the wick using the wick adjuster knob to the fully raised position. Grabbing the protective grille, give the heater a firm shake. If the safety shut-off device is working properly, you will hear a loud noise as the ratchet is disengaged and the torsion spring drops the wick into the body of the heater. To verify that the wick has been completely lowered, turn the wick adjuster knob in a counter-clockwise direction. If the safety shut-off device is functioning properly, the wick will have been completely lowered, if you are able to lower the wick further using the wick adjuster knob, this means that it is time to perform the "Carbon Removal/Dry Burning" procedure again.
LONG TERM STORAGE OF YOUR HEATER
Carefully following the instructions for storage given below will insure that your heater will operate efficiently and safely next season.
- Using a small amount of kerosene, swirl and rinse the inside of the tank. NEVER mix water with the kerosene as it will cause rust inside the tank. Pour the kerosene out making sure that you remove it all.
- With the fuel tank empty, ignite the heater. With the wick at its maximum height, keep the wick burning until it burns out completely (about 1 hr). It is a good idea to do this outside or in an extremely well-ventilated area.
- Remove the 2 cabinet screws and lift off the cabinet and grille assembly. Remove the burner. Remove the wick adjuster from the fuel reservoir. Thoroughly dry the inside of the fuel tank. Using a screwdriver and/or a brush, remove any carbon, tar or soot that might have accumulated on the wick adjuster, wick guide or burner.
- After a thorough cleaning, reassemble the heater. It is important when reassembling the wick adjuster to be sure to maintain an equal gap between the wick adjuster and the wick guide cylinder all around.
- See "Wick Replacement" section for reference.
— Store the heater with the wick in the fully lowered position and the safety shut-off device deactivated. - Store the heater in the original box with the original packing material and keep the OWNER'S MANUAL with the heater. Store in an area that is well-ventilated.
TROUBLESHOOTING GUIDE
| TROUBLES | CORRECTIVE ACTION |
| HEATER WILL NOT LIGHT:1. Fuel tank is empty2. Water present in kerosene | 1. Fill tank with water-clear 1-K kerosene.2. Drain tank. Remove wick assembly & replace wick. Reinstall wick assembly. Fill tank with water-clear 1-K kerosene. |
| HEATER PRODUCES SMOKE OR ODOR:1. Flame is too high2. Heater is in an air draft3. Burner is not level4. Carbon or tar builtup on wick5. Contaminated kerosene | 1. Using wick adjuster knob, lower wick to desired 1/2" flame.2. Move heater out of air draft.3. Using burner knob, rotate burner from side to side until it seats properly over wick.4. Perform "Carbon Removal/Dry Burning" procedure. Replace wick if necessary.5. Drain tank. Remove wick assembly & replace wick. Reinstall wick assembly. Fill tank with water-clear 1-K kerosene. |
| FLAME FLICKERS OR DIES:1. Water present in kerosene2. Carbon or tar built up on wick | 1. Drain tank. Remove wick assembly & replace wick. Reinstall wick assembly. Fill tank with water-clear 1-K kerosene.2. Perform "Carbon Removal/Dry Burning" procedure. Replace wick if necessary. |
| WICK BURNING DOWN EXCESSIVELY:1. Dangerous, volatile fuel mixed with kerosene (gasoline, benzene, alcohol, white gas, paint thinner, camp, stove fuel, oil compound) | 1. Drain and clean tank– Remove and replace wick– Fill tank with water-clear 1-K kerosene. |
| WICK ADJUSTER STICKS:1. Water present in kerosene2. Carbon or tar builtup | 1. Drain tank. Remove wick assembly & replace wick. Reinstall wick assembly. Fill tank with water-clear 1-K kerosene.2. Perform "Carbon Removal/Dry Burning" procedure. Replace wick if necessary. |
| WICK WILL NOT RAISE: | – Push the safety reset lever (see diagram – Fig. 1) to engage the automatic safety shut-off device.Then dial the wick up via the wick adjuster knob. |
| HEATER IS ENVELOPED IN FLAMES: | – Call Fire Department– Smother flames with fire extinguisher or sand. Otherwise smother flames with blankets and then throw water on blankets. Do not throw water directly on the heater itself. |
Specification
Model No. : SF-9345
Product Size : 22.5in x 18.7in x 18.7in
Weight (empty) : Approx. 28lbs
Wick Height : 25/64IN. (10mm)
Tank Capacity : 1.9 U.S. gallons
Max Fuel Consumption : 0.14 U.S. gallons/hr
Heating Output : Max. 4400Kcal/hr
Continuous Combustion time : Approx. 8-12 hrs.
Type of Heater : Convection
Fuel Tank : Integral
Ejراءات وقائية هامة
- ضبط موضع الحارق.

استبideal الفتيلة







اللغة العربية
10.
باقم بفك كم الفتي


إطفاء المدفاة

- BEFORE USING YOUR HEATER, BASIC SAFETY PRECAUTIONS SHOULD BE FOLLOWED
- PARTS OF DESCRIPTION
- ENGLISH
- UNPACKING AND ASSEMBLY
- KEROSENE (1-K ONLY)
- 1-K KEROSENE IS COLORLESS AND WATER-CLEAR
- KEROSENE SHOULD ONLY BE STORED IN A BLUE CONTAINER THAT IS CLEARLY MARKED "KEROSENE". DO NOT STORE KEROSENE IN A RED CONTAINER. RED CONTAINERS ARE ASSOCIATED WITH GASOLINE
- FUELLING YOUR HEATER
- NEVER FILL THE HEATER FUEL TANK IN THE LIVING SPACE
- FILL THE TANK OUTDOORS
- IMPORTANT NOTICE REGARDING FIRST IGNITION OF HEATER
- IGNITION VIA MATCH
- CHECKING THE IGNITION SYSTEM
- ADJUSTING THE WICK
- IMPORTANT NOTE: NEVER LEAVE THE HEATER UNATTENDED WHILE BURNING
- WICK MAINTENANCE / HOW TO CHECK THE CONDITION OF YOUR WICK
- CHECK YOUR WICK OFTEN
- DRY BURNING" YOUR HEATER / REMOVING CARBON FROM YOUR WICK
- WICK ASSEMBLY – CHECK AT LEAST ONCE A MONTH
- WICK REPLACEMENT
- EXTINGUISHING THE HEATER
- AUTOMATIC SAFETY SHUT-OFF DEVICE
- LONG TERM STORAGE OF YOUR HEATER
- TROUBLESHOOTING GUIDE
- SPECIFICATION
- EJراءات وقائية هامة
- استبIDEAL الفتيلة
Brand : ALPINA
Model : SF-9345
Category : Heating