Use an HDMI cable to connect the HDMI port of the media player to your TV. Ensure the TV is set to the correct input source.
Can I play 4K videos on this device?
Yes, the Hybrid PVR S20 supports 4K video output at 60Hz via HDMI 2.0.
What file formats are supported?
It supports MP4, MKV, AVI, MOV for video; MP3, WAV, AAC, FLAC for audio; JPEG, PNG for images.
How can I update the firmware?
Check the manufacturer’s website for firmware updates. Download the update to a USB drive, insert it into the player, and follow the update instructions in the settings menu.
Why is there no sound from my media player?
Ensure the volume is turned up, the HDMI or audio cable is securely connected, and the TV is not muted. Also check audio output settings on the device.
Can I use an external hard drive with the Hybrid PVR S20?
Yes, you can connect an external hard drive via the USB 2.0 or USB 3.0 port. The player will recognize it as a storage device.
Does this device support Wi-Fi?
Yes, it has built-in Wi-Fi 802.11 b/g/n for wireless network connectivity.
How do I reset the media player to factory settings?
Go to Settings > System > Factory Reset. Confirm the action. This will erase all personal data and restore default settings.
What is the power consumption of the Hybrid PVR S20?
It operates on 5V DC at 2A, consuming up to 10 watts.
Can I use the player without an internet connection?
Yes, you can play local media files from USB drives, SD cards, or external storage without an internet connection.
User questions about Hybrid PVR S20 TizzBird
0 question about this device. Answer the ones you know or ask your own.
Ask a new question about this device
No questions yet. Be the first to ask one.
Download the instructions for your Media player in PDF format for free! Find your manual Hybrid PVR S20 -
TizzBird and take your electronic device back in hand. On this page are published all the documents necessary for the use of your device. Hybrid PVR S20 by TizzBird.
USER MANUAL Hybrid PVR S20 TizzBird
natural_image
White TizzBird device with control panel and indicator lights (no readable text beyond branding)
Rev 1.x
Table of Contents
1 Safety Notice 4
2 Features 5
3 Specifications 6
3.1 S20T 6
3.2 S20A....7
4 Description of Each Part 8
5 Package Contents 9
6 Installation and Connection....10
6.1 Connecting the Video....10
6.2 Connecting the Audio....11
6.3 Connecting USB Device....12
1.1 13
7 Initial Setup....13
7.1 Language Setup....13
7.2 Video Output Setup....14
7.3 Screen Fitting Setup....15
7.4 Network Setup....15
7.5 Time & Weather Location Setup 16
7.6 Theme Setup....17
8 Using Remote Controller....18
9 Firmware Update & Installation of Apps....19
10 Initial Screen 20
10.1 Turning On Power 20
10.2 Home Screen....20
10.3 Audio Settings 21
10.4 Network Settings....22
10.4.1 Configure Wi-Fi Connection 22
10.4.2 Configure Ethernet Connection....23
10.4.3 Configure Manual-IP Ethernet 24
10.5 Turning Power Off, Completely Power Off 25
11 Start-Up and Terminate....26
11.1 Home Screen....26
11.2 Movie Browser 27
11.3 Terminate....27
12 Watching & Recording Digital TV 28
12.1 Scanning Channels 28
12.2 Watching Digital TV 29
12.3 Recording and Time-Shifting 30
13 Watching Movie 31
13.1 Selecting Device 31
13.2 Movie Browser 31
13.3 Movie Browser Menu....32
13.4 To Add Movie Poster 33
13.5 Synopsis Screen....34
13.6 Resume and Bookmark 35
13.7 Color Buttons at Movie Playback 37
13.8 Playback Speed Control 38
13.9 Searching Menu (Time, Chapter, Bookmark) 38
13.10 Playback Information Menu 39
13.11 Subtitle Menu....39
13.12 Audio Menu 39
13.13 Video Parameter Menu 40
13.14 Playback 3D Format Movies....40
13.15 Skip Playback Position....40
13.16 Movie Playback Controller 41
14 Listening Music....42
14.1 Music Browser 42
14.2 Music Playback Screen....43
14.3 Music Playback Menu 43
19.1 Network connection using NFS....60
19.1.1 Downloading TizzNFS Server 60
19.1.2 Executing TizzNFS Server & Configuration....60
19.1.3 Downloading other NFS Server....61
19.1.4 Executing freeNFS Server & Configuration....61
19.1.5 Connecting NFS Server at Device 62
19.2 Network Connection using Samba 65
19.2.1 Activating PC Share....65
19.2.2 Connecting Samba Server at Device 66
20 Firmware Upgrade 69
20.1 Online Upgrade (O.T.A – Over the Air Upgrade) 69
20.2 Local Upgrade....69
20.2.1 Upgrade at Settings Screen....69
20.2.2 Upgrade at File Browser 70
21 How to Fix Booting Failure....71
21.1 Abstract....71
21.2 Repairing by Safe Mode Booting....71
21.3 Repairing by System Recovery Mode....71
21.3.1 Preparation 71
21.3.2 Entering System Recovery Mode 71
22 GNU General Public License 74
1 Safety Notice
natural_image
Illustration of a hand using a pen to press down an electronic device with a red prohibition symbol (no text or labels)
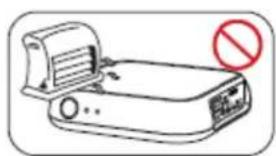
Do not try to disassemble the unit. It may cause malfuncon or re.
natural_image
Simple line drawing of a device with a red prohibition symbol on top (no text or labels)
Keep away the unit from magnezed devices. It may erase the data stored in the connected HDD drive.
natural_image
Illustration of a portable electronic device with a prohibition symbol (no text or labels)
Do not place the unit in places that are exposed to oil, water dust, humidity, rain or wind.
natural_image
Simple line drawing of a portable device with a red prohibition symbol (no text or labels)
Keep away the unit from overheated areas, such as heaters. Place it well venlated locaon. Ensure that a free airow is maintained around the unit.
natural_image
Illustration of a device with a red prohibition sign, showing electrical hazard and power lines (no text or symbols on the device itself)
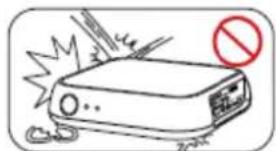
Do not drop or shock the unit from heights. Doing so may cause serious damage to the parts inside.
Do not touch the power plug with wet hands or use defective power cables and electric outlets. It may cause electric shocks or re.
Please install the unit nearby the socket outlet and easily accessible place. Unplug the power cable when the device is not used for a long me.
2 Features
Tizzbird receives and playbacks the terrestrial digital TV at your country. It a supports recording of digital TV program directly or thru EPG. You will not miss any of your favorite programs.
TizzBird provides a full web-browsing capability very similar like PC. Mouse and keyboard can be attached to support various inputs, which enable slick Interr surfing even on the big screen TV.
TizzBird runs applications on TV exact same APPs installed on the Android Smartphone without any conversion. This also includes 3D games or 3D APPs that utilize the superb OPEN-GL 3D accelerator. Some APPs that fixed screen-asper ratio cannot be applicable in some cases.
Tizzbird playbacks various full HD movie contents including HDMV and DVD backup formats as well as AVI, MKV, XVID and TS formats on TV. It supports most recent video formats such as H264 and VC-1. It also supports 3D side-by-side and top & bottom format.
TizzBird playbacks high resolution photo images on TV. It can slideshow the photos while playing back the music in background. Transition effects such as fade-in-out or zooming can be applied during transition of each photo.
TizzBird playbacks high quality lossless music such as FLAC, WAV up to 24bit 96Khz. It also supports compressed MP3, OGG, AAC and CUE.
TizzBird supports Ethernet and optional Wi-Fi 802.11n which enables fastest networking ever before. TizzBird supports NFS, SAMBA, uPnP network protocols to connect various servers.
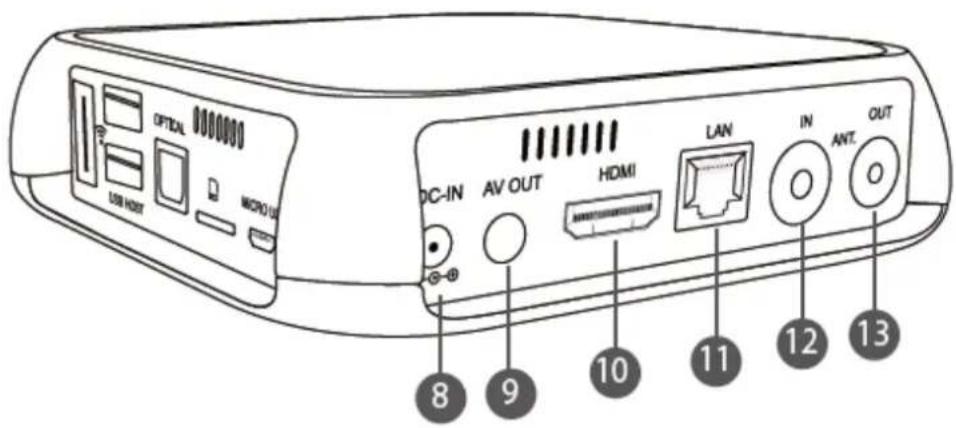
1x Power BuonDVB-T F connector input & pass-thru outputHDMI 1.41x Opcal Digital Audio OutputOne CVBS + analog stereo audio output port 3.5mm pi headphone-jack10/100 Ethernet3x USB 2.0 Host (2x for generic and 1x for Wi-Fi dongle)1x micro-USB port for downloading FW & debugging
Features (PVR)
High performance HD/ H264 recepon/ recordingDecoding/ viewing/ recording of digital terrestrial televisionDigital TV Time-shiingSupports all formats of DVB-T and AS4933.Supports DVB-T 7 days EPGDirect recording to NTFS le system.AirLink (Sending DTV contents to phone over IP) *
Features (Tizzbird)
Automac upgrade of system rmware & applicaons. (OTA)AirLinkTM features✓ Share contents of iPhone, Android phone and tablet on TV✓ Share contents of PC/ NAS on TVPlayback movie les✓ AVI, MPEG1/2/4 (Xvid), .VOB, .DAT, .WMV, .TP, .FLVMKV with H264/VC1/ WMV9Full HD – up to 1920x1080p resoluon3D BD thru HDMI 1.4 & MVCPlayback Music les✓ .MP3, .OGG, .WMA, .AAC, .WAV (PCM), FLACShow Image les✓ .JPG, .JPEG, GIF, PNG, BMPSlideshow while background music playingText Subtle support✓ SMI, .SUB, .SRT, .SSA, .ASS, .UTF, .LRCLanguage✓ Internaonal Languages
1x Power Buon ( Front )F connector antenna input & pass-thru outputHDMI 1.41x Opcal Digital Audio OutputOne CVBS + analog stereo audio output port 3.5mm pi headphone-jack10/100 Ethernet3x USB 2.0 Host (2 for generic and 1 for Wi-Fi dongle)1x micro-USB port for downloading FW & debugging
Features (PVR)
High performance HD/ H264 recepon/ recordingDecoding/ viewing/ recording of digital terrestrial televisionDigital TV Time-shiingSupports all 18 formats of ATSCDirect recording to NTFS le system.AirLink (Sending DTV contents to phone over IP)
Features (Tizzbird)
Automac upgrade of system rmware & applicaons. (OTA)AirLinkTM features✓ Share contents of iPhone, Android phone and tablet on TV✓ Share contents of PC/ NAS on TVPlayback movie les✓ AVI, MPEG1/2/4 (Xvid), .VOB, .DAT, .WMV, .TP, .FLVMKV with H264/VC1/ WMV9Full HD - up to 1920x1080p resoluon3D BD thru HDMI 1.4 & MVCPlayback Music les✓ .MP3, .OGG, .WMA, .AAC, .WAV (PCM), FLACShow Image les✓ .JPG, .JPEG, GIF, PNG, BMPSlideshow while background music playingText Subtle support✓ SMI, .SUB, .SRT, .SSA, .ASS, .UTF, .LRCLanguage✓ Internaonal Languages
File System
NTFS/ FAT32
LAN Connecvity
NFS/ Samba/ DLNA (uPnP) network protocols
Dimension
115 x 115 x 23 mm
Bundles
+5V 2A DC adapterIR remote & AV cable
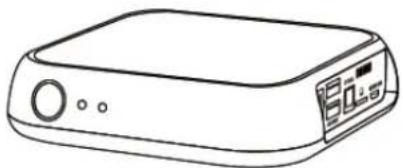
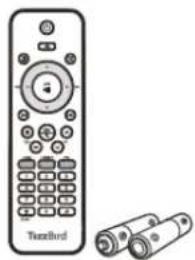
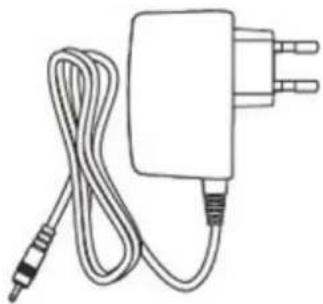
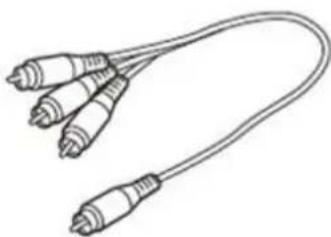
4 Description of Each Part
The TizzBird package contains the following items. The shape of items described below may slightly different from the actual contents.
natural_image
Line drawing of a rectangular electronic device with a control panel and display screen (no text or symbols)
Main Unit
natural_image
Stack of blank paper sheets with no visible text or symbols
Quick Guide
natural_image
Illustration of a TexBird remote control with two cylindrical batteries (no text or symbols on the device itself)
Remote Controller
natural_image
Line drawing of a connected electrical plug with a cable and terminal connector (no text or symbols)
Power Adapter
natural_image
Line drawing of a three-pin audio jack cable (no text or symbols)
AV Cable
6 Installation and Connection
6.1 Connecting the Video
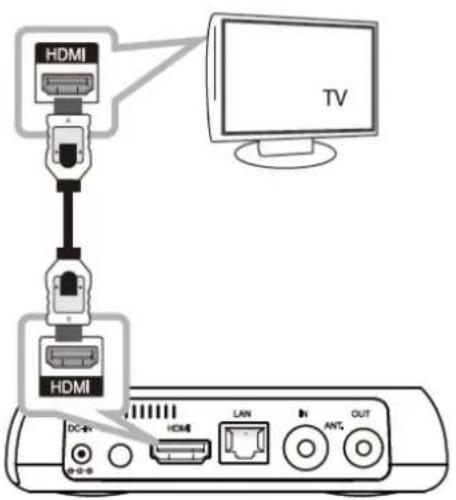
The TizzBird supports HDMI and Composite video output for connection to a TV, and each output needs to be configured in the settings browser depending on what cable is being used.
Connection to HDMI Output
Connect the device output to your TV using HDMI cable. 1080p full HD contents can be output as full-HD only thru HDMI. HDMI can also output the audio signal so no need to connect another cable for audio.
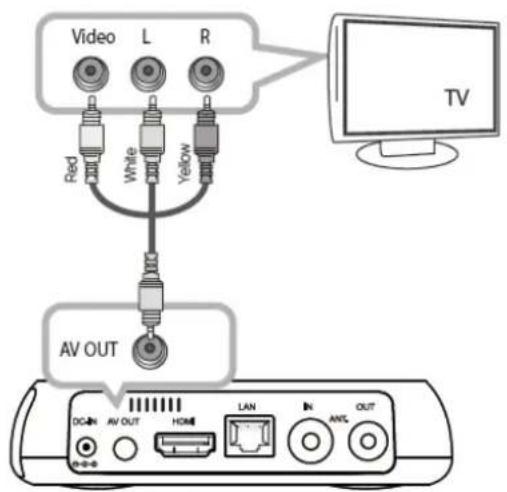
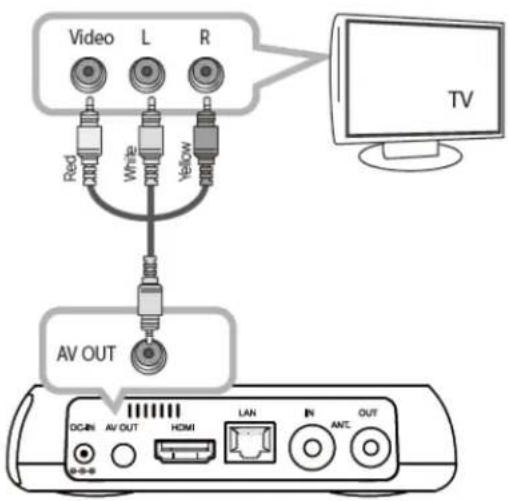
Connection to Composite Output
Connect the device output to your TV using the included AV cable. Select the appropriate video input mode on your TV. You need to connect the audio cable (white & red one of AV cable) for audio signal.
6.2 Connecting the Audio
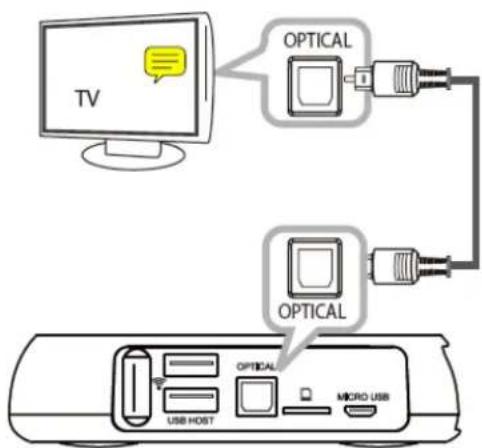
The unit provides RCA analog stereo output and optical digital output and HDMI to connect the audio device like AV receiver and TV. Please connect to audio outputs to appropriate port of audio device. Please select the appropriate input at the audio device using remote controller after connection.
Connection to TV
Connect the two audio cables of AV cable, the white one at left channel and the red one at right channel to appropriate terminal on your TV.
Connection to AV Receiver
Connect the optical cable or HDMI cable to your multi-channel AV receiver, if you have one. The compressed audio stream will be directly transferred to your AV receiver so you can enjoy the multi-channel surround sound.
flowchart
graph TD
    A["TV"] --> B["OPTICAL"]
    B --> C["USB HOST"]
    B --> D["MICRO USB"]
    style A fill:#f9f,stroke:#333
    style B fill:#ccf,stroke:#333
    style C fill:#cfc,stroke:#333
    style D fill:#fcc,stroke:#333
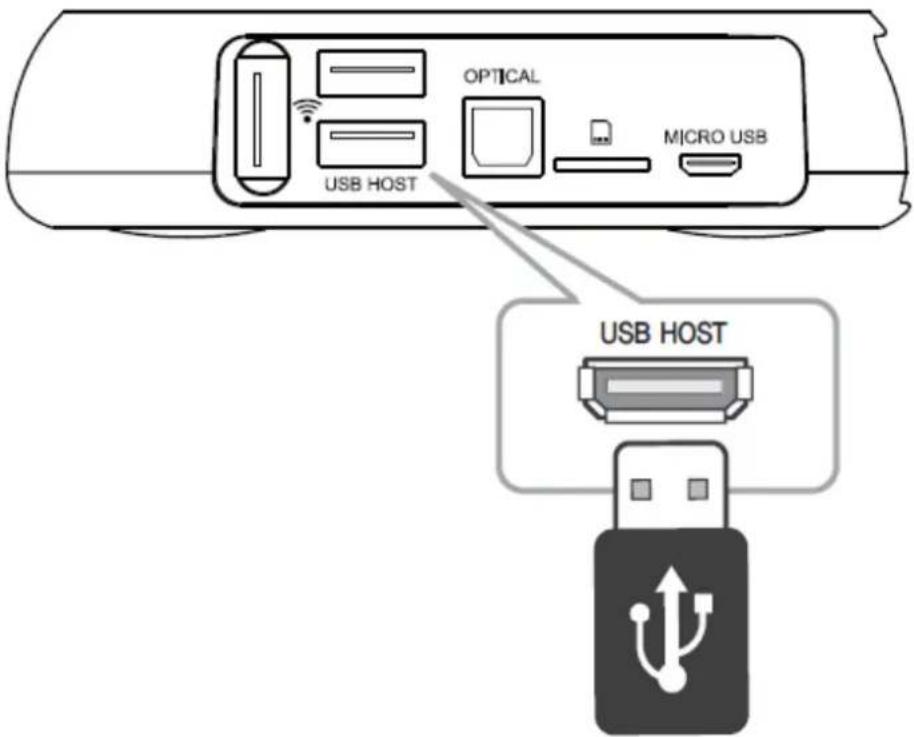
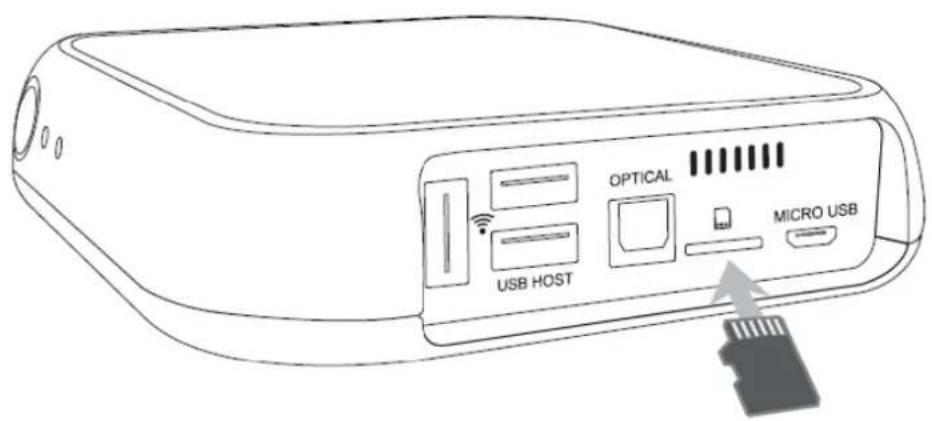
6.3 Connecting USB Device
This device provides two USB 2.0 host ports to connect various external devices, such as FLASH MEMORY drive, external USB HDD enclosure, digital camera/camcorder, keyboard & mouse, or Wi-Fi USB dongle.
7 Initial Setup
Initial setup consists of 6 steps of WIZARD style sequences. The sequence of WIZARD will be LANGUAGE SETUP → VIDEO OUTPUT SETUP → SCREEN FITTING → NETWORK SETUP → TIME&WEATHER SETUP → THEME SETUP
The PREV/ NEXT button on the top side of each screen will bring the PREV/ NEXT step.
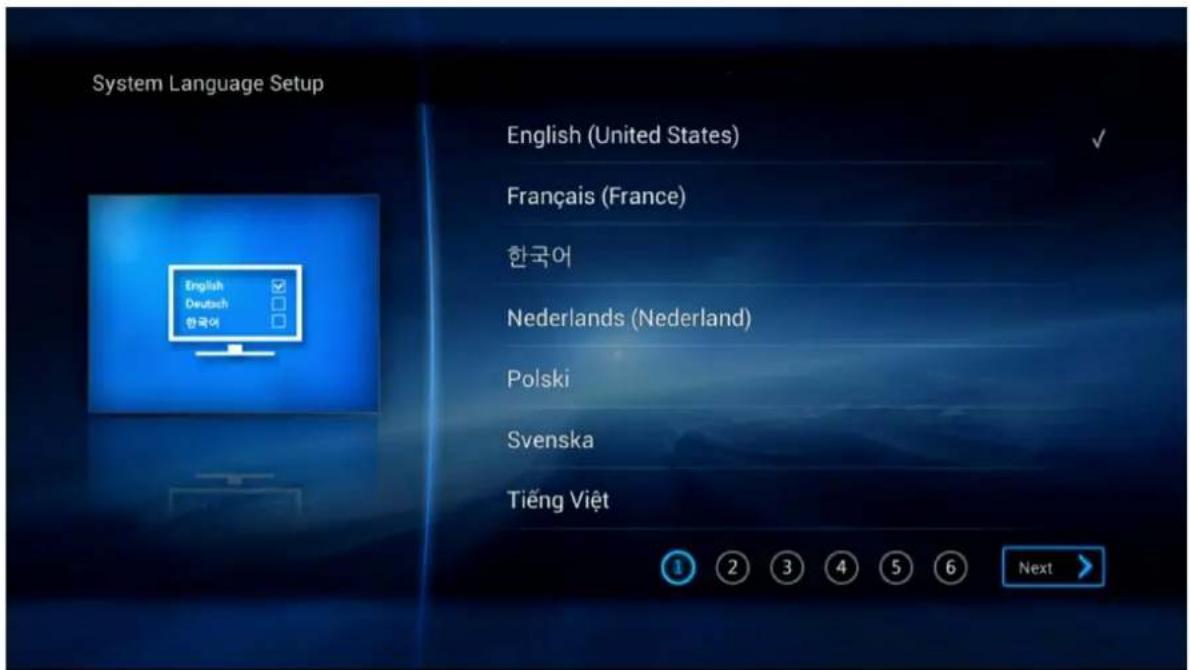
7.1 Language Setup
The first step is setup the menu language. The setup wizard will enumerate all the languages available at the device.
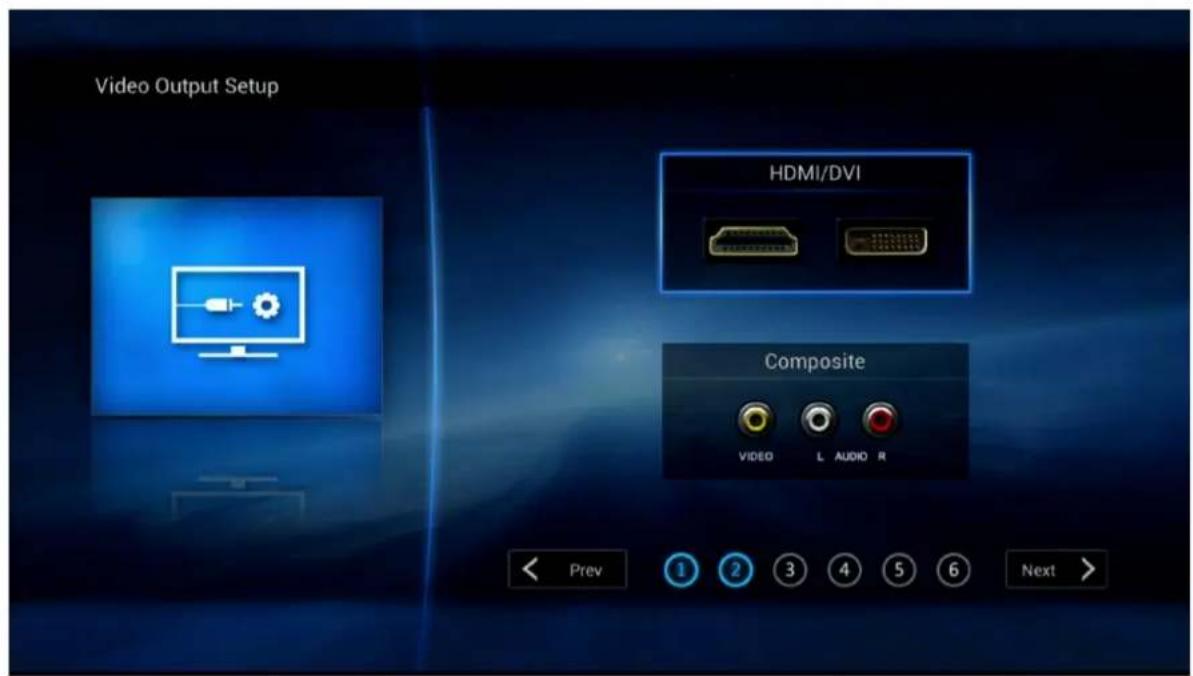
7.2 Video Output Setup
The 2^nd setup is video output. Video output screen will pop up both COMPOSITE and HDMI screen. User can select one of these buttons with MOUSE or REMOTE.
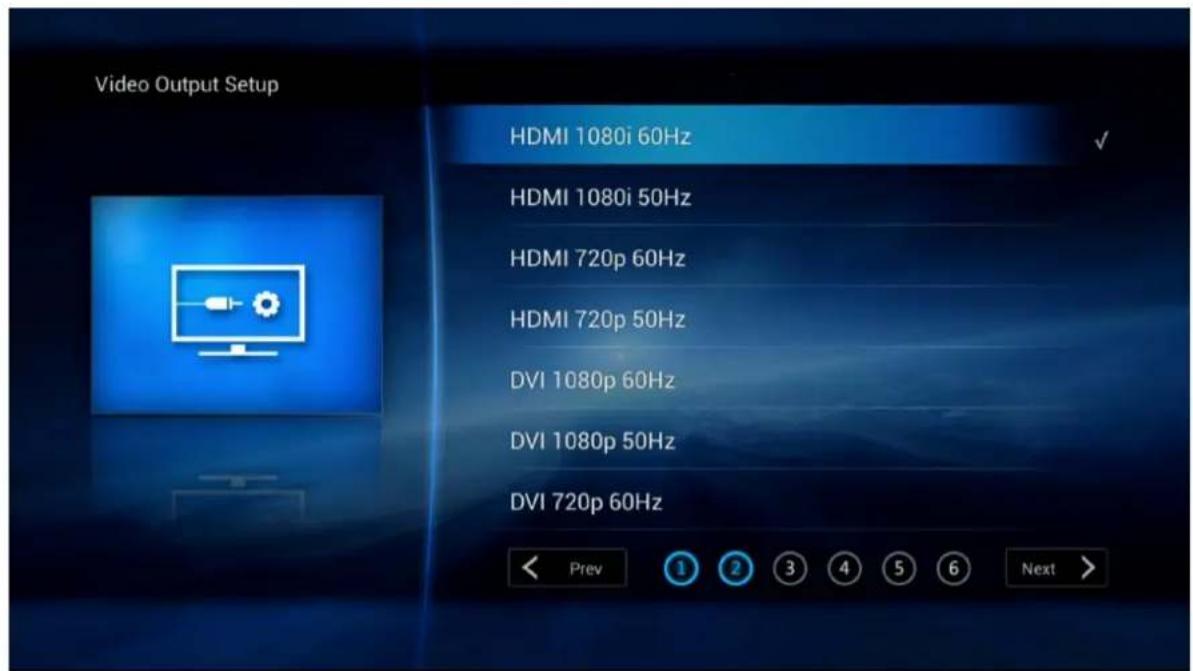
If user selects HDMI output then the screen resolution selection screen will appear as above.
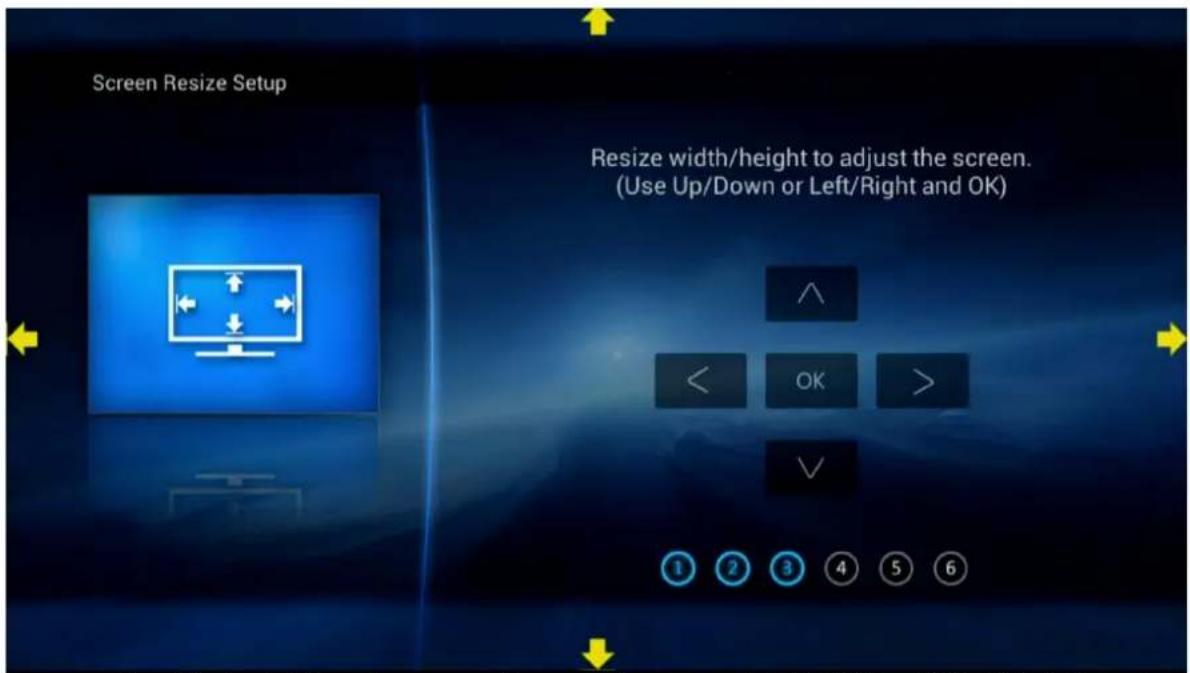
7.3 Screen Fitting Setup
The 3 ^rd step is fitting the screen size according to user's TV. Clicking UP/DOWN button at left-bottom side will increase/ decrease the screen size accordingly. Press OK when done.
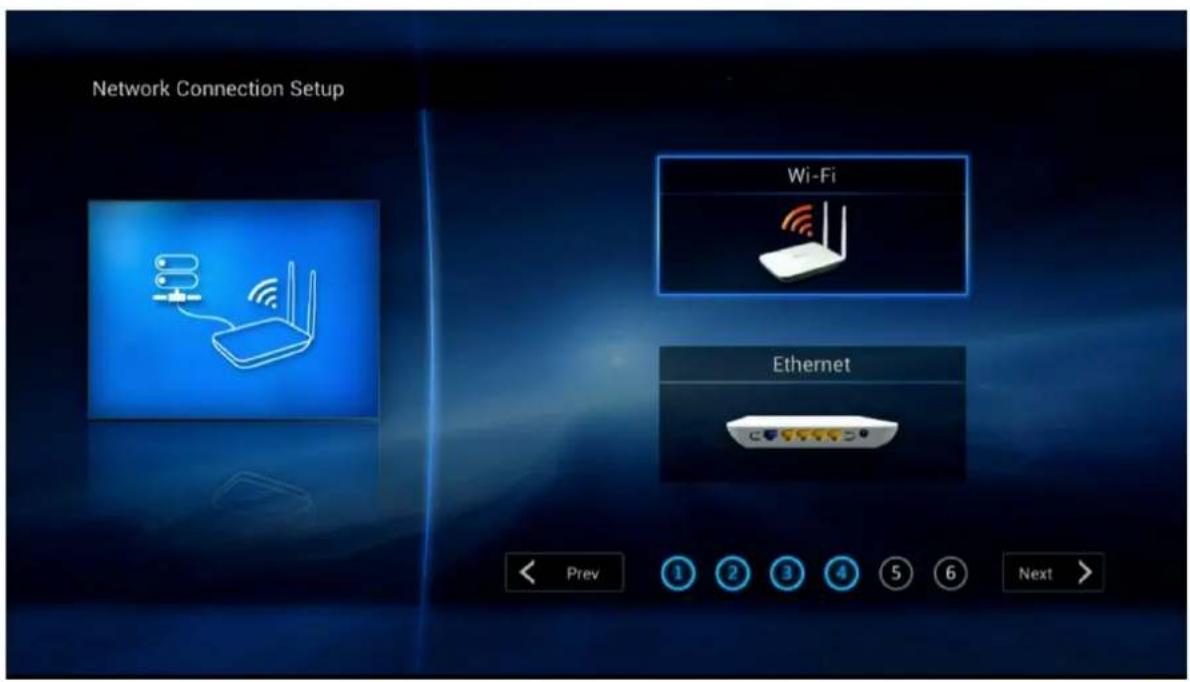
7.4 Network Setup
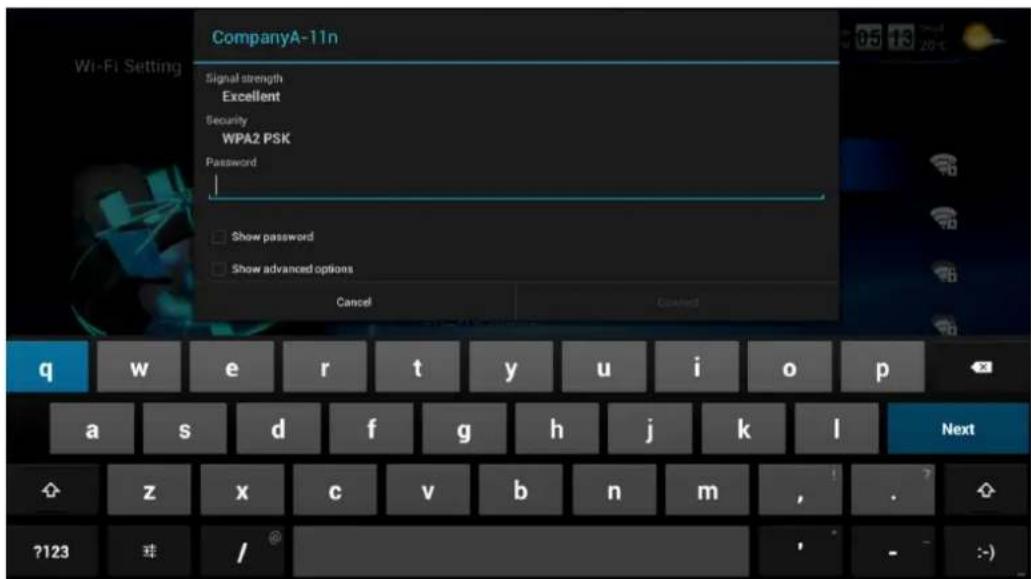
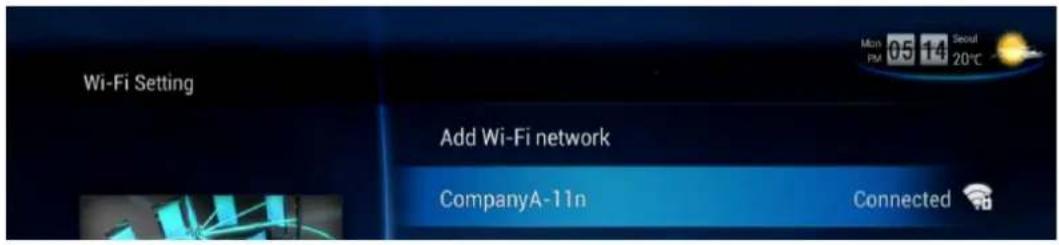
The 4th step is setting up network. Both Wi-Fi and Ethernet can be configured here. If Wi-Fi button were pressed, the following screen will enumerate all available Wi-Fi AP. Select one of them and click it.
After selection of appropriate Wi-Fi access point, typing the password will finalize the Wi-Fi setup and Internet connection will be made.
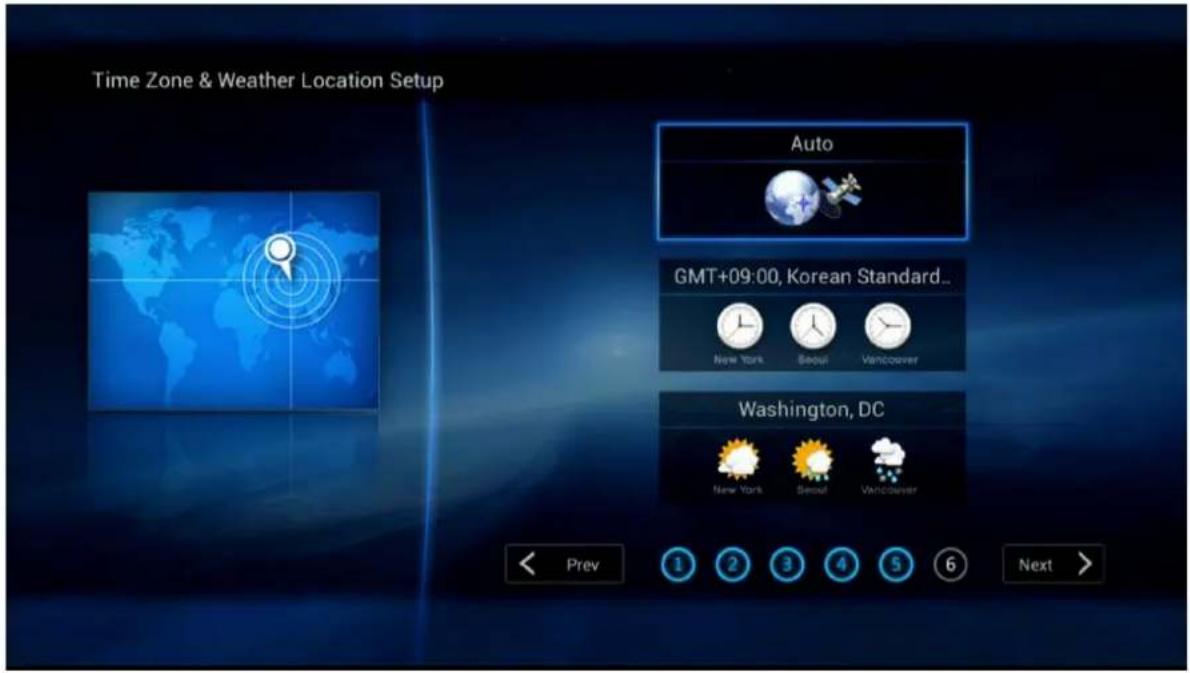
7.5 Time & Weather Location Setup
The next step is setting up time zone and weather location. Tizzbird provides automatic setup for those as long as network is connected.
To setup the time-zone automatically, select the "AUTO" button as above screen, if Internet is connected. Otherwise, you can manually input the time-zone or weather location. Select each button accordingly to do that.
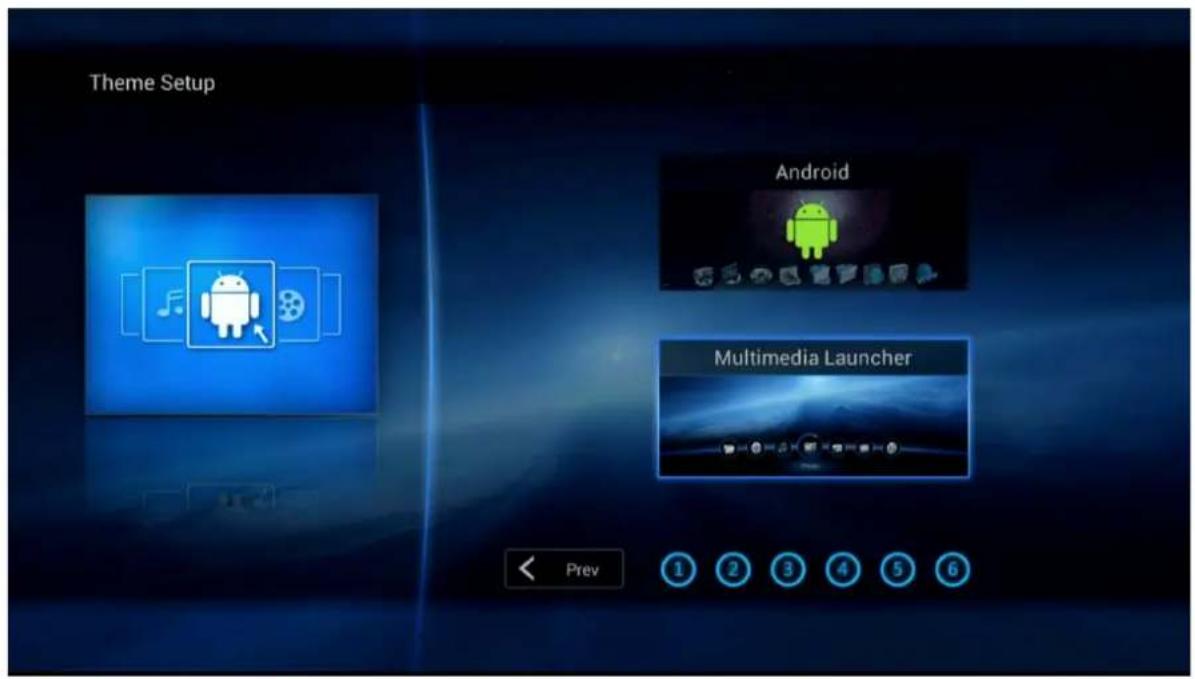
7.6 Theme Setup
The final step is setting up theme. Tizzbird provides two type of theme, one is the "Android" theme, the other is "Multimedia" theme. If you are familiar with smart phone user interface, please choose "Android". If you are more familiar with multimedia player, then choose "Multimedia" theme. The theme can be selected freely at settings later.
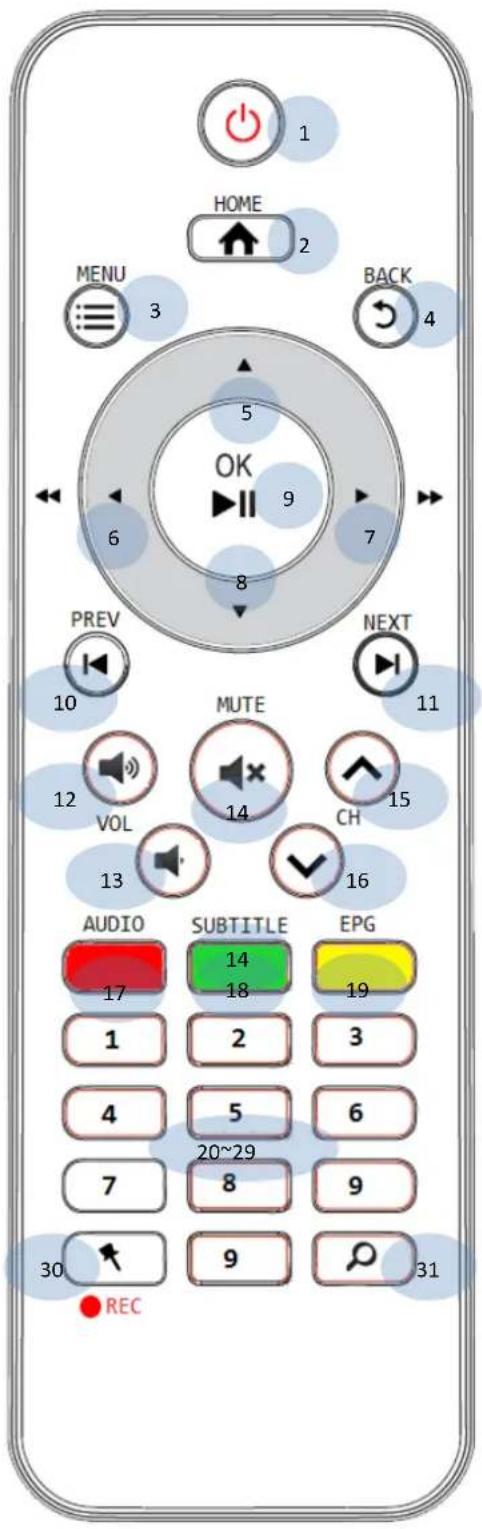
8 Using Remote Controller
1
Power On/ O
2
Go to HOME screen
3
Pop-up MENU
4
Go to PREVIOUS screen
5
Up Arrow
6
Le Arrow
7
Right Arrow
8
Down Arrow
9
Select
10
Select Previous (Chapter/ Item)
11
Select Next (Chapter/ Item)
12
Volume Up
13
Volume Down
14
Mute / Mouse On-O (Long pressed)
15
Channel Up
16
Channel Down
17
Color Key – Red (Context Sensitive)
18
Color Key – Green (Context Sensitive)
19
Color Key – Yellow (Context Sensitive)
20~29
Number Input Keys
30
Bookmark/ Record
31
Search
9 Firmware Update & Installation of Apps
The new FIRMWARE can be updated by OTA (Over the Air) when there is new firmware available. The information dialog will be pop-up when there is new firmware.
Go to "Settings" icon → "System Tab" and select "Firmware Upgrade".
If you download many applications from market, internal memory can be full. In this case you need to install the extra micro-SD card into the micro-SD slot for more applications. Then more application can be downloaded and installed.
Some applications are initially configured to be downloaded and installed into micro-SD device only, not internal memory.
10 Initial Screen
10.1 Turning On Power
Press button on the remote or press the power key at front panel to turn on the power. The unit will start boot-up.
The circle around power button will blink fast during the booting. LED will turn into BLUE during normal operation after booting.
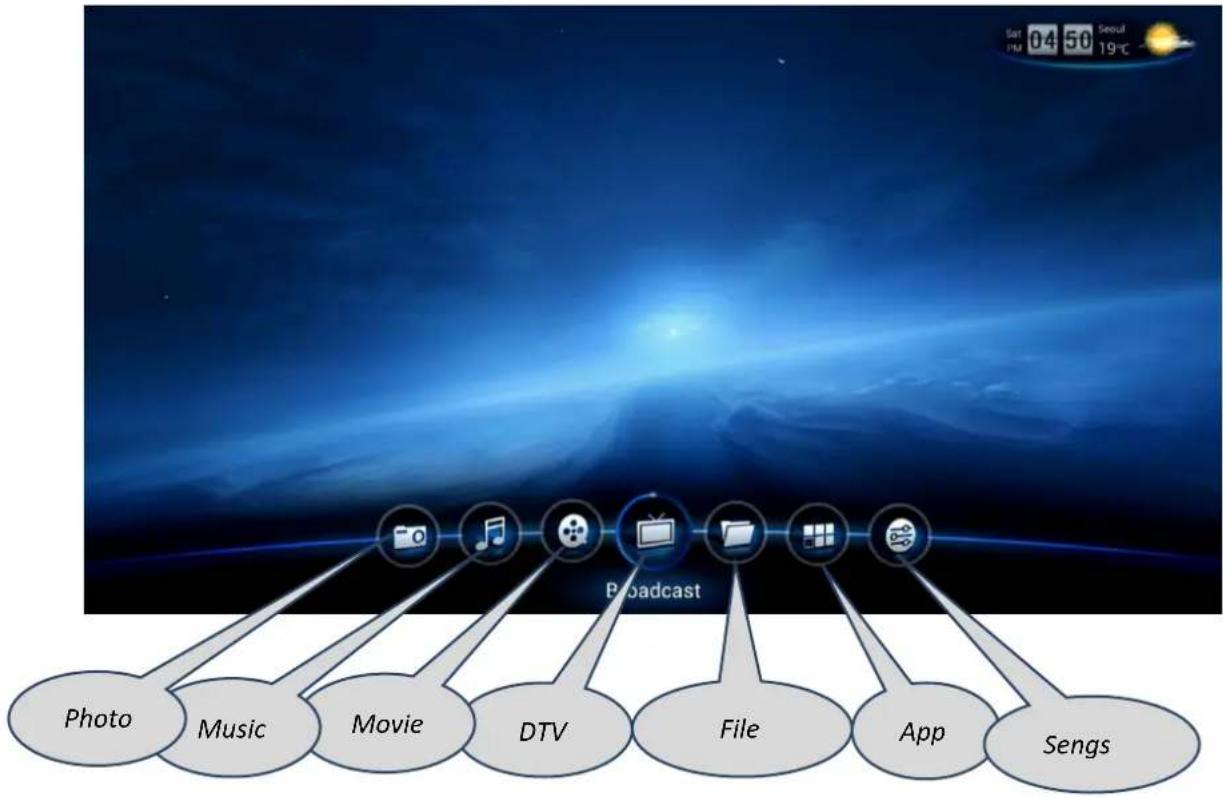
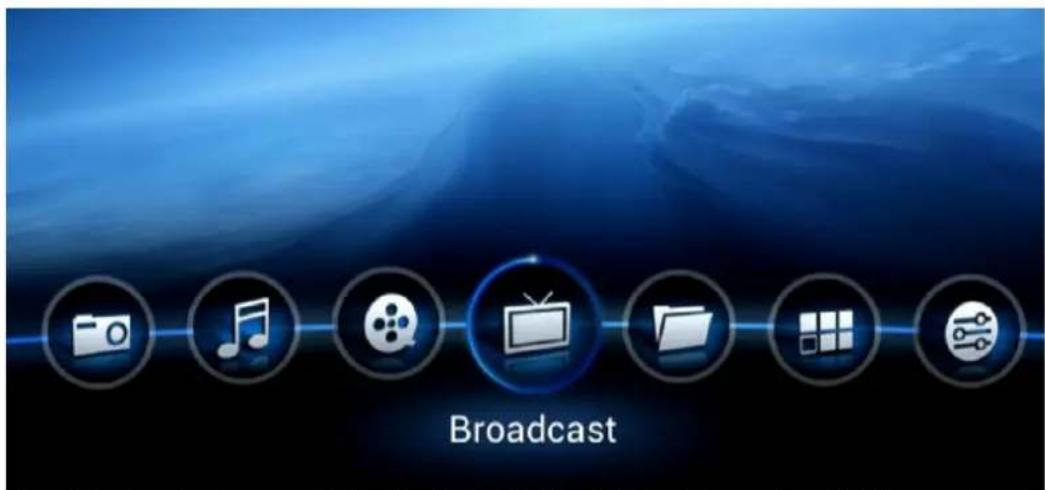
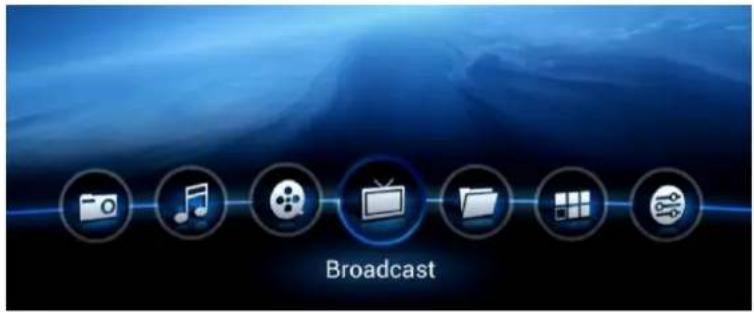
10.2 Home Screen
The below HOME SCREEN will appear after booting up. It shows 7 different items. The each item can do the each designated browsing. For example, movies can be browsed at MOVIE BROWSER. HOME SCREEN consists of 7 browsers including (from left to right) PHOTO/ MUSIC/ MOVIE/ DTV/ APP/ SETTINGS browsers.
To execute each browser, select the browser by arrow buttons on the remote and press button.
flowchart
graph TD
    A["Photo"] --> B["Music"]
    B --> C["Movie"]
    C --> D["DTV"]
    D --> E["File"]
    E --> F["App"]
    F --> G["Sengs"]
    H["Broadcast"] --> I["Image Icon"]
    style H fill:#f9f,stroke:#333
    style I fill:#ccf,stroke:#333
10.3 Audio Settings
Audio output should be configured as "Digital" mode to connect AV receiver. Select →
When "Digital" mode is selected, the pop-up will come out like following picture. The each audio format can be configured as ON/OFF of pass-thru. Please choose appropriate "On" or "Off" status according to the capability of connected audio device.
10.4 Network Settings
Network should be configured to surf Internet and download movie poster automatically from Internet and do network game. There are two types of network setting. One is Wi-Fi (Wireless), the other is Ethernet (Wired).
Prepare keyboard or mouse if the password of Wi-Fi is string. Below mouse or keyboard is compatible with this unit.
Keyboard: USB type or Wireless RF type
Mouse: USB type or Wireless RF type
10.4.1 Configure Wi-Fi Connection
Select → → . If the wireless AP was not configured before, the below window will pop-up automatically.
This pop-up shows the wireless access points available. Select one of them that can be accessible. It shows the signal strength and prompts the password, if password is required
like below picture. Password can be input by remote button if it's composed of numbers. Or mouse or keyboard need to be used if the password is string.
√ To maximize the performance of wireless conncon, 802.11n mode is recommended. 1080p MKV movie or HD broadcastsg stream can be streamed without stuering. Wireless AP should be congured like below.
√ Mode → 11n Only
√ Encrypon → WPA/2PSK
10.4.2 Configure Ethernet Connection
Gigabit Ethernet can be also used to connect wired network. Connect the network cable at the Ethernet network port at rear side of the unit.
1) Select → → .
2) If the configuration is "Auto IP", the network connection will occur immediately.
3) Otherwise, network setting should be manually configured by selecting .
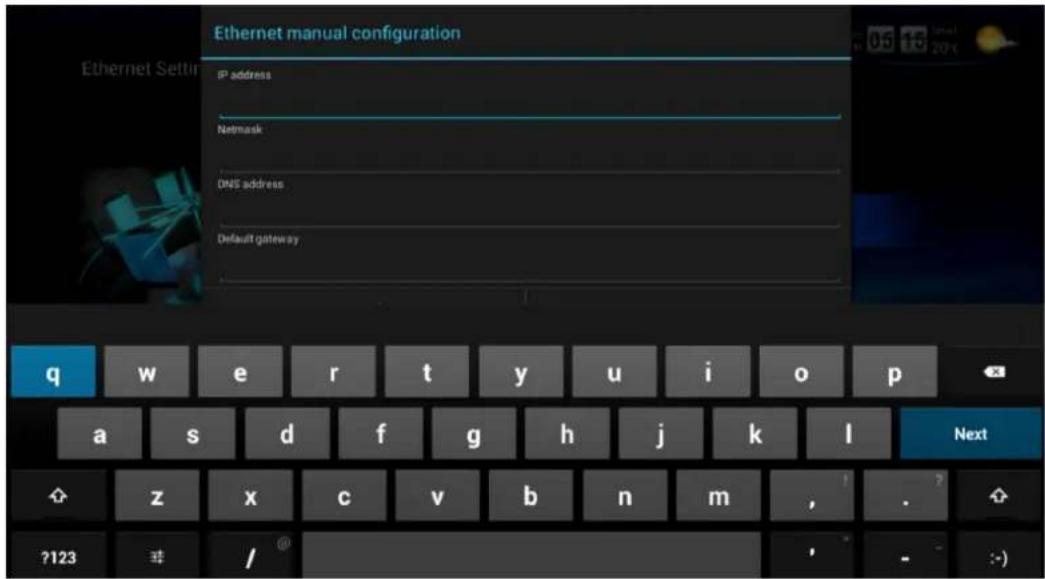
10.4.3 Configure Manual-IP Ethernet
To configure the manual-IP, select "Manual IP" like following picture then select "Next" button.
The following dialog box will appear. Enter the each digit by pressing number buttons on remote controller. Or you can use the mouse to enter the number. The virtual keyboard will appear if you click the field to enter.
10.5 Turning Power Off, Completely Power Off
To turn off the power, press button on the remote or press power key on the front panel. The LED will turn into RED status, and this shows the unit is in "STAND-BY" status.
Press power button on remote control more than 1 second will bring up the following POWER-OFF DIALOG BOX.
Power Off → Turn off power completely
Reboot → Reboot the system
Stand-by → Make it suspend mode
This unit consumes quite little power which is less than 0.4W at STAND-BY mode. This can be achieved by minimal power consumption logic. This unit supports high speed booting mode from STAND-BY. It takes less than two seconds to resume to the normal operation status from STAND-BY mode.
To turn power off completely, please press and hold key at the front panel more than 4 seconds. The LED will be turned off completely.
The status of LED lighng is like below
√ Inial boong
→Blinks fast
√ Operaon
→ Stays at BLUE.
√ Power O
→ Completely o
11 Start-Up and Terminate
11.1 Home Screen
Please refer to section 10.2 for Home screen.
The default selection would be DTV BROWSER at first start-up. TizzBird is a unique unit compared to other units, since it retains consistent user-interface based on the powerful database feature of Android OS. TizzBird provides full featured cover-view and imaged oriented browsing, which is highly intuitive. The other units can only provide user interface, mostly text based information with additional images.
DTV Browser: Browse all digital terrestrial channels available
Movie Browser: Register all movie les and let you browse them on poster based.
Music Browser: Register all music les and let you browse them on album-art based.
Photo Browser: Register all photo les and let you browse them on folder image based.
Sengs Browser: Browse available sengs.
App Browser: Browse registered applicaons and let you select and execute them.
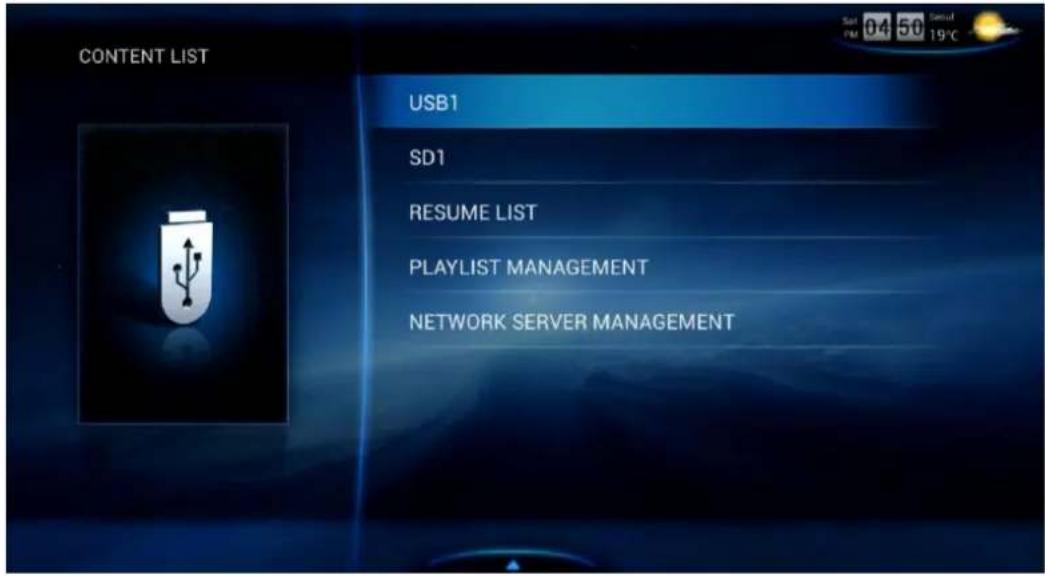
File Browser: Browse les and folders based on the device based. (Legacy mode)
11.2 Movie Browser
If you select movie browser, the following screen will appears.
If you select an appropriate device that attached, and you already have movie posters, the following screen will appear.
11.3 Terminate
Press button on remote or key on the front will turn the unit be into STAND-BY status. The unit will consume virtually nothing (less than 0.4W) in the STAND-BY status. The LED will turn into RED.
12 Watching & Recording Digital TV
12.1 Scanning Channels
Select "Broadcast" will bring the channel scanning dialog, if the device is not scanned before. This will bring the "Auto Scan" menu of setup.
Auto scanning of channels will begin, and show the current status of scanning like below.
Press the button to stop the channel scanning.
12.2 Watching Digital TV
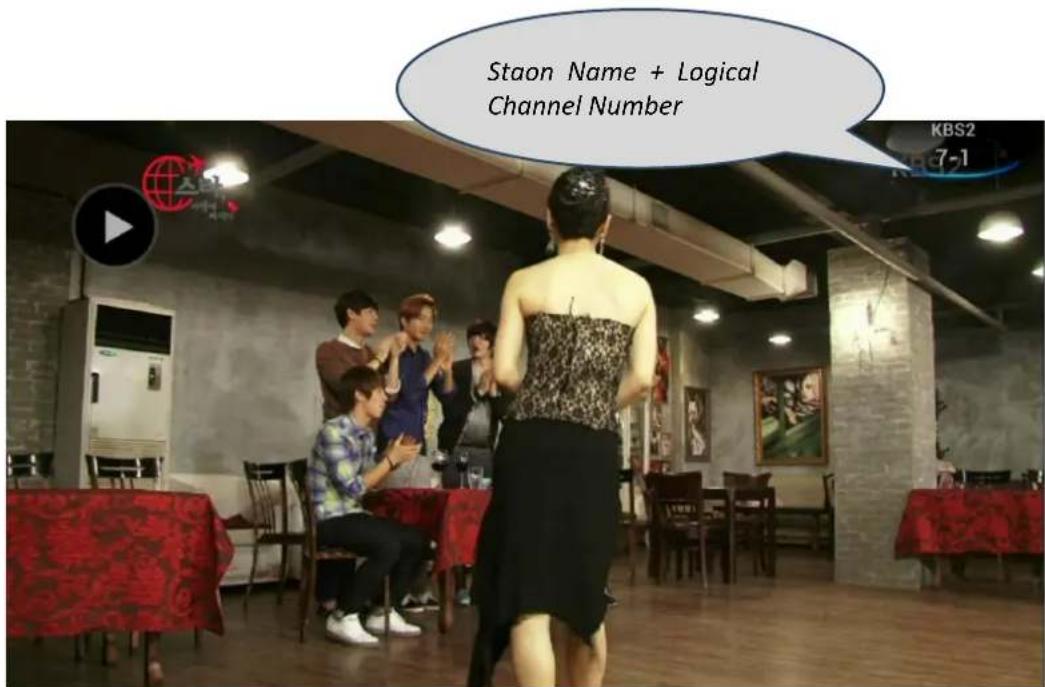
Select "Broadcast" at home screen will bring the digital TV channel like below.
To change channel, please use channel up/down button on the remote. Or you can directly enter the number button on the remote. When you enter the number button, the pop-up window of channel will appear.
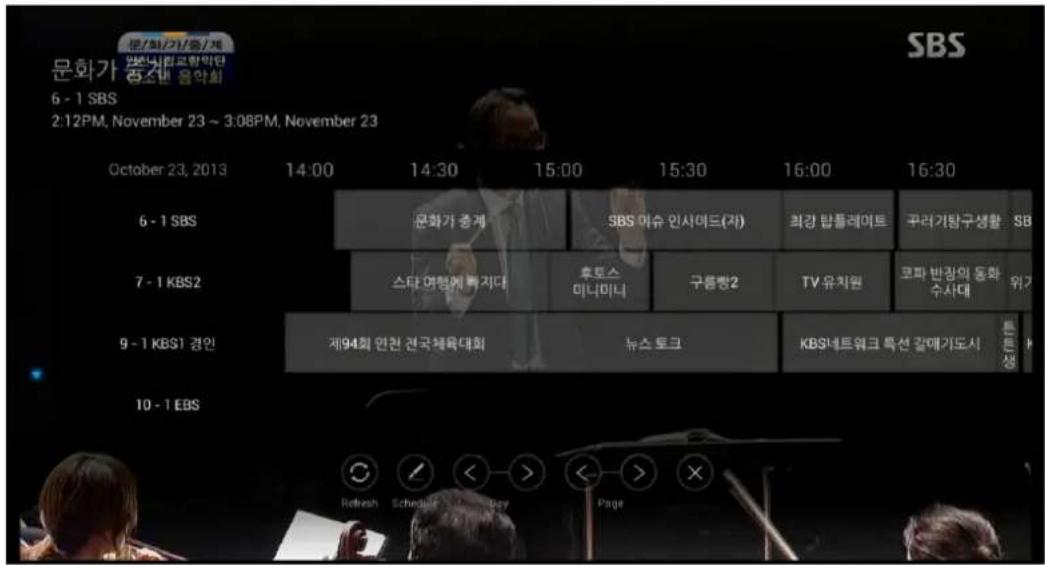
Select button (Yellow color button) will bring the electronic program guide (aka EPG) like below.
12.3 Recording and Time-Shifting
Press
Other manuals TizzBird
Discover other manuals and user guides for the brand TizzBird
💬 Hi! I'm your manual assistant.I know your TizzBird Hybrid PVR S20.
How can I help you? (use, settings, error codes, maintenance, explaining a step from the manual, etc.)💡 Examples :
• How do I use it ?
• Error code E3 ?
• How do I clean it ?


![Network Connection Setup Connection Status On [ Go back ] Add Wi-Fi network HansolWeVo Not in range Tizzbird2.4G Not in range tizzetsoft11n Not in range ChipAlive_2.4G_N8004R Connected Prev 1 2 3 4 5 6 Next >](/content/2026/05/1070246/images/39a597b06f78c1d22b0c38c7859a6ead9b1b26538cf1f4090b3ef0e9c1332bfc.jpg)
![Audio Output [ Go back ] HDMI Analog (PCM) Digital (S/PDIF) Analog (RCA)](/content/2026/05/1070246/images/f76328b2498c438ddf9727e8deaf5699fdbada9b36d44a9cabb56bc8ae7615cc.jpg)
![HDMI [ Go back ] Analog (PCM) Digital](/content/2026/05/1070246/images/ff68f3b3106d971a01334394be88b459c74f9d7f386cada59d5ec2949e7397ba.jpg)
![[ Go back ] Dolby Digital On DTS On HD-Audio Off](/content/2026/05/1070246/images/a697c51c24285042cb8cbd6f88b126f6c88136e4126f253add73561cadb81611.jpg)
![[ Go back ] Wi-Fi Connection On Off Cancel Network Information Advanced Setting 0x, 0Mbps Off Auto](/content/2026/05/1070246/images/0e0e1ad9cab3035025334382ba5ca1c84c3c4489dd8f5c3d28c5d0e652a9588e.jpg)
![Ethernet Setting [ Go back ] Auto Manual](/content/2026/05/1070246/images/f25267ba130371e0f7ecf6b686306a5d558cc434ad36d8a5c08191d23b4b9f65.jpg)
![Ethernet Setting [Go back] Auto Manual](/content/2026/05/1070246/images/b155e631388831d75e5650e33c1d1c10987d119d14a3250a2a92539e7ed0a1af.jpg)
![NETWORK2:// 13 Eerie (2013) DATE: October 19, 2013 A Hijacking (2012) DATE: October 21, 2013 Adventures In The Sin Bin (2012) DATE: October 27, 2013 Despicable Me 2 (2013) DATE: October 19, 2013 Green Street 3 - Never Back Down (2013) DATE: October 19, 2013 Grown Ups 2 (2013) DATE: October 19, 2013 Grown Ups 2 (2013) [1080p] DATE: October 21, 2013 Kick-Ass 2 (2013) DATE: October 17, 2013](/content/2026/05/1070246/images/3ac6273f49c216033774b6273605cec0beea47012bdde1e7fd89f694008e749f.jpg)
![Channel Management [ Go back ] Auto Scan Edit Channel](/content/2026/05/1070246/images/10b508841ce65bd72e3de9b586cb1f55973841754d150d3b42105bb743aa3427.jpg)
![Auto Scan [ Go back ] 11 - 1 MBC 9 - 1 KBS1 경인 6 - 1 SBS 7 - 1 KBS2 1 - 1 EBS Progress Scanned Channel List Frequency 66% 46 357.0MHz RF Channel No & Frequency](/content/2026/05/1070246/images/329b594928d6fb7a746b5eb673a7db44bf7803df67ee2936a9521b7eba1da413.jpg)