
RM-421 - Hi-Fi System DAEWOO - Free user manual and instructions
Find the device manual for free RM-421 DAEWOO in PDF.


| Product Type | Hi-Fi System |
| Brand | Daewoo |
| Model | RM-421 |
| Power Supply | 220V-230V / 50Hz |
| Power Consumption | 13W |
| Output Power (RMS) | 1.8W x 2 |
| Speaker Impedance | 4 ohms |
| Headphone Impedance | 32 ohms |
| Dimensions (L x W x H) | 223.5 x 150 x 206.5 mm |
| Weight | 5.4 kg |
| CD Player | 2 channels, S/N ratio 60dB, Sampling freq 44.1kHz, Disc size 75/120 mm |
| Cassette Deck | Speed 4.75 cm/s, Recording AC bias, Erasing DC magnet, Freq response 125-6300 Hz |
| Radio Tuning Range | AM 522-1620 kHz, FM 87.5-108 MHz |
| Remote Control Batteries | 2 x AAA (1.5V each) |
| CD Programming | Up to 20 tracks |
| Repeat Modes | Repeat 1, Repeat All, Repeat Off |
| FM Stereo Indicator | LED lights for stereo reception |
| Safety | Read instructions, avoid water/heat, proper cord placement |
| Disposal | WEEE directive – do not dispose as household waste |
| Ventilation | Do not impede normal ventilation |
| Dripping Protection | Not exposed to dripping or splashing; no liquid-filled objects on top |
Frequently Asked Questions - RM-421 DAEWOO
User questions about RM-421 DAEWOO
0 question about this device. Answer the ones you know or ask your own.
Ask a new question about this device
Download the instructions for your Hi-Fi System in PDF format for free! Find your manual RM-421 - DAEWOO and take your electronic device back in hand. On this page are published all the documents necessary for the use of your device. RM-421 by DAEWOO.
USER MANUAL RM-421 DAEWOO
USAGE OF CONTROLS OR ADJUSTMENTS OR PERFORMANCE OF PROCEDURES OTHER THAN THOSE SPECIFIED HEREIN MAY RESULT IN HAZARDOUS RADIATION EXPOSURE.
THIS UNIT SHOULD NOT BE ADJUSTED OR REPAIRED BY ANYONE EXCEPT QUALIFIED SERVICE PERSONNEL.
IMPORTANT:
SINCE MOVEMENT OF THE CD MECHANISM AND THE SENSITIVE CIRCUITY MAY CAUSE INTERFERENCE TO THE RADIO TURNER NEARBY, SWITCH THIS UNIT OFF WHILE OPERATING OTHER RADIO DEVICES.
LISTENING TO RADIO
OPERATION
- SET THE FUNCTION SELECTOR TO "RADIO" POSITION.
- SELECT THE DESIRED RADIO FREQUENCY BAND WITH BAND SELECTOR.
- TURN THE TUNING CONTROL TO SET THE DIAL POINTER AGAINST THE STATION FREQUENCY AS DESIRED.
- ADJUST VOLUME CONTROLS FOR THE DESIRED VOLUME LEVEL.
FM & FM-STEREO RECEPTION
- SET THE FM MODE SELECTOR AT "MONO" POSITION. PROGRAMS ARE RECEIVED IN MONO MODE. IN PARTICULAR WHEN STEREO SIGNALS ARE WEAK. IT IS PREFERABLE TO RECEIVE THE PROGRAM IN MONO.
- SET THE FM MODE SELECTOR AT "FM ST" POSITION FOR RECEIVING STEREO PROGRAMS. THE STEREO INDICATOR LIGHTS UP TO SHOW FM STEREO PROGRAM.
PLAYING COMPACT DISC
• GETTING STARTED
-
SET THE FUNCTION SELECTOR TO "CD" POSITION. OPEN THE CD COMPARTMENT BY PRESSING THE OPEN BUTTON. PUT A CD INTO THE COMPARTMENT AND CLOSE THE CD DOOR.
-
FOCUS SEARCH IS PERFORMED IF DISC IS INSIDE. TOTAL NO. OF TRACKS IS READ.

Repeat 1/ Repeat all Indication
Play / Pause Indication

PLAY/PAUSE MODE ▶II
-
IF PLAY/PAUSE BUTTON IS PRESSED DURING STOP MODE, THE FIRST TRACK WILL BE PLAYED AND THE PLAY/PAUSE LED WILL BE TURNED ON.
-
IF PLAY/PAUSE BUTTON IS PRESSED DURING PLAY MODE, GOTO PAUSE MODE AND THE PLAY/PAUSE LED AND THE TRACK NO. WILL BE FLASHING.
- STOP MODE
- IF STOP BUTTON IS PRESSED DURING PLAY OR PAUSE MODE. GO TO STOP MODE AND DISPLAY TOTAL NUMBER OF TRACKS ALL INDICATOR LED ARE TURNED OFF.

- SKIP MODE
(SKIP UP ▶▶/ SKIP DOWN ◀◀)
-
DURING PLAY OR PAUSE MODE. IF SKIP UP BUTTON IS PRESSED IT WILL GO TO NEXT TRACK AND DISPLAY THE TRACK NO. AND THEN CONTINUOUS THE PLAY OR PAUSE MODE.
-
DURING PL AY OR PAUSE MODE, IF BACK BUTTON IS PRESSED IT WILL GO BACK TO THE BEGINNING OF THE TRACK, SAME TRACK NO, IS DISPLAY CD AND CONTINUOUS THE PLAY OR PAUSE MODE.
-
PRESS BACK BUTTON AGAIN IT WILL GO TO THE PREVIOUS TRACK AND CONTINUOUS THE PLAY OR PAUSE MODE.
- REPEAT MODE
PRESS THE REPEAT BUTTON BEFORE OR DURING PLAY, A SINGLE TRACK OR ALL THE TRACKS CAN BE REPEATED.
EACH PRESS SWITCH THE REPEAT MODE
![graph LR A["(1) REPEAT 1"] --> B["(2) REPEAT ALL"] B --> C["(3) REPEAT OFF"]](/content/2026/05/1070231/images/0fb67642440dfe831e24054f2829a9ad45a401f78ea63ef947e4a62fab96a1a5.jpg)
REPEAT MODE
REPEAT 1
REPEAT ALL
REPEAT OFF
REPEAT 1/ALL INDICATION
FLASH
LIGHT ON
LIGHT OFF
CD PROGRAMMING
UP TO 20 TRACKS CAN BE PROGRAMMED FOR DISC PLAY IN ANY ORDER.
TO PROGRAM
- SET IN CD MODE.
- PRESS THE PROGRAM BUTTON, THE DISPLAY WILL SHOW "01". AND FLASH, AND THEN IT CHANGE TO "00" TO WAIT THE KEY INPUT.
- SELECT A DESIRED TRACK BY USING THE SKIP BUTTONS.
- PRESS THE PROGRAM BUTTON TO ENTER THE TRACK INTO THE PROGRAM.
- LED DISPL AY CHANGES TO "02", AND THEN CHANGES TO "00" AGAIN.
- REPE AT 3\~5, UP TO 20 TRACKS, AFTER REGISTER 20 TRACKS, THE DISPLAY SHOWS "01" AND FLASHES AGAIN.
TO COMPLETE PROGRAMMING AND START PLAY
PRESS PLAY BUTTON, PROGRAM PLAY AUTOMATICALLY.
TO CLEAR PROGRAMMING
SET THE FUNCTION SELECTOR TO TAPE OR RADIO, AND THEN TO CD AGAIN TO CANEL CD PROGRAMMING.
LISTENING TO TAPE
GENERAL OPERATION
STOP / EJECT KEY PRESS TO STOP ALL DECK OPERATIONS. PRESS AGAIN TO OPEN THE CASSETTE DOORS.
FAST FORWARD KEY & PRESS TO START RAPID TAPE WINDING IN EITHER FORWARD OR REVERSE FAST REWIND KEY DIRECTION. PRESS STOP / EJECT KEYS WHEN THE CASSETTE SPOOLS STOP TURNING.
PLAY KEY PRESS TO START PLAYING A TAPE.
PAUSE KEY PRESS TO STOP TAPE OPERATION TEMPORARILY. PRESS AGAIN TO RESUME TAPE OPERATION.
RECORD KEY PRESS TOGETHER WITH PLAY KEY TO START RECORDING.
PLAYBACK
- SET THE FUNCTION SELECTOR TO TAPE POSITION.
- PUT IN YOUR CASSETTE TAPE.
- PRESS PLAY KEY TO ACTIVATE PLAYBACK.
- ADJUST THE VOLUME CONTROL TO THE DESIRED LEVEL.
- USE PAUSE KEY WHEN YOU WANT TO STOP PLAYBACK TEMPORARILY.
- PRESS STOP / EJECT KEY WHEN FINISHED.
RECORDING
Button Description
The remote control requires 3V for operation.
PLAY/PAUSE - In CD mode, press once to start playback. Press once again to stop the disc play temporarily.
STOP P
ress to terminate CD playback.
SKIP
ress once to skip to previous track.
SKIP
ress once to skip to next track.
REPEAT - In CD mode, press to enable repeat play.
PRECAUTIONS CONCERNING BATTERIES
- Be sure to insert the batteries with correct positive “+” and negative “-” polarities.
- Use batteries of the same type. Never use different types of batteries together.
- When the remote control unit is not in use for a long time (more than a month), remove the batteries from the remote control unit to prevent them for leaking. If they leak, wipe away the liquid inside the baterry compartment and replace the batteries and never dispose of old batteries by throwing them in a fire.
Battery Installation
- Remove the battery compartment cover.
- Insert 2 x AAA dry batteries
- Make sure that the batteries are inserted with their positive “+” and negative “-” poles positioned correctly.
- Close the cover until it clicks.
- If the distance required between the remote control unit and main unit decreases, the batteries are exhausted. In this case replace the batteries with new ones.
* Switch off unit by function selector to Tape.
SAFETY INSTRUCTIONS
- READ INSTRUCTIONS - All the safety and operating instructions should be read before the appliance is operated.
- FOLLOW INSTRUCTIONS - All operating and use instructions should be followed.
- WATER AND MOISTURE - The appliance should not be used near water, for example, near a bathtub, washbowl, Kitchen sink, laundrytub, swimming pool or in a wet basement.
- HEAT - The appliance should be situated away from heat sources such as radiators, stoves, or other appliances (including amplifiers) that produce heat.
- POWER SOURCE - The appliance should be connected to a power supply only of the type described in the operating instructions or as marked on the appliance.
- POWER CORD PROTECTION - Power supply cords should be routed so that they are not likely to be walked on or pinched by items placed upon or against them, paying particular attention to cords at plugs, convenience receptacles and the point at which they exit from the appliance.
- POWER LINES - An out door antenna should be located away from power lines.
- NON-USE PERIODS - The power cord of the appliance should be unplugged from the outlet when the appliance is to be left un- used for a long period of time.
BEFORE OPERATION
NOTES- CONCERNING COMPACT DISCS.
Since dirty, damaged or warped discs may damage the unit, care should be taken of the followings items:
- a. Usable compact discs. Use compact disc only with the mark shown on the disc.
b. CD: compact disc only with digital audio signals.

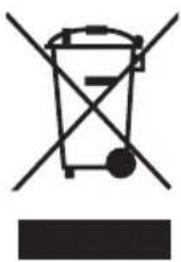
Disposal of Used Electrical & Electronic Equipment
The meaning of the symbol on the product, its accessory or packaging indicates that this product shall not be treated as household waste. Please, dispose of this equipment at your applicable collection point for the recycling of electrical & electronic equipments waste. In the European Union and Other European countries which there are separate collection systems for used electrical and electronic product. By ensuring the correct disposal of this product, you will help prevent potentially hazardous to the environment and to human health, which could otherwise be caused by unsuitable waste handling of this product. The recycling of materials will help conserve natural resources. Please do not therefore dispose of your old electrical and electronic equipment with your household waste. For more detailed information about recycling of this product, please contact your local city office, your household waste disposal service or the shop where you purchased the product.
SPECIFICATIONS
GENERAL
Power Supply: 220V-230V/50Hz
Power Consumption: 13Watt
Output Power(RMS): 1.8W x 2
Terminal impedance: Speaker 4ohms, Phones 32ohms
Unit Dimensions: 223.5(L) x 150(W) x 206.5(H)mm
Unit Weight: 5.4kgs
CASSETTE SECTION
Tape Speed: 4.75cm/sec
Recording System: AC BIAS
Erasing System: DC MAGNET
Frequency Response: 125-6300Hz
CD SECTION
Channels: 2 Channels
S/N Ratio: 60dB
Sampling Frequency 44.1kHz
Disc Size: 75 or 120
RADIO SECTION
Tuning Frequency: AM:522-1620 KHz
FM:87.5-108 MHz
SPECIFICATION SUBJECT TO CHANGE WITHOUT FURTHER NOTICE.
Dripping warning:
"The product shall not be exposed to dripping or splashing and that no object filled with liquids, such as vases. Shall be placed on the product"
Ventilation warning:
"The normal ventilation of the product shall no be impeded for intended use."
- IMPORTANT
- LISTENING TO RADIO
- OPERATION
- FM & FM-STEREO RECEPTION
- PLAYING COMPACT DISC
- PLAY/PAUSE MODE ▶II
- CD PROGRAMMING
- TO PROGRAM
- LISTENING TO TAPE
- PLAYBACK
- RECORDING
- BUTTON DESCRIPTION
- PRECAUTIONS CONCERNING BATTERIES
- BATTERY INSTALLATION
- SAFETY INSTRUCTIONS
- BEFORE OPERATION
- DISPOSAL OF USED ELECTRICAL & ELECTRONIC EQUIPMENT
- SPECIFICATIONS
- GENERAL
- CASSETTE SECTION
- CD SECTION
- RADIO SECTION
- SPECIFICATION SUBJECT TO CHANGE WITHOUT FURTHER NOTICE
- DRIPPING WARNING
- VENTILATION WARNING
Brand : DAEWOO
Model : RM-421
Category : Hi-Fi System