
HE 3348 SC - Digital decoder Trevi - Free user manual and instructions
Find the device manual for free HE 3348 SC Trevi in PDF.


| Product Type | Digital Decoder |
| Brand | Trevi |
| Model | HE 3348 SC |
| Dimensions (approx.) | 150 x 100 x 40 mm |
| Weight (approx.) | 300 g |
| Power Supply | DC 12V, 1A |
| Power Consumption | 10 W (max) |
| Resolution | 1080p Full HD |
| Supported Standards | DVB-S2 (satellite) |
| Connectivity | HDMI, RCA (composite), USB 2.0 |
| Main Functions | Channel scan, electronic program guide (EPG), time shift, parental control, software update via USB |
| Remote Control | Infrared, included |
| Display | LED front panel |
| Maintenance & Cleaning | Wipe with a soft, dry cloth. Do not use liquids or aerosols. |
| Safety Precautions | Keep away from moisture and heat. Unplug before cleaning. Use only the supplied power adapter. |
| Spare Parts & Repairability | Replacement remote and power adapter available. For repairs, contact an authorized service center. |
| General Information | Designed for receiving free-to-air satellite TV channels. Supports multiple audio and subtitle languages. |
Frequently Asked Questions - HE 3348 SC Trevi
User questions about HE 3348 SC Trevi
0 question about this device. Answer the ones you know or ask your own.
Ask a new question about this device
Download the instructions for your Digital decoder in PDF format for free! Find your manual HE 3348 SC - Trevi and take your electronic device back in hand. On this page are published all the documents necessary for the use of your device. HE 3348 SC by Trevi.
USER MANUAL HE 3348 SC Trevi
natural_image
Black electronic device with connector and ports, no visible text or symbols on bodyRicevitore
DVB-T
natural_image
Black remote control with black buttons and a 'Link' button at the bottom (no readable text or symbols beyond basic design)Telecomando

Manuale

natural_image
Pure electrical circuit lines without any symbolsnatural_image
Simple line drawing of a cable and a triangular pointer with labeled degrees (no text or symbols)Sensore

natural_image
Two overlapping black circular samples with textured surfaces (no text or symbols)Infrarosso
natural_image
Technical line drawing of a rectangular device with internal horizontal slats and a central rectangular component, no text or symbols present.
9 TELEVISIONE DIGITALE TERRESTRE (DTV)
natural_image
Black treu device with labeled ports HD + DVB-T2 + HEVC, no visible text or symbols beyond brandingContents
IMPORTANT SAFETY INSTRUCTIONS....20
1 Remote Control....21
1.1 Appearance of Remote Control....21
1.1 Front Panel....23
1.2 Installation 23
Connecting the receiver ....23
2 Basic Functions....24
2.1 First Installation....24
2.2 TV/RADIO Programs Switch....24
2.3 Channel Switch 24
2.4 TV & Radio Channel List / FAV List....24
2.5 Display Information of Programs 24
2.6 Program RECALL 24
2.7 Audio Language Switch and L/R Channel Switch 24
2.8 Subtitle 25
2.9 Teletext....25
2.10 PVR & Time shift functions 25
2.10.1 PVR (instant recording) 25
2.10.2 Time shift 25
3 Installation....27
3.1 Auto Search....27
3.2 Manual Search....27
3.3 Channel Filter 27
4 Channel 28
4.1 Channel Manager 28
4.2 Favorite List.... 28
5 Preference Setting....29
5.1 OSD Language 29
5.2 Preferred Subtitle 29
6 System Setting....29
6.1 Timer....29
6.2 Child Lock 30
6.3 Date Time 30
6.4 Factory Reset 31
6.5 Upgrade.... 31
6.6 Version 31
7 AUDIO / VIDEO Setting....31
7.1 Aspect Ratio ....\$5
7.2 Video resolution 31
7.3 HDMI resolution.... 31
7.4 HDMI Audio 31
8. MEDIA CENTER ....32
8.1 Multimedia.... 32
8.1.1 Media Selection Mode 32
8.1.2 Movie....32
8.1.3 Music 32
8.1.4 Recorder Manager 33
8.1.3 Recorder Manager Browser 33
8.1.4 Rename 33
8.1.5 Photo 33
8.16 E-Book 33
8.17 Disk manager 33
8.2 Multimedia Configuration.... 33
8.3 PVR Configuration 33
9. SPECIFICATIONS....35
IMPORTANT SAFETY INSTRUCTIONS

CAUTION
RISK OF ELECTRIC
SHOCK DO NOT
OPEN

TO REDUCE THE RISK OF ELECTRIC SHOCK.
DO NOT REMOVE COVER.
NO USER-SERVICEABLE
PARTS INSIDE. REFER
SERV CING TO QUALIFIED
SERV CE PERSONNEL.

This symbol indicates "dangerous voltage" inside the product that presents a risk of electric shock or personal injury.

This symbol indicates important instructions accompanying the product.
To inform users of possible dangers on the apparatus or on its components, the above symbols can be applied.
To reduce the risk of fire and electric shock, do not expose this unit to rain or moisture.
Please carefully read these precautions and instructions before operating this unit. Keep the manual for future reference.
Power Cord Protection
To avoid any malfunctions of the unit and to protect against electric shock, fire or personal injury, please observe the following:
● Hold the plug firmly when connecting or disconnecting the AC power cord.
- Keep the AC power cord away from heating appliances.
● Never put any heavy object on the AC power cord.
- Do not attempt to repair or reconstruct the AC power cord in any way.
● Never make or change connections with the power switched on.
IMPORTANT SAFETY INSTRUCTIONS
- The ventilation should not be impeded by covering the ventilation openings with items, such as newspapers, table-cloths, curtains, etc.;
- No naked flame sources, such as lighted candles, should be placed on the apparatus;
- Attention should be drawn to the environment aspects of battery disposal. Don't throw used batteries in dustbin. Please contact your retailer in order to protect the environment.
- Don't use the apparatus in tropical climates;
- The apparatus shall not be exposed to dripping or splashing and that no objects filled with liquids, such as vases, shall be placed on the apparatus.
- Where the mains plug is used as the disconnect device, the disconnect device shall remain readily operable. The main plug shall remain readily operable.
- Keep minimum distances (5 cm) around the apparatus for sufficient ventilation. (Minimum distance around the apparatus for sufficient ventilation.)
- If the electric cable is damaged, it must be replaced by the manufacturer, or by the qualification persons, in order to avoid a danger.
1 Remote Control
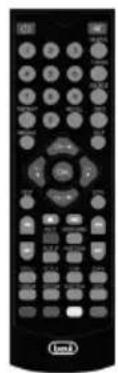
1.1 Appearance of Remote Control
| 2 Photograph | Key Function | |
 | POWER Switch off/on power supply | |
| MUTE Mute control | ||
| MARK Enter bookmark menu (refer to 8. MULTI MEDIA) | ||
| TV / RADIO | Press to switch between TV program and Radio program. | |
| SOURCE Change source between TV and Media | ||
| NUMBER 0 to 9 | Numeric keys: for input of numbers or for selecting a TV channel | |
| INFO | (1) Display information of programs(2) Display corresponding extended information at TV GUIDE state | |
| RECALL | (1) Return to upper menu(2) Press "RECALL" while watching TV to recall previously viewed channel. | |
| TIMESHIFT | Into the TIMESHIFT state, press key to enter the TIMESHIFT suspended state; Press button to enter TIMESHIFT playback state;Press button to exit the TIMESHIFT state; press info to see detailed information; | |
| EXIT | During multimedia playback, go back to previous TV program.Exit from current Menu, Back to previous menu without saving | |
| MENU | To display main menu, press again to exit current menu | |
| UP/CH+,DOWN/CH-,LEFT/V-,RIGHT/V+ | Keys to move up/down/left/right. Also for channel/volume change | |
| OK Enter channel / Favorite list | ||
| TEXT Teletext | ||
| STOP | Stop playing Media | |
| PLAY / PAUSE | Play/Replay / pause Media | |
| F.R & F.F | (1) Enter ZOOM mode, image can zoom in/out(2) Fast play backward / forward while Media playing | |
| PREV / NEXT | Play previous/next of Media in USB Storage | |
| REC | Enter Recording | |
| AUDIO/LANG | Press to set AUDIO mode / press to select Language | |
| HDMI Switch to high definition digital video output mode | ||
| PAGE UP / DOWN | Page up/down in Teletext | |
| VOL+/- | Volume adjusting | |
| CH-/CH+ | Select previous / next channel | |
| ZOOM | (1) Enable/disable zoom;(2) Switch to Daily Mode (GUIDE page)(3) Set/unset program locked in channel manager menu | |
| SUBTITLE | Switch the different language of subtitle | |
| AUTO | Auto scan channels of TV & Radio | |
| RED | Depend on OSD Hints | |
| GREEN | Depend on OSD Hints | |
| YELLOW Depend on OSD Hints | ||
| BLUE Depend on OSD Hints | ||
| GOTO | Enter into GOTO menu, select time of playing or stopping Media | |
Remark: When connecting outside hard-disk, the hard-disk must have its own power source.
Battery Installation
Insert 2 pieces batteries while observing the correct (+) and (-) polarities as illustrated below:

natural_image
Pure diagram of three vertical cylindrical tanks with internal chambers and connections, no text or symbols presentAbout the batteries
- If the remote control unit fails to work even when it is operated near the receiver, please replace the batteries (not included).
● Use 2 batteries of UM-4 (AAA) size (not included).
Notes:
- Do not use rechargeable (Ni-Cd) batteries.
- Do not attempt to recharge, short circuit, disassemble or throw the batteries into the fire.
- Do not drop, step on or cause any impact to the remote control unit. This may damage it, resulting malfunction.
- Do not mix old and new batteries.
- If the remote control unit is not going to be used for a long time, remove the batteries.
Caution
Keep batteries out of children's reach. If batteries are swallowed, contact a physician immediately.
1.1 Front Panel

-
ANT IN
-
HDMI port
-
USB port
-
ANT OUT
-
RC receiver
-
DC IN
1.2 Installation
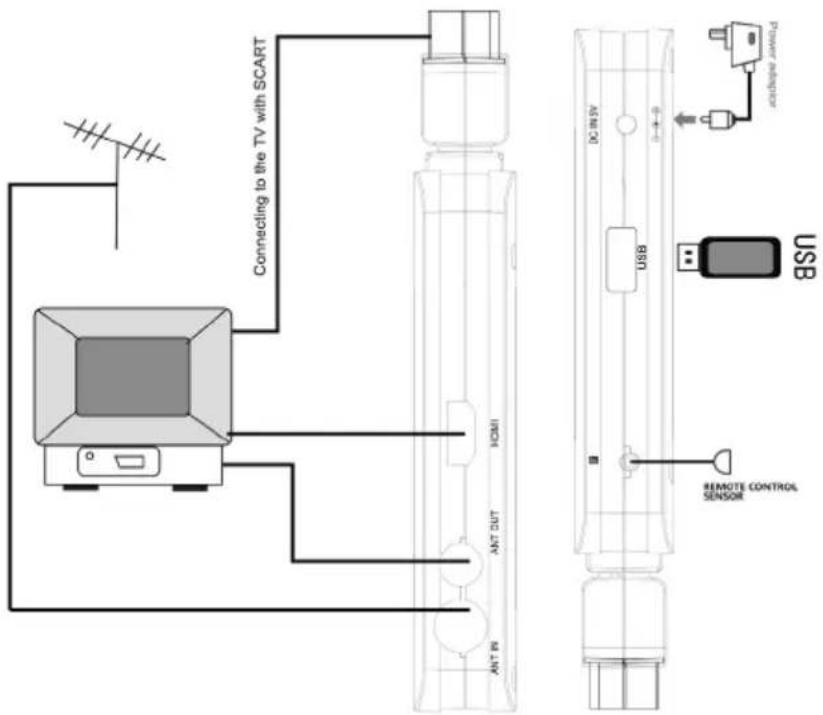
Connecting the receiver
Before you connect your receiver to your TV please ensure that it is placed on a flat and stable surface. Now that your receiver is in position connect it to your TV and any other peripheral devices. Please refer to the below diagram and your TVs user manual for cable installation instructions. Connect your receiver to power, power on your TV and the receiver before continuing to the initial set up guide.
2 Basic Functions
2.1 First Installation
If you are using the unit for the first time or have restored the unit to Factory Default, the installation Guide Menu will appear on your TV screen. Follow each of the option of the Installation Menu to setup your preferred menu language and suitable country (Region) etc.
First installation shall setup some important settings.
Use the arrow keys on the remote control to select your preferred Language, Country, Time Zone, LCN, then select channel search.
2.2 TV/RADIO Programs Switch
Press "TV/RADIO" to switch between Digital TV programs and Digital Radio programs when watching TV.
2.3 Channel Switch
Press "CH+/CH-" to switch to the previous or next program. Press number keys to input program number.
2.4 TV & Radio Channel List / FAV List
Press "OK" to switch to channel program list, press "LEFT/RIGHT" to select different program Column, press "UP/DOWN" to select program item.
Press "OK" to confirm the program selection, press "EXIT" to exit the program list.
If there are some favorite programs that have been set up, just press "OK" to enter into the favorite program list.
Press "UP/DOWN" to select favorite program, press "OK" to confirm the selection, press "RECALL" to return to previous menu.
2.5 Display Information of Programs
Press "INFO" to show the information of current program when it is in normal playing state.
2.6 Program RECALL
Press “RECALL” under state of full-screen to return to the previously played program.
2.7 Audio Language Switch and L/R Channel Switch
The program might have multilingual audio languages and the audio broadcast on different audio mode such as Stereo, Left or Right. All the available audio languages will be displayed while you press AUDIO/LANG key.
The screenshot is illustrated as below. If there is no audio output after you select the audio language, it indicates that there is no audio on the current audio mode, so you have to select preferable audio mode.
- Press "AUDIO" to switch the language of sound of current programs and switch among "stereo" → "left" → "right" (stereo→left channel→right channel).
- Press "LEFT/RIGHT" to switch among "stereo" → "left" → "right" (stereo→left channel→right channel), press "UP/DOWN" to switch the language of sound.
- Press "OK" to confirm the selection and return to full-screen play mode, press "EXIT" to return to full-screen play mode and save the setting.
2.8 Subtitle
- Subtitle is defaulted to be off. The programs might have multilingual subtitle information. Press "SUB" key on the remote control to enter the Subtitle menu of the current programs. All available subtitle languages will be displayed.
- Press "UP/DOWN" to move upward and downward to select the language.
2.9 Teletext
- If you want to watch Teletext, please press "TEXT" on the remote controller to enter into Teletext page.
- Input three digits to go to corresponding page you want to reach,
- Press "UP" to go to the previous page, while press "DOWN" to go to the next page;
- Press "OK" to adjust the transparence of the Teletext page.
- Press "TEXT" or "EXIT" to exit from teletext menu.
2.10 PVR & Time shift functions
2.10.1 PVR (instant recording)
During TV watching press "REC" to start recording, system has 3 seconds for initialization.
When initialization is finished, the screen left top will show "REC" icon, then it's recording and playing current program. You can press "info" to watch current recorded information.
Press “stop” while recording, will stop recording and resume normal play mode.
In the recording mode, you can also use REC key to set timer for subscribe stop record, besides you can reset the time optionally. (Can set the time length as cancel (00:00), or user define length). When the space is insufficient while recording, system will show "Storage Device Disk is Full" then stop recording and resume normal play back mode.
During recording, if a write failure happened, system will exit and stop recording.
2.10.2 Time shift
1) Press Ⅲ key to enter the TIMESHIFT mode. In Timeshift mode, you can watch the program meanwhile record the program.
2) the "TIMESHIFT" icon will be shown on left top side of the screen, and record program play will begin at recording start time.
a) In normal playback mode, and Timeshift set as Auto or Pause within PVR Config menu.
b) In recording mode.
3) In the below case press “<<” key also can enter into time shift mode, and playing program will fast rewind.
a) In normal playback mode, and time shift set as Auto or Pause within PVR Config menu.
b) In recording mode.
4) In Timeshift mode, when press "STOP" will exit Timeshift mode and other functions will be continued.
5) In Timeshift mode, when operate fast forward, the recording is still going on.
3 Installation
There are two kinds of Installation mode as follow:
- Auto Search
- Manual Search
3.1 Auto Search
Auto search is a kind of intelligent and convenient mode of programs searching, which covers programs of all frequent points of target countries or regions.
At present, this system covers many target countries and regions.
You can move the cursor to "auto search" via press "UP/DOWN" under "installation menu", then press "OK" to enter into Auto searching page.
% After entering into auto search page, system will scan all programs one by one under frequency points of current countries or regions selected automatically.
%_During scanning, press "EXIT" to stop and exit scanning.
% When all channels are detected and the scanning process is finished, press EXIT to quit the "Main Menu / Installation" page and display the channel to play.
3.2 Manual Search
If you understand much about digital TV and know the frequency of the program or if you want to scan the program at any frequency required, you can select manual search, which will allow you to save much time.
- You can move the cursor to "manual search" via press "UP/DOWN" under "installation menu", then press "OK" to enter into manual search page.
- Prior manual search, you need to setup relevant parameters including:
(1) Frequency (KHz): the default frequency is settled by different country, you can input relevant digitals to modify it.
(2) Bandwidth: the default value of bandwidth is settled by different country, while you can set it to 7MHz, 8MHz.
- Press "OK" after setting all parameters to start manual scan.
Move to START SEARCH, then press "OK" to start the manual search.
3.3 Channel Filter
All of channels or only unencrypted channels are set to be searched by selective settings.
4 Channel
System offers an efficient function of channel management such as channel deleting, marking, moving, locking, rename and grouping.
There are two independent pages for channel management: TV and RADIO,
4.1 Channel Manager
Channel manager page includes channel deleting, moving, locking and rename.
- You can enter the page as shown in the figure below via "MENU->channel->Channel Manager".
- It will pop up a dialogue box prompting that "Channel not available" when there are no channels in database to enter into, and it will not enter into channel organizer page.
- Channel organizer menu includes: Delete Channel, Skip Channel, Lock Channel and Channel Rename. Press "UP/DOWN" to choose the line where channel is, then press the 4-color key on the remote control:
- press the red key to set and cancel Lock Channel,
• the green key to set or cancel Delete Channel, - press the yellow key to set or cancel Skip Channel,
-
the blue key to set or cancel Rename Channel. After setting, corresponding figure will appear.
-
To rename channel, press "UP/DOWN" to choose the line where the channel to be renamed, press the blue key to enter the page to rename the channel.
-
Press the blue key to exit Channel Rename page.
-
To set or cancel Lock Program, the system will hint to input "0000". To set Delete Program, the system will hint to choose dialogue box "Delete selected Channels?", Press "LEFT/RIGHT" to choose, choose "Yes" to delete the program or choose "No" to cancel.
-
Press "EXIT" to exit Channel manager page and saving the edit result.
4.2 Favorite List
- You can press "FAV" on the remote control to enter into "Favorite list".
- It will pop up a dialogue box prompting that "Channel not available" when there are no programs in database to enter into, and it will not enter into channel grouping page.
- Press "UP/DOWN" to choose the line where the channel to be grouped in is, and then press the color keys on the remote control to set different channel grouping.
- When changing favorite channel is finished, press "EXIT", and then saving the selection and indicating with the hint of "Data Saving...".
5 Preference Setting
5.1 OSD Language
OSD Language option: The system has the user interface supporting a couple of languages, you can set language via OSD Language option:
(1) Move the cursor onto OSD Language option, Press "RIGHT" to enter OSD Language List.
(2) Press "UP/DOWN" to choose language.
(3) Press "OK" to confirm system interface language selection, then the setting is effective, and then the interface language turns into the currently chosen language, the cursor can move onto OSD Language option on the left.
(4) OSD TIMEOUT
To set the automatic exit time from MENU: 1S-6S.
(5) OSD TRANSPARENCY
To set the transparency of MENU: from 0% to 60%.
5.2 Preferred Subtitle
(1) Set the subtitle to your preferable language.
(2) When the preferred subtitle is selected, it will be displayed automatically while the stream has the selected subtitle.
(3) User can set another preferred subtitle language in the "2 ^nd preferred subtitle" option.
4. Timeshift to Record
Either of options, ON/OFF, can be selected. If ON is selected, when Timeshift operation will stop and the recorded file buffered by the Timeshift will be stored in USB equipment; if OFF is selected, Timeshift will operate continuously and the recorded file buffered by the Timeshift will not be stored in USB equipment.
6 System Setting
System Setup menu can provide convenient system setup.
6.1 Timer
If you want to set channel playing at certain time or REC some programs, you can set via Timer menu.
● Application shall provide list of timer for adding, viewing, editing and deleting.
- "Timer" shall list all the timers that are added through the "TV PROGRAM GUIDE" as well as the timer that are manually added by the user through the "Timer" menu.
● Application supports a maximum of 10 "Timer".
In Timer Edit menu, the system can support at most 10 events.
Date: Specifies the timer date
Program Name: Specifies the channel for which the timer is set
Start time: Specifies the start time of the timer
End time: Specifies the end time of the timer, be used in Recorder Type
Duration: Specifies the duration time of the timer, be used in Recorder Type
Mode: Specifies the frequency of the timer, duration can be any of the following:
● Once - timer will be triggered only once.
● Daily - timer will be triggered daily at the specified time.
● Weekly - timer will be triggered every week at the specified time.
● Monthly - timer will be triggered every Monthly at the specified time.
Type: Specifies the channel type for which the timer is set, user can select the below options :
Channel, Recorder, Standby, or On.
Channel : you can preset the time to switch to selected channel. You can only enter START TIME but not End Time and Duration.
Standby : you can preset the time you want the unit to go into standby mode. You can only enter START TIME but not End Time and Duration.
On : you can preset the time you want the unit to power ON. Enter the start time and then switch off the unit. The unit will power on at the preselected Start time.
Recorder : you can set the Channel you want to record, the start time and the duration. After setting the duration, the system will calculate the End Time automatically.
Then press OK key to confirm your settings and press POWER key to enter the unit into standby mode.
Remark : WARNING ! Please do not omit to insert an USB device in the USB port compatible for recording function.
If you select recorder type, it can be set Enable or Disable options such as AD Record, Subtitle Record and Txt Record.
Press "OK" after your settings and the system will return to previous menu.
6.2 Child Lock
Child Lock menu can provide convenient locked setup.
- Here you can set Enables or Disables the system lock, and also can set the parental rating from 0 to 18.
- You can revise system password.
(1) Press the 0-9 number key on the remote control to input Old Password, the default password is set as "0000".
(2) If the password is input correctly, the cursor can move onto Input New Password option, press 0-9 number key on the remote control to input new 4-digit Password.
6.3 Date Time
Clock Menu contains different clock settings. Following menu layout shows the Time Settings.
If the “Time Mode” is set to “Auto”, then “Time Zone” and “DST” shall be active for editing. If the Mode is “Manual”, these options shall be disabled.
If the "Time Mode" is set to "Manual" then, "Date" and "Time" shall be active for editing. If the Mode is "Auto", these options shall be disabled.
6.4 Factory Reset
It allows you to restore the unit to its default factory settings. When you select this option, you will be asked to enter your password (or default password "0000"). Press OK to resume the unit to factory default settings.
6.5 Upgrade
If you want to upgrade the software, please contact supplier.
Caution: Please don't cut off the power when you are upgrading the software.
6.6 Version
Via menu (MENU->setting->Version) to check the software version
7 AUDIO / VIDEO Setting
Video output mode can change the mode of video output, you can adjust TV mode according to the actual situation of you receiving equipment.
(1) Move the cursor to the corresponding option to be adjusted and press OK / Right key to display the available settings, and then press UP/DOWN key to move circularly and choose the desired option.
(2) Press OK key to save the settings.
7.1 Aspect Ratio
Aspect Ratio can be set as 16:9, 4:3PanScan, 4:3LetterBox, Full screen.
7.2 Video resolution
7.3 HDMI resolution
7.4 HDMI Audio
Below are the available options: HDMI Mute; HDMI PCM, HDMI RAW.
8. MEDIA CENTER
8.1 Multimedia
This product is compatible to play the MP3, JPEG and MPEG files. It can support only the files displaying in the list and the file format this product is compatible with.
Insert USB external device into the USB port compatible of the decoder.
Press USB key to enter into the Multi Media menu.
Press EXIT key to return to previously viewed TV program and exit the Multi Media menu.
8.1.1 Media Selection Mode
Use the "LEFT" or "RIGHT" key to select the music / photo / movie...etc. playback mode. Then press "OK" to enter the file list.
8.1.2 Movie
Movie File Browser
This menu helps the user to select and play a movie from a list of movies that are stored in the USB device.
Following menu layout shows the "Movie" menu.
Movie Playback
When the video is playing, the following information shall be displayed on OSD:
a. File name.
b. Total time and the current time for this playing file.
c. Play state of this video.
d. Progress bar.
e. File size and resolution of this video.
f. Repeat mode such as off/one/dir.
Go to Menu
Use the GOTO button of the Remote Control to switch to anytime time section of a movie and start the playback. Press GOTO button again to exit.
Book Mark Menu
To keep a memory of the playback section of any multi-media file, and start the playback at that particular time at any time again. Press the MARK key on the remote control to enter book mark menu. Press MARK key again to exit.
8.1.3 Music
This menu helps the user to select and play a song from a list of songs that are stored in the storage device. WMA, WAV, RA and MP3 format will be supported for playing.
When the music file is playing, the following information shall be displayed on OSD (see below picture)
g. Equalizer information.
h. Total time for this playing file.
i. Play state of this music.
j. Progress bar.
k. Current number of this file in total file list.
I. File size, artist, album and genre.
8.1.4 Recorder Manager
8.1.3 Recorder Manager Browser
To view the recorded TV programs stored in storage device.
8.1.4 Rename
In this menu the user can change the program's name as they like.
8.1.5 Photo
To view all the photos stored in the storage device. Follow the instructions at the bottom of the OSD screen.
To go to next picture, press Right navigation key. Press OK to see the picture on the screen.
To navigation keys, you can reverse the picture up, down, right, left.
8.16 E-Book
- Please download the text file on the internet and save in your USB drive and insert to device.
- Press "OK" to enter to E-book on the screen and find text file in USB Drive and then you can read the file on the screen.
8.17 Disk manager
- You can - MOVE/COPY, RENAME, DELETE, DELETE ALL – which are stored in the USB device. Please follow the OSD Hints to press the corresponding key of the remote controller.
8.2 Multimedia Configuration
8.3 PVR Configuration
You can enter the page via "MENU->Preference->PVR Config". it contains five options as follow:
- File Size
- Timeshift
- Timeshift Length
- Timeshift to Record
1. File Size
Any of options, 4G/3G/2G/1G, can be selected to set the size of the file to be recorded; if the size of the file exceeds the setting size during the record of the program, record program will
divide the file into different set files.
2. Timeshift
Any of options, AUTO/OFF/ PAUSE, can be selected to set the status of the current Timeshift, if AUTO is selected, Timeshift operation will perform automatically on the background, can change channel but discard previous Timeshift buffer and restart a new one; if OFF is selected, Timeshift operation will stop; if PAUSE is selected, Timeshift operation will be Manual start by PAUSE key, screen freeze at once, can resume by PLAY key, allow channel change only in the same TP, Timeshift buffer only record first channel; and if the preceding three options are changed when the AUTO is selected, Timeshift will restart.
3. Timeshift Length
Any of options, AUTO/30min/1h/2h, can be selected to set the time depth of the Timeshift; if AUTO is selected, the time depth of the Timeshift is depended on the available size of USB equipment; if any of options, 30min/1h/2h, is selected, the usable time depth of the Timeshift is 30min/1h/2h in the case that the available size of USB equipment is big enough, whereas, the usable time depth of the Timeshift is depended on available size of USB equipment.

Precautions for correct disposal of the product.
The symbol shown on the equipment indicates that waste must be disposed of in “separate collection” and so the product must not be disposed of together with urban waste.
The user must take the product to special “separate waste collection centres” provided by local government, or deliver it to the retailer against the purchase of a new product.
Separate collection of waste and subsequent treatment, recycling and disposal operations promotes the production of equipment with recycled materials and limits negative effects on the environment and on health caused by improper handling of waste.
Illegal disposal of the product leads to the enforcement of administrative penalties.
9. SPECIFICATIONS
Tuner
| Input Connector | IEC 16902. Female |
| Input Frequency Range | VHF(177.5-226.5),UHF(474-866MHz) |
| Num of RF Inputs | 1 |
| Input impedance | 75 ohm |
| RF output Connector | (bypass)IEC 16902 Male |
| Loop through | support |
Demodulation
| Standard | ETSI EN302 755 (V1.3.1) |
| Guard interval Modes | 1/4,19/256,1/8,19/128,1/16,1/32,1/128 Active Symbol duration |
| FEC Modes Rate | 1/2,3/5,2/3,3/4,4/5,5/6 Automatic |
| Carriers/Constellation | All modes supported including nonhierarchical |
| Demodulation | COFDM(QPSK, 16QAM, 64QAM,256QAM) 1K,2K,4k,8k,16k,32k |
| Channel bandwidth | 7MHz, 8 MHz |
Video Decoder
| Standard | ISO/IEC 13818-2 and ISO/IEC 14496-10 |
| Transport stream | ISO/IEC 13818-1 |
| Video decoding | MPEG-2 SD/HD (MP@ML and MP@HL), MPEG-4, HEVC(H.265), H.264/AVC SD/HD DivX 4.X ~ 5.X, AVI, VOB, MOV, MKV, TS, FLV, JPEG, BMP, PNG, |
| Aspect ratio | 4:3, 16:9 |
Audio Decoder
| Standard | ISO/IEC13818-3 TR1011154 |
| Audio decoding | MPEG-1 and MPEG-2 Layer I & II, WMA and HE-AAC Digital Audio |
| Sample rate | 32 kHz, 22.1 kHz, 44.1KHz,48 kHz |
Subtitles
| Subtitle | DVB Subtitle |
Accessories
| Remote control unit | IR (38kHz) RC3 / other on request (38kHz) |
| User Manual | 1 pcs |
Power
| AC input range | DC 5V/1.5A |
| Power consumption | < 6W |
| Standby consumption | < 0.5W |
! As a switching equipment, power adaptor should be convenient for operating. the device should be far away from water dropping and splashing, as well as vase full of liquid.
SIMPLIFIED EU DECLARATION OF CONFORMITY
Hereby TREVI Spa declares that the radio equipment type HE 3348 SC is in compliance with directive 2014 / 53 / EU.
The full text of the EU declaration of conformity is available at the following internet address www.trevi.it




Made in CHINA
Trevi S.p.A.
Strada Consolare Rimini-San Marino, 62 47924 Rimini (RN) Italy
Tel. 0541/756420 - Fax 0541/756430 - www.trevi.it - e-mail: info@trevi.it



- TELEVISIONE DIGITALE TERRESTRE (DTV)
- Contents
- IMPORTANT SAFETY INSTRUCTIONS....20
- Remote Control....21
- Basic Functions....24
- Installation....27
- Channel 28
- Preference Setting....29
- System Setting....29
- AUDIO / VIDEO Setting....31
- MEDIA CENTER ....32
- SPECIFICATIONS....35
- IMPORTANT SAFETY INSTRUCTIONS
- CAUTION
- Power Cord Protection
- Remote Control
- Appearance of Remote Control
- Battery Installation
- About the batteries
- Notes:
- Front Panel
- Installation
- Connecting the receiver
- Basic Functions
- First Installation
- TV/RADIO Programs Switch
- Channel Switch
- TV & Radio Channel List / FAV List
- Display Information of Programs
- Program RECALL
- Audio Language Switch and L/R Channel Switch
- Subtitle
- Teletext
- PVR & Time shift functions
- PVR (instant recording)
- Time shift
- Installation
- Auto Search
- Manual Search
- Channel Filter
- Channel
- Channel Manager
- Favorite List
- Preference Setting
- OSD Language
- Preferred Subtitle
- Timeshift to Record
- System Setting
- Timer
- Child Lock
- Date Time
- Factory Reset
- Upgrade
- Version
- AUDIO / VIDEO Setting
- Aspect Ratio
- Video resolution
- HDMI resolution
- HDMI Audio
- MEDIA CENTER
- Multimedia
- Media Selection Mode
- Movie
- Movie File Browser
- Movie Playback
- Go to Menu
- Book Mark Menu
- Music
- Recorder Manager
- Recorder Manager Browser
- Rename
- Photo
- E-Book
- Disk manager
- Multimedia Configuration
- PVR Configuration
- File Size
- Timeshift
- Timeshift Length
- Precautions for correct disposal of the product.
- SPECIFICATIONS
- SIMPLIFIED EU DECLARATION OF CONFORMITY
Brand : Trevi
Model : HE 3348 SC
Category : Digital decoder