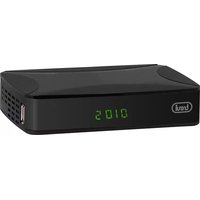
HE 3368 T2 - Digital decoder Trevi - Free user manual and instructions
Find the device manual for free HE 3368 T2 Trevi in PDF.


| Product Type | Digital Terrestrial Decoder (DVB-T2 / HEVC) |
| Brand | Trevi |
| Model | HE 3368 T2 |
| Dimensions (W x D x H) | Approx. 100 x 80 x 28 mm |
| Weight | Approx. 200 g |
| Power Supply | 5V DC, 1A (via USB cable or external adapter) |
| Power Consumption | Max 5 W (standby < 1 W) |
| Main Functions | DVB-T2/HEVC reception, MPEG-2/4/H.264/H.265 decoding, USB media playback (video/audio/photo), HDMI output (1080p), SCART output, electronic program guide (EPG), teletext, subtitle support |
| Connectivity | RF input (IEC), HDMI out, SCART out, USB 2.0 host, DC power jack |
| Supported Video Formats | MPEG-2, MPEG-4, H.264, H.265 (HEVC), AVI, MKV, MP4, etc. |
| Supported Audio Formats | MPEG-1/2 Audio, MP3, AAC, AC3, etc. |
| Supported Image Formats | JPEG, BMP, PNG |
| Remote Control | IR remote (batteries included) |
| Maintenance & Cleaning | Use a soft, dry cloth. Avoid liquids and abrasive cleaners. |
| Safety Instructions | Keep away from moisture, heat and direct sunlight. Do not disassemble. Use only the supplied power adapter. |
| Spare Parts & Repairability | No user-serviceable parts inside. Contact authorized service center for repairs. |
Frequently Asked Questions - HE 3368 T2 Trevi
User questions about HE 3368 T2 Trevi
0 question about this device. Answer the ones you know or ask your own.
Ask a new question about this device
Download the instructions for your Digital decoder in PDF format for free! Find your manual HE 3368 T2 - Trevi and take your electronic device back in hand. On this page are published all the documents necessary for the use of your device. HE 3368 T2 by Trevi.
USER MANUAL HE 3368 T2 Trevi
MINI RICEVITORE DVB-T2 HD CON H.265/HEVC
MINI HD DVB-T2 RECEIVER WITH H.265/HEVC
natural_image
Blank gray image with no visible content, text, or symbolsINDICE
- PREFAZIONE ......pag. 4
- PRECAUZIONI DI SICUREZZA....pag. 4
- CURA E MANUTENZIONE....pag. 5
- ALL'INTERNO DELL'IMBALLO....pag. 5
- DESCRIZIONE COMANDI RICEVITORE DVB-T2....pag. 5
- INSTALLAZIONE E COLLEGAMENTI....pag. 6
- TELECOMANDO
7.1 INSTALLAZIONE....pag. 6
7.2 DESCRIZIONE COMANDI....pag. 7
8. PRIMA INSTALLAZIONE ......pag. 8
9. TELEVISIONE DIGITALE TERRESTRE (DTV)
9.1 OPERAZIONI PRELIMINARI....pag. 8
9.1.1 RICERCA AUTOMATICA DEI CANALI....pag. 8
9.1.2 RICERCA MANUALE DEI CANALI....pag. 8
9.1.3 FUNZIONE LCN....pag. 8
9.1.4 SPOSTAMENTO CANALI MEORIZZATI....pag. 9
9.2 VISUALIZZAZIONE CANALI MEMORIZZATI....pag. 9
9.3 REGOLAZIONE VOLUME ......pag. 9
- MENU PRINCIPALE DTV
10.1 MENU PROGRAMMA....pag. 9
10.2 MENU IMMAGINE....pag. 10
10.3 MENU CERCA....pag. 10
10.4 MENU DATA E ORA....pag. 10
10.5 MENU OPZIONI....pag. 11
10.6 MENU SISTEMA....pag. 11
- USB....pag. 11
11.1 MEDIA CENTRE (MULTIMEDIA)....pag. 11
11.1.1 RIPRODUZIONE VIDEO....pag. 12
11.1.2 RIPRODUZIONE MUSICA....pag. 12
11.1.3 RIPRODUZIONE FOTO....pag. 12
- TELETEXT DVB-T pag. 12
12.1 RICERCA DI UNA PAGINA....pag. 12 - PROBLEMI E SOLUZIONI....pag. 12
- CARATTERISTICHE TECNICHE....pag. 13

ATTENZIONE
RISCHIO DI SCOSSE ELETTRICHE NON ESPORRE A PIOGGIA E UMIDITÀ

ATTENZIONE: NON APRIRE L'APPARECCHIO. ALL'INTERNO NON VI SONO COMANDI MANIPOLABILI DALL'UTENTE NE PARTI DI RICAMBIO. PER TUTTE LE OPERAZIONI DI SERVIZIO RIVOLGERSI AD UN CENTRO DI ASSISTENZA AUTORIZZATO TREVI

CAUTION
DANGER OF ELECTRIC SHOCK! DO NOT EXPOSE TO RAIN OR HUMIDITY

CAUTION: TO REDUCE THE RISK OF ELECTRIC SHOCK, DO NOT REMOVE COVER OR BACK. NO USER SERVICEABLE PERTS INSIDE. REFER SERVICING TO QUALIFIED PERSONNEL ONLY.

UKPLUG ONLY
WIRESCONNECTIONSTOATHREE-PINPLUG
The wires in this mains lead are coloured in accordance with the following wiring codes:
Blue: Neutral
Brown: Live
The wires in this mains lead must be connected to the terminals in the plug as follows:
Blue wire: N or Black
Brown wire: L or Red
Neither wire is to be connected to the earth (E or W) terminal of three-pin plug.
Should the fuse fail in the plug remove the plug form the wall socket and replace the fuse with a 3 Amp. ASTA approved BS 1362 fuse.
1 PREFAZIONE
natural_image
Black electronic device with digital display showing '0105' and 'Tread' logo (no readable text beyond branding)Ricevitore DVB-T2

Telecomando

Manuale
C

natural_image
Black rectangular device with ventilation slots and a labeled connector (no text or symbols on the device itself)natural_image
Diagram of a network device connected to a monitor and antenna, showing signal routing (no text or labels)7 TELECOMANDO
7.1 INSTALLAZIONE
9 TELEVISIONE DIGITALE TERRESTRE (DTV)
Thank you for purchasing this Trevi product!
Before using it, please read the following user manual carefully
- Make sure the product is not damaged, if so, contact the seller.
- Check that all accessories are present.
- Do not open the device: inside there are no controls that can be manipulated by the user or spare parts. For all operations, contact an Authorized Trevi Service Center.
- Keep the following user manual.
TREVI pursues a policy of continuous research and development, therefore the products may have different characteristics from those described.
2 SAFETY PRECAUTIONS

ATTENTION
This symbol shown on the back of the device and in this manual indicate the presence on the same of important instructions for safe use. Read them carefully before using the appliance.
- Place the appliance in an airy place.
- Do not cover the ventilation slots.
- The appliance must not be exposed to dripping or splashing water. No objects filled with liquid, such as vases, must be placed on the appliance.
- No naked flame sources, such as lighted candles, must be placed on the appliance.
- Cables must be hidden and protected.
- Keep the appliance away from the following places:
- near heat sources (radiators, stoves, direct sunlight, etc...);
- near wet areas (bathrooms, swimming pools, etc...);
- dusty areas;
- areas subject to strong vibrations.
Unplug the power cord during lightning storms or for long periods of non-use.
■ Instruct children and people with little knowledge of the product to use it correctly.
3 CARE AND MAINTENANCE
- Unplug the appliance before cleaning it.
- Do not use solvents or liquids, only a soft, dry cloth.
natural_image
Black electronic device labeled 'trout' with digital display showing 0105 (no readable text beyond branding)DVB-T2 Receiver

Remote
control
User
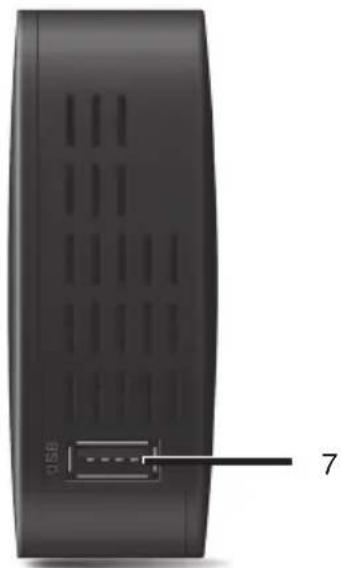
5 DESCRIPTION OF DVB-T2 RECEIVER COMMANDS


natural_image
Black rectangular device with ventilation slots and a USB port, labeled with number 7 (no text or symbols on the device itself)
- Antenna input
- HDMI output (to TV)
- SCART output (to TV)
-
Power cable AC 220-240V\~50Hz
-
Infrared sensor
- Power indicator (Red Stand-by, Green on)
- USB input
6 REMOTE CONTROL
6.1 INSTALLATION
Attention: batteries not included
- Open the battery compartment on the back of the remote control.
- Insert the batteries (size AAA) making sure to respect the polarity and the guide marks inside the battery compartment.
- Close the battery compartment.
To prevent the batteries from leaking with consequent damage to the remote control, be sure to install the batteries correctly and not to install different types of batteries (old and new, alkaline and zinc-carbon, etc...).
Remove the batteries from the remote control if it is not used for long periods.
6.2 COMMANDS DESCRIPTION

- POWER button, to Turn On/Stand-by the unit.
- MUTE button, to switch On/Off volume.
- button, not enabled.
- ▶ / || PLAY/PAUSE button, used for multimedia files.
- Not enabled.
- ■ STOP button, for multimedia files.
- ◀ PREV button, skip previous track + Red button function.
- ➤ NEXT button, skip next track + Green button function.
- FWD button, fast forward + Blu button function.
- ◀️ REV button, fast back + Yellow button function.
- TV/R button, switch between digital radio and DVB-T.
- AUD button, to select your favorite audio channel from those available from the TV channel.
- CH+/▲ button, to select next channel, press to move the cursor.
- VOL-/◀ button, to decrease volume, ress to move the cursor.
- VOL+/▶ button, to increase volume, press to move 8 the cursor.
- OK button, to confirm current setting, or display channel list in no-menu mode.
- CH-/▼ button, to select previous channel, press to move the cursor.
- MENU button, display main menu on TV screen, and press again to disappear menu.
- EXIT button, to quit current menu.
- PAGE+ button.
- INFO button, display information about the current channel.
- TTX button, switch on teletext, if current channel has this option, and use EXIT key to quit teletext.
- PAGE-button.
- LAST button, return to previous channel.
- SUB button, display subtitle options (availability depends on the channel).
- Numeric keys (0-9).
- TIMER button, not enabled.
- FAVOR button, displays your favorite channels list; press FAVOR again to access to the other favorite lists.
7 FIRST TIME INSTALLATION
After all connections have been made sure the unit is connected to the Main power. Press power button to switch On the unit.
If you are using the unit for the first time or have restored the unit to factory default, the installation guide menu will appear on your TV screen.
To navigate the menus, use the navigation keys ▲ and ▼, press OK to confirm the selection or press the EXIT button to exit.
- OSD LANGUAGE: press ◀ ▶ key to select a language.
- COUNTRY: press ◀ ▶ key to select your country of residence.
- FTA ONLY: press ◀ ▶ key to scan only free channels (FTA - Free to Air) or all channels (ALL).
- CHANNEL SEARCH: press ▶ or OK key to begin Automatic channel search.
Once channel tuning is complete, you can start watching TV programs.
You can finish scanning for digital channels by pressing the EXIT button.
Note: At the end of the digital terrestrial channel scan, the same channel with different frequencies in conflict of LCN numbering may be displayed. Select the frequency to assign the LCN number and press the OK button.
8 DIGITAL TERRESTRIAL TELEVISION (DTV)
To navigate the menus, use the navigation keys ◀ ▶, ▲ and ▼, press the OK key to enter and the EXIT key to exit the menu items. Press the OK button to confirm the selection. Press the EXIT button to exit the menu.
8.1 BASIC OPERATION
8.1.1 AUTO SEARCH
This option will automatically search for channels and save them once the scanning is complete. All previously saved channels and settings will be deleted.
- Press MENU button to enter the main menu;
- Press ◀ keys and select SEARCH;
- Press ▲▼ keys and select AUTO SEARCH;
- Press OK button to start automatic channel scan.
To cancel channel search, press EXIT. Any channels that have been found will be saved.
Note: If the TV displays “NO SIGNAL” message, it means that it is not receiving any TV signal, so you have to check aerial cable and connections.
8.1.2 MANUAL SEARCH
This option allows you to scan for new channels without deleting previously saved channels and settings.
- Press MENU button to enter the main menu;
- Press ◀ keys and select SEARCH;
- Press ▲▼ keys to select MANUAL SEARCH and press OK or ▶, the channel search screen will appear;
- Press ◀ ▶ keys to select the channel frequency;
- Press ▲▼ keys to select START and press OK button to start searching channels.
If a channel is found it is saved and added to the channels list. If channels can not be found during searching the unit will exit automatically.
Note: If the message “NO SIGNAL” appears when selecting the channel, it means that no signal is transmitted on that channel.
8.1.3 LCN FUNCTION
This decoder is equipped with the Logical Channel Number (LCN) function which is a national standard that assigns numbers to the same channels throughout the country where you are scanning.
This function is enabled by default.
If due to the antenna signal the channel numbering does not comply with the national standard, or you want to change the channel numbering to your liking, you must disable this function and move the channels as described above.
- Press MENU button to enter the main menu;
- Press ◀ ▶ keys to select PROGRAM;
■ Press ▲▼ keys to select LCN; - Press ◀ ▶ keys to set the LCN to OFF.
9 SYSTEM SETTING
9.1 PROGRAM MENU
- Press MENU button to enter the main menu;
- Press ◀ keys to select PROGRAM;
- Press ▲▼ keys until the desired item is selected and adjust it using the buttons ◀▶;
- Press EXIT button to exit.
Channel Edit
Allows you to perform operations on one or more stored channels.
- 1 DEL: select a channel using the ▲▼ keys and press the 1 key to delete the channel from the list. Press the OK button to confirm, an X will appear on the right side.
■ 2 MOVE: select the channel to be moved using the ▲▼ keys and press the 2 key. A symbol with two arrows will be displayed.
Press the ▲▼ keys until the destination of the channel to be moved is selected. Press the OK button to confirm the new position.
- 3 SKIP: select a channel using the ▲▼ keys and press the 3 key to activate the SKIP function. A square symbol with an arrow will appear. The channel will not be displayed when using the CH+, CH- buttons to change channels.
- 4 LOCK: Press key 4. Confirm the lock by entering the security code (default 000000), select a channel using the navigation keys ▲ ▼ and confirm with the OK key. A padlock symbol will be displayed. By activating this function, the channel can only be viewed after entering the security password.
- 5 FAV: Press key 5, select a channel using the ▲▼ keys and confirm with the OK key, select one of the lists of favorite categories that will appear (Movies, News, Sport, Music) to add it to its indoor. Select the desired list using the ▲▼ keys and press the OK key to confirm. The addition of the channel to one of the categories will be confirmed by the presence of a heart-shaped symbol. To delete a channel from a category, repeat the steps and, positioning on the channel marked as favorite, remove the check mark from the list where it was stored. The elimination will be confirmed by the disappearance of the heart-shaped symbol.
- RENAME: select a channel using the ▲▼ keys and press the GREEN button to rename the channel. Use the numeric keypad and the indications that appear on the screen.
Sort
Allows you to arrange the channel list according to certain parameters. In the factory, the channels are arranged by LCN numbering.
LCN
This decoder is equipped with the Logical Channel Number (LCN) function which is a national standard that assigns numbers to the same channels throughout the country in which you are scanning.
This function is enabled by default.
ACU
Function to activate/ deactivate the automatic channel update.
Volume Scope
Volume level setting equal for all channels (Global) or variable according to the specific volume of each channel (Channel).
9.2 PICTURE MENU
- Press the MENU key to enter the main menu;
- Press ◀ keys until the PICTURE item is selected;
- Press ▲▼ keys until the desired item is selected and adjust it using the ◀▶ keys;
- Press the EXIT button to exit.
Description of the adjustments:
- ASPECT RATIO: Choose the screen format from: Auto, 16: 9 Wide screen, 16: 9 PillarBox, 16: 9 Pan Scan, 4: 3 Leterbox, 4: 3 Pan Scan, 4: 3 Full.
■ RESOLUTION: 1080p, 576i, 576p, 720p, 1080i.
■ TV FORMAT: PAL or NTSC.
- TV-SCART: allows you to set the Scart output as RGB or CVBS.
- OSD SETTINGS: allows you to adjust the parameters of the OSD window such as: Transparency, Brightness, Chroma, Contrast and the OSD timeout.
- PANEL SETTINGS: to adjust the device display parameters such as: LED brightness, LED display (time or channel number) and Standby Show time (whether or not to show the time when the device is in Stand-by).
9.3 SEARCH MENU
- Press MENU button to enter the main menu;
- Press ◀ keys until the SEARCH item is selected;
- Press ▲▼ keys until the desired item is selected and adjust it using the ◀▶ keys;
- Press the EXIT button to exit.
Description of the adjustments:
- FTA ONLY: to scan only free channels (FTA - Free to Air) or all channels (ALL).
- AUTO SEARCH: Press the OK button to start automatic channel scan.
The search starts automatically and all available TV programs are stored progressively; the operation takes a few minutes.
- MANUAL SEARCH: select the channel to be searched manually using the ◀ ▶ keys. Each channel corresponds to a frequency. Press the OK button to start scanning.
- COUNTRY: press ◀ keys to select the country where you are scanning.
- ANTENNA POWER: press ◀ ▶ keys to activate/ deactivate the function for the use of an amplified antenna in the reception and scanning of channels.
9.4 TIME MENU
- Press MENU button to enter the main menu;
- Press ◀ keys until the TIME item is selected;
- Press ▲▼ keys until the desired item is selected and adjust it using the ◀▶ keys;
- Press EXIT button to exit.
Description of the adjustments:
- REGION AND TIME: allows you to set the city, the time zone and whether daylight saving time is activated or not.
- SLEEP (HOUR): you set the automatic shutdown of the decoder in case of user inactivity.
Press the navigation keys ◀ ▶ until you select the time after which the decoder should switch off; you can choose from 1 to 12 HOURS or OFF (decoder always on).
- POWER ON/OFF: you set the ignition and/ or shutdown according to an hourly schedule.
9.5 OPTION MENU
- Press MENU button to enter the main menu;
- Press ◀ keys until the OPTION item is selected;
- Press ▲▼ keys until the desired item is selected and adjust it using the ◀▶ keys;
- Press EXIT button to exit.
Description of the adjustments:
- OSD LANGUAGE: allows you to change the OSD language (menu).
■ EPG LANGUAGE: allows you to change the EPG language.
■ SUBTITLE LANGUAGE: Change the default DVBT subtitle language.
■ HOH SUBTITLE: Turn On/ Off descriptive subtitles for people with hearing impairments (if broadcast by the TV channel).
■ TTX LANGUAGE: Teletext language setting. - FIRST AUDIO LANGUAGE: allows you to change the first default listening language of DVBT.
- SECOND AUDIO LANGUAGE: allows you to change the second default DVBT listening language.
9.6 SYSTEM MENU
- Press MENU button to enter the main menu;
- Press ◀ keys until the SYSTEM item is selected;
- Press ▲▼ keys until the desired item is selected and adjust it using the ◀▶ keys;
- Press EXIT button to exit.
Description of the adjustments:
- PARENTAL GUIDANCE: allows you to select the desired blocking level based on age. You can choose between Off and from level 4 to level 18. The security password must be entered.
- LOCK CONTROL: Change the security password. It is necessary to enter the old code and then the new one, and reconfirm the new code (default: 000000).
- FACTORY RESET: allows you to restore the decoder settings to the initial conditions (factory settings). You must enter the security password and confirm the start of the system recovery with the OK button. The decoder will reset the values to the initial conditions and reset the channel list.
■ SYSTEM INFORMATION: View the decoder software version. - SOFTWARE UPGRADE: allows you to update the decoder software through the USB input.
9.7 USB MENU
- Press MENU button to enter the main menu;
- Press ◀ keys until the USB item is selected;
- Press ▲▼ keys until the desired item is selected and adjust it using the ◀▶ keys;
- Press EXIT button to exit.
9.8 MEDIA CENTRE
- Select one of the 4 categories available: FILE (to view all the files on the external key), VIDEO (to view video files), MUSIC (to listen to audio files), PICTURE (to view image files);
- Confirm the type of file you want to view by pressing the OK button;
- The contents of the USB device memory will be displayed on the left of the screen. Select the file to be played using the ▲▼ keys and press the OK button to start playback;
- Press EXIT button to return to the previous screen.
10 TELETEXT DVB-T
Teletext is a system of information transmitted by some broadcasters that can be consulted like a newspaper, leafing through it page by page.
- Press TTX button to activate Teletext;
The table of contents will appear on the screen with the various headings made up of three-digit pages; - Press EXIT button to exit Teletext.
10.1 SEARCH FOR A PAGE
Dial the desired page number with the numeric keypad. Enter the three digits that make up the page number (for example "201") by pressing in sequence the number "2" - "0" - "1", the number is displayed at the top left, the page counter starts the search, the page is displayed.
To consult another page, repeat the operation.
11 TROUBLE SHOOTING
| Problems Potential reason | What to do | |
| No picture | Power isn’t connected Connect the power | |
| The power switch is not On Switch On the power | ||
| Screen shows “No signal” | DVB-T2 cable not connected | Plug in the DVB-T cable |
| Aerial cable is faulty | Check aerial cable and connections | |
| No sound from speaker | No or incorrect connection with audio cable | Connect the audio cable correctly |
| Sound on mute Turn Off Mute function | ||
| Only sound, no image on the screen | Resolution not supported by TV set | Press V-Format button to change resolution |
| No or incorrect connection with AV cable | Make sure cables are connected correctly | |
| Only sound, no image on the screen | The program is a radio program | Press “TV/Radio” key to shift into TV mode |
| Remote control is not responding | The battery is exhausted Charge battery | |
| Remote control is not facing or close enough to the set top box | Adjust the position of the remote control and move closer to the unit | |
| Picture is breaking up The signal is too weak Check aerial cable and connections | ||
12 TECHNICAL SPECIFICATIONS
■ Supply Voltage ∼ 110-240V 50/60Hz
- Max Power consumption 8W Max/ Stand-by power consumption <0,5W
- Input frequency VHF: from 174MHz to 230MHz
UHF: from 470MHz to 862MHz
■ RF bandwidth 7/8MHz
■ Input impedance 75 Ohm
■ Screen format 4:3 and 16:9
- Decoding video MPEG-2 (MP@e MP@HL)/MPEG-4, H.264/AVC (HP@L4), HEVC (H.265) 10bit
- Decoding audio MPEG-1 Layer I&II&III, MPEG-4 e HE-AACv2
■ Input USB 2.0
■ Media File MP3, JPEG, BMP, AVI, MKV
■ Size 140x83x28.5mm
■ Weight (without accessories) 180g

■ Precautions for correct disposal of the product.
The symbol shown on the equipment indicates that waste must be disposed of in “separate collection” and so the product must not be disposed of together with urban waste.
The user must take the product to special “separate waste collection centres” provided by local government, or deliver it to the retailer against the purchase of a new product.
Separate collection of waste and subsequent treatment, recycling and disposal operations promotes the production of equipment with recycled materials and limits negative effects on the environment and on health caused by improper handling of waste.
Illegal disposal of the product leads to the enforcement of administrative penalties.
DICHIARAZIONE DI CONFORMITÀ UE SEMLIFICATA
SIMPLIFIED EU DECLARATION OF CONFORMITY
Hereby TREVI Spa declares that the radio equipment type HE 3368 T2 is in compliance with directive 2014/53/EU.
The full text of the EU declaration of conformity is available at the following internet address:
https://www.trevi.it/dms/zidi/TREVI/DOCHE3368T2.pdf

EN If you will not find your language on the instruction manual, please go on our website www.trevi.it to find it
FR Si vous ne trouverez pas votre langue sur le mode d'emploi, veuillez vous visiter sur notre site Web www.trevi.it de le trouver
DE Wenn Sie Ihre Sprache auf die Bedienungsanleitung nicht finden, gehen Sie bitte auf unsere Webseite www.trevi.it zu finden
ES Si no encuentras tu idioma en el manual de instrucciones, por favor vaya a nuestra página web www.trevi.it se encuentra
PT Se você não vai encontrar sua língua sobre o manual de instruções, por favor, vá em nosso site www.trevi.it para encontrá-lo

Trevi S.p.A.
Strada Consolare Rimini-San Marino, 62 47924 Rimini (RN) Italy
Tel. 0541/756420 - Fax 0541/756430 - www.trevi.it - e-mail: info@trevi.it


- INDICE
- ATTENZIONE
- CAUTION
- UKPLUG ONLY
- WIRESCONNECTIONSTOATHREE-PINPLUG
- PREFAZIONE
- TELECOMANDO
- INSTALLAZIONE
- TELEVISIONE DIGITALE TERRESTRE (DTV)
- SAFETY PRECAUTIONS
- ATTENTION
- CARE AND MAINTENANCE
- DESCRIPTION OF DVB-T2 RECEIVER COMMANDS
- REMOTE CONTROL
- INSTALLATION
- Attention: batteries not included
- COMMANDS DESCRIPTION
- FIRST TIME INSTALLATION
- DIGITAL TERRESTRIAL TELEVISION (DTV)
- BASIC OPERATION
- AUTO SEARCH
- MANUAL SEARCH
- LCN FUNCTION
- SYSTEM SETTING
- PROGRAM MENU
- Channel Edit
- Sort
- LCN
- ACU
- Volume Scope
- PICTURE MENU
- Description of the adjustments:
- SEARCH MENU
- TIME MENU
- OPTION MENU
- SYSTEM MENU
- USB MENU
- MEDIA CENTRE
- TELETEXT DVB-T
- SEARCH FOR A PAGE
- TROUBLE SHOOTING
- TECHNICAL SPECIFICATIONS
- ■ Precautions for correct disposal of the product.
- DICHIARAZIONE DI CONFORMITÀ UE SEMLIFICATA
- SIMPLIFIED EU DECLARATION OF CONFORMITY
Brand : Trevi
Model : HE 3368 T2
Category : Digital decoder