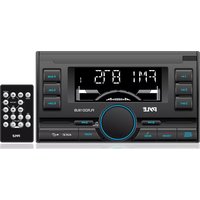
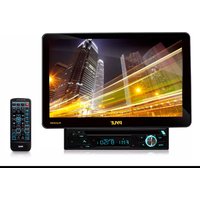
PLRDD19UB - Car radio Pyle - Free user manual and instructions
Find the device manual for free PLRDD19UB Pyle in PDF.


| Product Type | Car Stereo with CD-less Media Player |
| Brand | Pyle |
| Model | PLRDD19UB |
| Power Supply | DC 12 Volts, Negative Ground |
| Chassis Dimensions (W x D x H) | 7" x 6.2" x 3.9" |
| Maximum Output Power | 4 x 60 Watts |
| Current Drain | 15 Ampere (max) |
| FM Frequency Range | 87.5 - 108 MHz |
| AM Frequency Range | 520 - 1710 kHz |
| Radio Type | PLL Synthesizer Stereo Radio |
| Media Playback | MP3/WMA via USB and SD Card |
| Bluetooth | Hands-free calling and A2DP audio streaming |
| AUX Input | Yes (3.5mm front panel) |
| Preset Equalizer Modes | Flat, Pop, Rock, Classic, EQ Off |
| Sound Adjustments | Bass, Treble, Balance, Fader, Loudness |
| Automatic Memory Storing | Yes (up to 18 stations) |
| USB/SD Card Support | Up to 16 GB, 500 folders, 999 files, 8 folder layers |
| Display | LCD with frequency and function indicators |
| Remote Control | Included |
| Installation Type | DIN Front/Rear-mount (up to 30° tilt) |
Frequently Asked Questions - PLRDD19UB Pyle
User questions about PLRDD19UB Pyle
0 question about this device. Answer the ones you know or ask your own.
Ask a new question about this device
Download the instructions for your Car radio in PDF format for free! Find your manual PLRDD19UB - Pyle and take your electronic device back in hand. On this page are published all the documents necessary for the use of your device. PLRDD19UB by Pyle.
USER MANUAL PLRDD19UB Pyle
- PLL Synthesizer Stereo Radio
- MP3/WMA Player
• Automatic Memory Storing - Preset Equalization
- USB/SD card Interface
CONTENTS
Installation 3
Wiring Connection 5
Operation 6
Location of keys 6
Switching on/off the unit 7
Sound adjustment 7
EQ function....7
Display information 7
Liquid crystal display 7
Auxiliary function 7
Reset function 7
Radio operation 7
Switching to radio mode 7
Selecting the frequency band ...... 7
Selecting station 7
Automatic memory storing&
program scanning 7
Station storing 8
Local function....8
Stereo/mono function....8
USB play operation 8
Selecting tracks 8
Pausing playing 8
Previewing all tracks 8
Repeating the same track 8
Playing all tracks in random 8
Selecting directory up/down 9
Selecting tracks by AS/PS button.....9
SD card operation....9
Bluetooth operation......10
Remote control 12
Specification 13
Trouble shooting 14
Notes:
- Choose the mounting location where the unit will not interfere with the normal driving function of the driver.
- Before installing the unit, connect the wiring temporarily and make sure it is all connected up properly and the unit and the system work properly.
- Use only the parts included with the unit to ensure proper installation. The use of unauthorized parts can cause malfunctions.
- Consult with your nearest dealer if installation requires the drilling of holes or other modifications of the vehicle.
- Install the unit where it does not get in the driver's way and cannot injure the passenger if there is an emergency stop.
- If installation angle exceeds 30° from horizontal, the unit might not give its optimum performance.

- Avoid installing the unit where it would be subject to high temperature, such as from direct sunlight, or from hot air, from the heater, or where it would be subject to dust, dirt or excessive vibration.
DIN FRONT/REAR-MOUNT
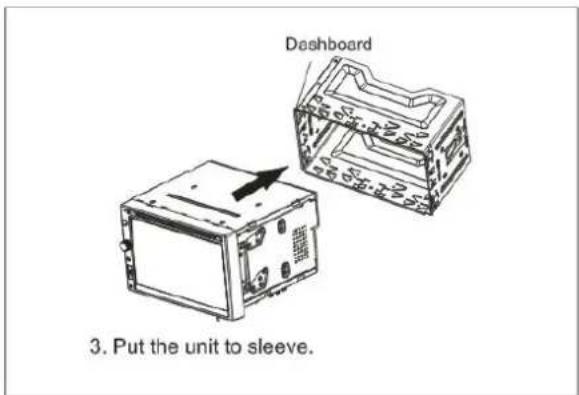
This unit can be properly installed either from "Front"(conventional DIN Front-mount) or "Rear"(DIN Rear-mount installation, utilizing threaded screw holes at the sides of the unit chassis). For details, refer to the following illustrated installation methods.
Installation Opening
This unit can be installed in any dashboard having an opening as shown below:

NOTE: INSTALLATION
- This player should be installed by professional technician.
- please read the instruction and operation of equipment carefully before installing.
- Make sure to connect all other wires before power connection.
- To avoid short circuit. Please make sure all the exposed wire are insulated.
- Please fix all the wires after installation.
- Please make all connections to the player according to this instruction manual. Wrong connections may cause damage.
- This player only fit for 12V DC automobile and please make sure your car belongs to this kind of cathode grounding electrical system.
- Please connect the wires correctly. Wrong connection will cause malfunction or damage the electrical system.



ISO CONNECTION

WIRE INSERTION VIEW
| PIN NO | WIRE COLOR | DESCRIPTION |
| 1 | ||
| 2 | ||
| 3 | ||
| 4 | ||
| 5 | BLUE | POWER ANTENNA |
| 6 | ||
| 7 | GRAY/BLACK | FRONT RIGHT SPEAKER (-) |
| 8 | GRAY | FRONT RIGHT SPEAKER (+) |
| 9 | PURPLE/BLACK | REAR RIGHT SPEAKER (-) |
| 10 | PURPLE | REAR RIGHT SPEAKER (+) |
| 11 | ||
| 12 | ||
| 13 | ||
| 14 | RED | ACC |
| 15 | YELLOW | B+ |
| 16 | BLACK+BLACK | GROUND |
| 17 | WHITE/BLACK | FRONT LEFT SPEAKER (-) |
| 18 | WHITE | FRONT LEFT SPEAKER (+) |
| 19 | GREEN/BLACK | REAR LEFT SPEAKER (-) |
| 20 | GREEN | REAR LEFT SPEAKER (+) |

natural_image
Technical line drawing of a vertical mechanical or electrical component with three vertical pins and a base (no text or symbols)LOCATION OF KEYS
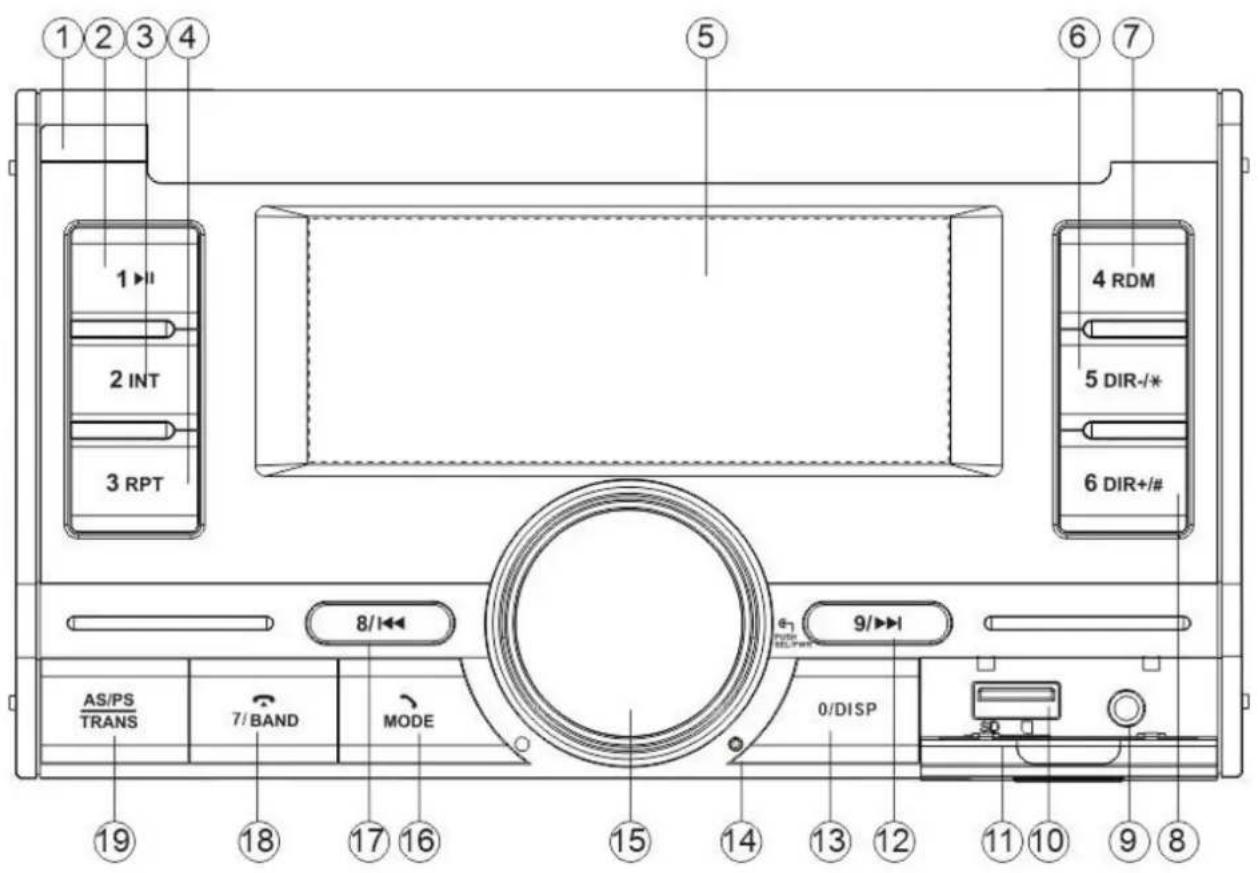
- IR
- 1 ▶II
- 2 INT
- 3 RPT
- LCD
- 5 DIR-/*
- 4 RDM
- 6 DIR+/#
- AUX IN
-
USB interface
-
SD slot
- 9/▶▶
- 0/ DISP
- Reset button
- PUSH/SEL/PWR
- /MODE
- 8/
- 7BAND
- AS/PS/TRANS
SWITCHING ON/OFF THE UNIT
Press PWR button (15) to turn on/off the unit. When the unit is on. Press and hold it for 2 seconds to turn off the unit.
SOUND ADJUSTMENT
Press SEL button (15) shortly to select the desired adjustment mode. The adjustment mode will change in the following order:
BAS-TRE-BAL-FAD-EQ-BEEP-
LOUD-LOC-STEREO-VOL-
BAS: bass
TRE: treble
BAL: balance
FAD: fader
EQ: Equalization
BEEP: Beep sound
LOUD: loudness
LOC: local
VOL: volume
By rotating the audio knob (15), it is possible to adjust the desired sound quality.
EQ FUNCTION
In EQ item you can select the preset EQ mode by rotating the audio knob (15) as below:

flowchart
graph TD
    A["FLAT---POP---ROCK---CLASS---EQ OFF"] --> B["↓"]
DISPLAY INFORMATION
Press 0/DISP button (13) to show the time for several seconds. After several seconds it will return to show the information.
LIQUID CRYSTAL DISPLAY
Exhibit current frequency and activated functions on the display.
AUXILIARY INPUT
The unit can be connected to a portable audio player through the AUX IN jack (9).
RESET FUNCTION
RESET button (14) must be activated with either a ballpoint pen or thin metal object.
The RESET button is to be activated for the following reasons:
- Initial installation of the unit after all wiring is completed.
- All the function buttons do not operate.
- Error symbol on the display.
Note: if press RESET button (14), the unit can't work yet, please use a cotton swab soaked in isopropyl alcohol to clean the socket on the front panel.
RADIO OPERATION
• SWITCHING TO RADIO MODE
Press ↘/MODE button (16) to select radio mode, the radio mode appears in the display together with the memory band and frequency.
- SELECTING THE FREQUENCY BAND
At radio mode, press 📞 /7/BAND button (18) shortly to select the desired band.
The reception band will change in the following order:

• SELECTING STATION
Press ▶▶ button (12) or ◀◀ button (17) shortly to activate automatic seek function. It will search up/down a station automatically. Press for 2 seconds until “MANUAL” appears on the display, the manual tuning mode is selected. In this mode you can turn up/down a step frequency one by one till searched a station. If both buttons have not been pressed for several seconds, they will return to seek tuning mode and “AUTO” appears on the display.
• AUTOMATIC MEMORY STORING & PROGRAM SCANNING
- Automatic memory storing
Press AS/PS/TRANS button (19) for 2 seconds the radio searches from the 87.5MHz frequency and checks the signal strength until one cycle search is finished. And then 18 strong stations are stored into the corresponding preset number button. In the first cycle it will in LOCAL mode to receive the stronger station. If it is less than 18 pcs station it will searching stations in 2^nd cycle in LOCAL OFF mode.
Program scanning
Press AS/PS/TRANS button (19) shortly to scan preset station. The radio is holding at that preset number for several seconds with release mute, then searches again.
- STATION STORING
To received a station, Press one of the preset button (1\~6) for 2 seconds. current station is stored into the number button.
- LOCAL function
Press SEL knob several times till appear “LOC OFF”. Rotating the audio knob (4) to turn on/off local function. In LOC ON mode the unit will reduce the receiving sensitivity when you search station. That means you can receive the station that signal is strong. It will ignore the station that signal is week. In LOC OFF mode it will increase the receiving sensitivity when you search the station. That means you can receive more stations.
• STEREO/MONO function
Press SEL knob several times till appear "STEREO". Rotating the audio knob (15) to select STEREO or MONO mode. In STEREO mode you can receive FM stereo signal. In MONO mode the stereo station will be switched to monochrome. Sometimes when the signal is not good. If you change it to
MONO mode. The noise will be reduced.
USB PLAY OPERATION
In the front panel of the unit, there is an USB interface (10). You can connect an USB driver through this interface (10).
When you connect an USB driver through the interface, the unit will search the MP3/ WMA files in the USB driver and start to play.
If a USB drive is already inserted in the driver. Keep pressing MODE button (18) shortly until the USB mode display appears.
SELECTING TRACKS
Press 8/◄◄ button (17) or 9/►► button (12) to move to the previous file or the following file. File number shows on display.
Hold 8/◄◄ button (17) or 9/►► button (12) to fast reverse or fast forward. Playing starts from when you release the button.
PAUSING PLAYING
Press 1 ▶ button (2) to pause playing. Press it again to resume play.
PREVIEWING ALL FILES
Press 2INT button (3) to play first several seconds of each file. Press again to stop intro and resume play.
REPEATING THE SAME FILE
Press 3RPT button (4) to continuously repeat the same track. Press it again to Repeat all the tracks.
PLAYING ALL FILES IN RANDOM
Press 4RDM button (7) to play all files in random order. Press again to cancel the function.
SELECTING DIRECTORY UP/DOWN
Press DIR-/*button (6) or DIR +/# button (8) to select directory downward or upward. If the MP3 disc
does not contain any directory, there is no function of pressing DIR-/*button (6) or DIR +/# button (8).
SELECTING TRACKS BY AS/PS BUTTON
AS/PS/TRANS button (19) is assigned as selection button in MP3/WMA operation.
When pressed, it is activated as selecting each mode as below:
"Searching track number" =>
"Searching File Name" => "Searching from directory"
- Searching Track number
Press AS/PS/TRANS button one time. It enters into "Searching track number" mode. The unit searches the track selected by following direct numeric buttons:
M1-M6, BAND (7), 8/◄◄, 9/►►I, DISP(0). VOL(all numbers)
After it finishes the numbers press SEL button to confirm. The unit searches the track and plays.
- Searching File Name
Press AS/PS/TRANS button for two times. It enters into "Searching File Name" mode. The unit searches files that have the same character which is inputted by the user pressing the corresponding buttons listed on the Table 1 below. Explain as follows:
- Use the corresponding buttons to select the characters A to Z, blank, 0 to 9, _, -, +.
- Press SEL button to start the file search.
- Searching From Directory
Press AS/PS/TRANS button for three times. The unit searches file from the folder by 8◄◄ / 9►►1 buttons or rotating the VOL knob. Display will list all available directories and songs. Select the desired directory/songs then press SEL button to confirm. If the
selected file is a song, it starts to play.
• DISPLAY INFORMATION
KEY Assigned IN Searching mode (Table 1)
| AS/PS | Mode Select |
| SEL | ENTER |
| M1 | A, B, C, 1 |
| M2 | D, E, F, 2 |
| M3 | G, H, I, 3 |
| M4 | J, K, L, 4 |
| M5 | M, N, O, 5/Directory DOWN |
| M6 | P, Q, R, 6/Directory UP |
| BAND | S, T, U, 7 |
| V, W, X, 8 | |
| Y, Z, SPACE, 9 | |
| DSP | _,-,+,0 |
| AUDIO KNOB | CHARACTER SELECTAll the CHARACTER above |
AUDIO KNOB & TUNE /SEEK/TRACK UP/DOWN buttons:
Searching file and directory during Navigation.
The USB solution can support:
- Folder: 500 max.
- File: 999 max.
• Depth of folder: 8 layers - Size: 16 GB
SD CARD OPERATION
There is a micro SD card interface (11) on the front panel of the unit.
When you insert a SD card in the card interface, the unit will search the
MP3/WMA files in the card and start to play. The operation is the same with the
USB operation described above. If in other mode. You can also press MOD
button to select SD mode.
Note:
- The main unit can only support the standard USB-memory device which is approved by Microsoft.
- USB MP3 player is not a standard which means different brand name or different models have their own standard. So our product cannot support every MP3 player.
- When connecting an MP3 player with an alkaline battery in the player (non rechargeable battery), you should remove the battery from the MP3 player then connect it to the USB interface. Otherwise, it may charge battery and cause battery to burst.
CAUTION
When there are important files in the USB device/Micro SD card, do not connect it to the main unit to play. Because any wrong operation may cause files loss. And our company assumes no responsibility for this.
BLUETOOTH OPERATION
(i) When use Bluetooth, please make sure the mobile phone supports Bluetooth function.
(ii) For the different kind of mobile phone, Bluetooth emissive power has some difference. To get the best conversation quality, it is commended that the distance between the mobile phone and the unit is within 3m. And please don't put any metal object or any obstacle between the path of the mobile phone and the unit.
- PAIRING
1) On the mobile phone, select the Bluetooth set up. (Please refer to the instruction manual of your mobile phone on how to operate Bluetooth.)
2) "Car KIT" should appear in the list on your mobile phone, please select "Car KIT" and then input password "0000".
3) When successful paired, the BT mark will be displayed on LCD.
- Answering / rejecting an incoming call
When there is a phone is coming in.
Press ↗ key to answer the call.
Press 🔔 key to reject the call.
- Hang up a call
When finished a conversation press
key to hang up this call.
- Checking phone book / received / dialed / missed call (for Android and Iphone mobile)
Press MOD key it will show "PHONE" on the display. Short press TRANS/AS/PS button (19) it will show the items as below:
In each item you can use 9/▶▶ button (12) or 8/◀◀ button (17) to check corresponding number. In the first time your mobile will receive a message that the unit will visit your mobile through Bluetooth. You have to agree and press "YES" to confirm.
(Note: It is necessary the phone number is in the phone not in the SIM card).
- Call out
1) Making an outgoing call by inputting the phone number manually.
Press MOD key it will show "PHONE" on the display. Press and hold "AS/PS/TRANS" key for 2 seconds. The LCD will become BLANK. Then you can enter phone number and press key to confirm the dialing.
(Note: If you input the wrong numbers. You can press the AS/PS key to cancel wrong numbers.) In front panel except there are 1\~6 digit. please note 0/7/8/9/*/# as below:
7: BND
8:
9:
0: DSP
*: press and hold 5 key for 2 seconds.
: press and hold 6 key for 2 seconds.
2) Redialing an outgoing call
Press MOD key it will show "PHONE" on the display. Press and hold "AS/PS/TRANS" key for 2 seconds. The LCD will become BLANK. In this moment press key will redial the last phone number.
3) Making an outgoing call from the phone book / received / dialed / missed call (for Android and Iphone mobile)
- Please reference page 9 "Checking phone book / received / dialed / missed call" item then select a phone number. Press key to dial.
Note: If there are 2 pcs of SIM card in your mobile phone. When you dial out the call will be from the front panel of the unit.
The call will not be able to dial out because your mobile phone will ask you which SIM card will be used to dial out. You have to confirm use SIM1 or SIM2 card then the call will be dialed out.
- Transfer the call between mobile phone and unit
During the talking mode, you can press TRANS/AS/PS button (19) to transfer the phone call between the mobile phone and the unit.
- Bluetooth audio (A2DP function)
Press /MODE key (16) it will show "PHONE" on the display. Then turn on the music player of your mobile phone and play a song. The sound will come out from the speaker of the unit. Press 1/▶▶ key of the front panel of the unit to pause/play the song. Press 9/▶▶ button (12) or 8/◀◀ button (17) to select next/previous song.

FUNCTION KEY & CONTROL
- POWER
Power ON/OFF Button - MODE
Mode Button(S,T,U,7,For MP3/WMA Operation) - TUNE/SKIP 1(8)
Tune/SKIP Down Button(V,W,X,8 For MP3/WMA Operation) - 7/BND
Band Select Button(When pressed shortly) - SCN
Scanning Button(D,E,F,2 For MP3/WMA Operation) - PAU
Pause Button (A,B,C,1 For MP3/WMA Operation) - SHF
Shuffle Button (J, K, L 4 For MP3/WMA Operation) - DIR▼
DIR▼ Button - VOL▲
Volume Up Button - SEL (LOU/ENT)
(Character Select (A,B\~8,9,0)For MP3/WMA Operation)
Sound Mode Select Button
(Character Shift Right For MP3/WMA Operation)
Loudness Button (When pressed long)
(Enter Button For MP3/WMA Operation) - TUNE/SKIP▶▶ (9)
Tune/SKIP Up Button(Y,Z,SPACE,9 For MP3/WMA - VOL ▼
Operation)
Volume Down Button
(Character Select(A,B\~8,9,0)For MP3/WMA Operation) - DSP(0)
Display Button(_, -, +, 0 For MP3/WMA Operation) - RPT
Repeat Button(G,H,I,3 For MP3/WMA Operation) - AS/PS(D-AUD)
Automatic Memory Storing & Program Scanning Button (Mode Select Button For MP3/WMA Operation) - LOC
Local/Distant Select Button - DIR▲
DIR ▲ Button
SPECIFICATION
GENERAL
Power Supply Requirements : DC 12 Volts, Negative Ground
Chassis Dimensions : 7" (W) x 6.2" (D) x 3.9"(H)
Tone Controls
- Bass (at 100 Hz) : ±10 dB
- Treble (at 10 kHz) : ±10 dB
Maximum Output Power
- Version V : 4x60 watts
Current Drain
- Version V : 15 Ampere (max.)
RADIO
(U.S.A)
FM
| Frequency Coverage | 87.5 to 108 MHz |
| IF | 10.7 MHz |
| Sensitivity (S/N=30dB) | 4μV |
| Stereo Separation | >25dB |
AM
| Frequency Coverage | 520 to 1710kHz |
| IF | 450kHz |
| Sensitivity (S/N=20dB) | 38dBu |
TROUBLE SHOOTING
Before going through the checklist, check wiring connection. If any of the problems persist after checklist has been made, contact support@pyleaudio.com.
| Symptom | Cause | Solution |
| No power. | The car ignition switch is not on. | If the power supply is connected to the car accessory circuits, but the engine is not moving, switch the ignition key to “ACC”. |
| The fuse is blown. | Replace the fuse. | |
| No sound. | Volume is turned low | Adjust volume to a desired level. |
| Wiring is not properly connected. | Check wiring connection. | |
| The operation keys do not work. | The built-in microcomputer is not operating properly due to noise. | Press the reset button. |
| The radio does not Work. The radio station automatic selection does not work. | The antenna cable is not connected. | Insert the antenna cable firmly. |
| The signals are too weak. | Select a station manually. |
- CONTENTS
- Notes:
- DIN FRONT/REAR-MOUNT
- Installation Opening
- NOTE: INSTALLATION
- SWITCHING ON/OFF THE UNIT
- SOUND ADJUSTMENT
- EQ FUNCTION
- DISPLAY INFORMATION
- LIQUID CRYSTAL DISPLAY
- AUXILIARY INPUT
- RESET FUNCTION
- RADIO OPERATION
- • SWITCHING TO RADIO MODE
- - SELECTING THE FREQUENCY BAND
- • SELECTING STATION
- • AUTOMATIC MEMORY STORING & PROGRAM SCANNING
- USB PLAY OPERATION
- SELECTING TRACKS
- PAUSING PLAYING
- SELECTING TRACKS BY AS/PS BUTTON
- • DISPLAY INFORMATION
- SD CARD OPERATION
- Note:
- CAUTION
- BLUETOOTH OPERATION
- - PAIRING
- - Answering / rejecting an incoming call
- - Hang up a call
- - Checking phone book / received / dialed / missed call (for Android and Iphone mobile)
- - Call out
- 1) Making an outgoing call by inputting the phone number manually.
- : press and hold 6 key for 2 seconds.
- 2) Redialing an outgoing call
- 3) Making an outgoing call from the phone book / received / dialed / missed call (for Android and Iphone mobile)
- - Transfer the call between mobile phone and unit
- - Bluetooth audio (A2DP function)
- FUNCTION KEY & CONTROL
- SPECIFICATION
- GENERAL
- RADIO
- (U.S.A)
- TROUBLE SHOOTING
Brand : Pyle
Model : PLRDD19UB
Category : Car radio