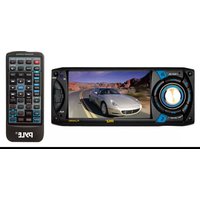
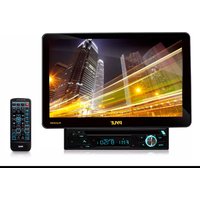
PLD40MU - Car radio Pyle - Free user manual and instructions
Find the device manual for free PLD40MU Pyle in PDF.


| Product Type | Car Stereo Receiver |
| Model Number | PLD40MU |
| Brand | Pyle |
| Chassis Size | Single DIN (7 x 2 x 6 inches) |
| Weight | 1.5 lbs (0.68 kg) |
| Power Supply | 12V DC (negative ground) |
| Maximum Power Output | 4 x 50 Watts |
| RMS Power Output | 4 x 25 Watts |
| Tuner Bands | AM/FM with 30 presets |
| Bluetooth Version | 5.0 (A2DP, AVRCP, HFP) |
| USB Port | Front USB 2.0 (supports MP3/WMA files) |
| SD Card Slot | Yes (supports up to 32GB) |
| Auxiliary Input | 3.5mm front auxiliary jack |
| Audio Outputs | 2-channel RCA preamp outputs |
| Display Type | LED backlit LCD |
| Remote Control | Included (IR remote) |
| Audio Features | EQ presets, bass/treble control, loudness |
| Maintenance & Cleaning | Clean with a soft, dry cloth; avoid solvents |
| Safety | Built-in fuse protection; do not expose to moisture |
| Spare Parts & Repairability | Remote, wiring harness, fuse (available from Pyle) |
Frequently Asked Questions - PLD40MU Pyle
User questions about PLD40MU Pyle
0 question about this device. Answer the ones you know or ask your own.
Ask a new question about this device
Download the instructions for your Car radio in PDF format for free! Find your manual PLD40MU - Pyle and take your electronic device back in hand. On this page are published all the documents necessary for the use of your device. PLD40MU by Pyle.
USER MANUAL PLD40MU Pyle
Visit us @ pyleaudio.com
PLD40MU


- FLIP DOWN AND REMOVABLE CONTROL PANEL
• 4.3" Wide Color TFT Touch Screen
• REMOTECONTROL
• DIGITAL VIDEO DISC PLAYER
• CONTROL PANEL USB PORT AND AUX INPUT
• SD/MMCCARDSLOT
• BUILT-INMW/FM-RDSTUNER
USERMANUAL
To ensure safety while driving
and to comply with laws,
drivers should not watch video or
operate the video device while driving.
PRECAUTION
Class1laserproduct
This car multi-media player is a class 1 laser product. However This car multi-media player uses a visible/invisible laser beam which could cause. Hazardous radiation exposure if directed.
Be sure to operate the car multi-media player correctly as instructed. Use of controls or adjustments or performance of procedures other than those specified herein may result in hazardous radiation exposure. Do not open covers and do not repair yourself. Refer servicing to qualified personnel.
Content
Precaution....1
Content....2
Installation steps....3
General knowledge about remote control....7
Locations and Names of controls on main unit....8
Locations and Names of controls on remote control....9
Same functions in any work source mode....10
Radio operation....13
Disc/USB/card operation....16
- Loading or unloading a disc, USB or card....16
1.1 Loading a disc, USB orcard.... 16
1.2 Unloading a disc, USB or card....17
- Popping up Function Icons-board....17
2.1 Function Icons-board of Digital Video/VCD/MPEG4/Image /MP3/WMA.... 17
2.2 CD interface.... 18
- Function of controls on the touch screen/main unit/remote control.... 19
* Region Code.... 28
* Parental Control....29
AUX IN operation.... 30
External iPod operation....31
Rear View Camera....32
Troubleshooting....33
Specification....34
INSTALLATIONSTEPS
-
Remove the 2 deck screws as right;
-
Mounting Slide Bracket Housing;
1) Remove the PLASTIC FRAME from the chassis;
2) Insert the 2 KEY PLATES into the grooves at the both sides of the chassis till they click; then pulling the two KEY PLATES to remove the chassis from the Slide Bracket Housing;

natural_image
Isometric line drawing of an electronic device casing with internal components and mounting holes (no text or symbols)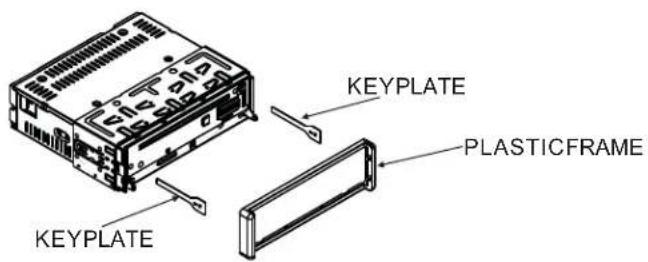
If you want to take CHASSIS out of the SLIDEBRACKETHOUSING, first remove the PLASTICFRAME of the both sides away, then insert the two KEYPLATES into left and right sides of chassis as above illustration.
3) Mount the Sliding Bracket Housing in the position of car multi-media system and bend some tabs of Sliding Bracket Housing to fix it.(see Installation Diagram)
- Connecting all wires:
1) Remove control panel from chassis as follows:
A. Press the OPEN button to flip down control panel.

B. Hold the left end of the control panel to slide rightwards a little and pull it towards you to remove it.

natural_image
Diagram showing two views of an electronic device chassis with labeled parts (no text or symbols present)2) Connecting all wires according to the wiring diagram as follows:

flowchart
graph TD
    A["RADIO ANTENNA JACK"] --> B["ISOCONNECTOR"]
    C["AUDIOLOUT(white)"] --> B
    D["AUDIOROUT(red)"] --> B
    E["VIDEOOUTPUT(brown)"] --> B
    F["SUBWOOFER"] --> G["GREY"]
    H["(B+)-12V REARCAMERASWITCH"] --> I["PINK"]
    J["(B-)-PARKINGBRAKE"] --> K["BROWN"]
    L["REARCAMERAINPUT"] --> M["YELLOW"]
    N["FRONT LchSPK."] --> O["WHITE"]
    P["REAR LchSPK."] --> Q["GREEN"]
    R["WHITE/BLACK"] --> S["GREEN/BLACK"]
    T["BLUE AUTOANTENNA"] --> U["CONSTANT12VOLTS"]
    V["YELLOW"] --> W["GROUND(B-)"]
    X["BLACK"] --> Y["IGNITIONSWITCH"]
    Z["RED FUSE"] --> AA["IGNITIONSWITCH"]
    AB["GREY"] --> AC["FRONT RchSPK."]
    AD["VIOLET"] --> AE["REAR RchSPK."]
NOTE:
- Must use 4 ohms impedance of speakers.
- After connecting parking Line, video on screen of control panel will be displayed only after applying parking brake.
- Before finishing wiring, do not attach control panel onto chassis.
3) Attach control panel onto chassis.
A. Make the right hollow of control panel aim at the right bulge of chassis, then push and hold control panel rightwards; at one time, move the left end of control panel towards chassis to make the left hollow of control panel aim at the left bulge of
chassis and then release holding.
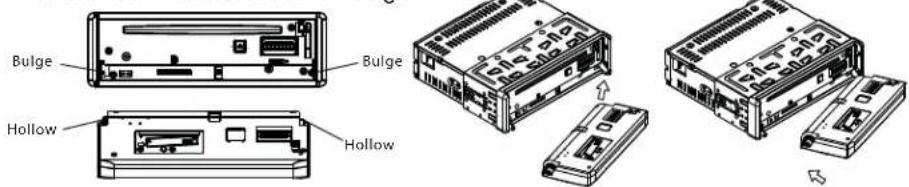
B. Flip control panel up till hearing a click sound to attach onto chassis.

natural_image
Illustration of a computer RAM module being inserted into a slot, with a hand adjusting the slot (no text or symbols visible)
* How to clean panel connector
Frequent detachment will deteriorate panel connectors. To minimize deterioration, periodically wipe the panel connectors with a clean/soft/dry cloth.
4) Testing it for making sure that it can work properly.
- Installing main unit according to installation diagram:
1) Insert the chassis of the car multi-media system into the sliding metal housing.
2) Use the metal strap to fix the rear part of chassis.
* Uninstalling main unit:
1) Remove metal strap from main unit;
2) Remove plastic trim frame from main unit;
3) Insert a key plate into left and right side of main unit and draw main unit out of sliding metal housing.
Installationdiagram

GENERAL KNOWLEDGE ABOUT REMOTE CONTROL
1. Removing insulating sheet
If using remote control for the first time, you can see an insulating sheet at the bottom side of remote control as right.
you must remove the insulating sheet as right. Otherwise, the remote control is disabled.

natural_image
Technical line drawing of a rectangular electronic component with a metallic connector inserted (no text or symbols)2. Replace lithium cell
If the electric energy of lithium cell is weak, replaceit.
1) Press and hold the movable block as direction indicated by arrow 1 as right, at one time pull cell holder out of remote control as direction indicated by arrow 2 as right.
2) Replace the old cell by a new one with (+) polarity side upward as right.
3) Insert the cell holder into remote control again as right.

3Noteabout usingremotecontrol
1) You should face the emitting window of remote control towards the sensor window of the unit.
2) Operation angle for front panel: About 30 degree
3) The distance between the emitting window of remote control and the sensor window of the unit: <5M.
4. Warning for lithium cells of remote control
1) Cell leakage may cause damage to remote control.
2) Do not throw cells into fire, it may cause explosion.
3. To avoid risk of accident, keep cells out of reach of children.
Locations and Names of Controls on Main Unit

ControlPanel
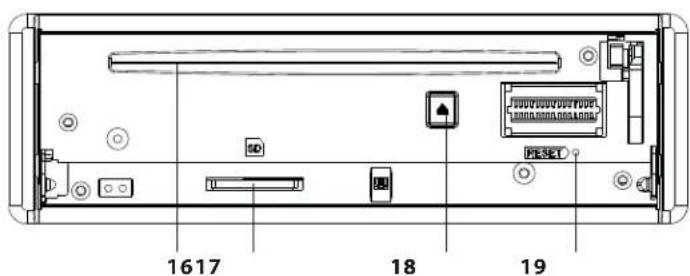
Front Facet of Chassis after removing Control Panel
- POWER BUTTON
10.APSBUTTON
2.>>|BUTTON - AF or TA BUTTON
- MODEBUTTON
12.BANDBUTTON - MUTE or PTY BUTTON
- |<<BUTTON
5.LOUDBUTTON - SEL BUTTON AND VOL KNOB
- IR SENSOR WINDOW
-
|| OR CH1\~6 BUTTON
- OPENBUTTON
16.DISCSLOT - USB PORT AND COVER
17.CARDSLOT -
AUX IN JACK
18.EJECTBUTTON -
RESETBUTTON
-8-
Locations and Names of Controls on Remote Control

- POWERBUTTON
2.MUTEBUTTON
3.REPEATBUTTON
4.ZOOMBUTTON
5.MODEBUTTON
- MENU or SW BUTTON
7.>>BUTTON
-
SUBTITLE or LO/DX BUTTON
-
<BUTTON
-
BANIONOSD
-
<<BUTTON
-
A/PS or TITLE/PBC BUTTON
13.TOPBUTTON
14.VOL+BUTTON
15.RDM BUTTON
16.VOL-BUTTON
17.SELBUTTON
- SETUPBUTTON
19.GOTOBUTTON
20.>||BUTTON
21.STOPBUTTON
-
AUDIO or MO/ST BUTTON
-
EQ or LOUD BUTTON
24.CLKBUTTON
25.^BUTTON
26.>>|BUTTON
-
ENTERBUTTON
-
BUTTON
29.VBUTTON
- |<<BUTTON
31.INTBUTTON
32.NUMBER(0\~9)BUTTON
33.+10BUTTON
34.AFBUTTON
35.TA BUTTON
Same functions in any work source mode
1. POWER button or OFF icon
In power off mode, pressing POWER button on remote control or pressing POWER button on control panel powers on main unit.
In power on mode, pressing POWER button on remote control or pressing POWER button on control panel or touching OFF icon on source menu(see Source menu fig.on next page) powers off main unit.
2. VOL knob & VOL+/VOL- buttons
To adjust volume level, rotate VOL knob on control panel or press or hold VOL+ or VOL-button on remotecontrol.
3.SELbutton
To switch between BASS, TREBLE, BALANCE, FADE, COLOR, BRIGHTNESS, CONTRAST, TINT and VOLUME, briefly and repeatedly press SEL button.
After switching on the desired mode above, rotate VOL knob or press VOL+/VOL- buttons to set it.
To switch between REG, PI, TA, AF, LOUD, SWF, EQ, DX/LOCAL(in radio mode), STEREO/MONO(in radio mode), TIME 12H/24H, CLOCK, BUZZ,EUR/USA FREQ,ANIMATION and BG, long press SEL button to switch on REG, then briefly and repeatedly press SEL button.
After switching on the desired mode above, rotate VOL knob or press VOL+/VOL- buttons to set it.
4.MUTEbutton
To switch MUTE mode on or off, press MUTE button on remote control or press MUTE button on control panel.
5.EQbutton
To select a desired preset EQ mode from JAZZ, CLASSIC, POP, ROCK and USER, press EQ button on remote control continuously.
6.LOUDbutton
To switch on or off LOUD mode, long press LOUD button on remote control or press LOUD button on control panel.
7.SWbutton
To switch on or off SUBWOOFER mode, long press SW button on remote control.
8. CLK button
Press CLK button on remote control to display clock time.
9. MODE button and source menu
To switch work source between RADIO, DISC(after inserting a disc), USB(after inserting a USB storage), CARD(after inserting a card) and AUX, press MODE button on remote control or press MODE button on control panel continuously.
During disc(non-CD)/USB/card playback, touch screen to pop up Function Icons-board and then touch the 📄icon in the Function Icons-board to enter the source menu(refer to Disc/USB/Card Operation).
During AUX playback, touch screen to pop up AUX interface and then touch AUX icon to enter the sourcemenu(refer to AUX Operation).
In radio or CD mode, touch Radio or CD icon to enter the source menu (refer to Radio Operation and Disc/USB/Card Operation).
The source menu displays as follows:

SourceMenu
In source menu, touch one icon of RADIO, DISC, AUX, SD CARD and USB to enter one work source of RADIO, DISC, AUX, SD CARD and USB.
10.SETicon
1) SETTING SYSTEM
In source menu, touch SET icon to display SYSTEM page of SET menu as follows:

System page of SET menu
In the SYSTEM page of SET menu, repeatedly touch the ▲ or ▼ icon to highlight one setting item of BRIGHTNESS, CONTRAST, COLOR, TINT, ANIMATION and WALLPAPER. After highlighting a desired setting item, touch the ▶ or ▶ icon to set it.
2) SETTING SOUND
In SET menu, touch SOUND icon to display SOUND page of SET menu as follows:

Sound page of SET menu
In the SOUND page of SET menu, repeatedly touch the ▲ or ▼ icon to highlight one setting item of TREBLE, BASS, BALANCE, FADE, SUBWOOFER, LOUDNESS, RADIO LOC/DX(entering Source Menu in radio mode), RADIO STEREO(entering Source Menu in radio mode) and BUZZER ON/OFF. After highlighting a desired setting item, touch the ▶ or ▶ icon to set it.
3) SETTING TIME
In SET menu, touch TIME icon to display TIME page of SET menu as follows:

Time page of SET menu
In the TIME page of SET menu, repeatedly touch the ▲ or ▼ icon to highlight one setting item of HOUR, MINUTE and 24H/12H. After highlighting a desired setting item, touch the ▶ or △ icon to set it.
4) SETTINGRDS
In SET menu, touch RDS icon to display RDS page of SET menu as follows:

RDS page of SET menu
In the RDS page of SET menu, repeatedly touch the ▲ or ▼ icon to highlight one setting item of REGION and PI SOUND/MUTE. After highlighting a desired setting item, touch the ▶ or △ icon to set it.
After finishing setting, touch SET icon to return back to normal playback.
11.OPENbutton
Press OPEN button on control panel to flip down the control panel, then hold the left part of the control panel to push it rightwards and pull it to you to remove it.
12. RESETbutton
When LCD displays wrongly or some buttons are not available or sound is distorted, press OPEN button to flip down the control panel, then remove it as above, then use the sharp end of a pointed object to press RESET button to reset the program to zero.
RadioOperation
- To enter RADIO mode(MODE button or RADIO icon)
When you use MODE button or source menu (tapping RADIO icon) to enter RADIO mode, it will display radio interface as follows:

* Some icons on radio interface correspond with the buttons on remote control or control panel as follows:
MUTE icon = MUTE button
& icons = VOL- and VOL+ buttons = VOL knob
SWF icon : To switch SUBWOOFER mode on or off.
LOUD icon : To switch LOUD mode on or off.
EQ icon = EQ button
APS icon = APS button = A/PS button
Radio icon: To enter source menu.
- To switch between bands (BAND)
The BAND icon or button can switch between bands of FM1, FM2, FM3, MW1 and MW2, and the word FM1, FM2, FM3, MW1 or MW2 will be displayed on screen.
- To search for a station ( and icons or v and ^ or |<< and >>| buttons)
1) Long touching 📄 or 🌐 icon or long pressing v or ^ button on remote control or long pressing |<< or >>| button on control panel can automatically search down or up for an available station beginning from the current frequency.
2) Briefly touching 🏠 or 🚫 icon or briefly pressing v or ^ button on remote control or briefly pressing |<< or >>| button on control panel can manually search down or up for a your desired station beginning from the current frequency.
- To preset and scan all memory stations (APS icon or A/PS and APS buttons)
1) When long touching APS icon or long pressing A/PS button on remote control or long pressing APS button on control panel, the radio searches from the lowest frequency and checks the signal strength level until 1 cycle search is finished, and the 6 strongest stations are preset to corresponding preset number memory bank for the current band.
The presetting function can be implemented in selected FM or MW band. (It can presets 3x6 stations for FM and 2x6 stations for MW in all)
2) When briefly touching APS icon or briefly pressing A/PS or APS button, the radio scans for each preset station in FM or MW band from NO.1 bank, each preset station broadcasts for 5 seconds. After finishing a circle of scanning, it will resume broadcasting the station in NO.1 bank.
NOTE: In FM band, FM1, FM2 and FM3 are preset and scanned as one band at a time; In MW band, MW1 and MW2 are preset and scanned as one band at a time.
- To preset and listen to a memory station(1\~6 icons or 1\~6 buttons or CH1-6 button)
1) Long touching one of 6 number(1\~6) icons or long pressing one of 6 number(1\~6) buttons can preset the current broadcasting station of the current band in the number memorybank;.
2) Briefly touching one of 6 number(1\~6) icons or briefly pressing one of 6 number(1\~6) buttons can listen to the memory station in the current band preset in the number memorybank.
* CH1-6 button:
1) To preset a station in a memory bank with CH1-6 button, first select a desired band; then press CH1-6 button to select a desired memory bank; and then search for a desired station; finally long press CH1-6 button to store the station in the memorybank.
2) To listen to a preset station with CH1-6 button, first switch on a desired band, then continuously press CH1-6 button highlight and listen to it.
- To switch on between stereo and mono mode (MO/ST button)
Press MO/ST button on remote control to select STEREO or MONO mode for FMband.
When the STEREO mode is activated, it can get better audio effect; when the MONO mode is activated, it can get clearer audio signal.
- To switch on between local and distance mode (LO/DX button)
Press LO/DX button to turn LOC on to tune for local stations with weak interference; Press LO/DX button to turn DX on to tune for distance stations with stronger signal. - To search for a RDS station that is broadcasting a typed program (PTY)
Continuously touching PTY icon on touch screen or continuously long pressing PTY button on control panel switches between the program types such as: NEWS ...and soon.
After selecting a desired program type, no operation for a while, it displays PTY SEEK and automatically searches for a station that is broadcasting the selected type of program.
If the station that is broadcasting the selected type of program does not exist, it will display NO PTY and return back to the previous normal station.
- To automatically alternate a stronger signal of frequency for the current RDS station(AF)
During broadcasting a typed program of a RDS station, use the AF icon in the RADIO interface or SEL and VOL buttons to set AF mode on or long press AF button on control panel or AF button on remote control to switch on AF mode, then AF icon flashes on screen.
After switching on AF mode, the radio checks the signal strength of AF(alternate frequency) all the time. Whenever a new AF is stronger than the current frequency,
It switches over to the AF for a short time, and the AF icon is light on screen(not flash).
* In FM mode, when switching on AF mode, the radio auto searches for or preset only those RDS stations.
*InFM mode, when switching on AF and TA modes, the radio auto searches for only those RDS stations broadcasting traffic announcement.
10. REGIONmode
use the RDS page of the SETUP MENU or the SEL and VOL buttons to set REGION mode on or off.
In REGION on mode, when switching on AF mode, the radio can't switch over to those AF stations which have a different regional program content.
In REGION off mode, when switching on AF mode, the radio can switch over to thoseAF stations which have a different regional program content.
11.PImode
use the RDS page of the SETUP MENU or the SEL and VOL buttons to set PI SOUND or PI MUTE mode.
In PI SOUND mode, when switching on AF mode, if a car cruises that critical area back and forth, an oscillation phenomenon can be occurred, because the different PI code can be receive from a same AF. when the different PI sound (DIP) is heard once in a while, the different PI sound will be heard for less than 1 second.
In PI MUTE mode, when switching on AF mode and under above same situation, a mute sound will be heard for less than 1 second.
12. To automatically search for traffic announcements (TA)
In any mode, use the TA icon or SEL and VOL buttons to set TA mode on or press TA button on control panel or long press TA button on remote control to switch on TA mode, then TA: ON will display on screen for a while and begin to search for those RDS radio stations transmitting traffic announcement.
When an RDS radio station transmits traffic announcement and is received by the radio, temporarily switch the current work source to an RDS radio station broadcasting traffic announcement, and TRAFFIC will be displayed on screen.
When the traffic announcement is over, it will return back to previous work source.
Disc/USB/CardOperation
1. Loading or unloading a disc, USB or card
1.1 Loading a disc, USB or card
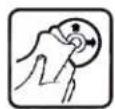
To play files in a disc, press OPEN button on control panel to flip down the control panel, then insert a disc with label surface up into disc slot, then flip up the control panel and attach onto chassis till hear a click sound, finally it will automatically play.
\* CAUTION OF USING DISC
1) Handle a disc by its edge, do not touch the surface of play side
2) Before inserting disc, wipe the disc outwards from the disc center with a clean, soft, dry, lint-free cloth. Do not use solvents /thinner such as petrol/benzine, cleaner.
3) After taking a disc out of disc slot, put the disc inside disc case to keep it clean.
4) Do not stick paper or tape on the disc surface of play side. If there is glue (or analog) on the disc surface, must wipe it up before using.


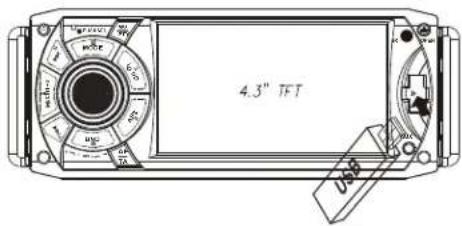
To play files in a USB, firstly open USB port cover, then insert USB storage into USB port, and then it will play files in the USB automatically.
To play files in a card, firstly press OPEN button to flip down control panel, then hold the left part of the control panel to push it rightwards and pull it to you to remove it, and then insert the card into card slot till hear a click sound, and then attach the control panel onto chassis again, by now it will play files in the card automatically.
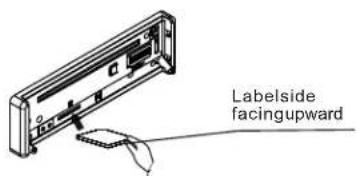

Press in till heard a "CLICK"
1.2 Unloading a disc, USB or card
To unload the disc in disc slot, use STOP button to stop playback and then press OPEN button to flip down the control panel, then press EJECT button to eject disc, then remove it.
To pull away the USB storage, use STOP button to stop playback, then you can remove the USB storage.
To unload the card in card slot, use STOP button to stop playback, then press OPEN button to flip down the control panel and then hold the left part of it to push rightwards and pull it to you to remove it, and then you can push the card for release it and then pull it out of the card slot.
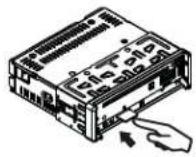
Press in till heard a "CLICK"
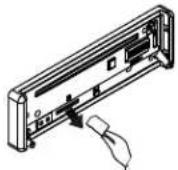
Remove the memory card
* During MP3/WMA playback, the information of file, folder, title, artist and album will be scrolling on LCD display. As long as the current playing MP3/WMA music contains relevant ID3 tag information in version 1.0/2.0 format, the 3 items underlined above will be scrolling on LCD display; otherwise, they will not.
* There is ESP function for all formats of discs.
2. Popping up Function Icons-board
2.1 Function Icons-board of Digital Video/VCD/MPEG4/Image/MP3/WMA
During Digital Video/VCD/MPEG4/Image playback, tapping any place on touch screen can pop up Function Icons-board 1 as next page, then tap 📄 icon to pop up Function Icons-board 2 as next page.
During MP3/WMA playback, tapping any place except folder area, track area and MP3/WMA&Image&MPEG4 icons can pop up Function Icons-board 1 same as one of Digital Video/VCD/MPEG4/Image, then tap 📄 icon to pop up Function Icons-board 2 same as one of Digital Video/VCD/MPEG4/Image.
![[MP3] TITLE / SONG: TRACK 03 / WMA MP3 001 002 003 004 005 006 007 Track area Folder area Track area MP3/WMA icon Image icon MPEG4 icon](/content/2026/05/1069190/images/19ae1751e1b89a1e73d477b4ad4cad7c433905e0968223acf84b565acf4275cf.jpg)
The Function Icons-boards display as follows:

Function Icons-board 1

Function Icons-board 2
* Some icons on the Function Icons-boards descript as follows:

: Same as MUTE button.

: Same as VOL- button or rotating VOL knob with anti-clock wise.

: Same as VOL+ button or rotating VOL knob with clock wise.

: Poping up source Menu.

: Poping up Function Icons-board 2.

: Same as EQ button.

: Same as CLK button.

: Same as long pressing EQ button.

: Same as SW button.

: Poping up Function Icons-board 1.

: To switch AF mode on or off.

: To switch TA mode on or off.
2.2 CD interface
During CD playback, the CD interface displays as follows:

* Some icons on the CD interface descript as follows:
CD icon : Poping up source Menu.
: Same as VOL+ button or rotating VOL knob with clock wise.
: Same as VOL-button or rotating VOL knob with anti-clock wise.
MUTE icon : Same as MUTE button.
EQ icon : Same as EQ button.
SWF: To switch SUBWOOFER mode on or off. LOUD: To switch LOUD mode on or off.
AF icon : To switch AF mode on or off.
TA icon : To switch TA mode on or off.
3. Function of controls on the touch screen/main unit/remote control
- ▶ icon or button
During playback, use it to pause playback; in pause mode, use it to resume play-back.
In CD interface, the icon displays as 📋.
- □ icon or button
During Digital Video/VCD/CD/MP3/WMA playback, tapping or pressing it pre-stop or pause playback; in pre-stop or pause mode, use ▶ icon or button to resume playback.
During playback, tapping or pressing it twice to fully stop playback; in fully stop mode, use icon or button to start playback from the beginning of the media.
During MPEG4/image playback, use □ icon or button to display root menu as follows:

During MP3/WMA playback, the root menu above displays all the time.
When displaying root menu, use < or > button to highlight the current chapter/track, the current folder or the kind icons.
* If there are no track/chapter for a kind icon, you can't highlight the kind icon.
When highlighting a kind icon, press ENTER button to enter it.
When highlighting the current folder, use v or ^ button to highlight other folders and then press ENTER button to enter it.
When highlighting the current track, use v or ^button to highlight other tracks and then press ENTER button to play it.
* For image, after highlighting a track, press ENTER button to display only the highlighted track; press >|| button to display all tracks step by step from the highlighted track.
* Tapping folder icon, track icon or kind icon can execute the operation above.
- / icons or buttons
During playback, continuously tapping « or » icon or continuously pressing « or » button can fast backwards or forwards at the following multiple of normal
speed: x2, x4, x8, x20, x1.
During fast playback, use ▶ icon or button to resume normal playback.
For image files, no this function.
4. / icons or buttons
During playback, use one of them to play previous or next chapter/track.
During playback, continuously long pressing 🎨 or ➕ button on control panel can fast backwards or forwards at the following multiple of normal speed: x2, x4, x8, x20, x1.
5. Numberbuttons
During Digital Video/VCD(PBC OFF)/MPEG4/Image/CD/MP3/WMA playback, use number buttons to input chapter/track SN. , then it will play or display it.
To input a chapter/track with an SN that is equal to or bigger than 10, use the +10 button to input the digit in tens place and then use 0-9 button to input the digit unitsorder.
I.e. +10 \~ 1 = 11 (number 11 chapter/track will be displayed/played.)
During VCD playback, when it is in PBC ON mode, the number buttons are disabled.
6. MENU icon and button
During Digital Video playback, use MENU icon or button to display the current chapter list, then use direction buttons to select your desired chapter and then press ENTER button to play it.
For VCD, MENU button and icon are disabled, track list is displayed on the monitor screen by pressing TITLE/PBC button or icon.
For MPEG4/image, MENU button and icon are disabled, root menu is displayed on the monitor screen by pressing □ button or tapping □ icon.
For MP3/WMA, MENU button and icon are disabled, root menu displays on the monitor screen all the time. Root menu of MP3/WMA is same as the one of MPEG4/image.
For CD, MENU button is disabled.
7. TITLE/PBC button and icon
During Digital Video playback, use TITLE/PBC button or icon to display title list; then use direction buttons to select your desired title and then press ENTER button to open the chapter list of the title; then use direction buttons to select your desired chapter and then press ENTER button to play.
* You can also tap a desired title and then chapter to play.
During VCD playback, use TITLE/PBC button or icon to switch PBC mode on or off. When PBC mode is switched on, it will play from the beginning of media till it displays a track list. When a track list is displayed, use the number buttons to select your desired tracktoplay.
For MP3/WMA/MPEG4/image, the TITLE/PBC button and icon are disabled.
For CD, the TITLE/PBC button is disabled
8. GOTO icon and GOTO button
For Digital Video/MPEG4/VCD/image/MP3/WMA, you can use GOTO, , , number and ENTER icons or GOTO, <, >, number and ENTER buttons to select a chapter /track or from a playback time point to play.
During playback, tap GOTO icon or press GOTO button to display changeable playback information bar as follows:
| Title SN. | Chapter SN. | Elapsed time | |
| DigitalVideo: | TT 01/10 CH | 09/20 | 0:01:38 |
| MPEG4: | CHAP 01/01 | A | 0:01:38 |
| VCD: | TRK 01/10 | PBC | 0:01:38 |
| Image: | TRK 006/231 | A | 0:00:00 Disabled |
| MP3/WMA: | TRK 01/23 | A | 0:02:22 |
* During playback, tapping 8010 icon can also display the Goto Function icons-board asfollows:

When displaying the changeable playback information bar, use □ / □ icon or < or > button to highlight title SN. (only for Digital Video), chapter/track SN. or elapsed time of current chapter/track (disabled for image).
When highlighting title SN. or chapter/track SN., use number icons or buttons to input desired SN. of title or chapter/track, then use ENTER icon or button to play the selected chapter/track.
When highlighting elapsed time of current chapter/track(disabled for image), use number icons or buttons to input desired playback time point for the playback time of the whole media for Digital Video/VCD and of the current chapter/track for MPEG4/MP3/WMA, then use ENTER icon or button to play from the playback time point.
ForCD, GOTO button is disabled.
9. icon or ZOOM button
During Digital Video/VCD/MPEG4/image playback, use 🔒 icon or ZOOMbutton to switch zoom mode between ZOOM 2, ZOOM 3, ZOOM 4, ZOOM ½, ZOOM 1/3, ZOOM 1/4 and ZOOM OFF.
When zooming in video/image, use direction buttons to move video/image upwards, downwards, rightwards or leftwards.
When not zooming in image, direction buttons can switch on 4 fixed rotated angles between >=90 deg cw, <=90 deg ccw, ^=UP-DOWN and LEFT-RIGHT.
For MP3/WMA, icon and ZOOM button are disabled.
For CD, the ZOOM button is disabled.
10. OSD icon or button
During Digital Video/VCD/MPEG4/Image/MP3/WMA playback, use OSD icon or button to display playback information bar as bellows:
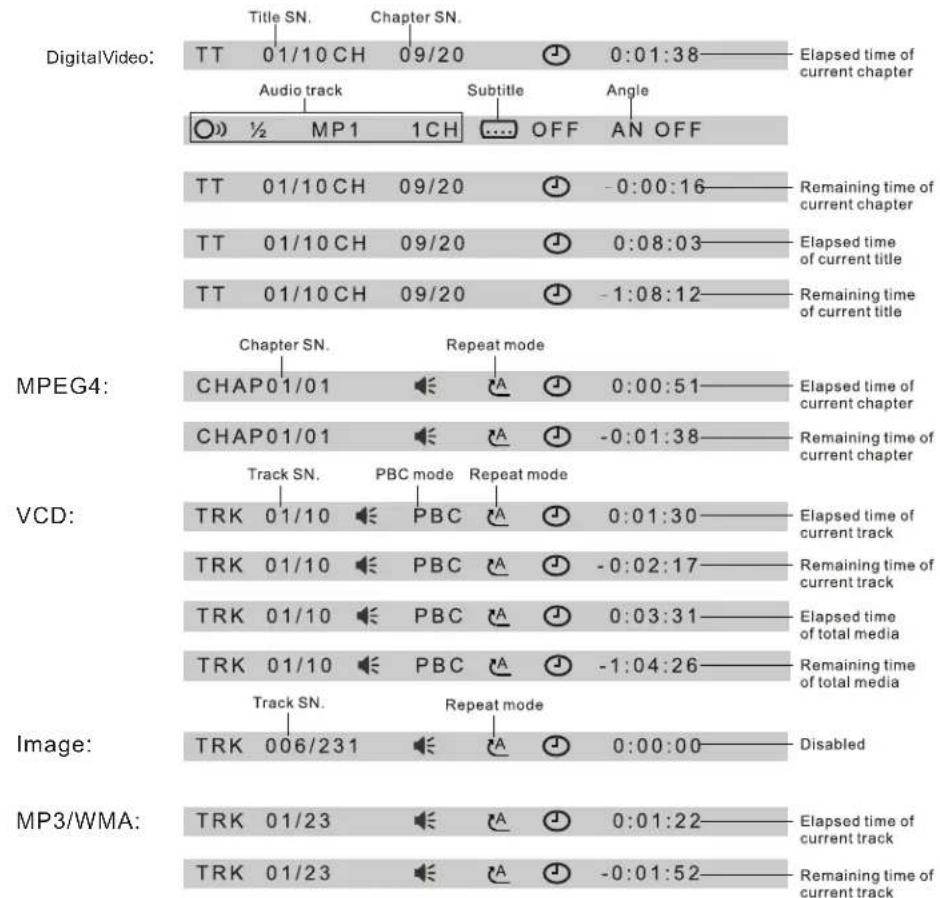
For CD, OSD button is disabled.
11. icon or REPEAT button
During Digital Video playback, use 🎨 icon or press REPEAT button to switch repeat mode between REP CHAPTER, REP TITLE, REP ALL and REP OFF.
During VCD(PBC OFF)/CD playback, use 📋 icon or press R IP A T button E1 switch repeat mode between R P , REP ALL or REPOFF.
During MP3/WMA/MPEG4/image playback, use 📋 icon or press REPEAT button to switch repeat mode between REP1, REP FOLDER(or DIR), REP ALL or REP OFF.
During VCD(PBC ON) playback, 📄 icon and REPEAT button are disabled.
- icon or RDM button
During Digital Video/VCD(PBC OFF)/CD/MP3/WMA playback, tapping is nor long pressing RDM button switches random mode on or off.
For MPEG4/image/VCD(PBC ON) playback, icon and RDM button are disabled.
- icon or INT button
During VCD/CD playback, tapping 📄 icon or long pressing INT button switches intro mode onoroff.
For Digital Video/MP3/WMA/MPEG4/image, icon and INT button are disabled.
- icon or button
During Digital Video playback, use 📄 icon or button to switch between audio tracks (depending on the current playing media).
/ D driving VCD playback, use button to switch audio channels between MONO L, MONO R, MIX MONO and STEREO.
For MPEG4/MP3/WMA/ionage,done button disabled.
- icon or button
During Digital Video playback, use 📄 icon or button to switch subtitle languages on or off (depending on the current playing media).
For VCD/MP3/WMA/MPEG4/imagico... and button disabled.
For CD, the 📄 button is disabled.
16. icon or SETUP button
Use 📄 icon or SETUP button to enter Media Setup Menu for setting up all media parameter values.
Use icon or SETUP button to display Media Setup Menu(the default page is SYSTEMSETUP);
Media Setup Menu has 4 pages in all. When highlighting a page, tap the aim page icon or press > or < button to highlight another page;
After selecting a page, tapping the aim item icon or press ^ or v button to highlight a setup item in the selected page;
After selecting a setup item, tapping the aim value; or press > button to enter the setup item, then press v or ^ button to select a desired value, finally press ENTER button to confirm it.
After finishing setting, tapping EXIT icon or press SETUP button to exit Media Setup Menu to resume normal playback.
Description of the 4 pages:
1) SYSTEM SETUP
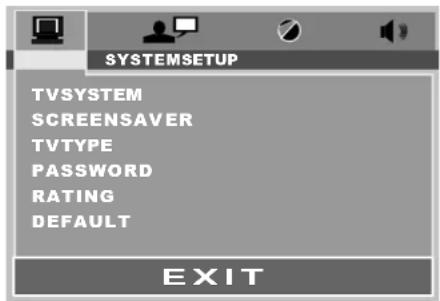
TVSYSTEM
This setup item is for setting up video system in NTSC, PAL or AUTO.
If you set a non-matched video system for playing a video, the playing video will display white-black or flash.
SCREENSAVER
This setup item is for switching screen saver on or off.
TV TYPE
This setup item is for setting up video display size.
(1) 4:3 PS: Choose this item when connecting a monitor with 4:3 screen. When playing video with 16:9 size, the left and right part of video will be cut out, and video will display in full screen.
(2) 4:3 LB: Choose this item when connecting a monitor with 4:3 screen. When playing video with 16:9 size, the top and bottom part of the monitor screen will be turned into a black square.
(3) 16:9: Choose this item when connecting a monitor with 16:9 wide screen.
PASSWORD
This setup item is for locking or unlocking parental control. The default mode is locked. The default unlocking password is 0000.
To lock or unlock parental control:
(1) Highlight PASSWORD item and then press > or ENTER button to enter it;
(2) Input password 0000;
(3) Press ENTER button to confirm, then it will unlock or lock parental control.
* Remove the section of the PASSWORD of the User Manual to keep this sensitive informationconfidential.
RATING
This setup item is for setting a new rating level of parental control.
(1) First highlight PASSWORD item to see whether parental control is locked or not. If it is in locked mode, unlock parental control referring to PASSWORD above.
(2) Highlight RATING item and press > or ENTER button to enter it, then use ^ or v button to select your desired rating level, and then press ENTER button to confirm.
(3) Highlight PASSWORD item again and then press > or ENTER button to enter it, then input password 0000, and press ENTER button to lock parental control again.
DEFAULT
This setup item is to change all parameter back to the default factory values.
2) LANGUAGE SETUP

OSD LANGUAGE
This item is for selecting the type of language displayed on the screen except for subtitle language and menu language (depending on current playing media).
AUDIO LANG
This item is for selecting the type of audio language (depending on current playing media).
SUBTITLELANG
This item is for selecting the type of subtitle language (depending on current playing media).
MENULANG
This item is for selecting the type of menu language (depending on current playing media).
3)VIDEOSETUP
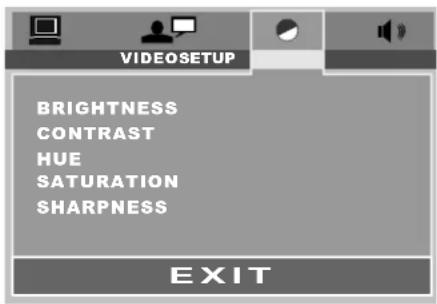
BRIGHTNESS
For adjusting brightness of video output.
CONTRAST
For adjusting contrast of video output.
HUE
For adjusting hue of video output.
SATURATION
For adjusting saturation of video output.
SHARPNESS
For adjusting sharpness of video output.
4) DIGITALSETUP
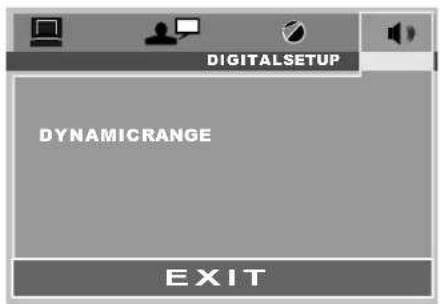
DYNAMIC RANGE
This item is for adjusting linear compression ratio. If you set it to FULL, Peak-to-Peak value of audio signal is minimum; if you set it to OFF, Peak-to-Peak value is maximum.
\*RegionCode
If you insert a disc into the disc slot and REGION ERROR is displayed, the car multi-media system can not play the disc. The reason is that the region codes of the car multi-media system and the used disc do not match each other.
Appendix: Region code of DigitalVideo
Motion Picture Association of America (MPAA) divided the world into 6 regions, and gave every region a region code for locking and unlocking DigitalVideo playback.
Basically, a coded DigitalVideo player can play only the discs if its region code is the same as the code of the Digital Videoplayer. Otherwise, it cannot play the disc.
Please note that only the DigitalVideoDigitalVideoD players produced by the 8 biggest film-making companies of America impose this restriction. The Digital VideoDigitalVideoD players not produced by the 8 biggest film making companies of America are not restricted by the rule of region code. Generally, they are called Free Region Code or Full Region Code.
The problems caused by area code inconsistency has motivated the production of unlocked version DigitalVideoDigitalVide and recodable Dplayers.
Region codes and the countries or areas represented by region codes are as follows:
Region 1: America, Canada, East-Pacific Inlands;
Region 2: Japan, West Europe, North Europe, Egypt, South Africa, Middle East;
Region 3: South-east Asian countries include Taiwan, Hong Kong, South Korea, Thailand, Indonesia, etc.;
Region 4: Australia, New Zealand, Central South America, South Pacific Inlands;
Region 5: Russia, Mongolia, Indian Peninsula, Middle Asia, East Europe, North Korea, North Africa, North-west Asia etc.;
Region 6: China mainland.
The 8 biggest film-making companies of America are as follows:
- WarnerBros;
- Columbia;
3.20th Century FOX; - Paramount;
5.Universal;
6.UA(UnitedArtist);
7.MGM(MetroDogwynMayer); - WaltDisney
\*ParentalControl
Q: After inserting a Digital Video disc into the disc slot, if a dialogue box pops up? and asks you to input a password, what should you do
A: The playing disc is locked by a rating level of parental control. If the current rating level of parental control of the Digital Video player is lower than the one of current disc, you must input the correct password of parental control to unlock the parental control and enter a rating level equal to or higher than one of the current disc in order to play the disc.
* For factory preset password of parental control of DigitalVideoplayer, please seethe. part of Media Setup Menu
Appendix: Parental Control
Parental Control function of a Digital Video player can control playback of movie ratings on a disc. You can set the Digital Video player to be a certain rating level of parental control using the Media Setup Menu. If the rating level of parental control of a disc is higher than the one of the Digital Video player, the Digital Video player cannot play the disc.
The Digital Video movie can be designed so that the Digital Video player can play different versions of content of a particular movie according to the different rating levels of parental control. Depending on the Dfegtate video, the scenes that are not suitable for children will be cleared or replaced by suitable scenes automatically.
The rating levels of Parental Control are as follows:
1KidSafe
2G
3PG
4PG13
5PGR
6R
7NC17
8Adult
AUX IN operation
An external AV system can use the car AV system as monitor and amplifier.
- Use an AV cable to make the car AV system and the external AV system connected through the AUX IN jack on control panel of the car AV system and the AV Out jacks of the external AV system.

- Play the external AV system, then use MODE button or Source Menu to enter AUX IN mode for the car AV system. By now, the program played by the external AV system can be output through the monitor of the car AV system and the speakers connected to the car AV system.

* The icons on the AUX interface descript as follows:
AUX : Popping up Source Menu.
MUTE : Same as MUTE button.
EQ : Same as EQ button.
SWF: Same as long pressing SW button.
: Same as VOL+ button or rotating VOL knob with clock wise.
LOUD: To switch LOUD mode on or off.
: Same as VOL-button or rotating VOL knob with anti-clock wise.
AF : To switch AF mode on or off.
TA : To switch TA mode on or off.
- In AUX IN mode, you can use SEL, +, -, VOL, MUTE, EQ, SW and LOUD buttons or icons to adjust audio and video.
External iPod operation
An external iPod can use the car AV system as a monitor and amplifier.
- Use the iPod cable to make the car AV system and the external iPod connected through the AUX IN jack on control panel of the car AV system and the headphone port of the external iPod.
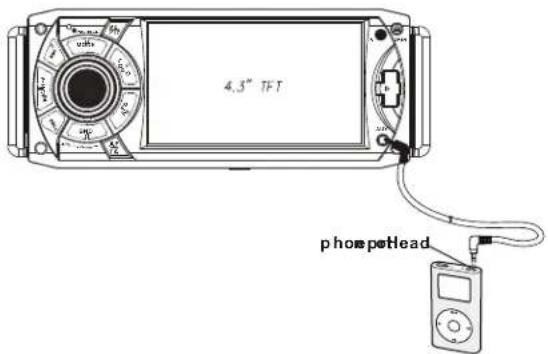
- Play the external iPod, then use MODE button to enter AUX IN mode for the car AV system. By now, the program played by the external iPod can be output through the monitor of the car AV system and the speakers connected to the car AV system.
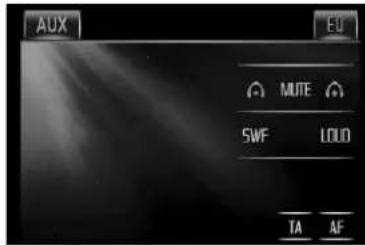
* The icons on the AUX interface descript as follows:
AUX : Popping up Source Menu.
EQ : Same as EQ button.
: Same as VOL+ button or rotating VOL knob with clock wise.
: Same as VOL- button or rotating VOL knob with anti-clock wise.
- In AUX IN mode, you can use SEL, +, -, VOL, MUTE, EQ, SW and LOUD buttons or icons to adjust audio and video.
REAR VIEW CAMERA
The car AV system can make you look at the actual status behind your car when you change the gear level to the back position.
- Use an video cable to make the car AV system and the rear view camera connected through the REAR CAMERA INPUT jack in the rear cabinet of the car AV system and the VIDEO OUTPUT jack of the rear view camera.
Make the REAR CAMERA SWITCH line in the rear cabinet of thecarAVsystem connected to (B+)12V power supply.
- When you change the gear level to the back position, the screen of the car AV system will display the actual status behind your car.
* Note : the external monitor can not display the actual status behind your car.
Troubleshooting
Please read the user manual carefully before using the car A/V system. If you have any difficulty using this car A/V system, refer to the troubleshooting guide. If you are still unable to resolve the problem after using all the suggestions, please contact your dealer or an authorised service centre.
NO PICTURE, SOUND
* Ensure that the power switch is on.
* Ensure that the power cord is not damaged or the fuse is not blown.
NO SOUND BUT HAVE PICTURE
* Ensure that the player's audio output is properly connected to the speaker's audio input.
* Check whether the audio connector is damaged.
* Check whether you have turned down the volume.
* Ensure that the audio is not in MUTE mode.
BLACK AND WHITE PICTURE OR SCREENROLLING
* Ensure that you have set right mode of video system (e.g. PAL, NTSC).
FLAWS OF PICTURE OR SOUND
* Check whether disc is scratched or stained.
* Check whether AV connector and output terminal is stained.
* Check whether there is condensation inside the lens. If so, power on the player and do not work for an hour or so, then try again.
DISPLAYS: NO DISC OR BAD DISC
* Ensure that you have inserted a disc into the disc slot.
* Check whether disc is inserted with label side upwards.
* Check whether disc is bent.
* Check whether disc is stained or scratched badly.
* Ensure that disc format is compatible to the player.
* Ensure that temperature inside the car is not too high. If so, cool off until the ambient temperature returns to normal.
* Insert another disc into the disc slot.
REMOTE CONTROL IS INSENSITIVE OR DOES NOT WORK
* Check whether the lithium cell of the remote control is powerful and working properly.
* Direct the IR emitting window of the remote control to the IR sensor of main unit.
* Check whether there are some obstacles between remote control and main unit.
SOME FUNCTION BUTTONS DO NOT WORK
* Turn off ACC power, then turn on again.
* Reset unit to zero, then turn on again.
* Remove control panel from chassis, reattach it onto the chassis and then turn it on again.
RADIO DOES NOT WORK
* Check whether antenna cable is connected firmly.
* Manually tune for a station.
Specification
General
Power Supply Requirement....DC 12V Current consumption....7A MAX.
Audio
Signal Output....2ch&4ch line out FrequencyResponse ....20 Hz - 20 KHz S/NRatio ....90 dB (JIS) WowandFlutter ....Below measurable limits
TFTMonitor
Monitor Screen Size....4.3 Inch Wide ColorSystem ....NTSC/PAL
Disc/USB/Card
CompatibleFormat.... DigitalVideo/MPEG4/VCD/IMAGE/MP3/WMA/CD
Radio
FM
Frequency range....87.5MHz - 107.9MHz Usable sensitivity....15dBu I.F Frequency....10.7MHz
MW
Frequency....530KHz - 1710KHz Usable sensitivity....40dBu I.F. Frequency....450KHz
NOTE:
Specification and design are subject to modification, without notice, dueto improvements in technology.
MADEINCHINA
88-J4321-03C
PYLE view
Visit us @ pyleaudio.com
IMPORTANT: Pack carefully in original package if possible. We are not responsible for damage incurred in returning items for repair. A letter stating your exact street address, daytime phone number, and the problem you are experiencing should be included. You must also enclose a copy of the original receipt a sproof of date of purchase
Brooklyn, NY 11204
1-800-444-5671
Monday Through Thursday. 9AM to 5PM
Friday 9AM to 1PM Eastern.
- PRECAUTION
- Class1laserproduct
- Content
- INSTALLATIONSTEPS
- NOTE:
- GENERAL KNOWLEDGE ABOUT REMOTE CONTROL
- Removing insulating sheet
- Replace lithium cell
- 3Noteabout usingremotecontrol
- Warning for lithium cells of remote control
- Same functions in any work source mode
- POWER button or OFF icon
- VOL knob & VOL+/VOL- buttons
- 3.SELbutton
- 4.MUTEbutton
- 5.EQbutton
- 6.LOUDbutton
- 7.SWbutton
- CLK button
- MODE button and source menu
- 3) SETTING TIME
- 4) SETTINGRDS
- 11.OPENbutton
- RESETbutton
- RadioOperation
- REGIONmode
- 11.PImode
- To automatically search for traffic announcements (TA)
- Disc/USB/CardOperation
- Loading or unloading a disc, USB or card
- Loading a disc, USB or card
- \* CAUTION OF USING DISC
- Unloading a disc, USB or card
- Popping up Function Icons-board
- Function Icons-board of Digital Video/VCD/MPEG4/Image/MP3/WMA
- CD interface
- Function of controls on the touch screen/main unit/remote control
- / icons or buttons
- Numberbuttons
- MENU icon and button
- TITLE/PBC button and icon
- GOTO icon and GOTO button
- icon or ZOOM button
- OSD icon or button
- icon or REPEAT button
- icon or SETUP button
- 1) SYSTEM SETUP
- TVSYSTEM
- SCREENSAVER
- TV TYPE
- PASSWORD
- RATING
- DEFAULT
- 2) LANGUAGE SETUP
- OSD LANGUAGE
- AUDIO LANG
- SUBTITLELANG
- MENULANG
- 3)VIDEOSETUP
- BRIGHTNESS
- CONTRAST
- HUE
- SATURATION
- SHARPNESS
- DYNAMIC RANGE
- \*RegionCode
- Appendix: Region code of DigitalVideo
- \*ParentalControl
- Appendix: Parental Control
- AUX IN operation
- External iPod operation
- REAR VIEW CAMERA
- Troubleshooting
- NO PICTURE, SOUND
- NO SOUND BUT HAVE PICTURE
- BLACK AND WHITE PICTURE OR SCREENROLLING
- FLAWS OF PICTURE OR SOUND
- DISPLAYS: NO DISC OR BAD DISC
- REMOTE CONTROL IS INSENSITIVE OR DOES NOT WORK
- SOME FUNCTION BUTTONS DO NOT WORK
- RADIO DOES NOT WORK
- Specification
- General
- Audio
- TFTMonitor
- Disc/USB/Card
- Radio
- FM
- MW
- MADEINCHINA
- PYLE view
Brand : Pyle
Model : PLD40MU
Category : Car radio