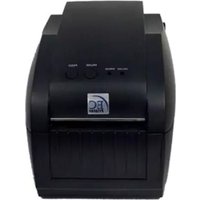
EC-3150D-USB - Label printer EC Line - Free user manual and instructions
Find the device manual for free EC-3150D-USB EC Line in PDF.


| Product Type | Desktop Label Printer |
| Model | EC-3150D-USB |
| Brand | EC Line |
| Dimensions (W x D x H) | 200 x 150 x 100 mm |
| Weight | 1.0 kg |
| Power Supply | USB bus power (5V 1A) or optional AC adapter |
| Print Technology | Direct Thermal |
| Print Resolution | 203 dpi (8 dots/mm) |
| Max Print Speed | 30 mm/s |
| Max Label Width | 58 mm |
| Max Label Length | 150 mm |
| Supported Label Types | Continuous roll, die-cut, fanfold |
| Connectivity | USB Type B |
| Compatible Operating Systems | Windows, macOS, Linux (with drivers) |
| Barcode Symbologies | Code 39, Code 128, EAN-13, UPC-A, QR Code, Data Matrix, PDF417 |
| Font Support | TrueType fonts via software |
| Software Included | Label design software (e.g., BarTender Lite) |
| Maintenance | Clean print head with isopropyl alcohol and lint-free swab; clean platen roller |
| Safety Instructions | Do not immerse in water; unplug before cleaning; only use recommended labels |
| Spare Parts Available | Print head, platen roller, cutter blade |
| Repairability | Modular design; parts replaceable by user |
Frequently Asked Questions - EC-3150D-USB EC Line
User questions about EC-3150D-USB EC Line
0 question about this device. Answer the ones you know or ask your own.
Ask a new question about this device
Download the instructions for your Label printer in PDF format for free! Find your manual EC-3150D-USB - EC Line and take your electronic device back in hand. On this page are published all the documents necessary for the use of your device. EC-3150D-USB by EC Line.
USER MANUAL EC-3150D-USB EC Line
natural_image
Line drawing of a portable electronic device with ventilation slots and control buttons (no text or symbols)Proficient in Commercial POS Receipt Printers
1. Introduction....2
1.1 Safety Warning ....2
1.2 Note 2
2. General Information ....3
2.1 Introduction ....3
2.2 Main Features ....3
3. Printer Parts ....3
4. Paper Roll Installation ....5
5. Specification 8
5.1 Specification Table 9
6. Setting Up the Printer 10
6.1 Unpacking 10
6.2 Power Cable Connection ....10
6.3 Data Cable Connection 10
6.4 Media Installation 10
7. Power On Utilities ....10
7.1 Self-Test 10
7.2 Gap Sensor Calibration .....11
7.3 Hexadecimal Dumping 12
7.4 Skip AUTO.BAS 12
7.5 Printer Initialization 13
8. Indicators and Buttons....13
8.1 Indicators 13
8.2 Buttons 13
9. Maintenance ....14
9.1 Printer Cleaning 14
1、Introduction
Thanks for choosing our new thermal label printer EC-3150. This product provides reliable performance and high printing quality at economic price. With powerful functions and easy operation design, EC-3150 is your best choice of thermal label printer.

CAUTION, NOTE

CAUTION: MUST COMPLY, OTHERWISE HUMAN GET HARM AND DEVICES MAGE.

NOTE: IMPORTANT INFOMATION AND TIPS FOR PRINTERS OPERATION.
SAFETY WARNING
PLEASE READ THE BELOW WARNINGS AND NOTES CAREFULLY BEFORE USING THE PRINTER.
1.1 SAFETY WARNING

CAUTION: THE PRINT HEAD IS A HEATED PART, PLEASE DO NOT TOUCH THE NT HEAD AND OTHER PARTS AROUND IT IN AND AFTER THE PRINTING PROCESS.

CAUTION: DO NOT TOUCH THE PRINT HEAD AND PLUG-IN PARTS TO AVOID NT HEAD DAMAGE.

CAUTION: DO NOT TOUCH THE PAPER TEAR-OFF KNIFE TO AVAOD GETTING RM.
1.2. Safety Notice:
* Don't touch the printer head with anything.
* Don't touch the cutter blade.
* Don't bend the power cord excessively or place any heavy objects onto it.
* Don't use the printer when it is out of order. This can cause a fire or and electrocution.
* When connecting or disconnecting the plug, always hold the plug but not the cord.
* Keep the desiccant out of children's reach.
* Use only approved accessories and do not try to disassemble, repair or remodel it by yourself.
* Install the printer on the stable surface. Choose firm, level surface where avoid vibration.
* Don't let water or other foreign objects into the printer.
* Don't connect a telephone line into the peripheral drive connector.
* We recommend that you unplug the printer from the power outlet if no use it for a long period.
2、General Information
2.1 Introduction
EC-3150 is designed for real-time and batch label printing, which is applicable in the field of transportation, logistics, post, retail sale, and etc. The printer can be connected with other equipment with various interface cards, such as Parallel, Serial, USB and LAN. It supports different paper media, including thermal paper roll, thermal label paper and sticker paper.
The printer provides direct thermal printing at selectable printing speed of 2.0, 3.0, 4.0, 5.0 and 6.0 inches per second. It accepts roll feed, die-cut and fan-fold labels. All common barcode format and QRCODE are available. Font and bar codes can be printed in 4 directions and in 1 to 10 times enlargement size. High performance and efficiency of label printing save your time!
2.2 Main Features
● Support thermal paper roll, thermal label paper and sticker paper.
● High speed printing, From2\~6inch/s
● Auto paper adjusting function.
● Auto temperature control for durable printing.
● Module design for different application.
3、Printer Parts

(1)
1- Top Cover 2- Base housing 3- Top Cover Open Button
4- Backing Paper Opening 5- Label Opening 6- Feed Button
7- Pause Button 8- Error Indicator 9- ONLINE/POWER Indicator
(2)
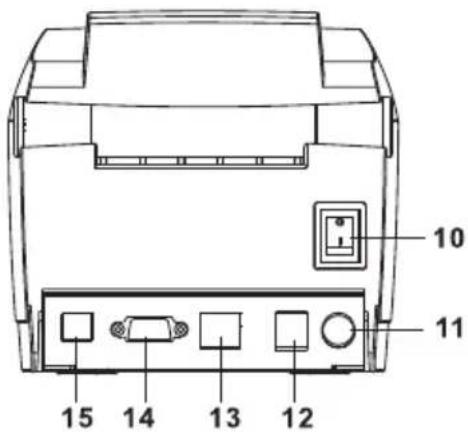
10- Power Switch
11- Power Jack
12- Cashdrawer Jack
13- Parallel Interface
14- USB Interface
15- Serial Interface

(3)

(4)
16- Print Head 17- Paper Roll 18- Label Guide 19- Paper Presence Sensor
20- Peel-off Roller Lever 21- Light Transmission Sensor Light Source
22- Paper Roll Spindle 23- Light Transmission Sensor Receiver
24- Peel-off Spindle 25- Peel-off Roller 26- Text sensor
4. Paper Roll Installation
(1) Insert the paper roll spindle into a paper roll, and place the paper roll into the printer. Fixing tab on the paper roll spindle should be inside the internal paper roll mount. Adjust the paper roll spindle position with the paper roll mount.
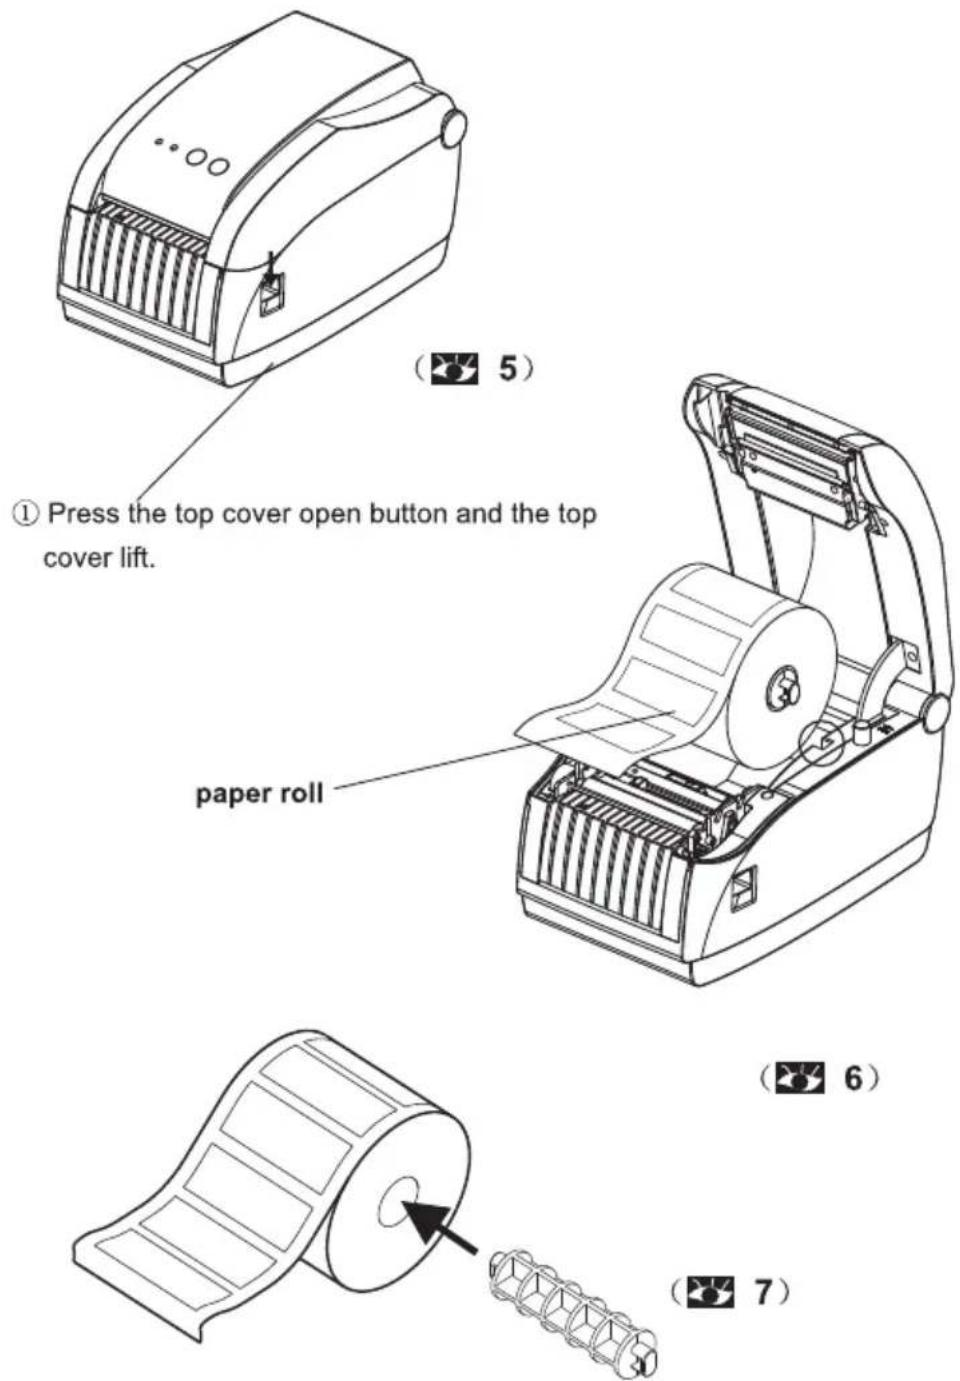
② Insert the paper roll spindle into the paper roll, and adjust the spindle position to make it in the center of the paper roll.
③ Place the paper roll into the internal paper roll mount. Please make sure the paper printing side face up as shown in the below photo.

natural_image
Illustration of a rolled document with a black 'X' symbol above it, no text or symbols present.(8)

natural_image
Technical line drawing of a mechanical device with an open lid and internal compartments, showing no text or symbols.(9)
(2) Loading label for peel-off mode
① Thread the label through the label guides and move the label guides to adjust the fitness paper width.

natural_image
Technical line drawing of a car interior showing dashboard, steering wheel, and door (no text or symbols)(10)
② Pull down the peel-off roller lever to unlock the peel-off roller.

Lever stands, the peel-off roller is locked.
Lever down, the peel-off roller is unlocked.
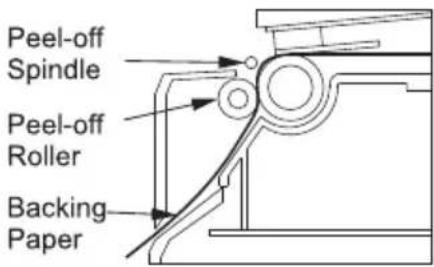
③ Split the label paper and backing paper manually and keep the label paper in the label opening. Thread the backing paper in front of the peel-off spindle and into the peel-off part.

natural_image
Technical line drawing of a car interior showing structural components and airflow direction (no text or symbols)(13)
④ Pull up the peel-off lever and the peel-off roller presses on the backing paper. Close the top cover.

flowchart
graph TD
    A["Internal Component 14"] --> B["Assembly Part 15"]
    style A fill:#f9f,stroke:#333
    style B fill:#bbf,stroke:#333
Lever down, the peel-off roller is unlocked.
Lever stands, the peel-off roller is locked, and the backing paper is in the peel-off part.

Note:
If the peel-off function fails, please check:
- The printing media is installed correctly.
- The backing paper must be in front of the peel-off spindle.
- The peel-off roller needs to press on the backing paper.
- The peel-off roller lever must be stand.
Please refer the pictures below:


16)


17)


18)
3) Loading label for normal print mode If do not need sticker peel off automatically, load paper roll as below:

natural_image
Technical line drawing of a mechanical device with internal compartments and mounting brackets (no text or symbols)5. Specification
5.1 Specification Table
| Parameter | ||
| Printing method | Direct Thermal | |
| Resolution | 203DPI | |
| Print width | 16-82mm | |
| Print speed | 2~6inch,Default 5 inch/s | |
| Memory | DRAM: 2M FLASH: 2M | |
| Print head temperature sensor | Thermal Sensitive Resistance | |
| Print head position sensor | Microswitch | |
| Paper detection sensor | Photoelectricity sensor | |
| Interface | Serial+USB+Ethernet | |
| Bar code Font Graphics | Bar code | CODE128, EAN128, ITF, CODE39, CODE93, EAN13, EAN13+2, EAN13+5, EAN8, EAN8+2, EAN8+5, CODABAR, POSTNET, UPC-A, UPCA+2, UPCA+5, UPC-E, UPCE+2, UPC-E+5, CPOST, MSI, MSIC, PLESSEY, ITF14, EAN14 QRCODE |
| Internal font | FONT 0 to FONT 8 Simplified Chinese, Traditional Chinese and Korean | |
| Enlargement & rotation | 1 to 10 times enlargement in both directions 0°, 90°, 270°, 360° rotation | |
| Graphics | Mono PCX and BMP files can be downloaded into FLASH and DRAM | |
| Media | Media type | Continuous, sticker, fan-fold, etc |
| Media width | 16mm - 82mm | |
| Media diameter | Max. 85mm | |
| Paper off mode | Tear off and Peel off | |
| Power | Input | 24V DC/2A |
| Environment condition | Work | 5 - 45°C, 20 - 80%RH |
| Storage | -40 - 55°C, ≤93%RH (40°C) | |
| Physical dimension | Diameter | 230(D) x 156(W) x 147(H)mm |
| Weight | 1.62kg | |
The printer supports both continuous and non-continuous paper.
● Continuous type: Paper roll
● Non-continuous type: 1) Label roll; 2) Sticker paper.
6. Setting Up the Printer
6.1 Unpacking
Please unpack the printer package, and inspect the parts according to the packing list. If any parts are missing or damaged, please contact the customer service of your purchased reseller or distributor.
6.2 Power Cable Connection
(19)

1) Make sure the printer power switch is OFF;
2) The printer power jack is a 3-pin socket and for 24V DC power input. Please plug the DC cord connector into the printer's power jack properly.
CAUTION:
■ When connecting or disconnecting the plug, always hold the plug but not the cord.
■ Avoid pulling the power cord, otherwise any damages may cause a fire or electrocution.
■ Avoid placing the power cord around other over heated equipment to prevent power cord melting, which may cause a fire or electrocution.
■ We recommend that you unplug the printer from the power outlet if no use it for a long period
6.3 Data Cable Connection
1) Make sure the printer power switch is OFF.
2) Plug the data cable connector into the printer's interface properly.
3) Plug the other end of the data cable with the host computer.
CAUTION:
■ Please do not plug the data cable when the printer power is ON.
6.4 Media Installation
To install the sticker paper and label roll, please refer"4. Paper Roll Installation".
7、Power On Utilities
There are five power-on utilities to set up and test printer hardware. These utilities are activated by pressing FEED button and PAUSE button.
7.1、Self-Test
To start the printer self-test, please follow the below steps,
- Turn off the printer power.
- Make sure the paper roll is installed correctly and the printer top cover is closed.
- Press the FEED button and turning on the printer power simultaneously. When the self-test paper (chart 21) comes out, release the FEED button.
Self-test Page Sample:
SELFTEST....Self-test Mode

natural_image
Abstract pattern of vertical striped lines with no text or symbols(20)
VERSION: V1.0....Firmware version
INTERFACE: PARALLEL......Interface type
SPEED: 5....Print speed
DENSITY: 7....Print darkness
SIZE: 76 mm, 60 mm....Paper width
GAP: 0 mm, 0 mm Gap distance
CODE PAGE: 437 Code page
MILAGE (m) : 44.7999999....Printed mileage (meter)
REFERENCE: 0 mm, 0 mm......Reference offset
DIRECTION: 0, 0.....Print direction
SHIFT: 0 ....Label print offset
OFFSET: 0 Paper tear-off offset Printer functions
SET PEEL: OFF.....Peel-off mode
SET TEAR: ON....Tear-off mode
SET HEAD: ON....Cover opening sensor
SET PRINTKEY: OFF....Press & print function
SET REPRINT: ON....Auto reprint function
SET KEY1 (FEED) : ON....Feed button function
SET KEY2 (PAUSE) : ON.....Pause button function
TAIWANESE BIG5: TST24.BF2....Traditional Chinese
CHINESE GB2312: TSS24.BF2.....Simplified Chinese
KOREAN KSC5601: K....Korean
button function
DRAM FILE: 0 FILE (S)
FLASH FILE: 0 FILE (S)
SECTOR SIZE: 4 KB
PHYSICAL DRAM: 2048 KBYTES
AVAILABLE DRAM: 1024 KBYTES FREE
PHYSICAL FLASH 2048 KBYTES
AVAILABLE FLASH 1024 KBYTES FREE
Numbers of download files
Physical & available
memory space
7.2 Gap Sensor Calibration
Gap sensor sensitivity should be calibrated at the following conditions
- A brand new printer
- Label stock changed
- Printer initialization
This function is to reset the label gap sensor sensitivity when the printer power is turned on. User needs to start the calibration of the gap sensor sensitivity after loading a different type of label roll or the printer is initialized.
Please follow the steps below to calibrate the gap sensor:
- Turn off the printer power.
-
Make sure the label roll is installed correctly and the printer top cover is closed.
-
Press and hold on the PAUSE button, then turn on the printer power. The printer will automatically calibrate the gap sensor sensitivity and save the gap length into DRAM. After then release the PAUSE button.
7.3 Dump mode
Please follow the steps below:
- Turn off the printer power.
- Make sure the label roll is installed correctly and the printer top cover is closed.
- Press and hold on the PAUSE button and FEED button, then turn on the printer power. When the POWER indicator (blue light) and ERROR indicator (red light) light simultaneously, release both buttons. The printer is changed to Dump Mode and print as below chart.


Note: Printer will not print if data is not more than one piece of label, and need to press FEED button to force the printer to print it out.
7.4 Skip AUTO.BAS
User can download an auto execution file (AUTO.BAS) to flash memory. Printer will run the AUTO.BAS program immediately when turning on printer power. The AUTO.BAS program can be interrupted by the power-on utility.
Please follow the steps below to skip the AUTO.BAS:
- Turn off the printer power.
- Press and hold on the PAUSE button and FEED button, then turn on the printer power. When the POWER indicator (blue light) dims and ERROR indicator (red light) lights, release both buttons. The printer skips running the AUTO.BAS program. And then the POWER indicator lights.
7.5 Printer Initialization
Printer initialization is used to clear DRAM and restore printer settings to defaults. Please do the gap sensor sensitivity calibration after the printer initialization.
Please follow the steps below to initialize the printer:
-
Turn off the printer power.
-
Press and hold on the PAUSE button and FEED button, then turn on the printer power. When the POWER indicator (blue light) lights and ERROR indicator (red light) dims, release both buttons. The printer DRAM is cleared and printer settings are restored to defaults.
8. Indicators and Buttons
The printer has two indicators (POWER indicator in blue light and ERROR indicator in red light) and two buttons (PAUSE and FEED).
8.1 Indicators:
| Item | Indicators Status | Descriptions |
| 1 | POWER indicator is ONERROR indicator is OFF | Printer is powered on and in normal print mode. |
| 2 | POWER indicator flashes slowly (640ms)ERROR indicator is OFF | Printer is paused. |
| 3 | POWER indicator flashes fast (160ms)ERROR indicator is OFF | Printed label is peel-off but not taken off. |
| 4 | POWER indicator is OFFERROR indicator flashes fast (160ms) | Printer cover is opened. |
| 5 | POWER indicator is OFFERROR indicator flashes slowly (640ms) | Paper shortage or gap sensor calibrated error. |
| 6 | POWER indicator flashes fast (160ms)ERROR indicator flashes fast (160ms) | Printer overheated protection is activated. After 1 minute, the printer will check again the temperature of print head. If the temperature gets right, printer resumes working. |
8.2 Buttons
| Item | Functions | Descriptions |
| 1 | Feed | Press the FEED button when POWER indicator is on and ERROR indicator is off. It feeds the label to the beginning of the next label |
| 2 | Pause | Press the feed button during printing and the printing job is suspended. |
| 3 | Self-test | Turn off the printer power.Make sure the paper roll is installed correctly and the printer top cover is closed.Press the FEED button and turning on the printer power simultaneously. When the self-test paper comes out, release the FEED button. |
| 4 | Gap sensor calibration | 1. Turn off the printer power.2. Make sure the label roll is installed correctly and the printer top cover is closed.3. Press and hold on the PAUSE button, then turn on the printer power. The printer will automatically calibrate the gap sensor sensitivity and save the gap length into DRAM. After then release the PAUSE button. |
| 5 | Dump mode | 1. Turn off the printer power.2. Make sure the label roll is installed correctly and the printer top cover is closed.3. Press and hold on the PAUSE button and FEED button, then turn on the printer power. When the POWER indicator (blue light) and ERROR indicator (red light) light simultaneously, release both buttons. The printer is changed to Dump Mode. |
9. Maintenance
9.1 Printer Cleaning
To ensure the printing quality, please proceed this maintenance section to keep your printer in good conditions and extend its life.
Please use one of following material to clean the printer:
Cotton swab
Lint-free cloth
Vacuum / Blower brush
100% ethanol
The cleaning process is described as following
| Printer Part | Method |
| Print Head | 1. Turn off the printer power before cleaning the print head.2. Allow the print head to cool for at least one minute.3. Use a cotton swab and 100% ethanol to clean the print head surface. |
| Platen Roller | 1. Turn off the printer power.2. Rotate the platen roller and use a cotton swab or lint-free cloth to wipe it thoroughly with 100% ethanol. |
| Exterior | Wipe it with water-dampened cloth. |
| Interior | Use a vacuum or blower brush to clean the dust. |
Note:
■ Always turn off the printer power before cleaning the printer.
■ Do not touch print head by hand. Tweezers is not allowed to use for cleaning, otherwise the print head, platen roller or sensor may be damaged.
■ Please use 100% ethanol. DO NOT use medical alcohol, gasoline or acetone, which may damage the print head and platen roller.
■ Do the sensor calibration after cleaning the sensors.
■ Only turn on the printer and resume printing job after the ethanol volatilized.

line
| x | y | |---|---| | 0.0 | 100.0 | | 0.1 | 95.0 | | 0.2 | 90.0 | | 0.3 | 85.0 | | 0.4 | 80.0 | | 0.5 | 75.0 | | 0.6 | 70.0 | | 0.7 | 65.0 | | 0.8 | 60.0 | | 0.9 | 55.0 | | 1.0 | 50.0 | | 1.1 | 45.0 | | 1.2 | 40.0 | | 1.3 | 35.0 | | 1.4 | 30.0 | | 1.5 | 25.0 | | 1.6 | 20.0 | | 1.7 | 15.0 | | 1.8 | 10.0 | | 1.9 | 5.0 | | 2.0 | 0.0 |


- Introduction....2
- General Information ....3
- Printer Parts ....3
- Paper Roll Installation ....5
- Specification 8
- Setting Up the Printer 10
- Power On Utilities ....10
- Indicators and Buttons....13
- Maintenance ....14
- 1、Introduction
- SAFETY WARNING
- Safety Notice:
- 2、General Information
- Introduction
- Main Features
- 3、Printer Parts
- Paper Roll Installation
- Note:
- Specification
- Specification Table
- Setting Up the Printer
- Unpacking
- Power Cable Connection
- CAUTION:
- Data Cable Connection
- Media Installation
- 7、Power On Utilities
- 7.1、Self-Test
- Self-test Page Sample:
- Gap Sensor Calibration
- Please follow the steps below to calibrate the gap sensor:
- Dump mode
- Skip AUTO.BAS
- Please follow the steps below to skip the AUTO.BAS:
- Printer Initialization
- Please follow the steps below to initialize the printer:
- Indicators and Buttons
- Maintenance
- Printer Cleaning
Brand : EC Line
Model : EC-3150D-USB
Category : Label printer