BX-372CS - Security Camera Provision-ISR - Free user manual and instructions
Find the device manual for free BX-372CS Provision-ISR in PDF.


| Product Type | Security Camera (Effio-E Box) |
| Brand | Provision-ISR |
| Model | BX-372CS |
| Image Sensor | 1/3" Sony DS CCD (PAL:ICX673AK/NTSC:ICX672AK) |
| DSP System | CXD4127 |
| Effective Pixels | PAL:976(H)×582(V) / NTSC:976(H)×494(V) |
| Scanning System | PAL/NTSC |
| Horizontal Resolution | 650 TV Lines |
| Minimum Illumination | 0.03 Lux / F1.0 |
| OSD Menu | Available (7 languages) |
| Backlight Compensation | BLC/HLC/OFF selectable |
| Sync System | Internal (INT) |
| S/N Ratio | ≥48 dB (AGC Off) |
| White Balance | ATW/PUSH/USER1/USER2/ANTI CR/MANUAL/PUSH LOCK |
| Gamma Correction | 0.45 |
| Gain Control | Yes |
| Motion Detection | On/Off (4 Zones) |
| Privacy Masking | On/Off (4 Zones) |
| Mirror (H-REV) | On/Off |
| Sharpness | On/Off (Level Adjustable) |
| Day/Night Selection | Color/B/W/Auto |
| ATR (Adaptive Tone Reproduction) | On/Off |
| Noise Reduction | 2D-DNR |
| Picture Adjustment | Yes (Brightness, Contrast, Sharpness, HUE, Gain) |
| White Pixel Detection and Compensation | Static and Dynamic |
| Automatic Adjustment of Mechanical Iris | Yes |
| Analog Output | Y/C Separate video, Composite video |
| Lens Mount | C/CS Lens, DC/Video Iris Optional |
| Power Supply | DC12V±10%, Max 2.0W |
| Dimensions (L×W×H) | 125 x 70 x 64 mm |
| Net Weight (Without Lens) | 530 g |
| Operating Temperature Range | -10°C to +50°C |
| Cleaning Instructions | Use a soft cloth with a little alcohol for CCD; avoid touching the CCD surface |
| Safety Precaution | Use proper power supply (DC12V) to avoid electrical shock or fire |
Frequently Asked Questions - BX-372CS Provision-ISR
User questions about BX-372CS Provision-ISR
0 question about this device. Answer the ones you know or ask your own.
Ask a new question about this device
Download the instructions for your Security Camera in PDF format for free! Find your manual BX-372CS - Provision-ISR and take your electronic device back in hand. On this page are published all the documents necessary for the use of your device. BX-372CS by Provision-ISR.
USER MANUAL BX-372CS Provision-ISR
natural_image
Exterior view of a silver and black mechanical device with no visible text or symbolsDigital CCTV Camera
Effio-E Box
USER MANUAL
English / Spanish
www.provision-ISR.comwww



Content
EN English Manual 1
Note: In order to avoid electrical shock or fire, please use proper power according to the manual.
Structure and Components 3
System connection 6
OSD Menu 7
OSD Menu Operation 9
1) LENS 9
2) SHUTTER/AGC 11
3) WHITE BAL 15
4) BACKLIGHT 18
5) PICT ADJUST 19
6) ATR (Adaptive Tone Reproduction) 21
7) PRIVACY 23
8) DAY/NIGHT 24
9) NR 27
10) CAMERA ID 29
11) SYNC 31
12) LANGUAGE 32
13) CAMERA RESET 33
Specifications 34
Note:
In order to avoid electrical shock or fire, please use proper power according to the manual.
Features
• 650TV Lines.
• 2D-DNR
- OSD control.
• 0.03 Lux sensitivity
• Motion detection
• HLC
• Color rolling control
- Privacy masking
Precautions
-
Do not install the camera in places where the temperature is above 50^ C or under -10^ C.
-
Do not touch the CCD surface with your finger. If cleaning is needed, please wipe it using a soft cloth with a little bit of alcohol.
-
Do not install in places with high humidity, it can seriously damage the quality of the picture.
-
Do not drop the camera and the controller and avoid physical shock.
-
Do not face your camera to a strong light, it can damage the CCD.
-
Do not expose the camera to rain or dusty surroundings.
-
It's highly important to use the correct and suitable power supply (DC12V) for the camera.
-
Only professional and qualified technician can install and test this camera.
-
During use, if any errors occur, cut off the power immediately and contact your local distributor.
Structure and Components
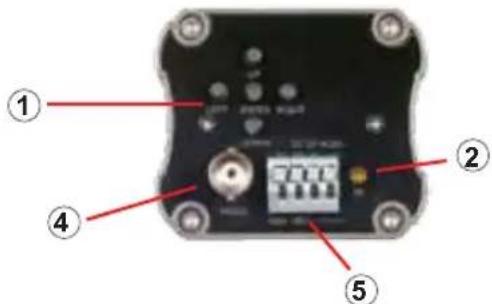
Tailplate Sketch
③ On the camera casing
Details:
① OSD Menu
② Indicator Led
③ Socket Auto Iris Lens
④ Video out
⑤ Power Supply Socket
Operation Steps
(1) Use the designated power supply supplied by the vendor.
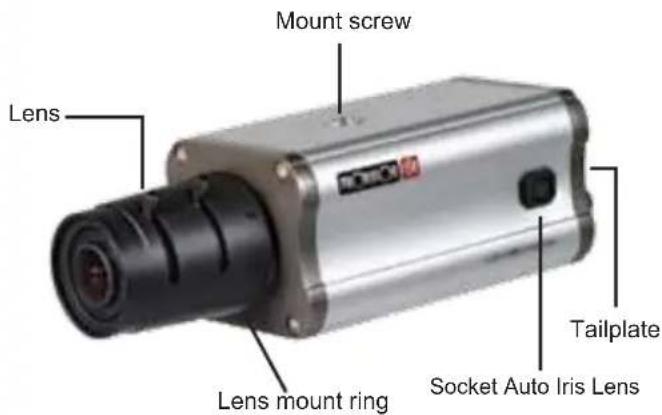
(2) Fasten the Lens you have chosen onto the "Lens Mount ring". In case of Auto Iris Lens, connect the Lens cable to the "Auto Iris Socket".
(3) Connect "Video out" ④ of the camera to the monitor or other video equipments (DVR) with a 75 ohm cable (RG59).
(4) When using an auto Iris Lens, ensure that the "Electronic shutter switch" ① is "ON" (Iris switch)
(a) If the Lens is DC driven, the "DC/VIDEO" switch ② should be switched to DC, and the optimal image effect can be achieved by adjusting the "Level Knob" ⑤.
(b) If the Lens is VIDEO driven, then the switch "DC/VIDEO" ② should be changed to the VIDEO position.
(5) Plug in the power supply:
(a) Case model B- direct plug is used (DC + in and - out) and after connecting the plug the "Power Indicator Light" ⑦ will work. At this point the monitor displays the live image.
(b) Case model D/H- power is connected by two wires. Make sure you plug the power in the right direction "+" / "-"
(6) Adjust the zoom and the focus of the Lens to get your optimal image.
(7) Back Focus is adjusted at the factory, therefore there is no need for further adjustments. However, in case you can't reach optimize focus by the lens focus ring, untie the "Back Focus Screw", then turn the "Lens Mount Ring" clockwise or counter clockwise until the image is clear. Then retighten the "Lens Mount Screw".
(8) Connect the control cable (RS485+ and RS485-) to the computer/DVR neat the "Level Knob" ⑤.
Automatic Aperture
Equip with automatic aperture lens. The definitions of the pins of the control cable are as follows (e.g. Tail Plate Sketch)
| SN | Video Control Power Supply Control | |
| 1 | +12V | DAMP- |
| 2 | NC | DAMP+ |
| 3 | VIDEO | DRIVE+ |
| 4 | GND | DRIVE- |
System connection
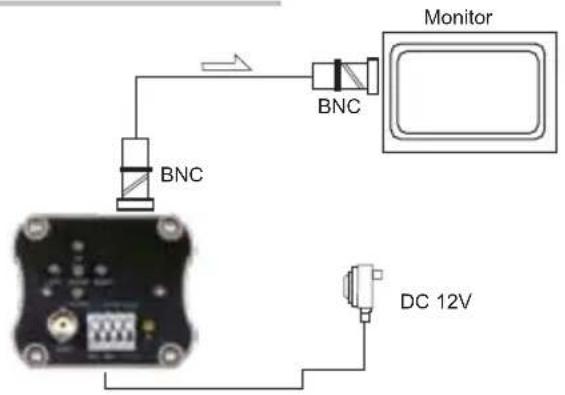
① Use one camera and one monitor
flowchart
graph TD
    A["Monitor"] --> B["Video Divider"]
    B --> C["MULTIPLEXER"]
    C --> D["DVR"]
    style A fill:#f9f,stroke:#333
    style B fill:#ccf,stroke:#333
    style C fill:#cfc,stroke:#333
    style D fill:#fcc,stroke:#333
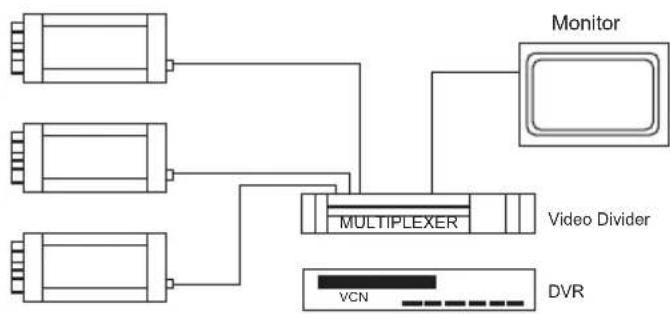
② Use Several Cameras and one Monitor
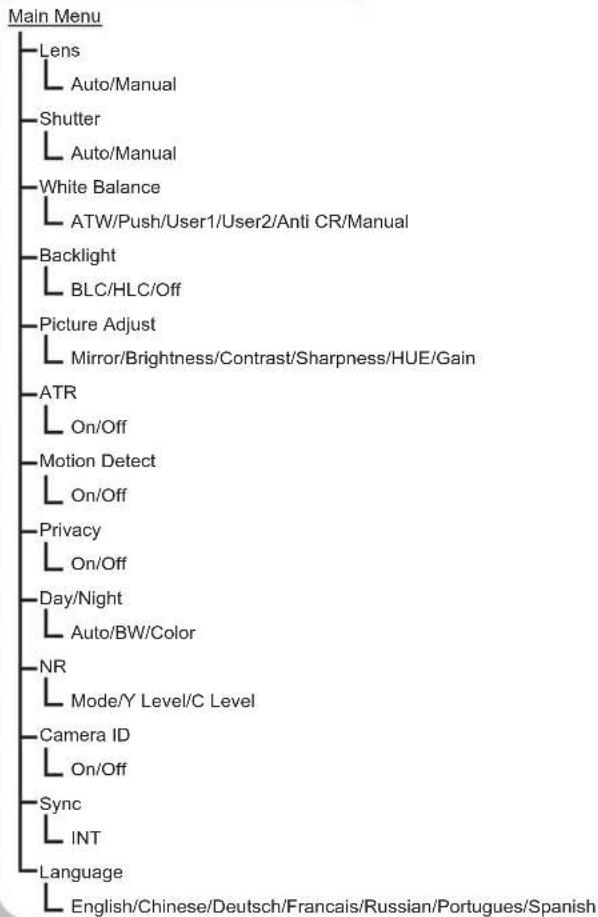
OSD Main Menu
flowchart
graph TD
    A["Main Menu"] --> B["Lens"]
    A --> C["Auto/Manual"]
    A --> D["Shutter"]
    A --> E["Auto/Manual"]
    A --> F["White Balance"]
    A --> G["ATW/Push/User1/User2/Anti CR/Manual"]
    A --> H["Backlight"]
    A --> I["BLC/HLC/Off"]
    A --> J["Picture Adjust"]
    A --> K["Mirror/Brightness/Contrast/Sharpness/HUE/Gain"]
    A --> L["ATR"]
    L --> M["On/Off"]
    A --> N["Motion Detect"]
    N --> O["On/Off"]
    A --> P["Privacy"]
    P --> Q["On/Off"]
    A --> R["Day/Night"]
    R --> S["Auto/BW/Color"]
    A --> T["NR"]
    T --> U["Mode/Y Level/C Level"]
    A --> V["Camera ID"]
    V --> W["On/Off"]
    A --> X["Sync"]
    X --> Y["INT"]
    A --> Z["Language"]
    Z --> AA["English/Chinese/Deutsch/Francais/Russian/Portugues/Spanish"]
7
OSD Menu
▲ - Joystick Up – Moves the cursor upwards.
▼ - Joystick Down – Moves the cursor downwards.
- Joystick Left – Moves the cursor to the left/change selection.
- Joystick Right – Moves the cursor to the right/change selection.
O - Joystick button – Press the Joystick to execute selections and displays a Submenu for an item with the mark.

You can push "UP" and "DOWN" to browse the main function.
Push "LEFT" and "RIGHT" to change the value.
Press the joystick for sub-menus and more configurations.
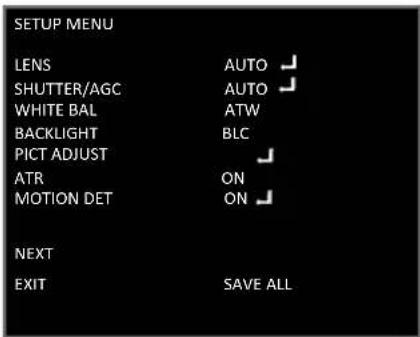
- To enter the SETUP MENU press the Joystick button – "O", The menu will appear on the screen.
8
OSD Menu Operation
1) LENS
The LENS menu allows you to set the lens which attached to You're camera.
MANUAL IRIS LENS: Where the aperture is fixed or set manually by the user. Iris is mechanism which closes and opens allowing more or less light into the lens.
AUTO IRIS LENS: In which the aperture is continuously controlled by the camera to automatically set to the desired level of brightness.
- When using a camera with a normal lens – set the LENS mode to MANUAL.
- When using an AUTO IRIS lens – set the LENS mode to AUTO.
- Scroll to LENS using ▲ or ▼.
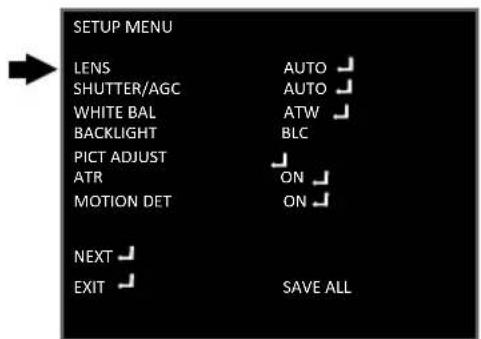
- Use ◀ or ▶ to select AUTO and press O to enter the AUTO IRIS menu.
- Use ▲ or ▼ to scroll the setup page.
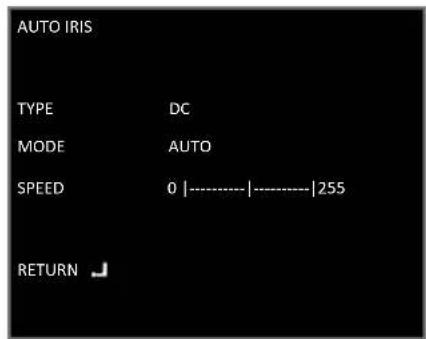
- Use ◀ or ▶ to change different parameters:
TYPE – you can select between 2 types of lens: DC or VIDEO. MODE – adjusts the LENS mode to CLOSE/OPEN/AUTO. SPEED –
2) a) SHUTTER/AGC
Here you can control SHUTTER function such as brightness level and AGC mode.
The shutter – Controls the amount of light according to your own environment. Increase SHUTTER value in dark places for a brighter picture,
Decrease SHUTTER value in places with more light for reducing amount of light.
- You can choose Auto/Manual option and set brightness level, AGC level or mode on/off.
- Scroll to SHUTTER/AGC using ▲ or ▼.
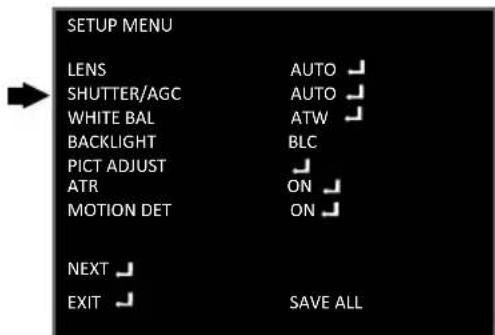
- Press O to enter the SHUTTER/AGC menu.
- Use ◀ or ▶ to select Auto and press O to enter the AUTO SETUP menu.
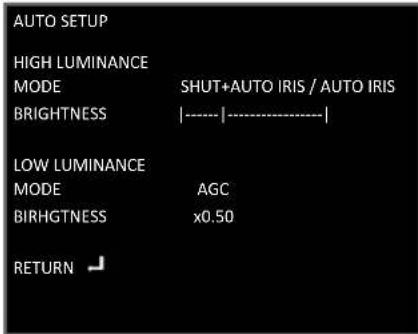
HIGH LUMUNANCE
- MODE – Use ◀ or ▶ to set AUTO IRIS (Recommended).
- BRIGHTNESS – Use ◀ or ▶ to set brightness level between 0 – 255.
LOW LUMUNANCE
AGC level – At low lightning conditions, if the image is too dark – select higher AGC level which means that the camera would amplify the CCD input signal and make image will become brighter but noisier.
- Mode - Use ◀ or ▶ to use AGC mode or turn it OFF.
- Brightness - Use ◀ or ▶ to set brightness level between x0.25/ x0.50/ x0.75/ x1.0.
RETURN – Return to previous menu.
b) From the main menu SHUTTER/AGC MANUAL SETTINGS.
- Scroll to SHUTTER/AGC using ▲ or ▼.
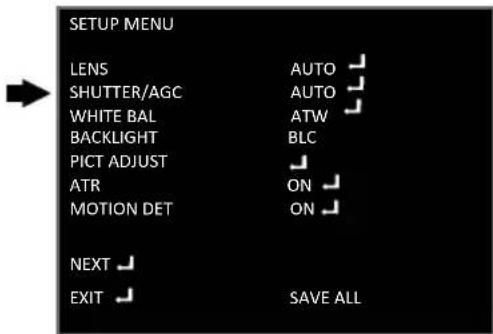
- Use ◀ or ▶ to select MANUAL and press O to enter the MANUAL SETUP menu.
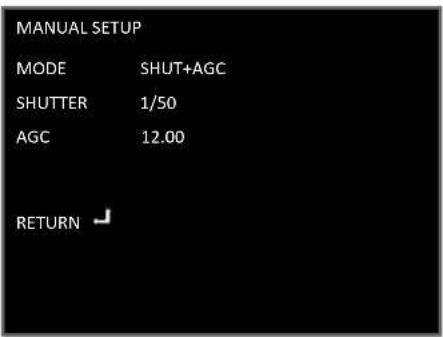
- Use ▲ or ▼ to move up and down in the menu.
- Use ◀ or ▶ to change SHUTTER value between 1/50, 1/120, 1/250, 1/500, 1/1000, 1/2000, 1/4000, 1/10000.
- Use ◀ or ▶ to change AGC value between 6.00/12.00/18.00/24.00/30.00/36.00/42.00/44.80.
Remember
Increase SHUTTER value in dark places for a brighter picture, Decrease SHUTTER value in places with more light for reducing amount of light.
AGC At low lightning conditions, if the image is too dark – select higher AGC level.
3) WHITE BAL
White balance adjustment - adjust the white balance of color necessary for the correct reproduction of colors including white as white and other colors based on it. In changing light conditions (changing the color temperature of light), white balance needs to be done again.
White balance setting can be adjusted according to the color temperature of object.
- Scroll to WHITE BAL using ▲ or ▼.
- Use ◀ or ▶ to select between the different modes: ATW/PUSH / USER1 / USER2 / ANTI CR / MANUAL / PUSH LOCK (see explanations about different modes next page):
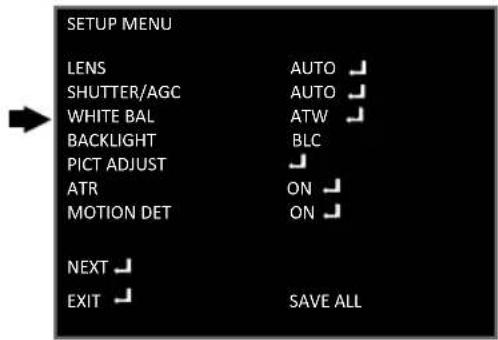
a) ATW
Auto Tracing White Balance - Auto white balance of color, which tracks the changes of white at the pictures in real time, comparing it with standard white color and reproduce the colors without the need for manual setup.
- From main menu - Scroll to WHITE BAL using ▲ or ▼.
- Use ◀ or ▶ to select ATW and press O to enter ATW MENU.
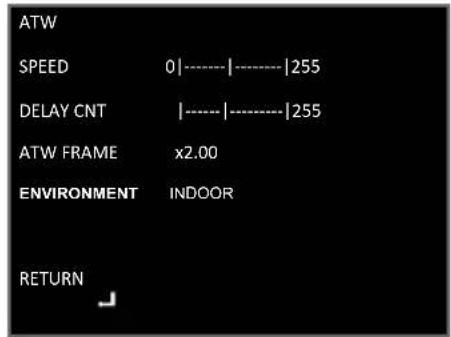
- Use ▲ or ▼ to navigate in the menu.
- Use ◀ or ▶ to change values of SPEED, DELAY CNT, ATW FRAME and ENVIRONMENT, According to your environment – Outdoor/Indoor.
b) USER 1/USER 2
Manually adjusts blue color lever and red color level.
B-GAIN - Blue color level.
R-GAIN - Red color level.
- From main menu - Scroll to WHITE BAL using ▲ or ▼.
- Use ◀ or ▶ to select USER 1 and press O to enter USER 1 menu.
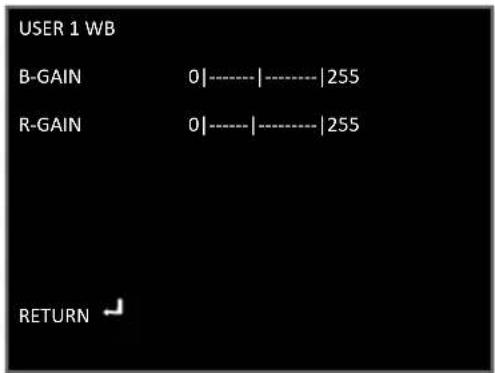
- Use ▲ or ▼ to navigate in the menu.
- Use ◀ or ▶ to change values of B-GAIN and R-GAIN.
c) ANTI CR
- From main menu - Scroll to WHITE BAL using ▲ or ▼.
- Use ◀ or ▶ to select ANTI CR.
4) BACKLIGHT
You can select between the special backlights modes – BLC or HLC according to your envioroment or turn it off. counter light, taillight, facilitating the photographed object to be separated from the background. Often with different color temperature compared with that of the front lighting, this creates a color perspective.
- Scroll to BACKLIGHT using ▲ or ▼.
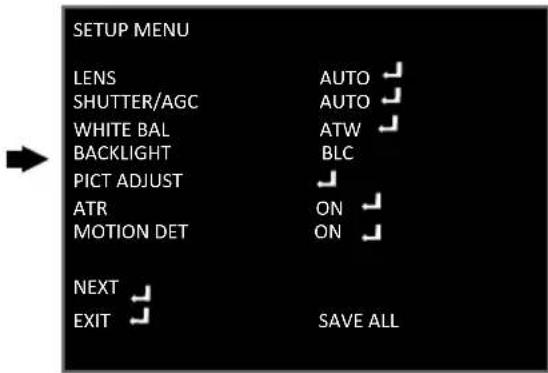
- Use ◀ or ▶ to change BACKLIGHT value between HLC / BLC / OFF.
HLC (highlight compensation)
(function that suppresses strong headlights at night and improves visibility to provide clear images with superb picture quality.
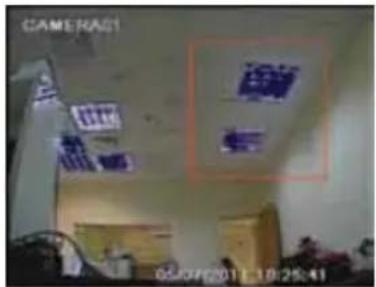
BLC
The camera features a backlight compensation circuit that prevents the object in front of the light to become like a black shadow and to create clear detailed picture.
5) PICT ADJUST
In this page you can easily adjust picture parameters like Brightness, Contrast, Sharpness, HUE and Gain.
Also contain the MIRROR effect-for un-normal installations.
Example:
OFF MIRROR


- Scroll to PICT ADJUST using ▲ or ▼.
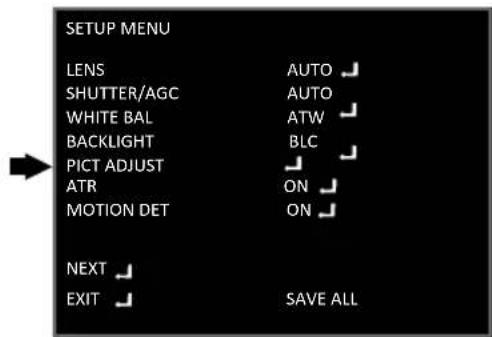
- Press O to enter to PICT ADJUST menu.
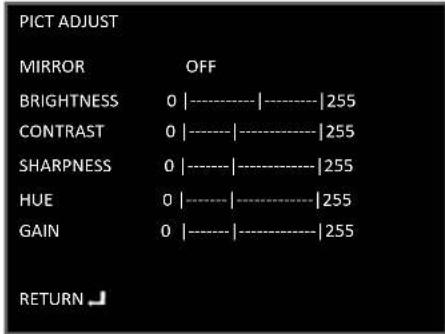
6) ATR (Adaptive Tone Reproduction)
improves the ability to create more detailed picture in both high and low luminance areas exist in the same picture.
Here you can adjust luminance level (refers to both high and low luminance) and contrast level according to your environament.
- Scroll to ATR using ▲ or ▼.
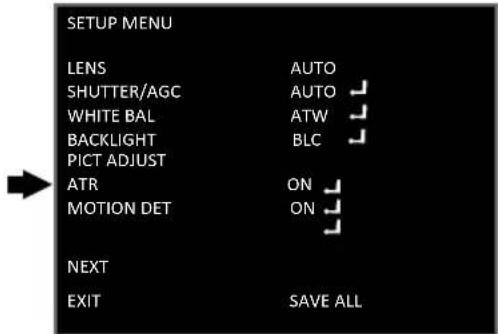
- Use ◀ or ▶ to select ON and press O to enter ATR menu. (You can use ◀ or ▶ to turn OFF the ATR option).
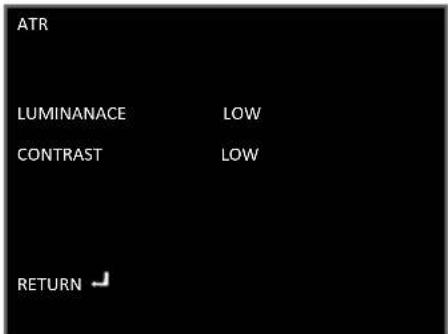
- Use ▲ or ▼ to navigate in the menu.
- Use ◀ or ▶ to LUMINANACE/CONTRAST value between LOW/MID/HIGH.
- Scroll to NEXT using ▲ or ▼.
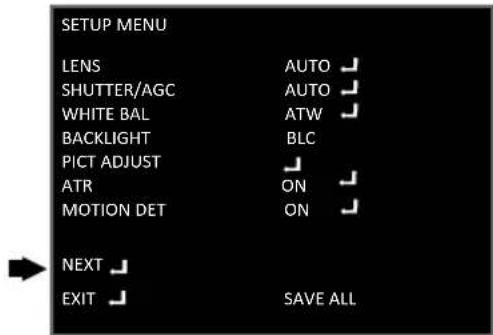
- Press O for next page,
- the second page of the setup menu will appear.
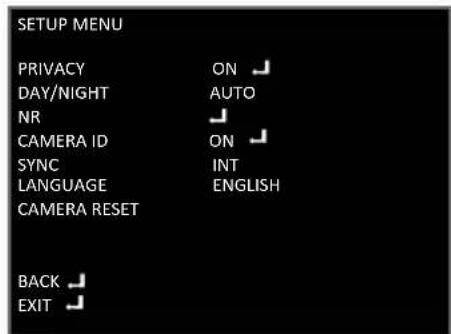
7) PRIVACY
This function is aiming at the protection of personal privacy, you can select up to 4 parts on the screen to be masked with colored cover size and location of the area is also adjustable.
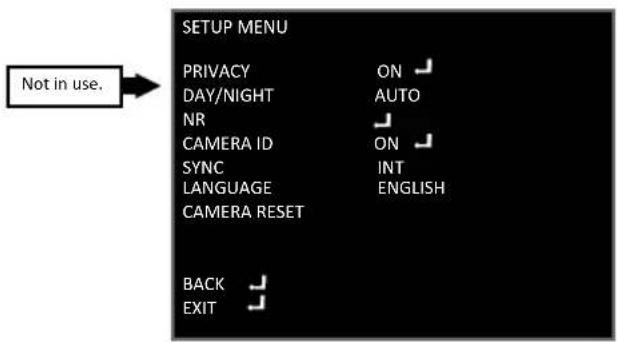
8) DAY/NIGHT
This option allows you to adjust your camera to the day or night mode to give maximum quality of picture.
You can select between AUTO/COLOR/B/W.
- Scroll to DAY/NIGHT using ▲ or ▼.
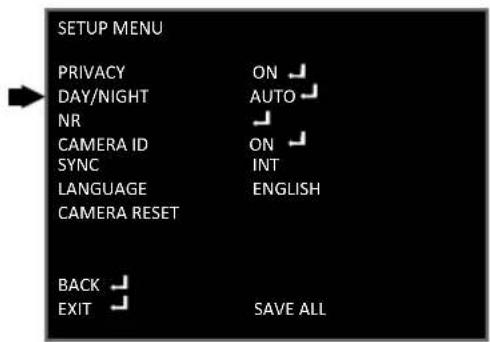
- Use ◀ or ▶ to select AUTO/COLOR/B/W. If selected AUTO or B/W, press O to enter the sub menu.
a) AUTO sub menu
BURST: Selects whether to output the burst signal when the B/W (NIGHT mode established (forcibly) status has been identified.
DELAY CNT: Sets the Night/Day identification transfer time.
DAY -> NIGHT: Sets the threshold for identifying the Night status from the Day status.
NIGHT -> DAY: Sets the threshold for identifying the Day status from the Night status.
- Use ▲ or ▼ to scroll in the menu.
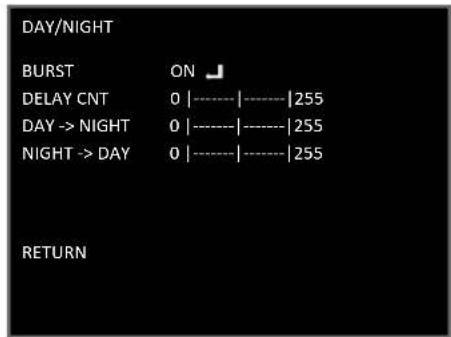
b) B/W (Black/White) sub menu
For setting BURST mode ON/OFF.
- Use ◀ or ▶ to change parameters value.
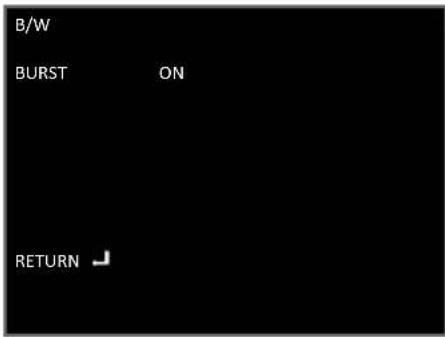
- Use ◀ or ▶ to change BURST mode ON/OFF.
9) NR
This function is used to set the noise reduction function.
- Scroll to NR using ▲ or ▼.
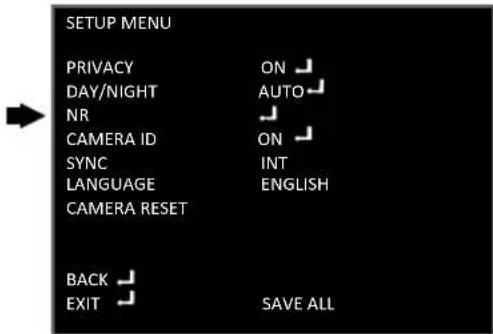
- Press O to enter NR menu.
- Use ▲ or ▼ to scroll in the menu.
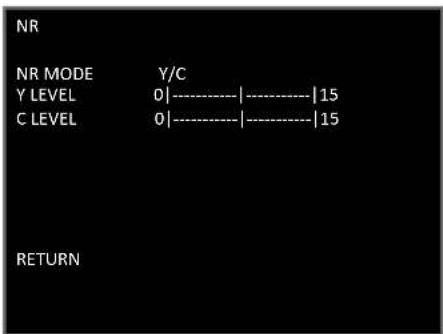
- Use ◀ or ▶ to change the parameters. (You can also switch OFF the NR MODE).
NR MODE - This function is used to set the noise reduction mode.
C LEVEL - Sets the Y filter strength.
Y LEVEL - Sets the Y filter strength.
10) CAMERA ID
This option allows you to select a name for your camera and select rather it will be displayed or not.
If selected off the name will not be displayed.
- Scroll to CAMERA ID using ▲ or ▼
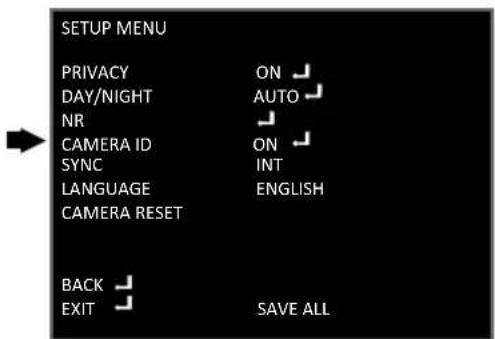
- Use ◀ or ▶ to change CAMERA ID to ON and press O to enter the sub menu.
You can select OFF if you don't want to display CAMERA ID.
- Use ◀ / ▶ / ▲ / ▼ to move the mark to select a name for your camera.
To clear last note use CLR (clear).
Camera ID can contain more the one word or line.
Use ▲ / ▼ to move the mark to different line.
Use ◀/▶ to create space between the words,
Or move the mark between different notes in the word.
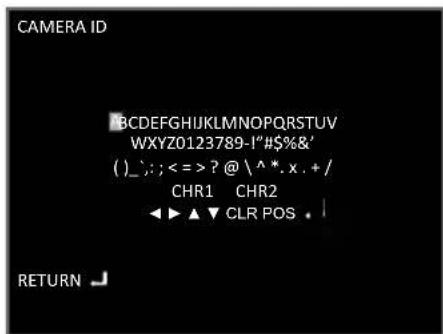
- When finished go to RETURN and press O.
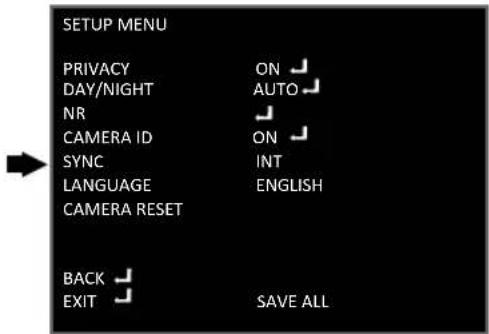
11) SYNC
This option is not adjustable – it's always on. The Line-Lock (L/L) feature allows the camera to synchronize its frame rate to the power line phase. The function is only available when the camera is operated by AC power. It allows the reduction of the fluorescent lights color rolling effect. When using 12v DC power, the camera is automatically set to internal (INT) synchronization mode.
12) LANGUAGE
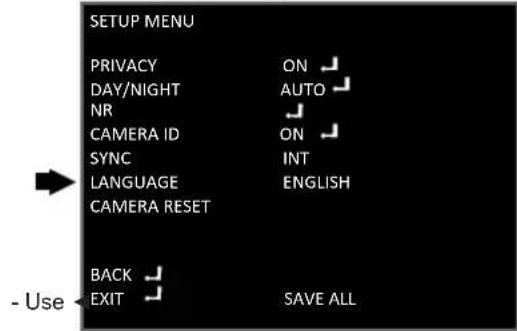
You can select different languages for the OSD to be displayed in: English, Chinese, Deutsch, France, Russian, Portuguese, Spanish.
- Scroll to LANGUAGE using ▲ or ▼.
13) CAMERA RESET
Reset camera to default settings.
- Scroll to CAMERA RESET using ▲ or ▼.
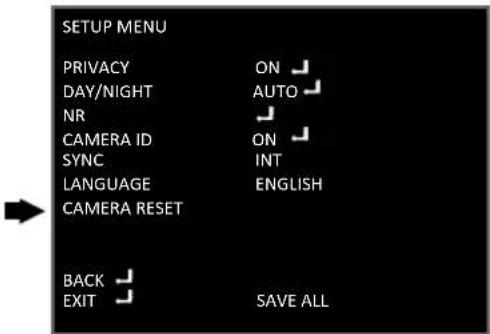
- Press O to reset camera to default values.
Specifications
| MODEL | BX-372CS |
| Image Sensor | 1/3" Sony DS CCD (PAL:ICX673AK/NTSC:ICX672AK) |
| DSP System | CXD4127 |
| Effective Pixels | PAL:976(H)x582(V) / NTSC:976(H)x494(V) |
| Scanning System | PAL/NTSC |
| Horizontal Resolution | 650TVL |
| Min. Illumination | 0.03 Lux / F1.0 |
| OSD Menu | Available( 7 languages ) |
| Backlight Compensation | BLC/HLC/OFF selectable |
| Sync. System | Internal |
| S/N Ratio | ≥48db (AGC Off) |
| White Balance | ATW/PUSH/USER 1/USER 2/ANTI CR/MANUAL/PUSH CLOCK |
| Gamma Correction | 0.45 |
| Gain Control | Yes |
| Motion Detection | On/Off( 4 Zone ) |
| Privacy Masking | On/Off( 4 Zone ) |
| Mirror(H-REV) | On/Off |
| SHARPNESS | On/Off (Level Adjustable) |
| D/N Selection | Color/B/W/Auto |
| ATR | On/Off |
| Noise Reduce | 2D-DNR |
| Picture Adjustment | Yes |
| White Pixel Detection and Compensation | Static and Dynamic |
| Automatic Adjustment of Mechanical Iris | Yes |
| Analog Output | Y/C Separate video, Composite video |
| Lens | C/CS Lens, DC/Video Iris Optional |
| Power | DC12V±10% Max 2.0W |
| Dimension | 125L x 70W x 64H mm |
| Net Weight | 530g Without Lens |
- Effio-E Box
- Content
- Note:
- Features
- Precautions
- Structure and Components
- Tailplate Sketch
- Details:
- Operation Steps
- Automatic Aperture
- OSD Main Menu
- OSD Menu
- OSD Menu Operation
- 1) LENS
- 2) a) SHUTTER/AGC
- HIGH LUMUNANCE
- LOW LUMUNANCE
- b) From the main menu SHUTTER/AGC MANUAL SETTINGS.
- Remember
- 3) WHITE BAL
- a) ATW
- b) USER 1/USER 2
- c) ANTI CR
- 4) BACKLIGHT
- HLC (highlight compensation)
- BLC
- 5) PICT ADJUST
- 6) ATR (Adaptive Tone Reproduction)
- 7) PRIVACY
- 8) DAY/NIGHT
- a) AUTO sub menu
- b) B/W (Black/White) sub menu
- 9) NR
- 10) CAMERA ID
- 11) SYNC
- 12) LANGUAGE
- 13) CAMERA RESET
Brand : Provision-ISR
Model : BX-372CS
Category : Security Camera