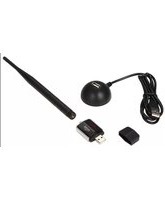
RNX-N180UBE - Network card Rosewill - Free user manual and instructions
Find the device manual for free RNX-N180UBE Rosewill in PDF.


| Product Type | Wireless USB Network Adapter |
| Model | RNX-N180UBE |
| Wireless Standard | IEEE 802.11b/g/n |
| Frequency Band | 2.4 GHz |
| Data Transfer Rate | Up to 150 Mbps |
| Interface | USB 2.0 |
| Antenna | External detachable antenna |
| Security | WEP 64/128-bit, WPA, WPA2, WPS |
| Dimensions | Approx. 1.8 x 0.7 x 0.3 inches |
| Weight | Approx. 0.3 oz |
| Power Source | Bus-powered via USB port |
| Operating Temperature | 32°F to 104°F (0°C to 40°C) |
| Storage Temperature | -4°F to 158°F (-20°C to 70°C) |
| Humidity | 10% to 90% non-condensing |
| Supported OS | Windows XP/Vista/7/8/10, Linux, Mac OS X |
| Range | Up to 100 meters indoors |
| Maintenance | Keep dry and clean; avoid physical damage |
| Safety | Low voltage device; do not disassemble |
| Spare Parts | Antenna replacement available |
| Repairability | Not user-serviceable; contact manufacturer |
Frequently Asked Questions - RNX-N180UBE Rosewill
User questions about RNX-N180UBE Rosewill
0 question about this device. Answer the ones you know or ask your own.
Ask a new question about this device
Download the instructions for your Network card in PDF format for free! Find your manual RNX-N180UBE - Rosewill and take your electronic device back in hand. On this page are published all the documents necessary for the use of your device. RNX-N180UBE by Rosewill.
USER MANUAL RNX-N180UBE Rosewill
This equipment has been tested and found to comply with the limits for a Class B digital device, pursuant to part 15 of the FCC Rules. These limits are designed to provide reasonable protection against harmful interference in a residential installation. This equipment generates, uses and can radiate radio frequency energy and, if not in-stalled and used in accordance with the instructions, may cause harmful interference to radio communications. However, there is no guarantee that interference will not occur in a particular installation. If this equipment does cause harmful interference to radio or television reception, which can be determined by turning the equipment off and on, the user is encouraged to try to correct the interference by one or more of the following measures:
- Reorient or relocate the receiving antenna.
- Increase the separation between the equipment and receiver.
- Connect the equipment into an outlet on a circuit different from that to which the receiver is connected.
- Consult the dealer or an experienced radio/ TV technician for help.
This device complies with part 15 of the FCC Rules. Operation is subject to the following two conditions:
1) This device may not cause harmful interference.
2) This device must accept any interference received, including interference that may cause undesired operation.
Any changes or modifications not expressly approved by the party responsible for compliance could void the user's authority to operate the equipment.
FCC RF Radiation Exposure Statement
This equipment complies with FCC RF radiation exposure limits set forth for an uncontrolled environment. This device and its antenna must not be co-located or operating in conjunction with any other antenna or transmitter.
"To comply with FCC RF exposure compliance requirements, this grant is applicable to only Mobile Configurations. The antennas used for this transmitter must be installed to provide a separation distance of at least 20 cm from all persons and must not be co-located or operating in conjunction with any other antenna or transmitter."
CE Mark Warning
This is a class B product. In a domestic environment, this product may cause radio interference, in which case the user may be required to take adequate measures.
National Restrictions
2400.0-2483.5 MHz
| Country | Restriction | Reason/remark |
| Bulgaria | General authorization required for outdoor use and public service | |
| France Outdoor use limited to 10 mWe.i.r.p. within the band 2454-2483.5 MHz | Military Radiolocation use. Refarming of the 2.4 GHz band has been ongoing in recent years to allow current relaxed regulation.Full implementation planned 2012 | |
| Italy | If used outside of own premises, general authorization isrequired | |
| Luxembourg | General authorization required for network and service supply(not for spectrum) | |
| Norway Implemented | This subsection does not apply for the geographical area within a radius of 20 km from the centre of Ny-Ålesund | |
| Russian Federation | Only for indoor applications | |
Note: Please don't use the product outdoors in France.
Table of Content
Chapter 1 Overview ....5
Package Content 5
1.1 Overview of the Product....5
1.2 Features....6
1.3 System Requirement....7
Chapter 2 Installation Guide ....8
2.1 Software Installation....8
Chapter 3 Install Wireless Adapter....12
3.1 USB adapter Installation 12
Chapter 4 System Configuration....14
4.1 General 14
4.2 Profile....15
4.2.1 Add 15
4.2.2 Remove 17
4.2.3 Edit 18
4.2.4 Duplicate....18
4.2.5 Set default ..... 19
4.3 Available Network 20
4.4 Status....21
4.5 Statistics....21
4.6 Wi-Fi Protect Setup....21
4.6.1 Method 1 PIN Input Config (PIN) ......22
4.6.2 Method 2 Push Button 24
FAQ....26
Chapter 1 Overview
Thank you for choosing Rosewill's 802.11n Wireless USB adapter – RNX-N180UBE.
This chapter is to introduce you more about this Wireless Adapter.
Package Content
Before getting started, please verify that your package includes the following items:
- Rosewill 802.11n Wireless USB Adapter x 1
- 5 dBi detachable Antenna x 1
- Extended USB Base x 1
- Quick Installation Guide x 1
- Resource CD x 1, including:
- Rosewill Wireless N Client Utility and Driver
- User Manual
Note:
Make sure that the package contains the above items. If any of the listed items are damaged or missing, please contact with your distributor.
1.1 Overview of the Product
The adapter is an 802.11n client device; it is designed to provide a high-speed and unrivaled wireless performance for your computer or notebook. With a faster wireless connection, you can get a better Internet experience, such as downloading, gaming, video streaming and so on.
With the 802.11n technology, higher throughput improvements using MIMO (multiple input, multiple output antennas), the RNX-N180UBE allows high packet transfer rate of up to 300Mbps for maximum download throughput. It can also interoperate with other wireless (802.11b, 802.11g). The adapter supports WEP, WPA and WPA2 encryption to prevent outside intrusion and protect your personal information from being exposed.
The adapter is easy to install and manage. The Quick Setup Wizard guides you step-by-step through the installation process; the Rosewill Wireless N Client Utility helps you create a wireless connection immediately.
With unmatched wireless performance, reception, and security protection, the RNX-N180UBE is the best choice for easily adding or upgrading wireless connectivity to your notebook and computer.
1.2 Features
● Complies with IEEE802.11n, IEEE802.11g, IEEE802.11b standards
● Supports 1T2R MIMO technology
● Supports WPA/WPA2 data security, IEEE802.1x authentication, TKIP/AES encryption, and 64/128 - bit WEP encryption
● Supports high rate of up to 300Mbps download speed for maximum throughput
- Ease to configure and provides monitoring information
● Supports Windows 2000, XP, Vista, 7
● Supports WPS
1.3 Product Specification
| StandardIEEE 802.11n Draft 2.0 and IEEE802.11g/b | RF Output Power(Typical)802.11b: up to 20 ± 1 dBm802.11g: up to 17 ± 1 dBm802.11n: up to 16 ± 1 dBm |
| Frequency Band2.400GHz ~ 2.484GHz | InterfaceUSB 2.0 A-TYPE |
| Data Rate802.11n: up to 150Mbps Upstream and up to 300 Mbps downstream802.11g: 54, 48, 36, 24, 18, 12, 9 & 6Mbps802.11b: 11, 5.5, 2 and 1 Mbps with auto-rate fall back | Antenna5dBi External Detachable antenna |
| Sensitivity-70dBm @ 802.11n-78dBm @ 802.11g-85dBm @ 802.11b | Driver supportWindows® 2000, XP 32/64, Vista 32/64, Win7 32/64 |
| Dimension:6.5 (L) x 5.5 (W) x 1.3 (H) (Inch)180 (L) x 180 (W) x 50 (H) (mm)Weight:1.5 (lbs) | Security64/128-bit WEP (Hex & ASCII), WPA/WPA2, WPA(TKIP with IEEE 802.1x)/WPA2(AES with IEEE 802.1x) |
Operation Temperature
0^ 60^ ambient temperature
Storage Temperature
-20°C \~ 70°C ambient temperature
Storage Humidity
10% \~ 90% (Non-condensing)
1.4 System Requirement
You must have at least the following
● A laptop computer/desktop PC with an available USB port
- At least a 300MHz processor and 32MB of memory
● Windows OS for Win98SE, ME, 2000, XP, Vista, 7
● A CD-ROM Drive
- USB controller properly installed and working in the computer
- A 802.11n、802.11g or 802.11b Wireless Access Point/Router (for infrastructure Mode) or another 802.11n、802.11g or 802.11b wireless adapter (for Ad-Hoc; Peer-to-Peer networking mode).
Chapter 2 Installation Guide
2.1 Software Installation
- Insert the Driver and Utility CD-ROM into the CD-ROM driver.
- The Wizard should run automatically, and Figure 02-1 should appear. If not, click the Start button and choose Run. In the field that appears, enter D:\autorun.exe (if "D" is the letter of your CD-ROM drive).

Figure 02-1
Next we use the USB wireless adapter installation steps as example. According to the PCI wireless adapter installation steps, you can complete PCI wireless adapter installing easily.
- Click Install Driver & Utility for USB Wireless Adapter on the Wireless Client Configuration Utility dialogue box, and then select the installing language from the next screen and click Next button.

Figure 02-2
- Click Next

Figure 2-3
- Click Install to start installing

Figure 02-4
- You may encounter this window, please click Continue Anyway to proceed.
![Software Installation The software you are installing has not passed Windows Logo testing to verify its compatibility with Windows XP. [Tell me why this testing is important] Continuing your installation of this software may impair or destabilize the correct operation of your system either immediately or in the future. Microsoft strongly recommends that you stop this installation now and contact the software vendor for software that has passed Windows Logo testing. Continue Anyway STOP Installation](/content/2026/05/1067862/images/a008c4fc63bb4d294b48c7505a33e21d7926b4de7457a5b2e17f327bc7a93021.jpg)
Figure 02-5
● Follow the InstallShield Wizard steps, and click Finish when done.

Figure 02-6
- Now your PC or notebook will restart automatically.
Chapter 3 Install Wireless Adapter
The wireless USB Adapter supports up to 300 Mbps wireless connection. This USB adapter is fully compliant with the specifications defined in IEEE802.11n standard. It is designed to complement USB2.0 computers and supports Windows98SE/Me/2000/XP/Vista.
3.1 USB adapter Installation
The status LED indicators of the USB wireless adapter are described in the following.
- Lnk/Act ON (Blue): Indicates a valid connection
- Lnk/Act Flashing: Indicates the adapter is transmitting or receiving data.

natural_image
Black wireless antenna with USB port, isolated on white background (no text or symbols)Figure 3-1
Install USB adapter
● Power on your PC, let the operating system boot up completely, and log in as needed.
- Hold the adapter and insert it into a USB slot.
- If the Welcome to Found New Hardware Wizard displays, choose install the software automatically (Recommended), and click Next button. The driver will be installed automatically.

Figure 3-2
- Now you have completed the driver and hardware installation for the adapter.
Chapter 4 System Configuration
Use the Wireless LAN Utility to check the link information, search for available wireless networks, or create profiles that hold different configuration settings. You can double-click the icon (Figure 0-1) on your desktop to run it. Another way to start the Configuration Utility is to click Start>Programs> 11n USB Wireless LAN Utility> 11n USB Wireless LAN Utility.
If you are using Windows XP, you can use either the Zero Configuration Utility or the Wireless Client Configuration.
Figure 0-1
4.1 General
The General tab (Figure 0-2) displays current basic wireless connection information.
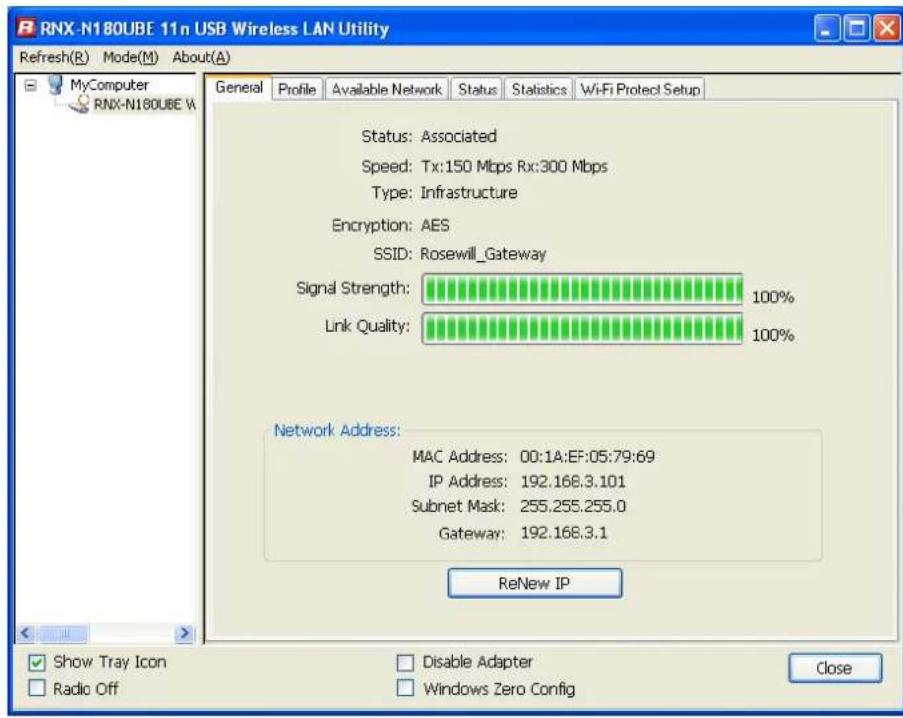
Figure 0-2
General Information
● Status: Wireless network Associated, Ad-hoc Mode or Not Associated.
● Speed: The data Tx rate and Rx rate of the current connection.
● Type: The type of the current wireless connection, Infrastructures or ad hoc
- Encryption: Current encryption.
- SSID: The unique name of the wireless network to which the wireless adapter is connecting.
● Signal Strength: The signal quality of the current connection. - Link Quality: The link quality of the current wireless connection.
Network Address
- MAC Address: The MAC Address of the Adapter.
● IP Address: The IP Address of the Adapter. - Subnet Mask: The Subnet Mask of the Adapter.
● Default Gateway: The Default Gateway address of the Adapter.
Others
● Show Tray Icon: Show USB Wireless LAN Utility icon in the windows taskbar notification area.
● Disable Adapter: Disable the wireless adapter.
● Radio off: Turn off the radio of the wireless adapter.
4.2 Profile
Using the Profile tab (Figure 4-3), you can add, remove, edit, duplicate, and set default a profile.

Figure 4-3
4.2.1 Add
● Create a new Infrastructure mode profile
If you want your wireless computers to communicate with other computers on your wired
network via a wireless access point. Click the Add button to create a new infrastructure profile.

Figure 0-4
When the Network Info dialog box appears (Figure 0-4), enter a name for the new profile. Enter the Network SSID. Choose the Network Authentication Mode and Data encryption from the drop-down menu and import the network key. Then click OK button.
● Create a new ad-hoc mode profile
If you want your wireless computers communicate with each other directly, click the Add button to create a new ad-hoc profile. Then, check on below option like Figure 4-5:

Figure 0-5
then select the correct operating channel for your network from the Channel drop-down menu.

Figure 04-6
Choose the Network Authentication Mode and Data encryption from the drop-down menu. And import the network key. Then click OK button. You have successfully created a profile.
4.2.2 Remove
Select a profile and click Remove button to delete this profile (Figure 4-7).

Figure 4-7
4.2.3 Edit
Select a profile and click Edit button to edit this profile (Figure 0-8).

Figure 0-8

Figure 0-9
Modify the profile information according to your demand.
4.2.4 Duplicate
Select a profile which you want to copy and then click Duplicate (Figure 0-10)

Figure 0-10
Import the new profile name in the popup window blank (Figure 4-11)
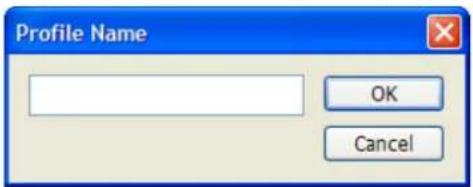
Figure 4-11
4.2.5 Set default
When you want to make one profile as a default wireless connection, you should select the profile and click Set default button. The wireless adapter will use this profile to connect to wireless network automatically when the utility running next time.
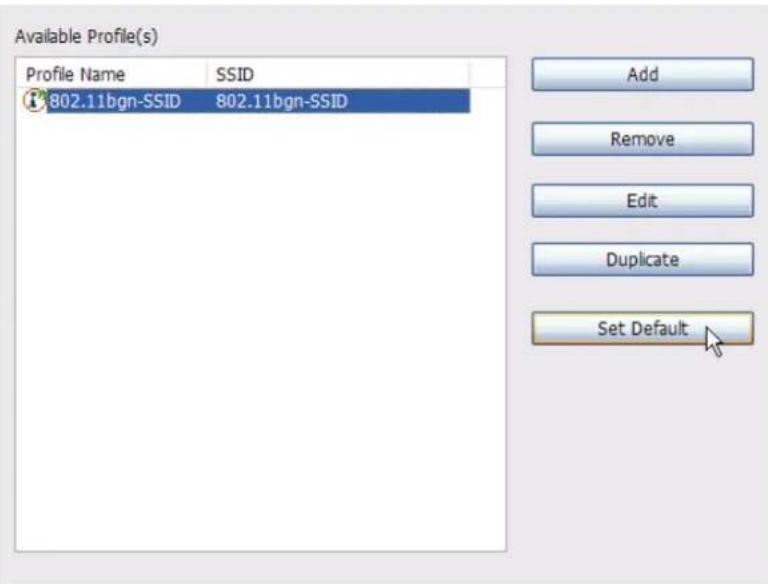
Figure 0-12
4.3 Available Network
The Available Network tab displays a list of infrastructure and ad-hoc networks for available wireless connection (Figure 04-13)

Figure 04-13
Double-click the network to which you wish to connect.
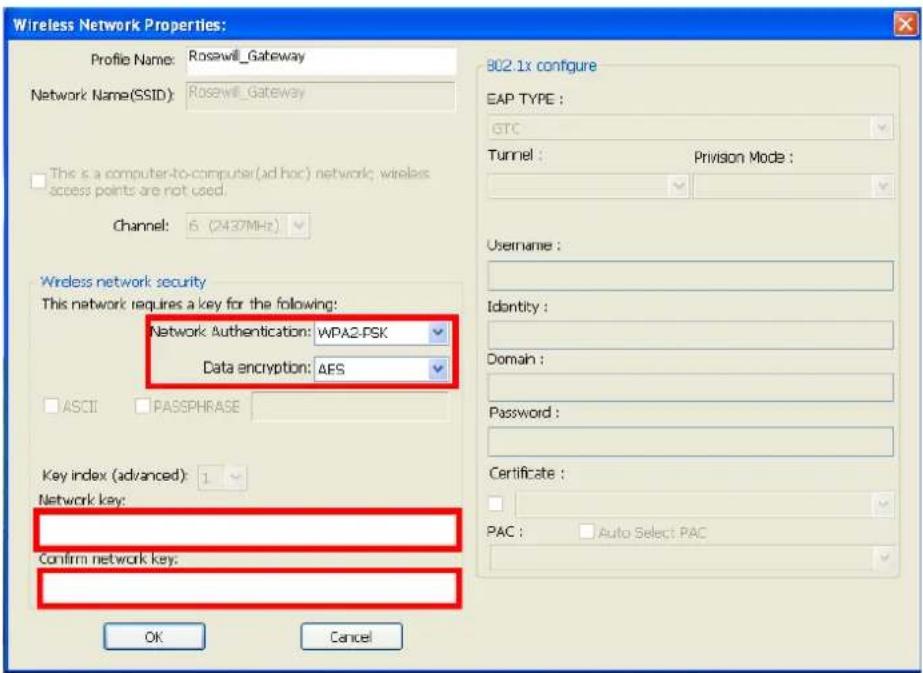
Figure 0-14
Refer to Figure 0-14 choose the Authorization modes and Encryption modes in the
drop-down box. (In most cases, the software pick the correct one for you) If the wireless network uses a Passphrase, enter the Passphrase in the Passphrase field. If the wireless network uses a WEP key, enter the WEP key in the Key field. Click the OK button to complete the network connection.
4.4 Status
The Status tab displays the detailed information of current device and wireless connection.
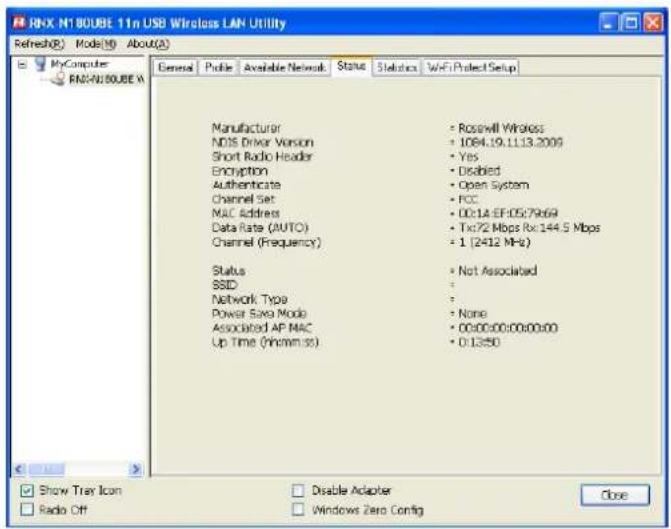
Figure 0-15
4.5 Statistics
The Statistics tab display the stat. value of current wireless connection Tx and Rx, you can click Reset button to reset value and restart to count.
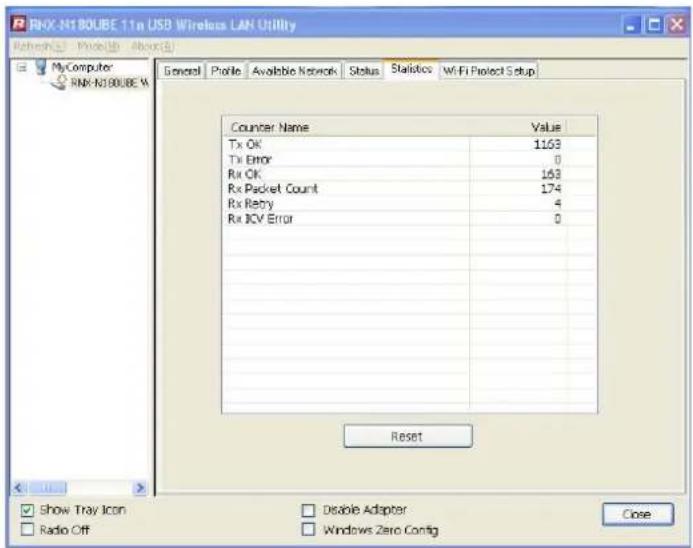
Figure 0-16
4.6 Wi-Fi Protect Setup

Figure 4-17
4.6.1 Method 1 PIN Input Config (PIN)
- Input the wireless NIC's PIN Code into AP and click Start PIN on the AP-Router WPS config page
Wi-Fi Protected Setup
This page allows you to change the setting for WPS (Wi-Fi Protected Setup). Using this feature could let your wireless client automatically synchronize its setting and connect to the Access Point in a minute without any hassle.
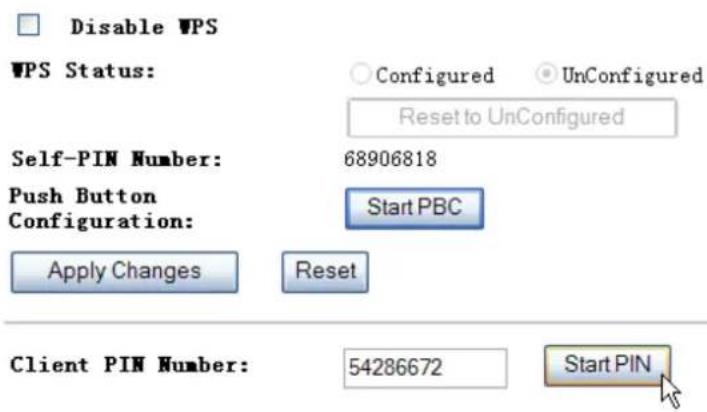
Figure 4-18
- Click Pin Input Config(PIN)

Figure 4-19
- Select one WPS AP which you want connect to and click Select button

Figure 0-20
- Please wait when the Figure 4-21 pop-up appear, the secure connection between AP and wireless NIC will be founded automatically.
![Wi-Fi Protected Setup - PIN method Wi-Fi Protected Setup - PIN method Please enter the following PIN code into your AP . PIN Code : 54286672 Status : Selected AP ...[802.11bgn-SSID] Cancel](/content/2026/05/1067862/images/0155865123506c905264ee3a85aa04223f4901711a875d4c8c35cfd70299f009.jpg)
Figure 4-21
4.6.2 Method 2 Push Button
1. Click Push Button Config(PBC) on Wi-Fi Protect Setup page
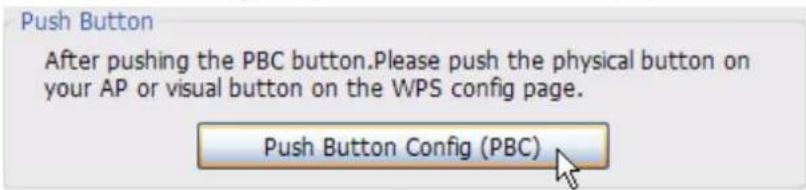
Figure 0-22
2. Click Start PBC on the AP-Router WPS config page
Wi-Fi Protected Setup
This page allows you to change the setting for WPS (Wi-Fi Protected Setup). Using this feature could let your wireless client automatically synchronize its setting and connect to the Access Point in a minute without any hassle.

Figure 0-23
- Please wait when the Figure 4-21 pop-up appear, the secure connection between AP and wireless NIC will be founded automatically.
![Wi-Fi Protected Setup - PBC method If there is more then one AP on the PBC mode,there will be [Session Overlap].Please using PIN method or wait for a while push the button again. Status : AP Sitesurvey ... Complete : Push Button Config (PBC) Cancel](/content/2026/05/1067862/images/2de878cd4832317ddd0a6d3bfd3c3d3a1a8071a1be093663dedd9d8244a1af95.jpg)
Figure 0-24
Remark
If there is more than one AP on the PBC mode, there will be session overlap. Please using method 1 PIN Input Config(PIN) or wait for a while push the button again.
FAQ
This chapter provides solutions to problems that may occur during the installation and operation of the Wireless USB Adapter. Read the descriptions below to solve your problems.
1. The Wireless USB Adapter does not work properly.
Reinsert the Wireless USB Adapter into your PC's USB slot. Right click My Computer and select Properties. Select the device manager and click on the Network Adapter. You will find the Adapter if it is installed successfully. If you see the yellow exclamation mark, the resources are conflicting. You will see the status of the Adapter. If there is a yellow question mark, please check the following:
Make sure that you have inserted the right adapter and installed the proper driver. If the Adapter does not function after attempting the above steps, remove the adapter and do the following:
Uninstall the driver software from your PC through Control Panel's "Add or Remove Programs".
Restart your PC and repeat the hardware and software installation as specified in this User Guide.
2. I cannot communicate with the other computers linked via Ethernet in the Infrastructure configuration.
Make sure that the PC to which the Adapter is associated is powered on.
Make sure that your Adapter is configured on the same channel and with the same security options as with the other computers in the Infrastructure configuration.
3. What should I do when the computer with the Adapter installed is unable to connect to the wireless network and/or the Internet?
Check that the LED indicators for the broadband modem are indicating normal activity. If not, there may be a problem with the broadband connection.
Check that the LED indicators on the wireless router are functioning properly. If not, check that the AC power and Ethernet cables are firmly connected.
Check that the IP address, subnet mask, gateway, and DNS settings are correctly entered for the network.
In Infrastructure mode, make sure the same Service Set Identifier (SSID) is specified on the settings for the wireless clients and access points.
In Ad-Hoc mode, both wireless clients will need to have the same SSID. Please note that it might be necessary to set up one client to establish a BSS (Basic Service Set) and wait briefly before setting up other clients. This prevents several clients from
trying to establish a BSS at the same time, which can result in multiple singular BSSs being established, rather than a single BSS with multiple clients associated to it. Check that the Network Connection for the wireless client is configured properly. If Security is enabled, make sure that the correct encryption keys are entered on both the Adapter and the access point.
Thank you for purchasing a quality Rosewill Product.
Please register your product at : www.rosewill.com for complete warranty information and future support for your product.

- FCC RF Radiation Exposure Statement
- CE Mark Warning
- National Restrictions
- Table of Content
- Chapter 1 Overview ....5
- Package Content 5
- Chapter 2 Installation Guide ....8
- Chapter 3 Install Wireless Adapter....12
- Chapter 4 System Configuration....14
- FAQ....26
- Chapter 1 Overview
- Package Content
- Overview of the Product
- Features
- Product Specification
- Operation Temperature
- Storage Temperature
- Storage Humidity
- System Requirement
- Chapter 2 Installation Guide
- Software Installation
- Chapter 3 Install Wireless Adapter
- USB adapter Installation
- Install USB adapter
- Chapter 4 System Configuration
- General
- General Information
- Network Address
- Others
- Profile
- Add
- ● Create a new Infrastructure mode profile
- ● Create a new ad-hoc mode profile
- Remove
- Edit
- Duplicate
- Set default
- Available Network
- Status
- Statistics
- Wi-Fi Protect Setup
- Method 1 PIN Input Config (PIN)
- Wi-Fi Protected Setup
- Method 2 Push Button
- Click Push Button Config(PBC) on Wi-Fi Protect Setup page
- Click Start PBC on the AP-Router WPS config page
- Remark
- FAQ
- The Wireless USB Adapter does not work properly.
- I cannot communicate with the other computers linked via Ethernet in the Infrastructure configuration.
- What should I do when the computer with the Adapter installed is unable to connect to the wireless network and/or the Internet?
Brand : Rosewill
Model : RNX-N180UBE
Category : Network card