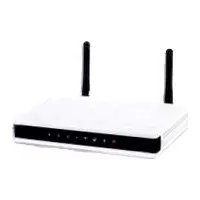
ENHWI-N2 - Router ENCORE - Free user manual and instructions
Find the device manual for free ENHWI-N2 ENCORE in PDF.


| Product Type | 802.11n Wireless LAN Router |
| Brand | ENCORE |
| Model | ENHWI-N2 |
| Standards | IEEE 802.11n draft 2.0, 802.11g, 802.11b, IEEE 802.3u 100BASE-TX Fast Ethernet |
| Wireless Speed | Up to 300Mbps (802.11n), 54Mbps (802.11g), 11Mbps (802.11b) |
| Frequency Band | 2.4 GHz ISM band (2412 ~ 2484 MHz) |
| Ports | 4 x 10/100Mbps Auto-MDIX LAN, 1 x 10/100Mbps Auto-MDIX WAN |
| Antennas | 2 x 2dBi gain dipole antennas (detachable) |
| Power Supply | 5VDC, 2.5A external adapter |
| Power Consumption | 7W (max) |
| Dimensions (W x D x H) | 150 x 80 x 30 mm (without antenna) |
| Weight | Approx. 0.3 kg |
| Operating Temperature | 0°C to 40°C |
| Storage Temperature | -10°C to 70°C |
| Humidity | 10% - 90% (non-condensing) |
| Wireless Security | 64/128-bit WEP, WPA, WPA2, WPA-PSK, WPA2-PSK |
| Firewall | Built-in NAT, SPI firewall, MAC/IP/URL filtering |
| VPN Passthrough | PPTP, L2TP, IPsec |
| Other Features | DHCP server, DDNS, UPnP, WPS, Virtual Server, DMZ |
| Certifications | FCC Class B, CE |
| Reset Procedure | Press and hold reset button for 15 seconds to restore factory defaults |
Frequently Asked Questions - ENHWI-N2 ENCORE
User questions about ENHWI-N2 ENCORE
0 question about this device. Answer the ones you know or ask your own.
Ask a new question about this device
Download the instructions for your Router in PDF format for free! Find your manual ENHWI-N2 - ENCORE and take your electronic device back in hand. On this page are published all the documents necessary for the use of your device. ENHWI-N2 by ENCORE.
USER MANUAL ENHWI-N2 ENCORE
ENHWI-N2
802.11n Wireless LAN Router
User's Guide
Regulatory notes and statements
Wireless LAN, Health and Authorization for use
Radio frequency electromagnetic energy is emitted from Wireless LAN devices. The energy levels of these emissions however are far much less than the electromagnetic energy emissions from wireless devices like for example mobile phones. Wireless LAN devices are safe for use frequency safety standards and recommendations. The use of Wireless LAN devices may be restricted in some situations or environments for example:
·Onboard airplanes, or
·In an explosive environment, or
·In case the interference risk to other devices or services is perceived or identified as harmful
In case the policy regarding the use of Wireless LAN devices in specific organizations or environments (e.g. airports, hospitals, chemical/oil/gas industrial plants, private buildings etc.) is not clear, please ask for authorization to use these devices prior to operating the equipment.
Regulatory Information/disclaimers
Installation and use of this Wireless LAN device must be in strict accordance with the instructions included in the user documentation provided with the product. Any changes or modifications made to this device that are not expressly approved by the manufacturer may void the user's authority to operate the equipment. The Manufacturer is not responsible for any radio or television interference caused by unauthorized modification of this device, of the substitution or attachment. Manufacturer and its authorized resellers or distributors will assume no liability for any damage or violation of government regulations arising from failing to comply with these guidelines.
Federal Communication Commission Interference Statement
This equipment has been tested and found to comply with the limits for a Class B digital device, pursuant to Part 15 of the FCC Rules. These limits are designed to provide reasonable protection against harmful interference in a residential installation. This equipment generates, uses and can radiate radio frequency energy and, if not installed and used in accordance with the instructions, may cause harmful interference to radio communications. However, there is no guarantee that interference will not occur in a particular installation. If this equipment does cause harmful interference to radio or television reception, which can be determined by turning the equipment off and on, the user is encouraged to try to correct the interference by one of the following measures:
- Reorient or relocate the receiving antenna.
- Increase the separation between the equipment and receiver.
- Connect the equipment into an outlet on a circuit different from that to which the receiver is connected.
- Consult the dealer or an experienced radio/TV technician for help.
FCC Caution: Any changes or modifications not expressly approved by the party responsible for compliance could void the user's authority to operate this equipment.
This device complies with Part 15 of the FCC Rules. Operation is subject to the following two conditions: (1) This device may not cause harmful interference, and (2) this device must accept any interference received, including interference that may cause undesired operation.
IMPORTANT NOTE:
FCC Radiation Exposure Statement:
This equipment complies with FCC radiation exposure limits set forth for an uncontrolled environment. This equipment should be installed and operated with minimum distance 20cm between the radiator & your body.
This transmitter must not be co-located or operating in conjunction with any other antenna or transmitter.
The availability of some specific channels and/or operational frequency bands are country dependent and are firmware programmed at the factory to match the intended destination. The firmware setting is not accessible by the end user.
Europe - EU Declaration of Conformity
This device complies with the essential requirements of the R&TTE Directive 1999/5/EC. The following test methods have been applied in order to prove presumption of conformity with the essential requirements of the R&TTE Directive 1999/5/EC:
EN 60 950-1: 2001 +A11: 2004
Safety of Information Technology Equipment
EN 50385: 2002
Product standard to demonstrate the compliance of radio base stations and fixed terminal stations for wireless telecommunication systems with the basic restrictions or the reference levels related to human exposure to radio frequency electromagnetic fields (110MHz - 40 GHz) - General public
EN 300 328 V1.7.1 (2006-10)
Electromagnetic compatibility and Radio spectrum Matters (ERM); Wideband transmission systems; Data transmission equipment operating in the 2,4 GHz ISM band and using wide band modulation techniques; Harmonized EN covering essential requirements under article 3.2 of the R&TTE Directive
EN 301 489-1 V1.6.1 (2005-09)
Electromagnetic compatibility and Radio Spectrum Matters (ERM); ElectroMagnetic Compatibility (EMC) standard for radio equipment and services; Part 1: Common technical requirements
EN 301 489-17 V1.2.1 (2002-08)
Electromagnetic compatibility and Radio spectrum Matters (ERM); ElectroMagnetic Compatibility (EMC) standard for radio equipment and services; Part 17: Specific conditions for 2,4 GHz wideband transmission systems and 5 GHz high performance RLAN equipment
This device is a 2.4 GHz wideband transmission system (transceiver), intended for use in all EU member states and EFTA countries, except in France and Italy where restrictive use applies.
In Italy the end-user should apply for a license at the national spectrum authorities in order to obtain authorization to use the device for setting up outdoor radio links and/or for supplying public access to telecommunications and/or network services.
This device may not be used for setting up outdoor radio links in France and in some areas the RF output power may be limited to 10 mW EIRP in the frequency range of 2454 – 2483.5 MHz. For detailed information the end-user should contact the national spectrum authority in France.
CE0560!
| cs Česky [Czech] | Encore Electronics, Inc. timto prohlasuje, że tento 802.11n Wireless Router je ve shodě se základními požadavky a dalšími příslušnými ustanoveními směrnice 1999/5/ES. |
| da Dansk [Danish] | Undertegnede Encore Electronics, Inc. erklærer herved, at folgende udstyr 802.11n Wireless Router overholder de væsentlige krav og øvrige relevante krav i direktiv 1999/5/EF. |
| de Deutsch [German] | Hiermit erklärt Encore Electronics, Inc., dass sich das Gerät 802.11n Wireless Router in Übereinstimmung mit den grundlegenden Anforderungen und den übrigen einschlägigen Bestimmungen der Richtlinie 1999/5/EG befindet. |
| et Eesti [Estonian] | Käesolevaga kinnitab Encore Electronics, Inc. seadme 802.11n Wireless Router vastavust direktivi 1999/5/EÜ põhinõuctele ja nimetatud direktivist tulenevatele teistele asjakohastele sätetele. |
| en English | Hereby, Encore Electronics, Inc., declares that this 802.11n Wireless Router is in compliance with the essential requirements and other relevant provisions of Directive 1999/5/EC. |
| es Español [Spanish] | Por medio de la presente Encore Electronics, Inc. declara que el 802.11n Wireless Router cumple con los requisitos esenciales y cualesquiera otras disposiciones aplicables o exigibles de la Directiva 1999/5/CE. |
| el Éλληνική [Grock] | ME TIIN ΠΑΡΟΥΣΑΕEncore Electronics, Inc. ΔΙΙΑΩΝΕΙ ΟΤΙ802.11n Wireless Router ΣΥΜΜΟΡΦΩΝΕΤΑΙ ΠΡΟΣ ΤΙΣ ΟΥΣΙΩΔΕΙΣ ΑΠΛΙΤΙΣΕΙΣ ΚΑΙ ΤΙΣ ΛΟΙΠΕΣ ΣΧΕΤΙΚΕΣ ΔΙΑΤΑΞΕΙΣ ΤΙΣ ΟΔΗΠΓΑΣ 1999/5/ΕΚ. |
| fr Français [French] | Par la présente Encore Electronics, Inc. déclare que l'appareil 802.11n Wireless Router est conforme aux exigences essentielles et aux autres dispositions pertinentes de la directive 1999/5/CE. |
| it Italiano [Italian] | Con la presente Encore Electronics, Inc. dichiara che questo 802.11n Wireless Router è conforme ai requisiti essenziali ed alle altre disposizioni pertinenti stabilite dalla direttiva 1999/5/CE. |
| Latviski [Latvian] | Ar so Encore Electronics, Inc. deklarē, ka 802.11n Wireless Router atbilst Direktīvas 1999/5/ΕΚ būtiskajām prasībām un citiem ar to saistītajiem noteikumiem. |
| Lietuviq [Lithuanian] | Šiuo Encore Electronics, Inc. deklaruoja, kad šis 802.11n Wireless Router atitinka esminius reikalavimus ir kitas 1999/5/EB Direktyvos nuostatas. |
| nl Netherlands [Dutch] | Hierbij verklaart Encore Electronics, Inc. dat het toestel 802.11n Wireless Router in overeenstemming is met de essentiële eisen en de andere relevante bepalingen van richtlijn 1999/5/EG. |
| mt Malti [Maltese] | Hawnhekk, Encore Electronics, Inc., jiddikjara li dan 802.11n Wireless Router jikkonforma mal-ftigijiet essenzjali u ma provvedimenti oħrajn relevanti li hemm fid-Dirrettiva 1999/5/EC. |
| hu Magyar [Hungarian] | Alulirott, Encore Electronics, Inc. nyilatkozom, hogy a 802.11n Wireless Router megfelel a vonatkozó alapvető követelményeknek és az 1999/5/EC irányelv egyeb előirásainak. |
| pl Polski [Polish] | Niniejszym Encore Electronics, Inc. oświadcza, że 802.11n Wireless Router jest zgodny z zasadniczymi wymogami oraz pozostałymi stosownymi postanowieniami Dyrektywy 1999/5/EC. |
| pt Português [Portuguese] | Encore Electronics, Inc. declara que este 802.11n Wireless Router está conforme com os requisitos essenciais e outras disposições da Directiva 1999/5/CE. |
| sl Slovensko [Slovenian] | Encore Electronics, Inc. izjavlja, da je ta [tip opreme] v skladu z bistvenimi zahtevami in ostalimi relevantnimi določili direktive 1999/5/ES. |
| Slovensky [Slovak] | Encore Electronics, Inc. týmto vyhlasuje, że 802.11n Wireless Router splňa základné požiadavky a všetky prislušné ustanovenia Smernice 1999/5/ES. |
| fi Suomi [Finnish] | Encore Electronics, Inc. vakuuttaa tätten että 802.11n Wireless Router tyyppinen laite on direktiivin 1999/5/EY olcellisten vaatimusten ja sită koskevien direktiivin muiden chtojen mukainen. |
| sv Svenska [Swedish] | Härmed intygar Encore Electronics, Inc. att denna 802.11n Wireless Router stár I överensstämmelse med de väsenliga egenskapskrav och övriga relevanta bestämmelser som framgår av direktiv 1999/5/EG. |
TABLE OF CONTENT
ABOUT THIS GUIDE .... 1
Purpose 1
Terms/Usage 1
Overview of this User's Guide.... 1
INTRODUCTION 2
Applications: 2
Supported Features: 3
UNPACKING AND SETUP...... 4
Unpacking....4
Setup 4
HARDWARE INSTALLATION...... 5
Front Panel....5
Rear Panel....6
Side Panel 6
Hardware connections....7
Connecting the WLAN Router....7
Check the installation....7
PC NETWORK TCP/IP SETTING 8
Windows 95/98/ME....8
Windows 2000....9
Windows XP 10
CONFIGURATION.... 11
Login to the WLAN Router through Wireless LAN.... 11
Login to the WLAN Router....11
Using the Web Browser 11
Setup Wizard....12
WAN Setting....22
DHCP Client or Fixed IP 22
PPPoE with Obtain IP Automatically 23
PPPoE with Specify IP 24
PPTP/L2TP with Obtain IP Automatically 25
PPTP/L2TP with Specify IP 25
BigPond Cable 26
Dynamic DNS: 26
Wireless setting....27
Basic....27
Security 28
Advanced 31
Wi-Fi Protected Setup.... 31
LAN Setting....33
Basic....33
DHCP....34
Access Control Setting.... 35
Filter....35
Virtual Server....38
Special AP 39
DMZ....40
Firewall settings 41
System Setting 42
Password 42
Time 43
Device Information 44
Log....45
Log Setting....46
Statistic....48
Restart 48
Firmware 49
Configuration 50
UPnP 51
Ping Test 52
Remote Management 53
TECHNICAL SPECIFICATIONS.... 54
FAQ....54
ABOUT THIS GUIDE
Congratulations on your purchase of ENCORE 802.11n Wireless Router. This integrated access device combines Internet gateway functions with wireless LAN and Fast Ethernet switch. It provides a complete solution for Internet surfing and office resource sharing, and it is easy to configure and operate for every user.
Purpose
This manual discusses how to install ENCORE 802.11n Wireless Router.
Terms/Usage
In this guide, the term “the WLAN Router” refers to your ENCORE 802.11n Wireless Router.
Overview of this User's Guide
Introduction. Describes ENCORE 802.11n Wireless Router and its features.
Unpacking and Setup. Helps you get started with the basic installation of ENCORE 802.11n Wireless Router.
Identifying External Components. Describes the front panel, rear panel and LED indicators of ENCORE 802.11n Wireless Router.
Connecting the WLAN Router. Tells how you can connect ENCORE 802.11n Wireless Router to your xDSL/Cable Modem.
Technical Specifications. Lists the technical (general, physical and environmental, performance and Routers settings) specifications of ENCORE 802.11n Wireless Router.
Note: Always run the CD and follow the steps in the Quick Installation Guide first to setup your router. If you still have problems after doing so then proceed to the following paragraphs to install the router with web-based configuration.
With the explosive growth of the Internet, accessing information and services at any time, day or night has become a standard requirement for most people. The era of the standalone PC is waning. Networking technology is moving out of the exclusive domain of corporations and into homes with at least two computers.
This integrated access device combines Internet gateway functions with wireless LAN and Fast Ethernet switch. Designed for the business and home, it saves you the cost of installing a separate modem and ISP line for each computer, while providing ready connection for the users, with or without the network wires.
Broadband network access is also gaining ground. However, allowing more than two computers to access the Internet at the same time means less affordable, higher costs. Thus, there is a need to share one public IP address over a single Internet connection to link the home with the Internet.
The scarcity of IP addresses and using a shared Internet connection through an Internet sharing device can solve high network access costs. All linked computers can make full use of broadband capabilities over such a device.
This device not only comes equipped with a wide range of features, but also can be installed and configured right out of the box. This device supports a simple local area network and Internet access share, offering great cost savings.
The local area network connects home computers while also allowing any of the computers to access the Internet, share resources, or play online games—the basis of the family computing lifestyle.
Applications:
Broadband Internet access:
Several computers can share one high-speed broadband connection through wireless or wired (WLAN, LAN and WAN-Internet).
Resource sharing:
Share resources such as printers, scanners and other peripherals.
File sharing:
Exchange data, messages, and distribute files thus making good use of hard disk space.
Online gaming:
Through the local area network, online gaming and e-commerce services can be easily setup.
Firewall:
A built-in firewall function — for security and anti-hacking systems.
Supported Features:
▶ High speed data transfer rate
NAT for sharing 1 IP address to all LAN/WLAN users.
➢ PPPoE and PPTP protocol for Dial-Up ADSL.
➤ 64/128 bit WEP Encryption
➢ WPA-PSK, WPA2-PSK, WPA, WPA2 security
DHCP Server / Client.
▶ UPnP (Universal Plug and Play).
WPS (Wi-Fi Protected Setup)
▶ Virtual Server mapping.
MAC filtering.
▶ Protocol/IP filtering
▶ Domain/URL filtering
▶ DDNS
- Upgradeable firmware for future function.
▶ Simple installation using Setup Wizard.
▶ Easy configuration via Web Browser.
UNPACKING AND SETUP
This chapter provides unpacking and setup information for ENCORE 802.11n Wireless Router.
Unpacking
Open the box of the WLAN Router and carefully unpack it. The box should contain the following items:
One IEEE 802.11b/g/n Wireless Broadband Router
◆ One Easy Go Installation CD
◆ One Multi-Language Quick Installation Guide
◆ Two 2dBi gain dipole antenna
◆ One external power adapter
If any item is found missing or damaged, please contact your local reseller for replacement.
Setup
The setup of the WLAN Router can be performed properly using the following methods:
◆ The power outlet should be within 1.82 meters (6 feet) of the Broadband Router.
- Visually inspect the DC power jack and make sure that it is fully secured to the power adapter.
◆ Make sure that there is proper heat dissipation and adequate ventilation around the Broadband Router. Do not place heavy objects on the Broadband Router.
- Fix the direction of the antennas. Try to place the Wireless Router in a position that can best cover your wireless network. Normally, the higher you place the antenna, the better the performance will be. The antenna’s position enhances the receiving sensitivity.
Front Panel
The figure below shows the front panel of ENCORE 802.11n Wireless Router.
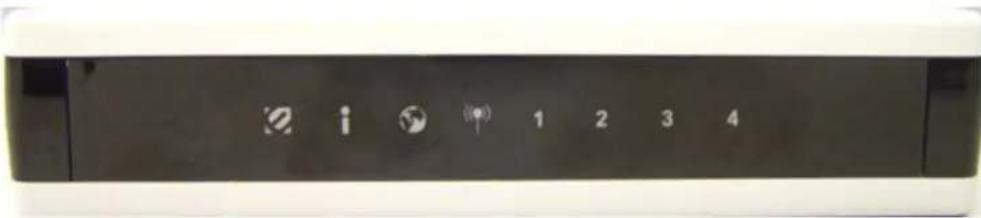
SYSTEM (i icon)
This indicator blinking green means the WLAN Router is working successfully. Otherwise, this indicator always on or off means the function of the WLAN Router has failed.
WAN (Link/ACT) (Globe icon)
The indicators light green when the WAN port is connected to a xDSL/Cable modem successfully.
The indicators blink green while the WAN port was transmitting or receiving data from the xDSL/Cable modem.
WLAN (ACT) (Antenna icon)
This indicator lights green when there are wireless devices connected and transmitting data to the WLAN Router.
LAN (Link/ACT)
These indicators light green when the LAN ports were connected successfully. These indicators blinking green while the LAN ports were accessing data.
Rear Panel
The figure below shows the rear panel of ENCORE 802.11n Wireless Router.

natural_image
Front view of a network switch device showing five Ethernet ports and two connectors (no text or labels visible)Antenna
There is two 2dBi gain antennas on the rear panel for wireless connection.
LAN (1-4)
Four RJ-45 10/100Mbps Auto-MDIX ports for connecting to either 10Mbps or 100Mbps Ethernet connections.
WAN
In the four port broadband Router, there is an RJ-45 10/100Mbps Auto-MDIX port for the WAN that connects to the xDSL/Cable modem for Internet connectivity.
POWER
Plug the power adapter to this power jack
RESET
Use a pin-shaped item to push to reset this device to factory default settings. It will be a useful tool when the manager forgot the password to login, and needs to restore the device back to default settings.
Side Panel
The figure below shows the side panel of ENCORE 802.11n Wireless Router.

natural_image
Pure electrical circuit lines without any symbolsSide Panel
WPS
Push this button to execute the Wi-Fi Protected Setup process.
Hardware connections
Connecting the WLAN Router
- Plug in one end of the network cable to the WAN port of the WLAN Router.
- Plug in the other end of the network cable to the Ethernet port of the xDSL or Cable modem.
- Use another network cable to connect to the Ethernet card on the computer system; the other end of the cable connects to the LAN port of the WLAN Router. Since ENCORE 802.11n Wireless Router has four ports, you can connect up to four computers directly to the unit. Then you do not have to buy a switch to connect these computers since one WLAN Router functions both as a connection-sharing unit and as a switch.
Check the installation
The control LEDs of the WLAN Router are clearly visible and the status of the network link can be seen instantly:
- With the power source on, once the device is connected to the broadband modem, the Power, System, LAN, WLAN and WAN port LEDs of the WLAN Router will light up indicating a normal status.
- When the WAN Port is connected to the ADSL/Cable modem, the WAN LED will light up.
- When the LAN Port is connected to the computer system, the LAN LED will light up.
The network TCP/IP settings differ based on the computer's operating system (Win95/98/ME/NT/2000/XP) and are as follows.
Windows 95/98/ME
- Click on the "Network neighborhood" icon found on the desktop.
- Click the right mouse button and a context menu will be show.
- Select "Properties" to enter the TCP/IP setting screen.
- Select "Obtain an IP address automatically" on the "IP address" field.
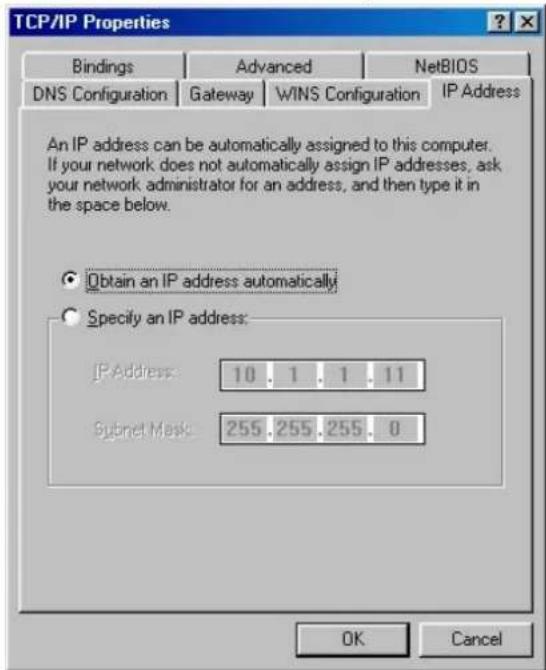
- Select "Disable DNS" in the "DNS" field.

- Select "None" for the "Gateway address" field.
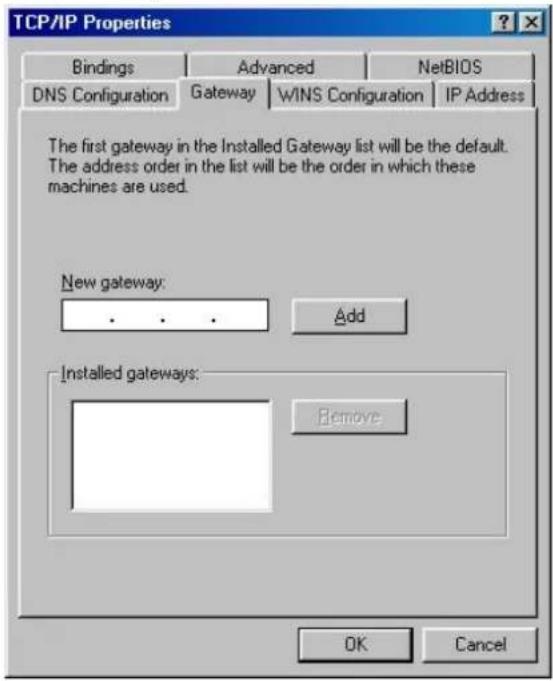
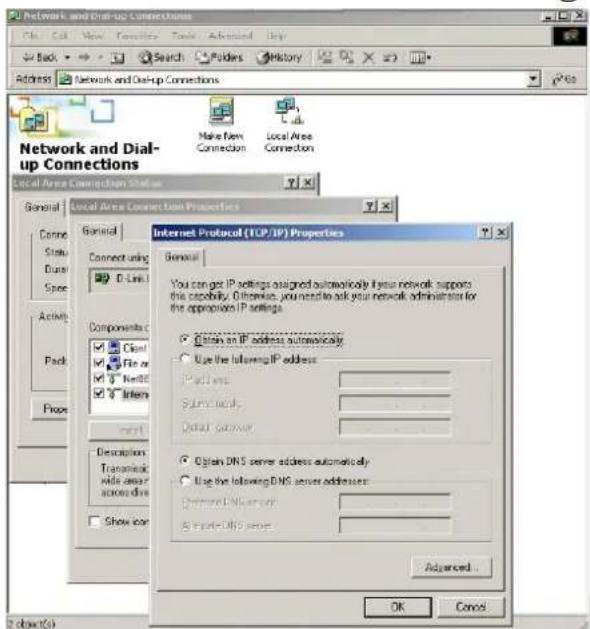
Windows 2000
Double click on the “My Computer” icon on the desktop. When “My Computer” window opens, open the “Control Panel” and then open the “Network dialup connection” applet. Double click on the “Local area network connection” icon. Select “Properties” to enter the TCP/IP setting window.
- In the "Local area network status" window, click on "Properties."
- In the “Local area network connection” window, first select TCP/IP setting and then select “Properties.”
- Set both "IP address" and "DNS" to Automatic configuration.
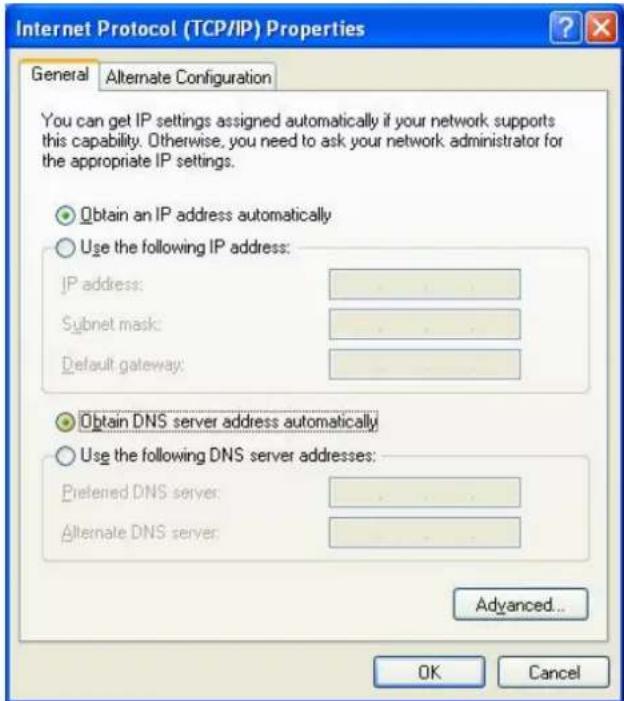
Windows XP
Point the cursor and click the right button on the "My Network Place" icon.
Select “properties” to enter the TCP/IP setting window.
- Set "IP address" to "Obtain an IP address automatically."
- Set "DNS" to "Obtain DNS server address automatically."
First make sure that the network connections are functioning normally.
This WLAN Router can be configured using Internet Explorer 5.0 or newer web browser versions.
Login to the WLAN Router through Wireless LAN
Before configuring the WLAN Router through WLAN, make sure that the SSID, Channel and the WEP is set properly.
The default setting of the WLAN Router that you will use:
√ SSID: ENHWI-N
√ Channel: 6
√ Security: disable
Login to the WLAN Router
Before you configure this device, note that when the WLAN Router, make sure the host PC must be set on the IP subnet that can be accessed by the xDSL/Cable modem. For example, when the default network address of the xDSL/Cable modem Ethernet interface is 192.168.10.x, then the host PC should be set at 192.168.10.xxx (where xxx is a number between 2 and 254), and the default subnet mask is 255.255.255.0.
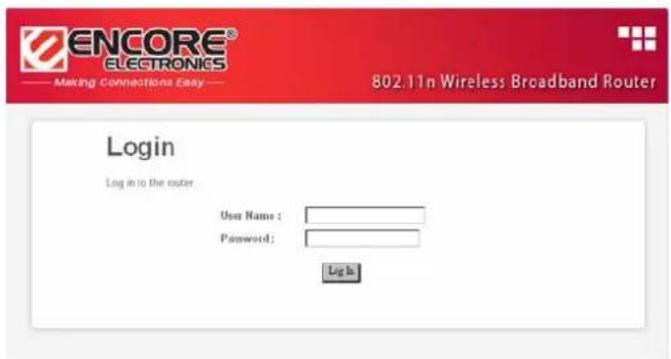
- Open Internet Explorer 5.0 or above Internet browser.
- Enter IP address http://192.168.1.1 (the factory-default IP address setting) to the URL web address location.

- When the following dialog box appears, enter the user name and password to login to the main configuration window, the default username and password is "admin".
Setup Wizard
Setup wizard is provided as part of the web configuration utility. User can simply follow the step-by-step process to get the wireless Router configuration ready to run in 6 easy steps by clicking on` the “Wizard” button on the function menu. The following screen will appear. Please click “Next” to continue.

Step 1: Set your new password
Setting the new admin password of the WLAN Router. Please click “Next” to continue.

Step 2: Choose time zone
Select the time zone from the drop down list. Please click "Next" to continue.

Step 3: Set LAN connection and DHCP server
Set user's IP address and mask. The default IP is 192.168.1.1. If the user chooses to enable DHCP, please click "Enable". DHCP enabled is able to automatically assign IP addresses. Please assign the range of IP addresses in the fields of "Range start" and "Range end". Please click "Next" to continue.

Step 4: Set Internet connection
The WLAN Router will attempt to auto detect your Internet Connection.
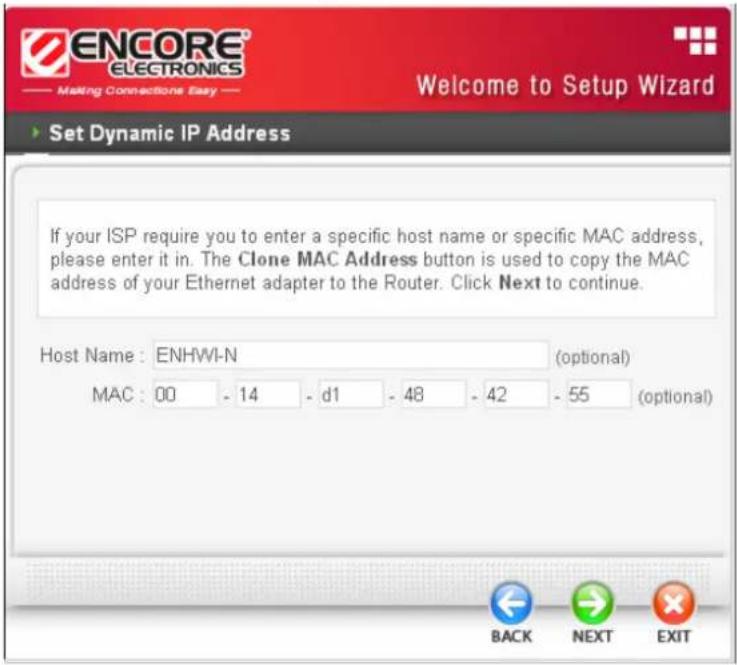
Obtain IP automatically (DHCP client):

If the user has enabled DHCP server, choose "Obtain IP automatically (DHCP client)" to have the WLAN Router assign IP addresses automatically.
Fixed IP Address:

If the Internet Service Provider (ISP) assigns a fixed IP address, choose this option and enter the assigned WAN IP Address, WAN Subnet Mask, WAN Gateway Address and DNS Server Addresses for the WLAN Router.

PPPOE

PPPoE to obtain IP automatically:

If connected to the Internet using a PPPoE (Dial-up xDSL) connection, and the ISP provides a User Name and Password, then choose this option and enter the required information.
PPPoE with a Specify IP address:

If connected to the Internet using a PPPoE (Dial-up xDSL) connection, and the ISP provides a User Name, Password and a Fixed IP Address, choose this option and enter the required information.
PPTP:

If connected to the Internet using a PPTP xDSL connection, enter your IP, Subnet Mask, Gateway, Server IP, PPTP Account and PPTP Password.

L2TP:

If connected to the Internet using a L2TP (Dial-up xDSL) connection and the ISP provides a Server IP, Account and Password information, choose this option and enter the required information.

Big Pond Cable(Australia):

If your ISP is Big Pond Cable, the ISP will provide a User Name, Password, Authentication Server and Login Server IP (Optional). Choose this option and enter the required information.

Step 5: Set Wireless LAN connection
Click “Enable” to enable Wireless LAN. If user enables the Wireless LAN, type the SSID in the text box and select a communications channel. The SSID and channel must be the same as wireless devices attempting to connect to the WLAN Router.
(When in FCC domain, you could chose ch1\~ch11; in ETSI domain, you could chose ch1\~ch13)

Step 6: Setup completed
The Setup wizard is now completed. The new settings will be effective after the WLAN Router restarts. Please click "Restart" to reboot the WLAN Router. If user does not want to make any changes, please click "Exit" to quit without any changes. User also can save the settings and restart Wireless Router by Click "Restart" button.

WAN Setting
This function enables users to set up the WLAN Router WAN connection, specify the IP address for the WAN, add DNS numbers, and enter the MAC address.
Connection Type: Select the connection type, either DHCP client, Fixed IP or PPPoE, PPTP, L2TP or BigPond from the drop-down list.
DHCP Client or Fixed IP
If user has enabled DHCP server, choose "Obtain IP automatically (DHCP client)" to have the router assign IP addresses automatically.

WAN IP Address: Select whether user wants to specify an IP address manually, or want DHCP to obtain an IP address automatically. When Specify IP is selected, type the IP address, subnet mask, and default gateway in the text boxes. User's ISP will provide with this information.
IP Address: For the Specify mode, enter the specific IP address that provided by your ISP.
Subnet Mask: For the Specify mode, enter the specific subnet mask that provided by your ISP.
Gateway: For the Specify mode, enter the specific gateway IP address that provided by your ISP.
DNS 1/2: Manually specific DNS server IP address. For the Obtain IP Automatically mode, leave 0.0.0.0 hear, the DHCP server will provides DNS server automatically.
Clone MAC Address: If your ISP requires you to enter a specific MAC address, please enter it in. The Clone MAC Address button is used to copy the MAC address of your Ethernet adapter to the Router.
PPPoE with Obtain IP Automatically
If connected to the Internet using a PPPoE (Dial-up xDSL) Modem, the ISP will provide a Password and User Name, and then the ISP uses PPPoE. Choose this option and enter the required information.

PPPoE with Specify IP
If connected to the Internet using a PPPoE (Dial-up xDSL) Modem, the ISP will provide a Password, User Name and a Specify IP Address, choose this option and enter the required information.

PPTP/L2TP with Obtain IP Automatically
If connected to the Internet using a PPTP/L2TP (Dial-up xDSL) connection, enter the your Server IP, PPTP/L2TP Account and PPTP/L2TP Password, if your ISP has provided you with a DNS IP address, enter it in the DNS field, otherwise, leave it zero.

PPTP/L2TP with Specify IP
If connected to the Internet using a PPTP/L2TP (Dial-up xDSL) connection, enter the your IP Address, Subnet Mask, Gateway IP address, DNS IP address, Server IP address, PPTP Account and PPTP Password.

BigPond Cable
If your ISP is Big Pond Cable, the ISP will provide a User Name, Password, Authentication Server and Login Server IP (Optional). Choose this option and enter the required information.

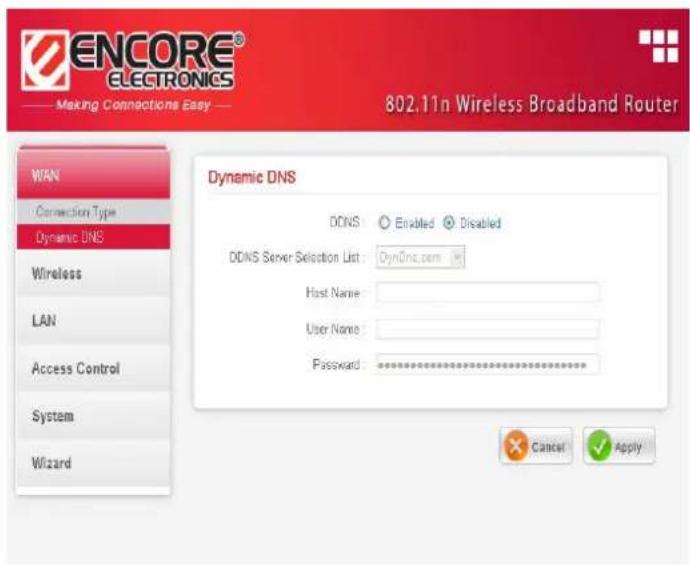
Dynamic DNS:
This synchronizes the DDNS server with your current Public IP address when you are online. First, you need to register your preferred DNS with the DDNS provider. Then, please selected one of DDNS server than fill the related information in the below fields: Host Name, User Name and Password.
Wireless setting
This section enables user to set wireless communications parameters for the router's wireless LAN feature.
Basic
This page allows user to enable and disable the wireless LAN function, create a SSID, and select the channel for wireless communications.

Enable/Disable: Enables or disables wireless LAN via the WLAN Router.
SSID: Type an SSID in the text box. The SSID of any wireless device must match the SSID typed here in order for the wireless device to access the LAN and WAN via the WLAN Router.
Channel: Select a transmission channel for wireless communications. The channel of any wireless device must match the channel selected here in order for the wireless device to access the LAN and WAN via the WLAN Router.(When in FCC domain, you could chose ch1\~ch11; in ETSI domain, you could chose ch1\~ch13)
802.11 Mode: Select one of the following:
●Mixed 802.11g and 802.11g - Select if you are using both 802.11b and 802.11n wireless clients.
●Mixed 802.11n, 802.11b, and 802.11g - Select if you are using a mix of 802.11n, 11g, and 11b wireless clients.
Channel Width: Select the Channel Width:
●Auto 20/40 - This is the default setting. Select if you are using both 802.11n and non-802.11n wireless devices.
●20MHz - Select if you are not using any 802.11n wireless clients.
SSID Broadcast: While SSID Broadcast is enabled, all wireless clients will be able to view the WLAN Router's SSID. For security purposes, users may want to disable SSID Broadcast to ensure only authorized clients have access.
Security
This function enables user to set authentication type for secure wireless communications. Open System allows public access to the router via wireless communications. Shared Key requires the user to set a WEP key to exchange data with other wireless clients that have the same WEP key. This router also supports WPA, WPA2 and WPA-PSK, WPA2-PSK.

WEP
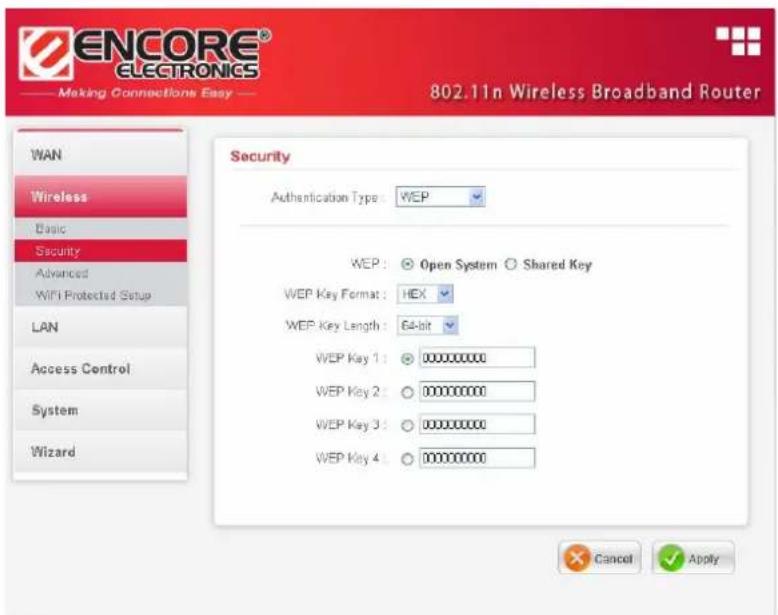
WEP: Open System and Shared Key requires the user to set a WEP key to exchange data with other wireless clients that have the same WEP key.
WEP Key Format: Select the key format from the drop-down list HEX or ASCII.
WEP Key Length: Select the level of encryption from the drop-down list. The WLAN Router supports, 64 and 128-bit encryption.
WEP Key 1 \~ 4: Enables users to create up to 4 different WEP keys. Manually enter a set of values for each key. Select a key to use by clicking the radio button next to the key. Click “Clear” to erase key values.
WPA-PSK / WPA2-PSK Security

Cipher Type: Select the cipher type for TKIP or AES encryption, Selected Auto for auto detects the cipher type.
Passphrase: The length should be 8 characters at least.
WPA / WPA2/ WPA-Auto Security
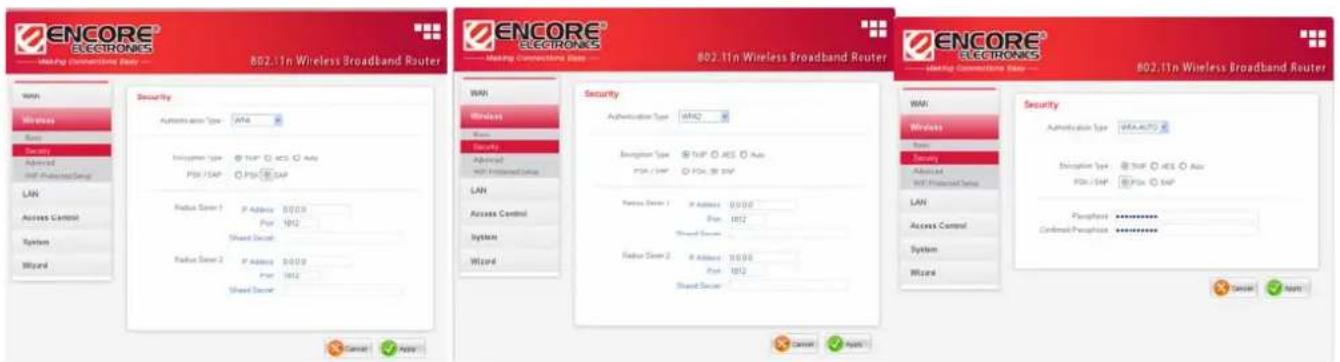
If WPA, WPA2 or WPA-Auto EAP is selected, the above screen is shown. Please set the length of the encryption key and the parameters for the RADIUS server.
Cipher Type: Select the cipher type for TKIP or AES encryption, Selected Auto for auto detects the cipher type.
RASIUS Server:
- Enter the IP address, Port used and Shared Secret by the Primary Radius Server.
- Enter the IP address, Port used and Shared Secret by the Secondary Radius Server. (optional)
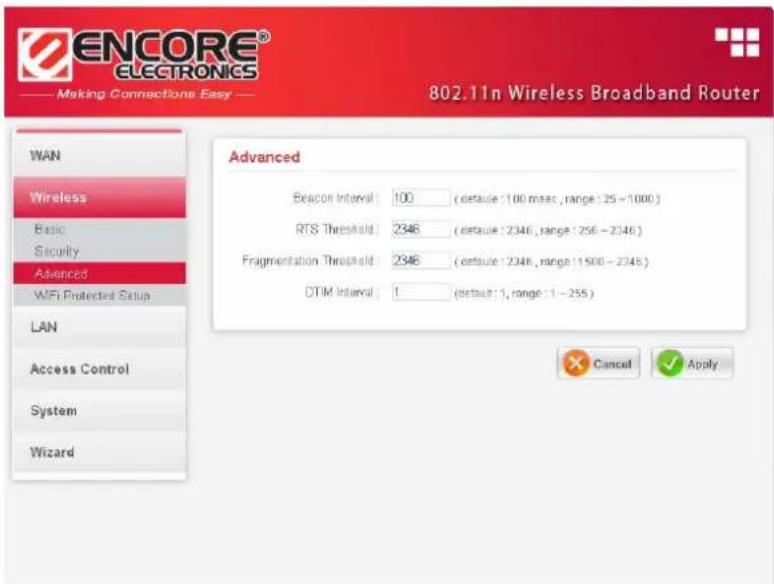
Advanced
This function enables user to configure advanced wireless functions.
Wi-Fi Protected Setup
This screen enables users to configure the Wi-Fi Protected Setup function.
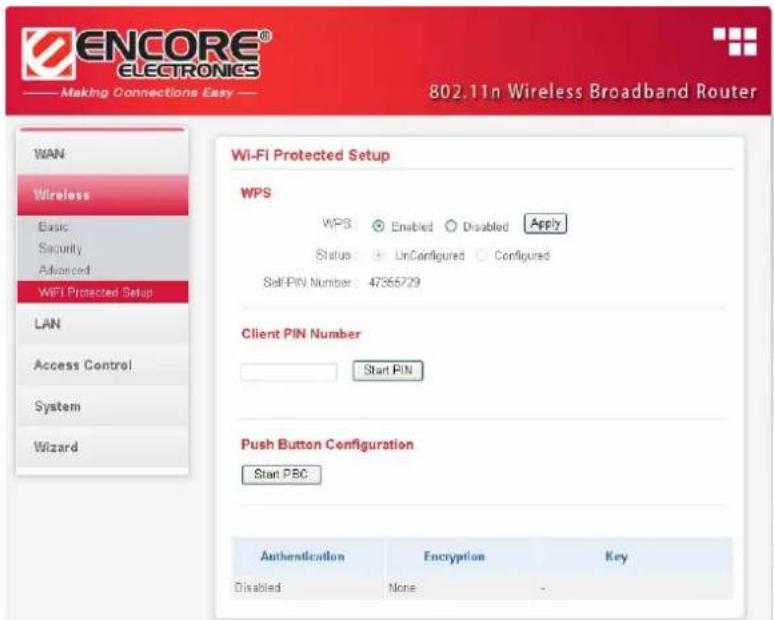
WPS: Enable or Disable the WPS (Wi-Fi Protected Setup) function
Status: Display the state (Un-configured State/Configured State) information of WPS.
Self-PIN Number: Display the default PIN number of WLAN Router.
Client PIN Number: Type Client PIN number the client uses to negotiate with WLAN Router via WPS protocol. It is only used when users want their station to join Router's network.
Push Button Configuration: Clicking this button will invoke the Push Button Configuration (PBC) method of WPS. It is only used when WLAN Router acts as a Registrar.
LAN Setting
The function enables user to configure the LAN port IP address & DHCP Server.
Basic
This page leads to set LAN port properties, such as the host name, IP address, and subnet mask.

Host Name: Type the host name in the text box. The host name is required by some ISPs. The default host name is "ENHWI-N"
IP Address: This is the IP address of the router. The default IP address is 192.168.1.1.
Subnet Mask: Type the subnet mask for the router in the text box. The default subnet mask is 255.255.255.0.
DHCP
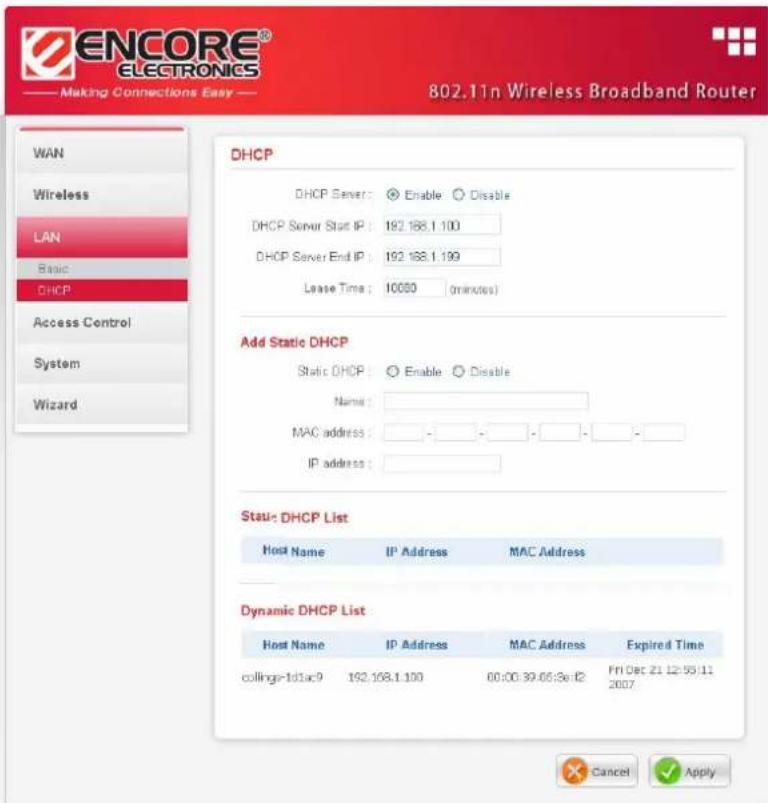
DHCP Server: Enables the DHCP server to allow the router to automatically assign IP addresses to devices connecting to the LAN. DHCP is enabled by default.
DHCP Server Start IP: Type an IP address to serve as the start of the IP range that DHCP will use to assign IP addresses to all LAN devices connected to the router.
DHCP Server End IP: Type an IP address to serve as the end of the IP range that DHCP will use to assign IP addresses to all LAN devices connected to the router.
Lease Time: The lease time specifies the amount of connection time a network user be allowed with their current dynamic IP address.
Add Static DHCP: Selected Enable the Static DHCP allows you to assign a static IP address to the PC that has the IP address and MAC address mapping set in the Static DHCP List.
Static DHCP List: The static DHCP mapping will list in the table, providing the Host Name, MAC Address and IP Address.
Dynamic DHCP List: All dynamic DHCP client computers are listed in the table and providing the Host name, IP address, and MAC address and Expired Time of the client.
Access Control Setting
This access control enables you to define access restrictions, set up protocol and IP filters, create virtual servers, define access for special applications such as games, and set firewall rules.
Filter
Using filter to deny or allow the users to access. Five types of filters to select: MAC, IP Filter, URL blocking, Domain blocking and Protocol filter.
MAC Filters

MAC Filter: Enables you to allow or deny Internet access to users within the LAN based upon the MAC address of their network interface. Click the radio button next to Disabled to disable the MAC filter.
Disable: Disable the MAC filter function.
Allow: Only allow computers with MAC address listed in the MAC Table.
Deny: Computers in the MAC Table are denied Internet access.
MAC Table: Use this section to create a user profile which Internet access is denied or allowed. The user profiles are listed in the table at the bottom of the page. (Note: Click anywhere in the item. Once the line is selected, the fields automatically load the item's parameters, which you can edit.)
Name: Type the name of the user to be permitted/denied access.
MAC Address: Type the MAC address of the user's network interface.
Add: Click to add the user to the list at the bottom of the page.
Update: Click to update information for the user, if you have changed any of the fields.
Delete: Select a user from the table at the bottom of the list and click to remove the user profile.
Clear: Click to erase all fields and enter new information.
Domain/ URL Blocking
You could enable Domain/URL blocking to deny the users from accessing the specified Domain/URL. Add those specified Domain/URL in the text box.
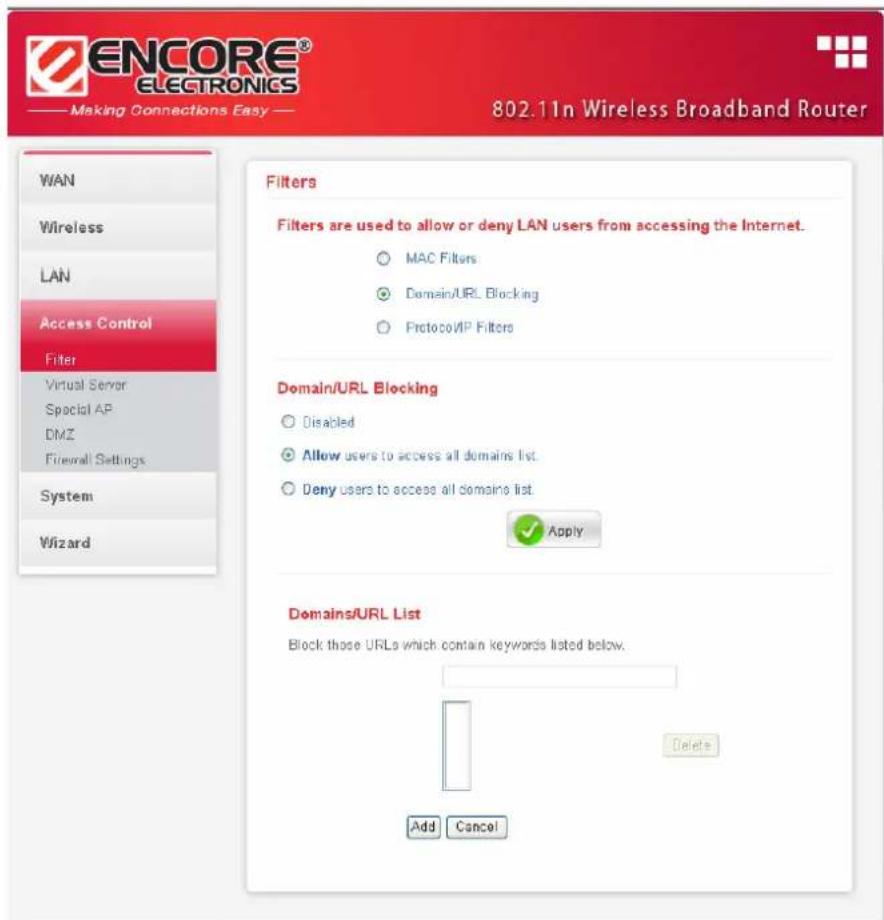
Disable: Disable the Domain/URL Blocking function.
Allow: Allow users to access all domains except “Blocking Domains/URL”.
Deny: Deny users to access all domains except "Permitted Domains/URL".
Blocked/Permitted Domains/URL: List domains you will Blocked or Permitted.
Apply: Click to add domain to the Blocked/Permitted Domains/URL list.
Del: Select a user from the table at the bottom of the list and click Del to remove the user profile.
Protocol/IP Filters
This protocol filter enables you to allow and deny access based upon a communications protocol list you create. The protocol filter profiles are listed in the table at the bottom of the page.
Note: When selecting items in the table at the bottom, click anywhere in the item. The line is selected, and the fields automatically load the item's parameters, which you can edit.

Enable: Click to enable or disable the IP address filter.
Name: Type the name of the user to be denied access.
Protocol: Select a protocol (TCP or UDP) to use for the virtual server.
Port: Type the port range of the protocol.
IP Range: Type the IP range. IP addresses falling between this value and the Range End are not allowed to access the Internet.
Add: Click to add the IP range to the table at the bottom of the screen.
Update: Click to update information for the range if you have selected a list item and have made changes.
Delete: Select a list item and click Delete to remove the item from the list.
Cancel: Click the Cancel button to erase all fields and enter new information.
Virtual Server
This screen enables users to create a virtual server via the WLAN Router. If the WLAN Router is set as a virtual server, remote users requesting Web or FTP services through the WAN are directed to local servers in the LAN. The WLAN Router redirects the request via the protocol and port numbers to the correct LAN server. The Virtual Sever profiles are listed in the table at the bottom of the page.
Note: When selecting items in the table at the bottom, click anywhere in the item. The line is selected, and the fields automatically load the item's parameters, which user can edit.
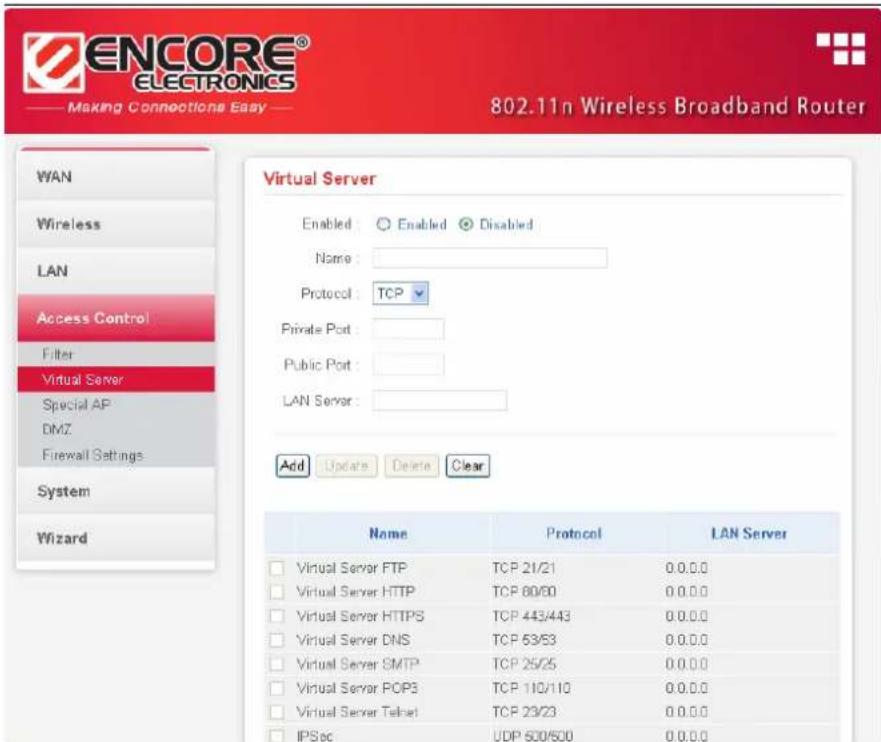
Enable: Click to enable or disable the virtual server.
Name: Type a descriptive name for the virtual server.
Protocol: Select a protocol (TCP or UDP) to use for the virtual server.
Private Port: Type the port number of the computer on the LAN that is being used to act as a virtual server.
Public Port: Type the port number on the WAN that will be used to provide access to the virtual server.
LAN Server: Type the LAN IP address that will be assigned to the virtual server.
Add: Click to add the virtual server to the table at the bottom of the screen.
Update: Click to update information for the virtual server if the user has selected a listed item and has made changes.
Delete: Select a listed item and click “Delete” to remove the item from the list.
Cancel: Click Cancel button to erase all fields and enter new information.
Special AP
This screen enables users to specify special applications, such as games which require multiple connections that are blocked by NAT. The special applications profiles are listed in the table at the bottom of the page.
Note: When selecting items in the table at the bottom, click anywhere in the item. The line is selected, and the fields automatically load the item's parameters, which user can edit.

Enable: Click to enable or disable the application profile. When enabled, users will be able to connect to the application via the WLAN Router's WAN connection. Click “Disabled” on a profile to prevent users from accessing the application on the WAN connection.
Name: Type a descriptive name for the application.
Trigger: Defines the outgoing communication that determines whether the user has legitimate access to the application.
- Protocol: Select the protocol (TCP, UDP, or ICMP) that can be used to access the application.
- Port Range: Type the port range that can be used to access the application in the text boxes.
Incoming: Defines which incoming communications users are permitted to connect with.
- Protocol: Select the protocol (TCP, UDP, or ICMP) that can be used by the incoming communication.
- Port: Type the port number that can be used for the incoming communication.
Add: Click to add the special application profile to the table at the bottom of the screen.
Update: Click to update information for the special application if user have selected a list item and have made changes.
Delete: Select a list item and click Delete to remove the item from the list.
Cancel: Click Cancel button to erase all fields and enter new information.
DMZ
This screen enables users to create a DMZ for those computers that cannot access Internet applications properly through the WLAN Router and associated security settings.
Note: Any clients added to the DMZ exposes the clients to security risks such as viruses and unauthorized access.

Enable: Click to enable or disable the DMZ.
DMZ Host IP: Type a host IP address for the DMZ. The computer with this IP address acts as a DMZ host with unlimited Internet access.
Apply: Click to save the settings.
Firewall settings

System Setting
This system setting enables users to change password, set the device time, view the device information, restart the system, save and load different settings as profiles, restore factory default settings, upgrade the firmware, and ping remote IP addresses....etc.
Password
This function enables users to set administrative and user passwords. These passwords are used to gain access to the WLAN Router interface.

Time
This function enables users to set the time and date for the WLAN Router's real-time clock, select properly time zone, and enable or disable daylight saving.
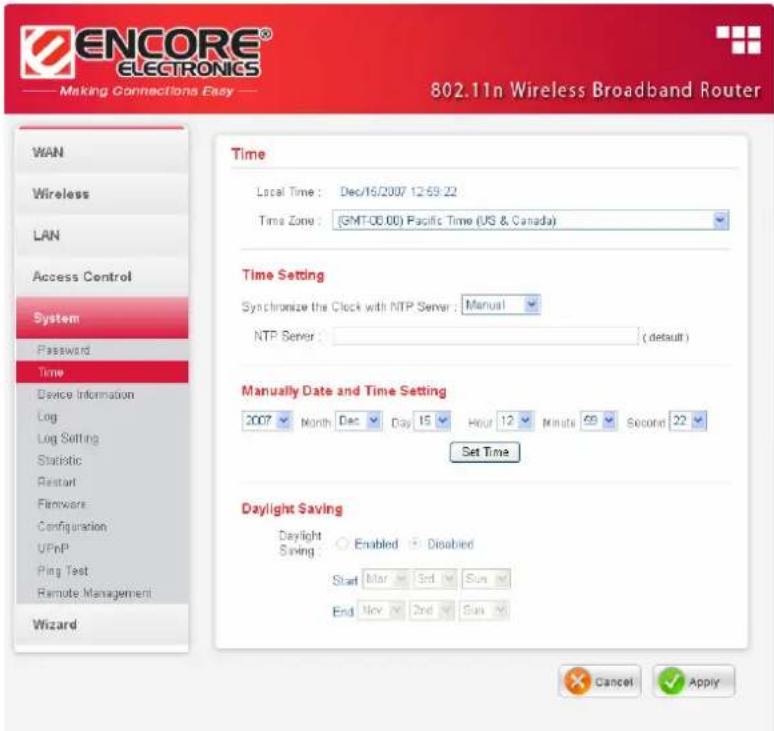
Local Time: Displays the local time and date.
Time Zone: Select the time zone from the drop-down list.
Synchronize the clock with NTP Server: Enable or disable the WLAN Router automatically adjust the system time from NTP Server.
NTP server: The Simple Network Time Protocol (SNTP) server allows the WLAN Router to synchronize the system clock to the global Internet through the SNTP Server. Specify the NTP domain name or IP address in the text box.
Manually Date and Time Setting: Manually setting the WLAN Router system time, press the Set Time button to update the system time.
Daylight Saving: Enables users to enable or disable daylight saving time. When enabled, select the start and end date for daylight saving time.
Device Information
This function enables users to view the WLAN Router's WAN, Wireless, LAN and System configurations.

WAN: This section displays the WAN interface configuration including the MAC address, Connection status, DHCP client status, IP address, Subnet mask, Default gateway, and DNS.
Wireless: This section displays the wireless configuration information, including the MAC address, the Connection status, SSID, Channel and Authentication type.
LAN: This section displays the LAN interface configuration including the MAC address, IP Address, Subnet Mask, and DHCP Server Status. Click “DHCP Table” to view a list of client stations currently connected to the WLAN Router LAN interface.
Click “DHCP Release” to release all IP addresses assigned to client stations connected to the WAN via the WLAN Router. Click “DHCP Renew” to reassign IP addresses to client stations connected to the WAN.
Log
This function enables users to view a running log of Router system statistics, events, and activities. The log displays up to 200 entries. Older entries are overwritten by new entries.
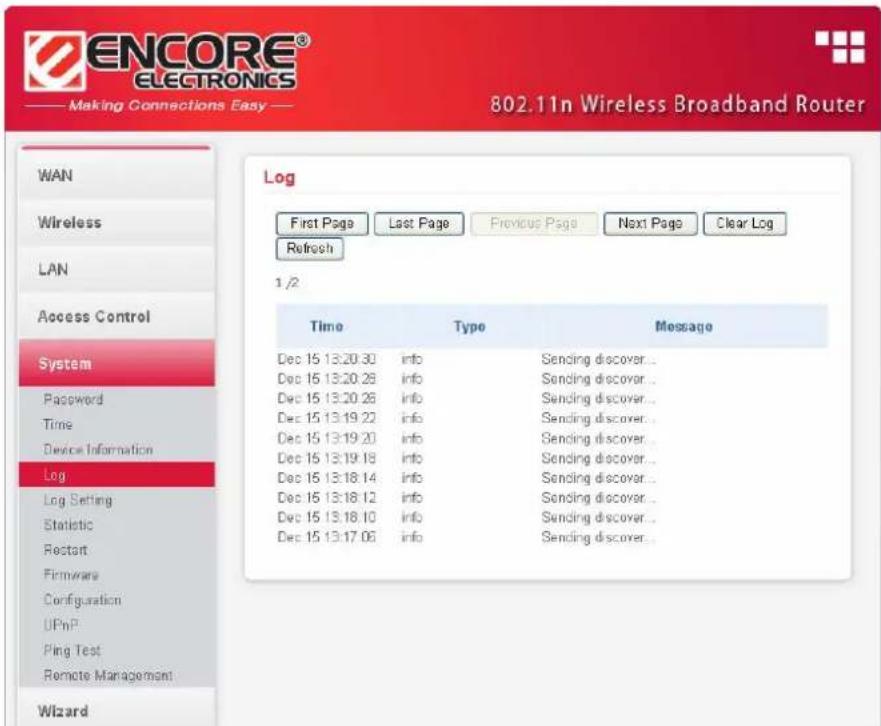
The Log screen commands are as follows:
Click "First Page" to view the first page of the log
Click "Last Page" to view the final page of the log
Click "Previous Page" to view the page just before the current page
Click "Next Page" to view the page just after the current page
Click "Clear Log" to delete the contents of the log and begin a new log
Click "Refresh" to renew log statistics
Log Setting
This function enables users to set Router Log parameters.
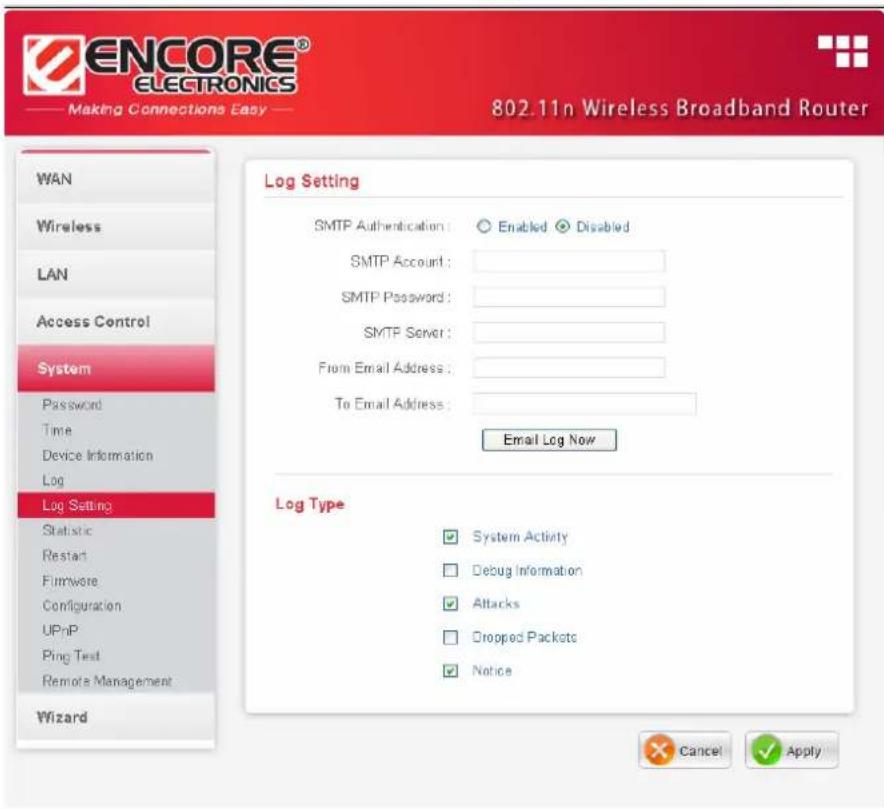
SMTP Server: Type your SMTP server address here.
Send to: Type an email address for the log to be sent to. Click “Email Log Now” to immediately send the current log.
SMTP Authentication: Selected the Enabled if the SMTP server need for authentication, fill in account name and password in SMTP Account field and SMTP Password field.
SMTP Account: If the SMTP Authentication enabled, fill in the SMTP account name here.
SMTP Password: If the SMTP Authentication enabled, fill in the password of the SMTP account here.
Syslog Server: Type the IP address of the Syslog Server if user wants the WLAN Router to listen and receive incoming Syslog messages.
Log Type: Enables users to select what items will be included in the log:
System Activity: Displays information related to WLAN Router operation.
Debug Information: Displays information related to errors and system malfunctions.
Attacks: Displays information about any malicious activity on the network.
Dropped Packets: Displays information about packets that have not been transferred successfully.
Notice: Displays important notices by the system administrator.
Statistic
This function displays a table that shows the rate of packet transmission via the WLAN Router's LAN, WAN and Wireless ports (in bytes per second).

Click "Reset" to erase all statistics and begin logging statistics again.
Restart
Click “Restart” to restart the system in the event the system is not performing correctly.

Firmware
This function enables users to keep the WLAN Router firmware up to date.

Please follow the below instructions:
Download the latest firmware from the manufacturer's Web site, and save it to disk.
Click "Browse" and go to the location of the downloaded firmware file.
Select the file and click “Upgrade” to update the firmware to the latest release.
Configuration
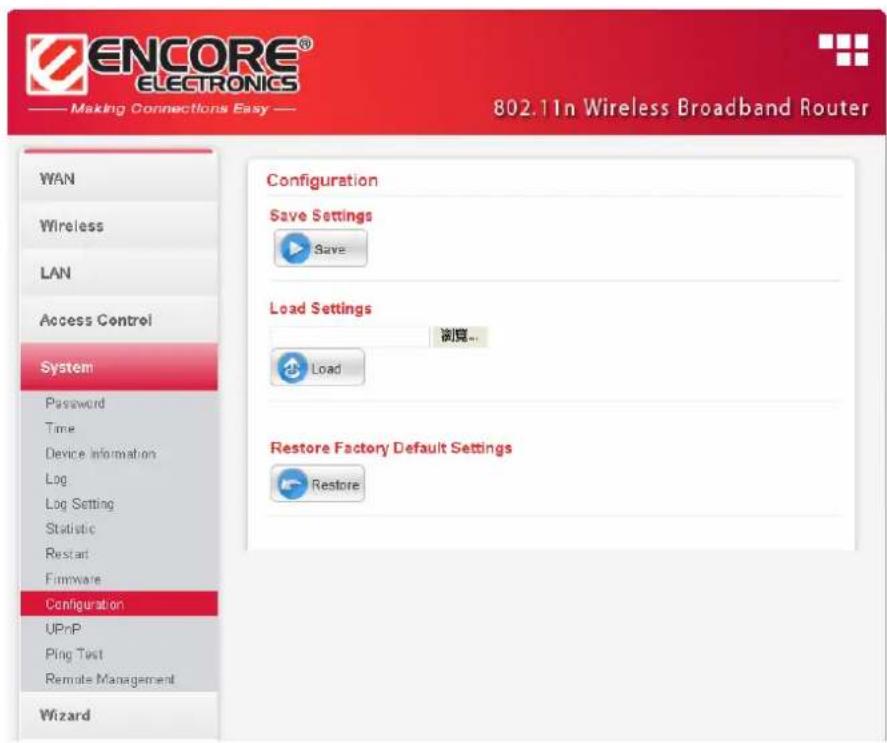
This function enables users to save settings as a profile and load profiles for different circumstances. User can also load the factory default settings, and run a setup wizard to configure the WLAN Router and Router interface.
UPnP
This function enables users to enable or disable the UPnP function on the WLAN Router.
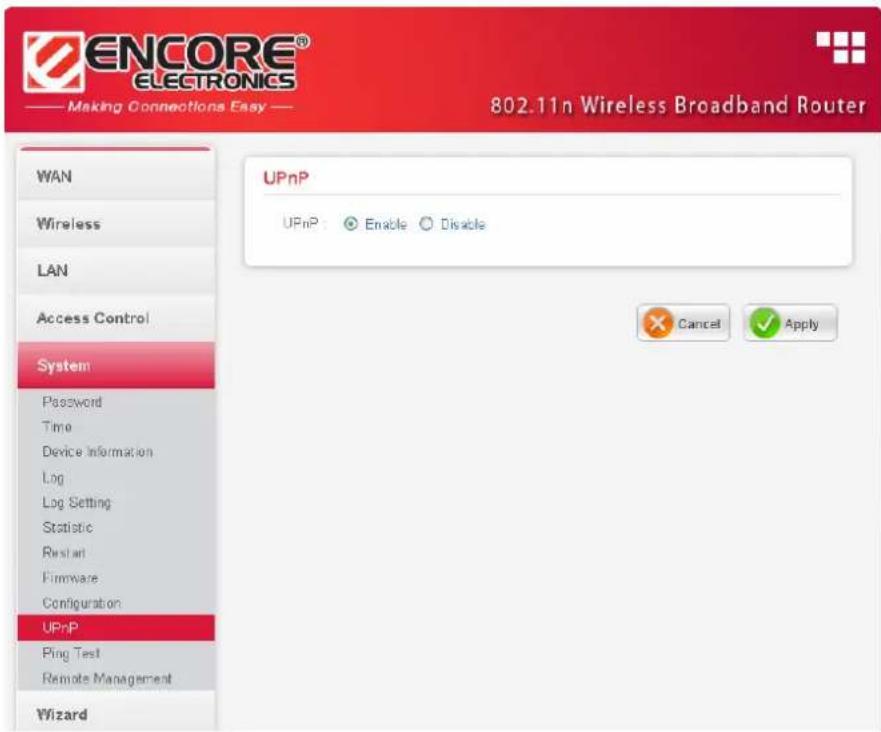
UPnP: Select to enable or disable the UPnP function on the WLAN Router.
Ping Test
The ping test enables users to determine whether an IP address or host is present on the Internet. Type the host name or IP address in the text box and click Ping button to start the Ping test.

Remote Management
This function enables users to set up remote management. Using remote management, the WLAN Router can be configured through the WAN via a Web browser. A user name and password are required to perform remote management.

HTTP: Enables users to set up HTTP access for remote management.
Remote IP Range: Type a range of IP addresses that can be pinged from remote locations
Gaming mode: If user is experiencing difficulties when playing online games or even certain applications that use voice data, user may need to enable Gaming Mode for these applications to work correctly. When not playing games or using these voice applications, it is recommended that Gaming Mode be disabled.
PPTP: Enables users to set up PPTP access for remote management.
IPSec: Enables users to set up IPSec access for remote management.
IDENT: Default is stealth. This enables users to set port 113 stealth.
TECHNICAL SPECIFICATIONS
| General | |
| Standards IEEE 80 | 2.3u 100BASE-TX Fast EthernetIEEE 802.11n draft 2.0; IEEE 802.11g; IEEE 802.11b |
| Protocol | CSMA/CD |
| Radio Technology | DSSS/OFDM |
| Data Transfer Rate | 802.11n mode: up to 300Mbps (auto sense)802.11g mode: up to 54Mbps (auto sense)802.11b mode: up to 11Mbps (auto sense)Ethernet: 10Mbps (half duplex), 20Mbps (full-duplex)Fast Ethernet: 100Mbps (half duplex), 200Mbps (full- duplex) |
| Receiver Sensitivity | 802.11n: -62dBm typical @ 300Mbps802.11g: -68dBm typical @ 54Mbps802.11b: -85dBm typical @ 11Mbps |
| TX Power 802.11n: | 13dBm typical802.11g: 13dBm typical802.11b: 17dBm typical |
| Network Cables 10 | BASE-T: 2-pair UTP Cat. 3,4,5 (100 m), EIA/TIA- 568 100-ohm STP (100 m)100BASE-TX: 2-pair UTP Cat. 5 (100 m), EIA/TIA-568 100-ohmSTP (100 m) |
| Frequency Range | 2412 ~ 2484 MHz ISM band |
| Modulation Schemes | DBPSK/DQPSK/CCK/OFDM |
| Security 64/128-bits | WEP Encryption; WPA, WPA-PSK, WPA2, WPA2-PSK |
| Channels | 1~11 Channels (US) 1~13 Channels (EU) |
| Number of Ports LAN | AN: 4 x 10/100Mbps Auto-MDIX Fast Ethernet portWAN: 1 x 10/100Mbps Auto-MDIX Fast Ethernet port |
| Physical and Environmental | |
| DC inputs 5VDC/2.5A | |
| Power Consumption | 7W (Max) |
| Temperature | Operating: °C ~ 40°C, Storage: -10° ~ 70°C |
| Humidity Operating | 10% ~ 90%, Storage: 5% ~ 90% |
| Dimensions 150 x 80 x 30 mm (W x D x H) without Antenna | |
| EMI: FCC Class B, | CE Mark B |
Q: What can I do if I forgot my password, or my router is not working correctly?
A: Step 1 Locate the reset pinhole on the back of the unit.
Step 2 With the unit powered on, press and hold the Reset button.
Step 3 Hold the Reset button for about 15 seconds.
Step 4 Release the Reset button.
Step 5 The unit will reboot. Allow 20-30 seconds before reconnecting.
Step 6 The device is now at factory defaults.
Note: Do not recycle power during the reset procedure.
The default user name is admin and the password is admin.
Q: How can I configure my router to work with a DSL (PPPoE) connection?
A: Make sure you disable or uninstall any PPPoE software such as WinPoet, Broadjump, or Enternet 300 from your computer or you will not be able to connect to the Internet. Do not disable until you've downloaded the firmware in Step 1. Please make sure that your modem is not also a router. If it is or you do not know, please contact your ISP and change the modem to Bridge mode.
Note: In some areas, BellSouth and Verizon may not use PPPoE.
Step 1 Upgrade to the latest firmware.
Step 2 Take a paperclip and perform a hard reset. With unit on, use a paperclip and hold down the reset button on the back of the unit for 15 seconds. Release it and the router will recycle, the lights will blink, and then stabilize.
Step 3 After the router stabilizes, open your web browser (Internet Explorer, Netscape, etc), enter 192.168.1.1 into the address window, and hit the Enter key. When the password dialog box appears, enter the username admin and password admin. Click OK.
If the password dialog box does not come up repeat Step 2.
Note: Do not run Wizard.
Step 4 Click on the WAN tab on top of the screen. Select PPPoE.
Step 5 Select PPPoE (unless your ISP supplied you with a static IP address).
Step 6 For Earthlink users, under the username field enter
ELN/username@earthlink.net and your password, where username is your own username (some Earthlink users may not need the ELN/ in front of username).
For SBC Global users, enter username@sbcglobal.net. For Ameritech users, enter username@ameritech.net. For BellSouth users, enter username@bellsouth.net.** For most other ISPs, enter username.
Step 7 Idle Time Out should be set to zero. Set MTU to 1492, unless specified by your ISP.
Note: If you experience problems accessing certain websites and/or email issues, please set the MTU to a lower number such as 1472, 1452, etc. Contact your ISP for more information and the proper MTU setting for your connection.
Step 8 Click Apply. When prompted, click Continue. Once the screen refreshes, unplug the power to the router.
Step 9 Turn off your DSL modem for 2-3 minutes. Turn back on. Once the modem has established a link to your ISP, plug the power back into the router. Wait about 30 seconds and log back into the router.
Step 10 Click on the Status tab in the web configuration where you can view the device info. Under WAN, click DHCP Release, then click Back, then click DHCP Renew, and then click Back. You should now see that the device info will show an IP address, verifying that the device has connected to a server and has been assigned an IP address.

- ENHWI-N2
- 802.11n Wireless LAN Router
- Regulatory notes and statements
- Wireless LAN, Health and Authorization for use
- Regulatory Information/disclaimers
- Federal Communication Commission Interference Statement
- IMPORTANT NOTE:
- FCC Radiation Exposure Statement:
- Europe - EU Declaration of Conformity
- EN 50385: 2002
- EN 300 328 V1.7.1 (2006-10)
- EN 301 489-1 V1.6.1 (2005-09)
- EN 301 489-17 V1.2.1 (2002-08)
- TABLE OF CONTENT
- ABOUT THIS GUIDE .... 1
- INTRODUCTION 2
- UNPACKING AND SETUP...... 4
- HARDWARE INSTALLATION...... 5
- PC NETWORK TCP/IP SETTING 8
- CONFIGURATION.... 11
- TECHNICAL SPECIFICATIONS.... 54
- FAQ....54
- ABOUT THIS GUIDE
- Purpose
- Terms/Usage
- Overview of this User's Guide
- Applications:
- Broadband Internet access:
- Resource sharing:
- File sharing:
- Online gaming:
- Firewall:
- Supported Features:
- UNPACKING AND SETUP
- Unpacking
- Setup
- Front Panel
- SYSTEM (i icon)
- WAN (Link/ACT) (Globe icon)
- WLAN (ACT) (Antenna icon)
- LAN (Link/ACT)
- Rear Panel
- Antenna
- LAN (1-4)
- WAN
- POWER
- RESET
- Side Panel
- WPS
- Hardware connections
- Connecting the WLAN Router
- Check the installation
- Windows 95/98/ME
- Windows 2000
- Windows XP
- Login to the WLAN Router through Wireless LAN
- Login to the WLAN Router
- Setup Wizard
- Step 2: Choose time zone
- Step 3: Set LAN connection and DHCP server
- Step 4: Set Internet connection
- Fixed IP Address:
- PPPOE
- PPPoE to obtain IP automatically:
- PPPoE with a Specify IP address:
- PPTP:
- L2TP:
- Big Pond Cable(Australia):
- WAN Setting
- DHCP Client or Fixed IP
- PPPoE with Obtain IP Automatically
- PPPoE with Specify IP
- PPTP/L2TP with Obtain IP Automatically
- PPTP/L2TP with Specify IP
- BigPond Cable
- Dynamic DNS:
- Wireless setting
- Basic
- Security
- WEP
- RASIUS Server:
- Advanced
- Wi-Fi Protected Setup
- LAN Setting
- DHCP
- Access Control Setting
- Filter
- MAC Filters
- Domain/ URL Blocking
- Protocol/IP Filters
- Virtual Server
- Special AP
- DMZ
- Firewall settings
- System Setting
- Password
- Time
- Device Information
- Log
- Log Setting
- Statistic
- Restart
- Firmware
- Configuration
- UPnP
- Ping Test
- Remote Management
Brand : ENCORE
Model : ENHWI-N2
Category : Router