FLW-110 - Water flosser Waterpik - Free user manual and instructions
Find the device manual for free FLW-110 Waterpik in PDF.

| Product Type | Water Flosser |
| Brand | Waterpik |
| Model | FLW-110 |
| Dimensions (L x W x H) | Approx. 15.2 x 11.4 x 22.9 cm (6 x 4.5 x 9 in) |
| Weight | Approx. 0.5 kg (1.1 lbs) |
| Power Supply | 120V / 60Hz (corded electric) |
| Water Tank Capacity | 450 ml (15 oz) |
| Pressure Settings | 2 pressure modes (Low and High) |
| Pulsations per Minute | 1400 pulses/min |
| Main Functions | Plaque removal, gum massage, interdental cleaning |
| Included Accessories | 2 jet tips (standard and perio pick) |
| Cleaning and Maintenance | Clean external surfaces with damp cloth; replace tips every 6 months |
| Safety Features | Water-resistant design; automatic shut-off after 2 minutes |
| Spare Parts Availability | Replacement tips, tank, and hose available from Waterpik |
| Reparability | Not user-serviceable; contact Waterpik support for repairs |
| Warranty | 2-year limited warranty |
Frequently Asked Questions - FLW-110 Waterpik
User questions about FLW-110 Waterpik
0 question about this device. Answer the ones you know or ask your own.
Ask a new question about this device
Download the instructions for your Water flosser in PDF format for free! Find your manual FLW-110 - Waterpik and take your electronic device back in hand. On this page are published all the documents necessary for the use of your device. FLW-110 by Waterpik.
USER MANUAL FLW-110 Waterpik
Instructions on Use and Care
1-800-525-2774 (U.S.A.) www.waterpik.com
Important Safeguards/Warnings
Read all instructions before using.
Danger, to avoid serious injury,
- If your physician or cardiologist has advised you to receive antibiotic premedication before a dental procedure, consult your dentist prior to using this device or any other oral hygiene aid.
- Do not swallow or inhale the Flossing Tip. Contact a physician immediately if Tip is accidentally swallowed or inhaled.
- Not for use by those with special needs or children under the age of 12 unless supervised by an adult. Keep out of reach of small children.
Caution, to avoid injury,
- Use this product only as indicated in these instructions or as recommended by your dental professional. Discontinue use if product is damaged.
- Do not walk around or do other things while using the Flosser.
- Do not use this product prior to consulting your dentist if you have severe periodontal disease, or bleeding gums.
- If you have sensitive gums begin using the Flosser on only one or two teeth. Wait 24 hours to gauge any discomfort before flossing your entire mouth.
- If you experience an allergic reaction when using the Whitening Tips, discontinue use.
Save these instructions
Congratulations on your purchase of the Waterpik® flosser, a quick, effective, and more convenient way to floss.
The Waterpik® flosser is the next generation of flossing devices. The flosser is most effective when the Tip is placed between teeth at the gumline. Unlike manual floss, that is inserted at the top of the space between each tooth and forced down and up, the Flosser Tip gently slides between teeth at the gumline. As power is turned on, the Flosser's 10,000 strokes per minute Tip action effectively circulates, contacting and dislodging plaque above and below the gumline, where it forms. This battery operated device is ready to go with you so that you can floss every day, and ideally after every meal. The Whitening Tips that are included help remove stain between teeth. Studies show this is the most difficult area of the teeth to remove stains. The Waterpik® flosser with Whitening Tips is safe to use everyday. The Waterpik® flosser may be used with any Waterpik® flosser replacement tip.
Importance of Flossing
Flossing the teeth is a very important adjunct to toothbrushing for good oral hygiene. Studies have even demonstrated that those who floss regularly have a decrease in periodontal disease, bad breath, and improvement in oral health. Many people believe flossing is only used to remove food particles. However, it is also used to remove plaque under the gums, which is the invisible film of bacteria that constantly forms on teeth. Floss goes in between the teeth, and scrapes the surfaces clear of this plaque and bacteria. The automatic Flosser also massages gums, helping them stay healthy.
As with any new habit, it takes time to adjust and establish your routine. Practice flossing with your new Flosser in front of a mirror for two weeks to master the technique. Upon initial flossing with the Waterpik® flosser, bleeding may occur in some gum areas. This is due to inflammation in the gums and should not persist longer than one to two weeks with regular use of the Flosser. Should the problem persist after two weeks, please consult your dentist or hygienist.
Special Uses: Your Waterpik® flosser is ideal for cleaning around braces, crowns, implants, and bridgework.
Waterpik One-Year Limited Warranty
When purchased in the United States: Water Pik, Inc. warrants to the original purchasers-owner of this product that it is free from defect in materials and workmanship for one year from date of purchase. Waterpik Technologies will repair or replace any part of the product, which in our opinion is defective, provided the product has not been abused, misused, altered or damaged after purchase. This limited warranty excludes the Flossing Tips and battery.
For service under this Warranty, look in your Yellow Pages directory under "Appliance-Household-Small-Service and Repair" for an authorized Waterpik Service Center near you. You may also call our toll-free Customer Service number, 1-800-525-2774, or return the product to Waterpik Technologies, Attn: Customer Service, 1730 East Prospect Road, Fort Collins, CO 80553-0001 for repair or replacement at no charge. For your protection when mailing packages, please use insured package delivery service.
This warranty gives you specific legal rights and you may also have other rights which vary from state to state.
Other Quality Dental Products from Waterpik Technologies
- Waterpik® personal oral cleaning system, Model WP-60W
- Waterpik® family oral cleaning system, Model WP-70W
- Waterpik® professional oral cleaning system, Model WP-72W
- Waterpik® SynchroSonic™ advanced action sonic toothbrush, Model DT-300W
- Waterpik® SynchroSonic™ Plus advanced action sonic toothbrush, Model DT-400W
- Waterpik® SenSonic® plaque removal instrument, Model SR-700W
- Waterpik® Vibe™ electric toothbrush, Model AT-200
natural_image
Hand holding a pen tip, no text or symbols visible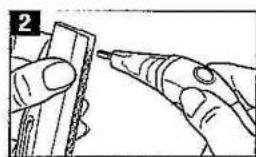
natural_image
Illustration of hands using a tool to apply material or adhesive (no text or symbols visible)
natural_image
Close-up of a hand holding a small tool with a pointed tip, no visible text or symbols
natural_image
Illustration of a dental tool interacting with teeth (no text or symbols present)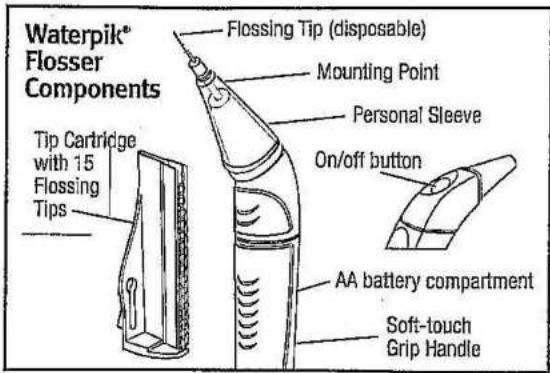
text_image
Waterpik® Flosser Components Tip Cartridge with 15 Flossing Tips Flossing Tip (disposable) Mounting Point Personal Sleeve On/off button AA battery compartment Soft-touch Grip HandleOPERATING INSTRUCTIONS
A. Attaching a Flossing Tip onto the Flosser
- Begin each flossing session with new Flossing Tip.
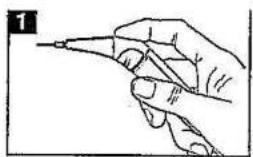
- Hold device comfortably (upright) in your hand: (Figure 1)
- Holding Handle in one hand and Tip Cartridge in the other, insert Mounting Point at end of Handle into one Flossing Tip at the top of Tip Cartridge. (Figure 2)
- Push until Flossing Tip snaps firmly in place.
- With Flossing Tip attached, pull Handle straight away from Tip Cartridge.
- Use fingers and tug gently on Flossing Tip to assure it is securely attached. (Figure 3)
You are now ready to begin flossing.
Keep the Tip Cartridge in a clean, dry place.
B. Using the Flosser
For best whitening results, always start with a fresh Tip on your front teeth and work your way to the back. Depending on your tooth spacing, using more than one Whitening Tip per flossing may be necessary (much like shifting from used to clean portions of ordinary floss.)
Floss in front of a mirror to help ease Tip placement between the teeth. The Flosser has a momentary on/off button so you can easily control the flossing motion. When you hold the button down, the flossing motion begins, and when you
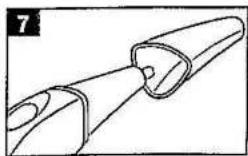
release the button the motion will stop. A Personal Sleeve (Figure 7) is included which covers the Flosser area that enters your mouth. Be sure it is positioned correctly on the Flosser just behind the Flosser Tip and is securely attached.
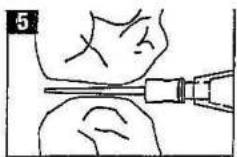
- Hold Flosser Handle in a vertical or upright position and maintain this position throughout use. Gently position Flossing Tip in the space between your teeth at gumline, always starting from the outside (cheek side) in. (Figure 4) Since Tip reaches all the way between teeth, it is not necessary to use Flosser from inside (tongue side) out. Position Flossing Tip as far between teeth as it will go comfortably. (Figure 5) If any resistance is felt as you position Flossing Tip, adjust angle slightly up or down or turn device on. Usually the moving Tip will smoothly slide into otherwise inaccessible interdental spaces. If you still feel any discomfort, move onto next space to be cleaned. Do not force the Flossing Tip into a tight space.
- Once Flossing Tip is in position between teeth, hold on/off button down and move Flossing Tip up and down against the surface of both teeth from contact point to below gumline. This will remove accumulated plaque on the tooth surfaces and help to whiten teeth above and below the gumline.
- Either release on/off button before moving to next space, or leave Flosser motion on as you move between teeth spaces.
- For convenience, begin at front of mouth and continue to back on each side. Be sure to clean between all upper and lower teeth.
- If difficulty is experienced in reaching spaces between rear molars bend the Tip sideways to allow easier access.
- Replace Whitening Tips as needed during flossing session.
For best results, change Flosser Tips after each use.
C. Tip Disposal and Flosser Cleaning
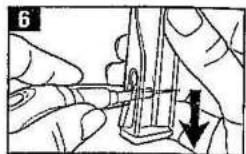
- When finished flossing locate Flossing Tip removal slot on Tip Cartridge. (Figure 6)
- Remove Flossing Tip by holding Cartridge in one hand and inserting whole Tip into wide end of slot with index finger positioned at top of the Personal Sleeve. (Figure 6)
- Push Flosser Handle down narrow end of slot and the used Tip
natural_image
Diagram of a mechanical component with no visible text or symbolswill easily disengage from the mounting point. Alternatively, Tips can be removed by grasping the large circular part of the Tip with fingers and pulling away from Flosser.
- Remove and rinse Personal Sleeve (Figure 7) and Mounting Point as needed. The Flosser is not water proof. Do not immerse in water or liquids. The Flosser can be cleaned with mild detergent and rinsed with water.
Changing the Battery
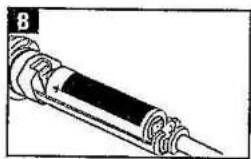
The Waterpik® flosser comes with one heavy duty "AA" battery. To install a new battery:
- Firmly hold top of Flosser and pull down on Handle until
battery compartment opens.
- Insert one new battery. For longer life use a premium quality "AA" alkaline battery. Line up +/- ends properly. (Figure 8)
- Push Handle back over battery compartment until it clicks into place.
Accessories Available
Tip Cartridge with 15 Flossing Tips – available in whitening with mint flavor or non-whitening – find at your local retailer, call 1-800-525-2774, or visit www.waterpik.com.
Personal Sleeves – call 1-800-525-2774 or visit www.waterpik.com.
| TROUBLESHOOTING GUIDE | |
| Problem | Recommendation |
| Cannot get Tip between teeth. | Adjust the angle of the Flossing Tip slightly up or down. With the Flosser off, push the Flosser Tip through the space as far as comfortable.Press on/off button to start the Flosser motion. Allow the motion to assist in entering space.Wet Tip with water or mouthwash to assist.If not successful, use traditional floss in this space.If using a Whitening Tip, try a standard Tip. |
| Cannot reach back molars. | Close mouth slightly to relax cheek muscles. Position device in desired space and then open again.Bend Tip sideways toward the rear molar space to improve access.If not successful, use traditional floss in this space. |
| Tip bends during use. | Straighten Tip and continue using. Use less force when flossing.Let the Flosser do the work. |
| Flossing Tip comes off between teeth or gets stuck in braces or crowns. | Be sure Flossing Tip clicks into position when loading from Cartridge. Tug on Tip before use. |
| Flosser bogs down during flossing. | Replace battery or use less force during flossing and let the Flosser do the work. |
| On/Off button does not start motion. | Replace battery. If Flosser still doesn't start, contact Customer Service (1-800-525-2774). |
| Tips fall out of Cartridge when engaging tip with Flosser Handle. | Hold Handle straight in line with Cartridge when putting Handle in Cartridge to engage Tip and when pulling back after Tip is engaged. |
| Difficulty in removing Tips from Flosser. | Use the removal slot on the Tip Cartridge. |
| Use more than four Whitening Tips per session. | The space between teeth is tight.Use of multiple Tips per session not harmful.You may choose to use standard Flossing Tips. |
waterpik Technologies
1730 East Prospect Road
Fort Collins, CO 80553-0001
U.S.A.
1-800-525-2774
www.waterpik.com
Waterpik and SenSonic are registered trademarks of Water Pik, Inc.
Waterpik (stylized), SynchroSonic, and Vibe are trademarks of Water Pik, Inc.
©2002 Water Pik, Inc.
Printed in U.S.A.


Made in U.S.A.
U.S. Patents 5,573,020 / 5,787,908 / 5,855,216;
Canadian Patent 2167092 and Patents Pending
Part No. 20005901AA
Form No. 02FL/FLW110-1002