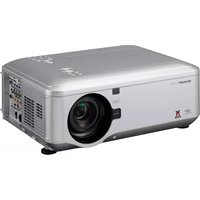
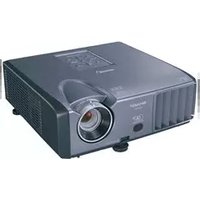
XG-PH80XN - Video projector SHARP - Free user manual and instructions
Find the device manual for free XG-PH80XN SHARP in PDF.


| Product Type | Video Projector |
| Brand | Sharp |
| Model | XG-PH80XN |
| Display Technology | DLP |
| Native Resolution | XGA (1024 x 768) |
| Brightness | 3500 ANSI lumens |
| Contrast Ratio | 2000:1 |
| Lamp Type | VIP 230 W |
| Lamp Life | 2000 hours (normal) / 3000 hours (eco) |
| Lens | 1.2x manual zoom / focus |
| Projection Size | 30 to 300 inches |
| Keystone Correction | Vertical +/- 40 degrees |
| Input Ports | HDMI, VGA, S-Video, Composite, Component |
| Output Ports | VGA out, Audio out (3.5mm) |
| Dimensions (W x H x D) | 315 x 109 x 280 mm |
| Weight | 3.7 kg |
| Power Consumption | 330 W (normal) / 0.5 W standby |
| Noise Level | 35 dB (normal) / 29 dB (eco) |
| Safety Features | Auto power-off, overheat protection, Kensington lock |
| Cleaning | Clean air filter every 100 hours; use soft cloth for lens |
| Spare Parts | Replacement lamp module (AN-PH80XN-LMP01) |
| Repairability | User-replaceable lamp and air filter |
| General Info | Designed for business and education presentations |
Frequently Asked Questions - XG-PH80XN SHARP
User questions about XG-PH80XN SHARP
0 question about this device. Answer the ones you know or ask your own.
Ask a new question about this device
Download the instructions for your Video projector in PDF format for free! Find your manual XG-PH80XN - SHARP and take your electronic device back in hand. On this page are published all the documents necessary for the use of your device. XG-PH80XN by SHARP.
USER MANUAL XG-PH80XN SHARP
Setting up the Screen 2
Screen Size and Projection Distance ....3
Connecting Pin Assignments ....14
RS-232C Specifications and Commands 16
Setting up the Projector Network Environment ....18
- Connecting the Projector to a Computer 19
- Setting an IP Address for the Computer 20
- Setting up a Network Connection for the Projector .....22
Controlling the Projector via LAN 24
Controlling the Projector Using Internet Explorer 24
Controlling the Projector and Confirming the Projector Status .....25
Making General Settings for the Network 26
Operating the Projector Using the PJLink™ Protocol ....27
Troubleshooting....28
Dimensions 31
Setting up the Screen
For optimal image quality, position the projector perpendicular to the screen with the projector's feet flat and level. Doing so will eliminate the need for Keystone correction and provide the best image quality.

Note
- The projector lens should be centered in the middle of the screen. If the horizontal line passing through the lens center is not perpendicular to the screen, the image will be distorted, making viewing difficult.
- For an optimal image, position the screen so that it is not in direct sunlight or room light. Light falling directly on the screen washes out the colors, making viewing diffi cult. Close the curtains and dim the lights when setting up the screen in a sunny or bright room.
Standard Setup (Front Projection)
■ Place the projector at the required distance from the screen according to the desired picture size.

natural_image
Simple line drawing of a meeting scene with three people around a table, one person gesturing while speaking (no text or symbols present)Example of standard setup
Side View
![[AN-PH808EX] 90° Screen Lens center H L](/content/2026/05/1065915/images/0f95a43f7b0b1c14a781c45eae7979a18d99ef4f018a07523bc6dfe6f8be3a4d.jpg)
[AN-PH814EZ/AN-PH818EZ/AN-PH823EZ/AN-PH845EZ]

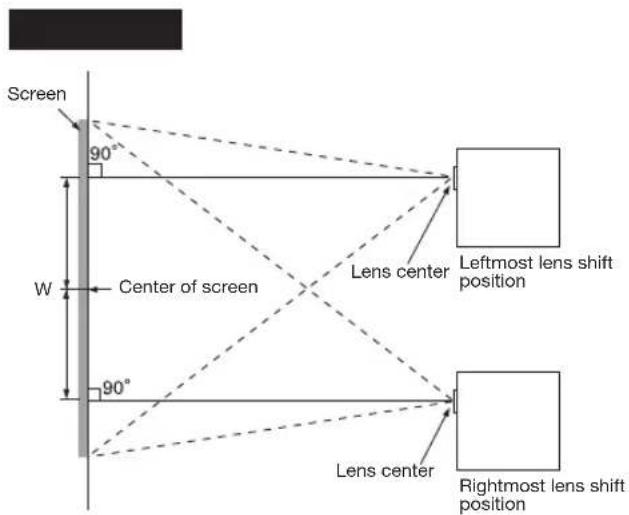
- The distance from the screen to the projector may vary depending on the size of the screen.
- The default setting can be used, when placing the projector in front of the screen. If the projected image is reversed, readjust the setting to "Front" in the "PRJ Mode" menu. (See page 49 of the projector's operation manual.)
- Place the projector so that an imaginary horizontal line that passes through the center of the lens is perpendicular to the screen.
Screen Size and Projection Distance
The projection screen size varies according to the distance from the lens of the projector to the screen. The optional lenses from Sharp are also available for specialized application. Please see your nearest Sharp Authorized Projector Dealer to details on all the lenses. (Refer to the lens operation manual when using a lens.)
Install the projector so that projected images are projected onto the screen at the optimum size by referring to the table. Use the values in the table as a reference when installing the projector.
Throw Distance
XG-PH80W-N
The graph below is for 100-inch (254 cm) screen with 16:10 normal mode.
Screen

bar
| Lens Type | Luminosity (m) | Throw distance ratio | | :--- | :--- | :--- | | Fixed wide lens (AN-PH808EX) | 5'6" | 1.7 | | Fixed wide lens (AN-PH808EX) | Throw distance ratio 1:0.8 | 0.8 | | Wide-zoom lens (AN-PH814EZ) | 9'5" - 12'8" | 2.9 | | Wide-zoom lens (AN-PH814EZ) | Throw distance ratio 1:1.3-1.8 | 1.3 | | Standard zoom lens (AN-PH818EZ) | 12'7" - 16'7" | 3.8 | | Standard zoom lens (AN-PH818EZ) | Throw distance ratio 1:1.8-2.4 | 1.8-2.4 | | Tele-zoom lens (AN-PH823EZ) | 15'8" - 31'4" | 4.8 | | Tele-zoom lens (AN-PH823EZ) | Throw distance ratio 1:2.2-4.4 | 2.2-4.4 | | Tele-zoom lens (AN-PH845EZ) | 31'4" - 58'8" | 9.5 | | Tele-zoom lens (AN-PH845EZ) | Throw distance ratio 1:4.4-8.3 | 4.4-8.3 |XG-PH80X-N
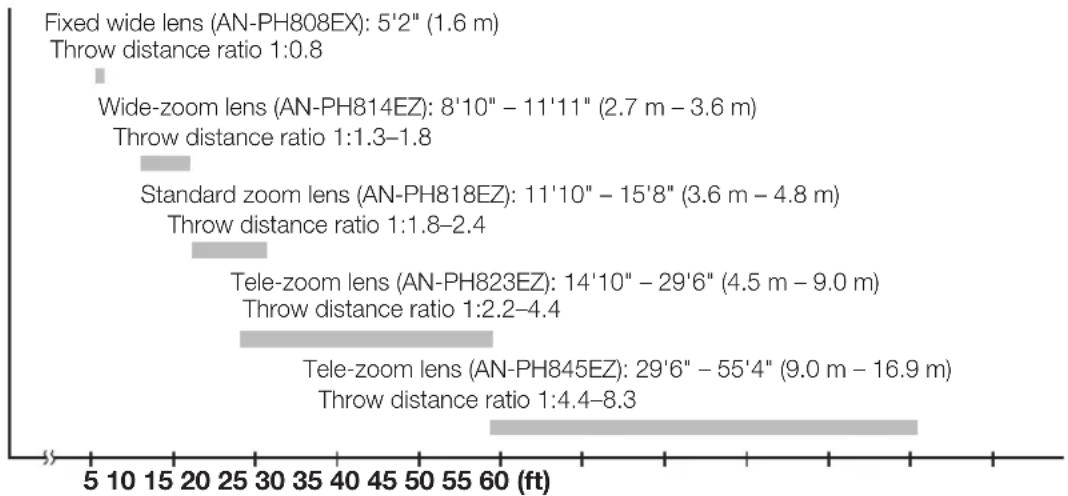
The graph below is for 100-inch (254 cm) screen with 4:3 normal mode.
Screen
bar
| Lens Type | Left Value (ft) | Right Value (ft) | | :--- | :--- | :--- | | Fixed wide lens (AN-PH808EX): 5'2" (1.6 m) Throw distance ratio 1:0.8 | 5 | 60 | | Wide-zoom lens (AN-PH814EZ): 8'10" – 11'11" (2.7 m – 3.6 m) Throw distance ratio 1:1.3–1.8 | 10 | 25 | | Standard zoom lens (AN-PH818EZ): 11'10" – 15'8" (3.6 m – 4.8 m) Throw distance ratio 1:1.8–2.4 | 20 | 30 | | Tele-zoom lens (AN-PH823EZ): 14'10" – 29'6" (4.5 m – 9.0 m) Throw distance ratio 1:2.2–4.4 | 25 | 45 | | Tele-zoom lens (AN-PH845EZ): 29'6" – 55'4" (9.0 m – 16.9 m) Throw distance ratio 1:4.4–8.3 | 30 | 60 |Standard Zoom Lens (AN-PH818EZ: For XG-PH80W-N)
F1.7-1.9, f = 26-34 mm
16:10 Signal Input (Normal Mode)
| Picture (Screen) size Projection distance [L] | Distance from the lens center to the bottom of the image [H] | Distance from the lens center to the center of the image [W] | |||||
| Diag. [ ] | Width Height Minimum [L1] | Maximum [L2 ] | Lower [H1] Upper [H2] | ||||
| 500" (1270 cm) | 1077 cm (424") | 673 cm (265") 19 | 2 m (62' 11") 25 | 3 m (83' 0") -336 | 6 cm (-132 ^1/2 ") | 0.0 cm (0") ± 107.7 cm (42 ^13/32 ") | |
| 300" (762 cm) | 646 cm (254") | 404 cm (159") | 11.5 m (37' 9") | 15.2 m (49' 10") | -201.9 cm (-79 ^1/2 ") | 0.0 cm (0") | ± 64.6 cm (25 ^7/16 ") |
| 200" (508 cm) | 431 cm (170") | 269 cm (106") | 7.7 m (25' 2") | 10.1 m (33' 3") | -134.6 cm (-53") | 0.0 cm (0") | ± 43.1 cm (16 ^61/64 ") |
| 150" (381 cm) | 323 cm (127") | 202 cm (79") | 5.8 m (18' 10") | 7.6 m (24' 11") | -101.0 cm (-39 ^3/4 ") | 0.0 cm (0") ± 32.3 cm (12 ^23/32 ") | |
| 100" (254 cm) | 215 cm (85") | 135 cm (53") | 3.8 m (12' 7") | 5.1 m (16' 7") | -67.3 cm (-26 ^1/2 ") | 0.0 cm (0") ± 21.5 cm (8 ^31/64 ") | |
| 80" (203 cm) | 172 cm (68") | 108 cm (42") | 3.1 m (10' 1") | 4.0 m (13' 3") | -53.8 cm (-21 ^13/64 ") | 0.0 cm (0") | ± 17.2 cm (6 ^25/32 ") |
| 70" (178 cm) | 151 cm (59") | 94 cm (37") | 2.7 m (8' 10") | 3.5 m (11' 8") | -47.1 cm (-18 ^35/64 ") | 0.0 cm (0") | ± 15.1 cm (5 ^15/16 ") |
| 60" (152 cm) | 129 cm (51") | 81 cm (32") | 2.3 m (7' 7") | 3.0 m (10' 0") | -40.4 cm (-15 ^29/32 ") | 0.0 cm (0") ± 12.9 cm (5 ^3/32 ") | |
| 40" (102 cm) | 86 cm (34") | 54 cm (21") | 1.5 m (5' 0") | 2.0 m (6' 8") | -26.9 cm (-10 ^19/32 ") | 0.0 cm (0") | ± 8.6 cm (3 ^25/64 ") |
4:3 Signal Input (Normal Mode)
| Picture (Screen) size Projection distance [L] | Distance from the lens center to the bottom of the image [H] | Distance from the lens center to the center of the image [W] | |||||
| Diag. [%] | Width | Height | Minimum [L1] | Maximum [L2] | Lower [H1] | Upper [H2] | |
| 300" (762 cm) | 610 cm (240") | 457 cm (180") | 13.0 m (42' 9") | 17.2 m (56' 5") | -228.6 cm (-90") | 0.0 cm (0") | ± 69.0 cm (27 ^11/64 ") |
| 200" (508 cm) | 406 cm (160") | 305 cm (120") | 8.7 m (28' 6") | 11.5 m (37' 7") | -152.4 cm (-60") | 0.0 cm (0") | ± 46.0 cm (18 ^7/64 ") |
| 150" (381 cm) | 305 cm (120") | 229 cm (90") | 6.5 m (21' 4") | 8.6 m (28' 2") | -114.3 cm (-45") | 0.0 cm (0") | ± 34.5 cm (13 ^37/64 ") |
| 120" (305 cm) | 244 cm (96") | 183 cm (72") | 5.2 m (17' 1") | 6.9 m (22' 7") | -91.4 cm (-36") | 0.0 cm (0") | ± 27.6 cm (10 ^7/5 ") |
| 100" (254 cm) | 203 cm (80") | 152 cm (60") | 4.3 m (14' 3") | 5.7 m (18' 10") | -76.2 cm (-30") | 0.0 cm (0") | ± 23.0 cm (9 ^1/6 ") |
| 80" (203 cm) | 163 cm (64") | 122 cm (48") | 3.5 m (11' 5") | 4.6 m (15' 1") | -61.0 cm (-24") | 0.0 cm (0") | ± 18.4 cm (7 ^1/4 ") |
| 60" (152 cm) | 122 cm (48") | 91 cm (36") | 2.6 m (8' 7") | 3.4 m (11' 3") | -45.7 cm (-18") | 0.0 cm (0") | ± 13.8 cm (5 ^7/6 ") |
When using the projector with screen sizes not listed in the above charts, calculate the values according to the formulas.
| 16:10 Signal | 4:3 Signal | |||
| [m/cm] | [Feet/inches] | [m/cm] | [Feet/inches] | |
| L1: Minimum projection distance (m/ft) | 0.03834 | 0.03834 / 0.3048 | 0.0434 | 0.0434 / 0.3048 |
| L2: Maximum projection distance (m/ft) | 0.05062 | 0.05062 / 0.3048 | 0.05731 | 0.05731 / 0.3048 |
| H1: Lower distance from the lens center to the bottom of the image (cm/in) | -0.6731 | -0.6731 / 2.54 | -0.762 | -0.762 / 2.54 |
| H2: Upper distance from the lens center to the bottom of the image (cm/in) | 0 | 0 / 2.54 | 0 | 0 / 2.54 |
| W: Distance from the lens center to the center of the image (cm/in) | ±0.21539 | ±0.21539 / 2.54 ±0.23004 | ±0.23004 | ±0.23004 / 2.54 |
: Picture diagonal size: 40" – 500" (16:10)
60" - 300" (4:3)

Note
- Allow a margin of error in the values in the diagrams above.
- When the distance from the lens center to the bottom of the image [H] is a negative number, this indicates that the bottom of the image is below the lens center.
Standard Zoom Lens (AN-PH818EZ: For XG-PH80X-N)
F1.7-1.9, f = 26-34 mm
4:3 Signal Input (Normal Mode)
| Picture (Screen) size Projection distance [L] | Distance from the lens center to the bottom of the image [H] | Distance from the lens center to the center of the image [W] | |||||
| Diag. [x] | Width Height Minimum [L1] | Maximum [L2] | Lower [H1] Upper [H2] | ||||
| 500" (1270 cm) | 1016 cm (400") | 762 cm (300") | 18.1 m (59' 4") | 23.9 m (78' 4") | -381.0 cm (-150") | 0.0 cm (0") | ± 101.6 cm (40") |
| 300" (762 cm) | 610 cm (240") | 457 cm (180") | 10.9 m (35' 7") | 14.3 m (47' 0") | -228.6 cm (-90") | 0.0 cm (0") | ± 61.0 cm (24") |
| 200" (508 cm) | 406 cm (160") | 305 cm (120") | 7.2 m (23' 9") | 9.6 m (31' 4") | -152.4 cm (-60") | 0.0 cm (0") | ± 40.6 cm (16") |
| 150" (381 cm) | 305 cm (120") | 229 cm (90") | 5.4 m (17' 10") | 7.2 m (23' 6") | -114.3 cm (-45") | 0.0 cm (0") | ± 30.5 cm (12") |
| 100" (254 cm) | 203 cm (80") | 152 cm (60") | 3.6 m (11' 10") | 4.8 m (15' 8") | -76.2 cm (-30") | 0.0 cm (0") | ± 20.3 cm (8") |
| 80" (203 cm) | 163 cm (64") | 122 cm (48") | 2.9 m (9' 6") | 3.8 m (12' 6") | -61.0 cm (-24") | 0.0 cm (0") | ± 16.3 cm (6 ^13 / _32 ") |
| 70" (178 cm) | 142 cm (56") | 107 cm (42") | 2.5 m (8' 4") | 3.3 m (11' 0") | -53.3 cm (-21") | 0.0 cm (0") | ± 14.2 cm (5 ^15 / _32 ") |
| 60" (152 cm) | 122 cm (48") | 91 cm (36") | 2.2 m (7' 1") | 2.9 m (9' 5") | -45.7 cm (-18") | 0.0 cm (0") | ± 12.2 cm (4 ^51 / _64 ") |
| 40" (102 cm) | 81 cm (32") | 61 cm (24") | 1.4 m (4' 9") | 1.9 m (6' 3") | -30.5 cm (-12") | 0.0 cm (0") | ± 8.1 cm (3 ^15 / _64 ") |
16:9 Signal Input (Normal Mode)
| Picture (Screen) size Projection distance [L] | Distance from the lens center to the bottom of the image [H] | Distance from the lens center to the center of the image [W] | |||||
| Diag. [%] | Width Height | Minimum [L] | Maximum [L] | Lower [H1] | Upper [H2] | ||
| 300" (762 cm) | 664 cm (261") | 374 cm (147") | 11.8 m (38' 9") | 15.6 m (51' 2") | -186.8 cm (-73 ^17/_32 ") | 62.3 cm (24 ^33/_64 ") | ± 66.4 cm (26 ^9/_64 ") |
| 200" (508 cm) | 443 cm (174") | 249 cm (98") | 7.9 m (25' 10") | 10.4 m (34' 2") | -124.5 cm (-49 ^1/_32 ") | 41.5 cm (16 ^11/_32 ") | ± 44.3 cm (17 ^7/_16 ") |
| 150" (381 cm) | 332 cm (131") | 187 cm (74") | 5.9 m (19' 5") | 7.8 m (25' 7") | -93.4 cm (-36 ^49/_64 ") | 31.1 cm (12 ^1/_4 ") | ± 33.2 cm (13 ^5/_64 ") |
| 120" (305 cm) | 266 cm (105") | 149 cm (59") | 4.7 m (15' 6") | 6.2 m (20' 6") | -74.7 cm (-29 ^27/_64 ") | 24.9 cm (9 ^13/_16 ") | ± 26.6 cm (10 ^29/_64 ") |
| 100" (254 cm) | 221 cm (87") | 125 cm (49") | 3.9 m (12' 11") | 5.2 m (17' 1") | -62.3 cm (-24 ^33/_64 ") | 20.8 cm (8 ^11/_64 ") | ± 22.1 cm (8 ^23/_32 ") |
| 80" (203 cm) | 177 cm (70") | 100 cm (39") | 3.2 m (10' 4") | 4.2 m (13' 8") | -49.8 cm (-19 ^39/_64 ") | 16.6 cm (6 ^17/_32 ") | ± 17.7 cm (6 ^31/_32 ") |
| 60" (152 cm) | 133 cm (52") | 75 cm (29") | 2.4 m (7' 9") | 3.1 m (10' 3") | -37.4 cm (-14 ^45/_64 ") | 12.5 cm (4 ^29/_32 ") | ± 13.3 cm (5 ^15/_64 ") |
When using the projector with screen sizes not listed in the above charts, calculate the values according to the formulas.
| 4:3 Signal | 16:9 Signal | |||
| [m/cm] | [Feet/inches] | [m/cm] | [Feet/inches] | |
| L1: Minimum projection distance (m/ft) | 0.03617 | 0.03617 / 0.3048 | 0.03941 | 0.03941 / 0.3048 |
| L2: Maximum projection distance (m/ft) | 0.04775 | 0.04775 / 0.3048 | 0.05202 | 0.05202 / 0.3048 |
| H1: Lower distance from the lens center to the bottom of the image (cm/in) | -0.762 | -0.762 / 2.54 | -0.62263 | -0.62263 / 2.54 |
| H2: Upper distance from the lens center to the bottom of the image (cm/in) | 0 | 0 / 2.54 | 0.20754 | 0.20754 / 2.54 |
| W: Distance from the lens center to the center of the image (cm/in) | ±0.2032 | ±0.2032 / 2.54 ±0 | .22138 | ±0.22138 / 2.54 |
: Picture diagonal size: 40" – 500" (4:3)
60" - 300" (16:9)

Note
- Allow a margin of error in the values in the diagrams above.
- When the distance from the lens center to the bottom of the image [H] is a negative number, this indicates that the bottom of the image is below the lens center.
Fixed Wide Lens (AN-PH808EX: For XG-PH80W-N)
F2.0, f = 11.4 mm
16:10 Signal Input (Normal Mode)
| Picture (Screen) size Projection | distance | Distance from the lens center to the bottom of the image [H] | Distance from the lens center to the center of the image [W] | ||
| Diag. [ ] | Width Height [L] | ||||
| 200" (508 cm) | 431 cm (170") | 269 cm (106") | 3.3 m (10' 11") | -134.6 cm (-53") | ± 43.1 cm (16 ^61/_64 " ) |
| 150" (381 cm) | 323 cm (127") | 202 cm (79") | 2.5 m (8' 2") | -101.0 cm (-39 ^3/_4 " ) | ± 32.3 cm (12 ^23/_32 " ) |
| 100" (254 cm) | 215 cm (85") | 135 cm (53") | 1.7 m (5' 6") | -67.3 cm (-26 ^1/2 " ) | ± 21.5 cm (8 ^31/_64 " ) |
| 50" (127 cm) | 108 cm (42") | 67 cm (26") | 0.8 m (2' 9") | -33.7 cm (-13 ^1/4 " ) | ± 10.8 cm (4 ^15/_64 " ) |
4:3 Signal Input (Normal Mode)
| Picture (Screen) size Projection | distance | Distance from the lens center to the bottom of the image [H] | Distance from the lens center to the center of the image [W] | ||
| Diag. [ ] | Width Height [L] | ||||
| 150 ^ (381 cm) | 305 cm (120 ^ ) | 229 cm (90 ^ ) | 2.8 m (9' 3") | -114.3 cm (-45") | ± 34.5 cm (13 ^37/64 ") |
| 100 ^ (254 cm) | 203 cm (80 ^ ) | 152 cm (60 ^ ) | 1.9 m (6' 2") | -76.2 cm (-30") | ± 23.0 cm (9 ^1/16 ") |
| 80 ^ (203 cm) | 163 cm (64 ^ ) | 122 cm (48 ^ ) | 1.5 m (4' 11") | -61.0 cm (-24") | ± 18.4 cm (7 ^1/4 ") |
When using the projector with screen sizes not listed in the above charts, calculate the values according to the formulas.
| 16:10 Signal | 4:3 Signal | |||
| [m/cm] | [Feet/inches] | [m/cm] | [Feet/inches] | |
| L: Projection distance (m/ft) | 0.01667 | 0.01667 / 0.3048 | 0.01887 | 0.01887 / 0.3048 |
| H: Distance from the lens center to the bottom of the image (cm/in) | -0.6731 | -0.6731 / 2.54 | -0.762 | -0.762 / 2.54 |
| W: Distance from the lens center to the center of the image (cm/in) | ±0.21539 | ±0.21539 / 2.54 | ±0.23004 | ±0.23004 / 2.54 |
: Picture diagonal size: 50" – 200" (16:10)
80" - 150" (4:3)

Note
- Allow a margin of error in the values in the diagrams above.
- When the distance from the lens center to the bottom of the image [H] is a negative number, this indicates that the bottom of the image is below the lens center.
Fixed Wide Lens (AN-PH808EX: For XG-PH80X-N)
F2.0, f = 11.4 mm
4:3 Signal Input (Normal Mode)
| Picture (Screen) size Projection distance | Distance from the lens center to the bottom of the image [H] | Distance from the lens center to the center of the image [W] | |||
| Diag. [ ] | Width Height [L] | ||||
| 200" (508 cm) | 406 cm (160") | 305 cm (120") | 3.1 m (10' 4") | -152.4 cm (-60") | ± 40.6 cm (16") |
| 150" (381 cm) | 305 cm (120") | 229 cm (90") | 2.4 m (7' 9") | -114.3 cm (-45") | ± 30.5 cm (12") |
| 100" (254 cm) | 203 cm (80") | 152 cm (60") | 1.6 m (5' 2") | -76.2 cm (-30") | ± 20.3 cm (8") |
| 50" (127 cm) | 102 cm (40") | 76 cm (30") | 0.8 m (2' 7") | -38.1 cm (-15") | ± 10.2 cm (4") |
16:9 Signal Input (Normal Mode)
| Picture (Screen) size Projection distance | Distance from the lens center to the bottom of the image [H] | Distance from the lens center to the center of the image [W] | |||
| Diag. [ ] | Width Height [L] | ||||
| 150" (381 cm) | 332 cm (131") | 187 cm (74") | 2.5 m (8' 4") | -93.4 cm (-36 ^49/_64 ") | ± 33.2 cm (13 ^5/_64 ") |
| 100" (254 cm) | 221 cm (87") | 125 cm (49") | 1.7 m (5' 6") | -62.3 cm (-24 ^33/_64 ") | ± 22.1 cm (8 ^23/_62 ") |
| 80" (203 cm) | 177 cm (70") | 100 cm (39") | 1.3 m (4' 4") | -49.8 cm (-19 ^39/_64 ") | ± 17.7 cm (6 ^31/_32 ") |
When using the projector with screen sizes not listed in the above charts, calculate the values according to the formulas.
| 4:3 Signal | 16:9 Signal | |||
| [m/cm] | [Feet/inches] | [m/cm] | [Feet/inches] | |
| L: Projection distance (m/ft) | 0.01573% | 0.01573% / 0.3048 | 0.01714% - 0.042 | (0.01714% - 0.042) / 0.3048 |
| H: Distance from the lens center to the bottom of the image (cm/in) | -0.762% | -0.762% / 2.54 | -0.62263% | -0.62263% / 2.54 |
| W: Distance from the lens center to the center of the image (cm/in) | ±0.2032% | ±0.2032% / 2.54 | ±0.22138% | ±0.22138% / 2.54 |
: Picture diagonal size: 50" – 200" (4:3)
80" - 150" (16:9)

Note
- Allow a margin of error in the values in the diagrams above.
- When the distance from the lens center to the bottom of the image [H] is a negative number, this indicates that the bottom of the image is below the lens center.
Wide-zoom Lens (AN-PH814EZ: For XG-PH80W-N)
F1.81-2.29, f = 19.3-25.8 mm
16:10 Signal Input (Normal Mode)
| Picture (Screen) size Projection distance [L] | Distance from the lens center to the bottom of the image [H] | Distance from the lens center to the center of the image [W] | |||||
| Diag. [ ] | Width Height Minimum [L1] | Maximum [L2] | Lower [H1] Upper [H2] | ||||
| 500" (1270 cm) | 1077 cm (424") | 673 cm (265") 14 | 3 m (47' 0") 19.3 | m (63' 3") -336.6 | cm (-132 ^1/2 ") 0 | 0.0 cm (0") ± 107.7 cm (42 ^13/_52 ") | |
| 300" (762 cm) | 646 cm (254") | 404 cm (159") | 8.6 m (28' 2") | 11.6 m (37' 11") | -201.9 cm (-79 ^1/2 ") | 0.0 cm (0") | ± 64.6 cm (25 ^7/15 ") |
| 200" (508 cm) | 431 cm (170") | 269 cm (106") | 5.7 m (18' 10") | 7.7 m (25' 4") | -134.6 cm (-53") | 0.0 cm (0") | ± 43.1 cm (16 ^61/_64 ") |
| 100" (254 cm) | 215 cm (85") | 135 cm (53") | 2.9 m (9' 5") | 3.9 m (12' 8") | -67.3 cm (-26 ^1/2 ") | 0.0 cm (0") ± 21.5 | cm (8 ^31/_64 ") |
| 80" (203 cm) | 172 cm (68") | 108 cm (42") | 2.3 m (7' 6") | 3.1 m (10' 1") | -53.8 cm (-21 ^13/64 ") | 0.0 cm (0") | ± 17.2 cm (6 ^25/_32 ") |
| 70" (178 cm) | 151 cm (59") | 94 cm (37") | 2.0 m (6' 7") | 2.7 m (8' 10") | -47.1 cm (-18 ^39/_64 ") | 0.0 cm (0") | ± 15.1 cm (5 ^19/16 ") |
| 60" (152 cm) | 129 cm (51") | 81 cm (32") | 1.7 m (5' 8") | 2.3 m (7' 7") | -40.4 cm (-15 ^29/_32 ") | 0.0 cm (0") ± 12.9 | cm (5 ^3/32 ") |
| 40" (102 cm) | 86 cm (34") | 54 cm (21") | 1.1 m (3' 9") | 1.5 m (5' 1") | -26.9 cm (-10 ^19/32 ") 0.0 cm (0") | ± 8.6 | cm (3 ^25/_64 ") |
4:3 Signal Input (Normal Mode)
| Picture (Screen) size | Projection distance [L] | Distance from the lens center to the bottom of the image [H] | Distance from the lens center to the center of the image [W] | ||||
| Diag. [%] | Width | Height | Minimum [L1] | Maximum [L2] | Lower [H1] | Upper [H2] | |
| 300" (762 cm) | 610 cm (240") | 457 cm (180") | 9.7 m (31' 11") | 13.1 m (43' 0") | -228.6 cm (-90") | 0.0 cm (0") | ± 69.0 cm (27 ^11/64 ") |
| 200" (508 cm) | 406 cm (160") | 305 cm (120") | 6.5 m (21' 3") | 8.7 m (28' 8") | -152.4 cm (-60") | 0.0 cm (0") | ± 46.0 cm (18 ^7/64 ") |
| 150" (381 cm) | 305 cm (120") | 229 cm (90") | 4.9 m (16' 0") | 6.5 m (21' 6") | -114.3 cm (-45") | 0.0 cm (0") | ± 34.5 cm (13 ^37/64 ") |
| 100" (254 cm) | 203 cm (80") | 152 cm (60") | 3.2 m (10' 8") | 4.4 m (14' 4") | -76.2 cm (-30") | 0.0 cm (0") | ± 23.0 cm (9 ^1/16 ") |
| 80" (203 cm) | 163 cm (64") | 122 cm (48") | 2.6 m (8' 6") | 3.5 m (11' 5") | -61.0 cm (-24") | 0.0 cm (0") | ± 18.4 cm (7 ^1/4 ") |
| 60" (152 cm) | 122 cm (48") | 91 cm (36") | 1.9 m (6' 5") | 2.6 m (8' 7") | -45.7 cm (-18") | 0.0 cm (0") | ± 13.8 cm (5 ^7/16 ") |
When using the projector with screen sizes not listed in the above charts, calculate the values according to the formulas.
| 16:10 Signal | 4:3 Signal | |||
| [m/cm] | [Feet/inches] | [m/cm] | [Feet/inches] | |
| L1: Minimum projection distance (m/ft) | 0.02865 | 0.02865 /0.3048 | 0.03243 | 0.03243 /0.3048 |
| L2: Maximum projection distance (m/ft) | 0.03856 | 0.03856 /0.3048 | 0.04365 | 0.04365 /0.3048 |
| H1: Lower distance from the lens center to the bottom of the image (cm/in) | -0.6731 | -0.6731 /2.54 | -0.762 | -0.762 /2.54 |
| H2: Upper distance from the lens center to the bottom of the image (cm/in) | 0 | 0 /2.54 | 0 | 0 /2.54 |
| W: Distance from the lens center to the center of the image (cm/in) | ±0.21539 | ±0.21539 /2.54 | ±0.23004 | ±0.23004 /2.54 |
: Picture diagonal size: 40" – 500" (16:10)
60" - 300" (4:3)

Note
- Allow a margin of error in the values in the diagrams above.
- When the distance from the lens center to the bottom of the image [H] is a negative number, this indicates that the bottom of the image is below the lens center.
Wide-zoom Lens (AN-PH814EZ: For XG-PH80X-N)
F1.81-2.29, f = 19.3-25.8 mm
4:3 Signal Input (Normal Mode)
| Picture (Screen) size Projection distance [L] | Distance from the lens center to the bottom of the image [H] | Distance from the lens center to the center of the image [W] | |||||
| Diag. [x] | Width Height Minimum [L1] | Maximum [L2] | Lower [H1] Upper [H2] | ||||
| 500" (1270 cm) | 1016 cm (400") | 762 cm (300") | 13.5 m (44' 4") | 18.2 m (59' 8") | -381.0 cm (-150") | 0.0 cm (0") | ± 101.6 cm (40") |
| 300" (762 cm) | 610 cm (240") | 457 cm (180") | 8.1 m (26' 7") | 10.9 m (35' 10") | -228.6 cm (-90") | 0.0 cm (0") | ± 61.0 cm (24") |
| 200" (508 cm) | 406 cm (160") | 305 cm (120") | 5.4 m (17' 9") | 7.3 m (23' 10") | -152.4 cm (-60") | 0.0 cm (0") | ± 40.6 cm (16") |
| 100" (254 cm) | 203 cm (80") | 152 cm (60") | 2.7 m (8' 10") | 3.6 m (11' 11") | -76.2 cm (-30") | 0.0 cm (0") | ± 20.3 cm (8") |
| 80" (203 cm) | 163 cm (64") | 122 cm (48") | 2.2 m (7' 1") | 2.9 m (9' 7") | -61.0 cm (-24") | 0.0 cm (0") | ± 16.3 cm (6 ^13/_32 ") |
| 70" (178 cm) | 142 cm (56") | 107 cm (42") | 1.9 m (6' 2") | 2.5 m (8' 4") | -53.3 cm (-21") | 0.0 cm (0") | ± 14.2 cm (5 ^19/_32 ") |
| 60" (152 cm) | 122 cm (48") | 91 cm (36") | 1.6 m (5' 4") | 2.2 m (7' 2") | -45.7 cm (-18") | 0.0 cm (0") | ± 12.2 cm (4 ^51/_64 ") |
| 40" (102 cm) | 81 cm (32") | 61 cm (24") | 1.1 m (3' 7") | 1.5 m (4' 9") | -30.5 cm (-12") | 0.0 cm (0") | ± 8.1 cm (3 ^13/_64 ") |
16:9 Signal Input (Normal Mode)
| Picture (Screen) size | Projection distance [L] | Distance from the lens center to the bottom of the image [H] | Distance from the lens center to the center of the image [W] | ||||
| Diag. [ ] | Width | Height | Minimum [L1] | Maximum [L2] | Lower [H1] | Upper [H2] | |
| 300" (762 cm) | 664 cm (261") | 374 cm (147") | 8.8 m (29' 0") | 11.9 m (39' 0") | -186.8 cm (-73 ^17/32 ") | 62.3 cm (24 ^33/64 ") | ± 66.4 cm (26 ^9/64 ") |
| 200" (508 cm) | 443 cm (174") | 249 cm (98") | 5.9 m (19' 4") | 7.9 m (26' 0") | -124.5 cm (-49 ^1/62 ") | 41.5 cm (16 ^11/32 ") | ± 44.3 cm (17 ^7/16 ") |
| 150" (381 cm) | 332 cm (131") | 187 cm (74") | 4.4 m (14' 6") | 5.9 m (19' 6") | -93.4 cm (-36 ^49/64 ") | 31.1 cm (12 ^1/4 ") | ± 33.2 cm (13 ^5/64 ") |
| 100" (254 cm) | 221 cm (87") | 125 cm (49") | 2.9 m (9' 8") | 4.0 m (13' 0") | -62.3 cm (-24 ^33/64 ") | 20.8 cm (8 ^11/64 ") | ± 22.1 cm (8 ^23/32 ") |
| 80" (203 cm) | 177 cm (70") | 100 cm (39") | 2.4 m (7' 9") | 3.2 m (10' 5") | -49.8 cm (-19 ^39/64 ") | 16.6 cm (6 ^17/32 ") | ± 17.7 cm (6 ^31/32 ") |
| 60" (152 cm) | 133 cm (52") | 75 cm (29") | 1.8 m (5' 10") | 2.4 m (7' 10") | -37.4 cm (-14 ^45/64 ") | 12.5 cm (4 ^29/32 ") | ± 13.3 cm (5 ^15/64 ") |
When using the projector with screen sizes not listed in the above charts, calculate the values according to the formulas.
| 4:3 Signal | 16:9 Signal | |||
| [m/cm] | [Feet/inches] | [m/cm] | [Feet/inches] | |
| L1: Minimum projection distance (m/ft) | 0.02703 | 0.02703 / 0.3048 | 0.02945 | 0.02945 / 0.3048 |
| L2: Maximum projection distance (m/ft) | 0.03637 | 0.03637 / 0.3048 | 0.03962 | 0.03962 / 0.3048 |
| H1: Lower distance from the lens center to the bottom of the image (cm/in) | -0.762 | -0.762 / 2.54 | -0.62263 | -0.62263 / 2.54 |
| H2: Upper distance from the lens center to the bottom of the image (cm/in) | 0 | 0 / 2.54 | 0.20754 | 0.20754 / 2.54 |
| W: Distance from the lens center to the center of the image (cm/in) | ±0.2032 | ±0.2032 / 2.54 | ±0.22138 | ±0.22138 / 2.54 |
: Picture diagonal size: 40" – 500" (4:3)
60" - 300" (16:9)

Note
- Allow a margin of error in the values in the diagrams above.
- When the distance from the lens center to the bottom of the image [H] is a negative number, this indicates that the bottom of the image is below the lens center.
Tele-zoom Lens (AN-PH823EZ: For XG-PH80W-N)
F2.1-2.9, f = 32-63 mm
16:10 Signal Input (Normal Mode)
| Picture (Screen) size Projection distance [L] | Distance from the lens center to the bottom of the image [H] | Distance from the lens center to the center of the image [W] | |||||
| Diag. [ ] | Width Height Minimum [L1] | Maximum [L2] | Lower [H1] Upper [H2] | ||||
| 500" (1270 cm) | 1077 cm (424") | 673 cm (265") 23 | 9 m (78' 5") 47.7 | m (156' 6") | -336.6 cm (-132 ^1/2 ") 0.0 cm (0") ± 107.7 cm (42 | ^13/_s2" | |
| 300" (762 cm) | 646 cm (254") | 404 cm (159") | 14.3 m (47' 1") | 28.6 m (93' 11") | -201.9 cm (-79 ^1/2 ") | 0.0 cm (0") | ± 64.6 cm (25 ^7/15 ") |
| 200" (508 cm) | 431 cm (170") | 269 cm (106") | 9.6 m (31' 5") | 19.1 m (62' 7") | -134.6 cm (-53") | 0.0 cm (0") | ± 43.1 cm (16 ^61/_s4 ") |
| 150" (381 cm) | 323 cm (127") | 202 cm (79") | 7.2 m (23' 6") | 14.3 m (47' 0") | -101.0 cm (-39 ^3/4 ") | 0.0 cm (0") | ± 32.3 cm (12 ^23/_s2 ") |
| 100" (254 cm) | 215 cm (85") | 135 cm (53") | 4.8 m (15' 8") | 9.5 m (31' 4") | -67.3 cm (-26 ^1/2 ") | 0.0 cm (0") | ± 21.5 cm (8 ^31/_s4 ") |
| 80" (203 cm) | 172 cm (68") | 108 cm (42") | 3.8 m (12' 7") | 7.6 m (25' 1") | -53.8 cm (-21 ^13/64 ") | 0.0 cm (0") | ± 17.2 cm (6 ^25/_s2 ") |
| 60" (152 cm) | 129 cm (51") | 81 cm (32") | 2.9 m (9' 5") | 5.7 m (18' 9") | -40.4 cm (-15 ^29/_s2 ") | 0.0 cm (0") | ± 12.9 cm (5 ^3/_s2 ") |
| 40" (102 cm) | 86 cm (34") | 54 cm (21") | 1.9 m (6' 3") | 3.8 m (12' 6") | -26.9 cm (-10 ^19/_s2 ") | 0.0 cm (0") | ± 8.6 cm (3 ^25/_s4 ") |
4:3 Signal Input (Normal Mode)
| Picture (Screen) size | Projection distance [L] | Distance from the lens center to the bottom of the image [H] | Distance from the lens center to the center of the image [W] | ||||
| Diag. [%] | Width | Height | Minimum [L1] | Maximum [L2] | Lower [H1] | Upper [H2] | |
| 300" (762 cm) | 610 cm (240") | 457 cm (180") | 16.2 m (53' 3") | 32.4 m (106' 4") | -228.6 cm (-90") | 0.0 cm (0") | ± 69.0 cm (27 ^11/64 ") |
| 200" (508 cm) | 406 cm (160") | 305 cm (120") | 10.8 m (35' 6") | 21.6 m (70' 11") | -152.4 cm (-60") | 0.0 cm (0") | ± 46.0 cm (18 ^7/64 ") |
| 150" (381 cm) | 305 cm (120") | 229 cm (90") | 8.1 m (26' 8") | 16.2 m (53' 2") | -114.3 cm (-45") | 0.0 cm (0") | ± 34.5 cm (13 ^37/64 ") |
| 100" (254 cm) | 203 cm (80") | 152 cm (60") | 5.4 m (17' 9") | 10.8 m (35' 5") | -76.2 cm (-30") | 0.0 cm (0") | ± 23.0 cm (9 ^1/16 ") |
| 80" (203 cm) | 163 cm (64") | 122 cm (48") | 4.3 m (14' 3") | 8.6 m (28' 4") | -61.0 cm (-24") | 0.0 cm (0") | ± 18.4 cm (7 ^1/4 ") |
| 60" (152 cm) | 122 cm (48") | 91 cm (36") | 3.2 m (10' 8") | 6.5 m (21' 3") | -45.7 cm (-18") | 0.0 cm (0") | ± 13.8 cm (5 ^7/16 ") |
When using the projector with screen sizes not listed in the above charts, calculate the values according to the formulas.
| 16:10 Signal | 4:3 Signal | |||
| [m/cm] | [Feet/inches] | [m/cm] | [Feet/inches] | |
| L1: Minimum projection distance (m/ft) | 0.04782 | 0.04782 / 0.3048 | 0.05414 | 0.05414 / 0.3048 |
| L2: Maximum projection distance (m/ft) | 0.09542 | 0.09542 / 0.3048 | 0.10802 | 0.10802 / 0.3048 |
| H1: Lower distance from the lens center to the bottom of the image (cm/in) | -0.6731 | -0.6731 / 2.54 | -0.762 | -0.762 / 2.54 |
| H2: Upper distance from the lens center to the bottom of the image (cm/in) | 0 | 0 / 2.54 0 | 0 / 2.54 | |
| W: Distance from the lens center to the center of the image (cm/in) | ±0.21539 | ±0.21539 / 2.54 ± | 0.23004 | ±0.23004 / 2.54 |
: Picture diagonal size: 40" - 500" (16:10)
60" - 300" (4:3)

Note
- Allow a margin of error in the values in the diagrams above.
- When the distance from the lens center to the bottom of the image [H] is a negative number, this indicates that the bottom of the image is below the lens center.
Tele-zoom Lens (AN-PH823EZ: For XG-PH80X-N)
F2.1-2.9, f = 32-63 mm
4:3 Signal Input (Normal Mode)
| Picture (Screen) size Projection distance [L] | Distance from the lens center to the bottom of the image [H] | Distance from the lens center to the center of the image [W] | |||||
| Diag. [%] | Width Height Minimum [L1] | Maximum [L2] | Lower [H1] Upper [H2] | ||||
| 500" (1270 cm) | 1016 cm (400") | 762 cm (300") | 22.6 m (74' 0") | 45.0 m (147' 8") | -381.0 cm (-150") 0.0 cm (0") ± 101.6 cm (40") | ||
| 300" (762 cm) | 610 cm (240") | 457 cm (180") | 13.5 m (44' 5") | 27.0 m (88' 7") | -228.6 cm (-90") | 0.0 cm (0") | ± 61.0 cm (24") |
| 200" (508 cm) | 406 cm (160") | 305 cm (120") | 9.0 m (29' 7") | 18.0 m (59' 1") | -152.4 cm (-60") | 0.0 cm (0") | ± 40.6 cm (16") |
| 150" (381 cm) | 305 cm (120") | 229 cm (90") | 6.8 m (22' 2") | 13.5 m (44' 4") | -114.3 cm (-45") | 0.0 cm (0") | ± 30.5 cm (12") |
| 100" (254 cm) | 203 cm (80") | 152 cm (60") | 4.5 m (14' 10") | 9.0 m (29' 6") | -76.2 cm (-30") | 0.0 cm (0") | ± 20.3 cm (8") |
| 80" (203 cm) | 163 cm (64") | 122 cm (48") | 3.6 m (11' 10") | 7.2 m (23' 8") | -61.0 cm (-24") | 0.0 cm (0") | ± 16.3 cm (6 ^13/_32 ") |
| 60" (152 cm) | 122 cm (48") | 91 cm (36") | 2.7 m (8' 11") | 5.4 m (17' 9") | -45.7 cm (-18") | 0.0 cm (0") | ± 12.2 cm (4 ^51/_64 ") |
| 40" (102 cm) | 81 cm (32") | 61 cm (24") | 1.8 m (5' 11") | 3.6 m (11' 10") | -30.5 cm (-12") | 0.0 cm (0") | ± 8.1 cm (3 ^13/_64 ") |
16:9 Signal Input (Normal Mode)
| Picture (Screen) size | Projection distance [L] | Distance from the lens center to the bottom of the image [H] | Distance from the lens center to the center of the image [W] | ||||
| Diag. [ ] | Width | Height | Minimum [L1] | Maximum [L2] | Lower [H1] | Upper [H2] | |
| 300" (762 cm) | 664 cm (261") | 374 cm (147") | 14.7 m (48' 5") | 29.4 m (96' 6") | -186.8 cm (-73 ^17/32 ") | 62.3 cm (24 ^33/64 ") | ± 66.4 cm (26 ^9/64 ") |
| 200" (508 cm) | 443 cm (174") | 249 cm (98") | 9.8 m (32' 3") | 19.6 m (64' 4") | -124.5 cm (-49 ^1 / _f22 ") | 41.5 cm (16 ^11/32 ") | ± 44.3 cm (17 ^7/16 ") |
| 150" (381 cm) | 332 cm (131") | 187 cm (74") | 7.4 m (24' 2") | 14.7 m (48' 3") | -93.4 cm (-36 ^49/64 ") | 31.1 cm (12 ^1/4 ") | ± 33.2 cm (13 ^5/64 ") |
| 100" (254 cm) | 221 cm (87") | 125 cm (49") | 4.9 m (16' 2") | 9.8 m (32' 2") | -62.3 cm (-24 ^33/64 ") | 20.8 cm (8 ^11/64 ") | ± 22.1 cm (8 ^23/32 ") |
| 80" (203 cm) | 177 cm (70") | 100 cm (39") | 3.9 m (12' 11") | 7.8 m (25' 9") | -49.8 cm (-19 ^39/64 ") | 16.6 cm (6 ^17/32 ") | ± 17.7 cm (6 ^31/32 ") |
| 60" (152 cm) | 133 cm (52") | 75 cm (29") | 2.9 m (9' 8") | 5.9 m (19' 4") | -37.4 cm (-14 ^45/64 ") | 12.5 cm (4 ^29/32 ") | ± 13.3 cm (5 ^15/64 ") |
When using the projector with screen sizes not listed in the above charts, calculate the values according to the formulas.
| 4:3 Signal | 16:9 Signal | |||
| [m/cm] | [Feet/inches] | [m/cm] | [Feet/inches] | |
| L1: Minimum projection distance (m/ft) | 0.04511 | 0.04511 / 0.3048 | 0.04915 | 0.04915 / 0.3048 |
| L2: Maximum projection distance (m/ft) | 0.09002 | 0.09002 / 0.3048 | 0.09807 | 0.09807 / 0.3048 |
| H1: Lower distance from the lens center to the bottom of the image (cm/in) | -0.762 | -0.762 / 2.54 | -0.62263 | -0.62263 / 2.54 |
| H2: Upper distance from the lens center to the bottom of the image (cm/in) | 0 | 0 / 2.54 | 0.20754 | 0.20754 / 2.54 |
| W: Distance from the lens center to the center of the image (cm/in) | ±0.2032 | ±0.2032 / 2.54 | ±0.22138 | ±0.22138 / 2.54 |
: Picture diagonal size: 40" - 500" (4:3)
60" - 300" (16:9)

Note
- Allow a margin of error in the values in the diagrams above.
- When the distance from the lens center to the bottom of the image [H] is a negative number, this indicates that the bottom of the image is below the lens center.
Tele-zoom Lens (AN-PH845EZ: For XG-PH80W-N)
F2.2-3.1, f = 63.5-117.4 mm
16:10 Signal Input (Normal Mode)
| Picture (Screen) size Projection distance [L] | Distance from the lens center to the bottom of the image [H] | Distance from the lens center to the center of the image [W] | |||||
| Diag. [%] | Width Height | Minimum [L1] | Maximum [L2] | Lower [H1] Upper [H2] | |||
| 500" (1270 cm) | 1077 cm (424") | 673 cm (265") 47.7 m (156' 6") | 89.4 m (293' 3") | -336.6 cm (-132 1/2") 0.0 cm (0") ± 107.7 cm (42 | ^13/_s2 | ||
| 300" (762 cm) | 646 cm (254") | 404 cm (159") | 28.6 m (93' 11") | 53.6 m (176' 0") | -201.9 cm (-79 1/2") | 0.0 cm (0") | ± 64.6 cm (25 7/15") |
| 200" (508 cm) | 431 cm (170") | 269 cm (106") | 19.1 m (62' 7") | 35.8 m (117' 4") | -134.6 cm (-53") | 0.0 cm (0") | ± 43.1 cm (16 61/64") |
| 150" (381 cm) | 323 cm (127") | 202 cm (79") | 14.3 m (47' 0") | 26.8 m (88' 0") | -101.0 cm (-39 3/4") | 0.0 cm (0") | ± 32.3 cm (12 23/32") |
| 100" (254 cm) | 215 cm (85") | 135 cm (53") | 9.5 m (31' 4") | 17.9 m (58' 8") | -67.3 cm (-26 1/2") | 0.0 cm (0") | ± 21.5 cm (8 31/64") |
| 80" (203 cm) | 172 cm (68") | 108 cm (42") | 7.6 m (25' 1") | 14.3 m (46' 11") | -53.8 cm (-21 19/64") | 0.0 cm (0") | ± 17.2 cm (6 29/32") |
| 60" (152 cm) | 129 cm (51") | 81 cm (32") | 5.7 m (18' 9") | 10.7 m (35' 2") | -40.4 cm (-15 29/32") | 0.0 cm (0") | ± 12.9 cm (5 3/32") |
| 40" (102 cm) | 86 cm (34") | 54 cm (21") | 3.8 m (12' 6") | 7.2 m (23' 6") | -26.9 cm (-10 19/32") | 0.0 cm (0") | ± 8.6 cm (3 25/64") |
4:3 Signal Input (Normal Mode)
| Picture (Screen) size | Projection distance [L] | Distance from the lens center to the bottom of the image [H] | Distance from the lens center to the center of the image [W] | ||||
| Diag. [ ] | Width | Height | Minimum [L1] | Maximum [L2] | Lower [H1] | Upper [H2] | |
| 300" (762 cm) | 610 cm (240") | 457 cm (180") | 32.4 m (106' 4") | 60.7 m (199' 2") | -228.6 cm (-90") | 0.0 cm (0") | ± 69.0 cm (27 ^11/64 ") |
| 200" (508 cm) | 406 cm (160") | 305 cm (120") | 21.6 m (70' 11") | 40.5 m (132' 10") | -152.4 cm (-60") | 0.0 cm (0") | ± 46.0 cm (18 ^7/64 ") |
| 150" (381 cm) | 305 cm (120") | 229 cm (90") | 16.2 m (53' 2") | 30.4 m (99' 7") | -114.3 cm (-45") | 0.0 cm (0") | ± 34.5 cm (13 ^37/64 ") |
| 100" (254 cm) | 203 cm (80") | 152 cm (60") | 10.8 m (35' 5") | 20.2 m (66' 5") | -76.2 cm (-30") | 0.0 cm (0") | ± 23.0 cm (9 ^1/16 ") |
| 80" (203 cm) | 163 cm (64") | 122 cm (48") | 8.6 m (28' 4") | 16.2 m (53' 1") | -61.0 cm (-24") | 0.0 cm (0") | ± 18.4 cm (7 ^1/4 ") |
| 60" (152 cm) | 122 cm (48") | 91 cm (36") | 6.5 m (21' 3") | 12.1 m (39' 10") | -45.7 cm (-18") | 0.0 cm (0") | ± 13.8 cm (5 ^7/16 ") |
When using the projector with screen sizes not listed in the above charts, calculate the values according to the formulas.
| 16:10 Signal | 4:3 Signal | |||
| [m/cm] | [Feet/inches] | [m/cm] | [Feet/inches] | |
| L1: Minimum projection distance (m/ft) | 0.09542 | 0.09542 /0.3048 | 0.10802 | 0.10802 /0.3048 |
| L2: Maximum projection distance (m/ft) | 0.17878 | 0.17878 /0.3048 | 0.20239 | 0.20239 /0.3048 |
| H1: Lower distance from the lens center to the bottom of the image (cm/in) | -0.6731 | -0.6731 /2.54 | -0.762 | -0.762 /2.54 |
| H2: Upper distance from the lens center to the bottom of the image (cm/in) | 0 | 0 /2.540 | 0 /2.54 | |
| W: Distance from the lens center to the center of the image (cm/in) | ±0.21539 | ±0.21539 /2.54 | ±0.23004 | ±0.23004 /2.54 |
: Picture diagonal size: 40" – 500" (16:10)
60" - 300" (4:3)

Note
- Allow a margin of error in the values in the diagrams above.
- When the distance from the lens center to the bottom of the image [H] is a negative number, this indicates that the bottom of the image is below the lens center.
Tele-zoom Lens (AN-PH845EZ: For XG-PH80X-N)
F2.2-3.1, f = 63.5-117.4 mm
4:3 Signal Input (Normal Mode)
| Picture (Screen) size Projection distance [L] | Distance from the lens center to the bottom of the image [H] | Distance from the lens center to the center of the image [W] | |||||
| Diag. [x] | Width Height | Minimum [L1] | Maximum [L2] | Lower [H1] Upper [H2] | |||
| 500" (1270 cm) | 1016 cm (400") | 762 cm (300") | 45.0 m (147' 8") | 84.3 m (276' 8") | -381.0 cm (-150") 0.0 cm (0") ± 101.6 cm (40") | ||
| 300" (762 cm) | 610 cm (240") | 457 cm (180") | 27.0 m (88' 7") | 50.6 m (166' 0") | -228.6 cm (-90") | 0.0 cm (0") | ± 61.0 cm (24") |
| 200" (508 cm) | 406 cm (160") | 305 cm (120") | 18.0 m (59' 1") | 33.7 m (110' 8") | -152.4 cm (-60") | 0.0 cm (0") | ± 40.6 cm (16") |
| 150" (381 cm) | 305 cm (120") | 229 cm (90") | 13.5 m (44' 4") | 25.3 m (83' 0") | -114.3 cm (-45") | 0.0 cm (0") | ± 30.5 cm (12") |
| 100" (254 cm) | 203 cm (80") | 152 cm (60") | 9.0 m (29' 6") | 16.9 m (55' 4") | -76.2 cm (-30") | 0.0 cm (0") | ± 20.3 cm (8") |
| 80" (203 cm) | 163 cm (64") | 122 cm (48") | 7.2 m (23' 8") | 13.5 m (44' 3") | -61.0 cm (-24") | 0.0 cm (0") | ± 16.3 cm (6 ^13/_32 ") |
| 60" (152 cm) | 122 cm (48") | 91 cm (36") | 5.4 m (17' 9") | 10.1 m (33' 2") | -45.7 cm (-18") | 0.0 cm (0") | ± 12.2 cm (4 ^51/_64 ") |
| 40" (102 cm) | 81 cm (32") | 61 cm (24") | 3.6 m (11' 10") | 6.7 m (22' 2") | -30.5 cm (-12") | 0.0 cm (0") | ± 8.1 cm (3 ^13/_64 ") |
16:9 Signal Input (Normal Mode)
| Picture (Screen) size | Projection distance [L] | Distance from the lens center to the bottom of the image [H] | Distance from the lens center to the center of the image [W] | ||||
| Diag. [ ] | Width | Height | Minimum [L1] | Maximum [L2] | Lower [H1] | Upper [H2] | |
| 300" (762 cm) | 664 cm (261") | 374 cm (147") | 29.4 m (96' 6") | 55.1 m (180' 10") | -186.8 cm (-73 ^17/32 ") | 62.3 cm (24 ^33/64 ") | ± 66.4 cm (26 ^9/64 ") |
| 200" (508 cm) | 443 cm (174") | 249 cm (98") | 19.6 m (64' 4") | 36.8 m (120' 7") | -124.5 cm (-49 ^1_f22 ") | 41.5 cm (16 ^11/32 ") | ± 44.3 cm (17 ^7/16 ") |
| 150" (381 cm) | 332 cm (131") | 187 cm (74") | 14.7 m (48' 3") | 27.6 m (90' 5") | -93.4 cm (-36 ^49/64 ") | 31.1 cm (12 ^1/4 ") | ± 33.2 cm (13 ^5/64 ") |
| 100" (254 cm) | 221 cm (87") | 125 cm (49") | 9.8 m (32' 2") | 18.4 m (60' 3") | -62.3 cm (-24 ^33/64 ") | 20.8 cm (8 ^11/64 ") | ± 22.1 cm (8 ^23/32 ") |
| 80" (203 cm) | 177 cm (70") | 100 cm (39") | 7.8 m (25' 9") | 14.7 m (48' 3") | -49.8 cm (-19 ^39/64 ") | 16.6 cm (6 ^17/32 ") | ± 17.7 cm (6 ^31/32 ") |
| 60" (152 cm) | 133 cm (52") | 75 cm (29") | 5.9 m (19' 4") | 11.0 m (36' 2") | -37.4 cm (-14 ^45/64 ") | 12.5 cm (4 ^29/32 ") | ± 13.3 cm (5 ^15/64 ") |
When using the projector with screen sizes not listed in the above charts, calculate the values according to the formulas.
| 4:3 Signal | 16:9 Signal | |||
| [m/cm] | [Feet/inches] | [m/cm] | [Feet/inches] | |
| L1: Minimum projection distance (m/ft) | 0.09002 | 0.09002 / 0.3048 | 0.09807 | 0.09807 / 0.3048 |
| L2: Maximum projection distance (m/ft) | 0.16866 | 0.16866 / 0.3048 | 0.18375 | 0.18375 / 0.3048 |
| H1: Lower distance from the lens center to the bottom of the image (cm/in) | -0.762 | -0.762 / 2.54 | -0.62263 | -0.62263 / 2.54 |
| H2: Upper distance from the lens center to the bottom of the image (cm/in) | 0 | 0 / 2.54 | 0.20754 | 0.20754 / 2.54 |
| W: Distance from the lens center to the center of the image (cm/in) | ±0.2032 | ±0.2032 / 2.54 | ±0.22138 | ±0.22138 / 2.54 |
: Picture diagonal size: 40" - 500" (4:3)
60" - 300" (16:9)

Note
- Allow a margin of error in the values in the diagrams above.
- When the distance from the lens center to the bottom of the image [H] is a negative number, this indicates that the bottom of the image is below the lens center.
Connecting Pin Assignments
COMPUTER/COMPONENT input and COMPUTER/COMPONENT output Terminals: mini
D-sub 15 pin female connector
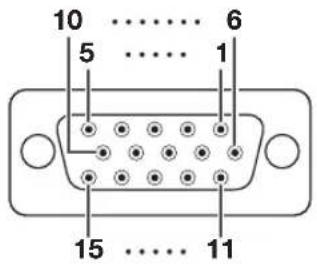
COMPUTER Input/Output COMPONENT Input/Output
Pin No. Signal Pin No. Signal
- Video input (red) 1. PR (CR)
- Video input (green/sync on green) 2. Y
- Video input (blue) 3. PB (CB)
- Not connected 4. Not connected
- Not connected 5. Not connected
- Earth (red) 6. Earth (PR)
- Earth (green/sync on green) 7. Earth (Y)
- Earth (blue) 8. Earth (PB)
- Not connected 9. Not connected
- GND 10. Not connected
- Not connected 11. Not connected
- Bi-directional data 12. Not connected
- Horizontal sync signal: TTL level 13. Not connected
- Vertical sync signal: TTL level 14. Not connected
- Data clock 15. Not connected
DVI-D Terminal: 24 pin connector

Pin No. Name Pin No. Name
- T.M.D.S. Data 2- 13. Not connected
- T.M.D.S. Dala 2+ 14. +5 V Power
- T.M.D.S. Data 2 Shield 15. Ground
- Not connected 16. Hot Plug Detect
- Not connected 17. T.M.D.S. Data 0 -
- DDC Clock 18. T.M.D.S. Data 0+
- DDC Data 19. T.M.D.S. Data 0
- Not connected 20. Not connected
- T.M.D.S. Data 1-21. Not connected
- T.M.D.S. Data 1+ 22. T.M.D.S. Clock Shield
- T.M.D.S. Data 1 Shield 23. T.M.D.S. Clock+
- Not connected 24. T.M.D.S. Clock-
RS-232C Terminal: D-sub 9 pin male connector
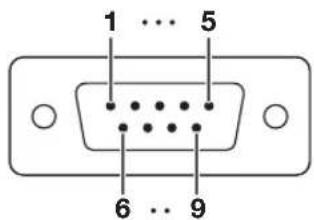
Pin No. Signal Name I/O Reference
- Not connected
- RD Receive Data Input Connected to internal circuit
- SD Send Data Output Connected to internal circuit
- Not connected
- SG Signal Ground Connected to internal circuit
- Not connected
- RS Request to Send Connected to CS in internal circuit
- CS Clear to Send Connected to RS in internal circuit
- Not connected
RS-232C Cable recommended connection: D-sub 9 pin female connector
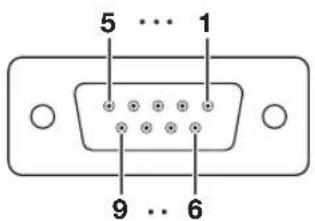
Pin No. Signal Pin No. Signal

flowchart
graph LR
    1. --> CD
    2. --> RD
    3. --> SD
    4. --> ER
    5. --> SG
    6. --> DR
    7. --> RS
    8. --> CS
    9. --> CI
    1. --> CD
    2. --> RD
    3. --> SD
    4. --> ER
    5. --> SG
    6. --> DR
    7. --> RS
    8. --> CS
    9. --> CI

Note
- Depending on the controlling device used, it may be necessary to connect Pin 4 and Pin 6 on the controlling device (e.g. computer).

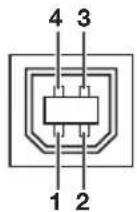
USB Terminal: Type B USB connector
LAN Terminal: LAN (RJ-45)
Pin No. Signal Name Pin No. Signal Pin No. Signal 8

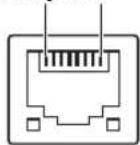

RS-232C Specifications and Commands
Computer control
A computer can be used to control the projector by connecting an RS-232C serial control cable (cross type, commercially available) to the projector. (See page 24 of the projector's operation manual for connection.)
Communication conditions
Set the serial port settings of the computer to match that of the table.
Signal format: Conforms to RS-232C standard. Parity bit: None
Baud rate: 115,200 bps Stop bit: 1 bit
Data length: 8 bits Flow control: None
Basic format
Commands from the computer are sent in the following order: command, parameter, and return code. After the projector processes the command from the computer, it sends a response code to the computer.
Command format


Command 4-digit Parameter 4-digit
Response code format
Normal response
| O | K |
| Return code (0DH) |
Problem response (communication error or incorrect command)
| E | R | R |
| Return code (0DH) |

Info
- When controlling the projector using RS-232C commands from a computer, wait for at least 40 seconds after the power has been turned on, and then transmit the commands.
- After sending an input selection or picture adjustment command and then receiving an “OK” response code, the projector may take some time to process the command. If a second command is sent while the projector is still processing the first command, you may receive an “ERR” response code. If this happens, try resending the second command.
- When more than one code is being sent, send each command only after the response code for the previous command from the projector is verified.
- "POWR?????", "TABN ____ 1", "TLPS ____ 1", "TPOW ____ 1", "TLPN ____ 1", "TLTT ____ 1", "TLTM ____ 1", "TLTL ____ 1", "TNAM ____ 1", "MNRD ____ 1", "PJNO ____ 1"
- When the projector receives the special commands shown above:
* The on-screen display will not disappear.
* The "Auto Power Off" timer will not be reset.
- The special commands are available for applications that require continuous polling.

Note
- Set "LAN/RS232C" in "Ex. Setting" of "PRJ-ADJ" menu to "RS232C".
- If an underbar (_) appears in the parameter column, enter a space.
- If an asterisk (*) appears in the parameter column, enter a value in the range indicated in brackets under CONTROL CONTENTS.
Commands
Example: When turning on the projector, make the following setting.
Computer Projector
| P | O | W | R | _ | _ | _ | 1 | ← | → | ← | O | K | ← |
| CONTROL CONTENTS COMMAND PARAMETER | RETURN | ||||||||||
| Power ON | Standby mode(or 40-second startup time) | ||||||||||
| Power On P O W R | - | - | - | 1 OK OK or ERR | |||||||
| Off | P | O | W | R | - | - | - | 0 OK or ERR | OK | ||
| Status | P | O | W | R | ? | ? | ? | ? | 1 | 0 | |
| Projector Condition | T | A | B | N | - | - | - | 1 | 0: Normal8: Lamp Life 5% or less16: Lamp Burn-out32: Lamp Ignition Failure | 0: Normal2: Fan Error4: Lamp Unit Cover Open8: Lamp Life 5% or less16: Lamp Burn-out32: Lamp Ignition Failure64: Temp Abnormally High | |
| Lamp | Lamp1 Status | T | L | P | S | - | - | - | 1 | 0: Off, 1: On, 2: Retry3: Waiting, 4: Lamp Error | 0: Off, 4: Lamp Error |
| Lamp2 Status | T | L | P | S | - | - | - | 2 | 0: Off, 1: On, 2: Retry3: Waiting, 4: Lamp Error | 0: Off, 4: Lamp Error | |
| Power Status | T | P | O | W | - | - | - | 1 | 1: On, 2: Cooling | 0: Standby | |
| Quantity | T | L | P | N | - | - | - | 1 | 2 | ||
| Lamp1 Usage Time(Hour) | T | L | T | T | - | - | - | 1 | 0 - 9999(Integer) | ||
| Lamp2 Usage Time(Hour) | T | L | T | T | - | - | - | 2 | 0 - 9999(Integer) | ||
| Lamp1 Usage Time(Minute) | T | L | T | M | - | - | - | 1 | 0, 15, 30, 45 | ||
| Lamp2 Usage Time(Minute) | T | L | T | M | - | - | - | 2 | 0, 15, 30, 45 | ||
| Lamp1 Life(Percentage) | T | L | T | L | - | - | - | 1 | 0% - 100%(Integer) | ||
| Lamp2 Life(Percentage) | T | L | T | L | - | - | - | 2 | 0% - 100%(Integer) | ||
| Lamp1 Timer Reset *1 | L | P | R | E | 0 | 0 | 0 | 1 | ERR | OK or ERR | |
| Lamp2 Timer Reset *1 | L | P | R | E | 0 | 0 | 0 | 2 | ERR | OK or ERR | |
| Name | Model Name Check | T | N | A | M | - | - | - | 1 | XGPH80WN/XGPH80XN | |
| Model Name Check | M | N | R | D | - | - | - | 1 | XG-PH80W-N/XG-PH80X-N | ||
| Serial No. Check *2 | S | N | R | D | - | - | - | 1 | Serial No. | ||
| Projector Name Setting 1(First 4 characters) *3 | P | J | N | 1 | * | * | * | * | OK or ERR | ||
| Projector Name Setting 2(Middle 4 characters) *3 | P | J | N | 2 | * | * | * | * | OK or ERR | ||
| Projector Name Setting 3(Last 4 characters) *3 | P | J | N | 3 | * | * | * | * | OK or ERR | ||
| Projector Name Check | P | J | N | 0 | - | - | - | 1 | Projector Name | ||
| Input Change | COMPUTER1 | I | R | G | B | - | - | - | 1 | OK or ERR | ERR |
| COMPUTER2 (5BNC) | I | R | G | B | - | - | - | 2 | OK or ERR | ERR | |
| COMPUTER3 (DVI) | I | R | G | B | - | - | - | 3 | OK or ERR | ERR | |
| COMPONENT | I | R | G | B | - | - | - | 4 | OK or ERR | ERR | |
| S-VIDEO | I | V | E | D | - | - | - | 1 | OK or ERR | ERR | |
| VIDEO | I | V | E | D | - | - | - | 2 | OK or ERR | ERR | |
| Input RGB Check | I | R | G | B | ? | ? | ? | ? | 1: COMPUTER1,2: COMPUTER2,3: DVI,4: COMPONENT or ERR | ERR | |
| Input Video Check | I | V | E | D | ? | ? | ? | ? | 1: S-VIDEO, 2: VIDEO or ERR | ERR | |
| Input Mode Check | I | M | O | D | ? | ? | ? | ? | 1: RGB, 2: VIDEO | ERR | |
*1 The Lamp Timer Reset command is available only in standby mode.
*2 Serial No. Check command is used to read out the 12 digits of serial No.
*3 For setting the projector name, send the commands in the order of PJN1, PJN2 and PJN3.
Setting up the Projector Network Environment
This section describes the basic procedure for using the projector via the network. If the network is already constructed, the projector's network settings may need to be changed. Please consult your network administrator for assistance with these settings. You can make network settings both on the projector and on the computer. The following procedure is for making settings on the computer.
Network settings on the computer
1. Connecting the projector to a computer
Connect a LAN cable (Category 5, cross-over type) between the computer and projector.


2. Setting an IP address for the computer
Adjust the IP settings of the computer to enable one-to-one communications with the projector.


3. Setting up a network connection for the projector
Adjust the projector network settings to conform to your network.


- Microsoft®, Windows® and Windows Vista® are registered trademarks of Microsoft Corporation in the United States and/or other countries.
- PJLink is a registered trademark or an application trademark in Japan, the United States, Canada, E.U., China and/or other countries/regions.
- All other company or product names are trademarks or registered trademarks of their respective companies.
1. Connecting the Projector to a Computer
Establishing a one-to-one connection from the projector to a computer. Using a commercially available LAN cable (UTP cable, Category 5, cross-over type) you can confi gure the projector via the computer.
1 Disconnect the computer's LAN cable from the existing network.
2 Connect a commercially available LAN cable (UTP cable, Category 5, cross-over type) to the projector's LAN terminal and connect the other end of the cable to the computer's LAN terminal.
3 Plug the power cord into the AC socket of the projector.
4 Turn on the computer.

Info
Confirm that the LINK LED on the rear of the projector illuminates. If the LINK LED does not illuminate, check the following:
• The LAN cable is properly connected.
- The power switches of both the projector and the computer are on.


natural_image
Diagram showing a projector connected to a laptop via cable, with an outlet plug and arrow indicating connection (no text or symbols)
This completes the connection. Now proceed to "2. Setting an IP Address for the Computer".
2. Setting an IP Address for the Computer
The following describes how to make settings in Windows Vista®.
1 Log on the network using the administrator's account for the computer.
2 Click "start", and click "Control Panel".
3 Click "View network status and tasks" of "Network and Internet", and click "View status" in the new window.
- This manual uses examples to explain the operations in Category View. If you are using Classic View, double-click "Network and Sharing Center".
4 Click "Properties".
- When the user account control display is displayed, click "Continue".
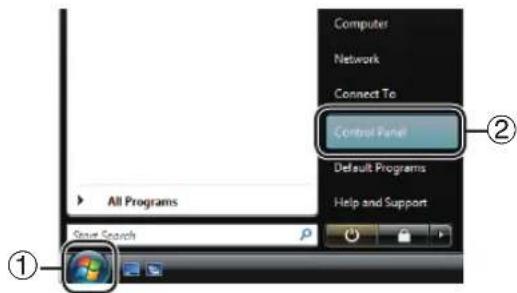

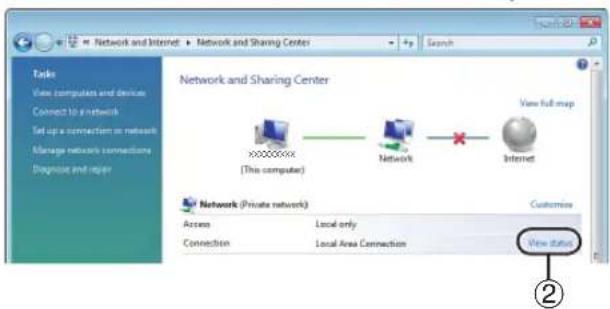
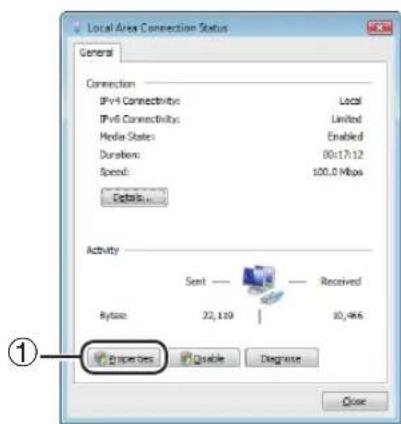
Setting up the Projector Network Environment
5 Click "Internet Protocol Version 4 (TCP/IPv4)", and click the "Properties" button.

6 Confi rm or change an IP address for the setup computer.
①Confi rm and note the current IP address, Subnet mask and Default gateway.
Make sure to note the current IP address,
Subnet mask and Default gateway as you
will be required to reset them later.
② Set temporarily as follows:
IP address: 192.168.150.3
Subnet mask: 255.255.255.0
Default gateway: (Do not input any values.)


Note
- The factory default settings for the projector are as follows:
DHCP Client: OFF
IP address: 192.168.150.2
Subnet mask: 255.255.255.0
Default gateway: 0.0.0.0
7 After setting, click the "OK" button, and then restart the computer.
After confirming or setting, proceed to "3. Setting up a Network Connection for the Projector".
3. Setting up a Network Connection for the Projector
Settings for such items as the projector's IP address and subnet mask are compatible with the existing network.
Set each item on the projector as follows. (See page 54 of the projector's operation manual for setting.)
DHCP Client: Off
IP Address: 192.168.150.002
Subnet Mask: 255.255.255.000
1 Start Internet Explorer (version 6.0 or later) on the computer, and enter "http://192.168.150.2/system.html" in "Address", and then press the "Enter" key.
2 The "System Confi guration" screen appears, ready for network settings for the projector.
| Items Setting example / Remarks | |
| IP Address | You can set this item when “DHCP Client” is set to “OFF”. Factory default setting: 192.168.150.2 Enter an IP address appropriate for the network. |
| Subnet Mask | You can set this item when “DHCP Client” is set to “OFF”. Factory default setting: 255.255.255.0 Set the subnet mask to the same as that of the computer and equipment on the network. |
| Default Gateway | You can set this item when “DHCP Client” is set to “OFF”. Factory default setting: 0.0.0.0 * When not in use, set to “0.0.0.0”. |
| DNS Server | Factory default setting: 0.0.0.0 * When not in use, set to “0.0.0.0”. |
| DHCP Client | Select “ON” or “OFF” to determine whether to use DHCP Client. |

System Configuration
| IP Address: | 192 . 168 . 150 . 2 |
| Subnet Mask: | 255 . 255 . 255 . 0 |
| Default Gateway: | 0 . 0 . 0 . 0 |
| DNS Server: | 0 . 0 . 0 . 0 |
| DHCP Client | ON OFF |
| MAC Address: | XX:XX:XX:XX:XX:XX |
| Firmware Version: |
Apply Cancel

Note
- Confirm the existing network's segment (IP address group) to avoid setting an IP address that duplicates the IP addresses of other network equipment or computers. If "192.168.150.2" is not used in the network having an IP address of "192.168.150.XXX", you don't have to change the projector IP address.
- For details about each setting, consult your network administrator.
Setting up the Projector Network Environment
3 Confir rm that the values are set properly, and then click the "Apply" button.
System Configuration


- Close the browser.
• This completes the network settings.
• After setting items, wait for about 15 seconds and then re-access. - Change the IP address of the setting computer back to its original address, which you have noted down in Step 6-① on page 21, and then connect the computer and the projector to the network.
Controlling the Projector via LAN
After connecting the projector to your network, enter the projector IP address in "Address" on Internet Explorer (version 6.0 or later) using a computer on the network to start a setup screen that will enable control of the projector via the network.
Controlling the Projector Using Internet Explorer
Complete connections to external equipment before starting the operation. (See pages 21-25 of the projector's operation manual.) Complete the AC cord connection. (See page 27 of the projector's operation manual.)

Note
- Set "LAN/RS232C" in "Ex. Setting" of the "PRJ-ADJ" menu to "LAN".
- When connecting the projector to the LAN, use a commercially available LAN cable (UTP cable, Category 5, cross-over type). When connecting the projector to a hub, use a straight-through cable.
1 Start Internet Explorer on the computer.
2 Enter "http://" followed by the projector IP address set by the procedure on page 22 followed by "/" in "Address", and then press the "Enter" key.
- When "DHCP Client" is set to "Off" on the projector, IP address is 192.168.150.2. If you did not change the IP address in "3. Setting up a Network Connection for the Projector" (pages 22-23), enter "http://192.168.150.2/system.html".
3 A screen for controlling the projector appears, ready for performing various status conditions and control.


Controlling the Projector and Confi rming the Projector Status
On this screen, you can perform projector control or confirm the projector status.
You can control the following items:
- Power
-
Picture
-
Bright
- Contrast
- Color
- Tint
-
Sharp
-
Input Select
• Volume - AV Mute
You can confirm the following items:
- Status
- Lamp life 1
- Lamp life 2
- Lamp time 1
- Lamp time 2
- Filter Timer
- Condition

Note
- For details about each item, refer to the projector's operation manual.
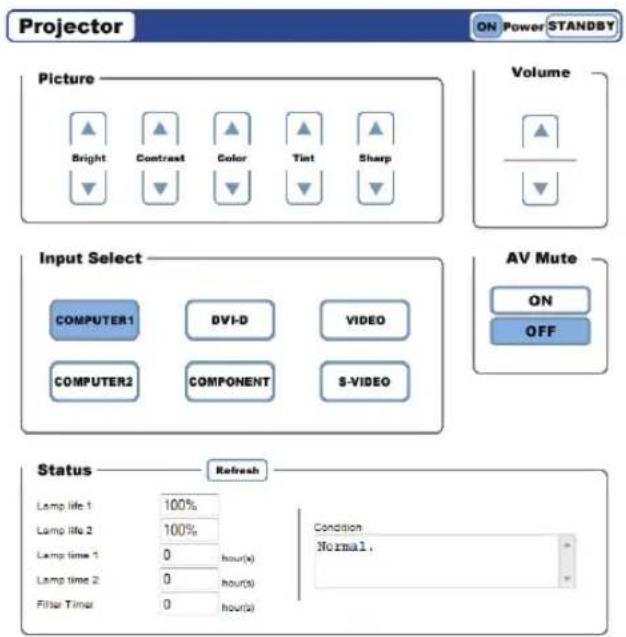
Making General Settings for the Network
Enter "http://XXX.XXX.XXX.X/lanconf.html" (for "XXX.XXX.XXX.X", enter the IP address set by the procedure on page 22) in "Address" on Internet Explorer (version 6.0 or later) using a computer on the network to display the "Projector LAN Confi guration" screen.
On this screen, you can make general settings relating to the network.
DOMAIN
| ItemsDescription | |
| Host Name Setting a hostname. | |
| Domain Name | Setting a domain name of the network connected to the projector. |
| ItemsDescription | |
| Error Mail Selecting “Enable” activates the Alert Mail feature. When using a wired LAN, your computer will receive an error message via e-mail if the projector lamp reaches the end of its lifetime or if an error occurs in the projector. | |
| Originator Address | Setting the projector's e-mail address. The e-mail address set here becomes Originator E-mail Address. |
| SMTP Server Setting an SMTP server address for e-mail transmission. | |
| Recipient Address (1-3) | Setting your recipient's address. |
TEST MAIL
Click "Execute" to enable the TEST MAIL feature, which allows you to send a test mail to confirm that the settings for e-mail transmission are properly made. Click "Test Mail Status" to make sure that the test mail is sent correctly.
PJLink
| ItemsDescription | |
| PJLink (Password) | Selecting “Enable” allows you to set a password when using the PJLink feature. |
| Password Setting | ng a password. |

Note
- When "DHCP Client" is set to "Off" on the projector, IP address is 192.168.150.2. If you did not change the IP address in "3. Setting up a Network Connection for the Projector" (pages 22-23), enter "http://192.168.150.2/system.html".
- You can input up to 60 characters.
- You can input the characters below:
- Host Name and Domain Name: A-Z, 0-9, -
- Originator Address, SMTP Server and Recipient Address: a-z, A-Z, 0-9, !, #, \$, %, &, *, +, -, /, =, ?, ^, {, |, }, \~, _, ', , @,
Projector

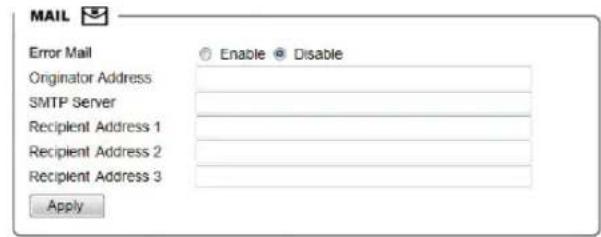
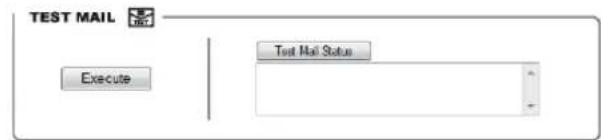

Confir rm that the values are set properly, and then click the "Apply" button.
Operating the Projector Using the PJLink™ Protocol
The projector conforms with the PJLink ^TM standard Class 1.
The commands to be used in controlling the projector by the PJLink ^TM protocol are as shown below.
| CONTROL CONTENTS | COMMAND RETURN | |||||||||
| Power Control | Off P O W R _ 0 OK or ERR3 | |||||||||
| On P O W R _ 1 OK or ERR3 | ||||||||||
| Power Status Query | P | D | W | R | _ | ? | 0: Standby Mode | |||
| Input List Query | I | N | S | T | _ | ? | 1: 12 | 2: 22 | 23: 31 | |
| Input Change | COMPUTER1 I N P T _ 1 1 OK or ERR3 | |||||||||
| COMPUTER2 I N P T _ 1 2 OK or ERR3 | ||||||||||
| COMPONENT I N P T _ 2 1 OK or ERR3 | ||||||||||
| S-VIDEO I N P T _ 2 2 OK or ERR3 | ||||||||||
| VIDEO I N P T _ 2 3 OK or ERR3 | ||||||||||
| DVI I N P T _ 3 1 OK or ERR3 | ||||||||||
| Input Status Query | I | N | P | T | _ | ? | 1: COMPUTER1 | |||
| AV Mute | Off A V M T _ 3 0 OK or ERR3 | |||||||||
| On A V M T _ 3 1 OK or ERR3 | ||||||||||
| AV Mute Status Query | A | V | M | T | _ | ? | 30: Off | |||
| 31: Onor ERR3 | ||||||||||
| Lamp Query | L | A | M | F | _ | ? | 1st Number: Lamp1 Usage Time (Hour) | |||
| Error Condition Query | E | R | S | T | _ | ? | 1st Byte: Fan Error Status | |||
| Projector Name Query | N | A | M | E | _ | ? | Projector Name | |||
| Manufacture Name Query | I | N | F | 1 | _ | ? | SHARP | |||
| Product Name Query | I | N | F | 2 | _ | ? | XG-PH80W-N/XG-PH80X-N | |||
| Other Information Query | I | N | F | O | _ | ? | Not used | |||
| Class Information Query | C | L | S | S | _ | ? | 1 | |||
PJLink™ Authentication:
To activate the password used for PJLink™, set "PJLink (Password)" to "Enable" and then enter the password (page 26). When operating without authentication, set "PJLink (Password)" to "Disable".
PJLink™ Compliant:
This product conforms with the PJLink standard Class 1 and all Class 1 commands are implemented.
This product confirms with the PJLink standard specification version 1.00.
For additional information, visit "http://pjlink.jbmia.or.jp/english/".
When connecting the projector using serial-connection
Check that the RS-232C terminal of the projector and a computer or the commercially available controller are connected correctly.
◀ Check that the RS-232C cable is a cross-over cable.
Check that the RS-232C port setting for the projector corresponds to the setting for the computer or the commercially available controller.
When connecting the projector to a computer using network (LAN)-connection
Check that the cable's connector is firmly inserted in the LAN terminal of the projector.
Check that the cable is firmly inserted into a LAN port for a computer or a network device such as a hub.
◀ Check that the LAN cable is a Category 5 cable.
Check that the LAN cable is a cross-over cable when connecting the projector to a computer directly.
Check that the LAN cable is a straight-through cable when connecting the projector with a network device such as a hub.
Check that the power supply is turned on for the network device such as a hub between the projector and a computer.
Check the network settings for the computer and the projector
◀ Check the following network settings for the projector.
- IP Address
Check that the IP address for the projector is not duplicated on the network. - Subnet Mask
When the gateway setting for the projector is "0.0.0.0" (Not Used), or the gateway setting for the projector and the default gateway setting for the computer are the same: - The subnet masks for the projector and the computer should be the same.
- The IP address parts shown by the subnet mask for the projector and the computer should be the same.
(Example)
When the IP address is "192.168.150.2" and the subnet mask is "255.255.255.0" for the projector, the IP address for the computer should be "192.168.150.X" (X=3-254) and the subnet mask should be "255.255.255.0".
- Gateway
When the gateway setting for the projector is "0.0.0.0" (Not Used), or the gateway setting for the projector and the default gateway setting for the computer are the same:
- The subnets for the projector and the computer should be the same. - The IP address parts shown by the subnet mask for the projector and the computer should be the same.
(Example)
When the IP address is "192.168.150.2" and the subnet mask is "255.255.255.0" for the projector, the IP address for the computer should be "192.168.150.X" (X=3-254) and the subnet mask should be "255.255.255.0".

- When "DHCP Client" is set to "Off" on the projector:
IP address: 192.168.150.2
Subnet mask: 255.255.255.0
Gateway address: 0.0.0.0 (Not Used)
- For network settings for the projector, refer to pages 22-23.
Take the following steps for checking the network settings for the computer.
-
Open a command prompt.
-
In the case of Windows® 2000: click "start" → "Programs" → "Accessories"
→ "Command Prompt" in order. -
In the case of Windows® XP, Windows Vista®: click "start" → "All Programs"
→ "Accessories" → "Command Prompt" in order. -
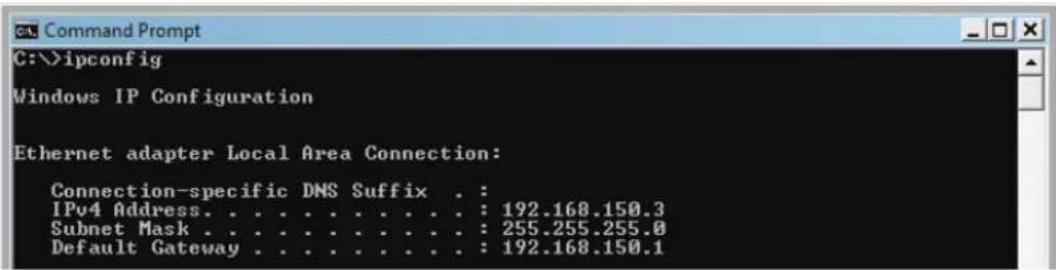
After launching the command prompt, enter the command "ipconfi g", and press the "Enter" key.

Note
- Communication may not be established even after carrying out the network settings for the computer. In such cases, restart your computer.
C:>ipconfig

Note
• Usage examples of ipconfig
C:>ipconfi g/? displays how to use "ipconfi g.exe".
C:>ipconfig displays the set IP address, subnet mask and default gateway.
C:>ipconfig /all displays all the setting information related to TCP/IP.
- To return to the Windows ^® screen, enter “exit” and press the “Enter” key.
Troubleshooting
Check if the "TCP/IP" protocol is operating correctly using the "PING" command. Also, check if an IP address is set.
-
Open a command prompt.
-
In the case of Windows® 2000: click "start" → "Programs" → "Accessories" → "Command Prompt" in order.
-
In the case of Windows® XP, Windows Vista®: click "start" → "All Programs" → "Accessories" → "Command Prompt" in order.
-
After launching the command prompt enter a command "PING".
Entry example C:>ping XXX.XXX.XXX.XXX
"XXX.XXX.XXX.XXX" should be entered with an IP address to be connected to, such as the projector.
- When connecting normally, the display will be as follows.
(The screen may be slightly different depending on the OS type.)

- When a command cannot be sent, "Request time out" will be displayed.
Check the network setting again.
If communication can still not be established properly, contact your network administrator.
- To return to the Windows ^® screen, enter "exit" and then press the "Enter" key.
When the projector cannot be connected, even though the "PING" command is checked:
- When a security software is installed on the PC, or when a fi re wall has been set up for the network system, connection may not be possible. Consult the system administrator.
Units: inches (mm)

Dimensions
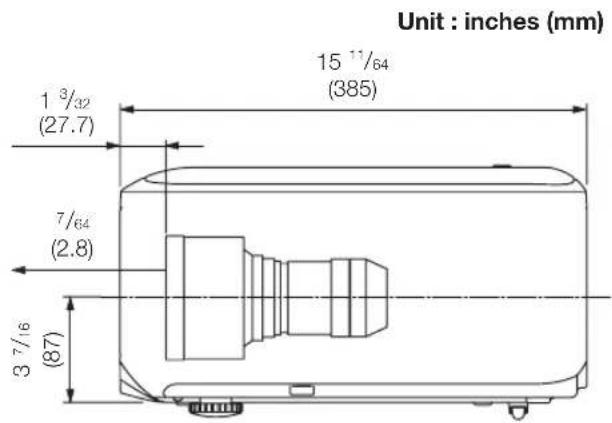
Projector and Lens Dimensions
[When AN-PH808EX is installed]

[When AN-PH814EZ is installed]

[When AN-PH818EZ is installed]
[When AN-PH823EZ is installed]

[When AN-PH845EZ is installed]

- Setting up the Screen
- Note
- Standard Setup (Front Projection)
- Example of standard setup
- Screen Size and Projection Distance
- Throw Distance
- XG-PH80W-N
- Screen
- XG-PH80X-N
- Standard Zoom Lens (AN-PH818EZ: For XG-PH80W-N)
- Standard Zoom Lens (AN-PH818EZ: For XG-PH80X-N)
- Fixed Wide Lens (AN-PH808EX: For XG-PH80W-N)
- Fixed Wide Lens (AN-PH808EX: For XG-PH80X-N)
- Wide-zoom Lens (AN-PH814EZ: For XG-PH80W-N)
- Wide-zoom Lens (AN-PH814EZ: For XG-PH80X-N)
- Tele-zoom Lens (AN-PH823EZ: For XG-PH80W-N)
- Tele-zoom Lens (AN-PH823EZ: For XG-PH80X-N)
- Tele-zoom Lens (AN-PH845EZ: For XG-PH80W-N)
- Tele-zoom Lens (AN-PH845EZ: For XG-PH80X-N)
- Connecting Pin Assignments
- COMPUTER/COMPONENT input and COMPUTER/COMPONENT output Terminals: mini
- COMPUTER Input/Output COMPONENT Input/Output
- Pin No. Signal Pin No. Signal
- DVI-D Terminal: 24 pin connector
- Pin No. Name Pin No. Name
- RS-232C Terminal: D-sub 9 pin male connector
- Pin No. Signal Name I/O Reference
- RS-232C Specifications and Commands
- Computer control
- Communication conditions
- Basic format
- Info
- Commands
- Setting up the Projector Network Environment
- Network settings on the computer
- Connecting the projector to a computer
- Setting an IP address for the computer
- Setting up a network connection for the projector
- Confir rm that the values are set properly, and then click the "Apply" button.
- Controlling the Projector via LAN
- Controlling the Projector Using Internet Explorer
- Start Internet Explorer on the computer.
- Controlling the Projector and Confi rming the Projector Status
- You can control the following items:
- You can confirm the following items:
- Making General Settings for the Network
- TEST MAIL
- Operating the Projector Using the PJLink™ Protocol
- PJLink™ Authentication:
- PJLink™ Compliant:
- When connecting the projector using serial-connection
- When connecting the projector to a computer using network (LAN)-connection
- Check the network settings for the computer and the projector
- Troubleshooting
- Dimensions
- Projector and Lens Dimensions
Brand : SHARP
Model : XG-PH80XN
Category : Video projector