
AL2415TC - Television AKAI - Free user manual and instructions
Find the device manual for free AL2415TC AKAI in PDF.


| Product Type | LED Television |
| Brand | AKAI |
| Model | AL2415TC |
| Screen Size | 24 inches (61 cm) |
| Display Technology | LED |
| Resolution | HD Ready (1366 x 768) |
| Aspect Ratio | 16:9 |
| Contrast Ratio | 1000:1 (typical) |
| Brightness | 200 cd/m² |
| Viewing Angle | 178°/178° |
| Refresh Rate | 60 Hz |
| Power Consumption (typical) | 30 W |
| Standby Power | < 0.5 W |
| Energy Efficiency Class | A+ |
| Weight (with stand) | 3.5 kg |
| Dimensions (with stand) | 552 x 374 x 150 mm |
| Connectivity | 2 x HDMI, 1 x USB, 1 x VGA, 1 x Composite, 1 x Headphone |
| Audio Power | 2 x 3 W |
| Remote Control | Included |
| Wall Mount Pattern | VESA 100 x 100 mm |
| Cleaning and Maintenance | Use a soft, dry cloth. Avoid harsh chemicals. |
| Safety Precautions | Place on stable surface; ensure ventilation. |
| Spare Parts Availability | Contact AKAI support for authorized service |
Frequently Asked Questions - AL2415TC AKAI
User questions about AL2415TC AKAI
0 question about this device. Answer the ones you know or ask your own.
Ask a new question about this device
Download the instructions for your Television in PDF format for free! Find your manual AL2415TC - AKAI and take your electronic device back in hand. On this page are published all the documents necessary for the use of your device. AL2415TC by AKAI.
USER MANUAL AL2415TC AKAI
User manual
Brugsanvisning
P1-P17
P18-P37
Table Of Contents
Table of Contents 1
Important Safety Instruction 2
Warnings and Cautions 3
Functional Parts(TV) 4
Rear View Of TV Set 5
Operation-Remote Control 6
Select Input Source 7
Basic Operation 7
ATV Source 8-10
Other Source 11
PC Source 11
DTV Source 11-12
USB Source 12
PVR Source 13-15
Troubleshooting Tips 16
Important Safety Instruction

WARNING
RISK OF ELECTRIC SHOCK DO NOT OPEN

WARNING: TO REDUCE THE RISK OF ELECTRIC SHOCK DO NOT REMOVE COVER OR BACK. NO USER-SERVICEABLE PARTS INSIDE. REFER SERVICING TO QUALIFIED SERVICE PERSONNEL.

The lighting flash with arrow head within a triangle is intended to tell the user that parts inside the product are a risk of electric shock to persons.

The exclamation point within a triangle is intended to tell the user that important operating and servicing instructions are in the papers with the appliance.
WARNING: TO REDUCE THE RISK OF ELECTRIC SHOCK DO NOT EXPOSE THIS APPARATUS TO RAIN OR MOISTURE AND OBJECTS FILLED WITH LIQUIDS, SUCH AS VASES, SHOULD NOT BE PLACED ON THIS APPARATUS.
Warnings And Cautions
natural_image
Illustration of a computer monitor with a crossed-out black X symbol and decorative stars above (no text or symbols)
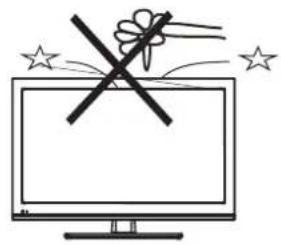
Caution
Do not drop or push objects into the television cabinet slots or openings. Never spill any kind of liquid on the television receiver.
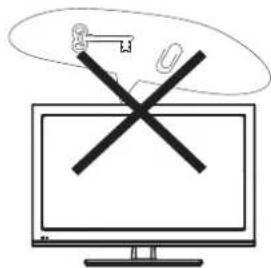

Caution
Do not insert anything in the ventilation holes. If metal or something flammable enters, it may result in fire or electric shock.

natural_image
Simple line drawing of a tilted rectangular object with a diagonal cross and a vertical line extending outward (no text or symbols)
Caution
Do not place your television on an unstable cart, stand, shelf or table. Serious injury to an individual, and damage to the television, may result if it should fall.

natural_image
Simple line drawing of a heating element with steam rising (no text or symbols)
Caution
Do not block the ventilation holes in the back cover. Adequate ventilation is essential to prevent failure of electrical component.


Warning
To prevent fire or electrical shock hazard, Do not expose the television receiver to rain or moisture.
Functional Parts( TV )
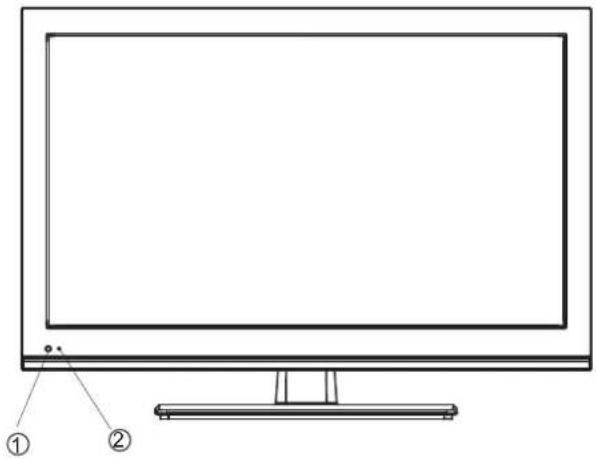
Front View of LED Set
- Remote Sensor
- LED indicator lamp
natural_image
Line drawing of a flat-screen monitor with labeled components (no text or symbols on the screen)To turn the TV power ON
Put the TV set on the correct place, then connect the DC plug of the AC-DC adaptor to the DC 12V socket at the back of the TV set. Connect the adaptor main cord to the wall outlet, then the LED indicator lamp turns red/blue and the TV set is at Standby/work Mode. At Standby Mode, if Standby Button is pressed the power indicator will change to blue. It will flash a few seconds before the picture appears.
To turn the TV power OFF
Press the Standby Button to make the TV set in Standby Mode, then disconnect the power plug from the wall outlet.
NOTE:
If TV is the selected input without signal received and NO operation is performed for about 5 minutes continuously, the TV set will enter standby mode. For any inputs other than TV, the TV set will not enter standby mode automatically without users' instruction. If you are not going to use this TV set for a long time, switch off the set and disconnect the power plug from the wall outlet.
Rear View Of TV Set
Back View of LED Set
- Standby Button
- SOURCE Button MENU Button
- P+ Button
P- Button - V+ Button V- Button


NOTE:
Precautions when connecting to other equipment.
When using external equipment with this TV set, please read the instruction manual of the external equipment.
Switch off all power supplies to the equipment and TV set before connection.
Always ensure that the input and output terminals are correctly connected.
The UPDATE terminals just use to update the system software.
Operation-Remote Control
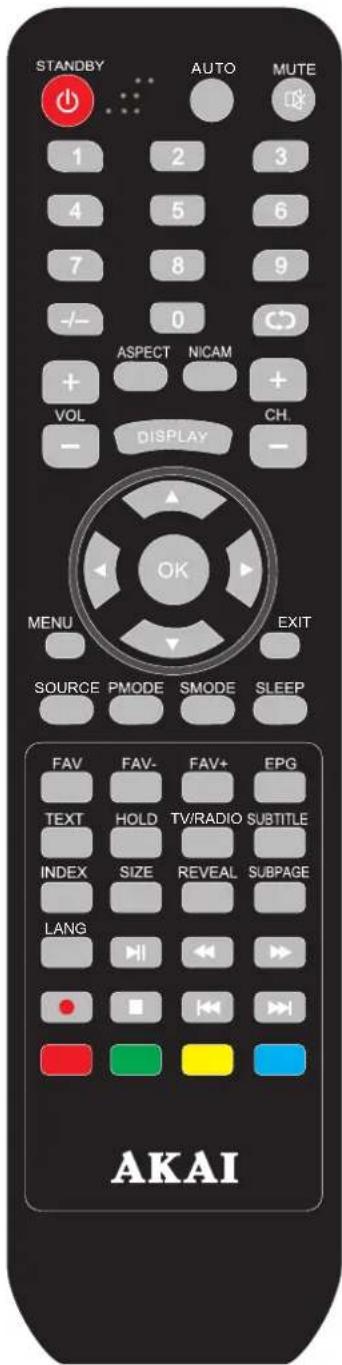
STANDBY: Switch on LED TV when at standby mode.
AUTO: Press to do auto configuration directly in PC source.
MUTE: Press to mute the sound. Press again or press VOL+ to unmute.
0-9: Press 0-9 to select a TV channel directly when you are watching TV. To enter page number in teletext mode and so on.
-/- :Press this button to enter a program number with different digits.eg. - for 1,-- for 11,--- for 111,---- for 1111.
:Returns to the previously viewed programme.
CH+/-: Press to scan through or to select a channel.
VOL+/-: Press to increase / decrease the sound level.
ASPECT: To select the aspect of screen.
NICAM: Change audio mode in ATV source: Stereo/ Dual I/II/Mono.Change audio mode in other source: Left/Right.
DISPLAY: Press to display the source and channel's information.
▼ / ▲ / ◀ / ▶ / OK: Allows you to navigate the on-screen menus and adjust the system settings to your preference.
MENU:Brings up the LED main menu to the screen in TV mode.
EXIT: Press EXIT to exit menu or sub menu.
SOURCE: Press to select the input source.
PMODE: Press repeatedly to cycle through the available video picture modes.
SMODE: Press to cycle through the different sound settings.
SLEEP: Let you select amount of time before your TV turn itself off automatically.
FAV:Press to display FAV menu in TV mode.
FAV+/-:Press to select the channel in fav channel.
EPG:Press to show the Electronic Program Guide menu.
TEXT:Switch On or Off the teletext mode.
HOLD: Hold On or Off for current page display.
TV/RADIO: Press to select TV or RADIO mode.
SUBTITLE: To switch the dialogue at the bottom of the screen.
INDEX: INDEX request the index page.
REVEAL: Press REVEAL to reveal or hidden the hidden words.
SUBPAGE: Press SUBPAGE to sub coded page access.
LANG: To show the list of audio languages available for the current channel.
▶: Play/pause or begin to timeshift.
■ : Stop recording
◀◀ : Press to go to the previous chapter.
▶▶: Press to go to the next chapter.
◀: Press to timeshift or play a program in fast rewind mode.
▶: Play a program in fast forward mode.
● : To begin recording.
RED/ GREEN/ YELLOW/ BLUE: Navigation buttons in TV mode.
SELECT INPUT SOURCE
- Press SOURCE button to display the input source list;
- Press ▼ / ▲ button to select the input source you want to watch;
- Press OK button to enter the selected source;
DTV
ATV
AV
SCART
YPBPR
PC
HDMI
USB
BASIC OPERATION
VIDEO


Brightness
Contrast
Saturatio
Sharpness

50
50
50 50
50
50
Picture Mode
Color Temp
NR
MPEG NR
Cinema Mode
Custom
Normal
Medium
Low
Low

← Select

Setup Wizard
There are Setup Wizard operations if the TV system is first time opened.
Setup Wizard(1)
Press ▼ / ▲ button to select the Language that you want to choose.
Press OK button to choose and enter the next step;
Press ▶ button to select Cancel. Choose Yes, there will be Setup Wizard operations when open the TV next time.
Setup Wizard(2)
Press ▼ / ▲ button to select the Country that you want to choose.
Press OK button to choose and enter the next step;
Press ▶ button to select Previous or Cancel, and press OK button to confirm the selection;
Setup Wizard(3)
Press OK button to start Auto Scan;
Press ▼ button to the button line, then press ◀ / ▶ button to select Previous or Cancel.
Setup Wizard(4)
Press Key MENU or EXIT to stop searching
- Press MENU button to display the MAIN OSD MENU;
- Press ◀ / ▶ button to select the MENU you want to
adjust:
- Press OK button or ▼ button to enter the sub menu;
- Press ▼ / ▲ button to select the entry, then press
OK button to enter and press ◀ / ▶ to adjust the value of selected entries;
- You can press MENU or EXIT button to save and return back to the previous menu.
ATV Source
Video Menu

Press ▼ / ▲ / ◀ / ▶ button to select Brightness/Contrast/Saturation/Sharpness, then press OK button to enter and press ◀ / ▶ button to adjust.
Press ▼ / ▲ / ◀ / ▶ button to select Picture Mode/Color Temp/NR/MPEG NR/Cinema, then press OK button to enter and press ▼ / ▲ button to select which mode you want.
Audio Menu

Press ▼ / ▲ / ◀ / ▶ button to select Volume/Balance/Treble/Bass/ SPDIF, then press OK button to enter and press ◀ / ▶ button to adjust.
Press ▼ / ▲ / ◀ / ▶ button to select SPDIF output/E qualizer, then press OK button to enter and Press ▼ / ▲ button to select the Mode of SPDIF output or Equalizer.
TV MENU

Program Edit: Press ▼ / ▲ / ◀ / ▶ button to select Program Table, then press OK button to enter.
Service Type: Press ▼ / ▲ / ◀ / ▶ button to select Service Type, then press OK button to enter and press OK button to adjust.
Network: Press ▼ / ▲ / ◀ / ▶ button to select Network, then press OK button to enter and press OK button to select All, Rowridge, Crystal Palace, Digital Finland, Winter Hill.
Press RED button on the remote control to rename the program. Press ▼ / ▲ button to select different characters. Press GREEN button to delete the program you don't want to remain.
Press YELLOW button to change the places of the two programs.
Press BLUE button to move the program to the new place.
FAV: Press ▼ / ▲ button to select you want to make it a favorite channel, then press ▶ button to select fav and press OK button to confirm, press OK button again will set it to a normal channel.
ATV Source
Lock: Press ▼ / ▲ button to select you want to lock channel, then press ▶ button to select lock and press OK button to confirm. press OK button again to cancel channel lock.
Skip: Press ▼ / ▲ button to select you want to skip channel, then press ▶ button to select skip and press OK button to confirm.press OK button again to cancel skip channel.
Auto Search : Press ▼ / ▲ / ◀ / ▶ button to select Auto Search, then press OK button to enter. Press ▼ / ▲ button to select Analog( or ATV), then press OK button to start search. Press ▼ / ▲ button to select
Digital, then press OK button to enter.
DVB-T: Press ▼ / ▲ button to select Aerial(or DTV), then press OK button to start searching DVB-T. DVB-C: Press ▼ / ▲ button to select Cable, then press OK button to set the information of DVB-C Searching.
Network ID: Press ▼ / ▲ / ◀ / ▶ button to select Network ID, then press OK button to enter. Press ◀ / ▶ button to select Auto or press the number button to set the ID by yourself, then press OK button to confirm the setting and back to the previous menu.
Frequency: Press ▼ / ▲ / ◀ / ▶ button to select Frequency, then press OK button to enter. Press ◀ / ▶ button to select Auto or press the number button to set the Frequency by yourself, then press OK button to confirm the setting and back to the previous menu.
Symbol Rate: Press ▼ / ▲ / ◀ / ▶ button to select Symbol Rate, then press OK button to enter. Press ◀ / ▶ button to select Auto or press the number button to set the Symbol Rate by yourself, then press OK button to confirm the setting and back to the previous menu.
Demodulation: Press ▼ / ▲ / ◀ / ▶ button to select Demodulation, then press OK button to enter. Press ▼ / ▲ button to select Auto \16QAM\64QAM\128QAM\256QAM. then press OK button to confirm the setting and back to the previous menu.
Service Type: Press ▼ / ▲ / ◀ / ▶ button to select Service Type, then press OK button to enter. Press ▼ / ▲ button to select All Services or Free Services.then press OK button to confirm the setting and back to the previous menu.
Scan Type: Press ▼ / ▲ / ◀ / ▶ button to select Scan Type, then press OK button to enter. Press ▼ / ▲ button to select Quick Scan or Full Scan. then press OK button to confirm the setting and back to the previous menu. Press ▼ / ▲ button to select Start, Press Start to search. After setting the above information, Press ▼ / ▲ button to select Start, Press Start to search.
Manual Search: Press ▼ / ▲ / ◀ / ▶ button to select Manual Search, then press OK button to enter.
Channel No.: Press ◀ / ▶ button to select Channel No., then press ▼ / ▲ button to adjust.
Color System : Press ◀ / ▶ button to select Color System, then press ▼ / ▲ button to select Auto, SECAM, PAL.
Sound System: Press ◀ / ▶ button to select Sound System, then press ▼ / ▲ button to select B/G, L/L', D/K, I.
AFT: Press ◀ / ▶ button to select AFT, then press ▼ / ▲ button to select On or Off.
Frequency: Press ◀ / ▶ button to select Frequency, then press ▼ / ▲ button to adjust.
SETUP MENU
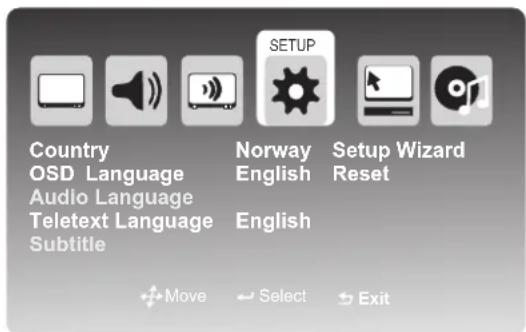
Press ▼ / ▲ / ◀ / ▶ button to select Country/OSD Language/Teletext Language, then press OK button to enter and press ▼ / ▲ button to select. Press ▼ / ▲ / ◀ / ▶ button to select Reset/Setup Wizard, then press OK button to enter and press ▼ / ▲ button to select Yes or No.
ATV Source
TIME MENU

Press ▼ / ▲ button to select Time Mode/Sleep Time/Current Time, then press OK button to enter and press ▼ / ▲ button to select Auto or Manual.
Date: Press ◀ / ▶ button to select year, then press ▼ / ▲ button to choose the year of current time, Chooses the month and the day with the similar method.
Time: Press ◀ / ▶ button to select hour, then press ▼ / ▲ button to choose the hour of current time, Chooses the minute with the similarmethod.
NOTE: Only when you set the Time Mode "Manual", you can set the Current Time.
OTHERS MENU

Press ▼ / ▲ / ◀ / ▶ button to select USB/SLOT/Partition, then press OK button to enter.
Press ▼ / ▲ / ◀ / ▶ button to select Select, then press OK button to enter.
Press ▼ / ▲ / ◀ / ▶ button to select All, then Press ◀ / ▶ / ▼ / ▲ button to select the program you want to play.
Press ▼ / ▲ / ◀ / ▶ button to select Picture/Music/Movie, then Press ◀ / ▶ / ▼ / ▲ button to select the picture you want to look. Press OK button to enter the picture/song/Movie you have selected.
Format: Press ▼ / ▲ / ◀ / ▶ button to select Format, then press OK button to enter. Press OK button to select FAT32, EXT3 or EXT2. After the designation, press ▼ / ▲ button to select OK button, will demonstrate the following dialog box. Press ◀ / ▶ button to select Yes, then press OK button to format the device, otherwise cancels the formatting. For more information please refer to USB channel.
Screen Mode: Press ▼ / ▲ / ◀ / ▶ button to select Screen Mode.
Parental Control: Press ▼ / ▲ / ◀ / ▶ button to select Parental Control, then press OK button to enter. Input password to enter, default password is "8888"
Parental Lock: Press ▼ / ▲ / ◀ / ▶ button to select Parental Lock, then press OK button to enter and press ▼ / ▲ button to select Off or On. When parental lock is at the “off” state, does not need to input the password to enter the parental control menu directly.
Parental Rating: Press ▼ / ▲ / ◀ / ▶ button to select Parental Rating, then press OK button to enter and press ▼ / ▲ button to select between 3 and 18.
Change PIN: Press ▼ / ▲ / ◀ / ▶ button to select Change PIN, then press OK button to enter. After inputting the old password, will demonstrate that inputs the new password dialog box. Input your new password.
After inputting the new password, will demonstrate the confirmation password dialog box. Input your new password again. After inputting the confirm password, will demonstrate "Password Changed!".
Blue Screen: Press ▼ / ▲ / ◀ / ▶ button to select Blue Screen, then press OK button to enter and press ▼ / ▲ button to select Off or On.
OTHER Source
AV/YPBPR/HDMI/SCART
Notes:
- Video / Audio / Setup / Time menu and description are the same with the ATV source.
2.AV/YPBPR/HDMI/SCART Source non-TV menu.
PC Source
PC MENU

Press ▼ / ▲ / ◀ / ▶ button to select
V.Position/H.Position/Phase/Clock, then press OK button to enter and press ◀ / ▶ button to adjust.
Press ▼ / ▲ / ◀ / ▶ button to select Auto Adjust/Auto Phase, then press OK button to auto adjust V.Position and H.Position.
Reset: Press ▼ / ▲ / ◀ / ▶ button to select Reset, then press OK button to return to factory settings.
Notes:
-
Video / Audio / Setup / Time menu and description are the same with the ATV source.
-
Others menu and description are the same with the ATV source.
DTV Source
DTV MENU

EPG: Press ▼ / ▲ / ◀ / ▶ button to select EPG, then press OK button to enter. Press ▼ / ▲ / ◀ / ▶ button to select program, then press OK button to remind, there will be a iron right of the program's name.
Auto Search: Press ▼ / ▲ / ◀ / ▶ button to select Auto Search, then press OK button to enter.
Manual Search: Press ▼ / ▲ / ◀ / ▶ button to select Manual Search, then press OK button to enter.
DTV Source
SETUP MENU

Audio Language: Press ▼ / ▲ / ◀ / ▶ button to select Audio Language/Teletext Language, then press OK button to enter and press ▼ / ▲ button to choose.
Subtitle: Press ▼ / ▲ / ◀ / ▶ button to select Subtitle, then press OK button to enter.
Subtitle: Press ▼ / ▲ / ◀ / ▶ button to select Subtitle, then press OK button to enter and press ▼ / ▲ button to choose On or Off.
Notes:
- Press SUBTITLE button on the remote control to enter and press ▼ / ▲ button to choose On or Off.
- When subtitle is at "Off" state, the subtitle mode and subtitle language show gray, will not be available.
Subtitle Mode: Press ▼ / ▲ / ◀ / ▶ button to select Subtitle Mode, then press OK button to enter and press
▼ / ▲ button to choose Normal or Hard of Hearing.
Subtitle Language: Press ▼ / ▲ / ◀ / ▶ button to select Subtitle Language/Alt.Language1/2/3, then press OK button to enter and press ▼ / ▲ button to choose.
Common Interface
Note: The Common Interface Menu only display after CI card inserted
Press ▼ / ▲ / ◀ / ▶ button to select Common Interface, then press OK button to enter and press ▼ / ▲ button to choose.
Press ▼ / ▲ / ◀ / ▶ button to select the options, then press OK button to see the detailed information of the CI card. Press MENU button on the front of panel or MENU on the remote control to display the main menu.
Press ◀ / ▶ button to select Others in the main menu, then press OK or button to enter.
Notes:
-
Video / Audio / Time menu and description are the same with the ATV source.
-
Others menu and description are the same with the ATV source.
USB Source
Press SOURCE button on the remote control, then press ▼ / ▲ button to select USB and press OK or ▼ button to enter.
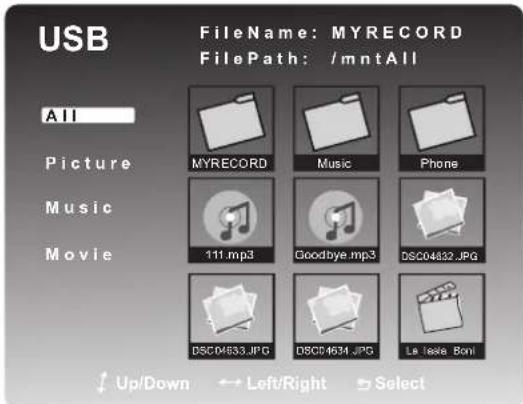
Picture
Press ▼ / ▲ button to select Picture and press OK button to show all folders and the picture document.
Press ▼ / ▲ / ◀ / ▶ button to choose some picture demonstration
Press OK button demonstration
Press ◀ / ▶ button to select ,then press OKbutton to view the previous picture.
Press ◀ / ▶ button to select , then press OKbutton to view the next picture.
Press ◀ / ▶ button to select ,then press OK button clockwise rotating the picture.
Press ◀ / ▶ button to select , then press OK button anti-clockwise rotating the picture.
Press ◀ / ▶ button to select , then press OK button the menu will appear Press ▼ / ▲ button to select Repeat, then Press ◀ / ▶ button select On or Off. This clause uses in establishing whether to circulate the broadcast picture.
Press ▼ / ▲ button to select Shuffle, then press ◀ / ▶ button select On or Off. This clause uses in establishing the picture to broad-cast stochastically.
PVR
Instant Recorder
Note: Make sure you have insert the USB device to the TV board before you start to do the recording. only working for digital TV.
Press RECORD button on your remote control to start record whenever you want to start.
The LED will keep blue and there will be a recording iron on the left top of the display screen during recording:

Press RECORD button again to set the During time of recording, to select the hour and minute, press ▼ / ▲ button to set the number. Press ▲ button to confirm you record time setting and back to the previous operation.

It will stop recording when have recorded for the Duration Time.
Press STOP button on your remote control to stop recording, there will be a dialog as follows:

press ▶ / ▶ button to select OK(to exit) or Cancel(continue recording), press OK button on your remote control to confirm your choose.
Note: During recording, you can not callout Input Source, Menu, Text, EPG, MHEG, FAV List and so on unless you stop RECORD first.
Press POWER button to enter the standby mode, the recording is continue backstage. During recording, you can't change the channel unless you stop recording first; The PVR function doesn't support recording Subtitle, Radio Channel and locked channel.
PVR Timer
Press MENU button on the front of panel or MENU on the remote control to display the main menu. Press ◀/▶ button to select Time in the main menu, then press OK button or to enter.

- Press ▼ / ▲ button to select PVR Timer.
- Press OK button to enter and press ▼ / ▲ button to edit.
- After finishing your adjustment, Press Menu or EXIT button to save and back to the previous menu.
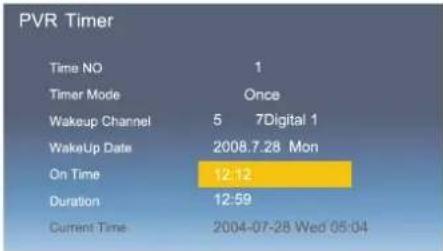
Timer NO
Press ▼ / ▲ button to select Time NO, then press OK button to enter and press ▼ / ▲ button to select Timer NO, you can set 8 different PVR WakeUp Timers in all.
Timer Mode
Press ▼ / ▲ button to select Timer Mode, then press OK button to enter and press ▼ / ▲ button to select Off, Once, Daily or Weekly.
Note: You can not set the following options if you set the Timer Mode "Off".
Wakeup Channel
Press ▼ / ▲ button to select Wakeup Channel, then press OK button to enter the Channel List and press ▼ / ▲ button to select the program which you want to record.
Wakeup Date
Press ▼ / ▲ button to select Wakeup Date, then press ◀ / ▶ button to select the year, month and day, press ▼ / ▲ button to set the number.
Press ← button to confirm you date setting and back to the previous operation.
On Time
Press ▼ / ▲ button to select On Time, then to select the minute and second, press ▼ / ▲ button to set the number.
Press ← button to confirm you start record time setting and back to the previous operation.
Duration
Press ▼ / ▲ button to select Duration ,press ▼ / ▶ button to select the hour and minute, press ▼ / ▲ button to set the number.
Press ▶ button to confirm you record time setting and back to the previous operation.
EPG Timer for PVR
Press ▼ / ▲ / ▶ / ▶ button to select EPG, then press OK button to enter.
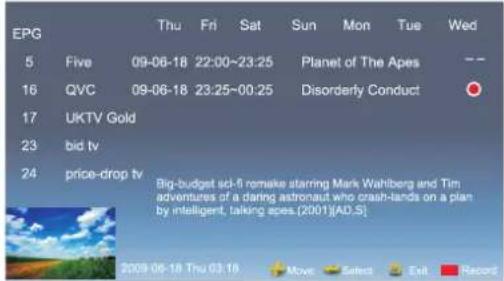
The current program's channel No. and channel name.
The current program's name.
The current program's broadcast date and start-stop time.
Press ▼ / ▲ / ▶ / ▶ button to select program, then press Red button to wakeup record, there will be a iron right of the program's name.
Note: You can't record the program which have been played
Timeshift
Press Timeshift button on your remote control to start Timeshift, the scene will stop, you can see a dialog as follows a few seconds later:
Playback Available
Then you can press Timeshift button again to play the program.
Press OK button to callout the control bar in the bottom of the screen as follows:
The time have played
Free space and available timeshift time of your USB
The time have timeshifted

Press Stop button on your remote control or on the control bar in the bottom of the the screen to stop Timeshift, there will be a dialog as follows:
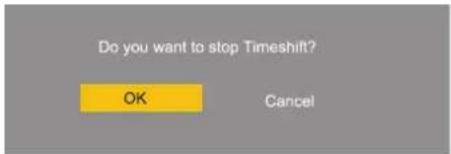
Press OK to stop Timeshift and press Cancel to continue Timeshift.
Press Fastforward button to fastforward and press Fastback to fastback the play.
Note: During Timeshift, you can not callout Input Source, Menu, Text, EPG, MHEG, FAV List and so on unless you stop it first.
Press POWER button will stop the Timeshift;
During recording, you can't change the channel unless you stop it first;
The Timeshift function doesn't support Timeshift Radio Channel and locked channel.
Troubleshooting Tips
Before calling for service, you can check the following items on symptoms and solutions.
No picture:
Check other channel, maybe station problem.
Adjust the tuning control.
Ensure that the input setting is at TV state.
Ensure that the LCD is on.
Ensure that the equipment is connected properly.
No sound and distorted sound:
Ensure that the input settings for the TV and sound are proper.
Adjust the tuning control.
Probably local interference, such as an appliance.
Re-orient aerial(if indoor type).
Ensure that the equipment is connected properly.
No remote Control:
Check the battery are installed with the correct polarity.
Point the remote control unit at the remote control sensor and operate.
Remove the obstacles between the remote control and the remote control sensor.
Operate the remote control unit at a distance of not more than 8 meters from the remote control sensor.
NO SIGNAL displayed (PC mode)
Check if the wire is connected correctly.
Ensure the computer or other equipments are at power on mode.
Ensure the TV input setting is at pc mode.
INVALID FORMAT displayed (PC mode)
Check if the input setting is compatible to the monitor specification.
Led lamp indicator on but no picture
Check the monitor setting :contrast ,brightness.
Check if the wire is connected correctly.
Some unusual spots on screen:
Some dot defects may appear on the screen, like red, green or blue, Spots, However, this will have no impact or effect on the monitor performance.
Lost password:
On the password screen, enter the following master password: 4886
You may use the master password to set a new password as desired.
Please remember your password and keep it carefully.

Electric and electronic equipment and included batteries contains materials, components and substances that can be hazardous to your health and the environment, if the waste material (discarded electric and electronic equipment and batteries) is not handled correctly.
Electric and electronic equipment and batteries is marked with the crossed out trash can symbol, seen below. This symbol signifies that electric and electronic equipment and batteries should not be disposed of with other household waste, but should be disposed of separately.
As the end user it is important that you submit your used batteries to the appropriate and designated facility. In this manner you make sure that the batteries are recycled in accordance with legislature and will not harm the environment.
All cities have established collection points, where electric and electronic equipment and batteries can either be submitted free of charge at recycling stations and other collection sites, or be collected from the households. Additional information is available at the technical department of your city.

- Table Of Contents
- Important Safety Instruction
- Warnings And Cautions
- Caution
- Warning
- Functional Parts( TV )
- Front View of LED Set
- NOTE:
- Rear View Of TV Set
- Back View of LED Set
- Operation-Remote Control
- SELECT INPUT SOURCE
- BASIC OPERATION
- Setup Wizard
- Setup Wizard(1)
- Setup Wizard(2)
- Setup Wizard(3)
- Setup Wizard(4)
- ATV Source
- SETUP MENU
- OTHER Source
- AV/YPBPR/HDMI/SCART
- PC Source
- DTV Source
- Notes:
- Common Interface
- USB Source
- Picture
- PVR
- Instant Recorder
- PVR Timer
- Timer NO
- Timer Mode
- Wakeup Channel
- Wakeup Date
- On Time
- Duration
- EPG Timer for PVR
- Timeshift
- Troubleshooting Tips
Brand : AKAI
Model : AL2415TC
Category : Television